Software Implementation
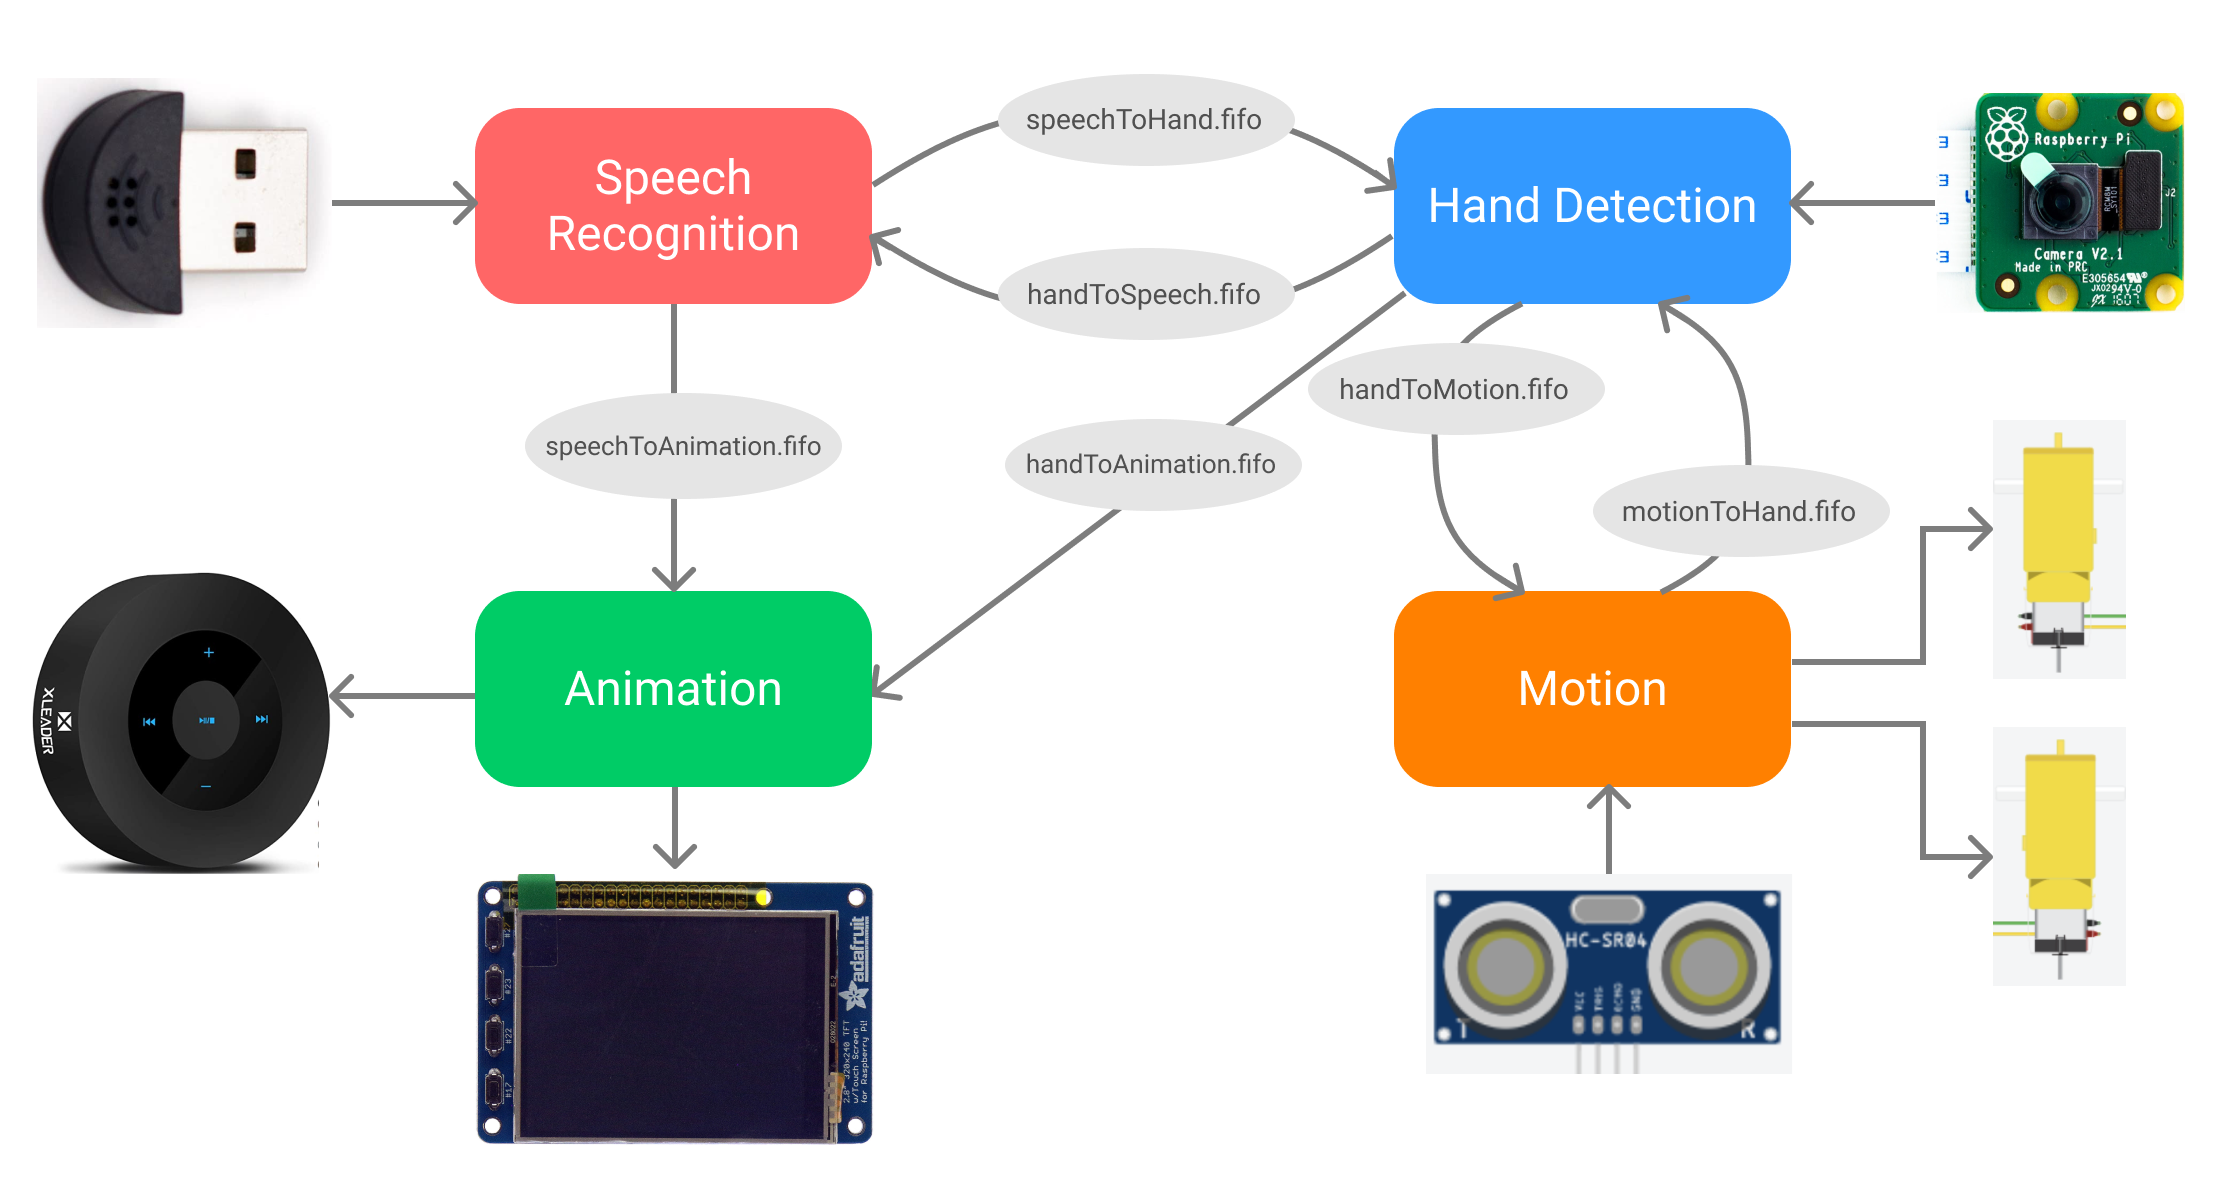
The software system of the PiDog was divided into four sections: speech recognition, hand detection, motion, and animation. Such a modular organization of the codebase helped separate different functions that the robot performs, and also in the implementation and testing of the different algorithms. While debugging, we were able to run the modules separately and verify their behavior before integrating into the overall system. In terms of division of labor, both the team members were able to work on different modules after brainstorming together, making the design process more efficient and effective. To run the entire system, the four modules are run separately as different processes. Since there are four cores on the Raspberry Pi 4, we expected the Linux scheduler to assign each process to a different core, thus providing a significant performance benefit. Lastly, the Python implementation of each of these modules had different requirements (Python 2, Python 3, sudo user, etc.), and running them as different processes removed any such Python conflicts between them. While these are separate modules, they have constant back-and-forth communication between them to run the complete system. This communication has been implemented using named pipes or FIFOs. Overall, we have designed the system to be run either by separate execution of the different modules (which provides constant feedback on the terminal), or by directly executing the main.sh which automatically runs the modules in background.
Speech Recognition
The speech recognition module handles the detection and recognition of voice commands by the robot. This process runs continuously to record small snippets of audio through the USB microphone, and sends those as requests to the Google Speech Engine to detect and recognize any English words in the recording. Once a command is found, it is forwarded to the other modules to handle. This module is itself divided into four files: record.py, speech.y, ping.py and main.py, where the first three consist of helper functions and classes, and the last serves as the main executable script when the module is run.
The record.py file consists of the RecordAudio class which completely handles recording of the audio snippets later used for recognition. To record audio from the USB microphone on the Raspberry Pi, we used PyAudio library. This serves as a Python interface for Linux’s PortAudio library. The class was implemented by referring to the PyAudio’s documentation and example code, and included two functions, one to record and the other to save the recording into a .wav file. The parameters we used for recording were a sampling rate of 44100 Hz, recorded in chunks of 1024 from a single channel (as we were not using a stereo microphone). After trial and error, we set a fixed recording duration of 3 seconds, which we felt was enough for any single-word command, also allowing buffer time to adjust for noise.
The requests for speech recognition were handled in a function defined in speech.py using the SpeechRecognition library. This function simply took the audio file recorded earlier as input and sent a request to the Google Speech Engine through direct functions of SpeechRecognition. This library also contains functions to send requests to other speech recognition services, like IBM Watson, Microsoft Bing, PocketSphinx, etc., most of which either require a license or extra installation. The default recognition through Google mostly worked well, so we chose to keep that in our system. We had also tried to use SpeechRecognition’s record feature which automatically records until silence is detected and sends the audio as a request for speech recognition. We found that the recognition accuracy of this method was much less than using PyAudio to record, and it also didn’t have any way of controlling the duration of the recording. Therefore, we kept PyAudio as the method of recording.
This module also consists of the ping.py script which is not used for speech recognition, but is required for the ‘Wake-up’ feature of PiDog. This feature is implemented using pings, which are small data packets sent over the network to another client. With this script, the Raspberry Pi pings the IP address of the user’s mobile phone in order to determine whether the phone is connected to the home network (and thus whether the user is at home or not). The script is designed to keep pinging the device until it receives a successful response, thus acting as a waiting loop for waking up the system.
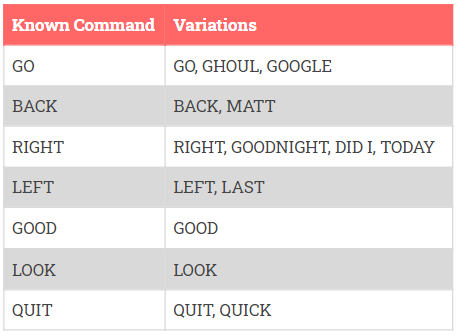
These different parts of the speech recognition module have been integrated into the main.py script. This main process runs in a continuous loop, repeatedly recognizing voice commands and passing them over to the rest of the system. It starts off with first running and waiting for the ping.py script until the user’s phone is detected on the network. Now, the robot has ‘woken up’ and the script indicates the animation module to produce the barking sound. Inside the continuous loop, the module uses the RecordAudio object to record an audio snippet, and then uses the speech.py function to send the request to Google speech engine. If nothing is recognized, it does so repeatedly until any words are found. Before and after each recording instance, the script also communicates to the animation module to display the ear-up and ear-down animation. Once a voice command is recognized, the script checks whether it is one of the commands that the system already recognizes, and accordingly conveys to both the animation and the hand-detector modules. For the initial set of voice commands, the module is equipped with a few common variations of each command to compare with, in order to account for inaccuracies in speech recognition. The script now waits for acknowledgment from both the animation, and the hand-detector modules. The acknowledgment might differ depending on the kind of command that was sent, which helps the module decide whether a new command has been identified correctly. If the QUIT command is detected, the script breaks out of its loop.

In order to test and debug the speech recognition module independently from the other modules, we had first developed the test_sr.py script, which runs exactly like the main script except without any of the communications with other modules. It instead prints out the status and the expected behavior, which helped us ensure the functionality of this module before integration into the system. It was through repeated testing that we determined the common variations of the commands, as recognized by the system, which have been shown below.
Hand Detector
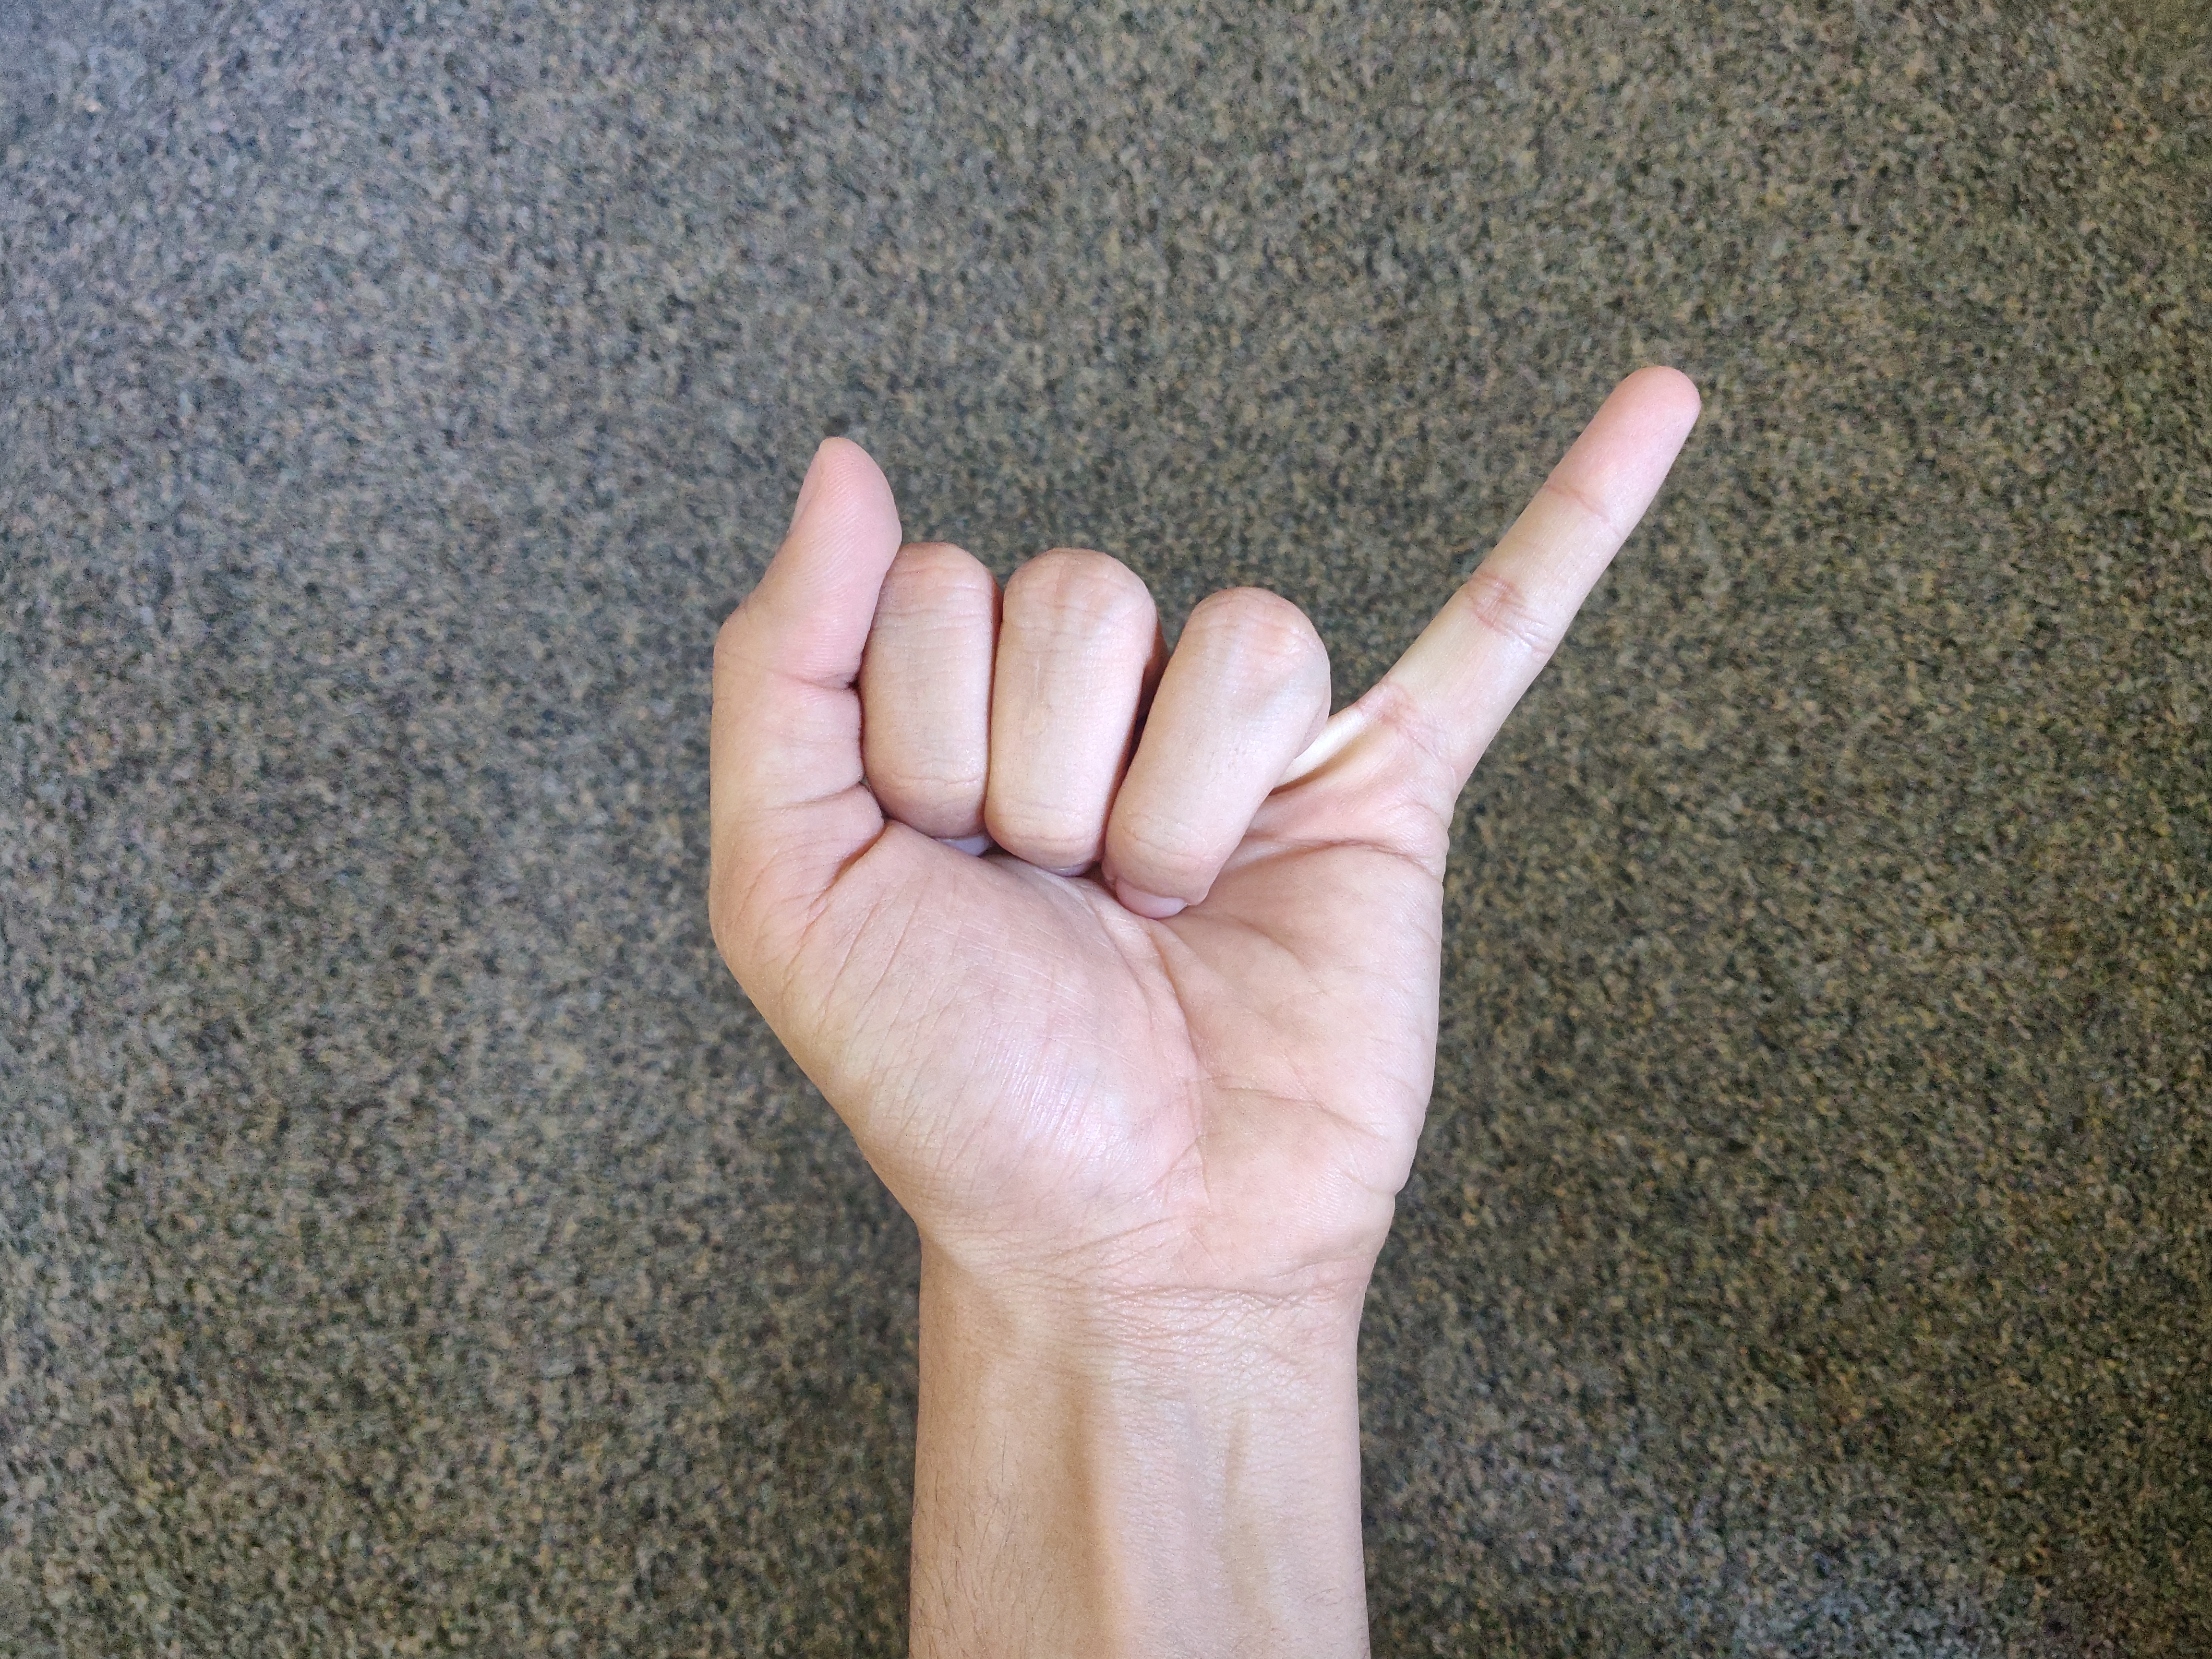
The hand detection module captures hand gestures and associates them with the four basic action commands. Based on its functionality, this module can be divided into two parts - computer vision and machine learning. The hand_detector.py file uses computer vision with Fig (1) to detect hand gestures. Machine learning models are used to associate the hand gestures with the four basic action commands. This functionality is implemented with the dataset.py and model.py files. The main executable script named main.py, which is executed when the module is run, combines the above two functionalities. We have designed the system to be "trained" with any hand gestures from scratch, as long as they are consistent over iterations. Given this, we chose to perform testing with the following four hand gestures for the basic commands, trying to ensure that each gesture is very different from the others in order to maintain good accuracy of recognition.

The hand detection functionality was implemented using OpenCV with Python 2. We were able to download using the commands provided on canvas without any issues. The video capture live feed from the Raspberry Pi Camera Module (PiCam) attached to the PiDog is analyzed to detect the hand. We explored multiple methods for hand detection and gesture recognition. We narrowed this down to two methods that can be used to detect and store hand gestures.
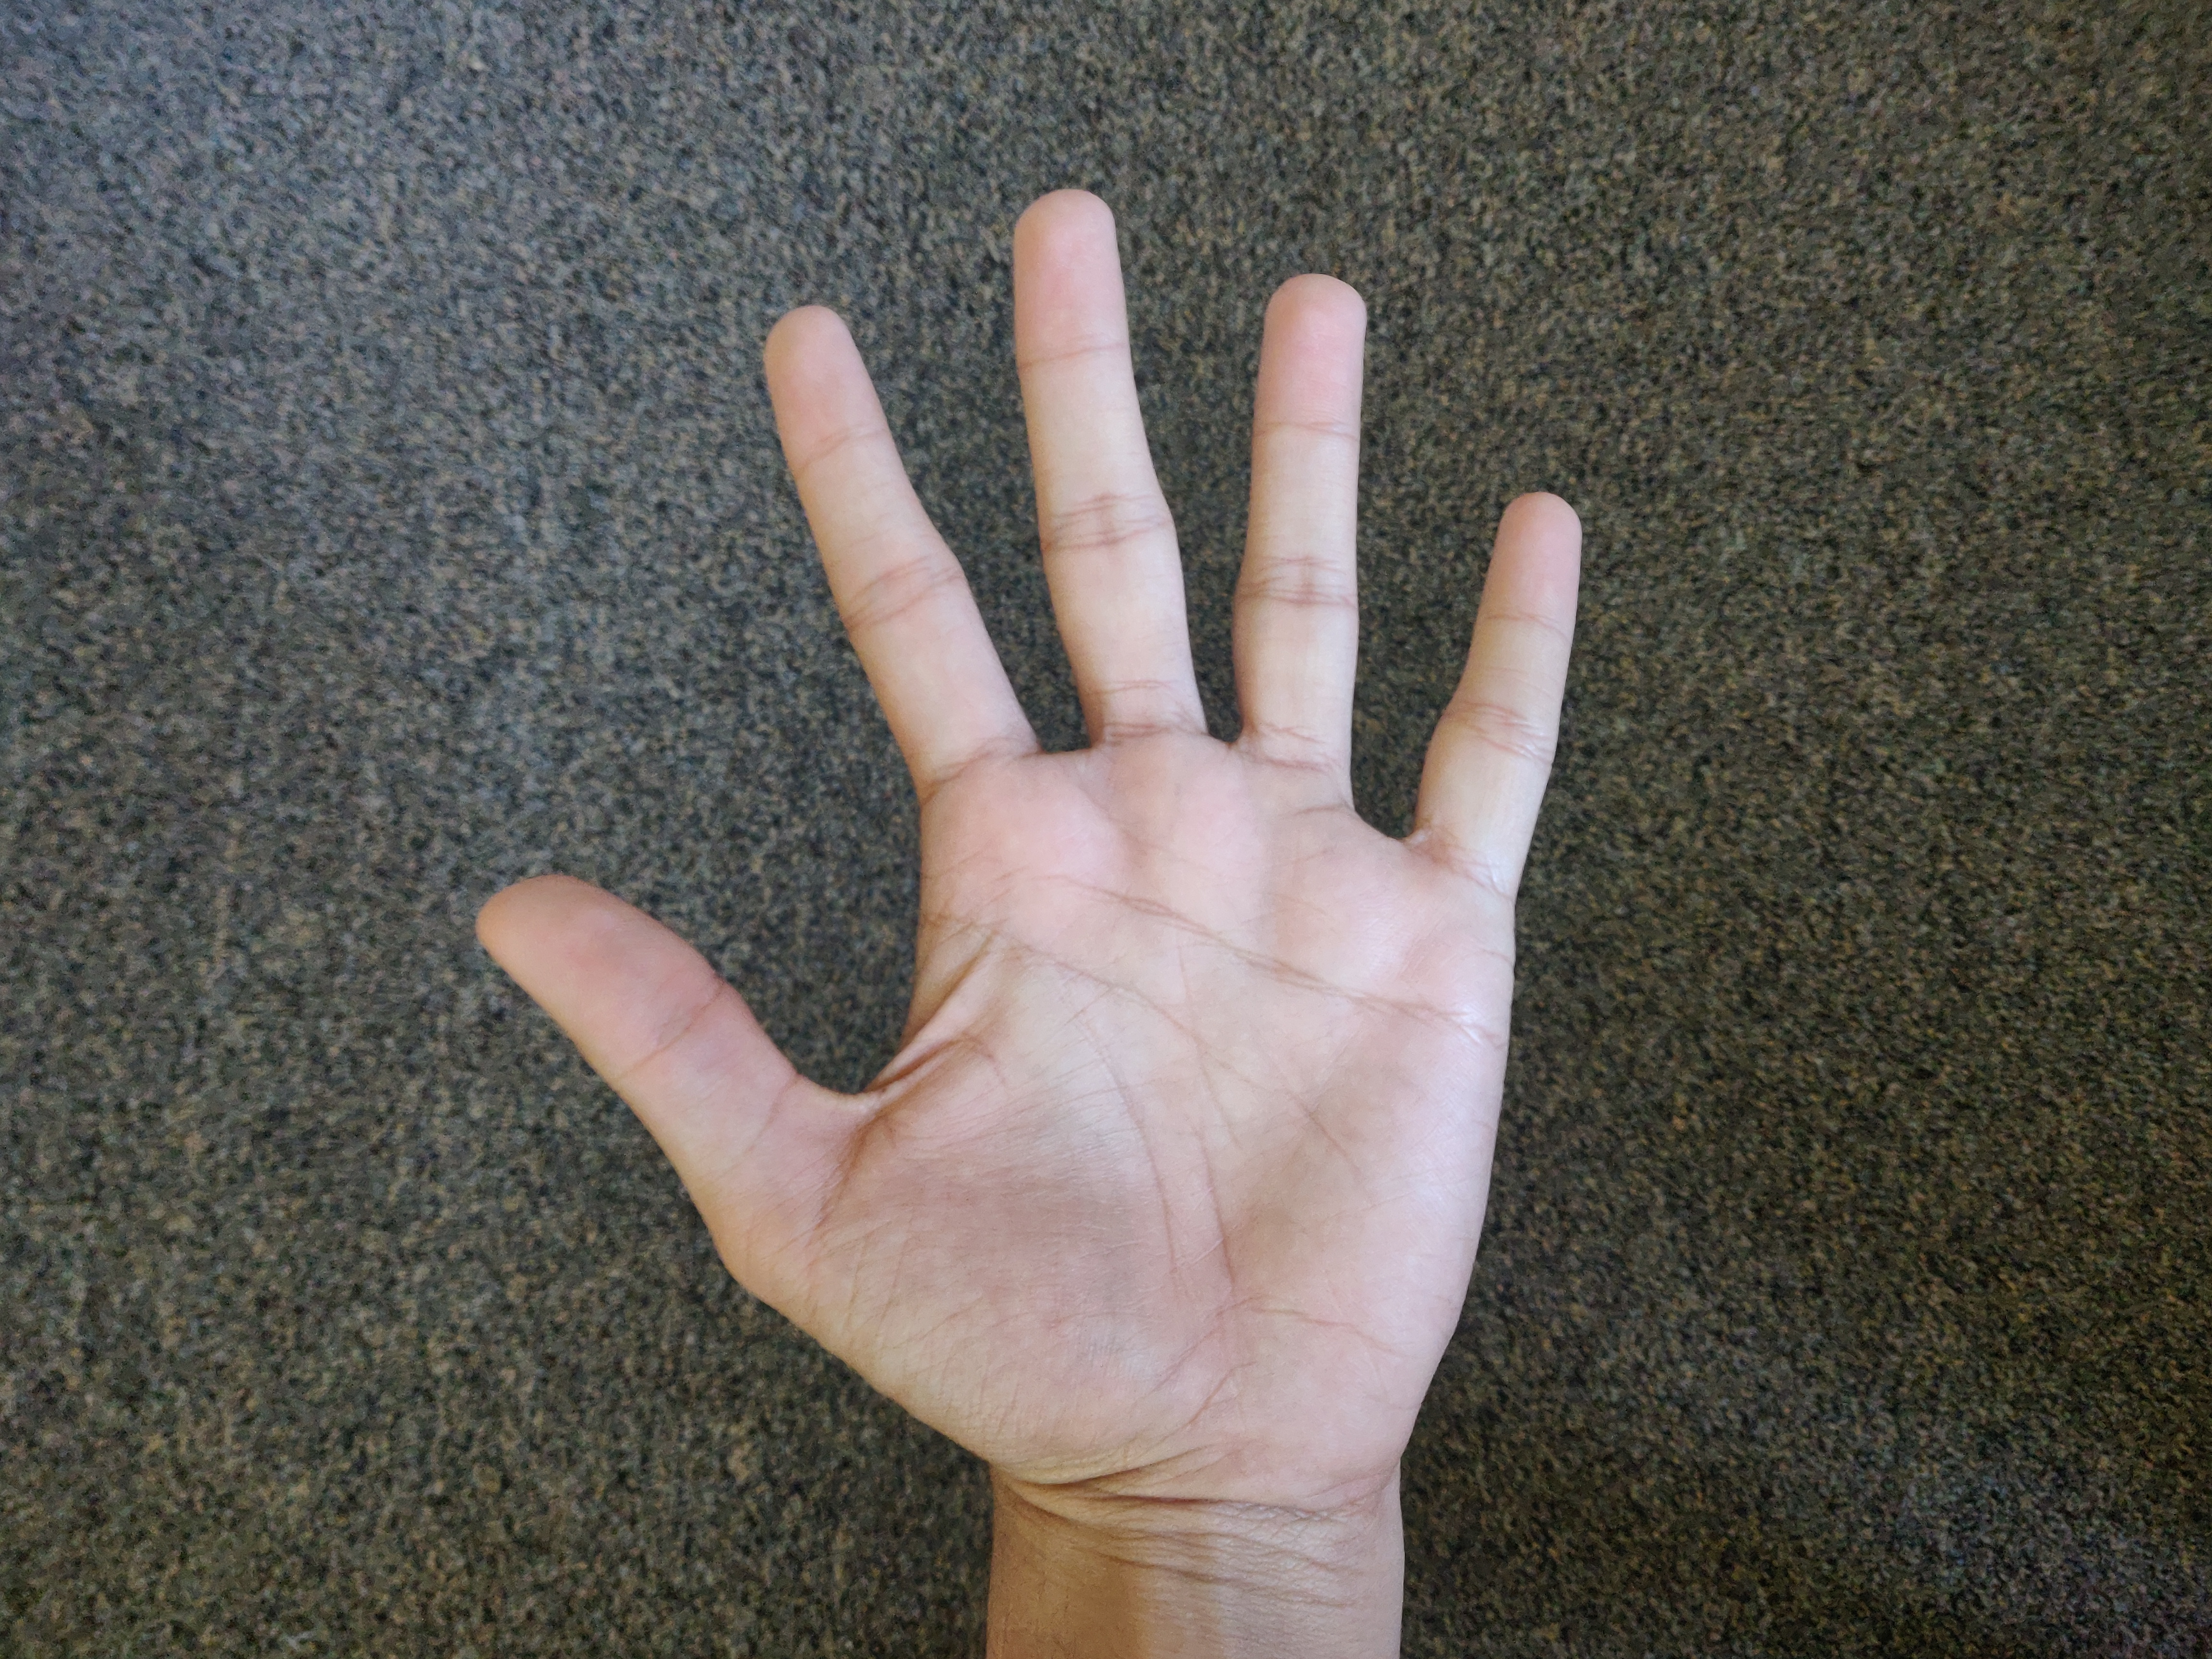
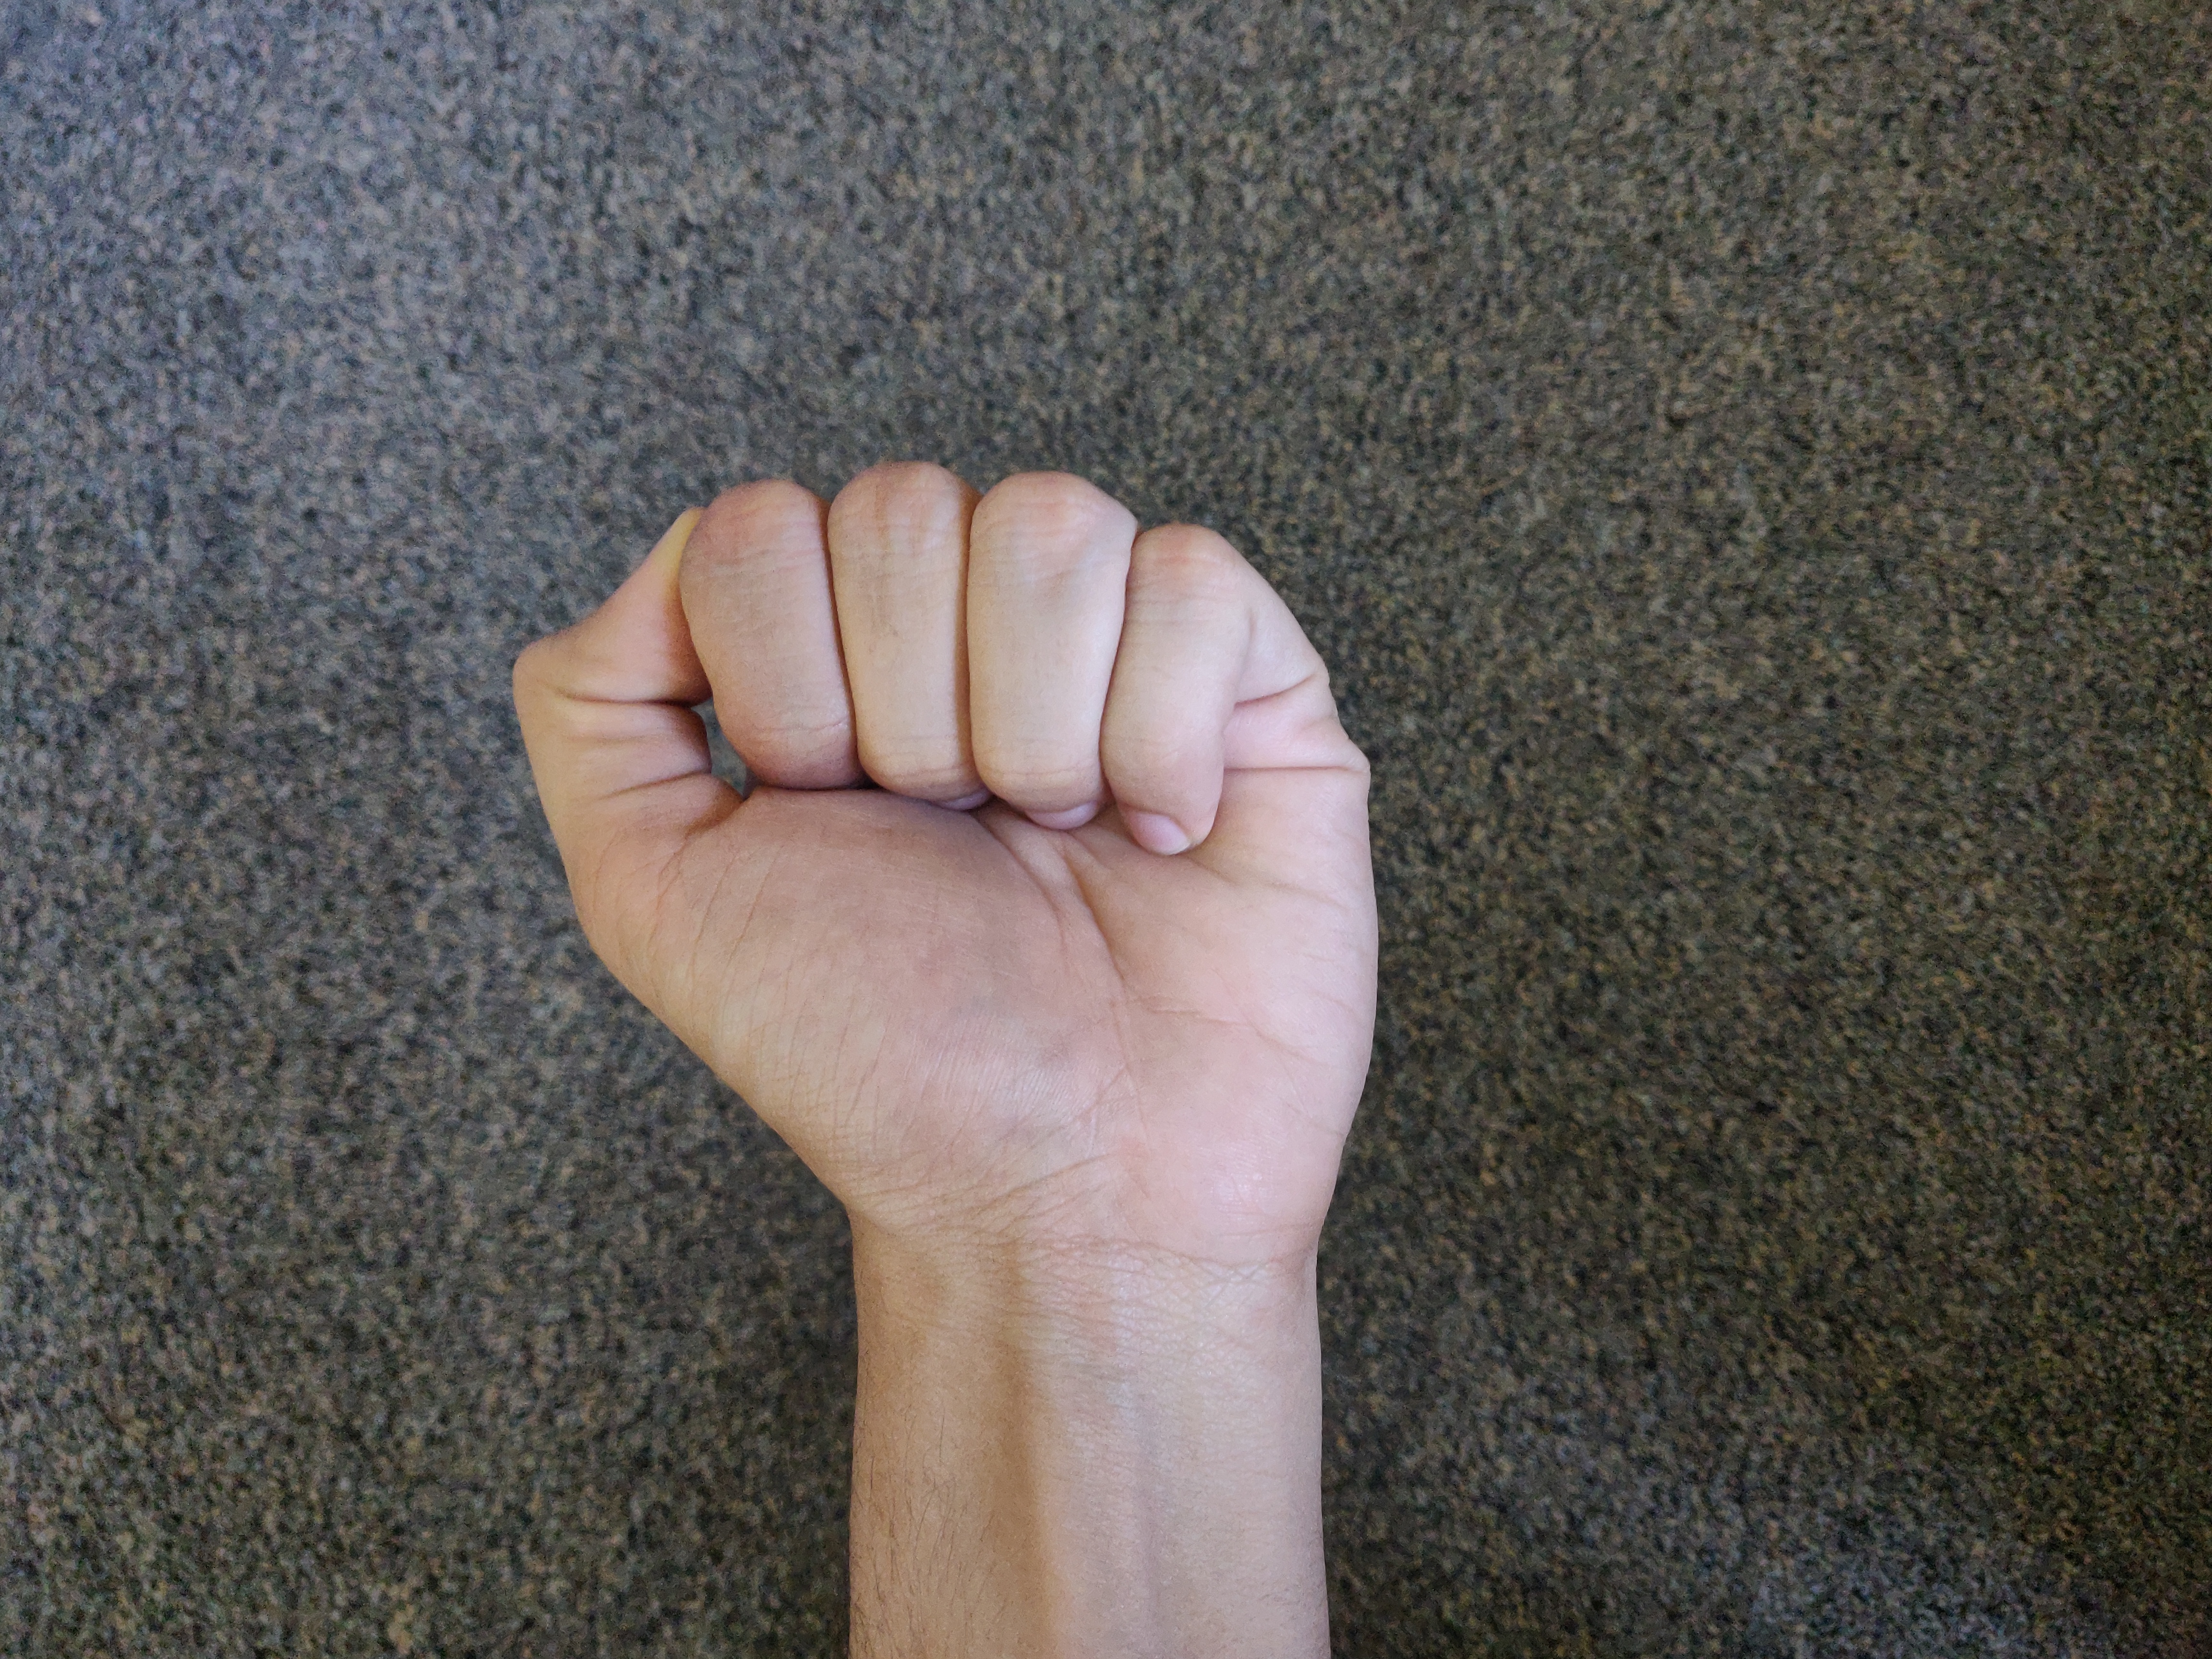
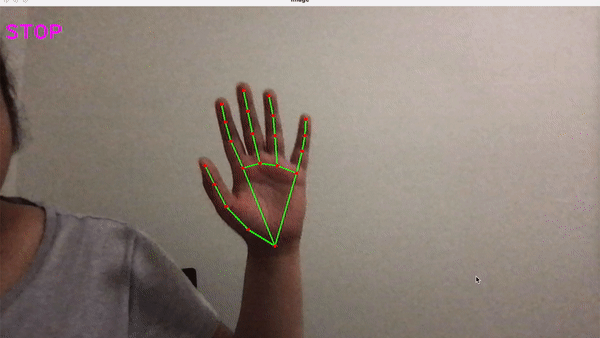
The first method is to use pre-built solutions offered by external modules such as MediaPipe by Google or OpenPose by CMU perpetual computing lab, which recognize hands and return positions of twenty points on the palm. An array of these twenty coordinates can be used to represent a gesture in the dataset used by the classification algorithms. These solutions use tensorflow to recognize hands, which means that this method is very accurate but could take a long time. We initially created a simple program on a local computer (Mac) to detect hand gestures and classify them into 5 actions based on the hand positions. The figure below shows some hand gestures recognised by this program. The Mediapipe library was extremely accurate and detected the hand in all situations, even while it was upside down or moving. Unfortunately Mediapipe does not offer support for Raspberry Pi 4, so we were unable to install it on the RPi, despite trying to install with the pip command and building it from source using bazel. The OpenPose library, although accurate, was extremely slow and the RPi did not meet the computational/memory requirements for it.
The second method is to use image processing in OpenCV to identify and segment the hand from the rest of the image. In this case, a 128 by 128 threshold image (black and white), containing only the palm, stored as a NumPy array can be used to represent the hand gesture in the dataset. First we used the skin map method to detect and segment the hand. During calibration, a color histogram based on the hand’s skin tone is created. To detect the hand, the image is filtered using the colors in the previously created histogram, selecting all parts of the image that match the skin tone. Of the filtered image, the largest section is the hand. The advantage of using this method is that we only need to do the calibration in the beginning or once before the program is run. We tried this method with red colored gloves, yellow colored gloves and no gloves on. However, the results were unreliable - the hand was detected sometimes, but the edges were not smooth, the other times the hand was not detected at all. Due to these issues, we decided to not use the skin map method. Next, we tried background subtraction to segment the hand from the rest of the image. The background of the image is calibrated as a weighted running average over thirty frames. There is movement or hand in the frame during the background calibration. During detection, the calibrated background is subtracted from the image frame. Since the only difference between the background and the current frame is the addition of the hand, the remaining image consists of just the hand. We were successfully able to detect the hand most of the time, so we decided to use this approach. The only disadvantage was that there should be no changes in the frame during the background calibration. So, the background is calibrated every time a motion is completed and we take care that there is nothing in the PiCam’s vision during the background calibration. We also positioned the PiCam to face the ceiling, as it offers a fairly neutral background.
Sometimes the person’s arm or face can also come in the frame. To segment just the palm of the hand from the rest of the body, we had to process the image some more using OpenCV functions. First, we used binary thresholding to create a thresholding to create a threshold image of the filtered frame. Parent contours (outermost outlines) were extracted from thresholded image using contour retrieval. Of the contours extracted, we assumed that the largest shape would be the hand and any other body parts attached to it like the arm. We then calculated the convex hull for the closed contour region with maximum area, the hand. A convex hull of a shape is the smallest convex set that contains it. This means that the convex hull for a palm would include the fingertips and the base of the palm. Using the extreme left, right, top and bottom of the list of points in the convex hull, the thresholded image is segmented. While this perfectly crops the palm at the fingertips (left, top and right extremes), the arm is also included at the bottom. To avoid this, the bottom margin of the palm is determined using the width of the hand (left and right extremes) and the top point of the index finger (top extreme). Due to our hand segmentation algorithm, we had to limit our gestures to ones where the palm is held upright. We also made sure that the arm is straight under/ inline with the palm and not tilted. Once the palm of the hand is segmented, the thresholded image of just the segment is resized to a 128 x 128 px square image for standardization.


The hand_detector.py file is a python module that implements image processing in OpenCV with the background subtraction and hand segmentation algorithms described above. The handDetector class in the module offers functions for initial PiCam video capture and OpenCV setup, background calibration and extracting the hand. An instance of this class is used in the main.py executable script. When extracting the hand, the image processing is done on a weighted average of the ten frames captured when the function is called. This ensures that the hand is captured even if there was a delay in placing the hand. If the hand is not detected, then the module captures ten more frames and repeats the process. Within three seconds of the function being called, if the hand is still not detected then the function returns None.
We used Machine Learning to train the PiDog to recognize hand gestures and associate them with the four basic motions - GO, LEFT, RIGHT and BACK. A ML model based on one of the algorithms described below is created when the PiDog first wakes up. This model takes in the 128 x 128 px thresholded image of the segmented hand stored as a two dimensional NumPy integer array as the data and the motion four basic motions as the data class. The model is trained on the hand gestures detected when audio command for any of the four basic motions is given. It tries to find similarities between the images and their motion classes. Once the model has been trained on a large enough data set consisting of at least three hand gestures belonging to each motion class, it can predict the motion class of a given hand gesture. During the LOOK command, the model tries to fit the recorded hand gesture into one of the four motion classes. If the predicted motion class is correct, it can be positively enforced by the user with GOOD command. Doing so, the model will add multiple instances of the hand gesture and its motion to the model’s training data. It is to be noted that the model is not detecting the hand or identifying the hand gestures as open fist, closed fist, etc, instead it is simply classifying it into one of the four motion classes based on the data it has been trained on. This means that the user can choose to train the model on any four hand gestures, one for each of the motions or even have multiple hand gestures for the same motion. The gestures used need to be significantly different to achieve accurate results from a small amount of training data.
We have provided four different Machine Learning algorithms, which can be used in the training. The models provided by scikit-learn machine learning toolkit were used. All the computation for training models and predicting takes place on the RPi. We used the toolkit instead of implementing our own models as it would have been impossible to provide accurate predictions. Using the toolkit’s models ensure that with a decent dataset, the predictions will be accurate. The hyperparameters for each of the models below were tuned based on our testing to achieve the best prediction results. All the models use supervised learning algorithms and multinomial classification. We analyzed and compared the speed and accuracy of each of the tuned models by running multiple trials on datasets of different sizes.
- K-nearest neighbors
sklearn.neighbors.KNeighborsClassifier: The KNN model finds the k data points that are closest to the input data (neighbors) and makes a prediction based on the classification of the neighbors. We used distance as the measure of closeness as our data consisted of images. Our model takes five of the closest neighbors into consideration and makes the prediction based on an average of the neighbor’s classes, weighted by the inverse of their distance. The KNN model was very fast and had a zero percent error rate when at least five gestures of each motion class were in the training dataset. - Logistic Regression
sklearn.linear_model.LogisticRegression: The logistic regression algorithms models an equation based on the training data and optimizes the coefficients in the equation to classify the input data. We have tuned our model to use ridge regression for regularization and newton-cg solver for optimization. This algorithm is usually used for and very accurate with binary classification, but as the toolkit provided a multiclass model, we were curious to see its performance on our data set. While the logistic regression model has a zero percent error rate, it was extremely slow. This is understandable as a multiclass logistic regression model for four classes would be implemented as three different binary logistic regression models. - Naive Bayes
sklearn.naive_bayes.MultinomialNB: This model applies the Bayes theorem with the “naive” assumption that given the data class, any two pairs of features are conditionally independent. Our program uses a multinomial naive bayes model with Laplace smoothing set to 1. This model was the fastest but had a small error rate of 8.3%. - Decision Trees
sklearn.tree.DecisionTreeClassifier: A decision tree is a set of decision rules for the data features which can be used to classify a data point. This model learns a set of decision rules based on the training data which is used to classify an input during prediction. At each stage of the decision tree, our model chooses the best way to split the data and uses Gini impurity as the splitting criterion. While this model was accurate with large datasets, it had an error rate of 25% with datasets of size 20.
From the above algorithms, we prioritized the accuracy on small datasets the most over speed. We chose the KNN model for classification in the main executable script. The implementation for the other models is still provided and can be selected by modifying the main script.
The dataset.py file provides a Dataset class which maintains a list of images of a particular size and their associated classes. Instances of the Dataset class are used to store the training data by the ML models described above. The model.py provides a wrapper class called Model for the four different sklearn ML models used. So the main file can directly use this wrapper instance, instead of creating an instance of the specific ML model. A new model can be built with an empty Dataset or with an existing Dataset retrieved from an object file. The class also offers helper functions to save the Dataset of the current model locally as an object file. We used python’s pickle library to save and retrieve the Dataset objects. This feature was extremely useful while training and testing, as we did not need to build the Dataset for training stage 1 and could easily move on to training stage 2. During prediction, if the model is unable to generate a prediction due to the small size of the dataset, an empty prediction is returned.
These different parts of the hand detection module have been integrated into the main.py script. It receives commands from the speech recognition module and passes them on to the motion module. When this script is run, it first initializes a ML Model and the HandDetector instance. The PiCam setup and background calibration are also implemented. The script then runs in a continuous loop waiting for a command from the speech recognition module. If one of the four basic motion commands is received, then the module tries to detect a hand. If a hand is detected, it adds it to the model’s dataset and trains it. Next for basic and other recognized audio commands, it implements the motion sequence associated with the command. To do so, it sends a single motion action to the motion module and waits for an acknowledgement from the motion module, indicating that the motion has been completed. Once the motion is completed, the next motion action in the sequence is sent and so on. After completing the entire motion sequence, the background is calibrated and an acknowledgement is sent to the speech recognition module. If the LOOK command was sent, then the module tries to detect a hand. If successful, then prediction is generated from the ML Model and the motion is performed followed by background calibration. At the end an acknowledgement is sent to the speech recognition module. If the GOOD command is received and the previous command was the LOOK command, then the model is reinforced for the previous gesture and motion class. If the NEW command is received, the module runs in a loop, detecting hand gestures and predicting their motion class until no hand is detected or no prediction is generated. Commands are sent to the animation module at the beginning and end of each loop iteration to widen and shrink the eyes of the PiDog to instruct the user to change gesture. If a motion sequence was predicted, then it is implemented in the manner described above and a positive acknowledgement is sent to the speech recognition module, else a negative one is sent. Lastly, if the QUIT command was sent, then it is passed on to the Motion module, an acknowledgement is sent to the speech recognition module and the program ends after saving the current model.
We have also provided a test.py script that mimics the functions of the robot to test and debug the hand detector module’s functionality individually. This script was used to perfect hand detection and generate statistics for the different ML models used. The script accepts the commands as text input, calibrates the background after completing each command, prints out the size of the dataset every time new data is added, prints the predictions and at the end returns the error rate for the predictions.

Motion
The motion module is responsible for handling all the physical movements of the PiDog robot. It runs in a continuous loop, waiting for commands from the hand-detector module and moves the robot accordingly. While moving, the module also repeatedly reads the ultrasonic sensor to determine if there is an obstacle in front of the robot and stop. Like the other modules, this has also been organized into different files with class definitions and a main script. The implementation of motor control is very similar to that of Lab 3, using GPIO and PWM on the Raspberry Pi.
The Motor and Robot classes handle the interface with both the motors through GPIO. While the Motor class is for individual motors, the Robot class instantiates two motor objects and manipulates them together. They have been implemented as independent classes with just general functions to move the motors and/or the robot in different ways (forward, backward, stop, etc.). The Ultrasonic class in sensor.py serves to get on-demand distance data from the HC-SR04 ultrasonic distance sensor installed on the robot. In order to detect distance, the sensor is used to send a fixed duration sound pulse (10 us) and then measure the duration of the reflected pulse from an object in front. Half of this duration is multiplied by the speed of sound in air to determine the distance of the object with the following formula:
distance = ( pulse_time * 34300 ) / 2 # Using the speed of sound as 34300 cm/s In the main.py script of the motion module, the process runs continuously to receive commands and perform the appropriate motion. Inside the main loop, it first waits for the command from the hand-detector module. If the command is one of GO, BACK, LEFT, RIGHT, it performs the forward, rotate, left turn, and right turn motions respectively, else it stays stationery. Each of these motion states also have a predetermined time duration (e.g. 2 seconds for GO), for which the script waits after executing the motion, and then stops the robot. The module also constantly checks the distance sensor for any obstacles, and if an object is detected within 20cm while the robot is moving forward, the motion is interrupted. Finally, the module sends an acknowledgement to the hand-detector that the motion has been completed. The script only breaks out of the loop if the command it receives is QUIT.

Animation
The animation module is responsible for displaying the PiDog on the PiTFT and playing the dog barking sound on the speaker. It consists of a single main.py script that PyGame to display the animations on the PiTFT and Linux’s built in aplay command to play the sounds. The script first does the environment setup for the PiTFT, displays the PiDog’s normal frame and the runs in a continuous loop, waiting for a command from the speech recognition module. The animation is implemented based on the commands received. On getting the wake up command, the barking sound is played. The PiDog’s raising ear and lowering ear animations are displayed when the speech recognition module starts and finishes recording the audio respectively. If a motion command or the LOOK command is received, the PiDog frame for that particular command is displayed and the bark sound is played. On receiving acknowledgement for motion completion, animation back to the normal PiDog is displayed. If the speech animation module sends a new command, then the module runs in a loop waiting for the command from the hand detection module. When the hand detection module sends a command, the PiDog toggles between widening its eyes and shrinking to the normal sized eye. This acts as an indication for the user to change the hand gesture. The loop breaks when the hand detection module communicates so and plays the dog bark sound. If the QUIT command is received, it breaks out of the loop and the program is terminated.
For the animations, we were a cartoon dog using Figma, a design software. The ear raising and ear lowering animation consists of six frames and the eye widening animation used for LOOK consists of two frames. The display for the LEFT and RIGHT commands is a single frame. In PyGame, the frames are displayed one after the other with a 50 milliseconds delay to provide a smooth transition. The dog barking sound is a .wav file downloaded from a royalty free website and is played by running linux’s aplay on the terminal using the subprocess module.


Communication
As it was mentioned earlier, the four of these modules build the robot together by interconnecting and constantly communicating with each other. In our system, this communication takes place with the help of FIFOs or named pipes. Before running all the modules, we created these predetermined FIFOs as fixed one-way communication channels from one module to the other. These were all placed in the top directory of the source code, with the name format as module1ToModule2.fifo (e.g. speechToHand.fifo) which helped avoid any confusion and bugs during implementation. While all the modules of the system have been implemented as individual components, they are dependent on each other for their functionality. For example, it is only after the speech recognition module detects and recognizes a command, that it forward the command to change animation on the PiTFT, and to recognize the hand gesture associated with the command in hand detector module. Moreover, because of the cyclic dependency of the modules on each other, it is very important for them to always be synchronized. This is why we chose to use FIFOs for the communication in the system; they are blocking channels where the sender will wait until the receiver has read the command, or the other way with the receivers waiting to get the next command. The read and write to FIFO calls in each iteration of the main loop of all the modules ensures that they are constantly in sync. The instances of a module reading/writing one of the FIFOs has been shown in the flowcharts of each of the modules. Overall, all the communication channels between these different parts of the system have been summarized in the plot below.