Design & Testing
 Drawing inspiration from vending machines
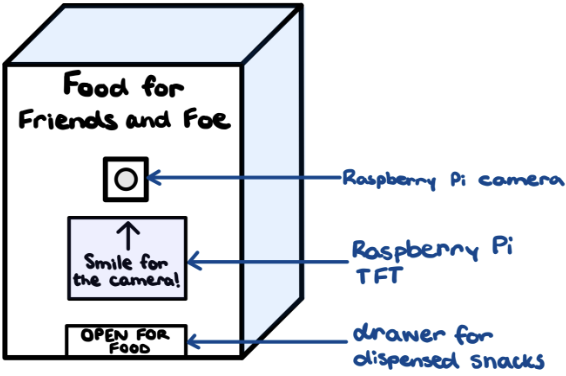
and pet food dispensers, we created a rough sketch of our snack dispenser with a front panel containing the
Raspberry Pi Camera, PiTFT, and pullout drawer. After coming up with a rough sketch of the snack dispenser,
we divided our project implementation into four parts:
Drawing inspiration from vending machines
and pet food dispensers, we created a rough sketch of our snack dispenser with a front panel containing the
Raspberry Pi Camera, PiTFT, and pullout drawer. After coming up with a rough sketch of the snack dispenser,
we divided our project implementation into four parts:
Facial Recognition Model
Research was first completed to determine the best classifier model for using facial recognition on the Raspberry Pi. After analyzing the Small Lock project and researching online, we decided to use the face_recognition Python library by ageitgey with Caroline Dunn’s specific facial_recognition implementation. (Note that while these two libraries sound very similar, the former is the general classifier algorithm and the latter is a specific implementation of face_recognition when using PiCam’s.) This library uses the Haar Cascade classifier to differentiate between different faces and is relatively easy to set up and use. Prerequisites for using the library include having Python 2.7 or Python 3.3+, dlib, and OpenCV installed in addition to the library itself.
In our first attempt, we had some issues with installing OpenCV and the dependencies for the face_recognition library, which were resolved by downgrading our system to run on Bullseye and by updating our system. Additionally, rather than running the scripts that install all dependencies at once, we ran the installation of each module and library one at a time. After installing all dependencies and the face recognition library, initial testing was completed using the Raspberry Pi Camera to first check that the PiCam was functional and understand how to take photos, before testing examples that used facial recognition.
Once the facial recognition example was working, we began integrating live video footage on the PiTFT. In order to stream live video on the PiTFT, we needed to integrate the example codes with code needed to use the PiTFT. During this portion of integration, we tested constantly and made adjustments to the code such as resizing the incoming video footage to fit on the PiTFT. We also consulted the Dance Box project for assistance.
The next step was to combine the ability to take photos while the live video footage was displayed on the PiTFT, so that people could take pictures to be added to the library. This integration was difficult to figure out at first because typical scripts to take photos used a different setup to that of streaming video footage, but after realizing that the video footage is just displaying still images that are being refreshed, we were able to take these frames and write them to a .jpg file that could later be used to train the classifier model on.
Now that we could both stream live video footage on the PiTFT and take pictures, we could begin testing the facial recognition portion of our project. We first realized that the model required many photos of unique people to obtain a greater accuracy, so we built up a library of 600 pictures of classmates and friends. At this point, facial recognition was somewhat accurate, but would recognize people incorrectly quite often and would change the decision the longer a person remained in the frame. To account for this, we made the first recognition of a face determine whether a person was recognized or not, which increased the accuracy.
Another issue we encountered was that initially, the pictures we took to train our model were blurry and out of focus since we were unaware of the PiCam lens adjustment tool to manually adjust the focus. As a result, we deleted our first dataset and then created a new dataset with photos taken with the focused Pi Camera. After building this new dataset, the prediction accuracy of the classifier increased to usually recognize people correctly. Currently, our dataset consists of approximately 1,000 pictures composed of both people we know on campus and celebrities online to have a larger and more diverse dataset.
During our exploration, we also found that higher definition photos, whether from Google Images or our phones improved the facial recognition accuracy, but also adversely affected processing time – so there is a slight trade-off. We also found that the model is best trained on photos taken when the user is around one foot away from the camera. When the user is further away, their face becomes smaller and features less distinguished, making it harder for the training model to determine specific features.
Dispensing Mechanism
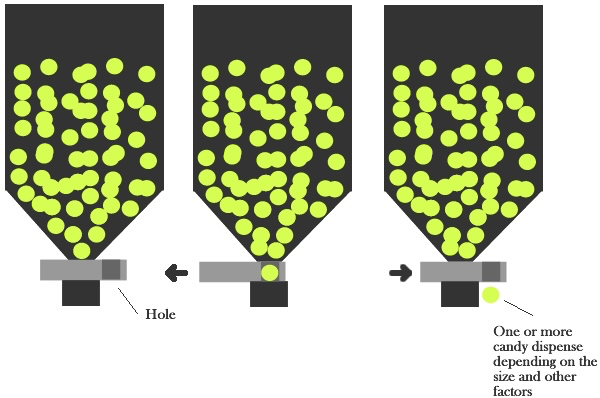 We considered multiple ways
to dispense our chocolate eggs and, initially, pebbles by looking at the
Sandwich Maker
project and other online resources for different dispensing mechanisms. Inspired by a sketch created in a
Robotics Stack Exchange thread
(pictured right), we determined that the best way to dispense items is to have two vertical
storage chutes just wide enough to hold our eggs and pebbles stacked on top of each other and then have one
item dispense at a time using a servo-controlled linear actuator.
We considered multiple ways
to dispense our chocolate eggs and, initially, pebbles by looking at the
Sandwich Maker
project and other online resources for different dispensing mechanisms. Inspired by a sketch created in a
Robotics Stack Exchange thread
(pictured right), we determined that the best way to dispense items is to have two vertical
storage chutes just wide enough to hold our eggs and pebbles stacked on top of each other and then have one
item dispense at a time using a servo-controlled linear actuator.
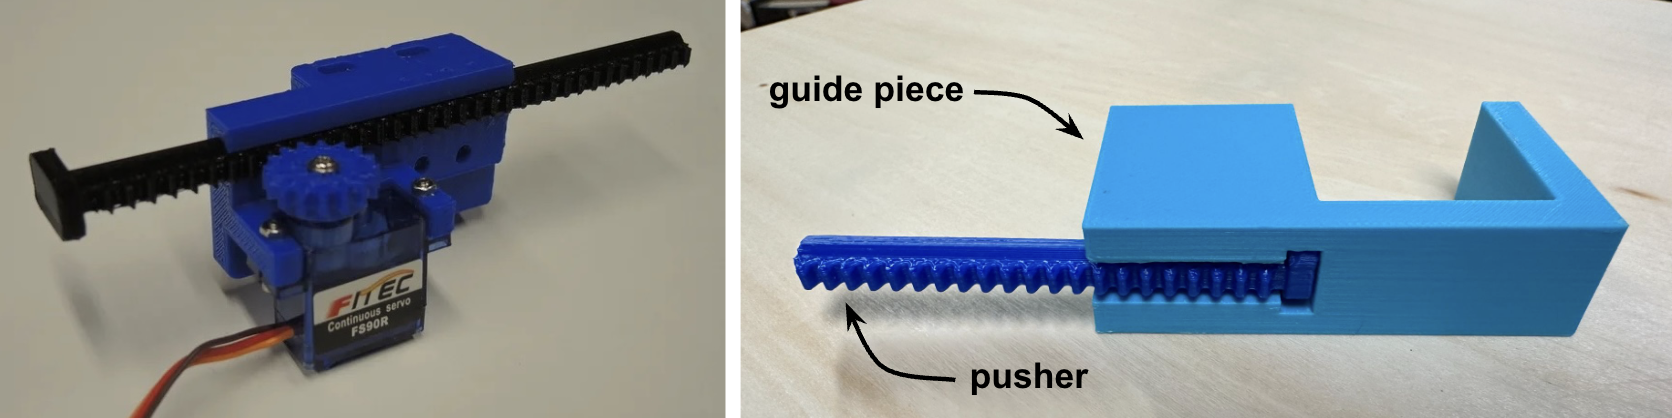
The linear actuator converts the rotational motion of the servo motor into linear motion to push and pull. As to not overcomplicate the mechanical design of our project, we 3D printed a pre-designed linear actuator from Thingiverse sized for micro servos, then designed a simple guide piece to fit over the larger end of the pusher. The guide piece dimensions were customized to each dispensing item to ensure that the hole was just large enough for one item. While designing the guide piece, the fact that the pusher is slightly off-center relative to its larger end piece was neglected leading to the pusher not fitting the divot properly. To resolve this issue, we trimmed a part of the pusher’s end piece for a proper fit and taped the pusher and guide piece together.
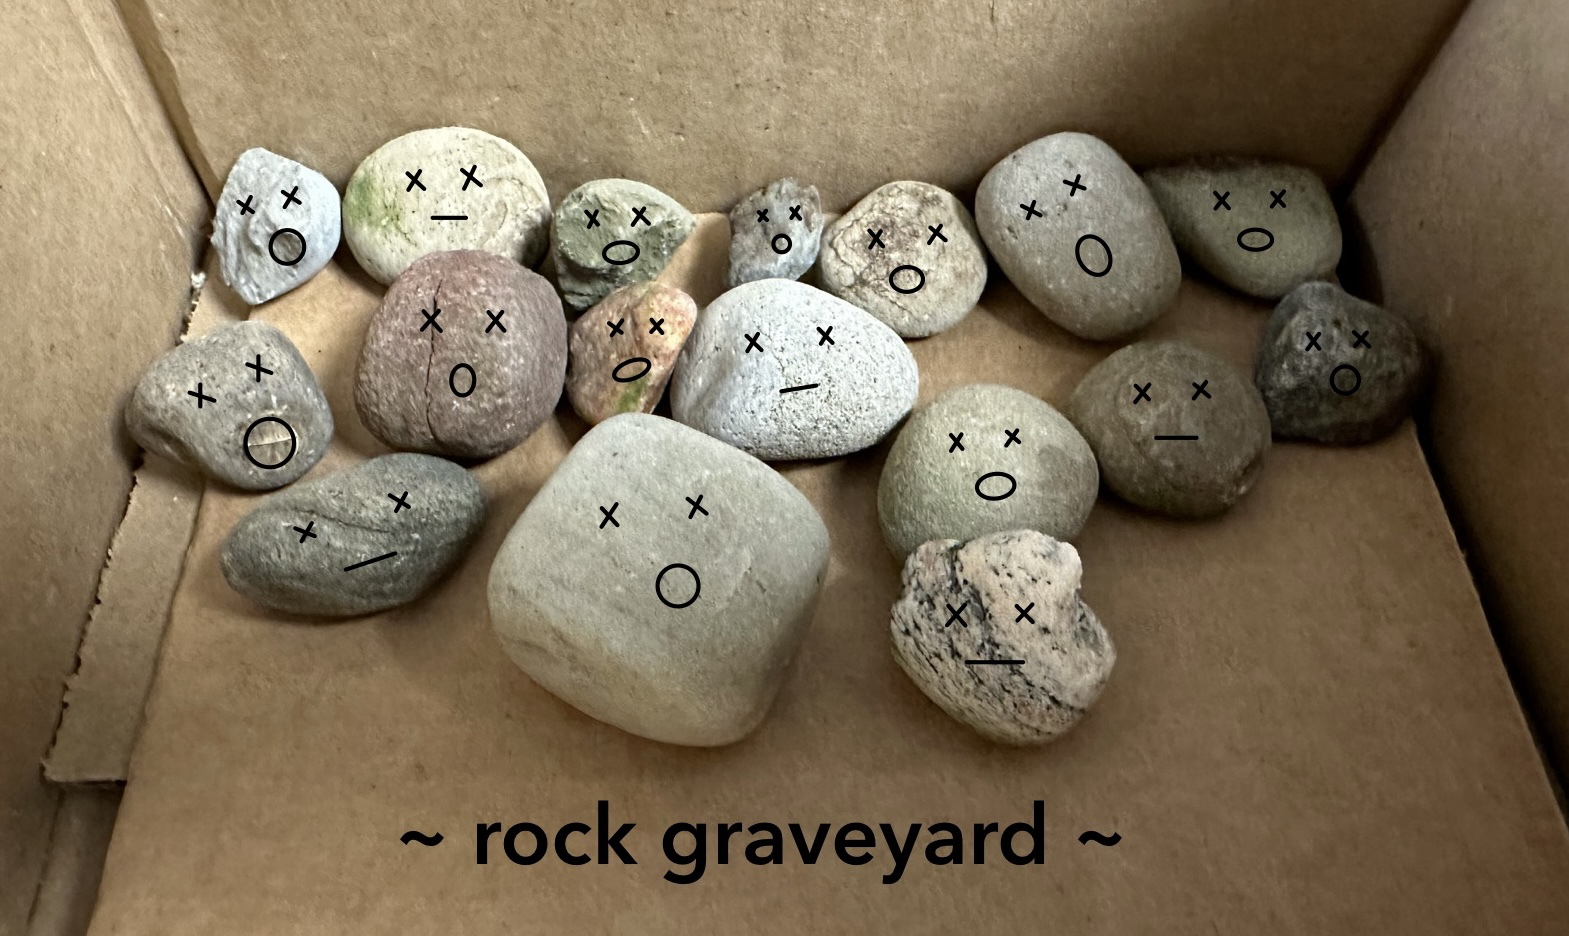
The storage chutes were created out of cardboard, which provided more flexibility for different shapes and easy adjustments. In the first iteration, we found that the non-uniformity of the rocks caused them to cling onto each other, making it hard to dispense. So unfortunately, we had to ditch our baby rocks harvested from mother nature herself and instead opted for uniformly-shaped marbles.
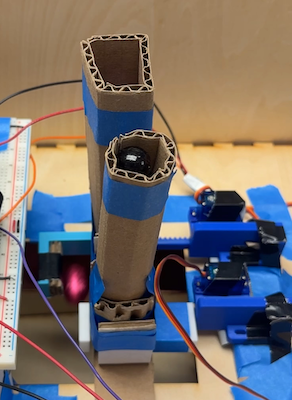 With a rectangular-shaped tube
for the chocolate eggs, a circular-shaped tube for the marbles, two U-shaped bottom pieces to act as the
stopper under the guide, and a whole bunch of painter’s tape, it was finally time to test the dispensing
mechanism. When stacked full, the items would sometimes get stuck in the middle and necessitated a slight
loosening of the tube. In addition, the linear actuator/guide would occasionally get caught by the tube or the
U-shaped underpiece. In response, the gap between the two was increased and cardboard was used to prop the
motor bracket of the linear actuator so that the linear actuator guide could move freely without getting
caught. These iterative adjustments were made until the dispensing mechanism ran smoothly without issues.
With a rectangular-shaped tube
for the chocolate eggs, a circular-shaped tube for the marbles, two U-shaped bottom pieces to act as the
stopper under the guide, and a whole bunch of painter’s tape, it was finally time to test the dispensing
mechanism. When stacked full, the items would sometimes get stuck in the middle and necessitated a slight
loosening of the tube. In addition, the linear actuator/guide would occasionally get caught by the tube or the
U-shaped underpiece. In response, the gap between the two was increased and cardboard was used to prop the
motor bracket of the linear actuator so that the linear actuator guide could move freely without getting
caught. These iterative adjustments were made until the dispensing mechanism ran smoothly without issues.
Coding the micro servo motors was quite simple since all they needed was a PWM signal. After setting up the PWM channels in the initializations, the servos can be run by changing the duty cycle. Through an experimental process, we determined the sleep time values for the linear actuator to push out and back. Since the chocolate egg is larger than the marble, it requires a slightly longer sleep time for a greater push range.
User Interface
Graphical User Interface
Our system runs off of a finite state machine – in our code, the variable “screen” is used to keep track of the current state. Each of its states is marked by a main GUI screen displayed on the PiTFT to provide instructions and receive user input when necessary.

 1 - Start: The system boots up to the Start state, where a green “START” button is displayed with
instructions to click on it. Pressing the button will trigger a touchscreen event to transition to the next state.
1 - Start: The system boots up to the Start state, where a green “START” button is displayed with
instructions to click on it. Pressing the button will trigger a touchscreen event to transition to the next state.
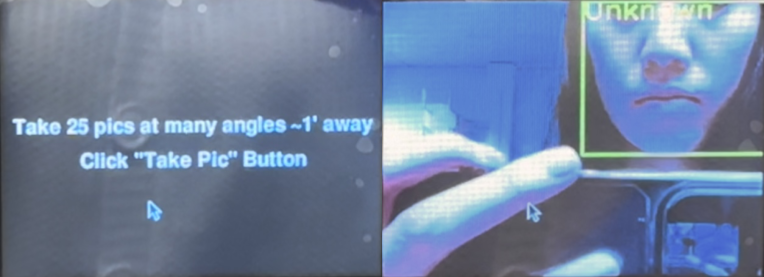
2 - Smile: The Smile state
automatically runs the PiCam video stream, while the facial recognition algorithm attempts to match faces to
the pre-existing library of known faces. Faces are outlined with a yellow box labeled with a name if a match
has been made, or “Unknown” if there is no match.
 When first displaying video to the PiTFT there were initial issues with formatting the video to fit onto the
PiTFT and also dealing with the loading time for the Pi Camera module to initialize and display on the screen.
Additionally, there was an issue with transitioning too fast between State 2 and 3. After experimenting, a
time.sleep(1) was strategically placed to pause the display for one second after registering a face before
transitioning to the next state.
When first displaying video to the PiTFT there were initial issues with formatting the video to fit onto the
PiTFT and also dealing with the loading time for the Pi Camera module to initialize and display on the screen.
Additionally, there was an issue with transitioning too fast between State 2 and 3. After experimenting, a
time.sleep(1) was strategically placed to pause the display for one second after registering a face before
transitioning to the next state.
3 - Dispense: The Dispense state displays “Dispensing Snack” while the servos move and then the
“Open Drawer Below” message instructs the user to retrieve their snack and find out if they are a friend or
foe. The next state depends on whether the user has been recognized. If recognized, there is a “Thank you for
stopping by!” message before returning to the initial Start state. If unrecognized, the system directly
transitions to State 4.
The basic GUI code structure changes the PyGame animation in a multiple-condition block separated by state.
After the conditional block, it has a general PyGame and PiTFT update command to update the PiTFT before the
next iteration of the while loop. But since State 3 cycles through multiple PyGame screens depending on
whether a user is recognized or not, care must be taken in inserting the screen update commands to properly
display each screen and to clear the previous screen before displaying the new screen. Additionally, due to
the many transitions, time.sleep() commands were inserted to lengthen the time between screen updates to
allocate an adequate amount of time for users to read the message.

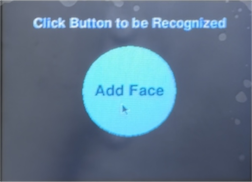 4 - Add to Library: The Add to Library state provides another on-screen button for an unrecognized
user to proceed with adding their face to the library.
4 - Add to Library: The Add to Library state provides another on-screen button for an unrecognized
user to proceed with adding their face to the library.
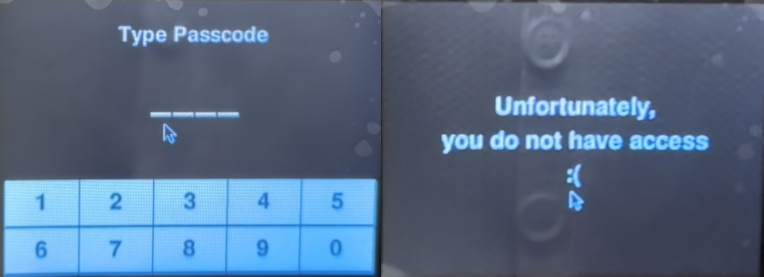
5 - Passcode: The Passcode state protects the system from unwanted users. You must have the
secret passcode to proceed. From a logistical standpoint, retraining the Haar Cascade algorithm takes
approximately one minute per 100 photos. With the dataset containing ~1,000 photos, this will cause the system
to be unusable for 10 minutes, preventing other customers from receiving their snacks ;)
The number pad is adapted from
PiNotes’
touchscreen keyboard implementation. While the orientation, dimension, and contents of the keys are changed,
the method of defining each key in a dictionary, drawing the number pad, and displaying the output text was
adapted for our use. A dashed line was also drawn to indirectly indicate the length of the passcode.
The user is given five attempts to correctly enter the passcode. On each failed attempt, the screen will
automatically reset for another try. If they fail to do so after five attempts, they will see an unfortunate
message before the system returns to the Start state. If they enter it properly, the system transitions
to State 6.
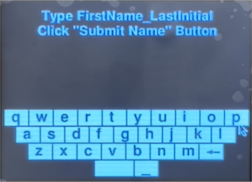 6 - Name Directory: The Name Directory state uses a full-fledged touchscreen keyboard for the
user to type in their name. This directory will hold all of the photos used to train and add the user to the
known person library. Similar to the number pad, the QWERTY-based keyboard is adapted from the
PiNotes
project with only a change to landscape orientation with corresponding key dimensions. To streamline our design,
we only used the lowercase keyboard and included the special features for space, underscore, and backspace as
it would be sufficient to enter the user’s FirstName_LastInitial. Our system automatically caps user input at
18 characters and if exceeded, will take the 18 characters as the name of the directory. It will then create a
directory in the pre-defined path as the parent directory for the pictures taken.
6 - Name Directory: The Name Directory state uses a full-fledged touchscreen keyboard for the
user to type in their name. This directory will hold all of the photos used to train and add the user to the
known person library. Similar to the number pad, the QWERTY-based keyboard is adapted from the
PiNotes
project with only a change to landscape orientation with corresponding key dimensions. To streamline our design,
we only used the lowercase keyboard and included the special features for space, underscore, and backspace as
it would be sufficient to enter the user’s FirstName_LastInitial. Our system automatically caps user input at
18 characters and if exceeded, will take the 18 characters as the name of the directory. It will then create a
directory in the pre-defined path as the parent directory for the pictures taken.
7 - Take Pictures: The Take Pictures state begins by displaying instructions on properly taking photos for the training model for two seconds. Then, it automatically runs the PiCam video stream. The user will know they have completed their mini photoshoot when the PiTFT screen changes – this marks the transition into State 8.
8 - Train: The Train state first displays a “Training” message with a warning that the process
may take up to 10 minutes. During this time, the algorithm loops through every photo in the dataset and
computes the facial embeddings. There is no way to cheat this process and only train on the new addition to
the library because the Haar Cascade is a static facial recognition model that is pre-trained and cannot adapt
during the detection process. Once complete, the PiTFT will display a confirmation message before returning to the
Start screen for another round.
Overall implementation of the FSM was done in parts first through designing the individual PyGame screens and
testing by having a button that would cycle through the different screens. After completing all the different
screens of the FSM, video streaming of the Pi Camera footage on the PiTFT, number pad interaction, keyboard
interaction, and picture taking were integrated one by one into our FSM code. During each stage of integration,
testing on the PiTFT occurred concurrently with the coding to ensure that screens displayed as desired, in
addition to proper touchscreen and button press functionality.

On-board Buttons
While creating the GUI, the need for buttons was clear. In some states, there was too much activity on the screen, so having an external button for input allowed for easier user interaction. As a result, the four PiTFT buttons were used to receive user input. The top most button and the bottom most button are universal buttons allowing control in all states to return to the start screen or quit the program respectively. The middle two PiTFT buttons are used during the Take Pictures and Name Directory states.
Button 17 is effectively a reset button and allows the user to return to the Start state no matter
what screen they are on.
Button 22 is used in the Name Directory state to submit the user’s name after typing, to prevent
accidental touchscreen misclicks due to fat fingers.
Button 23 is used in the Take Pictures state to trigger a photo capture.
Button 27 is used to quit and exit the program cleanly.
Frame
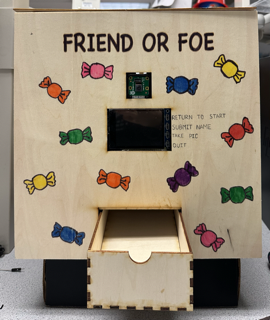 The frame of our project is constructed out of ⅛” plywood and includes the outside facade, inside support,
and bottom drawer unit. The outside facade has cutouts for the Pi Camera, PiTFT, and drawer. The
title is also engraved on and the box was later decorated with markers. Both the inside support and drawer
unit are adapted designs from
MakerCase. The inside support is a shorter, closed
box with a matching front cutout for the drawer and a rectangular cutout on top for the snacks to fall through
the dispensing mechanism. It also supports and props up the dispensing mechanism and Raspberry Pi. The
drawer is an open box with finger joints and has an additional semicircle cutout on the front face for
users to grab onto. Since the inside drawer is ~8 inches long and we do not want users to have to pull out the
entire drawer to retrieve their snack, we created a sloped bottom by cutting a piece of wood slightly longer
than the base such that the snack will roll to the front edge of the drawer. After designing the front face,
internal support box, and drawer, the designs were exported as .dxf files and taken to the Rapid Prototyping
Lab (RPL) to be laser engraved and cut out.
The frame of our project is constructed out of ⅛” plywood and includes the outside facade, inside support,
and bottom drawer unit. The outside facade has cutouts for the Pi Camera, PiTFT, and drawer. The
title is also engraved on and the box was later decorated with markers. Both the inside support and drawer
unit are adapted designs from
MakerCase. The inside support is a shorter, closed
box with a matching front cutout for the drawer and a rectangular cutout on top for the snacks to fall through
the dispensing mechanism. It also supports and props up the dispensing mechanism and Raspberry Pi. The
drawer is an open box with finger joints and has an additional semicircle cutout on the front face for
users to grab onto. Since the inside drawer is ~8 inches long and we do not want users to have to pull out the
entire drawer to retrieve their snack, we created a sloped bottom by cutting a piece of wood slightly longer
than the base such that the snack will roll to the front edge of the drawer. After designing the front face,
internal support box, and drawer, the designs were exported as .dxf files and taken to the Rapid Prototyping
Lab (RPL) to be laser engraved and cut out.
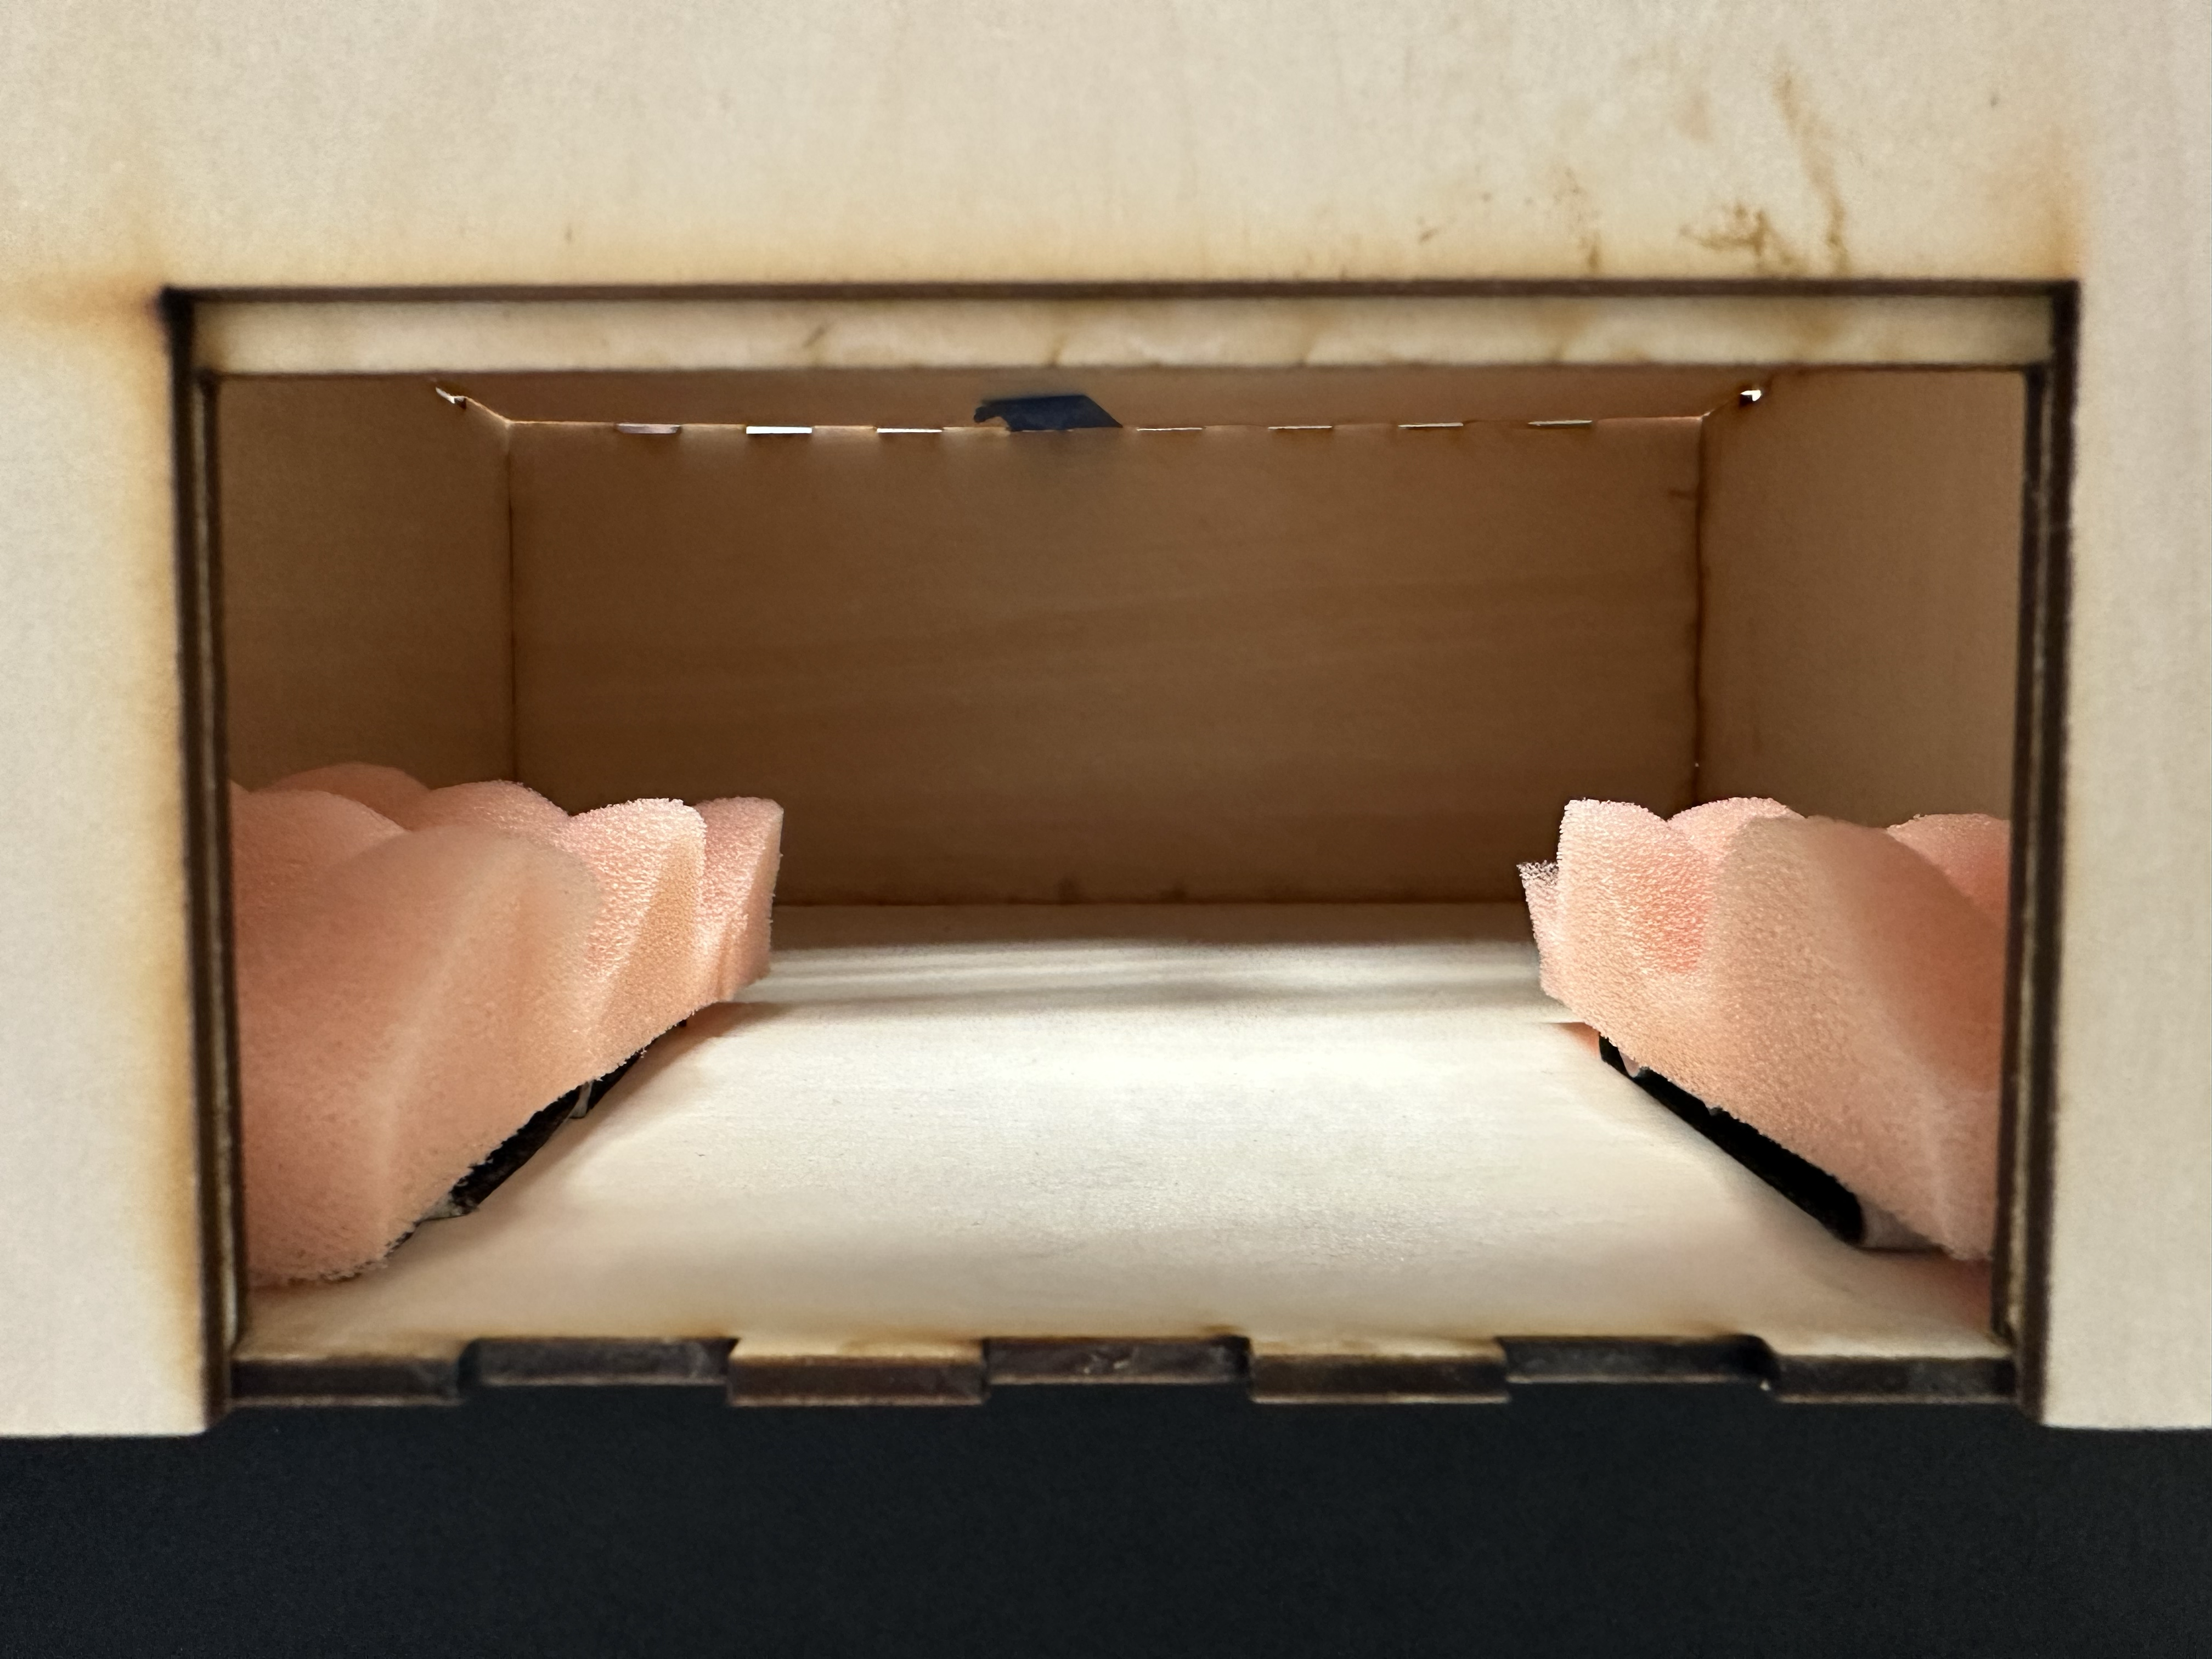
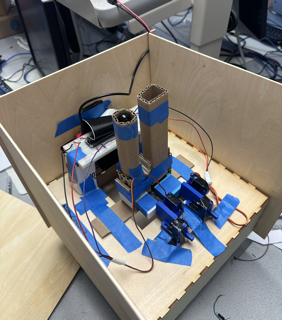 With all the cut pieces, we began assembling the frame by using wood glue to put together the box and then
attaching our dispensing mechanism on top of the internal box. As seen in the pictures below, the dispensing
tubes are suspended above the cutout of the box using cardboard and tape. On the backside of the box are the
linear actuators and servos which are raised higher for smoother sliding with our chutes, again using
cardboard and tape. Currently, these pieces are made out of cardboard and secured with tape as this allows
for easy adjustments while testing was being completed to find the optimal location for the servos and chutes,
in addition to allowing us to unclog the system during initial testing of the dispensing mechanism. Lastly,
two cardboard columns on top of the support box on the front side are used to elevate the breadboard and
avoid interference with the dispensing mechanism. Once all adjustments had been made, the front and side
panels were glued onto the sides and front of the support box.
With all the cut pieces, we began assembling the frame by using wood glue to put together the box and then
attaching our dispensing mechanism on top of the internal box. As seen in the pictures below, the dispensing
tubes are suspended above the cutout of the box using cardboard and tape. On the backside of the box are the
linear actuators and servos which are raised higher for smoother sliding with our chutes, again using
cardboard and tape. Currently, these pieces are made out of cardboard and secured with tape as this allows
for easy adjustments while testing was being completed to find the optimal location for the servos and chutes,
in addition to allowing us to unclog the system during initial testing of the dispensing mechanism. Lastly,
two cardboard columns on top of the support box on the front side are used to elevate the breadboard and
avoid interference with the dispensing mechanism. Once all adjustments had been made, the front and side
panels were glued onto the sides and front of the support box.
Two pieces of foam were also taped to the inside of the box to guide the drawer’s direction when pulling in and out.