Introduction

picam
Image processing tasks are used everywhere in modern technology, from graphics engines to iPhone apps and biomedical imaging applications. This objective of this project is to bring a greater understanding to all flavors of image processing tasks by surveying them through the RPi CloudCam, our digital effects camera.
CloudCam is a cloud-connected camera capable of capturing and customizing images with a slew of digital effects computed on board a Raspberry Pi 3. Users can also run Machine Learning model predictions on captured photos through CloudCam’s Amazon Web Services Elastic Compute Cloud (AWS EC2) interface to detect human emotions or common objects. Finally, all captured shots can be optionally saved locally and/or uploaded to a remote AWS Simple Storage Service (S3) server for later use!

System Overview

A high-level design of the project.

CloudCam is a system of hardware, local software, and remote software coming together in a state machine. An overall diagram depicting the inputs, flows, and data sources for each of the four major states is shown in the system diagram below:

state0
state1
state2
state3

The first three GPIO-connected physical buttons on a PiTFT screen control the transition between states, and the fourth button quits the camera application. The touchscreen is used to control actions in the menu state, which will trigger the display of the digital effects. Some of the menu options, particularly in the ML menu and Upload menu, will trigger calls to the various Cloud resources the CloudCam is connected to. We further break down the implementation details of each component of CloudCam in the Implementation section.

Implementation

The building blocks of the project

Basic Raspberry Pi Setup

While most of this project is implemented in software, the camera hardware setup is critical to CloudCam’s success (naturally). In order to properly configure a camera with the Raspberry Pi, we followed [this] setup tutorial. The physical camera connection looks like this:

rpi_camera
frontcam

Once we ensured that physical connection was secure, we opened up the raspi-config tool, and clicked on the interfaces tab. In order to connect to the camera, the ‘camera’ and ‘I2C’ options needed to be enabled. We made these changes, rebooted the Pi, and used the raspistill -o test.jpg test command to make sure the camera worked. The images initially came out blurry, so we used a focus ring to adjust the camera lens. After successfully creating the test.jpg file, we were ready to get started on the actual CloudCam code!

Control System

As described in the HLD section, CloudCam operates through a state machine of four specific states, as controlled by the user’s button and touchscreen presses. For the menu handler state specifically, we divide our code into a variety of different functions, which have one of four categories: image processing functions that actually perform computations, “blit” functions that manage display, “handler” functions that monitor and respond to user input, and “miscellaneous” functions that handle other CloudCam tasks, such as Given this, a typical flow of a user’s inputs would look something like this.

statemachine

Essentially, a user can take as many photos as they want, until the program is exited. For each photo they take, they can customize that photo with over a dozen different digital effects that can be compounded to create stimulating, artistic photos. Or, they could choose to use their image as an input to a Machine Learning service, and view those results any number of times. Once they are satisfied with the end result of their customizations, a user is easily able to open up a Save/Upload menu, where they can choose to discard an image, save it locally, or upload it to the Cloud.

Once the image effects menu is opened, a “level 1” menu is displayed, which divides up the different effects into four categories.

menu1

Clicking on any of these category options will open one of the following four “level 2” menus, which will allow a user to select the specific end effects they would like to apply to the image. Examples of the level 1 to level 2 menu transition are displayed below.

menu2
menu3
menu4
menu5

The menu handlers for the image effects are handled entirely by touchscreen input. The quadrant of the screen press is recorded, and mapped into the next menu transition. This also applies to the Save/Upload menu transitions, which occur when transitioning back to the free view mode, and display the following screens:

save1
save2

The next few sections will deep dive into how the different image effects were implemented, and how the cloud connection component of this project actually works!

Image Effects

For this project, we implemented a wide variety of fun image effects that a user can choose from when using the CloudCam. Many of these effects were created using the highly-optimized image processing Python library, OpenCV. The next few sections will go in-depth into how each of the grouped image applications are actually implemented.

Filters

The filtering effects are grouped as such because the effects in this category mimic the iPhone or Instagram style filters. Much of the following work was adapted from [this]. These typically involve an application of a 2D filter on an image, or involve changing the values in the different RGB channels of the image.

Noir

The simplest of the filtering-type applications, this effect uses the cv2.cvtColor(im, cv2.BGR2GRAY) to convert an image to grayscale while preserving lumosity. As the image loses two channels (going from BGR to gray), we have to account for the transition from 3D numpy arrays to 2D when displaying our image to the screen.

noir

Sepia

Sepia is a sample image filter that gives an image an “aged photograph” look. It is computed by applying the following filter to an input image.

sepia

Warm and Cool Images

“Warm” and “cool” are offered as two separate effect options, but they simply involve adjusting the distributions of the red and blue RGB channels respectively. Warmer images appear “redder” while cooler images appear “bluer.” The channels were adjusted through a spreadLookupTable() function that adjusted the values according to a Univariate Spline transform.

warm
cold

Adjustments

The adjustment group of image effects include four effects that can be dynamically incremented or decremented in an image. Common effects of this type include contrast and brightness adjustment, blur and sharpness, and saturation.
Choosing an effect in the adjustment menu will open up the current status of the edited image along with an adjustment bar at the bottom, as shown below.

incr

That bar serves as essentially a “level 2.5” menu option, as the system isn’t officially at the “view edited image state” until the “done” option is pressed. The “+” and “-” options will respectively trigger the increase and decrease modes on whichever adjustment function (e.g. increase contrast) is selected from the level 2 menu, and apply them to the edited image. The resulting image is displayed on the screen to be previewed, until the edits are finalized by selecting “done.”

Contrast and Brightness

Although these are implemented as two separate effects in the menu, they both are similar in that they involve linear operations of the form aX + b where X is the input image. The a parameter adjusts the contrast value multiplicatively, while the b parameter adjusts the brightness parammer additively. Brightness refers to the overall lightness or darkness of the image, so increasing the brightness every pixel in the frame gets lighter because of the constant bias. Contrast is the difference in brightness between objects in the image. Increasing the contrast of an image makes light areas lighter and dark areas darker. High and Low contrast images are shown below:

bright
dark

Contrast and brightness adjustment are respectively implemented by adjusting the alpha and beta parameters in the OpenCV function cv2.convertScaleAbs(alpha=a, beta=b), which performs the linear transform. For contrast adjustment on the user end, pressing the + button sets the contrast to 0.9, and the - button sets it to 1.1, and the images are multiplied by these constants. When the + button is selected for brightness adjustment, beta is set to +1, incrementing the overall image brightness by skewing it to the max brightness level. Similarly, if the - is pressed, beta is set to -1 to shift the image pixels down by one constant. High and Low brightness images are shown below:

high_contrast
low_constrast

Blur and Sharpness

The blur and sharpness adjustment effects are condensed into just one “blur” option, which involves the repeated application of either a blur or sharpness kernel, depending on a user’s input. If the + button is pressed, the image is filtered with a blur filter, like the one below.

blur1

This is the equivalent of an averaging, or box filter. By contrast, if “-” is pressed, a sharpness kernel is applied, such as the one below:

blur2

The result of blurring is exactly what it sounds like; the image looks fuzzier with details obscured. The result of the sharpening kernel is an image with enhanced edges and vibrant colors - almost like a colored-pencil sketch.

Blur
sharp

Saturation

The final adjustment parameter is the saturation adjustment. As stated earlier, OpenCV stores images in BGR format, and we are used to seeing images in RGB format as well. Adjusting the saturation required converting the image to an HSV type - Hue, Saturation, Value. Hue represents the color portion of a pixel as a number from 0 to 360 degrees: Saturation describes the amount of gray in a particular color, from 0 to 100 percent. Reducing this component toward zero introduces more gray into the image and produces a faded effect. By contrast, saturated images seem vibrant, with fuller colors. Sometimes, saturation appears as a range from 0 to 1, where 0 is gray, and 1 is a primary color. Value works in conjunction with saturation and describes the brightness or intensity of the color, from 0 to 100 percent, where 0 is completely black, and 100 is the brightest and reveals the most color. To adjust saturation, we converted the image to HSV through the cv2.cvtColor(img, cv2.COLOR_BGR2HSV) and split the resulting channels into h, s, and v components. We then added a constant value of 5 to all values in the image’s s channel, if the + button was pressed, or subtracted 5 if the - button was pressed.

high_sat
low_sat

Special Effects and Restoring

Special image effects that we included are ones that did not full under the filtering or adjusting umbrellas, but can be added to an image for other cool effects. In particular, we have support for 8-bit style images through pixelation, poster-like images through color clustering, and image outlines through Canny edge detection. As mentioned previously, these image effects can be stacked up on top of each other and used in conjunction. If a user wants to “clear out” these image effects and restore to defaults, that option is provided in this menu as well by pressing the “restore” button.

Pixelation

By “pixelating” an image, we can cool images in the style of an 8-bit video game. The pixelation process is a relatively simple matter of rescaling, using different interpolation methods. Interpolation is essentially the process of “guessing” what a neighboring pixel would be. To implement pixelation, we first downscale the image using cv2.resize(img, cv2.INTERP_LINEAR). The linear interpolator will use a combination of linear functions in order to determine neighboring pixels accurately. We then rescale the image back up using cv2.resize(img, cv2.INTERP_NEAREST). Nearest-neighbors interpolation does not adjust values of the pixels; it determines the neighboring pixels based on the exact values of pixels already present. This creates “blocks” in the rescaled image, mimicking pixels of an 8-bit game!

pixel

Color Clustering

Another special effect we added was color clustering through K means. Color clustering, or color quantization is the process of reducing the number of colors in an image. One reason to do so is to reduce the memory, but another reason, as in our case, is for the cool comic-book style poster effect. We use the OpenCV implementation of the K-means clustering algorithm for color quantization. K-means is an algorithm that attempts to classify an unknown set of data, in this case a bunch of RGB pixels, into a set number of groups or clusters. In an image, there are 3 features, R,G,B. To run this, we need to reshape the image to an array of Mx3 size, where M is the number of pixels in an image. After the clustering, we apply centroid values to all pixels, such that the resulting image will have the specified number of colors.

poster

Canny Edge Images

The final special effect CloudCam has is the ability to generate edge images, resembling outlines. We accomplish this by using cv2.Canny(img), which performs the Canny edge detection algorithm. That algorithm utilizes a series of gradient calculations, as well as a hysteresis double-threshold, in order to compute “strong” edges of an image. Although these thresholds need to be fine-tuned on a per-image basis in order to have the optimal results, for a typical image the standard lower/upper thresholds of 100 and 200 produce meaningful results!

canny

Stacking image effects

A feature of the CloudCam is that these image effects can stack up on top of each other to create new, unique image effects. These can be from any non-ML category. For example, a user could apply a warm filter, adjust the saturation, adjust the contrast, run a color clustering, and then pixelate an image - or any sort of combination like that, with no limit. The results of that particular sequence is shown below:

comboo

Machine Learning

The image effects described above are examples of classical, or non-learning-based Computer Vision applications. Most of these require relatively simple calculations, and run nearly instantly on the RPi. However, the newer applications of Computer Vision are typically done in conjunction with Machine Learning (ML) applications. Hundreds of different ML models exist that can generate or extract meaningful data from an input image, for a variety of different purposes. A camera that can generate inference results for trained ML models on the fly will certainly be a useful tool. To demonstrate our CloudCam’s ability to do so, we utilize two robust, pre-trained ML model frameworks, mini-Xception for Face and Emotion Recognition and MaskRCNN for common object detection and instance segmentation, as connections to the CloudCam.

To clarify, we don’t take credit for any of the ML models themselves - we borrowed pretrained versions of them. You can find the MaskRCNN model here on [gluon] and the face and emotion classification network here on [github]. These resources provide more in-depth information on the implementation and usage of these model architectures.

Examples of Emotion Recognition and MaskRCNN predictions are shown below:

Emotion Detection Results

happy_woman
sad_man
neutral_woman

MaskRCNN Results

mask2
mask3
objects

Cloud Connection

AWS EC2/S3 Infrastructure

We wanted to run larger, compute-heavy machine learning models on the images, but the hardware that comes in with the Pi has CPU, RAM, and memory limitations. It is also not realistic to scale the project on the Pi if we wanted to add more classification options and models. Thus, we turned to an AWS (Amazon Web Services) infrastructure to support this computation using their cloud technologies.

Specifically, we used Amazon EC2 (Elastic Compute Cloud) and Amazon S3 (Simple Storage Service). EC2 provides virtual compute environments (instances )that you can customize and configure, where adding more resources to the instance will cost more. S3 provides cloud storage containers (called buckets) where you can store data (in our case, images).

We used EC2 to load a t2.medium instance with Ubuntu 18.04. The name T2 refers to the type, while the size indicates the amount of RAM. T2 is one of the lowest tier types of instances with minimum CPU compute power.

The general pipelines to access the server is explained above. Essentially, we use Nginx, a web server, Gunicorn, as WSGI (Web Server Gateway Interface) server and Flask, a web framework (for python). Nginx handles where requests from the internet arrive first. Gunicorn translates requests into a format the web application can handle. You can learn more about what they do [here], and [here] are instructions for building your own web server.

Start by creating an EC2 instance, ssh in, and follow the instructions! Flask controls the server logic, such as what to do when certain endpoints are called. An endpoint is the URL that the server is waiting to receive and can act on, in our case we have 2 endpoints for each of the models: url/mask/ and url/emotion/ . We have Python functions that are executed when either of these endpoints are hit (we pass the image through model inference). In addition, Flask is a RESTful web framework, which means it only takes requests such as GET and POST. Thus, you must make GET requests to our endpoints. The server is setup with AWS credentials (private and public key) so that it can make requests to S3 to upload and download images using the boto3 api.

Failed Architectures

We had to make major design changes as we approached a cloud solution. We will make note of failed architectures here for future readers.

AWS IoT Greengrass

First, we tried to use AWS IoT Greengrass. The name sounds useful right? However, it turns how this service is meant for controlling edge devices from a central server… not the other way around. AWS provides something called Greengrass Connectors, which help configure an edge device (the Pi) to do computing ON the device itself, and then send it to the server. This is meaningful when you have multiple edge devices, and want to control all of them through a Greengrass Group. However, the way even Greengrass sends information back and forth between an edge device and the central server is no different than the way we used boto3. Our goal is to not have to run on the Pi, so we looked at other solutions.

AWS Lambda

Second, we tried to use AWS Lambda. Lambda is AWS’s notion of serverless architecture. A Lambda function will wait in the cloud until it is specifically called, execute its contents and exit. There is no server allocated for the function. This allows AWS to manage all resource allocation for all Lambda functions themselves. We figured we would set up Lambda functions that would run the model through an image when specifically called on. This is a valid architecture; however, there is one major limitation. When you deploy a Lambda, you create what is called a deployment package that contains all the files and dependencies for the Lambda. The maximum unzipped file size of a Lambda is 250 MB (that is, stored on S3 or Lambda Layers, the maximum size to upload directly to Lambda is only 50 MB). The deployment package of MaskRCNN is 400 MB, which was too much, mostly because of SciPy being too large. As such, Lambda could not handle our needs, and we had to settle on a server-based architecture. If your deployment package is small enough for Lambda to handle, we highly recommend using it as it erases the need to configure an EC2 instance. A regular TensorFlow model can usually stay within the constraints.

EC2 Issues

Finally, we decided to use an EC2 server with Nginx and Flask. Configuring the environment is tedious but doable, just make sure to use a virtual environment. You can find instructions [here].

One issue we came across was that the MaskRCNN model kept crashing on the instance due to a memory error. We originally started with a t2.micro instance, part of the free tier, which only has 1 GB of RAM! However, once we upgraded it to a paid instance, a t2.medium with 4 GB of RAM, the model ran fine.

MaskRCNN takes about 100 seconds to run on a t2.medium, which has the bare minimum of resources. EC2 has many options for high compute power instances, such as those with GPU’s, but of course these will cost more. However, it keeps the application flexible to by allowing us to run as much computation as we need to simply by throwing money at it. Note that pricing is by the hour, so it is very feasible to downgrade your instance for development and upgrade it for fast performance when needed. This allows for a very scalable architecture depending on how your requirements change! For pricing reference, it costs 4 cents/hr to run the t2.medium, 16 cents/hr to run a t2.xlarge, and 53 cents/hr to run a g4dn.xlarge. You can view pricing [here].

Results and Conclusions

Results

Everything worked as expected!

We were successfully able to demonstrate interfacing with the camera, Raspberry Pi, and the AWS server in a functional state machine. We could view the effects of a variety of image filters, and successfully used the camera input as testing data for two pretrained models hosted on the AWS servers. All pictures that were captured could be saved locally, as well as exported to the S3 bucket successfully. The demo of all of these features in action will be posted to the ECE 5725 Youtube Channel soon. In the meantime, all of our code is available at [this] Github repository!

Project Conclusions and Future Work

We had a lot of fun building this project, and were very happy that everything worked out in the end! However, like all great projects, there's plenty of room for improvement and extensions. Here are things we could improve on:

Async

One of the issues with basic GET requests is that in python you are calling it like any other function, and need to wait for the function to execute before you can move on in the code. This became a problem with MaskRCNN, which takes about 100 seconds to execute and causes the Pi to hang while we are waiting for a response from the server. It would be very useful to implement asynchronous requests such that the model inference can start as soon as we take a picture, so we can browse other camera options while we wait for the model to finish running.

Supporting videos

The scope of this project only looked at still image frames, but it is entirely possible to record and process videos using OpenCV libraries. It would be interesting to then create different video effects, such as slow motion, timelapse, boomerang, or moving average, in addition to the traditional image processing effects which you can apply to each frame.

Trying different servers and models

We only implemented 2 different models on 1 t2.medium instance. It would be interesting to try many other machine learning classifiers, such as different object detection algorithms, and use more expensive instances, to speed up the computation as much as possible on the most computation heavy types of models. Specifically, we could try to use YOLO: Real Time Object Detection, in conjunction with video, and output live transformations on to the piTFT. We could have YOLO run on compute-heavy servers, or try TinyYOLO (a lightweight version of YOLO) on the Pi. Although, YOLO does not return Masks of objects, it only returns the bounding boxes around them.

More Effects

Only around 12 different image effects are included so far, but there are a multitude of other options to explore! We could take to instagram and Snapchat as inspiration and attempt to create dynamic filter effects and image additions. Alternatively, we could explore more traditional filters such as histogram equalization, adaptive thresholding, or gradient images.

Follow best practices!

Just a note - make sure to follow AWS best practices or AWS will come after you. We accidently pushed our AWS credentials to github, which invoked AWS GuardDuty and put a ticket against our account as being compromised. We had to deal with several employees and rotate all our keys and passwords to re-secure the account.
There are also other standards to follow, such as making sure you don’t use your root account for everything, rather, you can make separate Users and assign them individual permissions, known as Roles. In this case, we made a separate User with an S3 role.

Appendix

Appendix A: Work Distribution

laas Laasya
  • Camera Fine Tuning
  • CloudCam state machine logic
  • Image effects code
  • RPi Graphic display
  • Final Report
ani Anirudh
  • ML Server Setup
  • S3 integration for cloud storage
  • AWS integration for both ML models
  • Website design and coding
  • Final Report

Appendix C: Budget

Part Quantity Unit Price
Raspberry Pi 3B 1 Including
Raspberry Pi Camera Module v2 1 Included
AWS EC2 Servers 1 $1.64

Total: $1.64

Appendix D: CloudCam Code

import RPi.GPIO as GPIO
import sys
import os
import numpy as np
import time
import pygame
from pygame.locals import*  # for event MOUSE variables
from collections import deque
import math
import io
import picamera
from picamera import PiCamera
import cv2
from scipy.interpolate import UnivariateSpline
from simple_image_commands import *
import requests


os.putenv('SDL_VIDEODRIVER', 'fbcon')
os.putenv('SDL_FBDEV', '/dev/fb1')
os.putenv('SDL_MOUSEDRV', 'TSLIB') # Track Mouse clicks on piTFT
os.putenv('SDL_MOUSEDEV', '/dev/input/touchscreen')

####### INITIALIZATION ####################################

GPIO.setmode(GPIO.BCM)

# piTFT buttons
GPIO.setup(17, GPIO.IN, pull_up_down=GPIO.PUD_UP)
GPIO.setup(22, GPIO.IN, pull_up_down=GPIO.PUD_UP)
GPIO.setup(23, GPIO.IN, pull_up_down=GPIO.PUD_UP)
GPIO.setup(27, GPIO.IN, pull_up_down=GPIO.PUD_UP)

pygame.init()
pygame.mouse.set_visible(False)

BLACK = (0, 0, 0)
WHITE = (255, 255, 255)
RED = (255, 0, 0)
GREEN = (0, 255, 0)
BLUE = (0, 0, 255)

menu_font = pygame.font.SysFont("caveat", 30)
screen = pygame.display.set_mode((0, 0), pygame.FULLSCREEN)
screen.fill(BLACK)

#####################Class Definition#####################
class Wheesh:
    def __init__(self):
        self.camera = PiCamera()
        # we can make this the same as ScreenWidth/Height if u want, or have the image take up a different size
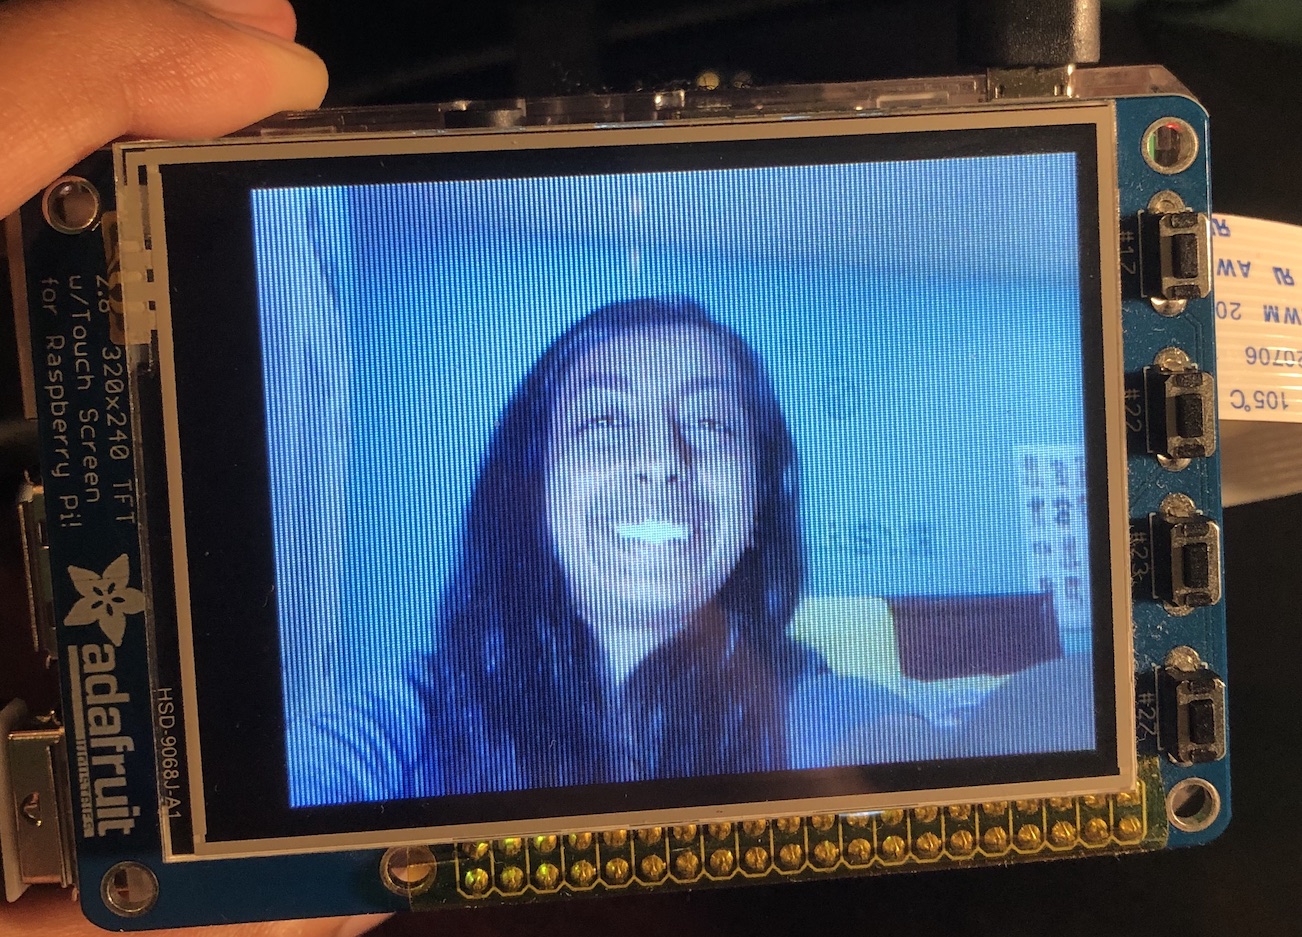
        self.camera.resolution = (320, 240)
        self.camera.rotation = 270

        self.menu_font = pygame.font.SysFont("caveat", 30)
        self.screen = pygame.display.set_mode((0, 0), pygame.FULLSCREEN)
        self.screen.fill(BLACK)
        self.stream = io.BytesIO
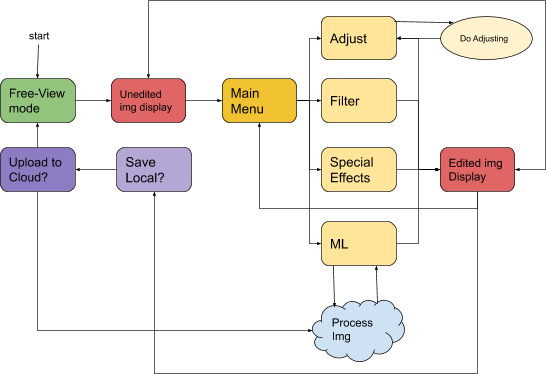
        # state system
        self._mainState = 0
        # screen dimensions x 3 channels
        self.rgb = bytearray(320 * 240 * 3)
        self.current_image = []
        self.edited_image = self.current_image
        self.n = 0
        self.curr_filename = ""     # original filename
        self.filename = ""          # edited filename
        self.tag = ""               # prefix of filenames without file extension
        self.timeout = 200          # timeout for ML prediction downloading
        self.start_time = str(int(time.time())) + "_"


        # 0:free view, 1:captured picture display (show orignal), 2: edited image
        # 3:menu

        # adjustment parameters
        self.contrast = 1              # contrast --> multiplication
        self.brightness = 0         # brightness --> addition     

    def inc(self):
        self.n += 1

    def CurrMode(self):
        return self._mainState

    def EnterState0(self):
        self._mainState = 0

    def EnterState1(self):
        self._mainState = 1

    def EnterState2(self):
        self._mainState = 2

    def EnterState3(self):
        self._mainState = 3

    ####### IMAGE PROCESSING ####################################
    def make_request(self, im, kind):
        if kind == "mask":
            resp = requests.get("http://ec2-34-205-78-136.compute-1.amazonaws.com:5000/mask/" + self.tag, timeout=150)
        elif kind == "emotion":
            resp = requests.get("http://ec2-34-205-78-136.compute-1.amazonaws.com:5000/emotion/" + self.tag, timeout=25)
        else:
            print "not a valid req type"
            resp = ":("
        return resp

    def capture(self, rgb, stop=False, n=0):
        stream = io.BytesIO()
        self.camera.capture(stream, resize=(320, 240),
                            use_video_port=True, format='rgb')
        stream.seek(0)
        stream.readinto(self.rgb)

        if stop:
            self.camera.capture("img_"+self.start_time+ str(self.n)+".jpg")
            self.curr_filename  = "img_"+self.start_time+ str(self.n)+".jpg"
            self.filename = "img_"+self.start_time+ str(self.n)+"_edited.jpg"
            self.tag = "img_"+self.start_time+ str(self.n)
            self.inc()
            stream.close()

            # decode = cv2.imdecode(np.asarray(rgb, np.uint8), cv2.IMREAD_COLOR)
            pgi = pygame.image.frombuffer(rgb, (320, 240), 'RGB')
            pgi_surf = pygame.surfarray.array3d(pgi)
            self.current_image = cv2.cvtColor(
                pgi_surf.transpose([1, 0, 2]), cv2.COLOR_RGB2BGR)
            self.edited_image = self.current_image
            test_upload(self.curr_filename, "upload_folder/"+self.curr_filename)

    def pygamify(self, image):
        # Convert cvimage into a pygame image
        if len(np.shape(image)) == 3:
            image2 = cv2.cvtColor(image, cv2.COLOR_BGR2RGB)
        else:
            image2 = cv2.cvtColor(image, cv2.COLOR_GRAY2RGB)
        return pygame.image.frombuffer(image2.tostring(), image2.shape[1::-1], "RGB")

    # Filter menu tasks: Taken from building instagram-like filters in python
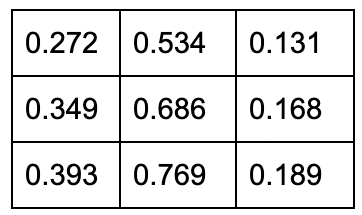
    def sepia(self, image):
        print "sepia"
        kernel = np.array([[0.272, 0.534, 0.131],
                           [0.349, 0.686, 0.168],
                           [0.393, 0.769, 0.189]])
        self.edited_image =  cv2.filter2D(image, -1, kernel)

    def spreadLookupTable(self, x, y):
        spline = UnivariateSpline(x, y)
        return spline(range(256))

    def warm_image(self, image):
        print "warm"
        increaseLookupTable = self.spreadLookupTable(
            [0, 64, 128, 256], [0, 80, 160, 256])
        decreaseLookupTable = self.spreadLookupTable(
            [0, 64, 128, 256], [0, 50, 100, 256])
        red_channel, green_channel, blue_channel = cv2.split(image)
        red_channel = cv2.LUT(red_channel, increaseLookupTable).astype(np.uint8)
        blue_channel = cv2.LUT(blue_channel, decreaseLookupTable).astype(np.uint8)
        self.edited_image = cv2.merge((red_channel, green_channel, blue_channel))

    def cold_image(self, image):
        print "cold"
        increaseLookupTable = self.spreadLookupTable(
            [0, 64, 128, 256], [0, 80, 160, 256])
        decreaseLookupTable = self.spreadLookupTable(
            [0, 64, 128, 256], [0, 50, 100, 256])
        red_channel, green_channel, blue_channel = cv2.split(image)
        red_channel = cv2.LUT(red_channel, decreaseLookupTable).astype(np.uint8)
        blue_channel = cv2.LUT(blue_channel, increaseLookupTable).astype(np.uint8)
        self.edited_image = cv2.merge((red_channel, green_channel, blue_channel))

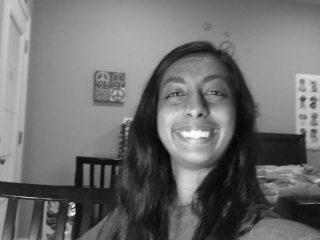
    def gray(self, image):
        print "gray"
        self.edited_image = cv2.cvtColor(image, cv2.COLOR_BGR2GRAY)

    # "Other" menu tasks
    def restore(self):
        print "revert changes"
        self.edited_image = self.current_image
    
    def cluster(self, image):
        print "clustering"
        # single channel as float
        Z = np.float32(image.reshape((-1,3)))
        criteria = (cv2.TERM_CRITERIA_EPS + cv2.TERM_CRITERIA_MAX_ITER, 10, 1.0)
        K = 8       # number of clusters

        # perform clustering
        ret, label, center = cv2.kmeans(Z, K, None, criteria, 10, cv2.KMEANS_RANDOM_CENTERS)

        # back to uint8
        center = np.uint8(center)
        result = center[label.flatten()].reshape((image.shape))
        self.edited_image = result
    
    def pixelate(self, image):
        print "8bit"
        # scale image down with linear interpolation, scale back up with nearest neighbors
        size = image.shape[:2][::-1]
        downsize = (320/4, 240/4)
        scaled_down = cv2.resize(image, downsize, interpolation = cv2.INTER_LINEAR)
        scaled_up = cv2.resize(scaled_down, size, interpolation = cv2.INTER_NEAREST)
        self.edited_image = scaled_up

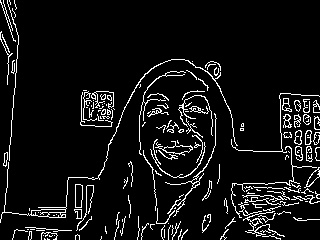
    def edge(self, image):
        print "edge"
        # Canny edge detection w/ hysteresis thresholding. Double check that thresholds are good.
        self.edited_image = cv2.Canny(image, 100, 200)

    # Adjust menu tasks    
    def adjust_contrast(self, mode):
        print "contrast"
        if mode == 0: # increase
            self.contrast = 1.1
        else:
            self.contrast = 0.9
        self.edited_image = cv2.convertScaleAbs(self.edited_image, alpha=self.contrast)

    def adjust_brightness(self, mode):
        print "brighter lol"
        if mode == 0: # increase
            self.brightness = 5
        else:
            self.brightness = -5
        self.edited_image = cv2.convertScaleAbs(self.edited_image, beta=self.brightness)
    
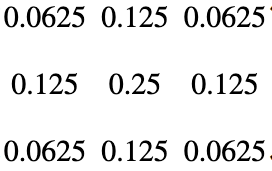
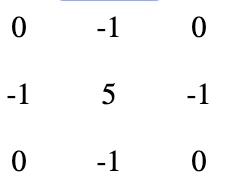
    def adjust_blur(self, mode):
        print "blur lol"
        # guassian blur
        # repeatedly apply a blurring or sharpening filter (3x3) to an image with filter2D
        if mode == 0: # more blur
            kernel = np.array([[1,1,1],[1,-9,1],[1,1,1]])*-1
            self.edited_image = cv2.filter2D(self.edited_image, -1, kernel)
        else:
            self.edited_image = cv2.blur(self.edited_image, (3,3))

    def adjust_saturation(self, mode):
        print "saturation"
        # images stored in bgr format
        imghsv = cv2.cvtColor(self.edited_image, cv2.COLOR_BGR2HSV).astype("float32")
        (h, s, v) = cv2.split(imghsv)
        if mode == 0: # increase
            s = np.add(s, 5)
        else:
            s = np.add(s, -5)
        s = np.clip(s,0,255)
        imghsv = cv2.merge([h,s,v])
        imgbgr = cv2.cvtColor(imghsv.astype("uint8"), cv2.COLOR_HSV2BGR)
        self.edited_image = imgbgr


    ####### SCREEN UPDATES ####################################

    def blit_text(self, s, pos):
        text = s
        text_surface = self.menu_font.render(s, True, BLACK)
        rect = text_surface.get_rect(center=pos)
        self.screen.blit(text_surface, rect)

    def blit_image(self, img, pos):
        pgi = self.pygamify(img)
        self.screen.blit(pgi, pos)
        pygame.display.flip()

    def blit_icon(self, img_path, pos):
        print "unimplemented"

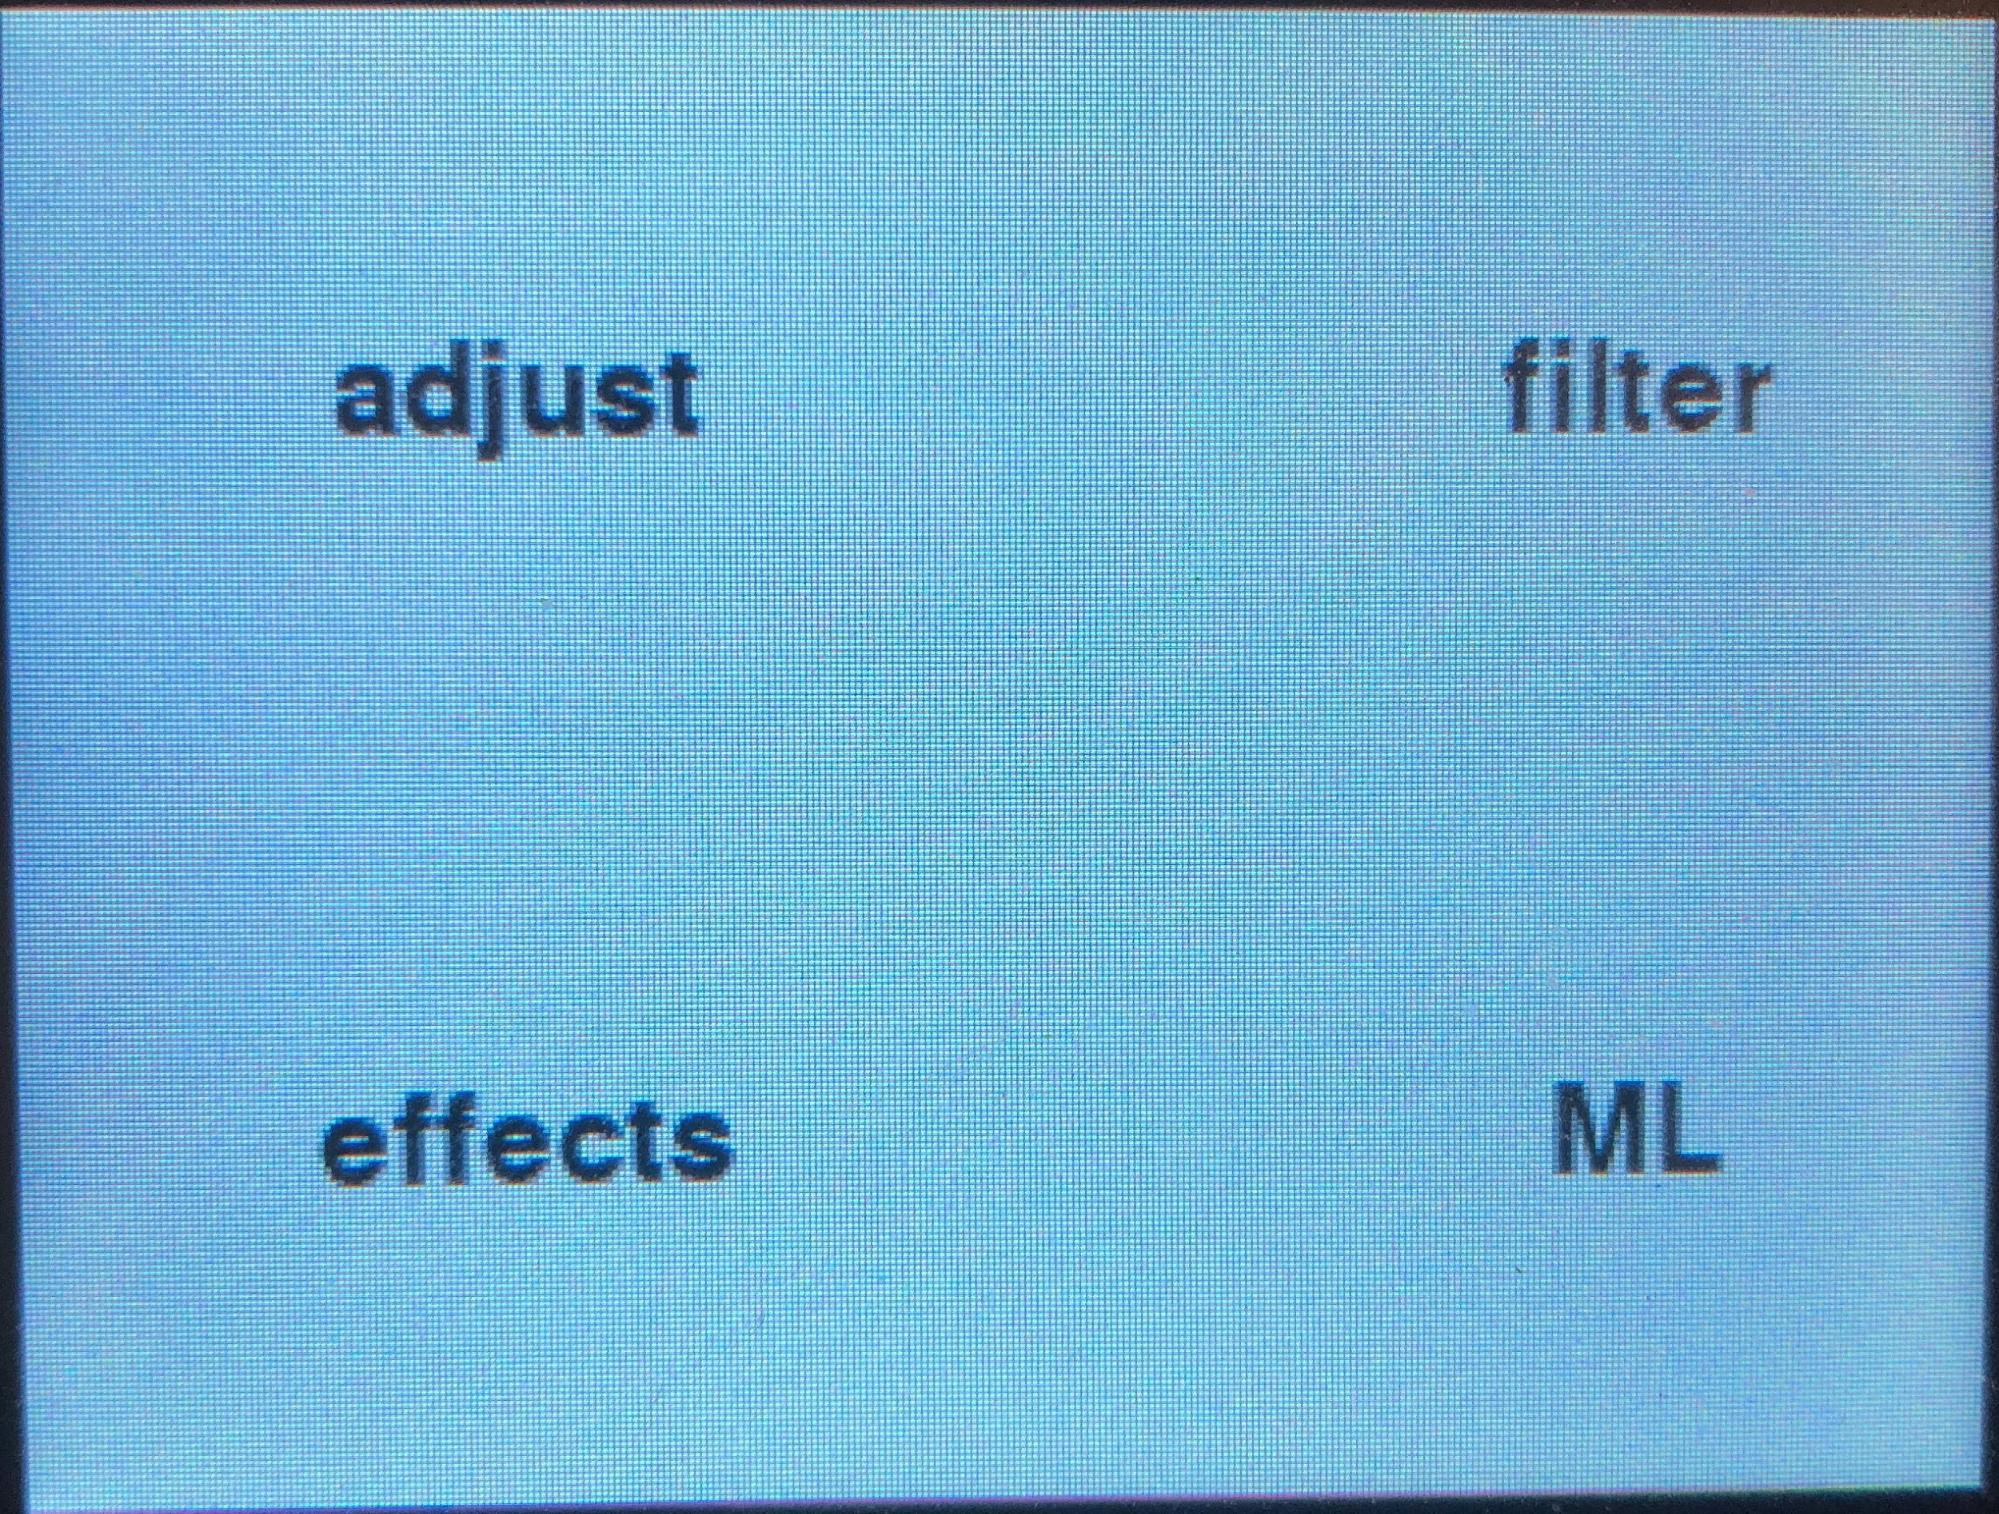
    def blit_main_menu(self):
        self.screen.fill(WHITE)
        self.blit_text("effects", (80, 180))
        self.blit_text("filter", (260, 60))
        self.blit_text("ML", (260, 180))
        self.blit_text("adjust", (80, 60))
        pygame.display.update()

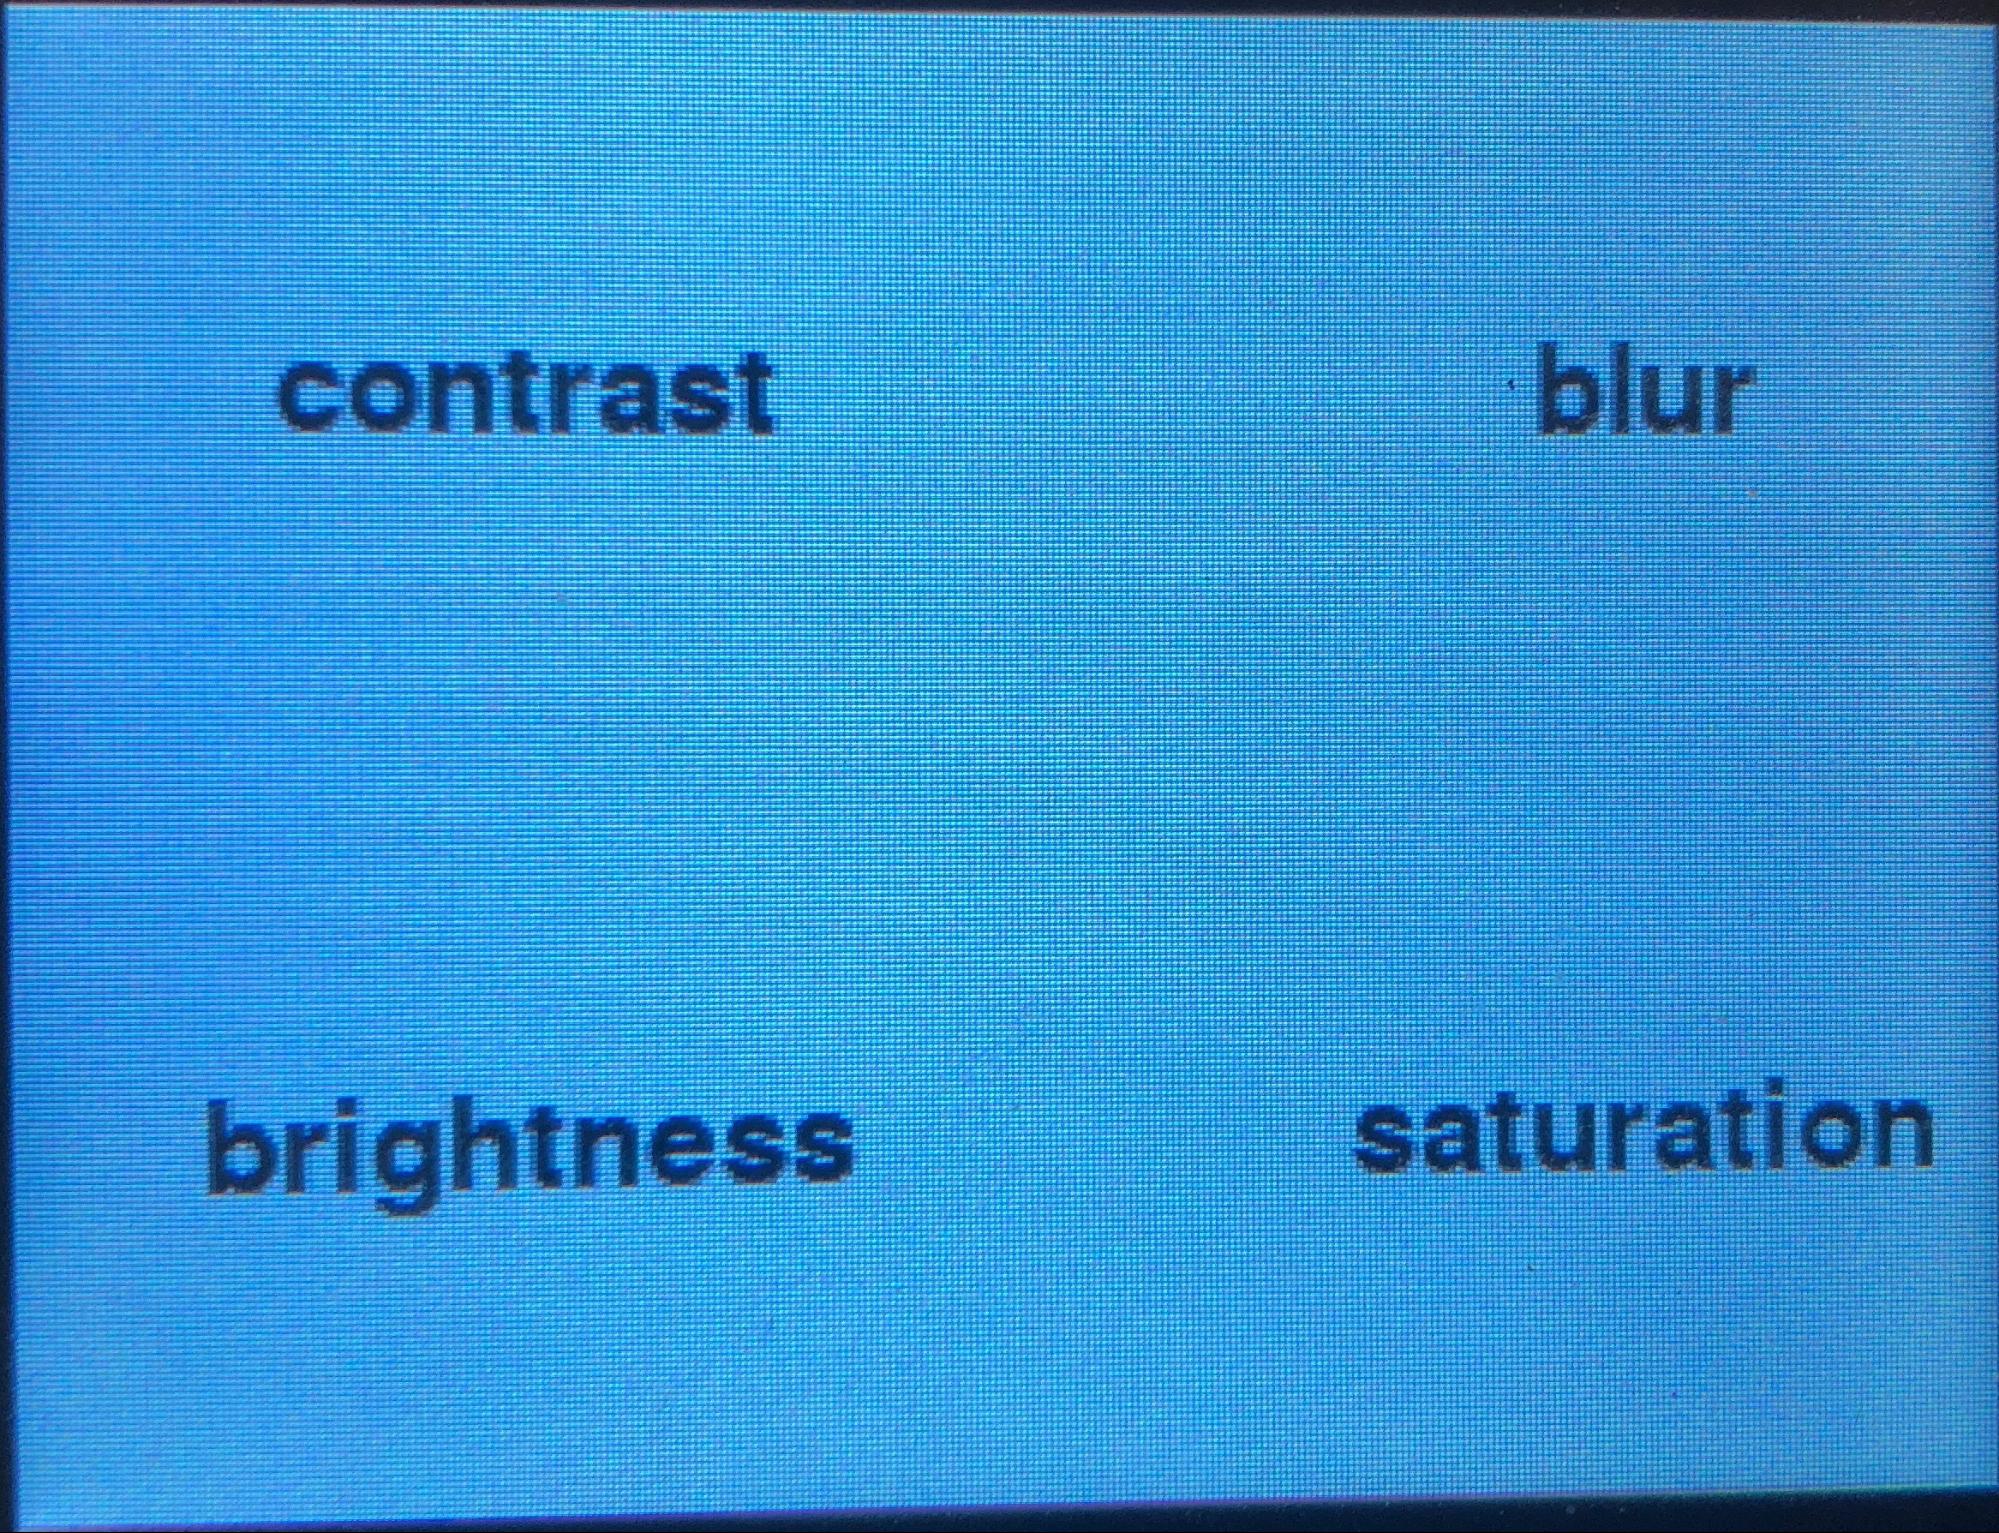
    def blit_adjust_menu(self):
        self.screen.fill(WHITE)
        self.blit_text("blur", (260, 60))
        self.blit_text("contrast", (80, 60))
        self.blit_text("brightness", (80, 180))
        self.blit_text("saturation", (260, 180))
        pygame.display.update()

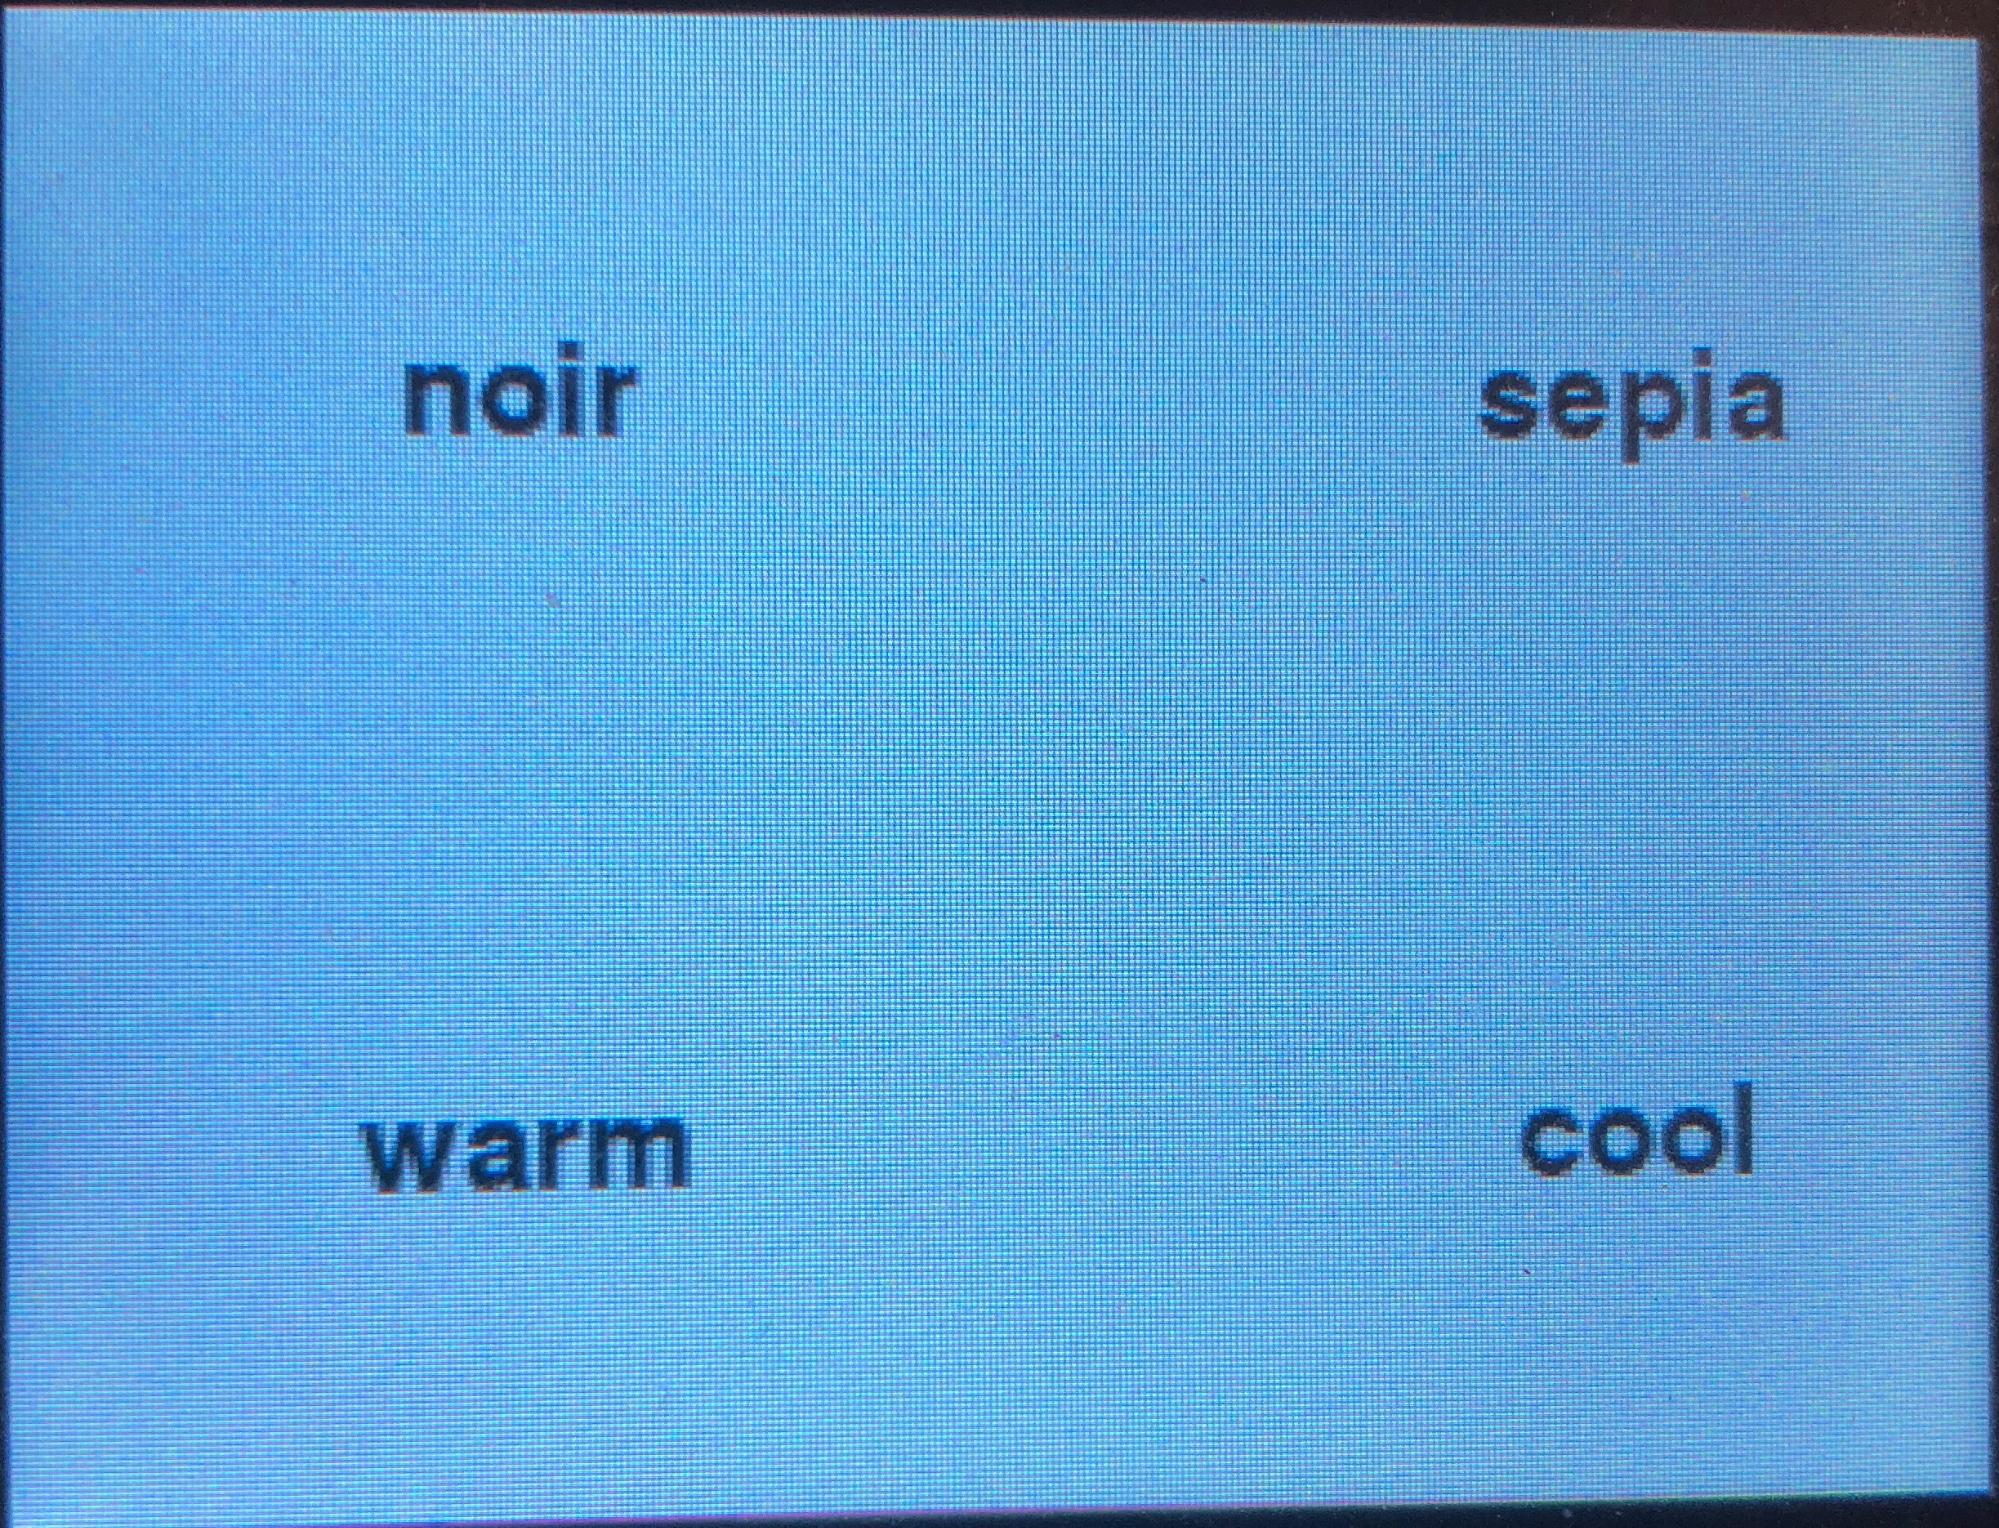
    def blit_filter_menu(self):
        self.screen.fill(WHITE)
        self.blit_text("warm", (80, 180))
        self.blit_text("sepia", (260, 60))
        self.blit_text("cool", (260, 180))
        self.blit_text("noir", (80, 60))
        pygame.display.update()

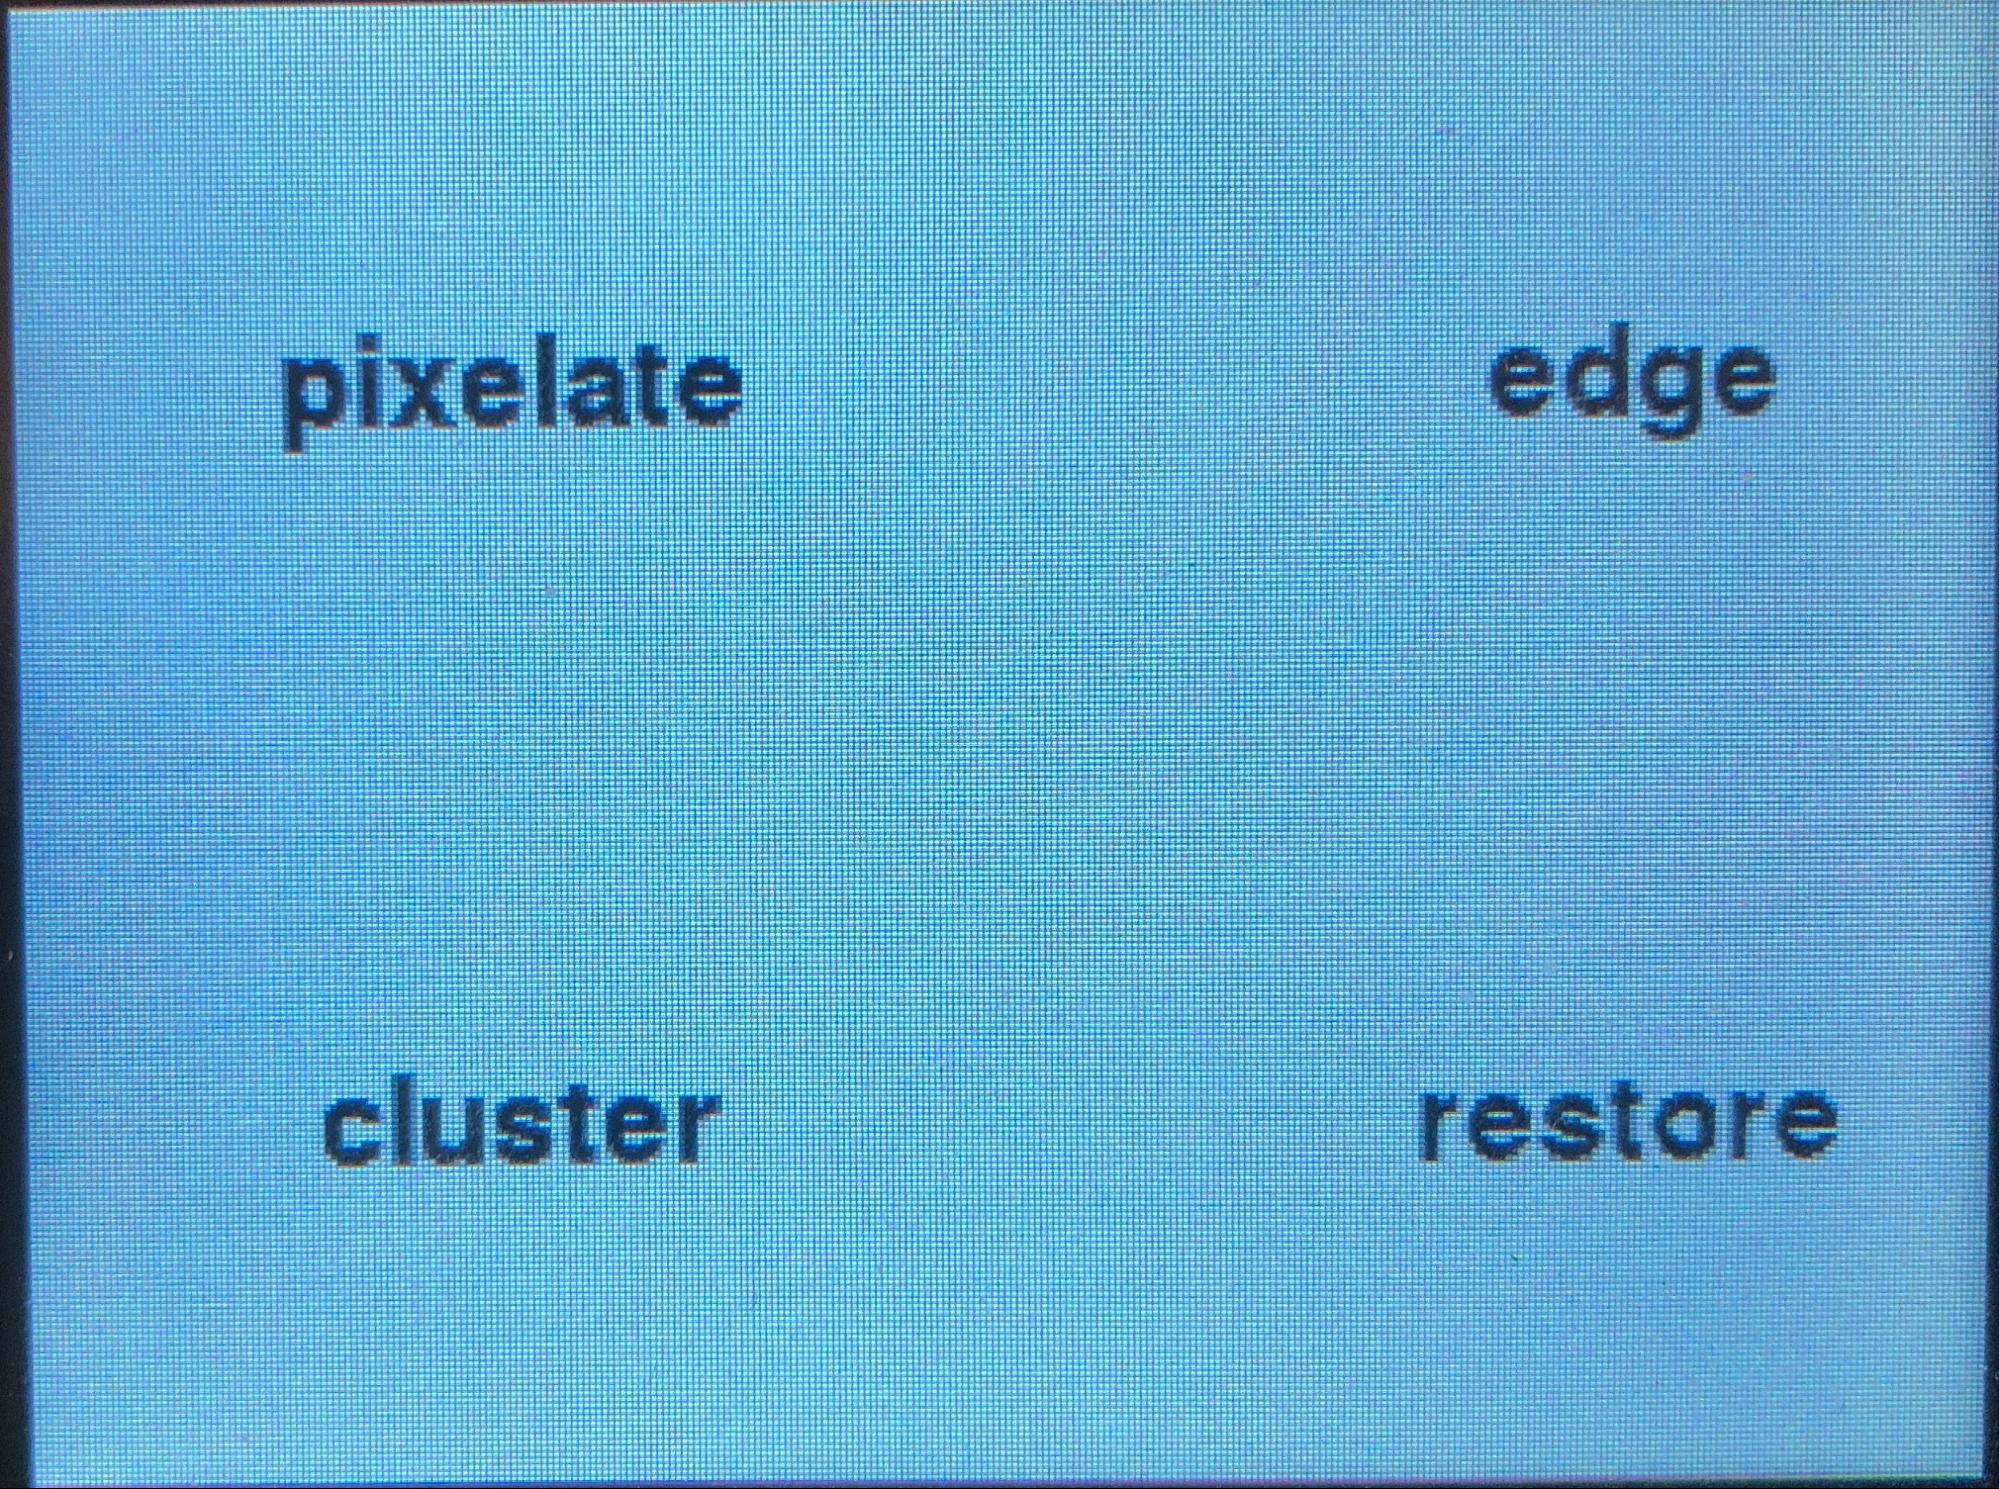
    def blit_effects_menu(self):
        self.screen.fill(WHITE)
        self.blit_text("pixelate", (80, 60))
        self.blit_text("edge", (260, 60))
        self.blit_text("restore", (260, 180))
        self.blit_text("cluster", (80, 180))
        pygame.display.update()

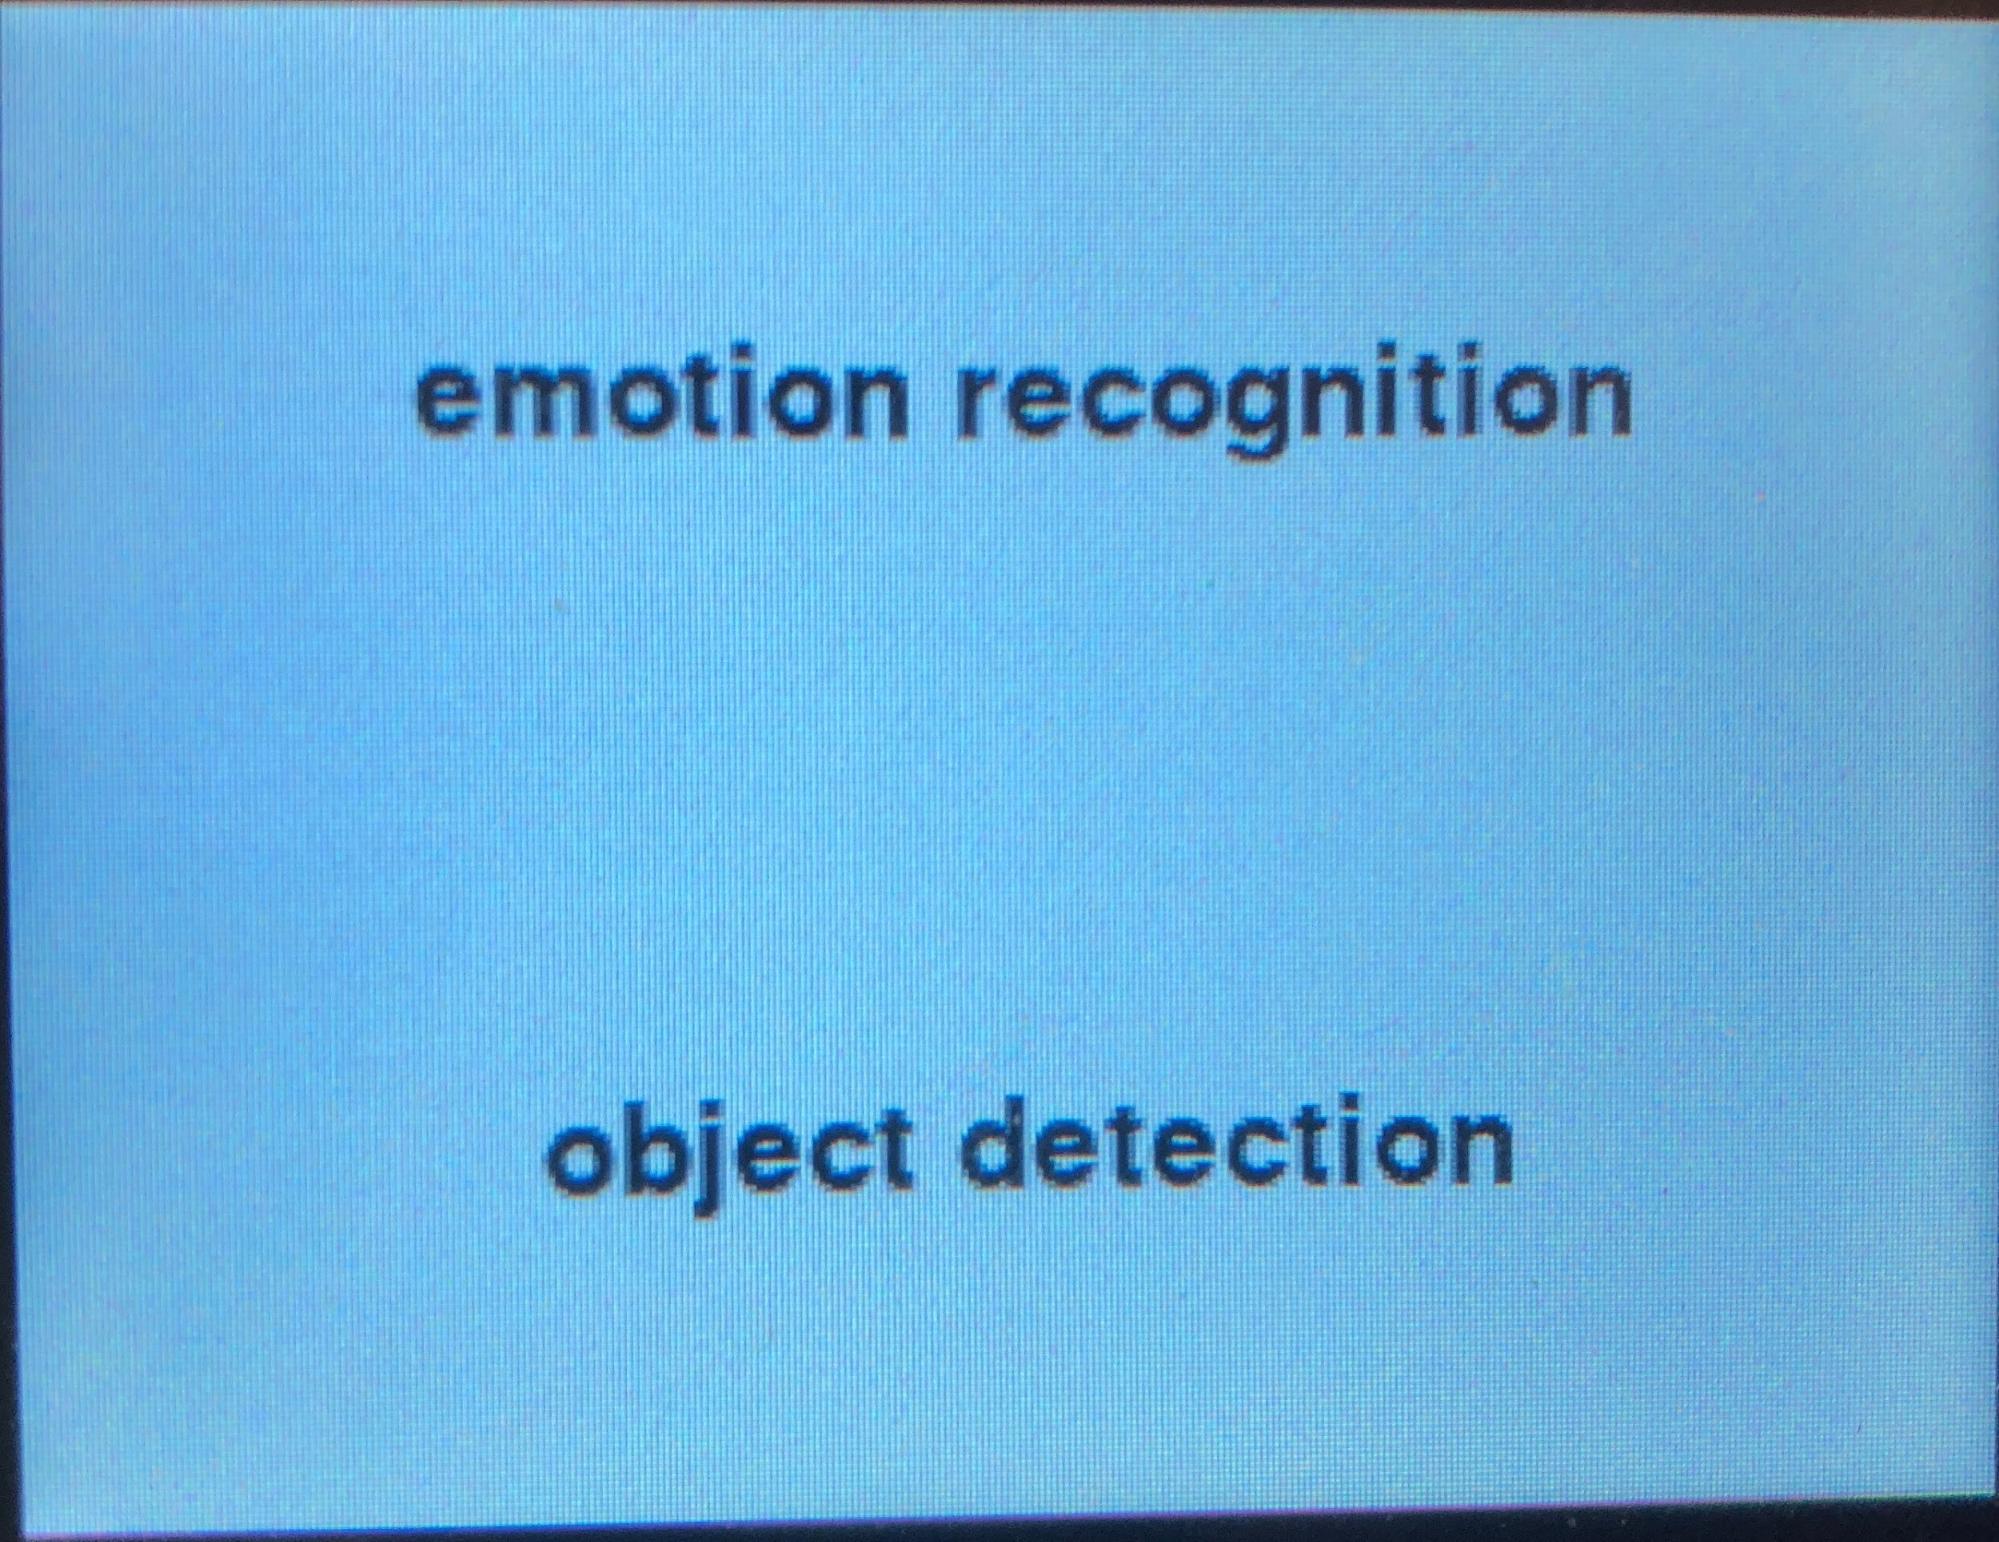
    def blit_ml_menu(self):
        self.screen.fill(WHITE)
        self.blit_text("emotion recognition", (160, 60))
        self.blit_text("object detection", (160, 180))
        pygame.display.update()
    
    def blit_save_menu(self):
        self.screen.fill(WHITE)
        self.blit_text("Save Edited Img?", (160, 20))
        self.blit_text("YES", (160, 60))
        self.blit_text("NO", (160, 180))
        pygame.display.update()
    
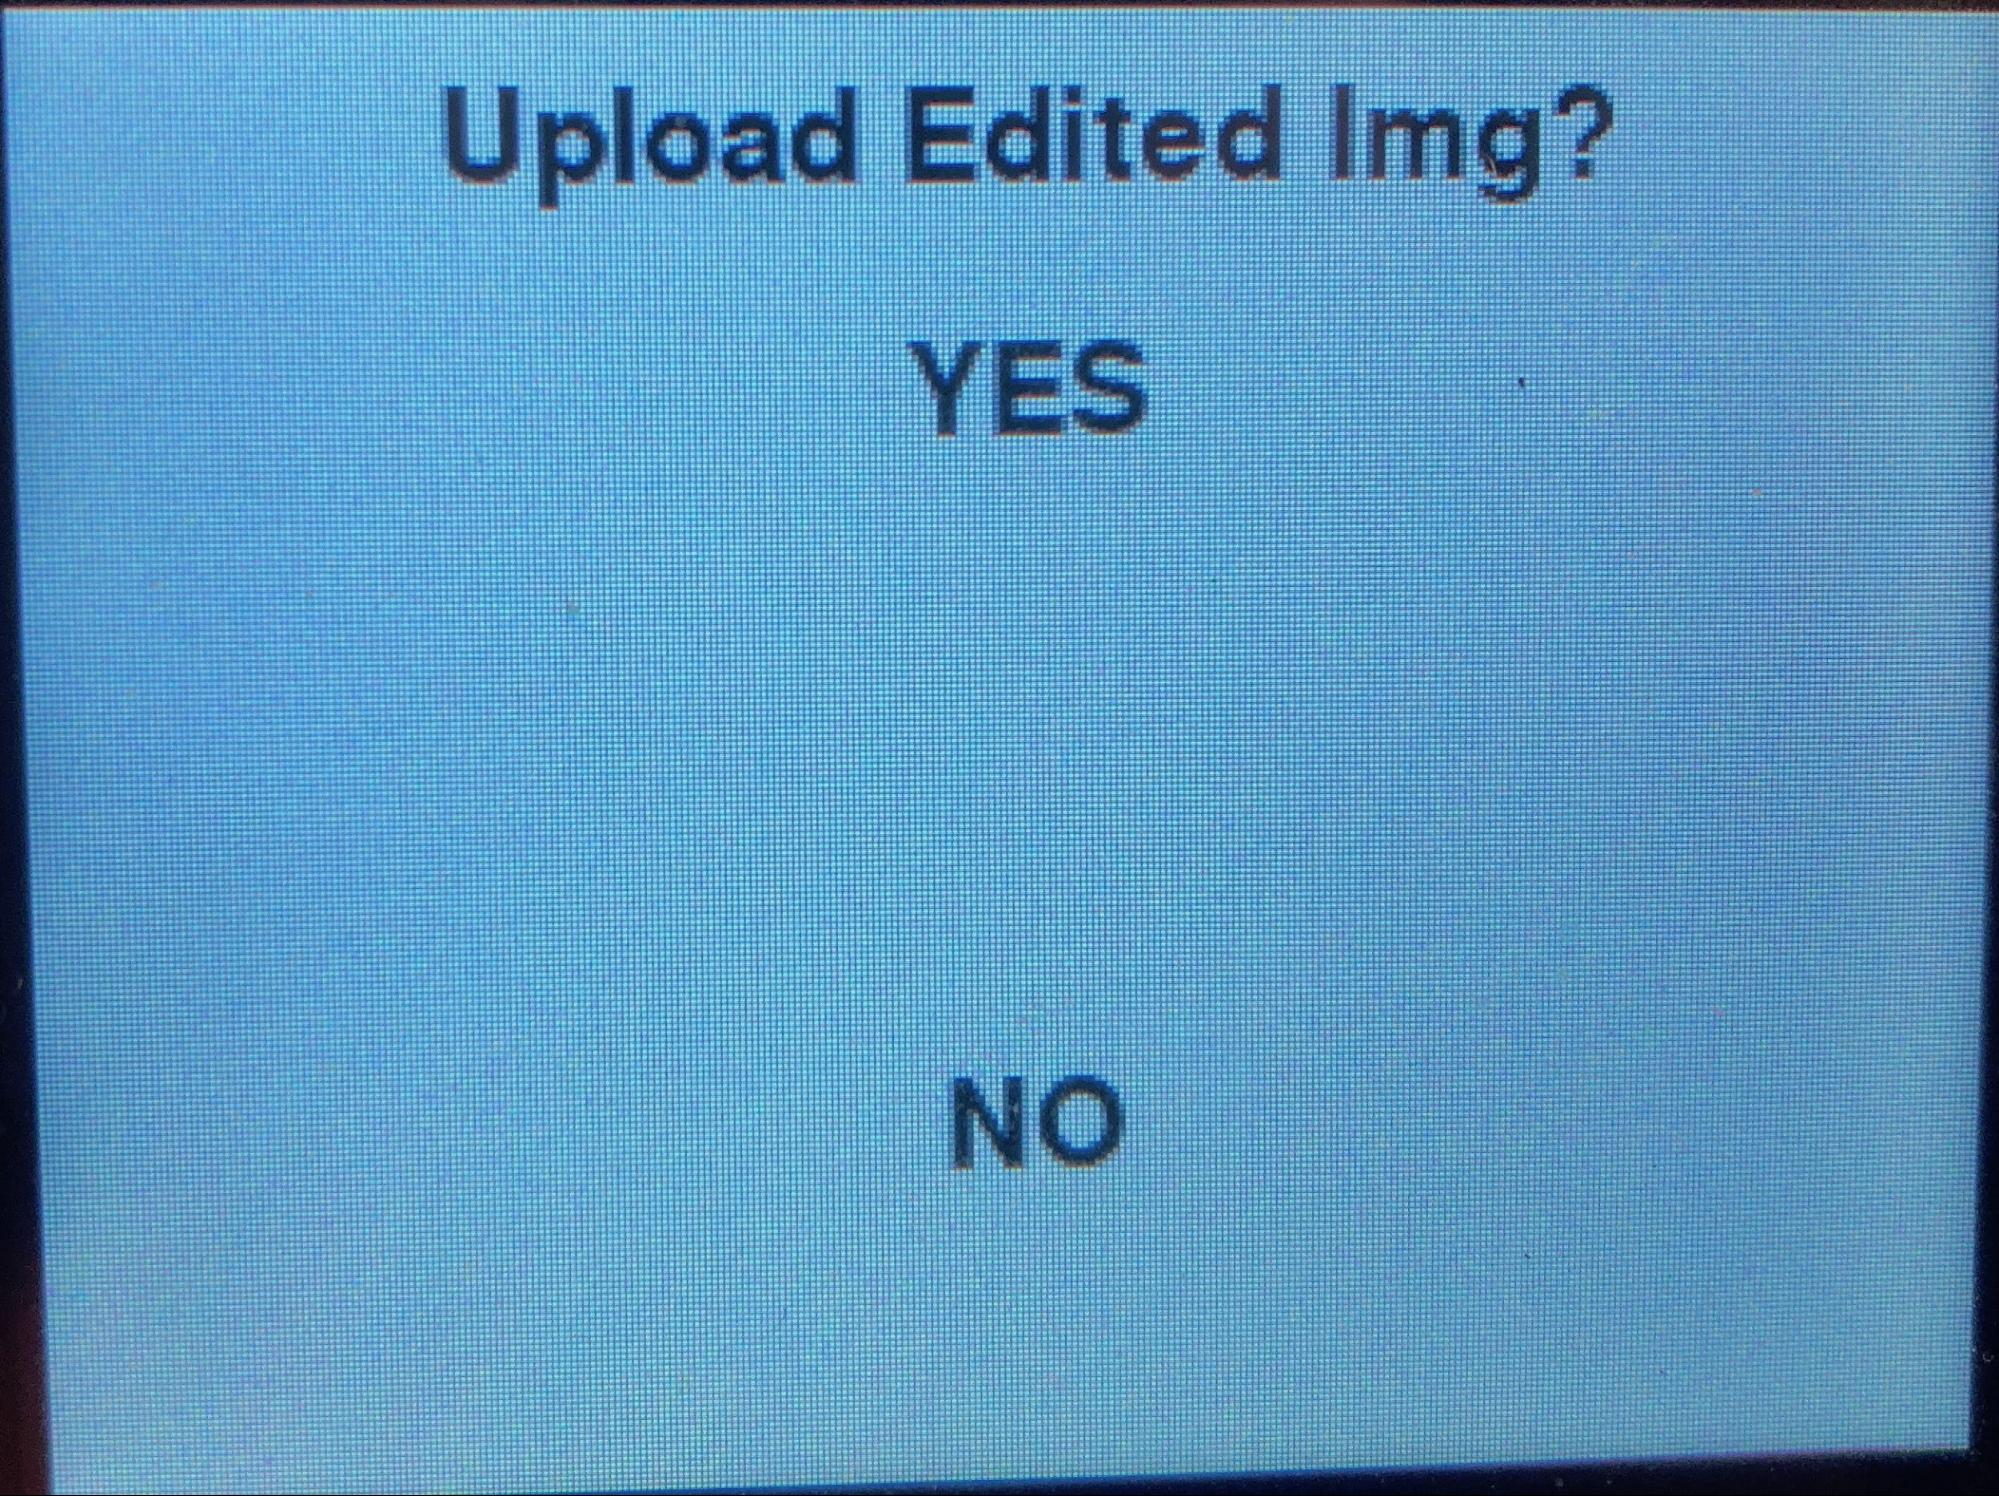
    def blit_upload_menu(self):
        self.screen.fill(WHITE)
        self.blit_text("Upload Edited Img?", (160, 20))
        self.blit_text("YES", (160, 60))
        self.blit_text("NO", (160, 180))
        pygame.display.update()
    
    def blit_adjust_bar(self):
        pygame.draw.rect(screen, WHITE, (0,200, 320, 40))
        self.blit_text("+", (30, 220))
        self.blit_text("-", (280, 220))
        self.blit_text("done", (140, 220))
        pygame.display.update()

    def blit_message(self, message):
        # another form of blit text
        self.screen.fill(WHITE)
        self.blit_text(message, (160, 120))
        pygame.display.update()

    ####### EVENT HANDLING ####################################

    def get_quadrant(self):
        for event in pygame.event.get():
            if event.type == pygame.QUIT:
                sys.exit()
            elif(event.type is MOUSEBUTTONDOWN):
                pos = pygame.mouse.get_pos()
            elif(event.type is MOUSEBUTTONUP):
                pos = pygame.mouse.get_pos()
                x, y = pos
                # quit button (before game)
                if x > 180 and y > 120:
                    return 1
                elif x > 180 and y < 120:
                    return 2
                elif x < 180 and y > 120:
                    return 3
                else:
                    return 4
        return 0

    # handle contrast bar press
    def get_bar_press(self):
        for event in pygame.event.get():
            if event.type == pygame.QUIT:
                sys.exit()
            elif(event.type is MOUSEBUTTONDOWN):
                pos = pygame.mouse.get_pos()
            elif(event.type is MOUSEBUTTONUP):
                pos = pygame.mouse.get_pos()
                x, y = pos
                # quit button (before game)
                if x < 70 and y > 200 :
                    return 1
                elif x > 250 and y > 200:
                    return 2
                elif y > 200 and x in range(50,250):
                    return 3
        return 0

    def handle_filter_menu(self, image):
        quad = self.get_quadrant()
        if quad == 1:
            self.warm_image(image)
            return  False
        elif quad == 2:
            self.sepia(image)
            return  False
        elif quad == 3:
            self.cold_image(image)
            return False
        elif quad == 4:
            self.gray(image)
            return False
        return True
        _
    
    def handle_effects_menu(self, image):
        quad = self.get_quadrant()
        if quad == 4:
            print "8bit"
            self.pixelate(image)
            return  False
        elif quad == 3:
            print "kmeans cluster"
            self.cluster(image)
            return False
        elif quad == 2:
            print "edge"
            self.edge(image)
            return  False
        elif quad == 1:
            print "restore to default.."
            self.restore()
            return False
        return True

    def handle_contrast_bar(self, adjust_method):
        self.blit_adjust_bar()
        option = self.get_bar_press()
        if option == 1:
            print "plus"
            adjust_method(0)
            self.blit_image(self.edited_image,(0,0))
            self.blit_adjust_bar()
            return False
        elif option == 2:
            print "minus"
            adjust_method(1)
            self.blit_image(self.edited_image,(0,0))
            self.blit_adjust_bar()
            return False
        elif option == 3:
            print "submit"
            return True
        return False

    def handle_adjust_menu(self, image):
        quad = self.get_quadrant()
        if quad > 0:
            self.blit_image(image,(0,0))
            self.blit_adjust_bar()

        if quad == 3:
            done_adjusting = False
            while not done_adjusting:
                done_adjusting = self.handle_contrast_bar(self.adjust_brightness)
            return False

        elif quad == 2:
            done_adjusting = False
            while not done_adjusting:
                done_adjusting = self.handle_contrast_bar(self.adjust_blur)
            return False

        elif quad == 4:
            done_adjusting = False
            while not done_adjusting:
                done_adjusting = self.handle_contrast_bar(self.adjust_contrast)
            return False

        elif quad == 1:
            done_adjusting = False
            while not done_adjusting:
                done_adjusting = self.handle_contrast_bar(self.adjust_saturation)
            return False

        return True

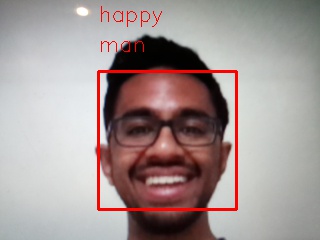
    def handle_ml_menu(self, image):
        quad = self.get_quadrant()
        if quad == 2 or  quad == 4:
            # get emotion image by s3 download
            self.blit_message("loading detection...")
            try:
                print self.tag
                test_download(local_download_path = self.tag+"_emotion.jpg", s3_file_name = "test_folder/" + self.tag + "_emotion.jpg")
                self.edited_image = cv2.imread(self.tag+"_emotion.jpg")
                return False
            except Exception as e:
                # file doesn't exist yet
                code = 404
                current_time = time.time()
                while code == 404 and time.time()-current_time < self.timeout:
                    curr_time = time.time()
                    try:
                        resp = self.make_request(self.tag, "emotion")
                    except Exception as e:
                        print e
                    code = resp.status_code
                    print resp
                    print time.time()-curr_time
                    print "get"
                if code == 404:
                    self.blit_message("prediction failed :(")
                    time.sleep(1)
                else:
                    test_download(local_download_path = self.tag+"_emotion.jpg", s3_file_name = "test_folder/" + self.tag + "_emotion.jpg")
                    self.edited_image = cv2.imread(self.tag+"_emotion.jpg")
                return False
            
        elif quad == 1 or quad == 3:
            # get mask image
            self.blit_message("loading detection...")
            try:
                test_download(local_download_path = self.tag+"_mask.jpg", s3_file_name = "test_folder/" + self.tag + "_mask.jpg")
                self.edited_image = cv2.imread(self.tag+"_mask.jpg")
                self.edited_image = cv2.resize(self.edited_image, (320,240))
                return False
            except Exception as e:
                # file doesn't exist yet
                code = 404
                current_time = time.time()
                while code == 404 and time.time()-current_time < self.timeout:
                    curr_time = time.time()
                    resp = self.make_request(self.tag, "mask")
                    code = resp.status_code
                    print resp
                    print time.time()-curr_time
                    print "get"
                if code == 404:
                    self.blit_message("prediction failed :(")
                    time.sleep(1)
                else:
                    test_download(local_download_path = self.tag+"_mask.jpg", s3_file_name = "test_folder/" + self.tag + "_mask.jpg")
                    self.edited_image = cv2.imread(self.tag+"_mask.jpg")
                    self.edited_image = cv2.resize(self.edited_image, (320,240))
                return False
            
        return True

    def handle_main_menu(self, image):
        # case switch for each of the different quadrants
        quad = self.get_quadrant()
        if quad == 4:
            # open adjustment menu
            self.blit_adjust_menu()
            adjusting = True
            while adjusting:
                adjusting = self.handle_adjust_menu(image)
            return False

        elif quad == 2:
            # open filtering l2 menu
            filtering = True
            self.blit_filter_menu()
            while filtering:
                filtering = self.handle_filter_menu(image)
            return False

        elif quad == 3:
            self.blit_effects_menu()
            handling = True
            while handling:
                handling = self.handle_effects_menu(image)
            return  False

        elif quad == 1:
            self.blit_ml_menu()
            handling = True
            while handling:
                handling = self.handle_ml_menu(image)
            return  False

        return  True
    
    def handle_save_menu(self, image):
        quad = self.get_quadrant()
        if quad == 2 or  quad == 4:
            # save image
            cv2.imwrite(self.filename, image)
            return  False
        elif quad == 1 or quad == 3:
            # do nothing
            return False
        return True
    
    def handle_upload_menu(self, image):
        quad = self.get_quadrant()
        if quad == 2 or  quad == 4:
            # upload image
            print quad
            cv2.imwrite(self.filename, image)
            test_upload(local_filename = self.filename, s3_file_name = "edited/" + self.filename)
            return  False
        elif quad == 1 or quad == 3:
            # do nothing
            print quad
            return False
        return True


####### MAIN LOOP ####################################
w = Wheesh()

############ MAIN LOOP #########################
try:
    while True:
        # free view mode: menu isnt open and we aren't on a frame
        if w.CurrMode() == 0:  # free viewing mode, have ability to take a picture
            try:
                w.capture(w.rgb)
                img = pygame.image.frombuffer(w.rgb, (320, 240), 'RGB')
                w.screen.blit(img, (0, 0))
            except :
                print "exceptioned"
                GPIO.cleanup()
                w.camera.close()
                quit()
                continue
            # take a picture
            if (not GPIO.input(17)):
                w.capture(w.rgb, True, w.n)
                print("picture taken")
                w.EnterState1()

        # captured picture display mode / (show orignal)
        if w.CurrMode() == 1:
            w.blit_image(w.current_image, (0,0)) #either update display right here, or move the blit into the "enter" functions
            if ( not GPIO.input(23) ):
                print "displaying edited image"
                w.EnterState2()

            # only open menu when frozen
            if ( not GPIO.input(22) ):
                print "opening main menu..."
                w.EnterState3()

            if (not GPIO.input(17)):
                # todo: open save menu
                w.blit_save_menu()
                time.sleep(1)
                save_menu_open = True
                # process save menu actions:
                while save_menu_open:
                    save_menu_open = w.handle_save_menu(w.edited_image)
                w.blit_upload_menu()
                upload_menu_open = True
                time.sleep(1)
                # process upload menu actions:
                while upload_menu_open:
                    upload_menu_open = w.handle_upload_menu(w.edited_image)
                w.EnterState0()

        # edited picture display mode (show edited)
        if w.CurrMode() == 2:
            w.blit_image(w.edited_image, (0,0))
            if ( not GPIO.input(23) ):
                print "displaying original image"
                w.EnterState1()

            # only open menu when frozen: can open menu from edited image
            if ( not GPIO.input(22) ):
                print "opening main menu..."
                w.EnterState3()

            if (not GPIO.input(17)):
                # todo: open save menu
                w.blit_save_menu()
                time.sleep(1)
                save_menu_open = True
                # process save menu actions:
                while save_menu_open:
                    save_menu_open = w.handle_save_menu(w.edited_image)
                w.blit_upload_menu()
                upload_menu_open = True
                time.sleep(1)
                # process upload menu actions:
                while upload_menu_open:
                    upload_menu_open = w.handle_upload_menu(w.edited_image)
                w.EnterState0()

        # effects main menu mode
        if w.CurrMode() == 3:
            # if main menu is not open
            w.blit_main_menu()
            main_menu_open = True
            # process menu actions:
            while main_menu_open:
                main_menu_open = w.handle_main_menu(w.edited_image)
            print "done with menu. showing edited image now"
            w.EnterState2()

        # quit at any time
        if ( not GPIO.input(27) ):
            print "Thanks for trying out the SmartCam :)"
            GPIO.cleanup()
            w.camera.close()
            quit()

        pygame.display.update()


except KeyboardInterrupt:
    GPIO.cleanup()
    w.camera.close()
    quit()

Appendix E: Server Code

  1
  2
  3
  4
  5
  6
  7
  8
  9
 10
 11
 12
 13
 14
 15
 16
 17
 18
 19
 20
 21
 22
 23
 24
 25
 26
 27
 28
 29
 30
 31
 32
 33
 34
 35
 36
 37
 38
 39
 40
 41
 42
 43
 44
 45
 46
 47
 48
 49
 50
 51
 52
 53
 54
 55
 56
 57
 58
 59
 60
 61
 62
 63
 64
 65
 66
 67
 68
 69
 70
 71
 72
 73
 74
 75
 76
 77
 78
 79
 80
 81
 82
 83
 84
 85
 86
 87
 88
 89
 90
 91
 92
 93
 94
 95
 96
 97
 98
 99
100
101
102
103
104
105
106
107
108
109
110
111
112
113
114
115
116
117
118
119
120
121
122
123
124
125
126
127
128
129
130
131
132
133
134
135
136
137
138
139
140
141
142
143
144
145
146
147
148
149
150
151
152
153
154
155
156
157
158
159
160
161
162
163
164
165
166
167
168
169
170
171
172
173
174
175
176
177
178
179
180
181
182
183
184
185
186
187
188
189
190
191
192
193
194
195
196
197
198
199
200
201
202
203
204
205
206
207
208
209
210
211
212
from matplotlib import pyplot as plt
from gluoncv import model_zoo, data, utils
import logging
import boto3
from keras.models import load_model
import numpy as np
from flask import Flask
import cv2
import time
from face_classification.src.image_emotion_gender_demo_modified import demo_emotion

app = Flask(__name__)

ACCESS_KEY_ID = ''
ACCESS_SECRET_KEY = ''
BUCKET_NAME = 'raspi-smart-camera'

jpg = ".jpg"

# Run MaskRCNN with a pretrained model
def run_mask_model(image_str):
    net = model_zoo.get_model('mask_rcnn_resnet50_v1b_coco', pretrained=True)
    print("downloaded the model")
    print("Starting Inference")

    im_fname = "images/" + image_str + jpg
    x, orig_img = data.transforms.presets.rcnn.load_test(im_fname)
    ids, scores, bboxes, masks = [xx[0].asnumpy() for xx in net(x)]
    width, height = orig_img.shape[1], orig_img.shape[0]
    masks, _ = utils.viz.expand_mask(masks, bboxes, (width, height), scores)
    orig_img = utils.viz.plot_mask(orig_img, masks)

    print("finished mask classification, making plot")

    fig = plt.figure(figsize=(10, 10), frameon=False)
    ax = fig.add_subplot(1, 1, 1)
    ax = utils.viz.plot_bbox(orig_img, bboxes, scores, ids,
                            class_names=net.classes, ax=ax)
    print("Plotted the mask model output")
    # fig.set_size_inches(w,h)

    # plot final image without axis
    ax.set_axis_off()
    # fig.add_axes(ax)
    # ax.imshow(orig_img, aspect='auto')

    plt.savefig("images/" + image_str + "_mask" + jpg, bbox_inches='tight', pad_inches=0)
    print("End of MaskRCNN")

# Run Emotion Detection with a pretrained model (located in a different directory)
def run_emotion_model(image_str):
    demo_emotion(image_str)

# Run both models
def classify(image_str):
    print("Starting Classify")
    start = time.time()
    run_mask_model(image_str)
    end1 = time.time()
    print("Execution time for emotion: " + str(end1-start))
    run_emotion_model(image_str)
    end2 = time.time()
    print("Execution time for mask: " + str(end2-end1))

def test_download(image_str):
    s3 = boto3.resource(
        's3',
        aws_access_key_id=ACCESS_KEY_ID,
        aws_secret_access_key=ACCESS_SECRET_KEY,
    )

    s3_file_name = "upload_folder/" + str(image_str)
    local_download_path = "images/" + image_str #include the file name

    # Image download
    s3.Bucket(BUCKET_NAME).download_file(s3_file_name, local_download_path); # Change the second part
    # This is where you want to download it too.
    # I believe the semicolon is there on purpose
    print ("Download Done")

def download(image_str):
    s3 = boto3.resource(
        's3',
        aws_access_key_id=ACCESS_KEY_ID,
        aws_secret_access_key=ACCESS_SECRET_KEY,
    )

    s3_file_name = "upload_folder/" + str(image_str) + jpg
    local_download_path = "images/" + image_str + jpg #include the file name

    try:
    # Image download
        s3.Bucket(BUCKET_NAME).download_file(s3_file_name, local_download_path); # Change the second part
        logging.info("Successfully uploaded file {} to S3 bucket {}/{}.".format(local_download_path, BUCKET_NAME, s3_file_name))
    except Exception as e:
        print("Error: could not upload file:" + local_download_path + " to s3:" + str(e))

def upload(image_str):
    local_filename1 = "images/" + image_str + "_mask.jpg"
    local_filename2 = "images/" + image_str + "_emotion.jpg"

    s3_filename1 = image_str + "_mask.jpg"
    s3_filename2 = image_str + "_emotion.jpg"

    #note the s3 filename/path is set differently and has to be listed manually

    data1 = open(local_filename1, 'rb')
    data2 = open(local_filename2, 'rb')

    s3 = boto3.resource(
        's3',
        aws_access_key_id=ACCESS_KEY_ID,
        aws_secret_access_key=ACCESS_SECRET_KEY,
    )
    try:
        s3.Bucket(BUCKET_NAME).put_object(Key="test_folder/" + s3_filename1, Body=data1)
        logging.info("Successfully uploaded file {} to S3 bucket {}/{}.".format(local_filename1, BUCKET_NAME, s3_filename1))
    except Exception as e:
        print("Error: could not upload file:" + local_filename1 + " to s3:" + str(e))

    try:
        s3.Bucket(BUCKET_NAME).put_object(Key="test_folder/" + s3_filename2, Body=data2)
        logging.info("Successfully uploaded file {} to S3 bucket {}/{}.".format(local_filename2, BUCKET_NAME, s3_filename2))
    except Exception as e:
        print("Error: could not upload file:" + local_filename2 + " to s3:" + str(e))

    print ("Upload Done")

def upload_mask(image_str):
    local_filename1 = "images/" + image_str + "_mask.jpg"

    s3_filename1 = image_str + "_mask.jpg"

    #note the s3 filename/path is set differently and has to be listed manually

    data1 = open(local_filename1, 'rb')

    s3 = boto3.resource(
        's3',
        aws_access_key_id=ACCESS_KEY_ID,
        aws_secret_access_key=ACCESS_SECRET_KEY,
    )
    try:
        s3.Bucket(BUCKET_NAME).put_object(Key="test_folder/" + s3_filename1, Body=data1)
        logging.info("Successfully uploaded file {} to S3 bucket {}/{}.".format(local_filename1, BUCKET_NAME, s3_filename1))
    except Exception as e:
        print("Error: could not upload file:" + local_filename1 + " to s3:" + str(e))

    print ("Upload Mask Done: " + image_str)

def upload_emotion(image_str):
    local_filename2 = "images/" + image_str + "_emotion.jpg"

    s3_filename2 = image_str + "_emotion.jpg"

    #note the s3 filename/path is set differently and has to be listed manually

    data2 = open(local_filename2, 'rb')

    s3 = boto3.resource(
        's3',
        aws_access_key_id=ACCESS_KEY_ID,
        aws_secret_access_key=ACCESS_SECRET_KEY,
    )
    try:
        s3.Bucket(BUCKET_NAME).put_object(Key="test_folder/" + s3_filename2, Body=data2)
        logging.info("Successfully uploaded file {} to S3 bucket {}/{}.".format(local_filename2, BUCKET_NAME, s3_filename2))
    except Exception as e:
        print("Error: could not upload file:" + local_filename2 + " to s3:" + str(e))

    print ("Upload Emotion Done: " + image_str)

#################
### Endpoints ###
#################

@app.route("/")
def hello():
    return "<h1 style='color:blue'>Welcome to raspi-smart-camera!</h1><h2>Endpoints:</h2><h3>classify, emotion, mask</h3>"

@app.route('/classify/<input_str>')
def classify_image(input_str):
    # don't put .jpg in the name, i'll add it myself
    download(input_str) # downloads the original image from the upload folder in the bucket
    classify(input_str) # run the image through both models and save them
    upload(input_str) # upload the completed images into the processed folder _emotion.jpg and _mask.jpg
    return "classified and uploaded image: " + str(input_str)

@app.route('/download/<input_str>')
def download_image(input_str):
    print("downloading image: " + input_str)
    test_download(input_str)
    return "tried to download image: " + str(input_str)

@app.route('/emotion/<input_str>')
def emotion(input_str):
    print("GET Request for /emotion on image: " + input_str)
    download(input_str)
    run_emotion_model(input_str)
    upload_emotion(input_str)
    return ("Finished Executing Emotion")

@app.route('/mask/<input_str>')
def mask(input_str):
    print("GET Request for /mask on image: " + input_str)
    download(input_str)
    run_mask_model(input_str)
    upload_mask(input_str)
    return "Finished Executing Mask"

if __name__ == '__main__':
    app.run(host='0.0.0.0')