Code Appendix
The only files necessary to run the project are:
coopyServer.py, the server/base station code, and
coopyBot.py, the robot/image processing code
Please note, the devices must still be manually paired for bluetooth.
coopyBot.py
###############################################################################
# #
# original file: 4_multi_core.py #
# #
# authors: Andre Heil - avh34 #
# Jingyao Ren - jr386 #
# #
# date: December 1st 2015 #
# #
# edited by: Michael Rivera - mr858 #
# Henri Clarke - hxc2 #
# #
# edit date: May 9th 2019 #
# #
# original brief: This file uses multicore processing to track your face. #
# This is similar to 1_single_core.py except now we utilize #
# all four cores to create a more fluid video. #
# #
###############################################################################
### Imports ###################################################################
from picamera.array import PiRGBArray
from picamera import PiCamera
from functools import partial
import socket
import sys
import cv2
import os
import time
import numpy as np
from bluedot.btcomm import BluetoothClient
from signal import pause
import RPi.GPIO as GPIO
### Setup #####################################################################
resX = 320
resY = 240
cx = resX / 2
cy = resY / 2
# Setup the camera
camera = PiCamera()
camera.resolution = ( resX, resY )
camera.framerate = 60
# Use this as our output
rawCapture = PiRGBArray( camera, size=( resX, resY ) )
# The face cascade file to be used
face_cascade = cv2.CascadeClassifier('/home/pi/opencv-2.4.9/data/lbpcascades/lbpcascade_frontalface.xml')
t_start = time.time()
fps = 0
mode = -1
ipServer = None
# Bluetooth
def data_received(data):
global mode
global ipServer
global pl
global pr
if data == "d" and mode == 5: # Transition from wait state to writing
mode = 1
elif data == 'h': # Wiggle
mode = 2
elif data == 'r': # Drive state
mode = 3
elif data == 'c': # Write state
mode = 1
elif data == 'b': # Home state
mode = 0
pl.ChangeDutyCycle(0)
pr.ChangeDutyCycle(0)
elif data == 'stop': # Stop driving
pl.ChangeDutyCycle(0)
pr.ChangeDutyCycle(0)
elif mode == 3: # Compute direction of driving
deg = float(data)
uptimer = 0.0
uptimel = 0.0
if deg > 90:
uptimer = 1.3
uptimel = 1.7 - .4 * ((float(deg) - 90) / 90)
print('q2: ' + str(uptimel) +', ' + str(uptimer))
elif deg > 0:
uptimel = 1.7
uptimer = 1.7 - .4 * ((float(deg) ) / 90)
print('q1: ' + str(uptimel) +', ' + str(uptimer))
elif deg > - 90:
uptimer = 1.7
uptimel = 1.3 + .4 * ((float(deg) + 90) / 90)
print('q4: ' + str(uptimel) +', ' + str(uptimer))
else:
uptimel = 1.3
uptimer = 1.3 + .4 * ((float(deg) + 180) / 90)
print('q3: ' + str(uptimel) +', ' + str(uptimer))
pl.ChangeDutyCycle(dcOf(uptimel))
pl.ChangeFrequency(freqOf(uptimel))
pr.ChangeDutyCycle(dcOf(uptimer))
pr.ChangeFrequency(freqOf(uptimer))
elif mode == -1: # Obtain ip for socket
ipServer = data
mode = 0
print(data)
# Polling Bluetooth connection
conn = True
client = None
while(conn):
conn = False
try:
client = BluetoothClient("B8:27:EB:9A:90:25",data_received)
except:
conn = True
### Helper Functions ##########################################################
YOLK = 250, 165, 0
LIGHTBLUE = 160, 200, 255
# Obtain faces information from classifier
def get_faces(img):
gray = cv2.cvtColor( img, cv2.COLOR_BGR2GRAY )
faces = face_cascade.detectMultiScale( gray )
return faces
# Draw face information onto image and rotate servos
def draw_frame(img, faces):
global fps
global time_t
global pr
global pl
global mode
wx = 0
wc = 0
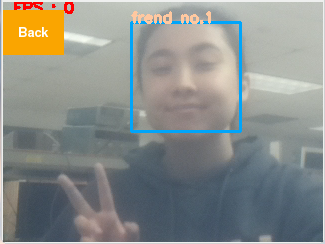
# Draw a rectangle around every face
for ( x, y, w, h ) in faces:
cv2.rectangle( img, ( x, y ),( x + w, y + h ), YOLK, 2 )
cv2.putText(img, "frend no." + str( len( faces ) ), ( x, y ), cv2.FONT_HERSHEY_SIMPLEX, 0.5, LIGHTBLUE, 2 )
wx += x + x + w
wc += 2
if mode == 0 or mode == 1 or mode == 5:
if wc == 0:
pl.ChangeDutyCycle(0)
pr.ChangeDutyCycle(0)
else:
upT = 1.5 + .04 * ((float(wx/wc) - 160)/(160))
updateServos(upT)
# Calculate and show the FPS
fps = fps + 1
sfps = fps / (time.time() - t_start)
cv2.putText(img, "FPS : " + str( int( sfps ) ), ( 10, 10 ), cv2.FONT_HERSHEY_SIMPLEX, 0.5, ( 0, 0, 255 ), 2 )
return img
### Servo Setup ##########################################################
GPIO.setmode(GPIO.BCM)
GPIO.setup(12,GPIO.OUT)
GPIO.setup(26,GPIO.OUT)
GPIO.setup(5,GPIO.IN,pull_up_down=GPIO.PUD_UP)
isRunning = True
def myButton(channel):
global isRunning
isRunning = False
GPIO.add_event_detect(5,GPIO.FALLING,callback=myButton,bouncetime=300)
pl = GPIO.PWM(12,46.5)
pr = GPIO.PWM(26,46.5)
pr.start(0)
pl.start(0)
def freqOf(uptime):
return (1.0 / ((20+uptime) * .001))
def dcOf(uptime):
return (100 * uptime / (20 + uptime))
def updateServos(uptime):
pl.ChangeDutyCycle(dcOf(uptime))
pl.ChangeFrequency(freqOf(uptime))
pr.ChangeDutyCycle(dcOf(uptime))
pr.ChangeFrequency(freqOf(uptime))
### Main ######################################################################
shift = -1
for frame in camera.capture_continuous( rawCapture, format="bgr", use_video_port=True ):
image = frame.array
faces = get_faces(image)
dframe = draw_frame(image, faces)
rawCapture.truncate( 0 )
if not isRunning:
break
if mode == 1: # Write state
client.send("w")
s = socket.socket()
cv2.imwrite("test.png",dframe) # Save image locally
s.connect((ipServer,9999))
f = open('test.png','rb') # Read local image to socket
l = f.read(1024)
while(l):
s.send(l)
l = f.read(1024)
f.close()
s.close()
mode = 5 # Switch to wait state
print(dframe[0][0])
if mode == 2: # Wiggle
updateServos(1.5 + shift * .2)
shift = shift * -1
GPIO.cleanup()
coopyServer.py
# Henri Clarke (hxc2), Michael Rivera (mr858)
# Wednesday lab
# Final Project
import pygame
from pygame.locals import * #for event MOUSE variables
import os
import RPi.GPIO as GPIO
import time
import random
import socket
import sys
import re
from subprocess import check_output
import math
import cv2
from bluedot.btcomm import BluetoothServer
from signal import pause
# ENVIRONMENT VARIABLES: uncomment for piTFT
#os.putenv('SDL_VIDEODRIVER', 'fbcon')
#os.putenv('SDL_FBDEV', '/dev/fb1')
#os.putenv('SDL_MOUSEDRV', 'TSLIB')
#os.putenv('SDL_MOUSEDEV', '/dev/input/touchscreen')
# GPIO SETUP
GPIO.setmode(GPIO.BCM)
GPIO.setup(17, GPIO.IN, pull_up_down=GPIO.PUD_UP)
isRunning = True
# GPIO / BUTTONS
def myButton(channel):
global isRunning
isRunning = False
GPIO.add_event_detect(17, GPIO.FALLING, callback=myButton, bouncetime = 300)
# PYGAME SETUP
pygame.init()
pygame.mouse.set_visible(True) # set false when on piTFT
WHITE = 255, 255, 255
BLACK = 0, 0, 0
RED = 255, 0, 0
YOLK = 250, 165, 0
GREEN = 0, 255, 0
BLUE = 0, 0, 255
LIGHTBLUE = 160, 200, 255
rgb = [RED, GREEN, BLUE]
screen = pygame.display.set_mode((320, 240))
center_button_loc = (160,60)
screen_center = 160, 120
my_font = pygame.font.Font(None, 20)
home_buttons = {'Friend':(80, 60), 'Camera':(160,60), 'Drive':(240,60)}
start = time.time()
i = 0
j = 0
state = 0
# CLOCK SETUP
clockvar = pygame.time.Clock() #initialization of clock
global framerate
framerate = 60
size = width, height = 320, 240
# IMAGE SETUP
chikin = pygame.image.load("../thechikin.png")
chikinrect = chikin.get_rect()
chikinrect = chikinrect.move([120,130])
surf = None
buff = None
# Bluetooth and sockets
s = socket.socket()
s.bind(('0.0.0.0',9999))
s.listen(1)
def data_received(data):
global s
global surf
global buff
global state
if data == "w": # Upon receiving a new image
print(data)
sc, address = s.accept() # Open socket
print(address)
f=open('test.png','wb') # Write file locally
l=sc.recv(1024)
while(l):
f.write(l)
l = sc.recv(1024)
f.close()
sc.close()
surf = pygame.image.load("test.png") # Load local image for piTFT
buff = surf.get_rect()
buff.left = 0
buff.top = 0
if state == 2: # If in camera display mode
server.send('d')
# When client connects, send ip
def when_client_connects():
temp = check_output(['hostname','-I'])
server.send(re.sub('\n','',temp))
server = BluetoothServer(data_received_callback=data_received,when_client_connects=when_client_connects)
#WHILE PROGRAM IS RUNNING
while isRunning:
clockvar.tick(framerate) #manual framerate control so we can edit it
screen.fill(LIGHTBLUE) #erase the work space
if state == 0 or state == 1:
screen.blit(chikin, chikinrect)
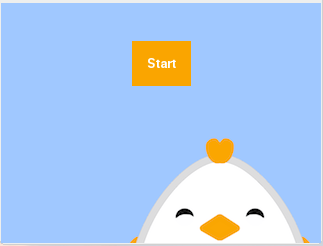
if state == 0: #start screen
# render start button
text_surface = my_font.render("Start", True, WHITE)
rect = text_surface.get_rect(center=center_button_loc)
bkgd_rect = pygame.draw.rect(screen, YOLK, (rect.left-15, rect.top-15, rect.width+30, rect.height+30))
screen.blit(text_surface,rect)
for event in pygame.event.get(): # event handling
if((event.type is MOUSEBUTTONDOWN)):
pos = pygame.mouse.get_pos()
i,j = pos
print ("touch at "+ str((i,j)))
elif(event.type is MOUSEBUTTONUP):
pos = pygame.mouse.get_pos()
x,y = pos
if y > 35 and y < 75:
if x > 130 and x < 190:
print "start"
state = 1
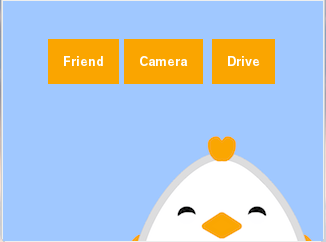
if state == 1: # coopy is ON
for my_text, text_pos in home_buttons.items(): # home button rendering
text_surface = my_font.render(my_text, True, WHITE)
rect = text_surface.get_rect(center=text_pos)
bkgd_rect = pygame.draw.rect(screen, YOLK, (rect.left-15, rect.top-15, rect.width+30, rect.height+30))
screen.blit(text_surface,rect)
for event in pygame.event.get(): # event handling
if((event.type is MOUSEBUTTONDOWN)):
pos = pygame.mouse.get_pos()
i,j = pos
state = 1
print ("touch at "+ str((i,j)))
elif(event.type is MOUSEBUTTONUP):
pos = pygame.mouse.get_pos()
x,y = pos
if y > 35 and y < 75: #{'Friend':(80, 60), 'Camera':(160,60), 'Drive':(240,60)}
if x > 50 and x < 110: # friend
print "heart"
server.send('h')
elif x > 130 and x < 190: # camera
print "camera"
server.send('c')
state = 2
elif x > 210 and x < 270: # drive
print "drive"
server.send('r')
state = 3
if state == 2: # Camera display mode
if surf != None:
screen.blit(surf,buff) # Load new image to screen
text_surface = my_font.render("Back", True, WHITE)
rect = text_surface.get_rect(center=(30,30))
bkgd_rect = pygame.draw.rect(screen, YOLK, (rect.left-15, rect.top-15, rect.width+30, rect.height+30))
screen.blit(text_surface,rect)
for event in pygame.event.get(): # event handling
if((event.type is MOUSEBUTTONDOWN)):
pos = pygame.mouse.get_pos()
i,j = pos
print ("touch at "+ str((i,j)))
elif(event.type is MOUSEBUTTONUP):
pos = pygame.mouse.get_pos()
x,y = pos
if y > 5 and y < 50:
if x > 0 and x < 60:
print "back"
server.send('b')
state = 1
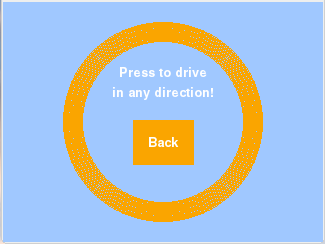
if state == 3: # DRIVE MODE
# Graphics
pygame.draw.circle(screen, YOLK, screen_center, 100, 20)
title_top_surface = my_font.render("Press to drive", True, WHITE)
title_top_rect = title_top_surface.get_rect(center=(160, 70))
title_bottom_surface = my_font.render("in any direction!", True, WHITE)
title_bottom_rect = title_bottom_surface.get_rect(center = (160, 90))
text_surface = my_font.render("Back", True, WHITE)
rect = text_surface.get_rect(center=(160,140))
bkgd_rect = pygame.draw.rect(screen, YOLK, (rect.left-15, rect.top-15, rect.width+30, rect.height+30))
screen.blit(text_surface,rect)
screen.blit(title_top_surface, title_top_rect)
screen.blit(title_bottom_surface, title_bottom_rect)
for event in pygame.event.get(): # event handling
if((event.type is MOUSEBUTTONDOWN)):
pos = pygame.mouse.get_pos()
i,j = pos
deg = math.atan2(-(j-120),i-160) / math.pi*180
server.send(str(deg)) # send the angular information of finger press
elif(event.type is MOUSEBUTTONUP):
pos = pygame.mouse.get_pos()
x,y = pos
if y > 95 and y < 145:
if x > 130 and x < 190:
print "back"
server.send('b')
state = 1
else:
server.send('stop') # lifted finger
pygame.display.flip()
s.close()