Project Objective & Introduction

One day when Yuchong and Jie were discussing on what they planned to do for their ECE 5725 project, Jie's received a email from Cornell Alert reporting a home burglary where the criminal sneaked into a house. An idea popped in their minds: How about building a home security sytem to protect their homes and loved ones in it?


This system should be powerful enough so that Jie and Yuchong could watch the real time CCTV stream video and audio of their front doors from anywhere. Also, the system should be smart enough to automatically recognize their faces and open the doors while deny the faces of intruders. Even more, this system should enable remote control so that even if Yuchong forgets bringing the key, Jie still could open the door remotely while sitting at Phillips hall.
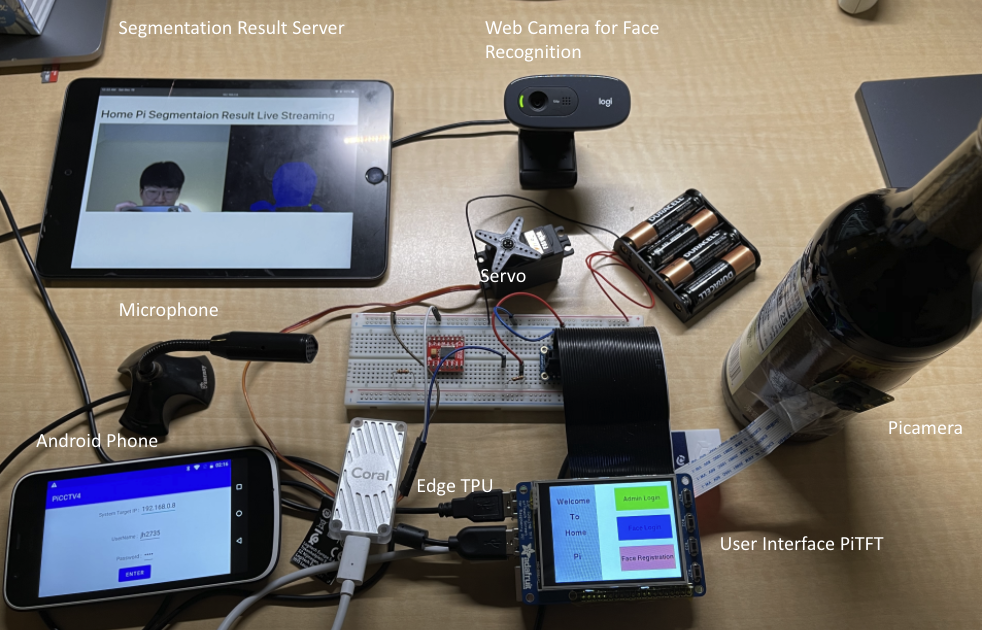
Home Pi, our project, is a security system desgined for protecting the front doors of our home. This system streams live video and audio CCTV based on Picamera and Microphone to a webserver, which an android phone could access to. This system provides fast face recognition and real-time semantic segmentation based on Tensorflow and OpenCV powered by Coral TPU. An Android application should be able to access the system remotely.

Design


Home Pi is a RPi embedded system apparatus consisting of a user interface, a android phone for remote control, a CCTV and its streaming server, a TPU and a webcam for smooth face recognition and a servo module for door control. Our system enable users to monitor the CCTV remotely via capturing video and audio through a Pi Cam and a microphone. The image and audio could be transmitted to a anrdoid phone, which could remotely control the system, via WiFi. Also, an extremely smooth face recogntion module powered by the powerful USE edge TPU enable face recognition and face registration.


CCTV Server

M

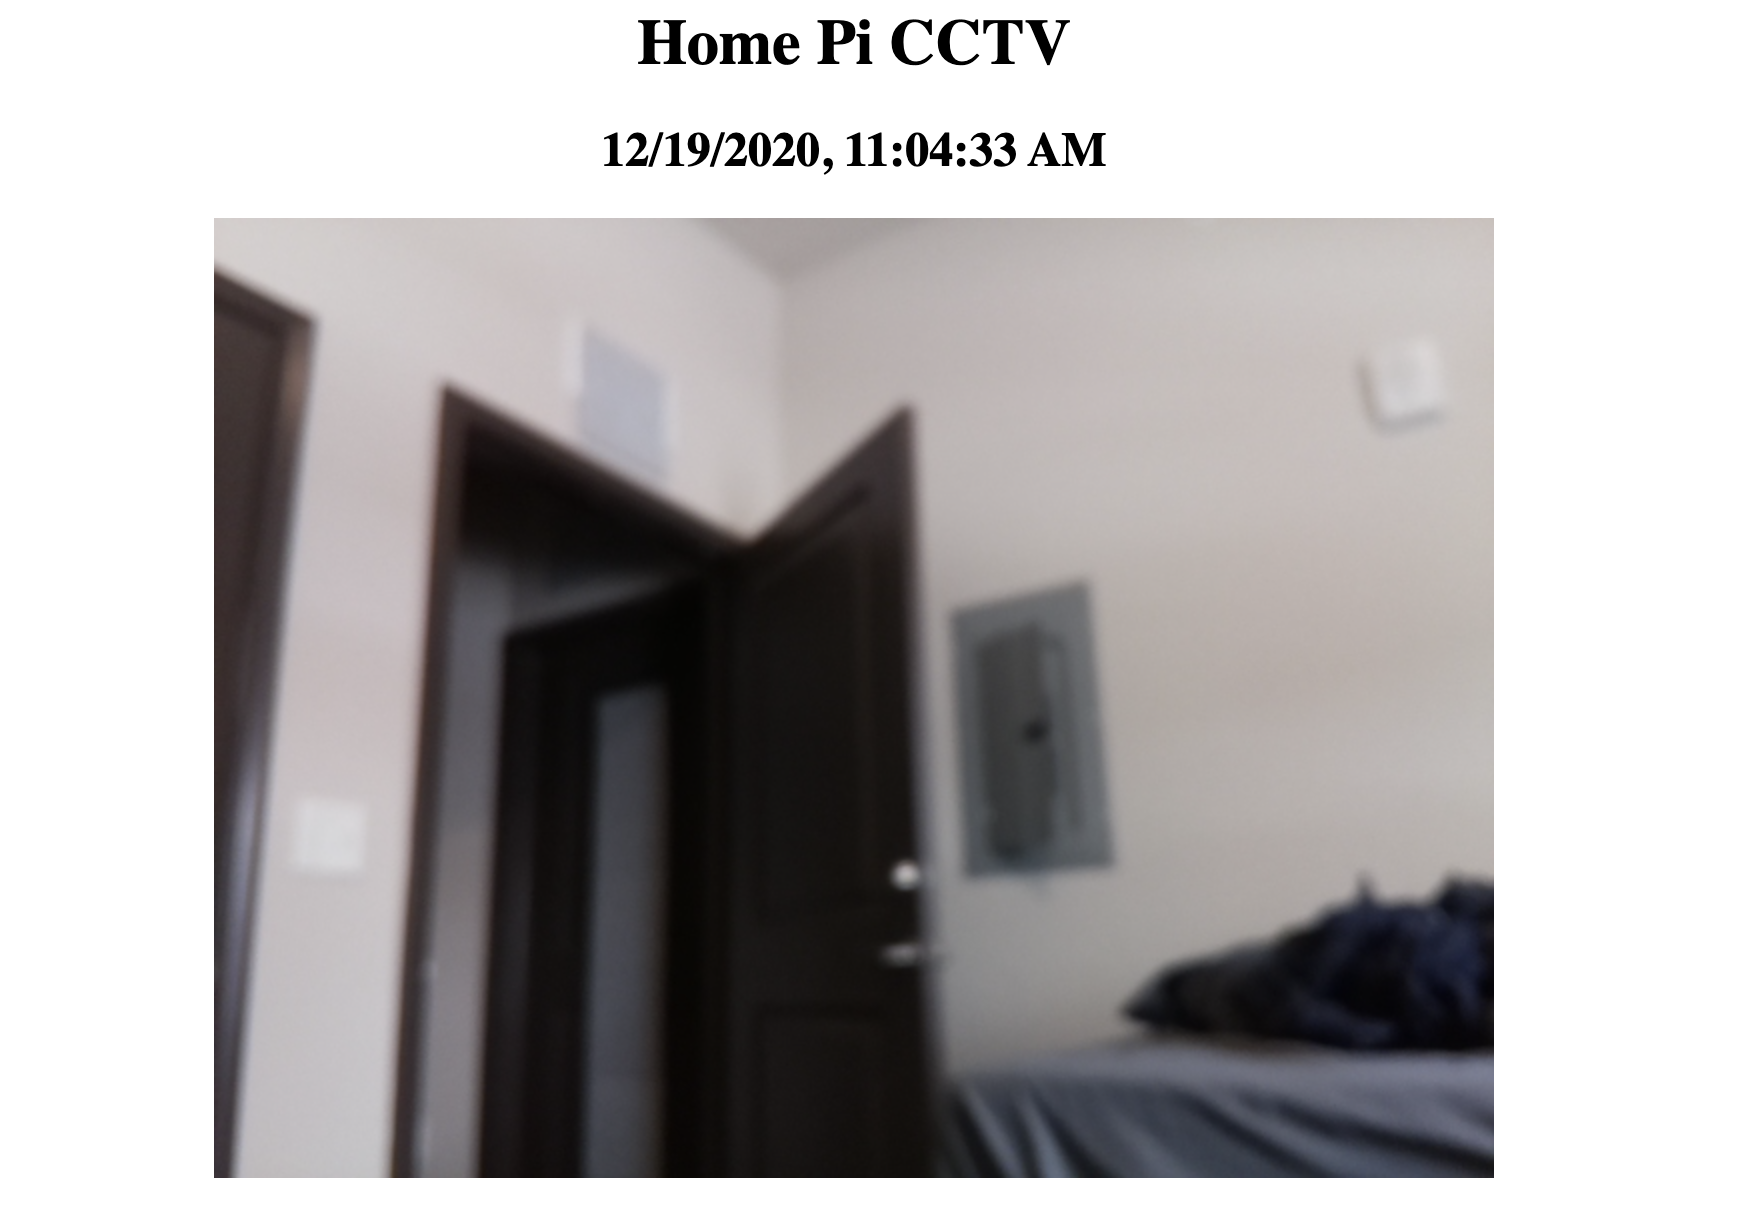
Our project has a CCTV server streams the live video and audio. The video is captured via a Picamera and the audio is collected via a microphone. The video and audio should be accessed via web browser and android application allowing users to access it conveniently.

TPU & Face Recognition

V

To enable smooth user face login and fast face recognition, in our project, a USB Edge TPU, a tensor processing unit capable of accelerating machine learning tasks powered by Tensorflow, is integrated into our system.

Android App

H

This system allows users to control it remotely via Android App. This android application should allow users to login via username and password. The authorized users could access live CCTV, the live semantic segmentation results and also control the door based on socket communication with the system.

Multiprocessing Algorithms

V

In our project, the RPi has to perform tasks, including face recognition and semantic segementation, video and audio streaming, a multithreading UI, TCP socket communcation and a Flask web application at the same time. To reduce latency, we used Python multi processing to fully take advantage of four cores of RPi.

FSM Control Interface

V

In this project, a user interface is implemented on PiTFT. To control the work flow of the GUI, a finite state machine is designed. This state machine helps the interface behave correspondingly based on the current state and given user inputs and performs state transitions. The FSM could also help the multithread algorithms perform correctly.

Flask-based Stream Server

V

Thanks to the powerful coral TPU, real-time semantic segmentation could be achieved in our project. To show the results, a web video server based on Flask was developed to stream the semantic segmentation results to a server, which could be accessed by Android App and web browser.
CCTV Server

Pi Camera Video Stream

Pi camera was installed following this tutorial. First, install the Raspberry Pi Camera by inserting the cable into the Raspberry Pi camera port. Then we ran sudo raspi-config in the terminal to enable the camera. If the camera option is not available, then an update needs to be made, we run sudo apt-get update and sudo apt-get upgrade in this case. The Raspberry Pi needs to be rebooted.
To check if the picamera is successfully installed, we use camera to take photos raspistill -o image.jpg If we could view the image.jpg by running gpicview image.jpg without errors, the picamera is installed perfectly.
We consulted the official handbook tutorial to make the RPi with Picamera as a video stream server. This is a simple HTTP server that achieves significantly higher frame rates than any solution else we tested (mjpg-streamer, Motion program, RPi-Cam-Web-Interface). The code we used could be found here. We set the live video feed to a website served by the RPi http:// IP_Address_Of_Pi:9000. So, we could access the video streaming through web browser on a machine that is connected to the same LAN. The video stream could come with very little latency.

.

Pi Audio Stream

For audio stream, a USB microphone was used in our project. Once the microphone is plugged in, we load the audio module by typing sudo modprobe snd_bcm2835. And we check if we could use it properly by recording some audio into a file by running: arecord -D plughw:1,0 test.wav. And press CTRL+C when we’ve got enough recording. We play it to check if it works! aplay test.wav. Using the command alsamixer, we could record louder or adjust some parameter and play with the input/output levels of the microphone.
Similar to the video stream, it would be convenient if we stream the audio to a webserver to which the user could access via Android App or browsers. We followed the tutorial tutorial here to make our RPi an Internet radio station to record or play your podcasts.

We set up the streaming station using two packages called DarkIce, a live audio streamer, and Icecast an audio/video streaming media server. The detail of how to install Darkice and Icecast could be found here.
After the Icecast2 installation, we made a Config file for DarkIce by creating a file named darkice.cfg. The content configurations file should be like xxx and we also need to make shell script named darkice.sh so we could start the audio stream service by executing it. After entering sudo service icecast2 start, we could launch the audio stream server by executing the shell script sudo /home/pi/darkice.sh. And we set We set the live audio feed to a website served by the RPi, and the audio could be accessed by visiting the url http:// IP_Address_Of_Pi:8000/rapi.mp3 on browser.

. Github Repo

TPU-Based Face Recognition

Our system will first run semantic segmentation to obtain the area of interest (ROI) that are related to people. Then, the ROI will be put into a classification model to determine whether the current user is registered. The classification results will be sent to the UI via message queue and to determine whether to open the door.
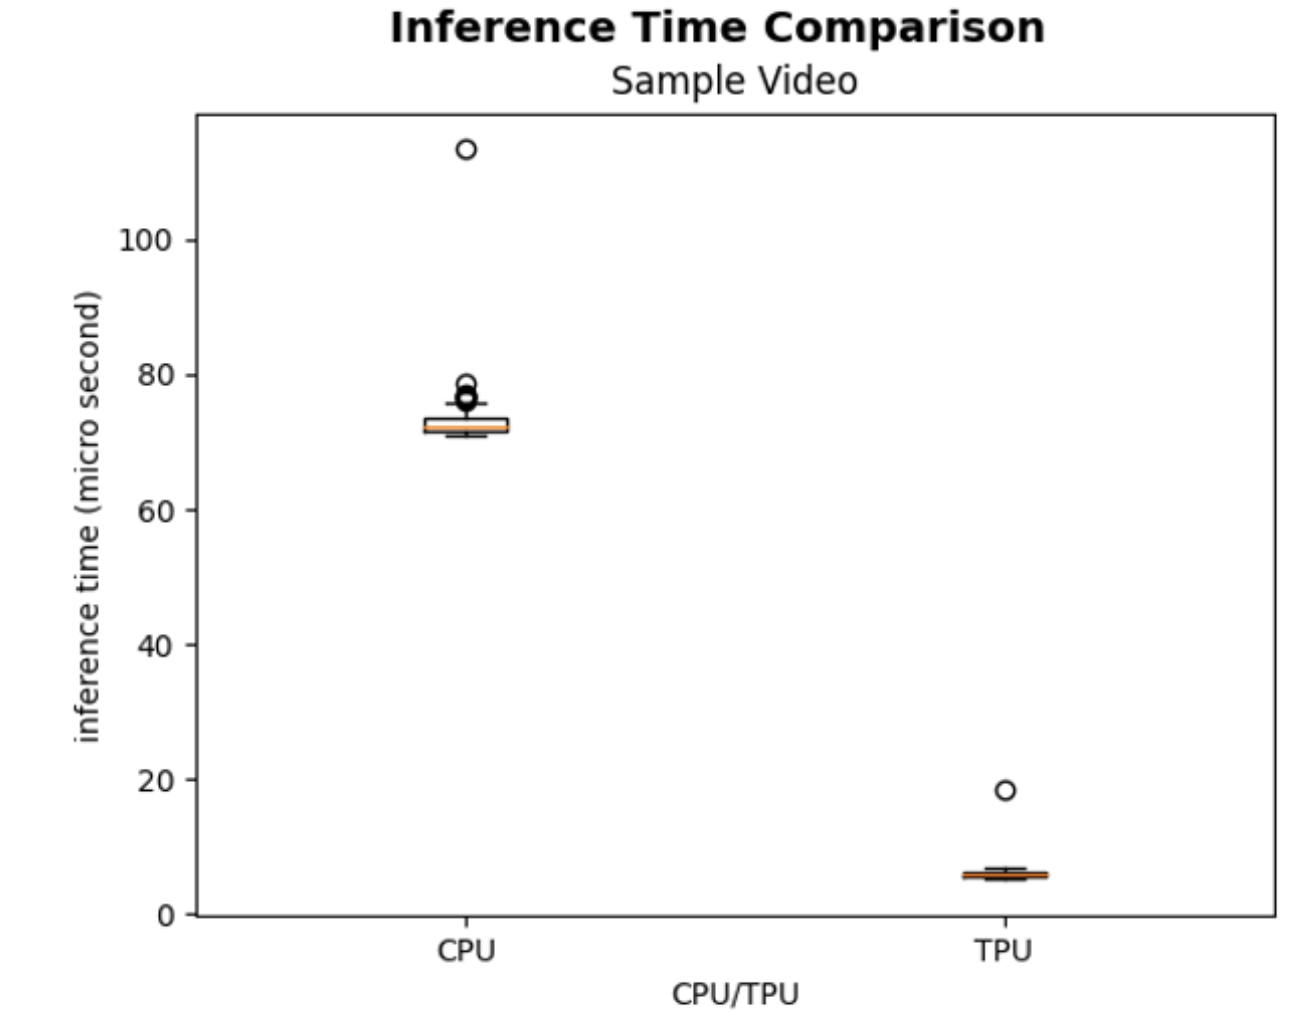
The main benefit of TPU is that we could achieve real-time recognition speed. Even though Raspberry Pi 4B comes with a GPU, this GPU is designed for more general tasks of graphic processing but not specifically designed for tensor processing tasks. Thus, with this Edge USB TPU, the computation performance of a Raspberry Pi on tensor processing tasks is greatly boosted.

Sampling video as dataset, the inference time of the classification for each frame in the video is recorded. Then, we plot the recorded inference times on a bar graph, with y-axis being the inference time in milliseconds which is shown on the comparison between inference times on CPU and TPU, there is a huge difference for TPU and CPU. The inference times for TPU are all below 20 milliseconds with average around 10 milliseconds. These numbers translate to a frame rate of 100 frames per second, which is a lot bigger than most cameras’ frame rate which is usually 30 or 60 fps. As for the CPU, the average inference time lies below 80 milliseconds, which corresponds to just 12.5 frames per second. So using TPU can greatly improve our system’s response time.

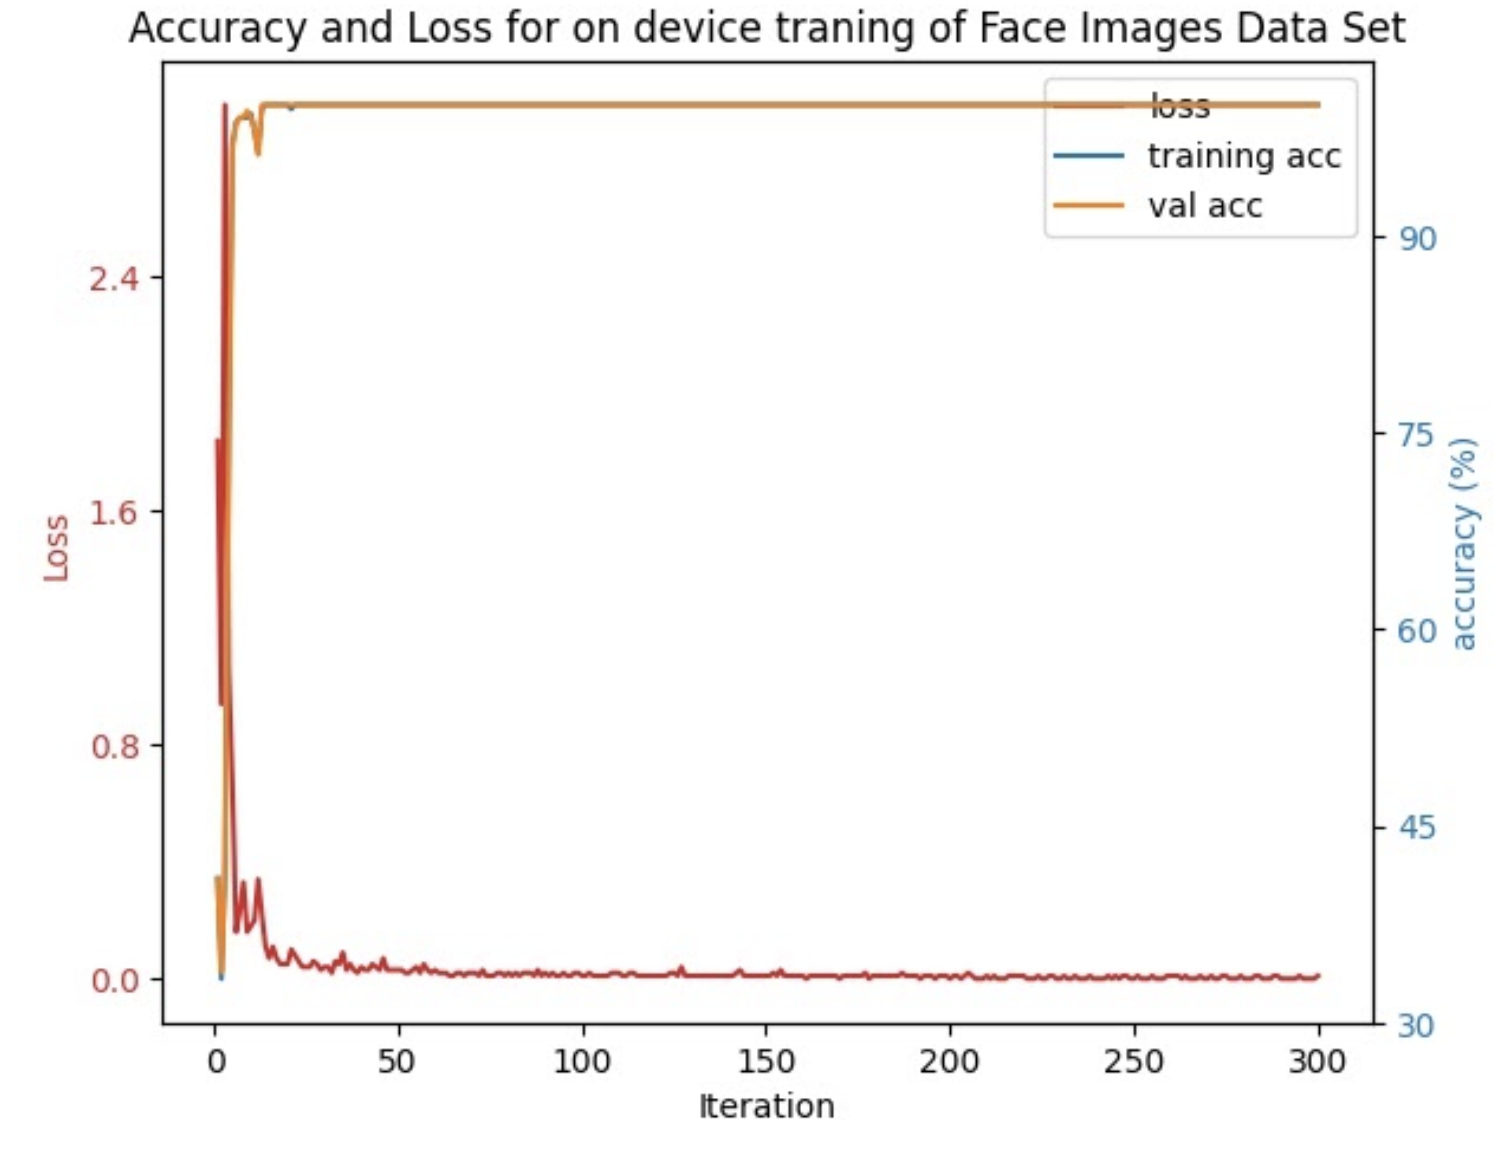
Another benefit of using TPU is it can retrain a model on-device very quickly. This feature allows new users to register their faces into the system and at the next boot, our program can retrain the classification model very quickly. For our experiment, re-training on 300 images for around 300 iterations only takes 2 to 3 seconds, and the accuracy of the re-trained model is also very high. In figure 2, we have shown the accuracy and loss over 300 iterations. As shown in the figure, the model quickly learns the images and reach a plateau very early.

Integer rutrum ligula eu dignissim laoreet. Pellentesque venenatis nibh sed tellus faucibus bibendum.

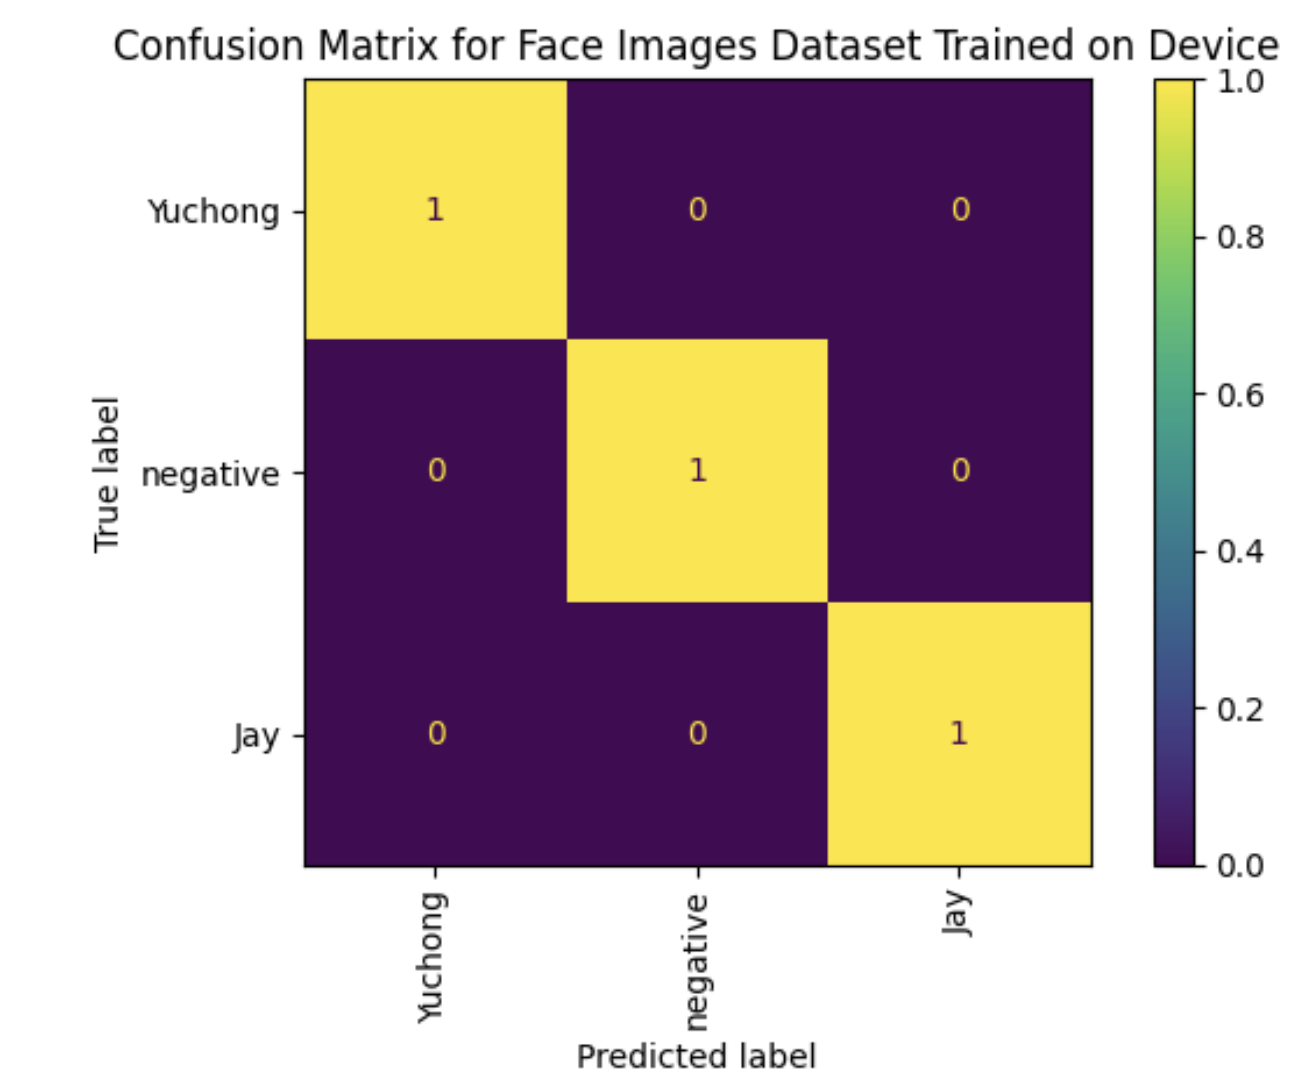
And to illustrate our model’s performance, we have also plotted the confusion matrix for test images. As shown in this confusion matrix, the model can clearly differentiate between Yuchong, Jay and negative.

Github Repo

Android Application

Video and Audio Stream on APP

After setting up the live stream video and audio station on RPi, we need to display the video on the Android phone by using WebView in App's MainActivity.

public class MainActivity extends AppCompatActivity implements SensorEventListener {
        private WebView webview ;
        ...
        @Override
        protected void onCreate (Bundle savedInstanceState) {
        ...
        webview =(WebView)findViewById(R.id.webView);
	// make the webview adapt to the screen
        WebSettings settings = webView.getSettings();
        settings.setUseWideViewPort(true);
        settings.setLoadWithOverviewMode(true);
	// display the video
        webview.setWebViewClient(new WebViewClient());
        webview.getSettings().setJavaScriptEnabled(true);
        webview.getSettings().setDomStorageEnabled(true);
        webview.setOverScrollMode(WebView.OVER_SCROLL_NEVER);
        webview.loadUrl("http://ip_address_of_Rpi:9000");

       }
 }

But WebView only could not play the audio, to get the real-time audio streaming, we still need to include a MediaPlayer in our Android to play the sound from the audio server.


	MediaPlayer mediaPlayer = new MediaPlayer();
        mediaPlayer.setAudioAttributes(
                new AudioAttributes.Builder()
                        .setContentType(AudioAttributes.CONTENT_TYPE_MUSIC)
                        .setUsage(AudioAttributes.USAGE_MEDIA)
                        .build()
        );
        try {
            mediaPlayer.setDataSource("http://ip_address_of_Rpi:8000/rapi.mp3");// the url for the sound data source
            mediaPlayer.prepare();
        } catch (IOException e) {
            e.printStackTrace();
        }
        //  might take long! (for buffering, etc)
        mediaPlayer.start();
 

TCP SOCKET COMMUNICATION (Application End)

In our project, we have "Admin Login" section in our interface. When entering this module, the UI would ask the user (the admins or the app holders) to login by entering password and username on the APP. After a successgul login, the UI (PiTFT) would display the username of the user who have logged in the system. And the user who has successfully logged in should have the right to open the door and watch the CCTV live. Thus, a TCP socket communication module should also be deployed on both the Android APP and RPi server end. The following code is

class Sender extends AsyncTask {
        Socket s;// socket connected to RPi
        PrintWriter pw;
        String msg;
        String type;
        BufferedReader bufferedReader;
        @SuppressLint("SetTextI18n")
        @Override
        protected Void doInBackground(Void...params){
            try {
                s = new Socket("ip address of RPi", 7000);
			// send message to RPi Server
                pw = new PrintWriter(s.getOutputStream());
                pw.write(msg);
                pw.flush();
                bufferedReader = new BufferedReader(new InputStreamReader(s.getInputStream()));
			// receive message from RPi Server
                String msg2 = bufferedReader.readLine();

                switch (type) {
                    case "login":
                        if (msg2!=null && msg2.equals("Success")) {
                            success = true;
						// login successfully
                            statusTextView.setText("Login Success");
                           showToast("Login Success");
                        }else{
						// login fail
                            statusTextView.setText("Not Login In");
                            showToast("Login Fail");
                        }
                        break;
                    case "doorOpen":
                        if (msg2!=null && msg2.equals("Success")) {
                            doorOpen = true;
                            doorStatusTextView.setText("Door Open");
                        }
                }

             ....
        }
    }
 

User Login Activity

Before allowing the user to see the CCTV live stream and control our system, a login activity must be passed to verify the user identity. Thus, a user login activity was first launched on our App. The login activity would allow users to fill in the username, password, IP address of RPi, and the designated port number.

public class StartActivity extends AppCompatActivity {

	private EditText textViewUserName;
    private EditText textViewPassword;
	...

    @Override
    protected void onCreate(Bundle savedInstanceState) {
	....
	// login button
        Button buttonEnter = (Button) findViewById(R.id.enter);
        buttonEnter.setOnClickListener(

                (x) -> {
                    uName = textViewUserName.getText().toString();
                    pwd = textViewPassword.getText().toString();
                    host = textViewIP.getText().toString();
                    TCPport = Integer.valueOf(textViewPort.getText().toString());

                    if (uName == null || uName.length() == 0 || pwd == null || pwd.length() == 0) {
                        showToast("please fill all blanks");
                        return;
                    }else{
                        StartActivity.Sender sender = new  StartActivity.Sender();
                        sender.host = host;
                        sender.port = TCPport;
                        sender.msg = "Check:"+uName+":"+pwd;
                        sender.type = "login";
                        sender.execute();
                        long timeInit = System.currentTimeMillis();

			// wait for the login result from server
                        while(System.currentTimeMillis() - timeInit<3000){
                            if (success){
                                Intent startMainActivityIntent = new Intent(StartActivity.this, MainActivity.class);
                                startActivity(startMainActivityIntent);
                                finish();
                            }
                        }
                    }
                });


Mutliprocessing Algorithms

To achieve our goal of live video and audio streaming, face recognition, semantic segementation and flask stream, we must decrease the latency and running time of every part as fast as possible. At the beginning, we tried to launch every thing in one bash file. This delay time and the latency is too long. To reduce the latency, one solution is to parallel process different tasks to take advantage of four cores in R-Pi. In python, we could use the multiprocessing library to fully take advantage of four cores of R-Pi. In total, we have five process assigned to four cores.

Learn More
  1. The first core is assgined to stream the video and audio for the CCTV. Since we do not need the feedback from CCTV to control our state machine, we do not need to pass a queue into this process for interprocess communication. Even more, this core is assigned to a Flask Web application process, which is consumer process consuming the frames generated by sementic segmentation process. Thus, a frame_queue is passed into it to received processed semantic segmentation frames from the face recognition module.
  2. The second core is assgined to launch the TCP socket server to receives socket connection and communicates with Android APP. For the user login module, the main interface needs user login information and display the login user. Thus,this is a producer process producing TCP connection results and the login_queue is passed into for processing communication.
  3. The third core is assigned to launch the face registration and face recognition module. By assigning a core to this computation-heavy module, the system could achieve higher frame per second and also receive face recognition result in only 20 ms. For this module, this is a producer process producing face recognition results and semantic segmentation frames. Thus, a face_recognition_queue for passing recognition results and a frame_queue for sending frames to Flask server were passed into.
  4. The forth core is used to launch the main user interface. This UI screen is refreshed every 0.02 second, several GPIO callback and several threads were running at the same time so it needs the multiprocessing algorithm to ensure the UI smooth response. This is a consumer process, this process receives the face recognition results and the login results from other processes. Thus, the face_recognition_queue and login_queue were passed into to allow the UI get the results from APP login and face recognition.

The above describes the tasks that every core executes. But we still need to figure out how each process could communicate with each other via queues. In our project, the producer processes produce the results and frames. If the producer ceasely put results into the queue, unexpected results would appear. For exmaple, if the face recognition module continuously feeds results into the queue and the UI only asks for results occasionally, the recognition results would be piled up in the queue. The next time when the UI requests the request, it could only get = the outdated piled up results from the front of the queue since queue is First-In-First-Out. In order to resolve this problems, we have two solutions: 1. the producers examines the status of the message queue and clear the outdated results; 2. use LIFO (Last-In-First-Out) queue so that the consumer could always get the newest results.
After weighing the pros and cons, we decided to take the first option that the producers clear the outdated results in time since it hep could lower the burden on the system memory and resources. This is a classic producer-consumer design pattern where queue serves as the message pipe and the cache, and the producer process needs to match the speed of the consumer process.
FSM Control User Interface

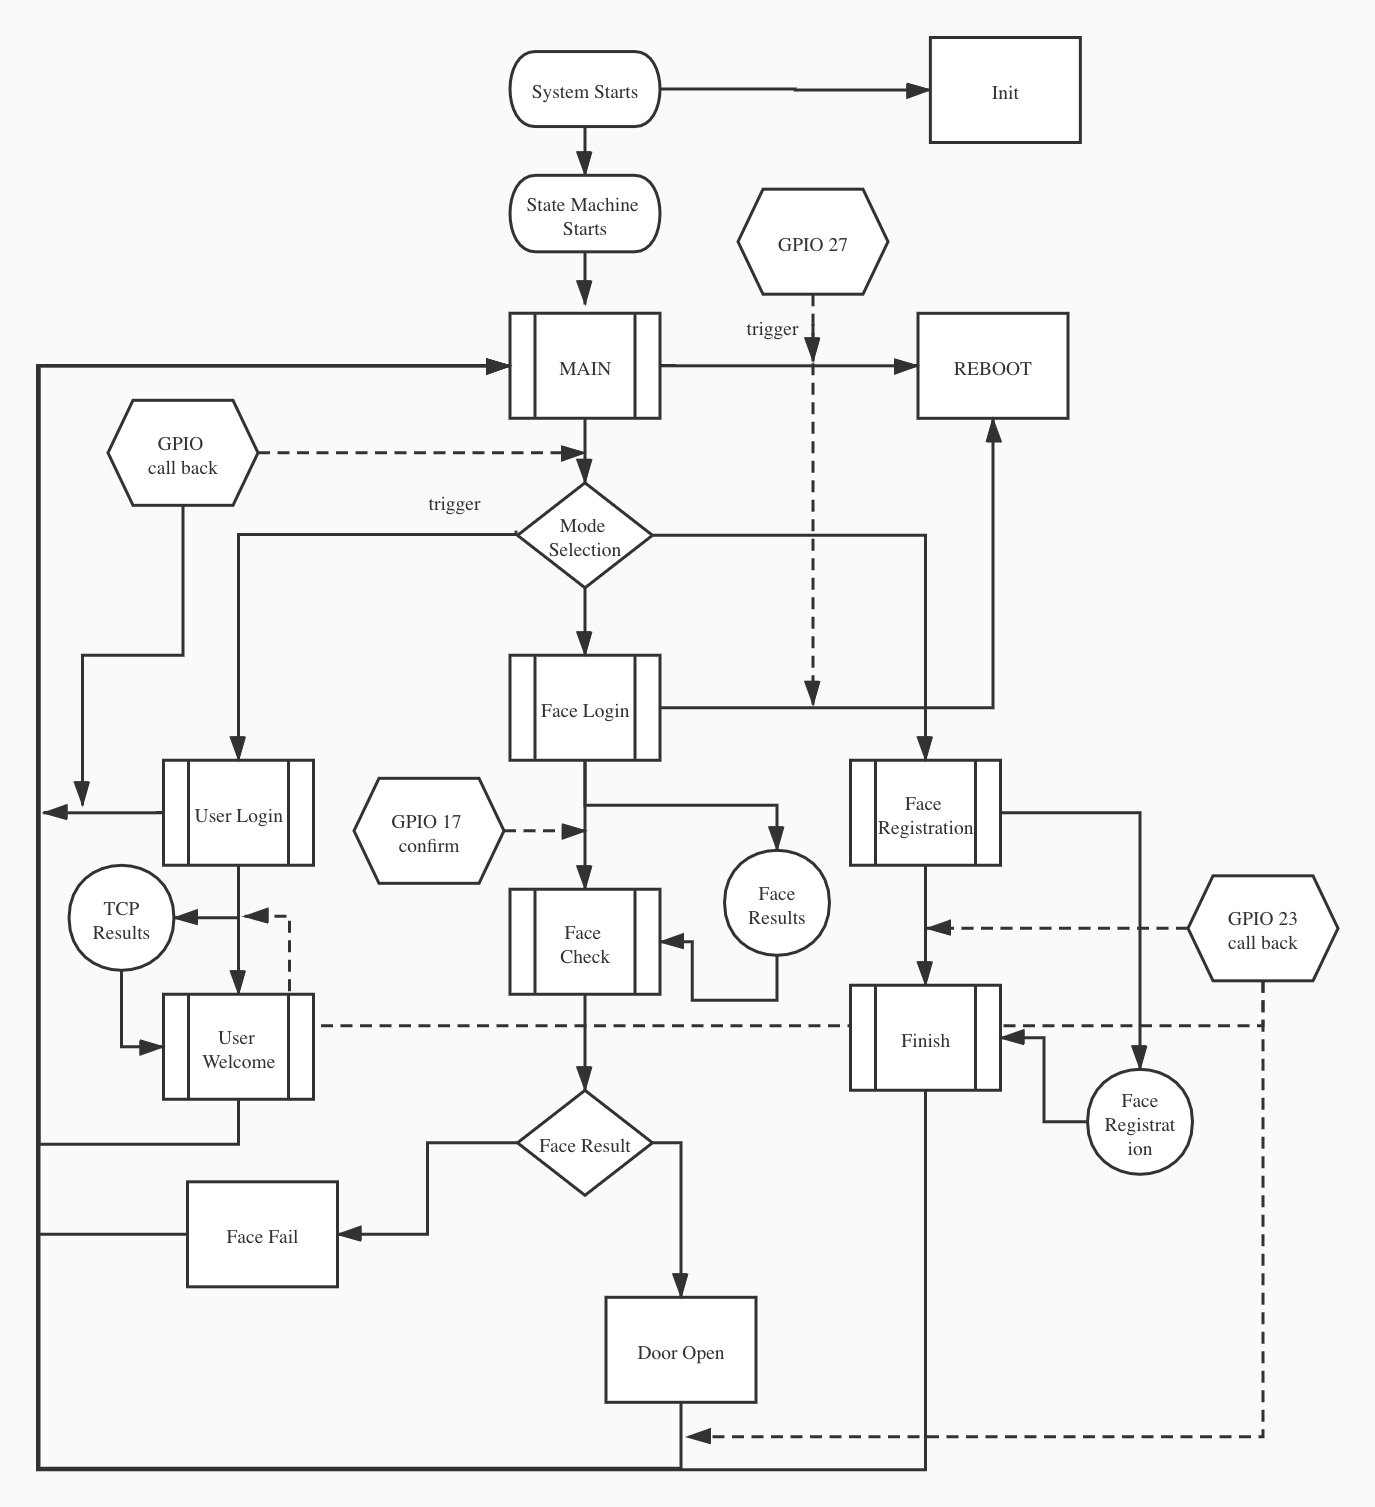
In our project, apart from multiprocessing, the user interface and the system need to process several complex tasks at the same time. A finite state machine is designed to control the logic of multi thread activities and all functional modules. The user interface would behave accordingly given user inputs and performs state transitions.

  1. When system starts, the system would first assgin cores to each modules, and initialize the message queue for process communication. Then the state machine would enter the MAIN state where the main interface is displayed. When user input is given (For example, the user chooses "Admin Login", "Face Login" or "Face Registration"), the state machine would transit to the corresponding state.
  2. When state machine in "Admin Login" function, the state machine would start a new thread trying to get user login results from TCP module modules via message queue. When the state machine receives positive results, the state machine would transit to "User Welcome" and will then return to "MAIN" state.
  3. When state machine in "Face Login" function, the state machine would start a new thread trying to get results from Face Recognition module modules via message queue. When user press "Confirm", the state machine would shift to "Check" and will decide if open the door based on recognition results. If it is the intended users, a new thread would be started to open the door asynchronously.
  4. When state machine in "Face Registration" function, the state machine would start a new thread to call a bash shell script taking photos of the faces of users and save them to a designated location. When this process finish, the state machine would return to "FINISH" and then "MAIN" automatically.

Flask based Semantic Segmentation Result Streaming Server

Thanks to the powerful coral TPU, real-time semantic segmentation could be achieved in our project. Thus, in order to get more intuitive results of the face recognition module, we decided to stream the semantic segmemantation results. We evaluated several solutions:

  1. TCP socket image transfer, but we need to view it through VNC, which is not very ideal in our project, since we do not want to ssh login the RPi when system is running.
  2. RPi-Cam-Web-Interface and mjpg-streamer allows for high frame rate realtime image transfer, but don’t allow for customization
  3. Django could be ideal but it is too heavy for our project, since we do not need to process complex requests.
At last, we settled on Flask, which is a lightweight Python web backend framework. Then, a web video server based on Flask was developed to stream the semantic segmentation results to a server, which could be accessed by Android App and web browser.

Testing & Issues

In our project, we have tracked issues we met based on timeline. The below is a timeline recording the issues we discovered in our project and also the way how we resolve those problems.

Broken Pi Cam

At first, we have tested every hardware we have got in our project. And we have found out that the PiCam turned out to be a little fragile.

Python Module Installation

For the installation of python modules, since the Raspibian system, we need to pay special attention to users and python version. In our project, we launch our programs with sudo python3. Thus, we need to use sudo pip3 install to make sure every module is installed under super user and Python3.

Multiprocessing Communication

Since mutliprocesses need to communicate with each other, we have researched on several solutions of multiprocessing communication, such as FIFO, Queue. We decided to use Queue and implement the multiprocessing algorithms, since there would be no need to interact with OS frequently thus to increase the efficiency.

Multiple Camera Conflicts

In our project, we used two cameras. However, the camera index is randomly assigned but OpenCV requires the specific number of WebCam is assigned to. In order to avoid this randomness, we have designed a method to confirm the number which is assigned to web cam using commands v4l2-ctl -d /dev/videoN -D

Clear Text not permitted in Android

When we developed android application viewing the live CCTV, the communication protocol is based on HTTP which is unsecured and not permitted in Android 8. Also, we also need to configure Internet before launching the App. Thus, we need to include android:usesCleartextTraffic="true" and in the AndroidManifest.xml file.

Internet Conncetion when Initializing

Since our project highly relies on Internet connection, we have included a piece of shell script code to ensure Pi has connected to Wifi before launching the main program.

Servo Issues

For this project, we also use a continuous rotation servo to control a door. However, the servo is not calibrated and it continues to rotate at a slow speed when given a stop signal. To solve it, by looking through the servo’s datasheet, we found that we can calibrate the servo by adjusting the potentiometer. So we calibrated the servo by giving a stop signal and trying to find the position that the servo moves the least.

Memory Allocation

The on-board GPU on Pi may have run out of memory space since we used multiple cameras. Upon investigation, we have found that Pi actually allows users to determine the memory allocation to GPU. We have increased default memory 128 MB to 256 MB.

Test Videos

We followed an incremental testing approach in our development. This enabled our team to parallelize our work seperately, while ensuring each individual of us develop fully functional component before being integrated into the system-at-large. The below videos records how we test each module, and integrate them into a system.

About Us

Jie He (jh2735)

Android, CCTV, User Interface, Multiprocessing Algorithm, Flask, Website

Yuchong Geng (yg534)

Servo Control, Face Recognition, Semantic Segmentation, TPU

Result & Conclusion

For this assignment we have successfully designed and implemented a Smart Home Entry system. We have used many different tools and techniques to build our system including but not limited to Android Studio, Flask, TPU, multi-processing, TCP/IP socket, FSM and etc. And we think our system performs well as we expected. We can also further improve our face recognition module by using diverse images to train our model. After implementing this system and spending many times on debugging errors we have made, we have grabbed a lot of knowledge about embedded systems that cannot be learned just by studying textbooks. And we want to use this opportunity to thank our amazing instructor Joseph Skovira and dedicated TAs for their generous support, detailed guidance and great passion into this course.

Github Repo

Future Work

Even though we have achieved all of the functions that we have designed, we do think that there are many places for improvement. And they are divided into three parts: network latency, UI design and diverse dataset for our classification model. Network latency is a main factor that affects our system’s user experience. Our system streams two videos into the network at the same time and they may suffer from high latency and thus are not able to generate smooth and stable streams. We think there are some ways to solve this problem. For example, a resolution adjuster can be implemented so when the system senses a high latency, it will automatically reduce the video resolution. Another improvement can be made on our UI design. Specifically, we have two places that have UI interfaces, the PiTFT display screen and our Android App. When we were designing the system, our top priority was to make sure all the codes work perfectly, so we did not have many UI designs on our Apps and display screen. We think a more user friendly interface would make our system more attractive. Lastly, we think we can further improve our classification model’s performance by re-training it on a more diverse dataset. Currently, our dataset only contains Yuchong and Jay’s images as well as their rooms’ images, so we think our model’s great performance can only be realized at our rooms. A more diverse dataset can make sure our model has a “global” understanding of its task.

Parts List

Total: $33

Code Appendix

main system


###################################

### author: Jie He and Yu Chong###

### Date: Dec 19 2020 ############

##################################

import pygame

from pygame.locals import MOUSEBUTTONDOWN, MOUSEBUTTONUP

import os

import time

import numpy as np

import RPi.GPIO as GPIO

import traceback

import threading

from multiprocessing import Process, Queue

from subprocess import call

import subprocess

import socket

import time

from threading import Thread

import base64

import cv2

import zmq

from video_stream import Classify_and_Stream

from servoControl import ServoControl

import os

from flask import Flask, render_template, Response


app = Flask(__name__)


# Display on piTFT

# need sudo ti be effective

os.putenv('SDL_VIDEODRIVER''fbcon')

os.putenv('SDL_FBDEV''/dev/fb1')


# Track mouse clicks on piTFT

os.putenv('SDL_MOUSEDRV''TSLIB')

os.putenv('SDL_MOUSEDEV''/dev/input/touchscreen')


GPIO.setmode(GPIO.BCM)  # Use broadcom numbering

# Setup two output pins

global state, success


global systemOn

systemOn = True


global detected

detected = False


global prediction

prediction = ''


global frameQueue

frameQueue = Queue()


# for flask semantic segmentation stream

def gen_frames(frameQueue:Queue):  # generate frame by frame from camera

    while True:

        # Capture frame-by-frame

        #frame = frameQueue.get(True) # read the camera frame

        if not frameQueue.empty():

            frame = frameQueue.get(True)

            ret, buffer = cv2.imencode('.jpg', frame)

            frame = buffer.tobytes()

            yield (b'--frame\r\n'

                   b'Content-Type: image/jpeg\r\n\r\n' + frame + b'\r\n')


@app.route('/video_feed')

def video_feed():

    global frameQueue

    #Video streaming route. Put this in the src attribute of an img tag

    return Response(gen_frames(frameQueue), mimetype='multipart/x-mixed-replace; boundary=frame')


@app.route('/')

def index():

    """Video streaming home page."""

    return render_template('index.html')


def init_CCTV_video_audio():

    call("sudo bash /home/pi/final_project/init_video_audio", shell=True)


def getLocalIp():

    '''Get the local ip'''

    try:

        s = socket.socket(socket.AF_INET, socket.SOCK_DGRAM)

        s.connect(('8.8.8.8', 80))

        ip = s.getsockname()[0]

    finally:

        s.close()

    return ip


listensocket = socket.socket()

Port = 7000

maxConnections = 999

IP = socket.gethostname()


listensocket.bind((getLocalIp(),Port))


listensocket.listen(maxConnections)

print("Server started at " + IP + " on port " + str(Port))


running = True


def openDoor():

    # servo to open and pin number

    servo = ServoControl(13)

    servo.openDoor()

    time.sleep(1)

    servo.closeDoor()

    # print("stop")

    pass


# load the user info database

users = {"123": "123",

         "jh2735""1234",

         "ycg534""3456"}


def connectonProcess(clientsocket,queueLogin:Queue):

    message = clientsocket.recv(1024).decode()  # Receives Message

    # Prints Message

    print(message)

    if message != "":

        if message.startswith("Check:"):

            str_list = message.split(":")

            if str_list[1] in users:

                success = str_list[2] == users[str_list[1]]

                if success:

                    clientsocket.sendall(b"Success")

                    print("user login success")

                    queueLogin.put(str_list[1])

                else:

                    clientsocket.sendall(b"Failure")

                    print("user login failed")

            else:

                clientsocket.sendall(b"Failure")

                print("user login failed")

        elif message == "Door Open":

            print("Door Open")

            clientsocket.sendall(b"Success")

            openDoor()


    clientsocket.close()


# TCP server

def rpi_TCPServer(queueLogin:Queue):

    while running:

        clientsocket, address = listensocket.accept()

        threading.Thread(target=connectonProcess(clientsocket, queueLogin), name="userName").start()


# face recognition

def faceRecognition(q:Queue,frameQueue:Queue):

    classify = Classify_and_Stream()

    classify.classify_and_stream(detected, prediction, q, frameQueue,5)


# main interface function

def mainInterface(q: Queue, queueLogin: Queue):


    '''

      GPIO four buttons callback functions and registration

    '''

    global state, success

    # default state

    state = "MAIN"


    # GPIO 17 - user login on phone

    def GPIO17_userMain(channel):

        global state

        print("----user login----")

        if state == "MAIN":

            state = "USER"

        elif state == "FACE":

            state = "CHECK"


    # GPIO 22 user face login

    def GPIO22_userFaceLogin(channel):

        global state

        print("----userFaceLogin----")

        if state == "MAIN":

            state = "FACE"


    # GPIO 23 user face registration

    def GPIO23_userCancel(channel):

        global state

        tuple_choice =  ("REGISTRATION","USER","FACE","CHECK","Login")

        print("----user cancel----")

        if state == "MAIN":

            state = "REGISTRATION"

        elif state in tuple_choice:

            state = "MAIN"


    # system exit

    def GPIO27_close(channel):

        print("----system off process begin----")

        # state = "close"

        global systemOn

        systemOn = False

        GPIO.cleanup()

        # shutdown the RPi

        call("sudo reboot", shell=True)


    # GPIO set up

    GPIO.setup(17, GPIO.IN, pull_up_down=GPIO.PUD_UP)

    GPIO.setup(22, GPIO.IN, pull_up_down=GPIO.PUD_UP)

    GPIO.setup(23, GPIO.IN, pull_up_down=GPIO.PUD_UP)

    GPIO.setup(27, GPIO.IN, pull_up_down=GPIO.PUD_UP)

    GPIO.add_event_detect(17, GPIO.FALLING, callback=GPIO17_userMain, bouncetime=300)

    GPIO.add_event_detect(22, GPIO.FALLING, callback=GPIO22_userFaceLogin, bouncetime=300)

    GPIO.add_event_detect(23, GPIO.FALLING, callback=GPIO23_userCancel, bouncetime=300)

    GPIO.add_event_detect(27, GPIO.FALLING, callback=GPIO27_close, bouncetime=300)


    '''

    state machine control thread functions

    '''


    def checkResult(q: Queue):

        global success

        print("read date from queue")

        # ten positive result in 3 secs

        val = q.get(True)

        success = val

        pass


    # door open

    def openDoor():

        # servo to open and pin number

        servo = ServoControl(13)

        servo.openDoor()

        time.sleep(1)

        servo.closeDoor()

        # print("stop")


        pass


    # registration


    def registration():

        print("registration")

        # save photos in local file system

        call("sudo bash take_photo.sh", shell=True)

        time.sleep(50)

        print("registration finish")

        stateChange('Cancel')

        pass


    def backToMain():

        print("back to main")

        time.sleep(5)

        if state == "FINISH" or state == "CHECK" or state == "Login":

            stateChange('Cancel')


    '''

      state machine related functions

    '''


    def loginCheck(queueLogin:Queue):

        global state

        if not queueLogin.empty():

            gloabal userName

            userName = queueLogin.get(True)

            if state == "USER":

                state = "Login"


    # state machine

    stateMachine = {

        "Admin Login""USER",

        "Face Login""FACE",

        "Face Registration""REGISTRATION",

        "Cancel""MAIN",

        'Confirm''CHECK',

        "Finish""FINISH"

    }


    # button trigger state machine state change

    def stateChange(input):

        global state

        print(input)

        state = stateMachine[input]


    '''

    Pygame related functions

    '''


    # pygame initialization

    pygame.init()

    pygame.mouse.set_visible(False)


    # screen initialization

    size  = 320, 240

    screen = pygame.display.set_mode(size)

    fontUsed = pygame.font.Font(None, 30)


    # draw a button on screen

    def draw_button(button, screen):

        # Draw the button rect and the text surface

        pygame.draw.rect(screen, button['color'], button['rect'])

        screen.blit(button['text'], button['text rect'])


    # create a button object: color, background, callback function, text, rect for collide detection

    def create_button(x, y, w, h, bg, text, textColor, callback):

        # Create a buttondictionary of the rect, text,

        # text rect, color and the callback function.

        FONT = pygame.font.Font(None, 24)

        text_surface = FONT.render(text, True, textColor)

        button_rect = pygame.Rect(x, y, w, h)

        text_rect = text_surface.get_rect(center=button_rect.center)

        button = {

            'rect': button_rect,  # rect to detect button detection

            'text': text_surface,

            'text rect': text_rect,

            'color': bg,

            'callback': callback,

            'text_text': text

        }

        return button


    def drawText(x: int, y: int, text: str, color: tuple):

        text_surface = fontUsed.render(text, True, color)

        text_rect = text_surface.get_rect(center=(x, y))

        screen.blit(text_surface, text_rect)


    # color setting

    SHADOW = (192, 192, 192)

    WHITE = (255, 255, 255)

    LIGHTGREEN = (0, 255, 0)

    GREEN = (0, 200, 0)

    BLUE = (0, 0, 128)

    LIGHTBLUE = (0, 0, 255)

    RED = (200, 0, 0)

    LIGHTRED = (255, 100, 100)

    PURPLE = (102, 0, 102)

    LIGHTPURPLE = (153, 0, 153)

    BLACK = (0, 0, 0)


    '''

    interface elements

    '''


    # options buttons

    userLogin = create_button(170, 10, 140, 60, LIGHTGREEN, 'Admin Login', BLACK, lambda: stateChange('Admin Login'))

    faceRecognition = create_button(170, 85, 140, 60, LIGHTBLUE, 'Face Login', BLACK, lambda: stateChange('Face Login'))

    faceRegistration = create_button(170, 160, 140, 60, LIGHTRED, 'Face Registration', BLACK, lambda: stateChange('Face Registration'))


    # confirm cancel

    cancel = create_button(200, 200, 120, 40, RED, 'Back To Main', BLACK, lambda: stateChange('Cancel'))

    confirm = create_button(170, 90, 100, 50, SHADOW, 'Confirm', BLACK, lambda: stateChange('Confirm'))


    # welcome interface

    text_left = {

        "welcome": (6040"Welcome"),

        "to":(60,80,"To"),

        "home": (60, 120, "Home"),


        "pi": (60, 180, "Pi")

    }

    text_left_list = ['welcome', 'to','home', 'pi']


    '''

    text for user / face / check / registration / finish

    '''

    # user login

    text_user = (220, 70, "Login on App")


    # user_success

    text_success1 =  (220,70,"Welcome")

    text_success2 = (220,120,"jh2735")


    # face

    text_face1 = (220, 40, "Face camera")

    text_face2 = (220, 60,"press Confirm")


    # check

    text_success = (220, 60, "Welcome!")

    text_Fail = (220, 60, "Face Fail")


    # registration

    text_reg1 = (220, 60, "Registration")

    text_reg2 = (220, 120, "Be patient")


    # draw finish

    text_finish = (220, 80, "Please Back to Main")


    # A list that contains all buttons for main interface.

    button_list_main = [userLogin, faceRecognition, faceRegistration]


    # a list that contains all buttons for other interfaces

    button_list_else = [cancel, confirm]


    '''

    thread

    '''

    threadOpen = None

    threadCheck = None

    threadRegistration = None

    threadFinish = None


    while systemOn:

        time.sleep(0.04)

        # make white screen

        screen.fill(pygame.Color('white'))  # Flush screen

        if state == "MAIN":

            for button in button_list_main:

                draw_button(button, screen)

            pygame.draw.rect(screen, SHADOW, [0, 0, 120, 240])

            for text in text_left_list:

                itemText = text_left[text]

                drawText(itemText[0], itemText[1], itemText[2], BLACK)

            success = False

            threadOpen = None

            threadCheck = None

            threadRegistration = None

            threadFinish = None

            threadLogin = None


        elif state == "USER":

            pygame.draw.rect(screen, SHADOW, [0, 0, 120, 240])

            for text in text_left_list:

                itemText = text_left[text]

                drawText(itemText[0], itemText[1], itemText[2], BLACK)

            drawText(text_user[0], text_user[1], text_user[2], BLACK)

            draw_button(cancel, screen)

            if not threadLogin:

                threadLogin = threading.Thread(target=loginCheck, name="loginCheck")

                threadLogin.start()


        elif state == "Login":

            pygame.draw.rect(screen, SHADOW, [0, 0, 120, 240])

            for text in text_left_list:

                itemText = text_left[text]

                drawText(itemText[0], itemText[1], itemText[2], BLACK)

            drawText(text_success1[0], text_success1[1], text_success1[2], BLACK)

            text_success2 = (220,120,userName)

            drawText(text_success2[0], text_success2[1], text_success2[2], BLACK)


            draw_button(cancel, screen)

            if not threadFinish:

                threadFinish = threading.Thread(target=backToMain, name="backToMain")

                threadFinish.start()


        elif state == "FACE":

            #print("FACE:"+str(success))

            pygame.draw.rect(screen, SHADOW, [0, 0, 120, 240])

            for text in text_left_list:

                itemText = text_left[text]

                drawText(itemText[0], itemText[1], itemText[2], BLACK)

            draw_button(cancel, screen)

            draw_button(confirm, screen)

            drawText(text_face1[0], text_face1[1], text_face1[2], BLACK)


            drawText(text_face2[0], text_face2[1], text_face2[2], BLACK)


            if not threadCheck:

                # read the value of face recognition and copy it to success

                threadCheck = threading.Thread(target=checkResult(q), name="checkResult")

                threadCheck.start()


        elif state == "CHECK":


            pygame.draw.rect(screen, SHADOW, [0, 0, 120, 240])

            for text in text_left_list:

                itemText = text_left[text]

                drawText(itemText[0], itemText[1], itemText[2], BLACK)

            # check the result of face recognition

            draw_button(cancel, screen)


            if success:

                drawText(text_success[0], text_success[1], text_success[2], BLACK)

                if not threadOpen:

                    threadOpen = threading.Thread(target=openDoor(), name="openDoor")

                    threadOpen.start()


            else:

                # refuse word

                drawText(text_Fail[0], text_Fail[1], text_Fail[2], BLACK)


                if not threadFinish:

                    threadFinish = threading.Thread(target=backToMain, name="backToMain")

                    threadFinish.start()

                pass


        elif state == "REGISTRATION":

            pygame.draw.rect(screen, SHADOW, [0, 0, 120, 240])

            for text in text_left_list:

                itemText = text_left[text]

                drawText(itemText[0], itemText[1], itemText[2], BLACK)

            draw_button(cancel, screen)

            drawText(text_reg1[0], text_reg1[1], text_reg1[2], BLACK)

            drawText(text_reg2[0], text_reg2[1], text_reg2[2], BLACK)

            if not threadRegistration:

                # read the value of face recognition and copy it to success

                threadRegistration = threading.Thread(target=registration, name="registration")

                threadRegistration.start()


        elif state == "FINISH":

            pygame.draw.rect(screen, SHADOW, [0, 0, 120, 240])

            for text in text_left_list:

                itemText = text_left[text]

                drawText(itemText[0], itemText[1], itemText[2], BLACK)


            draw_button(cancel, screen)

            drawText(text_finish[0], text_finish[1], text_finish[2], BLACK)


            if not threadFinish:

                # read the value of face recognition and copy it to success

                threadFinish = threading.Thread(target=backToMain, name="backToMain")

                threadFinish.start()


        pygame.display.flip()


if __name__ == '__main__':

    try:

        q = Queue()

        queueLogin = Queue()

        print("init video and audio")

        process_CCTV = Process(target=init_CCTV_video_audio)

        print("user interface")

        process_interface = Process(target=mainInterface, args=(q,queueLogin,))

        print("TCP Server")

        process_TCP_Server = Process(target=rpi_TCPServer, args(queueLogin,))

        process_Face_Recognition = Process(target=faceRecognition,args=(q,frameQueue))

        process_Face_Recognition.start()

        process_TCP_Server.start()

        process_CCTV.start()

        process_interface.start()


        # running flask stream server

        app.run(host="0.0.0.0")


    except BaseException:

        traceback.print_exc()


Android Code - Main activity

package com.example.picctv4;

// author jie he & yuchong geng
import androidx.annotation.RequiresApi;
import androidx.appcompat.app.AppCompatActivity;

import android.annotation.SuppressLint;
import android.media.AudioAttributes;
import android.media.MediaPlayer;
import android.os.AsyncTask;
import android.os.Build;
import android.os.Bundle;
import android.webkit.WebSettings;
import android.webkit.WebView;
import android.webkit.WebViewClient;
import android.widget.Button;
import android.widget.EditText;
import android.widget.TextView;
import android.widget.Toast;

import java.io.BufferedReader;
import java.io.IOException;
import java.io.InputStreamReader;
import java.io.PrintWriter;
import java.net.Socket;
import java.net.UnknownHostException;

public class MainActivity extends AppCompatActivity {
    private EditText usernameEditText;
    private EditText passwordEditText;
    private TextView statusTextView;
    private String uName = "jh2735";
    private String pwd = "1234";
    private TextView doorStatusTextView;
    private boolean success = false;
    private boolean doorOpen = false;

    private WebView webView;
    @RequiresApi(api = Build.VERSION_CODES.LOLLIPOP)
    @Override
    protected void onCreate(Bundle savedInstanceState) {
        super.onCreate(savedInstanceState);
        setContentView(R.layout.activity_main);


        statusTextView = findViewById(R.id.status);
        doorStatusTextView = findViewById(R.id.door);

        usernameEditText = findViewById(R.id.username);
        passwordEditText = findViewById(R.id.password);
        final Button loginButton = findViewById(R.id.loginbtn);
        final Button doorButton = findViewById(R.id.doorbtn);


        statusTextView.setText("Login Success");
        usernameEditText.setText(uName, TextView.BufferType.NORMAL);
        passwordEditText.setText(pwd,TextView.BufferType.NORMAL);
        doorStatusTextView.setText("Door Closed");


        webView = (WebView) findViewById(R.id.webView);
        // to make the webview adapt to the screen
        WebSettings settings = webView.getSettings();
        settings.setUseWideViewPort(true);
        settings.setLoadWithOverviewMode(true);
        MediaPlayer mediaPlayer = new MediaPlayer();
        mediaPlayer.setAudioAttributes(
                new AudioAttributes.Builder()
                        .setContentType(AudioAttributes.CONTENT_TYPE_MUSIC)
                        .setUsage(AudioAttributes.USAGE_MEDIA)
                        .build()
        );
        try {
            mediaPlayer.setDataSource("http://192.168.1.12:8000/rapi.mp3");
            mediaPlayer.prepare();
        } catch (IOException e) {
            e.printStackTrace();
        }
        //  might take long! (for buffering, etc)
        mediaPlayer.start();

        // --------
        webView.setWebViewClient(new WebViewClient());
        webView.getSettings().setJavaScriptEnabled(true);
        webView.getSettings().setDomStorageEnabled(true);
        webView.setOverScrollMode(WebView.OVER_SCROLL_NEVER);
        webView.loadUrl("http://192.168.1.12:9000/index.html");

        loginButton.setOnClickListener(
                (x)->{
                    if(!success){
                        uName = usernameEditText.getText().toString();
                        pwd = passwordEditText.getText().toString();
                        if (uName == null || uName.length() == 0 || pwd == null || pwd.length() == 0) {
                            showToast("please fill all blanks");
                            return;
                        }else{
                            Sender sender = new Sender();
                            sender.msg = "Check:"+uName+":"+pwd;
                            sender.type = "login";
                            sender.execute();
                        }
                    }else{
                        statusTextView.setText("Login Success!");
                        showToast("You already Log in !");
                    }

                }
        );

        doorButton.setOnClickListener(
                (x)->{
                    Sender sender = new Sender();
                    sender.msg = "Door Open";
                    sender.type = "doorOpen";
                    sender.execute();
                }
        );

    }

    private void showToast(String Str) {
        Toast.makeText(this, Str, Toast.LENGTH_SHORT).show();
        Toast.makeText(this, Str, Toast.LENGTH_SHORT).show();
    }

    class Sender extends AsyncTask<Void,Void,Void> {
        Socket s;
        PrintWriter pw;
        String msg;
        String type;
        BufferedReader bufferedReader;
        @SuppressLint("SetTextI18n")
        @Override
        protected Void doInBackground(Void...params){
            try {
                s = new Socket("192.168.1.12", 7000);
                pw = new PrintWriter(s.getOutputStream());
                pw.write(msg);
                pw.flush();
                bufferedReader = new BufferedReader(new InputStreamReader(s.getInputStream()));
                String msg2 = bufferedReader.readLine();

                switch (type) {
                    case "login":
                        if (msg2!=null && msg2.equals("Success")) {
                            success = true;
                            statusTextView.setText("Login Success");
                            showToast("Login Success");

                        }else{
                            statusTextView.setText("Not Login In");
                            showToast("Login Fail");
                        }
                        break;
                    case "doorOpen":
                        if (msg2!=null && msg2.equals("Success")) {
                            doorOpen = true;
                            doorStatusTextView.setText("Door Open");
                        }
                }

                bufferedReader.close();
                pw.close();
                s.close();
            } catch (UnknownHostException e) {
                System.out.println("Fail");
                e.printStackTrace();
            } catch (IOException e) {
                System.out.println("Fail");
                e.printStackTrace();
            }
            return null;
        }
    }
}

Android Code - login activity

package com.example.picctv4;


import android.annotation.SuppressLint;
import android.app.Activity;
import android.content.Context;
import android.content.Intent;
import android.content.SharedPreferences;
import android.os.AsyncTask;
import android.os.Bundle;
import android.view.View;
import android.widget.Button;
import android.widget.EditText;
import android.widget.TextView;
import android.widget.Toast;

import androidx.appcompat.app.AppCompatActivity;

import java.io.BufferedReader;
import java.io.IOException;
import java.io.InputStreamReader;
import java.io.PrintWriter;
import java.net.Socket;
import java.net.UnknownHostException;

public class StartActivity extends AppCompatActivity {
    private String host = "192.168.0.8";
    private int TCPport = 7000;
    private String uName = "jh2735";
    private String pwd = "1234";

    private EditText textViewUserName;
    private EditText textViewPassword;

    private EditText textViewIP;
    private EditText textViewPort;
    private boolean success;

    @Override
    protected void onCreate(Bundle savedInstanceState) {
        super.onCreate(savedInstanceState);
        setContentView(R.layout.activity_start);
        //Get the last IP and port value, and show them
        // get the textView object
        textViewIP = (EditText) findViewById(R.id.systemIP);
        textViewPort = (EditText) findViewById(R.id.systemPort);
        textViewPassword = (EditText) findViewById(R.id.systmePassword);
        textViewUserName = (EditText) findViewById(R.id.systemUserName);

        // set default host and port
        textViewUserName.setText(uName);
        textViewPassword.setText(pwd);
        // set default host and port
        textViewIP.setText(host);
        textViewPort.setText(String.valueOf(TCPport));
        success = false;
        Button buttonEnter = (Button) findViewById(R.id.enter);
        buttonEnter.setOnClickListener(

                (x) -> {
                    uName = textViewUserName.getText().toString();
                    pwd = textViewPassword.getText().toString();
                    host = textViewIP.getText().toString();
                    TCPport = Integer.valueOf(textViewPort.getText().toString());

                    if (uName == null || uName.length() == 0 || pwd == null || pwd.length() == 0) {
                        showToast("please fill all blanks");
                        return;
                    }else{
                        StartActivity.Sender sender = new  StartActivity.Sender();
                        sender.host = host;
                        sender.port = TCPport;
                        sender.msg = "Check:"+uName+":"+pwd;
                        sender.type = "login";
                        sender.execute();
                        long timeInit = System.currentTimeMillis();
                        while(System.currentTimeMillis() - timeInit<3000){
                            if (success){
                                Intent startMainActivityIntent = new Intent(StartActivity.this, MainActivity.class);
                                startActivity(startMainActivityIntent);
                                finish();
                            }
                        }
                    }
                });

    }
    private void showToast (String Str) {
        Toast.makeText(this, Str, Toast.LENGTH_SHORT).show();
        Toast.makeText(this, Str, Toast.LENGTH_SHORT).show();
    }
    class Sender extends AsyncTask<Void,Void,Void> {
        Socket s;
        PrintWriter pw;
        String msg;
        String type;
        BufferedReader bufferedReader;
        String host;
        int port;

        @SuppressLint("SetTextI18n")
        @Override
        protected Void doInBackground(Void...params){
            try {
                s = new Socket(host, port);
                pw = new PrintWriter(s.getOutputStream());
                pw.write(msg);
                pw.flush();
                bufferedReader = new BufferedReader(new InputStreamReader(s.getInputStream()));
                String msg2 = bufferedReader.readLine();

                switch (type) {
                    case "login":
                        if (msg2!=null && msg2.equals("Success")) {
                            success = true;
                        }else{

                        }
                        break;
                }

                bufferedReader.close();
                pw.close();
                s.close();
            } catch (UnknownHostException e) {
                System.out.println("Fail");
                e.printStackTrace();
            } catch (IOException e) {
                System.out.println("Fail");
                e.printStackTrace();
            }
            return null;
        }
    }
}
				

CCTV Server

# Web streaming example
# Source code from the official PiCamera package
# http://picamera.readthedocs.io/en/latest/recipes2.html#web-streaming

import io
import picamera
import logging
import socketserver
from threading import Condition
from http import server


PAGE="""\
<html>
<head>
<title>Home Pi CCTV</title>
</head>
<body>
<center><h1>Home Pi CCTV</h1></center>
<center><h2 id="linkweb"></h2></center>
<script>setInterval("linkweb.innerHTML=new Date().toLocaleString();",1000);
</script>
<center><img src="stream.mjpg" width="640" height="480"></center>

</body>
</html>
"""

class StreamingOutput(object):
    def __init__(self):
        self.frame = None
        self.buffer = io.BytesIO()
        self.condition = Condition()

    def write(self, buf):
        if buf.startswith(b'\xff\xd8'):
            # New frame, copy the existing buffer's content and notify all
            # clients it's available
            self.buffer.truncate()
            with self.condition:
                self.frame = self.buffer.getvalue()
                self.condition.notify_all()
            self.buffer.seek(0)
        return self.buffer.write(buf)

class StreamingHandler(server.BaseHTTPRequestHandler):
    # get request
    def do_GET(self):
        if self.path == '/':
            self.send_response(301)
            self.send_header('Location', '/index.html')
            self.end_headers()
        elif self.path == '/index.html':
            content = PAGE.encode('utf-8')
            self.send_response(200)
            self.send_header('Content-Type', 'text/html')
            self.send_header('Content-Length', len(content))
            self.end_headers()
            self.wfile.write(content)
        elif self.path == '/stream.mjpg':
            self.send_response(200)
            self.send_header('Age', 0)
            self.send_header('Cache-Control', 'no-cache, private')
            self.send_header('Pragma', 'no-cache')
            self.send_header('Content-Type', 'multipart/x-mixed-replace; boundary=FRAME')
            self.end_headers()
            try:
                while True:
                    with output.condition:
                        output.condition.wait()
                        frame = output.frame
                    self.wfile.write(b'--FRAME\r\n')
                    self.send_header('Content-Type', 'image/jpeg')
                    self.send_header('Content-Length', len(frame))
                    self.end_headers()
                    self.wfile.write(frame)
                    self.wfile.write(b'\r\n')
            except Exception as e:
                logging.warning(
                    'Removed streaming client %s: %s',
                    self.client_address, str(e))
        else:
            self.send_error(404)
            self.end_headers()

class StreamingServer(socketserver.ThreadingMixIn, server.HTTPServer):
    allow_reuse_address = True
    daemon_threads = True


if __name__ == '__main__':
    print("-----CCTV Server----")
    with picamera.PiCamera(resolution='640x480', framerate=24) as camera:
        output = StreamingOutput()
        #Uncomment the next line to change your Pi's Camera rotation (in degrees)
        #camera.rotation = 90
        camera.start_recording(output, format='mjpeg')
        try:
            address = ('', 9000)
            server = StreamingServer(address, StreamingHandler)
            server.serve_forever()
        finally:
            camera.stop_recording()

face recognition

import numpy as np

import cv2

import sys

from multiprocessing import Process, Queue, Pool

import zmq

import base64

"""

python3 examples/semantic_segmentation.py \

  --model test_data/deeplabv3_mnv2_pascal_quant_edgetpu.tflite \

  --input test_data/bird.bmp \

  --keep_aspect_ratio \

  --output ${HOME}/segmentation_result.jpg

"""


import argparse

import time

import numpy as np

from PIL import Image


from pycoral.adapters import common

from pycoral.adapters import segment

from pycoral.utils.edgetpu import make_interpreter

from pycoral.adapters import classify

from pycoral.utils.dataset import read_label_file

from  testCheck import checkPIcam, executeandsearch

import os


class Classify_and_Stream:


    def create_pascal_label_colormap(self):

        """Creates a label colormap used in PASCAL VOC segmentation benchmark.

        Returns:

            A Colormap for visualizing segmentation results.

        """

        colormap = np.zeros((256, 3), dtype=int)

        indices = np.arange(256, dtype=int)


        for shift in reversed(range(8)):

            for channel in range(3):

                colormap[:, channel] |= ((indices >> channel) & 1) << shift

                indices >>= 3


        return colormap


    def label_to_color_image(self, label):

        """Adds color defined by the dataset colormap to the label.

        Args:

            label: A 2D array with integer type, storing the segmentation label.

        Returns:

            result: A 2D array with floating type. The element of the array

            is the color indexed by the corresponding element in the input label

            to the PASCAL color map.

        Raises:

            ValueError: If label is not of rank 2 or its value is larger than color

            map maximum entry.

        """

        if label.ndim != 2:

            raise ValueError('Expect 2-D input label')


        colormap = self.create_pascal_label_colormap()


        if np.max(label) >= len(colormap):

            raise ValueError('label value too large.')


        return colormap[label]


    def classify_and_stream(self, detected, prediction, queue:Queue, frameQueue:Queue, buffer_count=5):

        interpreter_seg = make_interpreter('/home/pi/rpi-face/deeplabv3_mnv2_pascal_quant_edgetpu.tflite', device=':0')

        interpreter_seg.allocate_tensors()

        width, height = common.input_size(interpreter_seg)


        if (checkPIcam('video0')):

            cap = cv2.VideoCapture(1)

        else:

            cap = cv2.VideoCapture(0)

        # counter for classification results:

        result_counter = [0,0,0]

        while(True):

            # Capture frame-by-frame

            ret, frame = cap.read()


            #convert opencv image to PIL image

            img = Image.fromarray(frame)


            #classification:

            labels = read_label_file('/home/pi/final_project/label_map.txt')


            interpreter = make_interpreter('/home/pi/final_project/retrained_model_edgetpu.tflite')

            interpreter.allocate_tensors()


            size = common.input_size(interpreter)

            image = img.resize(size, Image.ANTIALIAS)

            common.set_input(interpreter, image)


            start = time.perf_counter()

            interpreter.invoke()

            inference_time = time.perf_counter() - start

            classes = classify.get_classes(interpreter, 1, 0.0)

            #print('%.1fms' % (inference_time * 1000))


            #print('-------RESULTS--------')

            for c in classes:

                print('%s: %.5f' % (labels.get(c.id, c.id), c.score))


            # determine if door should be opened

            result_counter[c.id] += 1

            if (result_counter[c.id] >= buffer_count):

                result_counter[0] = 0

                result_counter[1] = 0

                result_counter[2] = 0

                prediction = labels.get(c.id, c.id)

                if (prediction == 'negative'):

                    detected = False

                else:

                    detected = True

            #print("write in queue")

            while (queue.qsize() > 2):

                queue.get(True)

            queue.put(detected)

            print(detected)

            print(prediction)

           # fifo = open(FIFO, 'w')

           # print("write in")

           # fifo.write(str(detected))

           # fifo.close()


            #start = time.perf_counter()

            # segmentation

            resized_img, _ = common.set_resized_input(

                interpreter_seg, img.size, lambda size: img.resize(size, Image.ANTIALIAS))

            start = time.perf_counter()

            interpreter_seg.invoke()


            result = segment.get_output(interpreter_seg)

            end = time.perf_counter()

            if len(result.shape) == 3:

                result = np.argmax(result, axis=-1)


            # If keep_aspect_ratio, we need to remove the padding area.

            new_width, new_height = resized_img.size

            result = result[:new_height, :new_width]

            mask_img = Image.fromarray(self.label_to_color_image(result).astype(np.uint8))

            #end = time.perf_counter()


            # Concat resized input image and processed segmentation results.

            output_img = Image.new('RGB', (2 * new_width, new_height))

            output_img.paste(resized_img, (0, 0))

            output_img.paste(mask_img, (width, 0))


            #end = time.perf_counter()

            seg_time = end - start 

            #print('segmentation time: %0.1fms' % (seg_time * 1000))

            #print('classification time: %.1fms' % (inference_time * 1000))


            #convert PIL image to opencv form

            open_cv_image = np.array(output_img)


            #frame = cv2.resize(open_cv_image, (640, 480))  # resize the frame

            frameQueue.put(open_cv_image)

            # Display the resulting frame

            #cv2.imshow('frame', open_cv_image)

            if cv2.waitKey(1) & 0xFF == ord('q'):

                break


        # When everything done, release the capture

        cap.release()

        cv2.destroyAllWindows()