ECE5725 Project
Self Parking Car
Parth Bhatt, Vipin Venugopal
Introduction
We are offering a solution to the most feared part of a driver’s test –Parallel Parking. Driving through the city, it is a grueling task finding a parking spot. But squeezing your car into it is a whole different ball game. Wouldn’t it be great if you could just press a button let your car take care of this?
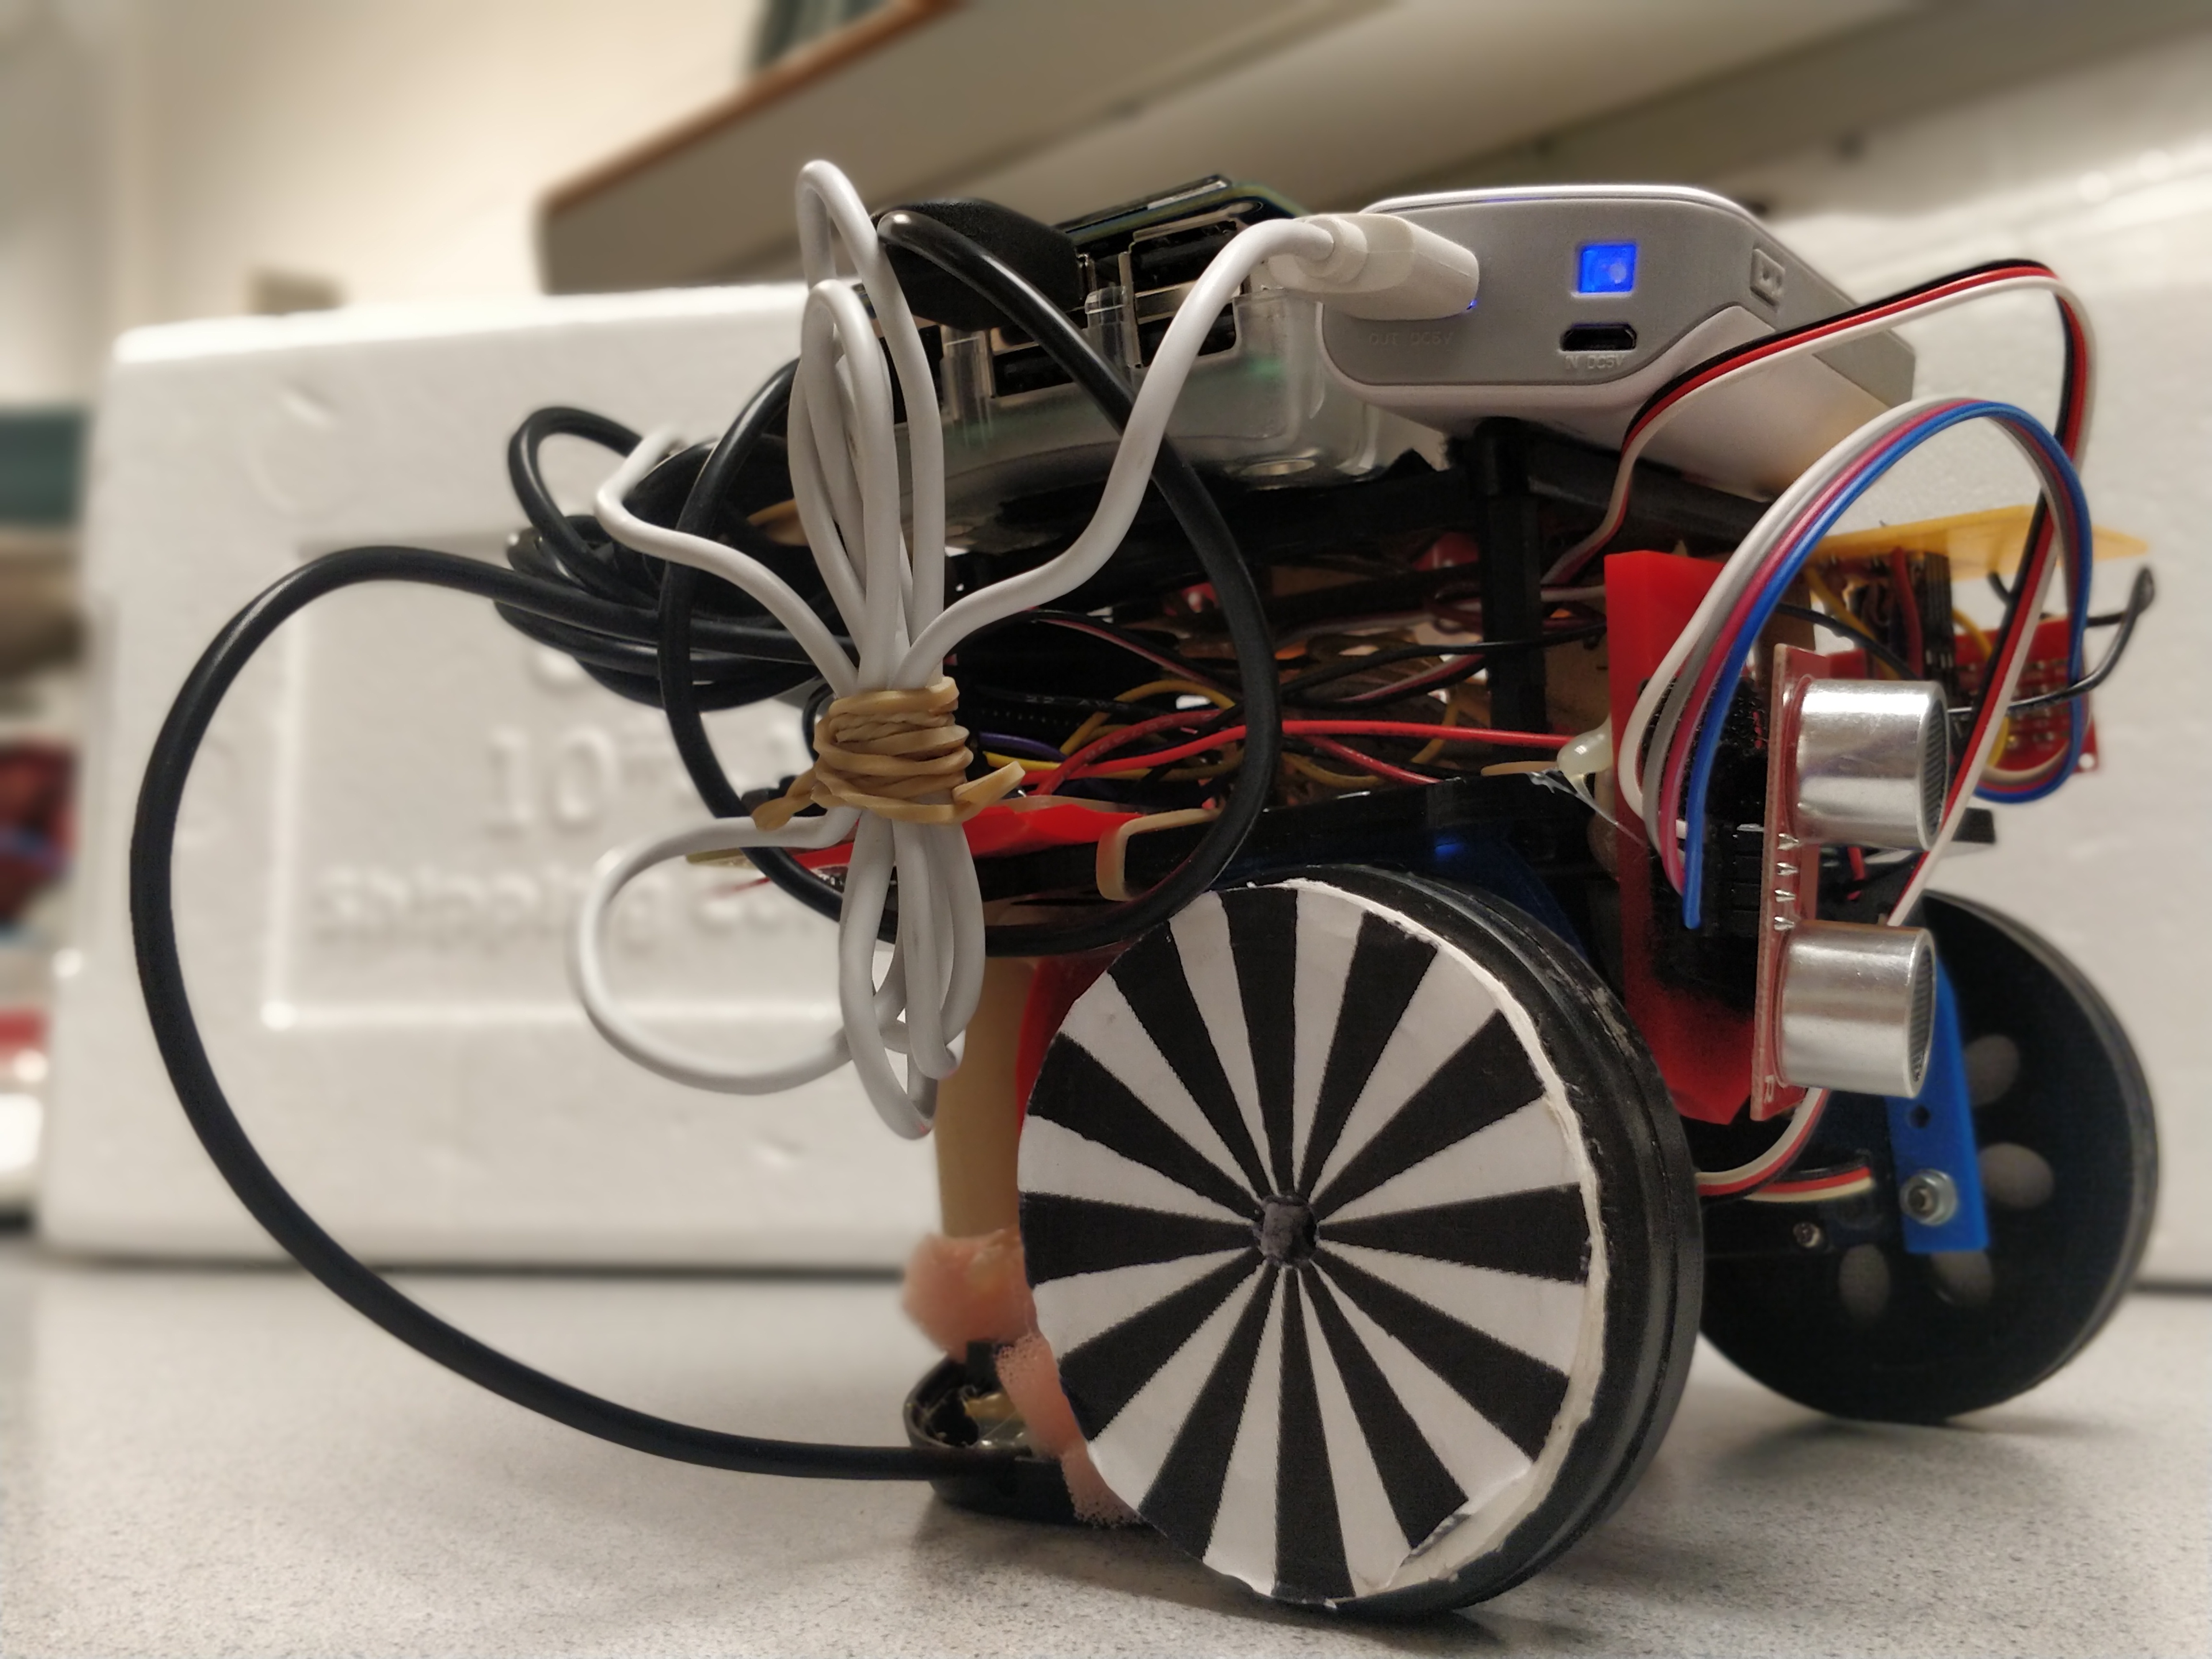
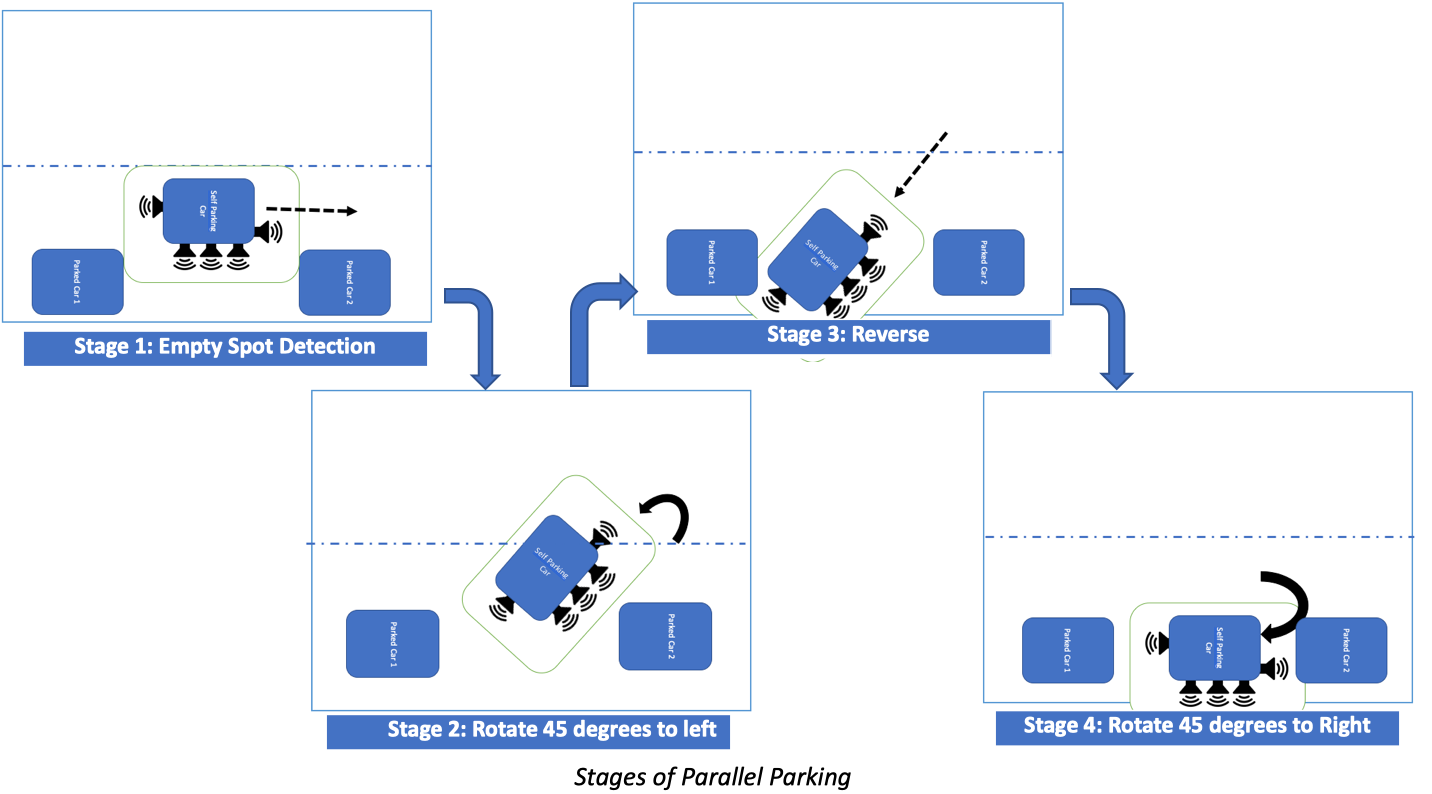
We have built a low-cost prototype for implementing a parallel parking algorithm on a mobile robot car, using a Raspberry Pi, camera, Ultrasonic sensors and an optical sensor. A hardware push button starts process of self-parking the car. On pressing the button, the robot moves forward, while scanning for vacant spots on the side using ultrasonic sensor array and the camera. On finding a suitable spot of appropriate dimensions, the robot moves forward and stops at an appropriate distance. The robot then makes a 45 degree turn and back up into the spot. The ultrasonic sensors at the back of the robot allows it to move backward till the obstacle. Then the robot makes another 45 degree in the opposite direction to become straight. After this using the front and rear sensors, the robot can park itself within the spot.
The control algorithm goes through various stages, where the Raspberry Pi would use various combinations of the sensor data to make decisions and rotate the servo motors in appropriate direction to maneuver the robot. The robot car should select only those spots in which it can fit in. It should also not collide with the walls or other vehicles during the entire process.
Project Objective:
The project aims at building a low-cost prototype for implementing autonomous parallel parking on a Robot Car with a RaspberryPi Platform using Sensor fusion of multiple ultrasonic sensors & PiCamera and closed loop control of Servo Motors.
Design
Hardware Design
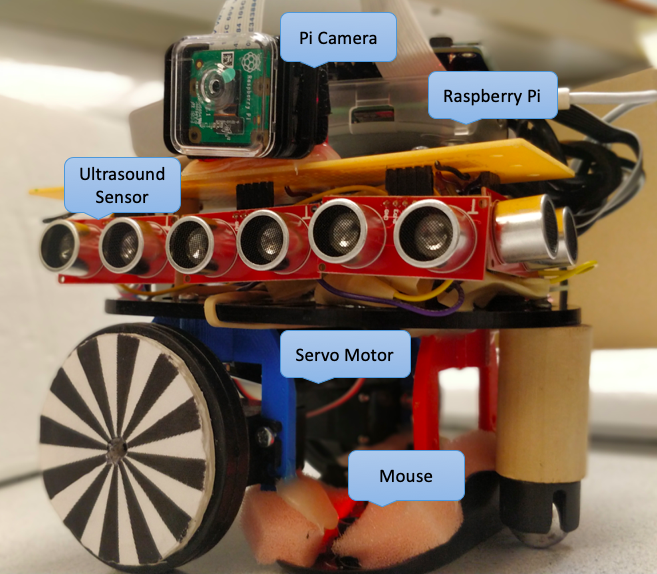
The hardware components of the self-parking car include.
- Raspberry Pi
- Parallax Continuous Rotation Servo Motors
- Ultrasonic Sensors
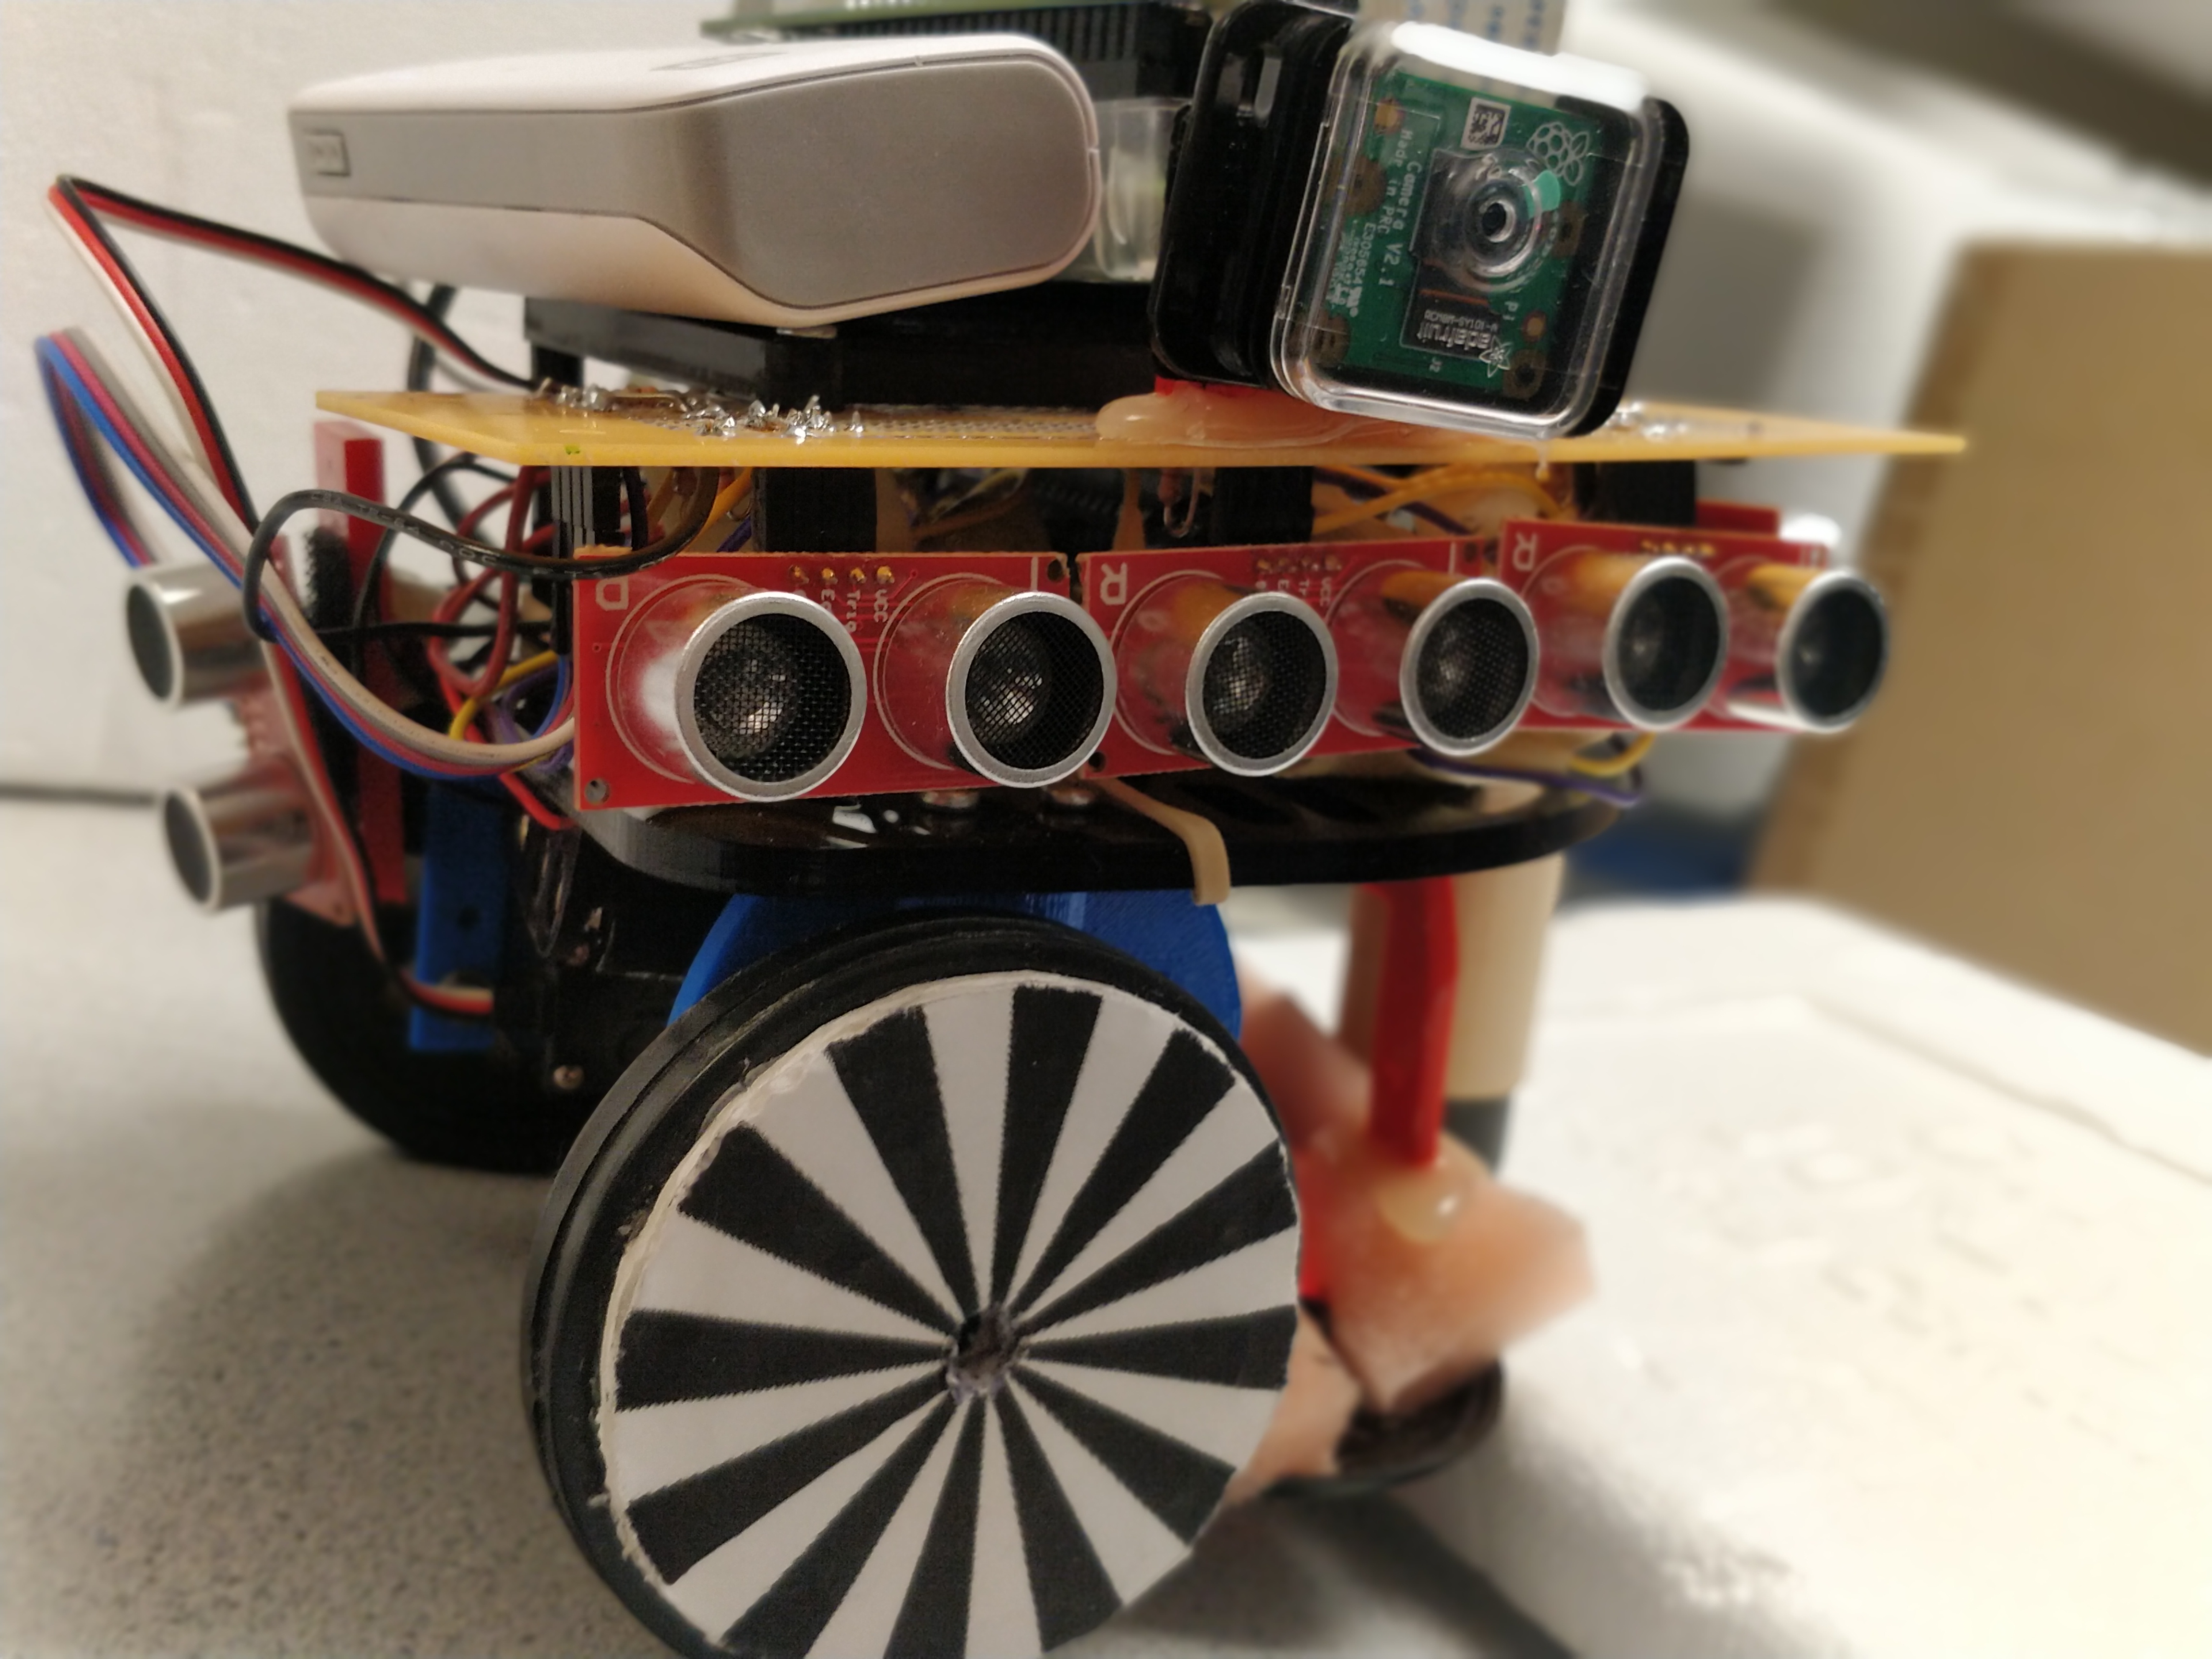
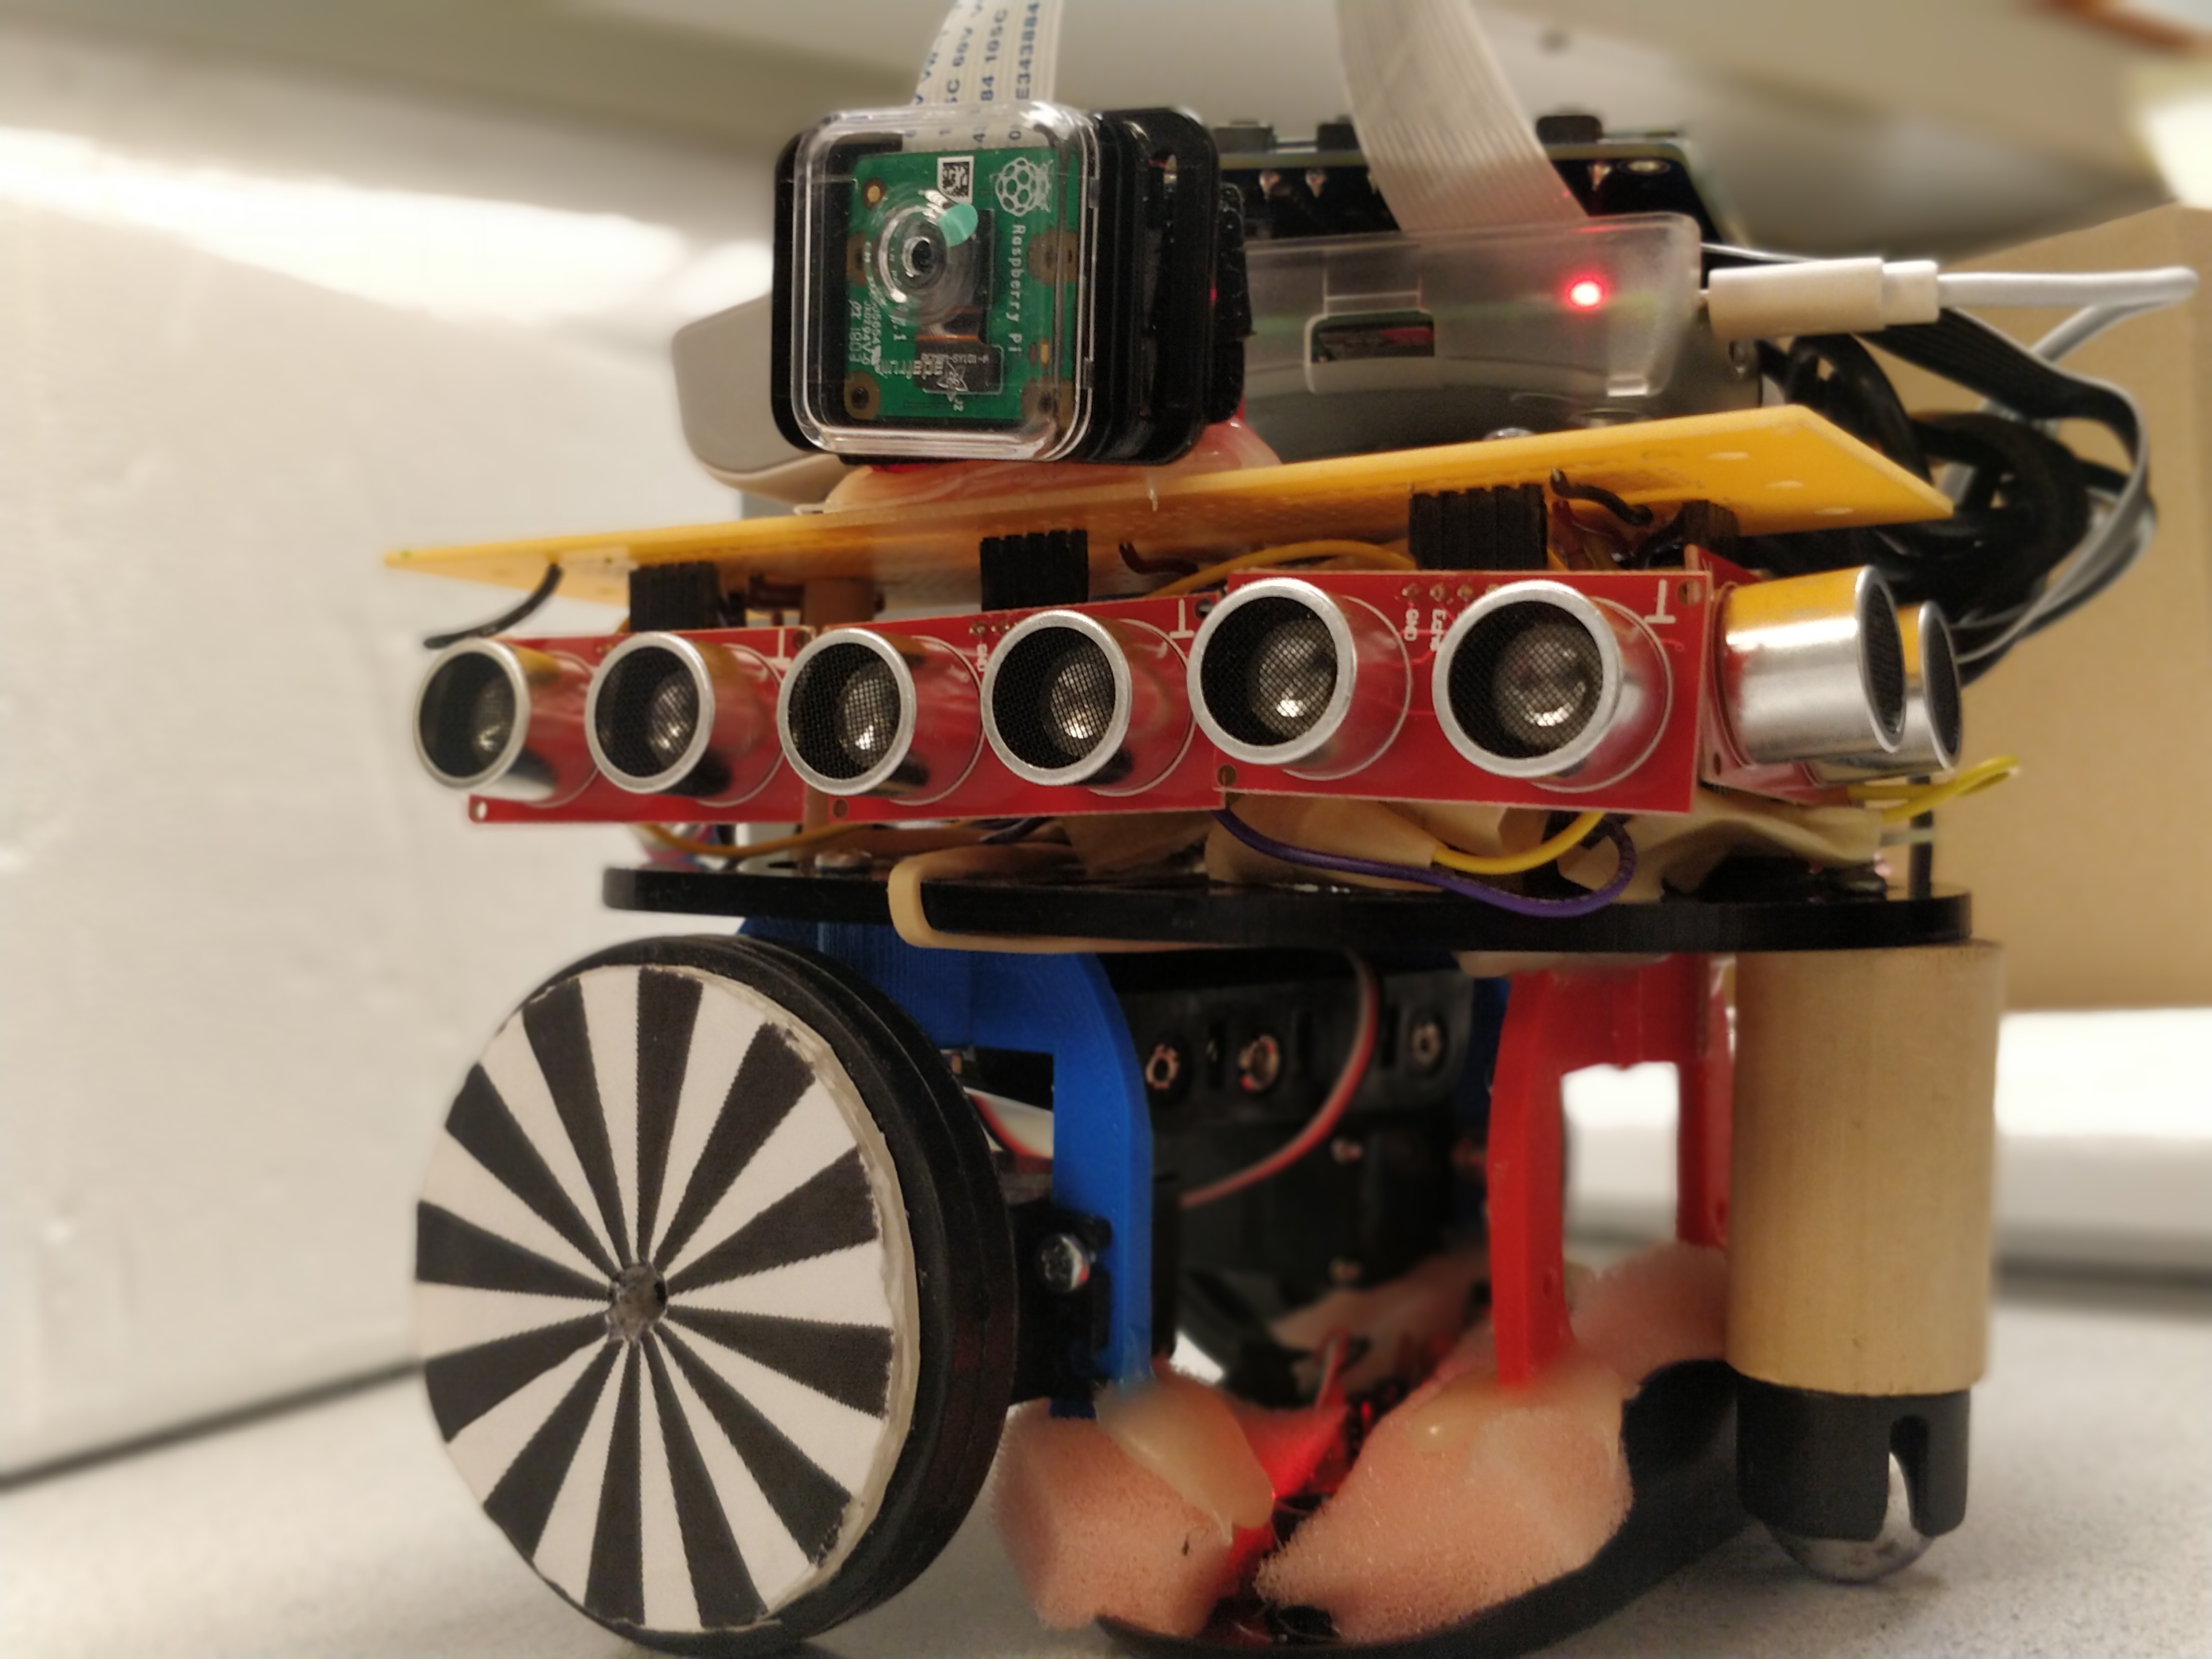
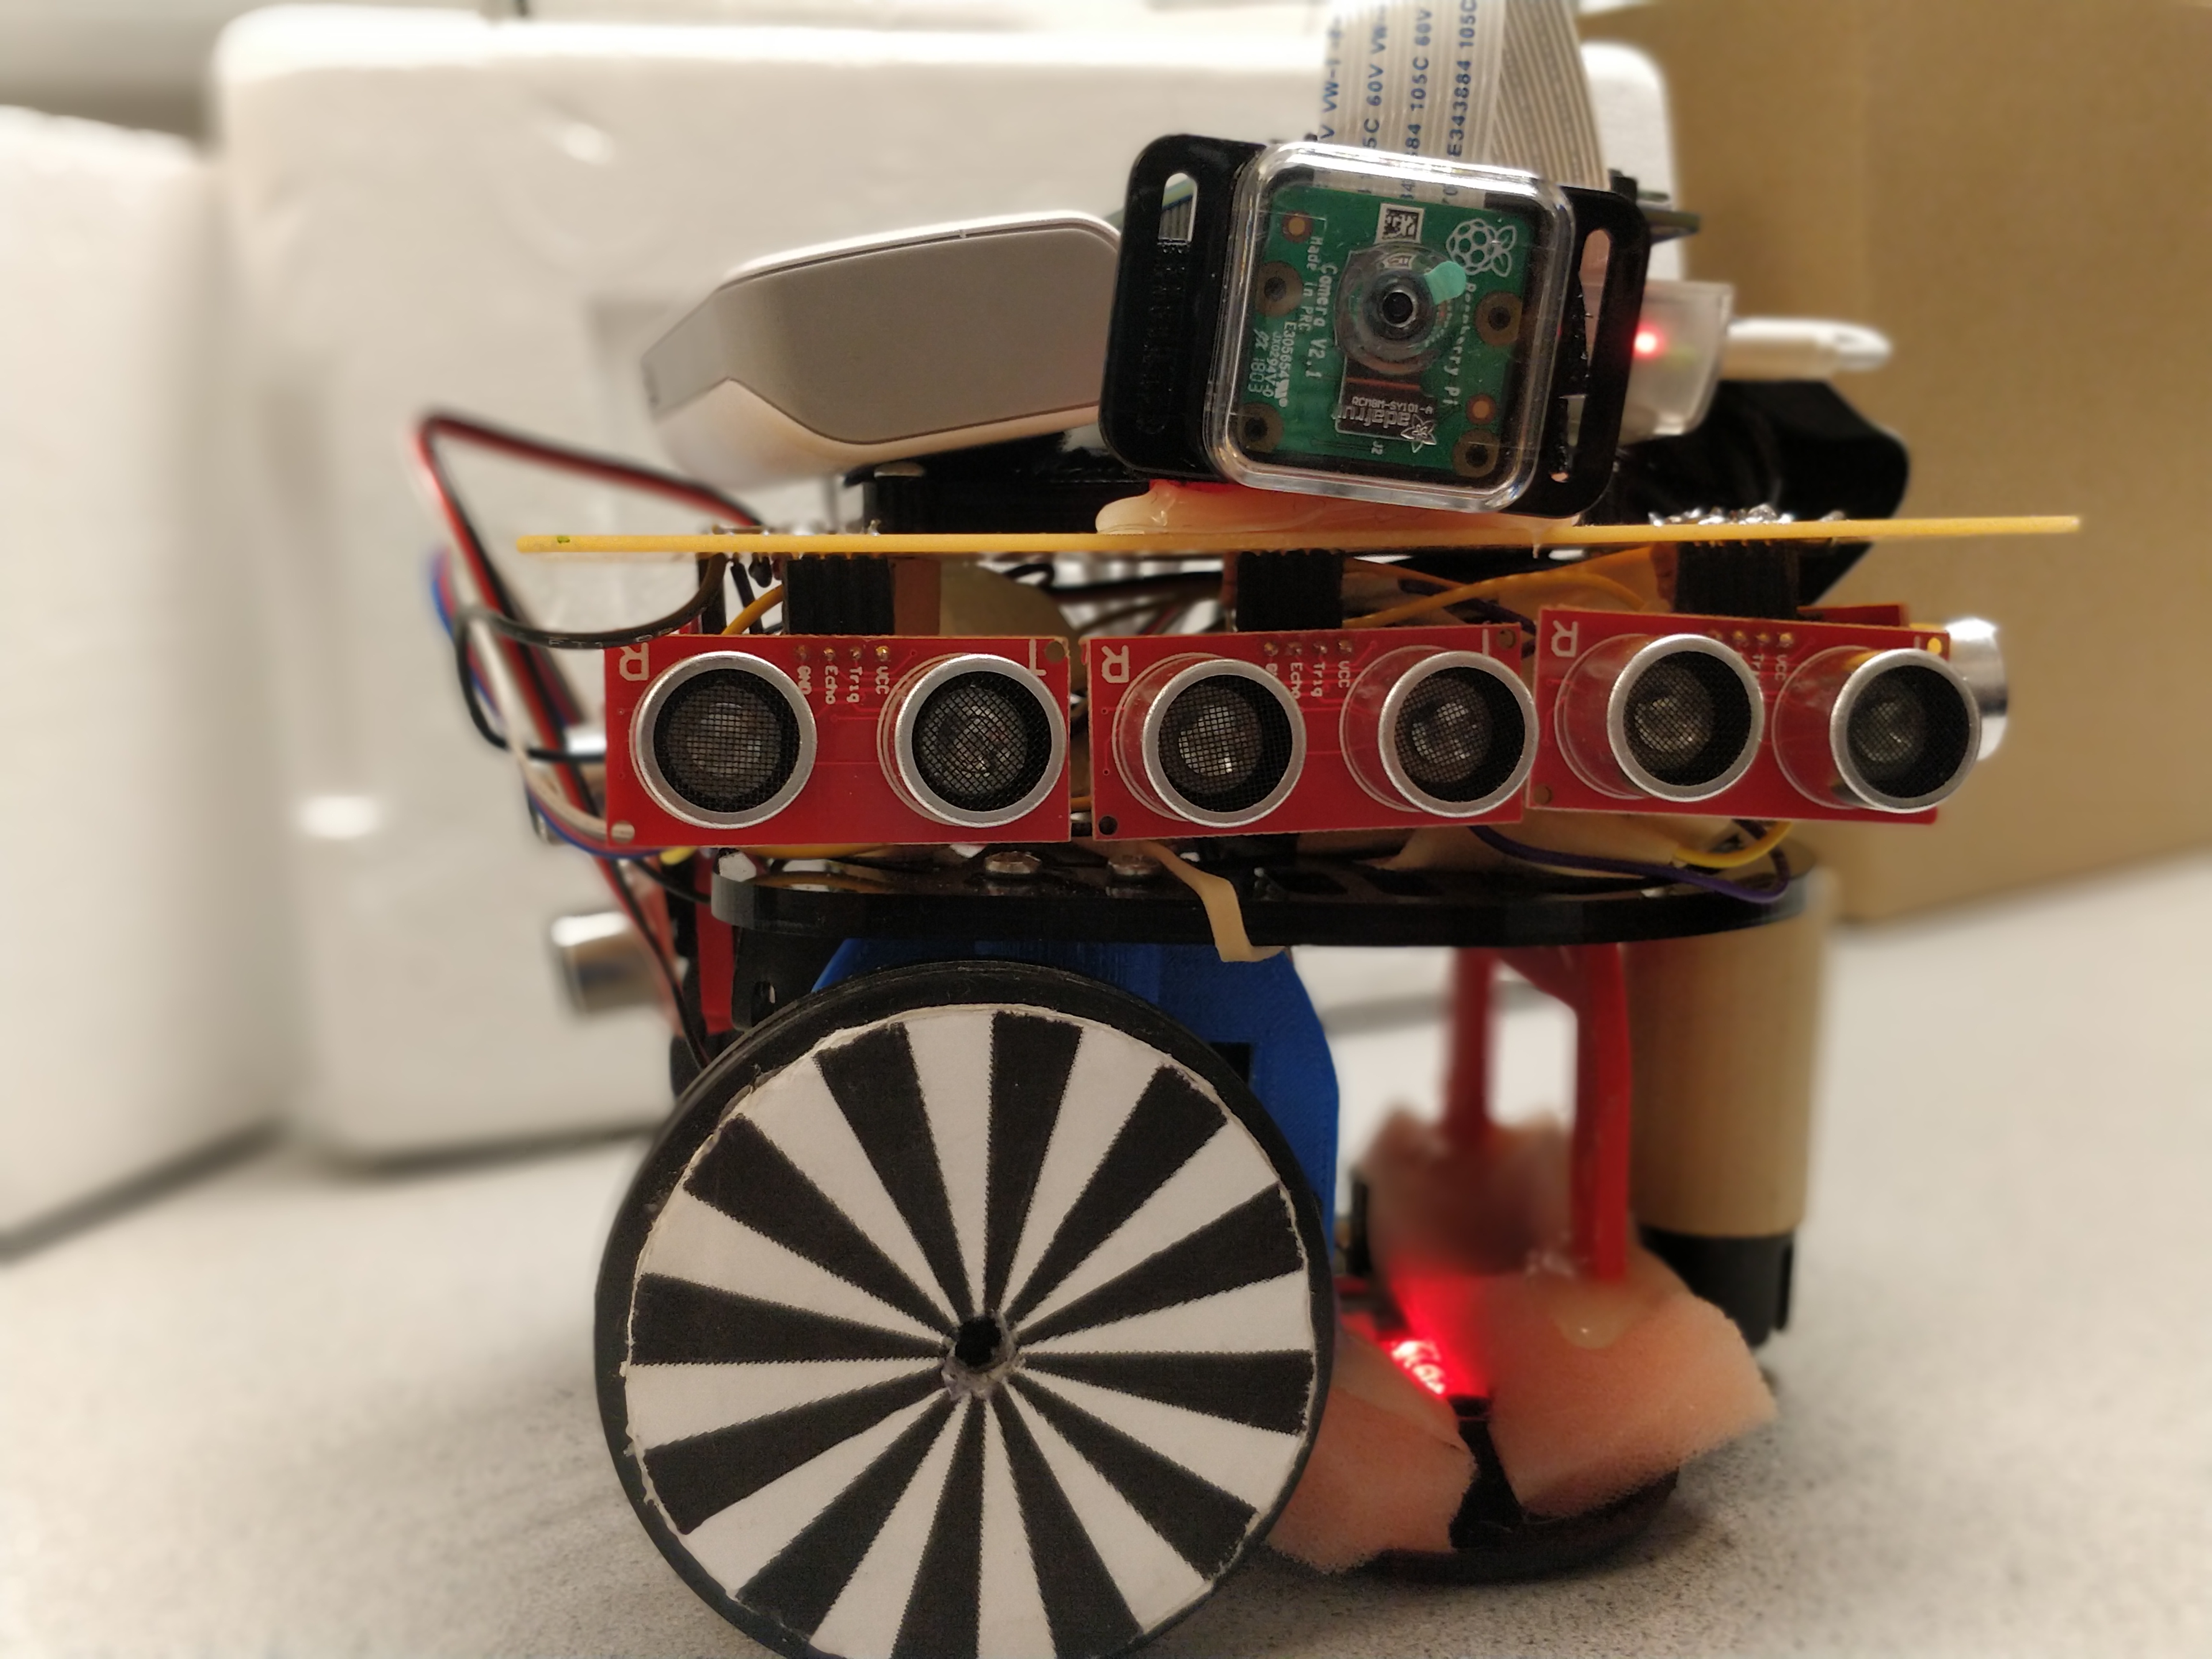
- Pi-Camera
- Optical Mouse
Raspberrypi: It is a rapid prototyping platform running on the ARM based controller. This project employs the Rpi-3 board which is running on the ARM A7 processor with Raspbian OS which is a flavor of Linux.
Parallax Continuous Rotation Servo Motors: These are the servo motors which require the continuous series of pulses for giving out the output. The two consecutive pulses should have at least 20ms time difference between them. Parallax rotation motors are designed in such a way that the motors are at halt when the on time of the pulses is 1.5ms. If the on time of the pulses is reduced from 1.5ms, the motors rotate in the clockwise direction. If the time is increased from 1.5ms, the motors rotate in the anti-clockwise direction. The pulse widths are can only be limited between 1.3ms to 1.7ms. Hence, the motor would rotate at full speed in clockwise direction at 1.3ms and anti-clockwise direction at 1.7ms. This property of the Parallax Continuous Rotation Servo Motors is used to move the robot car to different directions. So if both, left and right motors are rotating in same direction, the robot would turn left or right. If the motors are rotating in opposite directions, the robot car can be made to move forward or behind.
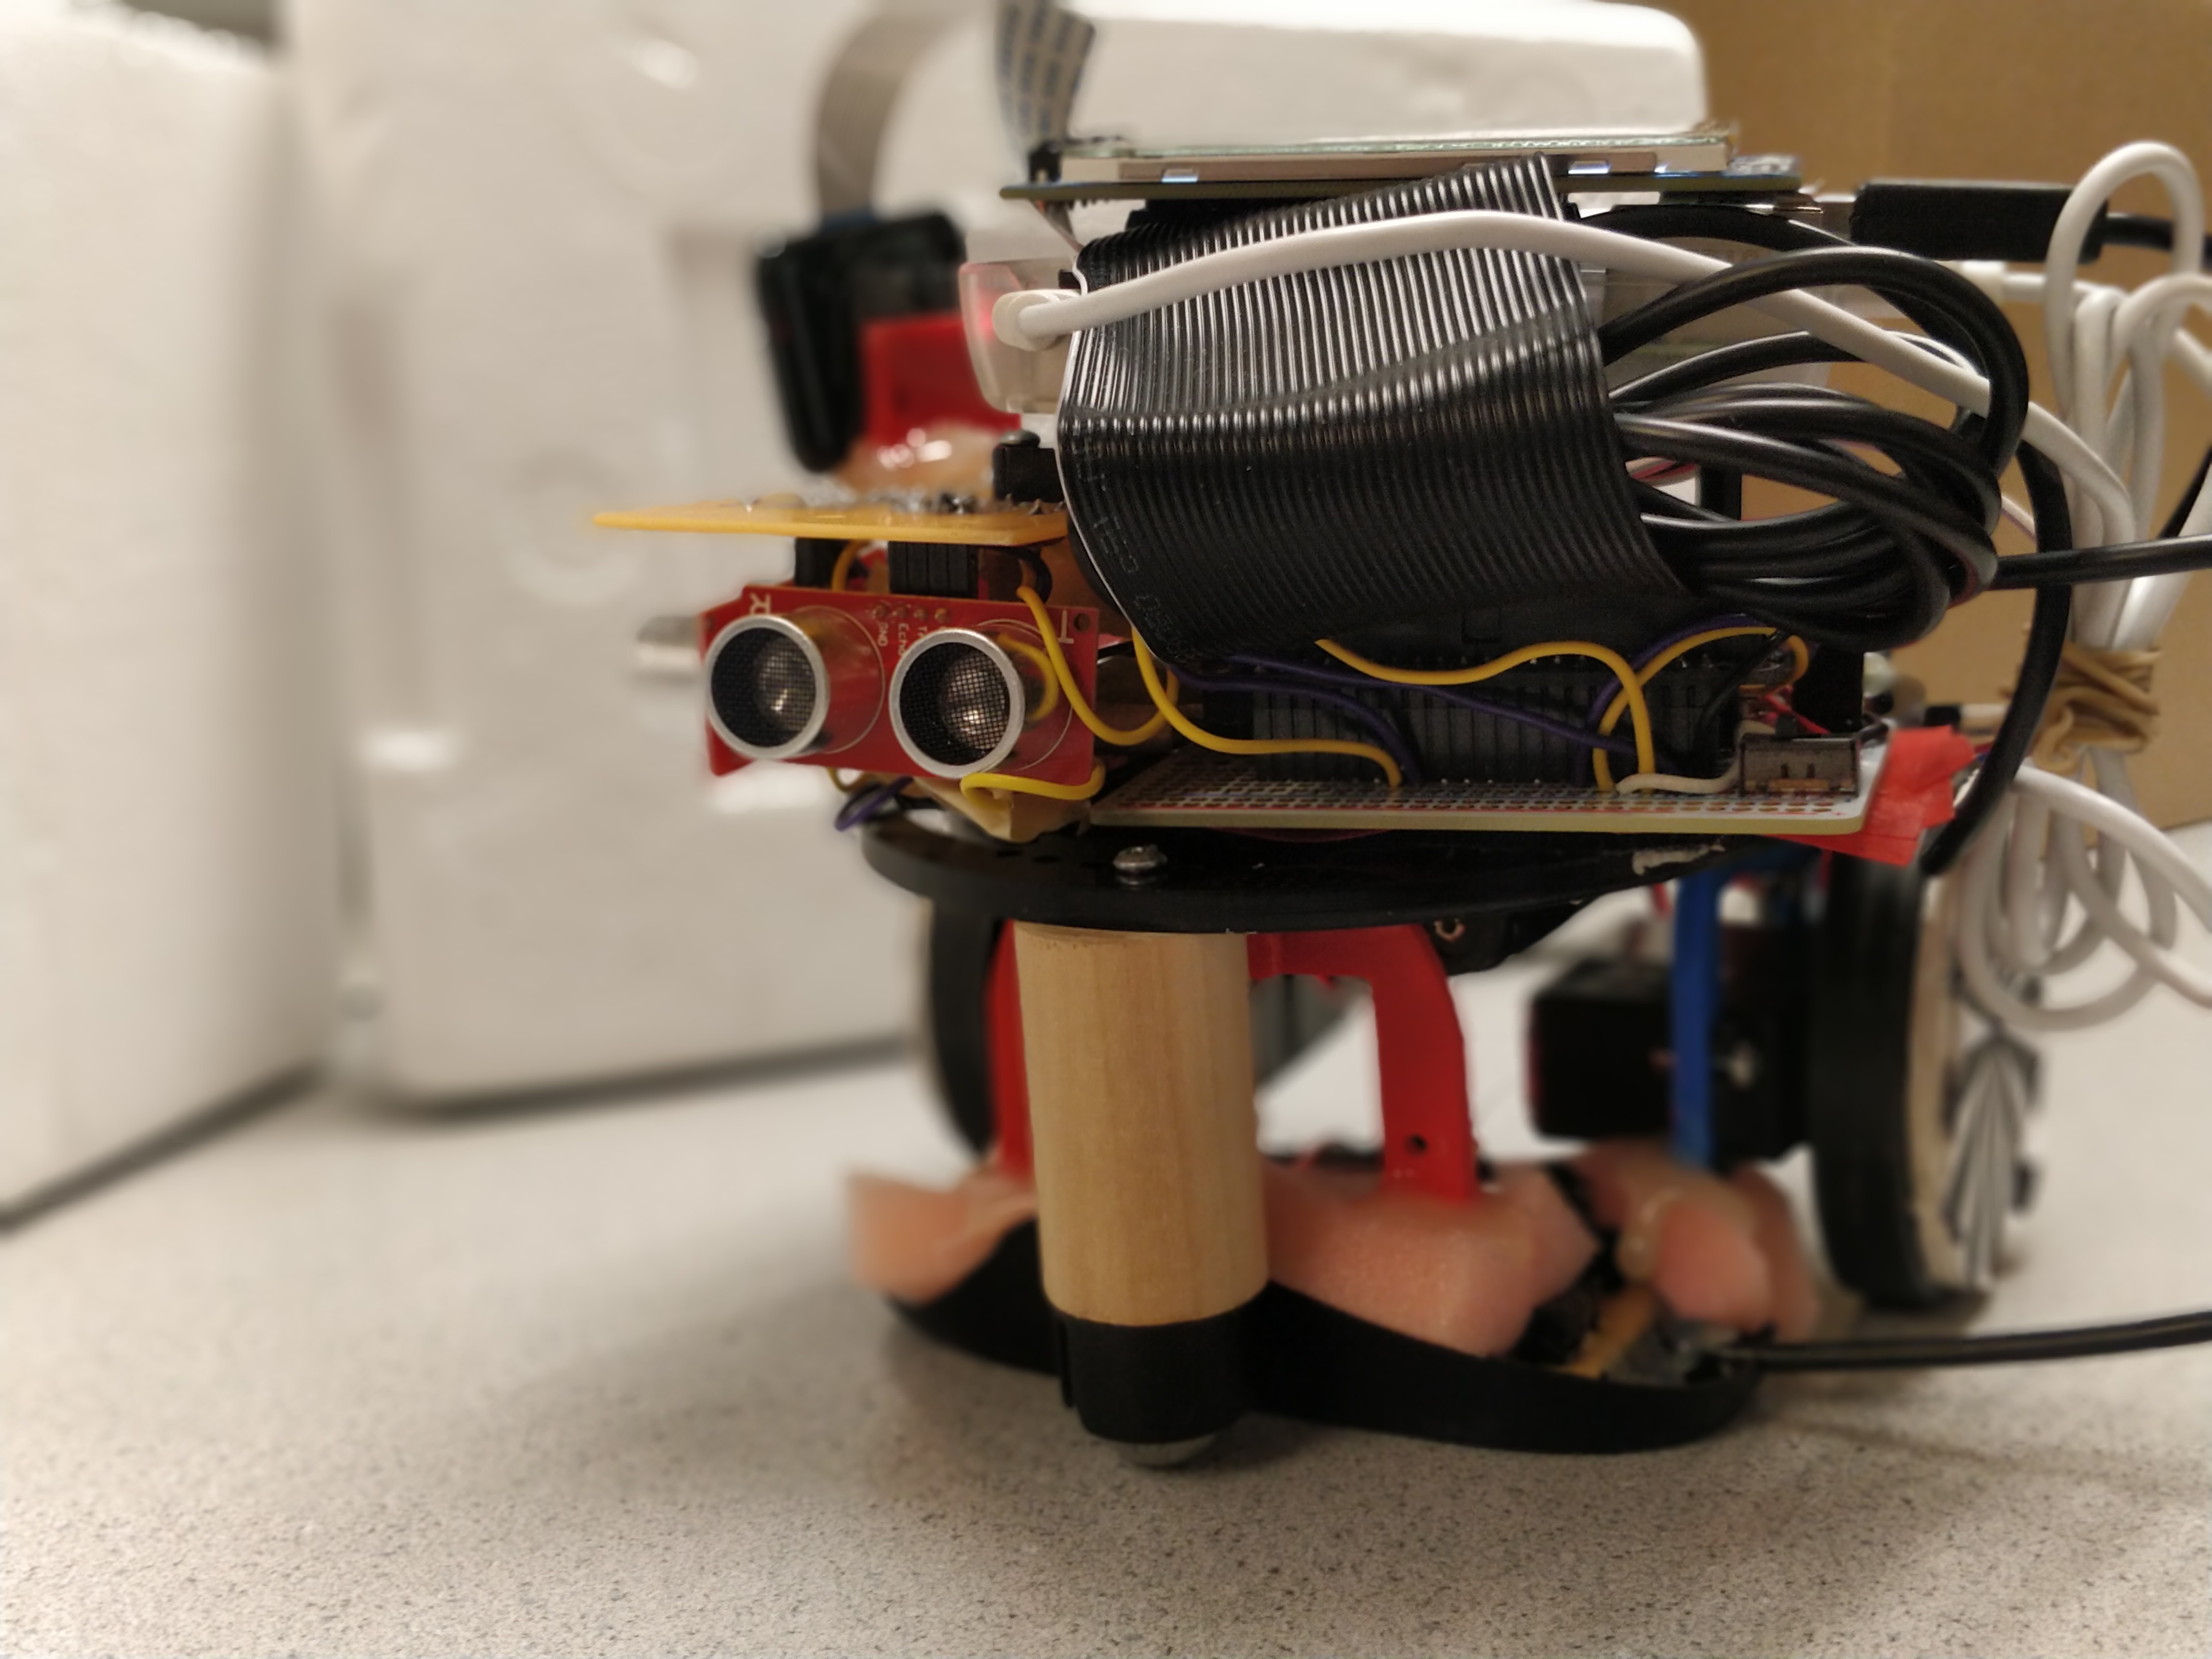
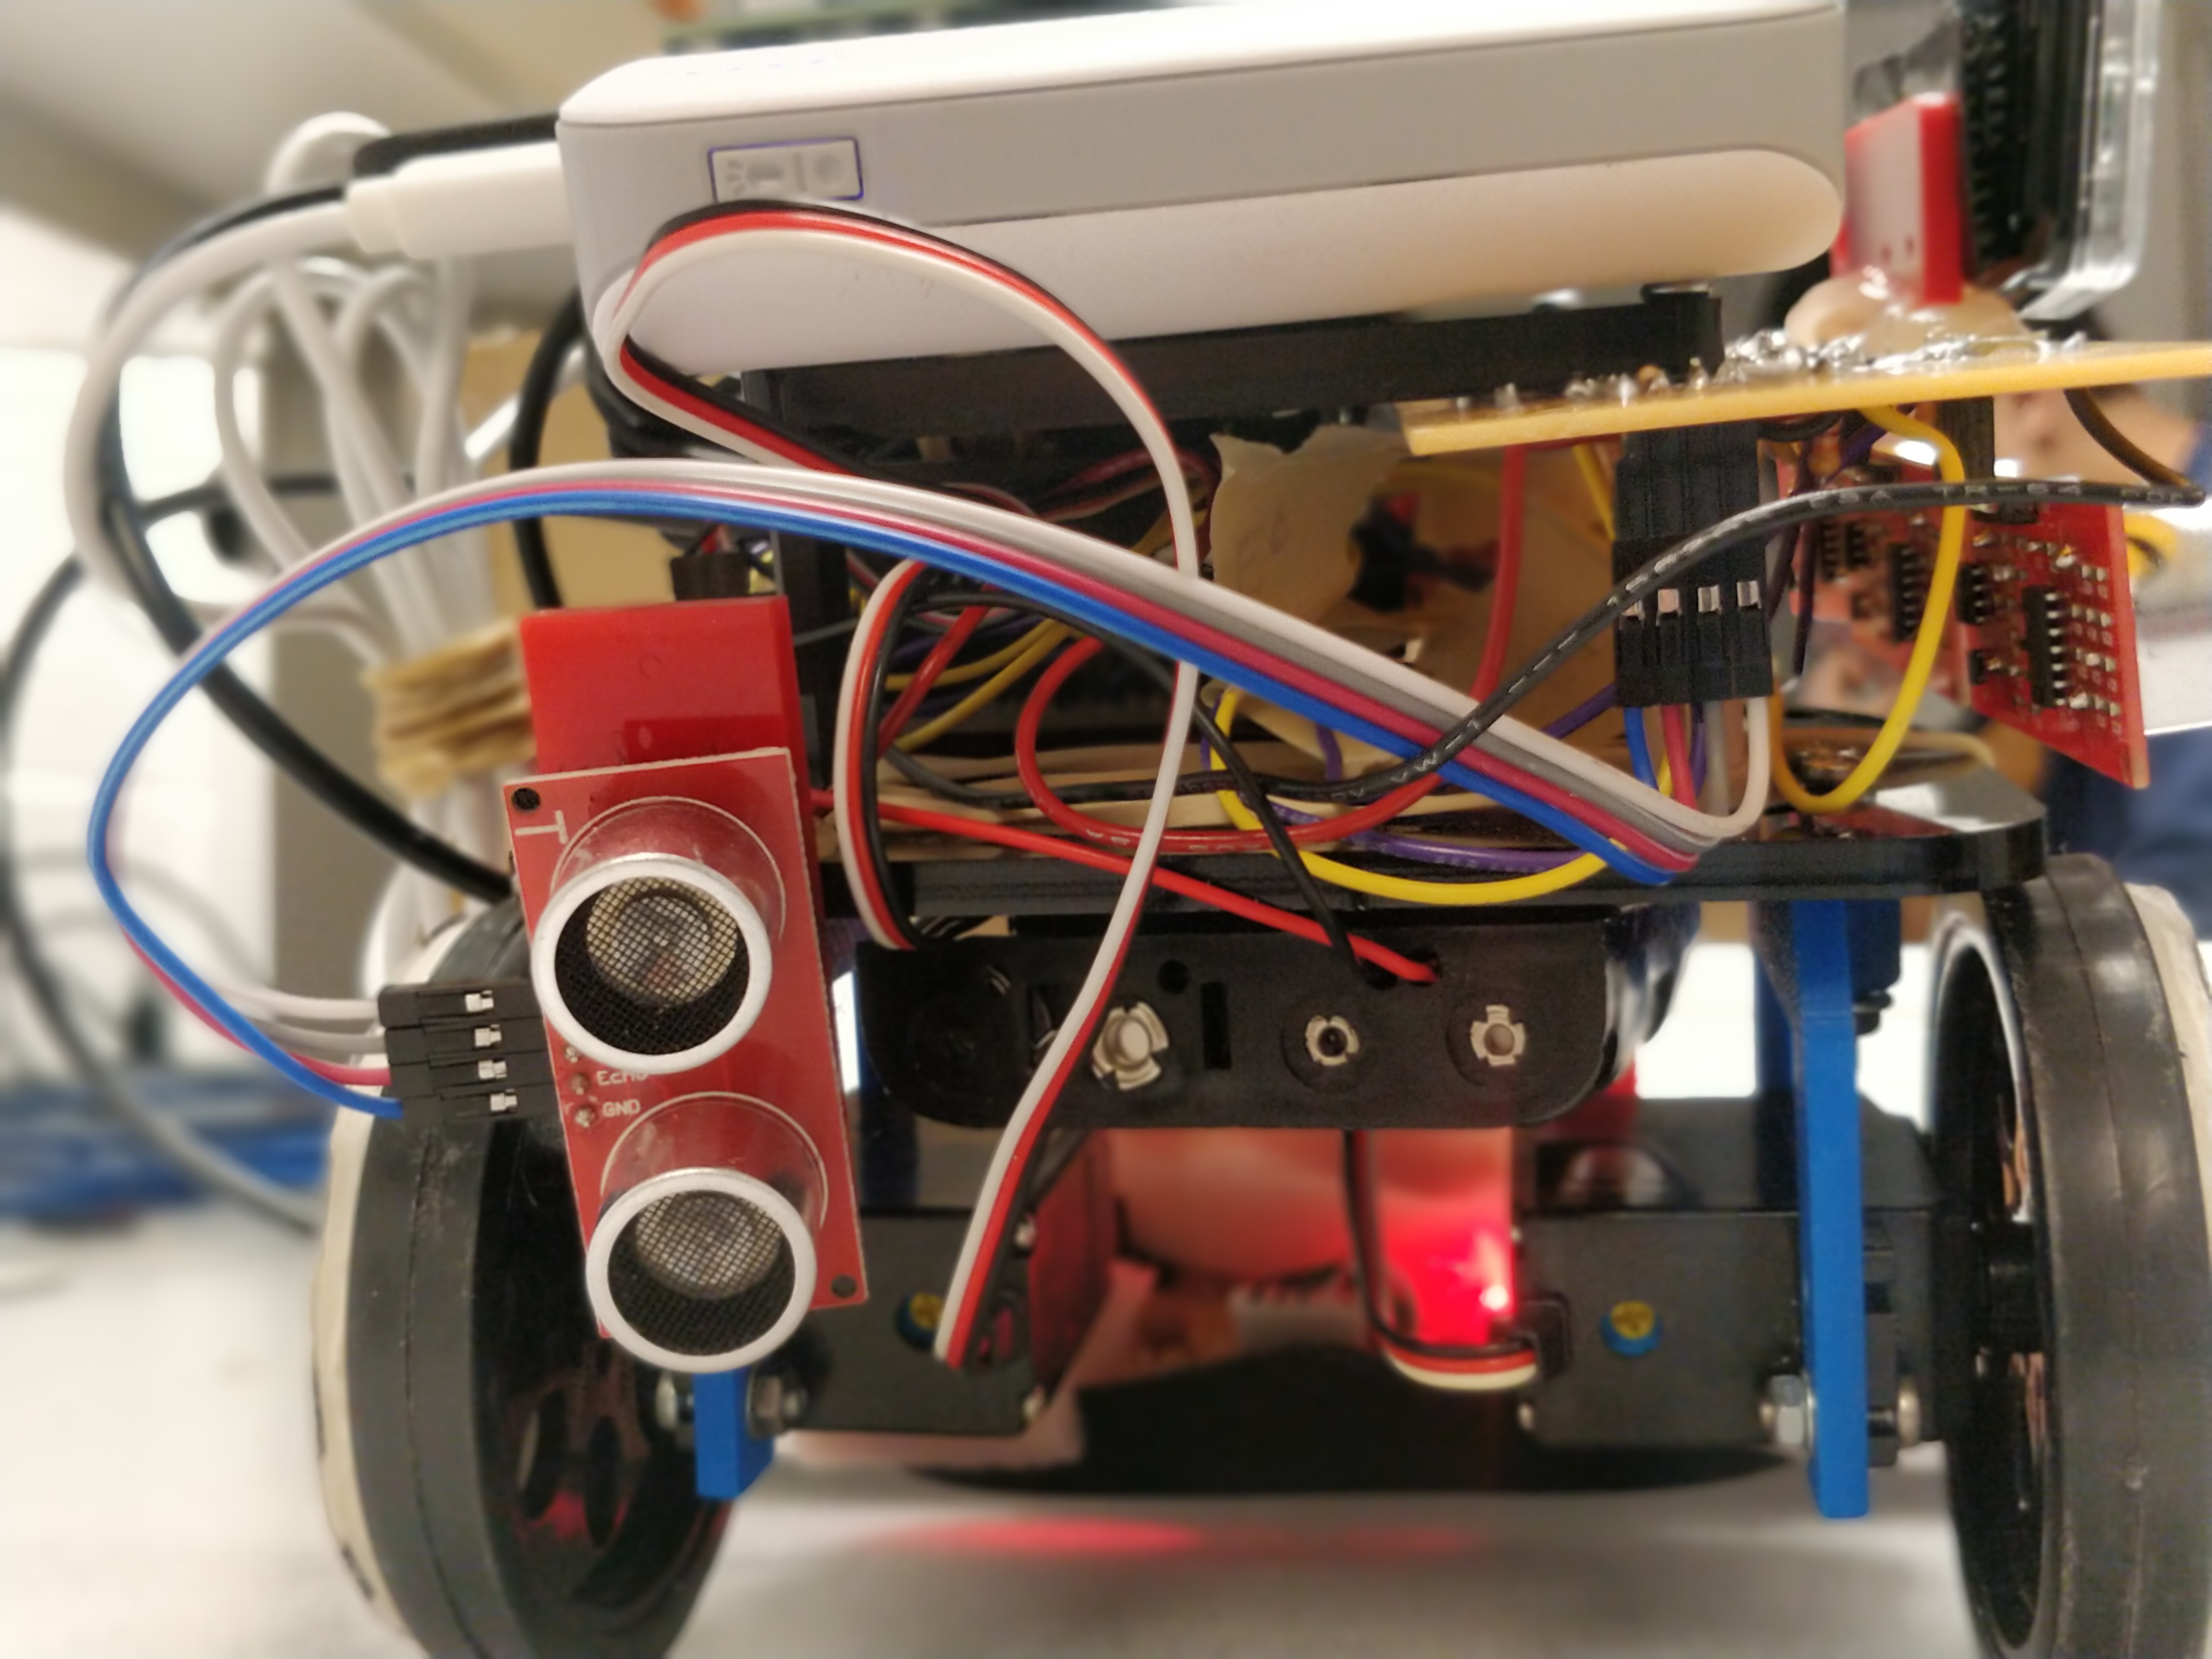
Ultrasonic Sensors: The Ultrasonic sensors are used to measure the distance from the device from the nearest wall or an obstacle. The sensors used in this project are HC-SR04 from Sparkfun. These sensors have 4 pins of which two are the supply pins and the other two are trigger and echo signals. When a 10-microsecond pulse is given on the trigger pin, a 40MHz signal is sent by the sensor and a pulse is returned from the echo pin after a while, the width of this pulse is directly proportional to the distance of the nearest obstacle. This distance is being used to detect the parking spot. The car would only detect the parking spot if all the three sensors detect the distance to be more than 15cm which is the width of the robot car.
Pi-Camera: pi-camera is a camera which is directly compatible with the Raspberry Pi board. The Board also has a connector so that there is no hassle for connecting the wires from the camera the board. The camera just needs to be plugged into the connector and it can be accessed in the code using the OpenCV libraries. This library will be discussed in detail in the software design section.
Optical Mouse: This is used to make the robot move the robot forward. It is not possible to make the motors to move at a same speed to make the robot to move in a straight line. At any time, one motor would be moving slower than other. Hence, to make sure the motor is moving in a straight line, it is necessary to have a feedback mechanism. Initially, this feedback mechanism was intended to be implemented using the optical encoders stuck on the wheels but these IR sensors are very susceptible to the ambient light. Hence, these sensors were replaced by a mouse. The optical mouse, when being used on the computer for aa graphical user interface, returns a dx (change in the x coordinate) and dy (change in y coordinate) to move the mouse pointer on the screen. These values can be integrated to obtain the real time x an y coordinates of the mouse. Hence, the mouse is attached with the robot. When the robot moves forward, the x coordinate of the mouse should remain constant to make sure it is running in a straight line. The y coordinate of the mouse would provide the distance travelled by the robot. Additionally, the mouse connects to the Raspberry Pi board via USB which also save time to connect the wires from the sensors to the microcontroller board.
Software Design
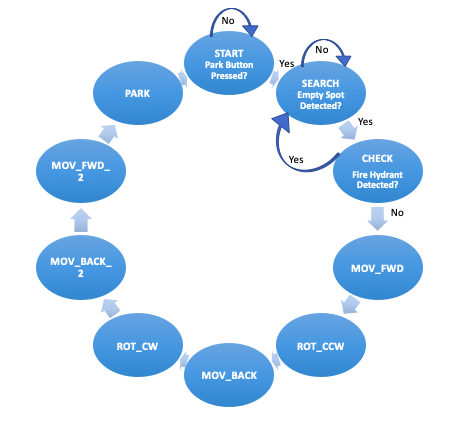
The system software consists of the Self-Parking State Machine and associated functions and interfaces.
Self-Parking State Machine: The FSM is used to move the Robot Car from initial position to the final parked position. The various states make use of different combinations of sensors to control the movement of the robot.

Hardware PWM generation: The PWM signal required for controlling the servo motors is generated using the pigpio library. Pigpiod is a utility which launches the pigpio library as a daemon. Once launched the pigpio library runs in the background accepting commands from the pipe and socket interfaces. The pigpiod utility requires sudo privileges to launch the library but thereafter the pipe and socket commands may be issued by normal users.
Optical mouse odometry: The position of the robot at any point of time is sensed using an optical mouse connected over USB port. The optical mouse, when being used on the computer for a graphical user interface, returns a dx (change in the x coordinate) and dy (change in y coordinate) to move the mouse pointer on the screen. These values can be integrated to obtain the real time x an y coordinates of the mouse. Hence, the mouse is attached with the robot. When the robot moves forward, the x coordinate of the mouse should remain constant to make sure it is running in a straight line. The y coordinate of the mouse would provide the distance travelled by the robot. The mouse movements in the x and y direction are accumulated using a background process. Any movement in mouse is captured and immediately updated on a FIFO. The main application reads from FIFO to get the current position.
Movement control: To make the robot move in a straight line, the initial x and y positions are stored, the left motor is rotated in anticlockwise direction and right motor is rotated in clockwise direction. The right motor is moved at a constant speed and the speed of the left motor is varied in proportion to the difference between current x position and initial x position to minimize the error and maintain straight line movement until current y position matches the desired value. For rotating the robot, the motors are rotated in same direction and same speed. When the current x value matches desired value, the rotation is stopped.
Fire hydrant detection: The image processing algorithm looks for red objects in the frame and if a red object of dimension larger than the set value is detected, it is tagged as a fire hydrant. The detection was carried out using OpenCV library. The frame from the camera is captured and converted from RGB to HSV color space. The image is masked to detect only red pixels. Further computation intensive processing is done only if number of pixels exceed the minimum threshold, otherwise the frame is discarded. The boundary and center of the object is then extracted. If the radius is higher than the minimum set value, the object is tagged as a fire hydrant.
Ultrasonic Interface: The HC-SR04 distance measuring transducer can be easily interfaced with code. However, using readily available library makes it easier to add multiple sensors and avoid cluttering up the main program code. The Bluetin_Echo library was installed using PIP used to read the sensor in centimeter scale.
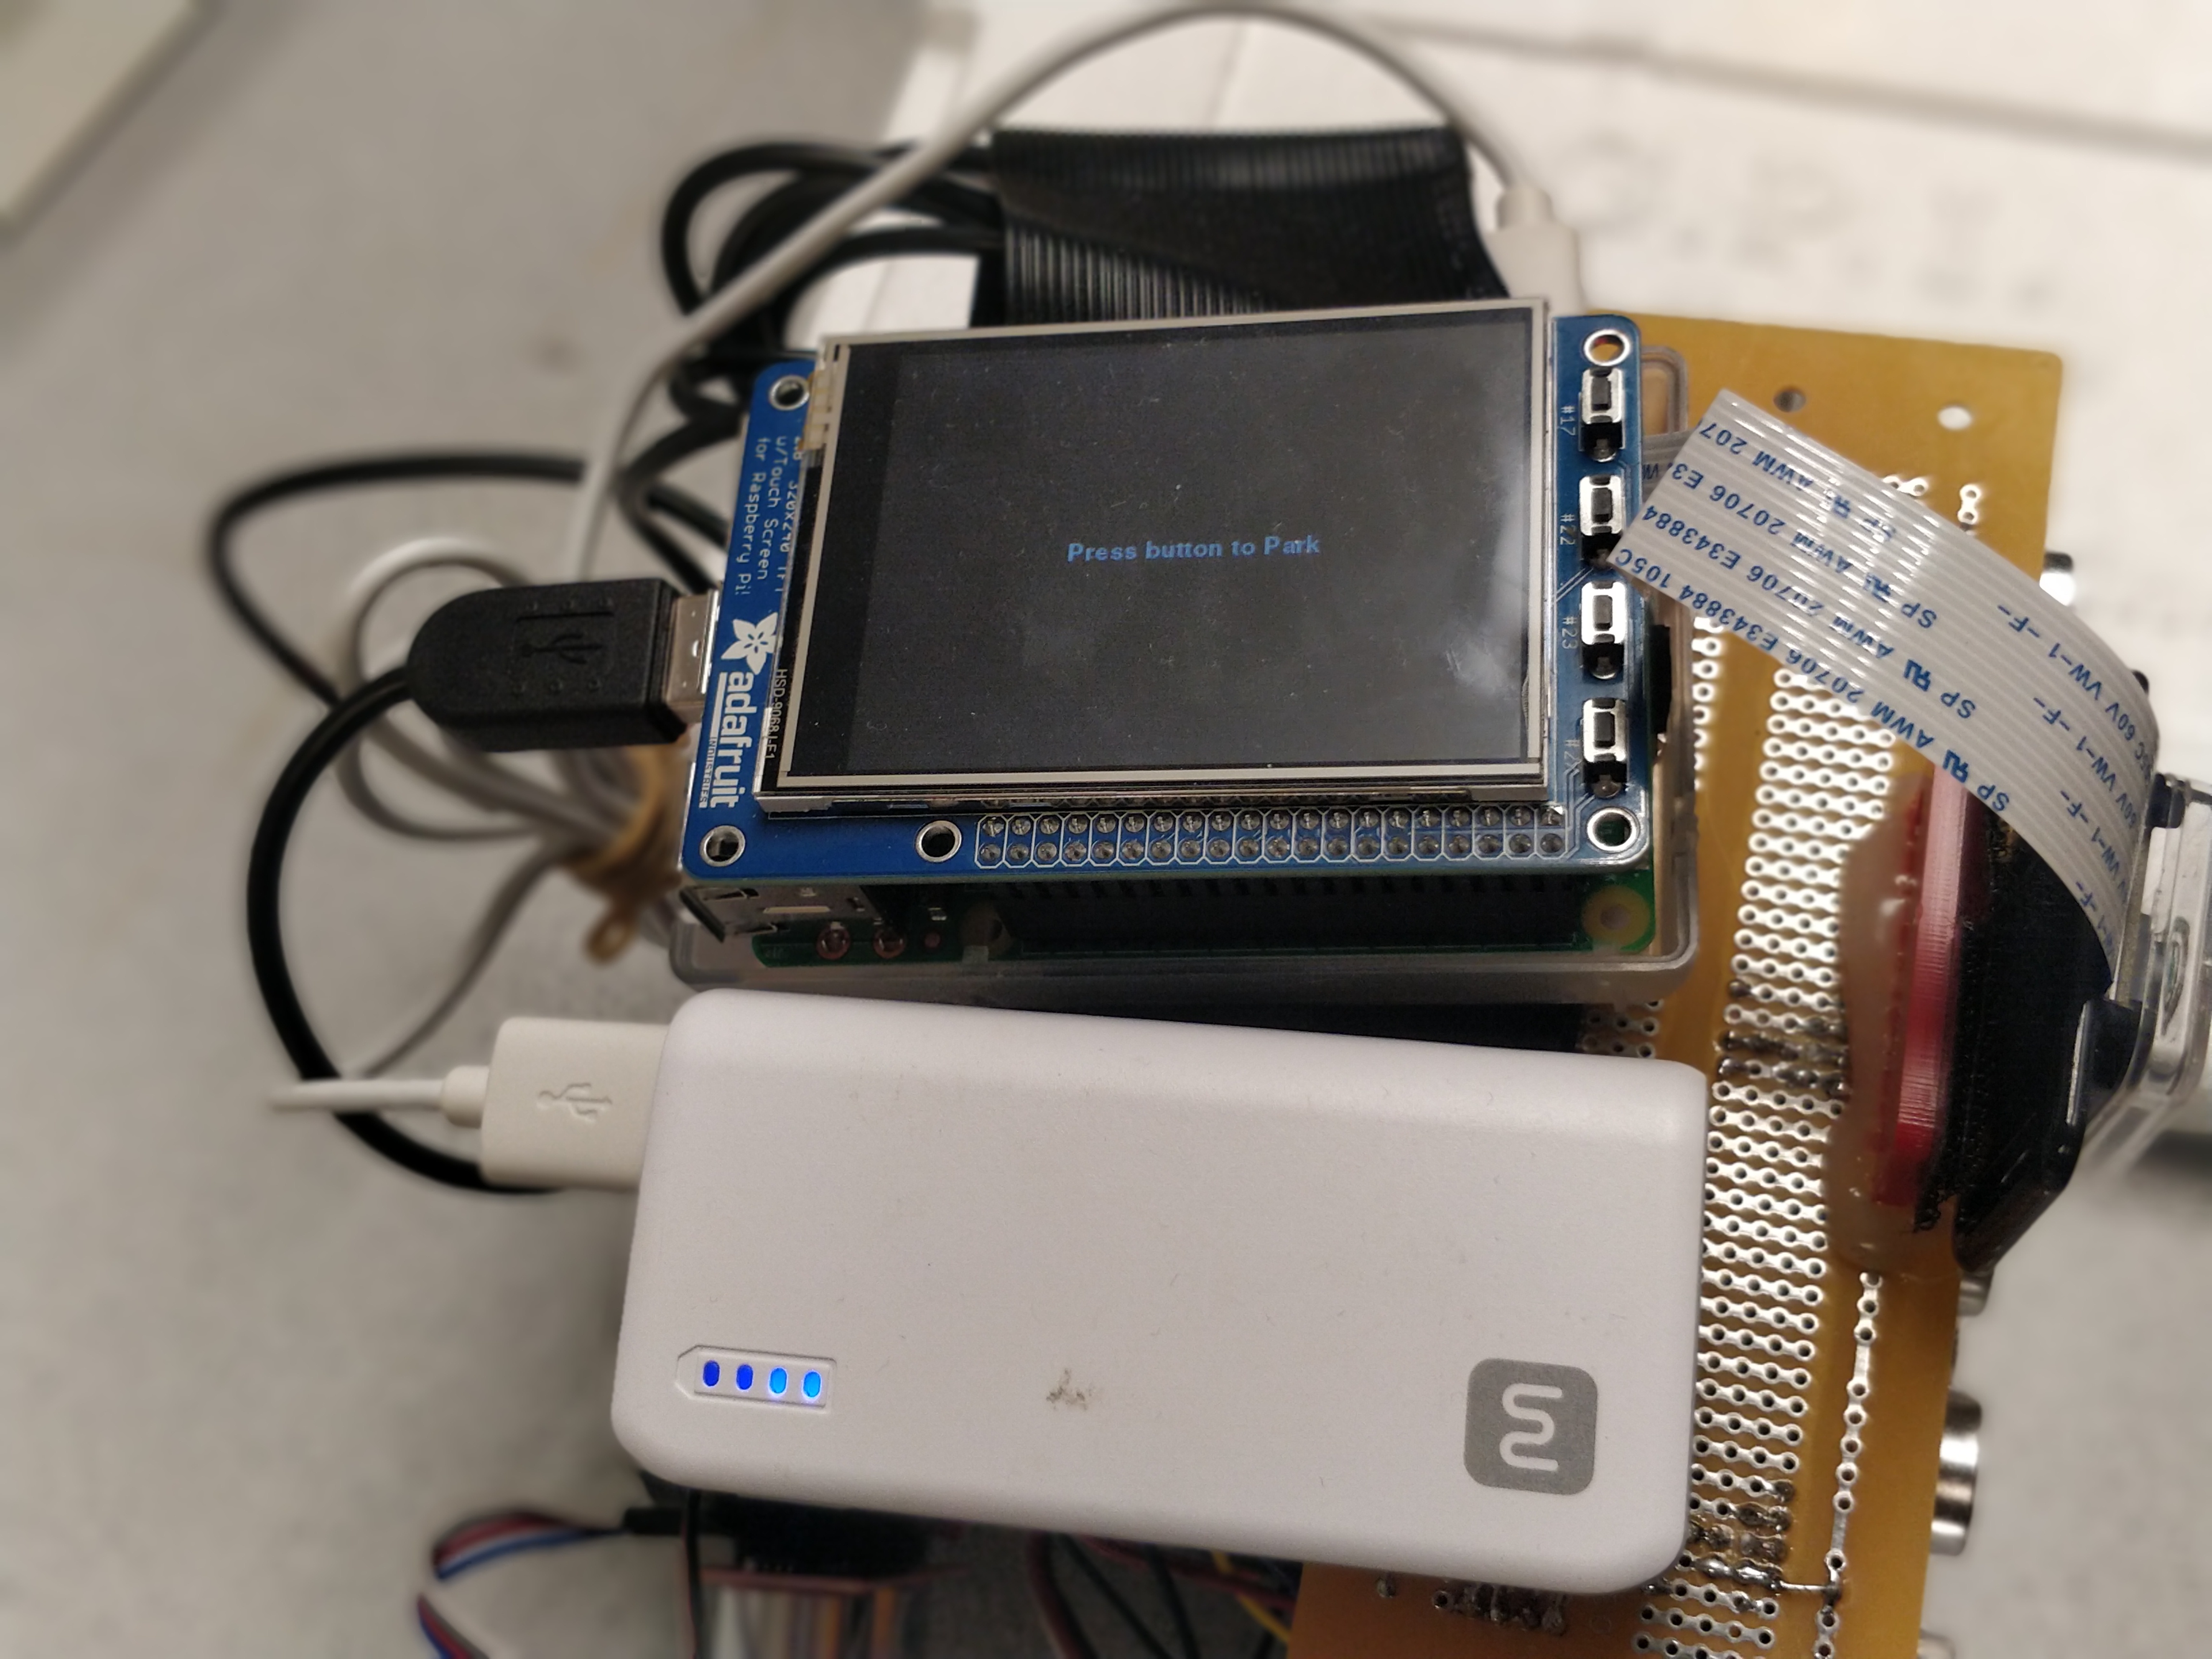
User Interface: The user interface for the systems consists of a pushbutton and a PiTFT. The push button is sensed through interrupt processing using RPi.GPIO library. The Pygame library provides an excellent platform for implementing the GUI. The GUI provides feedback to the user about the current state of the parking algorithm and also forms a useful tool for debugging.
Testing
An incremental test and build strategy was adopted in this project. The control of servo motors and movement of the robot in open loop was already tested as part of LAB3. At the end of each stage of testing, the temporary wirings of sensors were replaced with solder boards to ensure reliability.
The first interface to be added was ultrasonic sensor. This interface was fairly simple as the library was readily available. The modular approach allowed interfacing of multiple sensors easy. However, it was observed that during movement of the robot, the ultrasonic sensors mounted on side of the robot interfered with each other. To avoid this, only one sensor was used for vacant spot detection. Once detected, the robot was stopped and other two sensors were used to verify if the width of spot is sufficient. However, at times the ultrasonic sensors misbehaved leading to incorrect readings. The library provides an option to take multiple readings and return the average value. This improved the results significantly.
Secondly, the feedback mechanism for controlling speed of motors was implemented. It was intended to be implemented using the optical encoders stuck on the wheels but these IR sensors are very susceptible to the ambient light. Hence, these sensors were replaced by a mouse. The accumulated mouse readings are valid until an overflow occurs. This resulted in the robot misbehaving on overflow. The accumulated value is reset to zero, whenever the background process is started. To prevent overflow errors, the background process was started on pressing the park button and killed when park is completed, using OS calls. The cycle repeats on each button press.
Thirdly, the state machine was tested. It was observed that the mouse readings are updated only when the robot moves. In idle condition, in order to get the initial position, a function was defined to provide a slight jerk to the robot. The state machine was tested intensively. The various thresholds for distance and timing inside the state machine was set based on the testing. The mapping of mouse position to physical distance was also carried out in this stage.
The final interface to be added was PiCamera. For this, OpenCV library had to be installed. However, readily complied version was not available for current raspbian version. This was fixed by updating raspbian to latest version. Assertion error which occurred while using OpenCV was fixed using sudo modprobe bcm2835-v4l2.
The final integrated system was thoroughly tested and tuned. It was observed that the performance of control algorithm deteriorated with reduction in battery voltage level as it affects the motor power levels. The problem was solved by replacing the batteries when the voltage level decays.
Result
The self-parking car was able to successfully carry out tasks autonomously:
- Distance measurement using ultrasonic Sensors
- Closed loop control of robot platform using optical mouse
- Object identification using Raspberry Pi camera
- Implementation of Parallel Parking Algorithm using state machine
All the core objectives were achieved within the allotted time of 5 weeks and budget of 100 dollars(Excluding RaspberryPi).
Conclusion
Overall, the system worked as expected. The limitations in the system were mainly due to the use of low cost sensors. The robot performed extremely well in most scenarios. But in some cases, the ultrasonic sensors gave incorrect readings, leading to unexpected behavior. The project provided exposure to multiple domains like embedded systems, image processing, sensor fusion, control systems and system design. It also involved significant amount of hardware design. The design using an embedded operating system was beneficial as it took care of large amount of background work. Also, availability of large number of open source libraries significantly speeded up the development process.
Future Work
The prototype me all the expectation that were set. However, significant amount of improvements can be carried out to make the system better. The use of optical mouse for odometry is limited to smooth surfaces and small distance. They can be replaced with IMU and compass based systems for better performance. Higher quality of Ultrasonic sensors may be used to increase reliability. Also, the current control algorithm uses only a Proportional term. Implementing a full PID control algorithm can help in achieving better maneuvers. Currently, the fire hydrant detection is carried out by detecting red objects. This area can be improved significantly, by implementing trained models for recognition of different kinds of fire hydrant images using machine learning. The state can also be extended to recognize other features like driveways also. The camera is currently used only for object identification. It can also be used in conjunction with ultrasonic sensors to take better decisions. The work done in this project can be used as a baseline and enhancements in all of the above areas can be carried out to significantly improve the system.
Team

Vipin
vv258@cornell.edu
Implemented state machine for parking
Image Processing using openCV

Parth
pb527@cornell.edu
Control system for the robot to move in a straight line.
Mechanical and electrical hardware assembly
Group work
Interfacing of the Ultrasonic sensors
Setting up motors using pigpio library
Interfacing the Optical mouse with Raspberry pi
Writing up the website
Parts List
- Raspberry Pi $35.00
- Raspberry Pi Camera $25.00
- Parallax Continuous Rotation Servo Motors $30.00
- Optical mouse $13.00
- Ultrasonic Sensors $20
- LEDs, Resistors and Wires - Provided in lab
Total: $123
References
PiCamera DocumentRaspberryPi
Parallax Continuous Rotation Servo
Pigpio Library
Ultrasonic Sensor
Bluetin_Echo Library - Ultrasonic Sensor
Optical Mouse Program
Object Detection Program for Fire Hydrant
Code Appendix
Self-Parking.py
1 2 3 4 5 6 7 8 9 10 11 12 13 14 15 16 17 18 19 20 21 22 23 24 25 26 27 28 29 30 31 32 33 34 35 36 37 38 39 40 41 42 43 44 45 46 47 48 49 50 51 52 53 54 55 56 57 58 59 60 61 62 63 64 65 66 67 68 69 70 71 72 73 74 75 76 77 78 79 80 81 82 83 84 85 86 87 88 89 90 91 92 93 94 95 96 97 98 99 100 101 102 103 104 105 106 107 108 109 110 111 112 113 114 115 116 117 118 119 120 121 122 123 124 125 126 127 128 129 130 131 132 133 134 135 136 137 138 139 140 141 142 143 144 145 146 147 148 149 150 151 152 153 154 155 156 157 158 159 160 161 162 163 164 165 166 167 168 169 170 171 172 173 174 175 176 177 178 179 180 181 182 183 184 185 186 187 188 189 190 191 192 193 194 195 196 197 198 199 200 201 202 203 204 205 206 207 208 209 210 211 212 213 214 215 216 217 218 219 220 221 222 223 224 225 226 227 228 229 230 231 232 233 234 235 236 237 238 239 240 241 242 243 244 245 246 247 248 249 250 251 252 253 254 255 256 257 258 259 260 261 262 263 264 265 266 267 268 269 270 271 272 273 274 275 276 277 278 279 280 281 282 283 284 285 286 287 288 289 290 291 292 293 294 295 296 297 298 299 300 301 302 303 304 305 306 307 308 309 310 311 312 313 314 315 316 317 318 319 320 321 322 323 324 325 326 327 328 329 330 331 332 333 334 335 336 337 338 339 340 341 342 343 344 345 346 347 348 349 350 351 352 353 354 355 356 357 358 359 360 361 362 363 364 365 366 367 368 369 370 371 372 373 374 375 376 377 378 379 380 381 382 383 384 385 386 387 388 389 390 391 392 393 394 395 396 397 398 399 400 401 402 403 404 405 406 407 408 409 410 411 412 413 414 415 416 417 418 419 420 421 422 423 424 425 426 427 428 429 430 431 432 433 434 435 436 437 438 439 440 441 442 443 444 445 | # Vipin Venugopal (vv258), Part Bhatt (pb527) # ECE 5725 Final Project: Self Parking Car # 12/05/2018 # Description: SelfParking.py consists of the state machine # to implement parallel parking algorithm # for autonomus vehicles. It also uses Bluetin_Echo library # for reading ultrasonic sensors and # Fire_Hyd for object recognition using openCV # Notes: Before running this code, run "sudo pigpiod" # in the command prompt to enable hardwarePWM # Press Button 17 on PTFT to initiate parking # In case of assertion error, relaunch the program after # running "sudo modprobe bcm2835-v4l2" in command prompt # import libraries import RPi.GPIO as GPIO import time import pigpio import pygame # Import pygame graphics library from pygame.locals import * # for event MOUSE variables import os #for OS calls import sys import re from math import * from Bluetin_Echo import Echo import Fire_Hyd import subprocess import signal os.putenv('SDL_VIDEODRIVER', 'fbcon') # Display on piTFT os.putenv('SDL_FBDEV', '/dev/fb1') GPIO.setmode(GPIO.BCM) # Setup the mode to match the mode on Broadcom pin labels pygame.init() pygame.mouse.set_visible(False) #disable mouse pointer GPIO.setup(17, GPIO.IN, pull_up_down=GPIO.PUD_UP) # Set GPIO17 as input for Park button ################################################Pygame Init########################################### black = 0,0,0 white = 255,255,255 size = width, height = 320, 240 screen = pygame.display.set_mode((320,240)) #set screen size to PiTFT resolution my_font = pygame.font.Font(None, 20) screen.fill(black) # Erase the Work space start_surface = my_font.render("Initializing...", True, white) #splash screen rect_start = start_surface.get_rect(center=(160,120)) screen.blit(start_surface, rect_start) pygame.display.flip() #Display the initial screen #configure the states STATE_START=1 STATE_SEARCH=2 STATE_CHECK=3 STATE_MOV_FWD=4 STATE_ROT_CCW=5 STATE_MOV_BACK=6 STATE_ROT_CW=7 STATE_MOV_BACK_2=8 STATE_MOV_FWD_2=9 STATE_PARK=10 #Display messages for states state_text = { STATE_START : "Press button to Park", STATE_SEARCH : "Search for Parking spot", STATE_CHECK : "Checking for Fire Hydrant", STATE_MOV_FWD : "Parking Spot Found", STATE_ROT_CCW : "Parking...", STATE_MOV_BACK : "Parking...", STATE_ROT_CW : "Parking...", STATE_MOV_BACK_2 :"Parking...", STATE_MOV_FWD_2 :"Parking...", STATE_PARK : "Car Parked" } STATE=STATE_START PREV_STATE=STATE_PARK x_start = 0 MIN_SPACE = 15 # minimum space required to park the car MIN_DIST = 5 # minimum distance from the car parked in front MIN_REV_DIST = 10 # minimum distance from the car parked behind #Set the servo motor pins LEFT_MOTOR_PIN =13 RIGHT_MOTOR_PIN =12 #initialise hardware PWM pi_hw = pigpio.pi() pi_hw.set_mode(LEFT_MOTOR_PIN, pigpio.OUTPUT) pi_hw.set_mode(RIGHT_MOTOR_PIN, pigpio.OUTPUT) child_pid = 0 once = 0 def park(channel): #call back function to start parking global STATE global child_pid global once #global x_start if STATE==STATE_START: #call mouse.py to start reading x and y coordinates proc = subprocess.Popen(["python","mouse.py"], stdout=subprocess.PIPE, stderr=subprocess.PIPE) child_pid = proc.pid#store pid to kill the process after park time.sleep(0.3) STATE=STATE_SEARCH screen.fill(black) # Erase the Work space jurk() #slight jerk to start mouse reading once = 1 GPIO.add_event_detect(17,GPIO.FALLING, callback=park, bouncetime=300) #configure interrupt for handling park button ################################################Init done########################################### print "Initialized libraries" ################################################FIFO Read########################################### path = "mouse_FIFO" #FIFO for communicating with mouse.py coord = [0, 0] def getcoords(): #reads the coordinates from FIFO global coord fifo = open(path, "r") lines = fifo.read() num = lines.split(" ") #splits the space seperated coordinates into two values coord = [int(a) for a in num] fifo.close() def getX(): #returns the x coordinate read from FIFO global coord getcoords() return coord[1] def getY(): #returns the y coordinate read from FIFO global coord getcoords() return coord[0] print "Initialized FIFO Read functions" ################################################Motors Init########################################### #Primary wheel inputs to set initial speed primary_t_on = 1.5/1000 primary_t_off = 20.0/1000 primary_period = primary_t_on + primary_t_off primary_freq = 1/primary_period primary_duty = 1000000*(primary_t_on/primary_period) pi_hw.hardware_PWM(LEFT_MOTOR_PIN,primary_freq,primary_duty) #Secondary wheel inputs to set initial speed secondary_t_on = 1.5/1000 secondary_t_off = 20.0/1000 secondary_period = secondary_t_on + secondary_t_off secondary_freq = 1/secondary_period secondary_duty = 1000000*(secondary_t_on/secondary_period) pi_hw.hardware_PWM(RIGHT_MOTOR_PIN,secondary_freq,secondary_duty) print "Initialized Motors" ################################################Motors Signals########################################### # primary wheel clockwise motion feedback function def primary_motor_signals(v): global primary_t_on, primary_t_off, primary_period, primary_freq, primary_duty #convert speed to pwm value primary_t_on = round(((v) + 1.50)/1000, 5) #limit the pwm on time to 1.3ms to 1.7ms range if primary_t_on > 0.0017: primary_t_on = 0.0017 elif primary_t_on < 0.0013: primary_t_on = 0.0013 print("primary_t_on:" + str(primary_t_on)) primary_t_off = 20.0/1000 #calculate PWM period primary_period =primary_t_on + primary_t_off #calculate PWM frequency primary_freq = 1/primary_period #calculate PWM duty cycle primary_duty = 1000000*(primary_t_on/primary_period) #Set PWM frequency and duty cycle pi_hw.hardware_PWM(LEFT_MOTOR_PIN,primary_freq,primary_duty) # secondary wheel motion feedback function def secondary_motor_signals(v): global secondary_t_on, secondary_t_off, secondary_period, secondary_freq, secondary_duty #convert speed to pwm value secondary_t_on = round(((-v) + 1.50)/1000, 5) #limit the pwm on time to 1.3ms to 1.7ms range if secondary_t_on > 0.0017: secondary_t_on = 0.0017 elif secondary_t_on < 0.0013: secondary_t_on = 0.0013 print("secondary_t_on" + str(secondary_t_on)) secondary_t_off = 20.0/1000 #calculate PWM period secondary_period = secondary_t_on + secondary_t_off #calculate PWM frequency secondary_freq = 1/secondary_period #calculate PWM duty cycle secondary_duty = 1000000*(secondary_t_on/secondary_period) #Set PWM frequency and duty cycle pi_hw.hardware_PWM(RIGHT_MOTOR_PIN,secondary_freq,secondary_duty) print "Initialized Motors Signals" ################################################Robot Controls########################################### def mov_fwd(): #print "mov_fwd funtion" #calculate error error = getX() - x_start #limit error to -1000 to +1000 if error > 1000: #stop() error = 1000 #play = False elif error < -1000: error = -1000 print("error:" + str(error)) #calculate primary wheel speed proportional to the error prim_val = 0.1+(0.0011*error) #set constant secondary wheel value based on tuning sec_val = 0.07 #0.067 #set primary and secondary wheel speeds primary_motor_signals(prim_val) secondary_motor_signals(sec_val) #time.sleep(0.02) def mov_bk(): #set constant primary and secondary wheel speed based on tuning prim_val = -0.050 #0.1+(0.0011*error) sec_val = -0.050 #set primary and secondary wheel speeds primary_motor_signals(prim_val) secondary_motor_signals(sec_val) time.sleep(0.02) def rlt(): #print "fcuntion called" jurk() #slight jerk to start mouse reading angle=getX()+250 #calculate x position for desired angle based on tuning print("angle:" + str(angle)) p_angle=getX() #read current x position while(p_angle<angle): #rotate robot clockwise till desired x is achieved print("p angle:" + str(p_angle)) prim_val = -0.1 sec_val = 0.1 primary_motor_signals(prim_val) secondary_motor_signals(sec_val) p_angle= getX() time.sleep(0.02) stop() #stop the motors def rrt(): jurk()#slight jerk to start mouse reading angle=getX()-450 #calculate x position for desired angle based on tuning print("angle:" + str(angle)) p_angle=getX() #read current x position while(p_angle>angle): #rotate robot anti-clockwise till desired x is achieved print("p angle:" + str(p_angle)) prim_val = 0.1 sec_val = -0.1 primary_motor_signals(prim_val) secondary_motor_signals(sec_val) p_angle= getX() time.sleep(0.02) stop() #stop the motors def jurk(): #small velocities to motor to get mouse readings primary_motor_signals(0.01) secondary_motor_signals(0.01) def stop(): #stop the PWMs pi_hw.hardware_PWM(LEFT_MOTOR_PIN,0,0) pi_hw.hardware_PWM(RIGHT_MOTOR_PIN,0,0) print('stop') print "Initialized Robot control Functions" ################################################UC Pins INIT########################################### print("starting") stop() # Define pins for ultrasound sensors TRIGGER_PIN_1 = 5 ECHO_PIN_1 = 6 TRIGGER_PIN_2 = 20 ECHO_PIN_2 = 21 TRIGGER_PIN_3 = 23 ECHO_PIN_3 = 19#24 TRIGGER_PIN_4 = 26 ECHO_PIN_4 = 16#25 TRIGGER_PIN_5 = 22 ECHO_PIN_5 = 27 # Initialise five sensors. echo = [Echo(TRIGGER_PIN_1, ECHO_PIN_1) , Echo(TRIGGER_PIN_2, ECHO_PIN_2) , Echo(TRIGGER_PIN_3, ECHO_PIN_3) , Echo(TRIGGER_PIN_4, ECHO_PIN_4) , Echo(TRIGGER_PIN_5, ECHO_PIN_5)] #initilase the sensors distance=[0,0,0,0,0] stop() #for sensor in range(0, len(echo)): # distance[sensor] = echo[sensor].read('cm', 3) #print distance time_start = time.time() print "Starting Main code" screen.fill(black) # Erase the Work space #display Park message start_surface = my_font.render("Press button to Park", True, white) rect_start = start_surface.get_rect(center=(160,120)) screen.blit(start_surface, rect_start) pygame.display.flip() play = True ################################################Main Code########################################### try: while play:#(not(STATE == STATE_PARK)): print STATE start_time=time.time() if(STATE==STATE_START): #------------------STATE 1-------------------# while(STATE==STATE_START): #wait for Park buttonpress pass # if STATE==STATE_START # time.sleep(1) elif(STATE==STATE_SEARCH): #------------------STATE 2-------------------# print "moving fwd in main state2" mov_fwd() #move forward for 20ms print "done mov fwd state 2" us_val = round(echo[1].read('cm', 2),2) # read third ultrasound sensor if(once == 1): # store initial x position to calculate error x_start=getX() once = 0 if(us_val>MIN_SPACE): #stop the motors if spot detected print us_val x_start=getX() #slow() stop() for sensor in range(1, len(echo)-1): #check if the spot width is suffiecient using three ultrasound sensor readings distance[sensor] = round(echo[sensor].read('cm', 3),2) print(distance) if(distance[1]>MIN_SPACE and distance[2]>MIN_SPACE and distance[3]>MIN_SPACE): #goto next state if spot is suitable STATE=STATE_CHECK else: time.sleep(0.02); jurk() #primary_motor_signals(0.01) #secondary_motor_signals(0.01) #x_start=getX() elif(STATE==STATE_CHECK): #------------------STATE 3-------------------# #CHECK FOR FIRE HYDRANT #time.sleep(5) fire_hydrant=Fire_Hyd.Check_hydrant() print "hydrant detected: " + str(fire_hydrant) jurk() #primary_motor_signals(0.01) #secondary_motor_signals(0.01) y_start=getY() if(fire_hydrant==0): #goto next state if there is no fire hydrant STATE=STATE_MOV_FWD else: STATE=STATE_SEARCH #resume search state if fire hydrant is detected while((getY()-y_start < 3000)):# or (round(echo[3].read('cm', 2),2)>MIN_REV_DIST)): mov_fwd() #move forward for fixed distance till fire hydrant is out of frame y_start=getY() #x_start=getX() fire_hydrant = 0 elif(STATE==STATE_MOV_FWD): #------------------STATE 4-------------------# #move forward fixed distance to cross the vacant spot if((getY()-y_start < 3500)):# or (round(echo[3].read('cm', 2),2)>MIN_REV_DIST)): mov_fwd() else: STATE=STATE_ROT_CCW elif(STATE==STATE_ROT_CCW): #------------------STATE 5-------------------# rlt() #rotate counterclockwise 45 degree STATE=STATE_MOV_BACK stop() t_start = time.time() elif(STATE==STATE_MOV_BACK): #------------------STATE 6-------------------# val = round(echo[0].read('cm', 3),2) print ("back dist in state 6: " + str(val)) #move back for fixed time or till obstacle detected if(val>MIN_REV_DIST and ((time.time() - t_start) <2.5)): mov_bk() else: stop() #stop the motors STATE=STATE_ROT_CW elif(STATE==STATE_ROT_CW): #------------------STATE 7-------------------# rrt() #rotate clockwise 45 degree STATE=STATE_MOV_BACK_2 t_start = time.time() stop() elif(STATE==STATE_MOV_BACK_2): #------------------STATE 8-------------------# mov_bk() #move back for fixed time or till obstacle detected if(round(echo[0].read('cm', 1),2)<3 or (time.time() - t_start) > 0.5): stop() STATE=STATE_MOV_FWD_2 t_start=time.time() elif(STATE==STATE_MOV_FWD_2): #------------------STATE 9-------------------# #move forward for fixed time or till obstacle detected mov_fwd() if(round(echo[4].read('cm', 1),2)<MIN_DIST or (time.time() - t_start) > 0.6): stop() STATE=STATE_PARK #goto park state #kill mouse.py process os.kill(child_pid, signal.SIGTERM) t_start=time.time() elif(STATE==STATE_PARK): #wait in park state for 5 seconds before going to start state if(time.time() - t_start > 5): STATE=STATE_START if(not(STATE==PREV_STATE)): #display state messages on PiTFT screen.fill(black) # Erase the Work space state_surface = my_font.render(state_text[STATE], True, white) rect_state = state_surface.get_rect(center=(160,120)) screen.blit(state_surface, rect_state) pygame.display.flip() PREV_STATE = STATE while((time.time()-start_time) <0.02): pass #if(time.time()-time_start > 10): # break except: #handle exceptions #GPIO.cleanup() print "Exception" stop() #stop the motors pi_hw.stop() os.kill(child_pid, signal.SIGTERM) #kill mouse.py |
mouse.py
1 2 3 4 5 6 7 8 9 10 11 12 13 14 15 16 17 18 19 20 21 22 23 24 25 26 27 28 29 30 31 32 33 34 35 36 37 38 39 40 | # original source: http://kodedevil.com/2017/07/09/optical-mouse-odometer-rpi/ # Process used to read mouse movements, accumulate them to get x and y coordinates and write to FIFO # import libraries import struct, math, os, errno file = open( "/dev/input/mice", "rb" ); output = "mouse_FIFO"; point_x = 0; point_y = 0; scaling = 1; #determine the scaling based on trial and calibration class Point: x = 0.0 y = 0.0 def getMouseEvent(): #read value from mouse buf = file.read(3); x,y = struct.unpack( "bb", buf[1:] ); dis = Point(); dis.x = x; dis.y = y; return dis; while( 1 ): dis = getMouseEvent(); #read value from mouse point_x = point_x + (scaling * dis.x); #accumulate x coordinate point_y = point_y + (scaling * dis.y); #accumulate y coordinate try: pipe = os.open(output, os.O_WRONLY | os.O_NONBLOCK); #write to FIFO os.write(pipe, "%d %d" % (point_x,point_y)); print(str(point_x) + " " + str(point_y)) os.close(pipe); except OSError as err: if err.errno == 6: pass; else: raise err; file.close(); |
Fire_Hyd.py
1 2 3 4 5 6 7 8 9 10 11 12 13 14 15 16 17 18 19 20 21 22 23 24 25 26 27 28 29 30 31 32 33 34 35 36 37 38 39 40 41 42 43 44 45 46 47 48 49 50 51 52 53 54 55 56 57 58 59 60 61 62 63 64 65 66 67 68 69 70 71 72 73 74 75 76 | # original source: https://courses.ece.cornell.edu/ece5990/ECE5725_Spring2018_Projects/fy57_xz522_AutoTurret/index.html # modified to detect red object and return 1 if found # Import libaries from multiprocessing import Process, Queue, Value, Lock, Array import time # Import time library for time control import sys import numpy as np import cv2 from datetime import datetime np.set_printoptions(threshold=np.nan) #returnBoolean, frame = videoCap.read() def Check_hydrant(): #Main: Step 1. Set Video Resolution Parameters #Note: There will be less info to process if resolution decreases x_res = 640 #320 y_res = 480 #240 center_x = x_res/2 center_y = y_res/2 #Main: Step 2. Create a VideoCapture object to capture video videoCap = cv2.VideoCapture(0) videoCap.set(3, x_res) videoCap.set(4, y_res) #Main: Step 3. Center Tolerance Parameters tolerance = 10 red_threshold = 500000 #red_threshold = 100000 lower_red1 = np.array([0,50,50]) upper_red1 = np.array([10,255,255]) lower_red2 = np.array([170,50,50]) upper_red2 = np.array([180,255,255]) # Setting Kernel Convolution Parameters kernelOpen=np.ones((5,5)) kernelClose=np.ones((20,20)) frame = 0 contours = 0 hydrant =0 # 1. Extract a frame from the video returnBoolean, frame = videoCap.read() # 2. Convert RGB color space to HSV (hue, saturation, value) color space frame_hsv = cv2.cvtColor(frame, cv2.COLOR_BGR2HSV) # Define range of red color in HSV # H maps to 0-360 degree and S, V maps to 0-100% # 3. Threshold the HSV image to get only red colors mask1 = cv2.inRange(frame_hsv, lower_red1, upper_red1) mask2 = cv2.inRange(frame_hsv, lower_red2, upper_red2) mask= mask1 + mask2 # 4. Check the sum of blue pixels, only try to send over for processing if greater than threshold sum_of_red = np.sum(mask) if (sum_of_red > red_threshold): #print(mask.shape) # 1. Implement the open and close operation to get rid of noise and solidify an object maskOpen=cv2.morphologyEx(mask,cv2.MORPH_OPEN,kernelOpen) maskClose=cv2.morphologyEx(maskOpen,cv2.MORPH_CLOSE,kernelClose) # 2. Extract contour contours,h=cv2.findContours(maskClose.copy(),cv2.RETR_EXTERNAL,cv2.CHAIN_APPROX_NONE) if (len(contours)>0): c = max(contours, key=cv2.contourArea) ((x, y), radius) = cv2.minEnclosingCircle(c) M = cv2.moments(c) center = (int(M["m10"] / M["m00"]), int(M["m01"] / M["m00"])) # only proceed if the radius meets a minimum size. Correct this value for your obect's size if radius > 0.5: hydrant= 1 #if cv2.waitKey(1) & 0xFF == ord('q'): #break #returnBoolean, frame = videoCap.read() return hydrant |