Python Implementation
Code for this section was developed by Mayank Sen Sharma
Design
After converting the input to a one-dimensional binary array, the next step was to iterate over all the learning data-set and find the nearest neighbor, i.e the digit that most closely resemble the given input. In addition to predicting the input, the algorithm also had to be self-learning in order for it to improve its accuracy with time. First, ten files were created that stored the learning data-set. Each file stored learning data-sets corresponding to only one digit. Next, a function was created which parsed through each learning data-set in every file, XORed it with the input data-set and summed up the result. This step of XORing and summing up of result was done in order to find the Manhattan sum mentioned in earlier section. After the distance between the training and input data-set was calculated, 4 minimum distances for each digit was returned to the main function. In the main function, the set of 4-nearest neighbor was used to predict the input figure drawn by the user. To do this, the sum of 4-nearest negibhor for each digit was calculated and the minimum digit with minimum sum was predicted as the digit resembling the input.
Since the accuracy of k-nearest neighbor algorithm depends on the size of the learning data-set, it was essential to learn from the user inputs and keep updating the data-sets for each digit. In order to develop a self-learning algorithm, the program after printing out the prediction asks the user if the prediction is correct. In case the prediction is wrong, the program further asks the user to input the digit that was acutally drawn by him. Once this data is given by the user, the program goes ahead and updates the training-data set of that particular digit with the current input-data set. This ensured that the accuracy kept improving after each use of the program. In case, the prediction is correct, the program would still update the data-set of the correctly predicted digit if the minimum distance is not 0. This ensured that the size of the data-set kept increasing which in turn improved the accuracy.
Testing
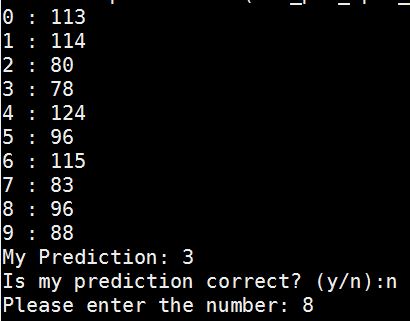
The self learning digit recognization python program was extensively tested for different inputs. This was necessary in order to build the learning data set too. Initially, when the program was tested with small training data-set for each digit, the program showed poor accuracy. However, the self learning aspect of the code helped it to enhance it's accuracy over time. In addition, the sum of distances of 4 nearest neighbor for each digit was displayed for the user to check how accurately the program was working. A standard response in case of miss-prediction is shown in Figure 1.
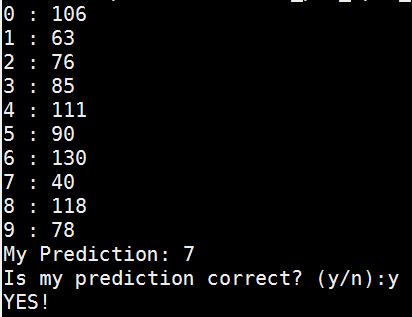
As the program was trained and the size of the training data-set kept increasing, the accuracy of the program improved. It was essential to train the program for different forms of writing (hand-writing variation). Hence, the program was trained by the programers as well as few volunteers which enhanced the digit-recognization capability of program. In case of a correct prediction, the response of the program is shown in Figure 2.
In addition, the run-time of the code was also taken into consideration to evaluate the performance of the program. Since, one of the major aim was to develop a real-time digit recognition program, it was essential to keep the execution time to minimum. In the inital stages of program development, the run-time of the program was less than one second. However, as the data-set of training set of each digit increased to 100, the run-time for the program increased to 1.4 seconds. Seeing this trend, it was estimated that as the training data-set for each digit would increase further to around 2000 per digit, the execution time could increase to upto half a minute. Hence, it was necessary to optimize the execution time of the code and reduce the run-time. This optimization is discussed in the next section.
Code
Digit Recognition Python Code
######################################################
# Developed by Mayank Sen Sharma for ECE5990 Project #
#                                                    #
# Digit recognition python program                   #
######################################################

import pygame
import operator
from multiprocessing import Process, Queue
import multiprocessing
import os
import time

os.putenv('SDL_FBDEV', '/dev/fb1')
os.putenv('SDL_MOUSEDRV', 'TSLIB')
os.putenv('SDL_MOUSEDEV', '/dev/input/touchscreen')

def get_points():
    pygame.init()
    screen = pygame.display.set_mode((320, 240))
    clock = pygame.time.Clock()

    radius = 5
    x = 0
    y = 0
    points = []

    while True:

        pressed = pygame.key.get_pressed()


        for event in pygame.event.get():

            if event.type == pygame.QUIT:
                return

            if event.type == pygame.MOUSEMOTION:
              if event.buttons[0]:
                # if mouse moved, add point to list
                position = event.pos
                points = points + [position]
                points = points[-500:]

            if event.type == pygame.MOUSEBUTTONUP:
	        pygame.quit()
                return points

        screen.fill((0, 0, 0))

        # draw all points
        i = 0
        while i < len(points) - 1:
            drawLineBetween(screen, i, points[i], points[i + 1], radius)
            i += 1

        pygame.display.flip()

        clock.tick(24)

# Function to draw the figure on screen
def drawLineBetween(screen, index, start, end, width):
    color = (255, 255, 255)

    dx = start[0] - end[0]
    dy = start[1] - end[1]
    iterations = max(abs(dx), abs(dy))

    for i in xrange(iterations):
        progress = 1.0 * i / iterations
        aprogress = 1 - progress
        x = aprogress * start[0] + progress * end[0]
        y = aprogress * start[1] + progress * end[1]
        pygame.draw.circle(screen, color, (int(x), int(y)), width)


# Main part of program

points = get_points()
# screen size 320 x 240
# dividing by a factor of 16
Matrix = [0 for x in range(20*15)]

i = 0
while i < len(points) - 1:
  x = int(points[i][0]/16)
  y = int(points[i][1]/16)
  i += 1
  Matrix [ x + 20*y ] = 1

# initialise K-nearest neighbor array
Knn = [[300 for x in range(4)] for x in range(10)]

start_time = time.time()

num = 0

# computing K nearest neighbor
while num < 10:

  # Reading data file
  f = open("data_{}.dat".format(num),"r")
  line = f.readline()

  while line:

    # code for converting string to list
    line = line.strip('[')
    line = line.strip(']\n')
    line = line.split(",")
    data = [int(e) for e in line ]

    # Distance between test and training set
    dist =  sum(map(operator.xor, Matrix, data))

    index = 0
    for x in Knn[num]:
      if dist < x:
        Knn[num][index] = dist
        break
      index += 1

    line = f.readline()

  f.close()
  num += 1

print("\n--- %s seconds ---\n" % (time.time() - start_time))

# Voting function
num           = 0
predicted_num = 0
minimum       = 1200

while num < 10:

  total = sum(Knn[num])
  print str(num) + " : " +str(total)
  if total < minimum:
    minimum       = total
    predicted_num = num
  num += 1

print "My Prediction: " + str(predicted_num)

a = True

while a:

  check = raw_input('Is my prediction correct? (y/n):')

  if (check == "y"):
    print "YES!"
    a = False

  elif (check == "n"):
    predicted_num = input('Please enter the number: ')
    a = False

  else:
    print "You entered wrong input, please try again..."

if Knn[predicted_num][0] != 0:
  with open("data_{}.dat".format(predicted_num), "a") as myfile:
    myfile.write(str(Matrix) + "\n")
Contact
Mayank Sen Sharma (ms3272[at]cornell.edu), Siddharth Mody (sbm99[at]cornell.edu)
Graduate students of Class 2016 at Cornell University