Objectives top
The aim of the project is to establish an understanding of speech recognition systems, both offline and online, as well as to develop applications on both systems. The goal of using an online speech recognition system, such as Google's speech recognition API, was for us to utilize a well-developed tool and expand it to create even more applications. The goal of implementing an offline speech recognition system was to create a mobile system that users can train to learn and adapt to their commands.
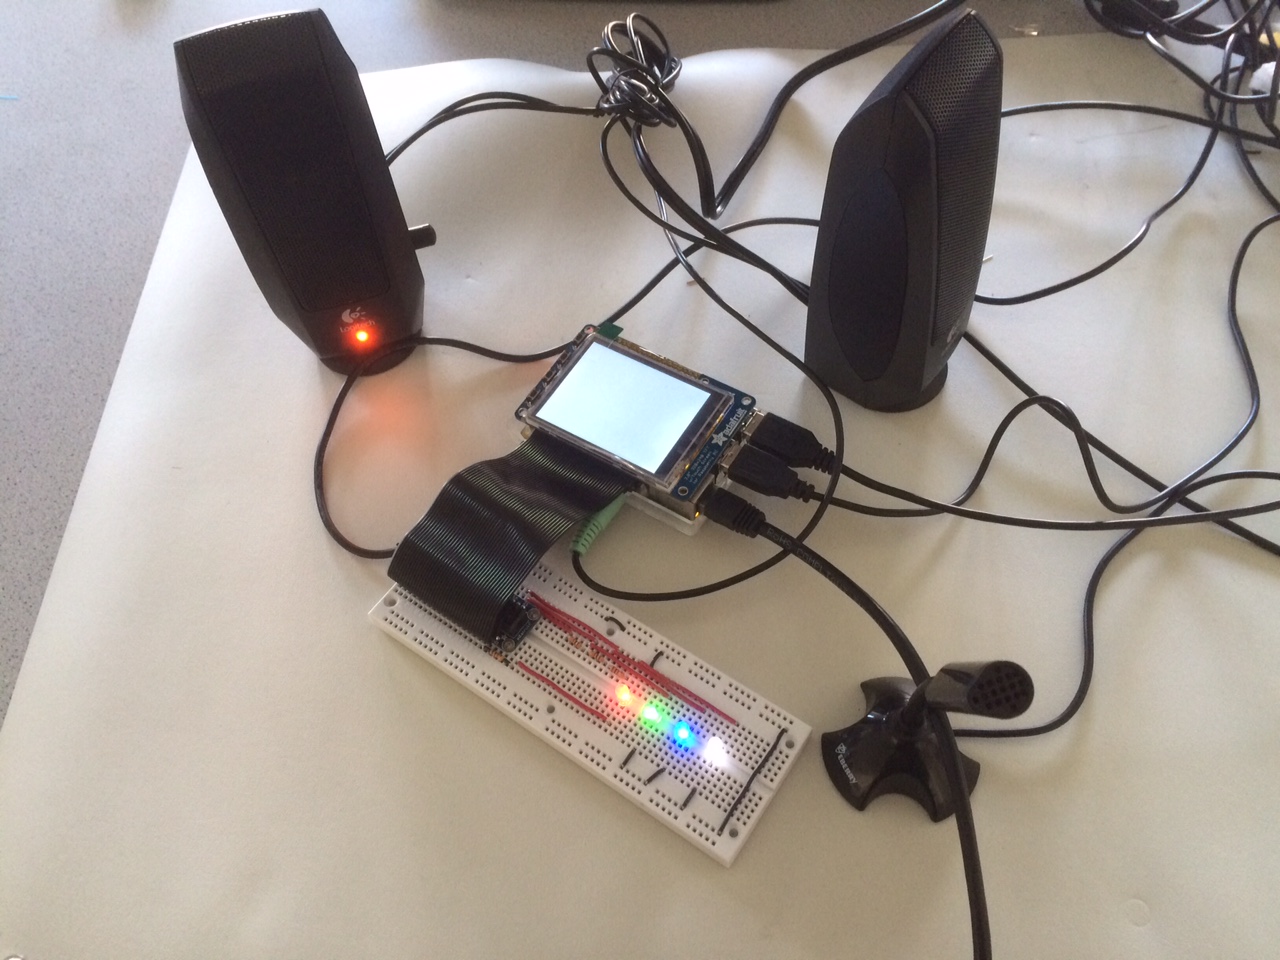
Figure 1: Speech Recognition with Raspberry Pi Setup
Introduction top
The project can broadly be divided into two parts. The first part deals with implementing a voice assistant, similar to Apple's Siri or Microsoft's Cortana. Here, an open source platform known as Jasper was implemented on the Raspberry Pi 2. The Jasper platform comes with a few built-in functionalities. Using the open source platform, additional modules were built and added to the system. The second part of the project involves implementing an embedded speech recognition devoid of internet access. This was implemented by generating a fingerprint for keywords using Mel Frequency Cepstral Coefficients (MFCC). Further, we demonstrated a proof of concept for applications such as home automation by toggling lights using MFCC-based speech recognition.
PLEASE EMBED VIDEO HERE
Design and Testing top
As mentioned above,the final project can be broadly divided into two parts pertaining to speech recognition: one dealing with the open source voice assistant, Jasper's, implementation, and the other involves implementing an offline, embedded speech recognition system.
The hardware used for the project includes a passive USB microphone to input the voice and a self-powered set of speakers. The passive USB microphone was chosen for two main reasons. First of all, the USB Microphone would work without an additional sound card attached to the Raspberry Pi 2 because the sound card it built-in. As a result, the USB microphone would serve the purpose of plug and play. In addition to this, a passive microphone was chosen over one that is controlled by a button for input in order to allow for ease of use on the user's end. This would allow the user to simply provide Jasper with a command by speaking out loud to it rather than pressing a button to have the program operate. The speakers selected are self-powered so that its power supply is independent of the Raspberry Pi 2. This was mainly chosen since a USB-powered speaker would consume an additional USB port and it also acted as a precautionary measure to protect the Raspberry Pi 2. Besides this, the audio port on the Raspberry Pi 2 is an ‘audio out’ port, so the microphone cannot be used through the audio port. In this project, we use the eBerry Plug and Play Desktop USB Microphone and Logitech Multimedia speakers. The cost of these are specified in the Bill of Materials (BOM) section.
Jasper
Jasper is an open source platform similar to voice assistants such as Siri or Cortana. Jasper's implementation that is currently specified on its official website [1] is for the Raspberry Pi 1, and not the Raspberry Pi 2. However, a manual compilation would allow the system to successfully work on the Raspberry Pi 2. The compilation that was used is courtesy of [2], since the aim of the project is testing and comparing the speech recognition aspect with other speech recognition platforms, and extending and developing additional applications that utilize the Jasper framework.
Our implementation involved Jasper using Google as the Speech To Text (STT) Engine and Espeak as the Text To Speech (TTS) Engine. Google's STT is based off the Google Speech API, where developer keys are required, where each key provides 50 requests per day. With this being said, utilizing this engine requires an active internet connection to work. To create an embedded device devoid of the internet connection, we would need a speech recognition system independent of the internet. Pocketsphinx, which was developed by CMU, does not require internet connection; however, on testing its SST engine on Jasper, we determined that the recognition was quite inaccurate and led to the execution of incorrect commands.
Jasper, on compilation, had built-in features such as telling the time, weather, news, and email. For the email functionality, Jasper would provide the number of unread emails and would specify the name of the sender of there are only a few unread emails in the inbox. These features worked accurately and gathered information from external online resources. Further additional standard modules were implemented based off the Developer API instructions provided by [1].
Using a developer token, Jasper was interfaced with Evernote. This enabled the user to instruct Jasper to take notes that were then stored on your Evernote account. The voice command used here is “Note”. After providing the note, Jasper will write the note on your Evernote account accurately and with minimum delay.
Jasper was also introduced a module to state its current kernel and CPU utilization. This is evoked using the command “Status”. Also, another module evoked by “Movies” would enable Jasper to give details on different movies, depending on the user's choice.
Finally, a standard module allowing Jasper to play music stored on the Raspberry Pi’s memory was implemented. This module was evoked by saying the keyword “Music”, currently it has been tested for just one song, but its functionalities are easily expandable. In this module, the music was played using Omxplayer.
When testing the SST engines for accuracy and functionality, everything worked smoothly. As stated above, it was determined that the offline SST, Pocketsphynx, was not reliable and resulted in several false-positive results. This conclusion was able to be made because the text output of the speach to text conversion was printed back to the user. Looking at the return values from the actual speech, the hit rate of correct words with the expected was very low. In addition to this, the built-in modules and additional modules created displayed expected results during the testing phase of the project.
In terms of speech recognition, Jasper, combined with Google's SST, has a high recognition rate for the inputs given by the user. It not only considers the word said but also takes into account similar sounding words to predict the input given by the users. On Jasper, while developing the modules, the developer can specify the words required to evoke the command as well as related words to recognize the module evoked.
However, like all recognition systems, it has certain drawbacks. Firstly, for an accurate recognition on the Jasper, internet connection is a requirement and an active internet connection for speech recognition is not always accessible or desired. Secondly, using the Google Speech recognition engine for free has a cap of 50 requests per day and forcing the user to generate multiple keys and switching them is quite tedious and not durable for an embedded system. Finally, a major downside of Google Speech is the fact that it is sensitive to the user's accent. For instance, American accents work quite well whereas, for a user with a different accent, Jasper’s recognition is quite terrible.
These are just a few reasons which arise the need for an internet devoid, accent independent, and durable speech recognition system. The second part of this project deals with implementing such a system resolving the drawbacks of Jasper.
Offline Speech Recognition - "Deluminator"
The Offline Speech Recognition portion of this project consisted of three different parts: collecting audio samples, training, and the actual voice recognition portion.
Voice Recognition with Mel Frequency Cepstral Coefficient (MFCC):
The Mel-Frequency Cepstral Coefficients (MFCC) are coefficients that are derived from taking an input audio clip. On a high level, the MFCC is derived by first taking the Fourier transforms of the signal, mapping the powers of the spectrum onto the mel scale, taking the logs of the powers at each mel frequency, and finally taking the discrete cosine transform of the log of the powers. This will result in coefficients that represent the amplitudes of the input signal. A more detailed implementation of how the coefficients are found and extracted can be found in the References section [4].
Using Python, these values were generated and then stored into a database that allowed us to create a simple learning system, which will be explained in more detail later. The program to provide the MFCC values was written incrementally, allowing to ensure that not only did the coefficients come out properly, but to ensure that they were consistent.
Audio Samples:
Before finding the MFCC values that were used to create a fingerprint for different words that were pronounced, the audio samples had to be obtained. The first step of achieving this was to simply have the Raspberry Pi record a sample of our voice, input the recording into the Python program that was written, and extract the MFCC coefficients. The first program that was used to record commands was ‘arecord’. Below are two samples of the .wav files that were recorded using ‘arecord’.
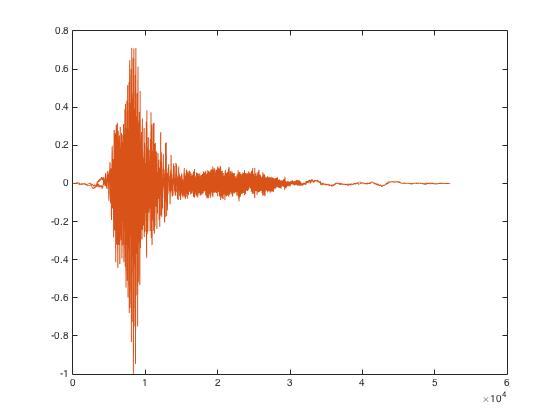
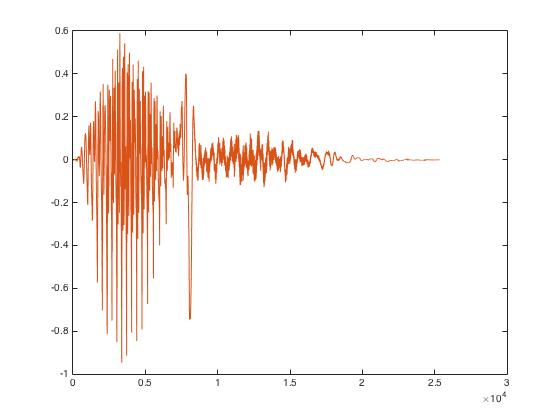
Figure 2: Audio Recordings Using 'arecord'
The problem with using 'arecord' as the form of recording was that the user was to manually start and stop the recording. The main downside of this is the inconsistency of having the user stop the recording precisely at the same time each time a recording was made. Having recordings that are roughly the same length is very important because the power spectrums that are retrieved from taking the mel transform will lead to drastically different output coefficients, making the system difficult to train. In addition to this, using ‘arecord’ lead to a lot of undesired background noise that was also mixed into the signal, leading to an imprecise recording of the desired keyword.
Because of the challenges that were faced when using 'arecord', a couple of ideas came to mind. One idea that came up was to take an input sample, filter out the background noise, and then clip the audio so that only the desired spectrum is retained before taking the mel transform of the signal. The other idea was to set a threshold value that would record the signal only if the amplitude of the signal was greater than that value. With these two ideas on mind, 'pyAudio' was discovered, which allows the user to edit audio inputs in Python. Specifically, as desired, it provides the user with the ability to manipulate an input audio file and also to set a threshold which only records when the input amplitude is larger than that threshold value.
With this library at hand, we were able to test to see if the samples were only recorded when desired and if the background noise was cancelled out compared to the recordings that were retrieved when using 'arecord'. Initially, besides retrieving the signal, the input signal was zero-padded on both ends of the voice spectrum by half a second in hopes of improving the variability in mel coefficients after the transform has been taken, as there is a greater difference between nothing being heard and the voice itself.
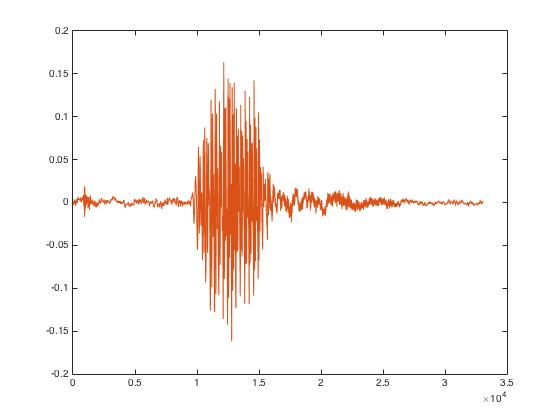
Figure 3: Zero Padded Signal
As can be seen above, using 'pyAudio' helped clear up the signal a lot and that the desired spectrum is prominent relative to the noiseless zero-pads and filtered-out background noise (which was accomplished by setting the threshold value). While this is the case, however, when taking the MFCC to find the spectrum coefficients, the coefficients found all came out to be 0. The reason that this was the result was due to the amount of zero padding that was added to the input signal. When the zero-padding was taken out, the coefficients were of a reasonable value. Solely looking at the output coefficients of the MFCC, it can be seen that different recordings of the same word looked different, but were much more similar than the coefficients of different words. With this, we were able to implement the offline speech recognition portion of the project. The final non-zero-padded signal can be seen below.
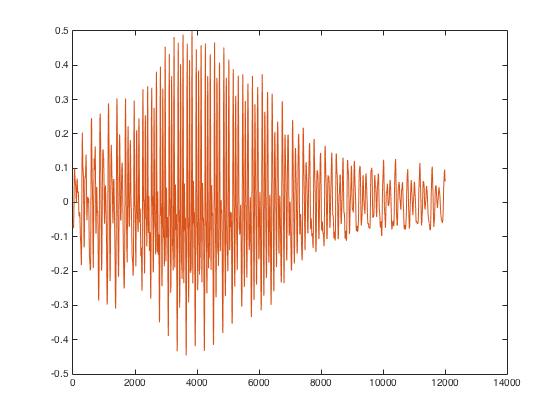
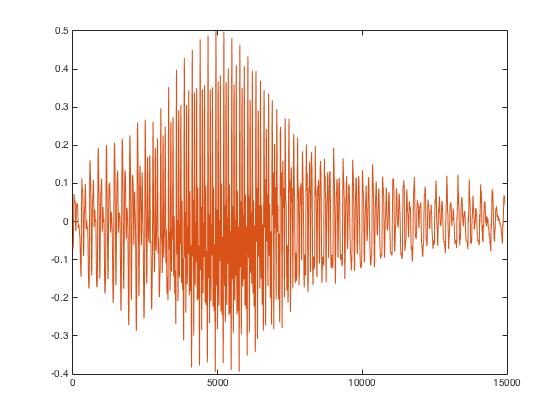
Figure 4: Trimmed Auio Signal
Finally, after the coefficients were extracted from the input signal, it can be seen that even though the values vary slightly, each indexed value in the array is very close to the value in the same indexed location of a different input signal for the same keyword. This can be seen in the plots below:
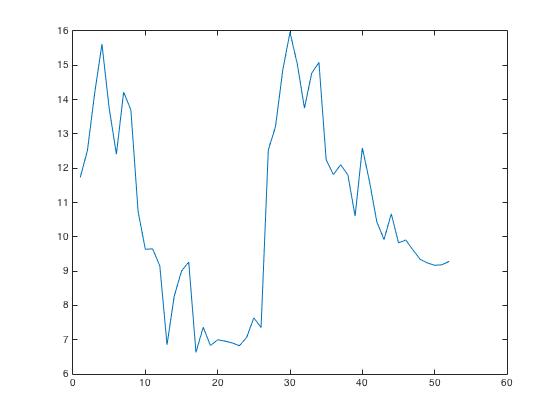
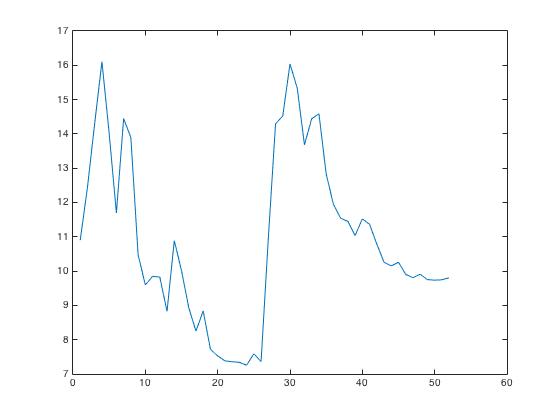
Figure 5: MFCC Output
Besides finding the best way to record an input sample to allow for accurate recognition, this portion of the project worked out smoothly. In terms of testing to ensure that the word that was being recorded was not only the correct word, but also audible and not covered by static or background noise, before initial training was completed, each recording was played back. This allowed us to make sure that the training set would be as accurate as possible.
Training:
In order to ensure that the system is able to recognize keywords, it must be trained. This was completed by writing a program 'training.py' that is solely used for training the system. A high-level block diagram of how the program works can be seen in the Drawings section.
Similar to what was explained above, the program will utilize the 'pyAudio' library to take an input sample .wav file and generate the MFCC values. The program will then search through the database of values based on previous training values. If there is a hit, then the program will ask “Did you say XYZ,” where "XYZ" is a keyword that has already been stored to the database. If the keyword matches what the user said, the user will type “y”, and the new coefficients will be put into the database. If the word "XYZ" that the program prints out is incorrect, the user can input “n”, and the program will ask “what did you mean?” The user will then have the ability to type in the correct word that corresponds to the recording that was just made. These new coefficients will then be added to the database of coefficients.
This type of training is very useful because it not only allows the system to be robust as more and more samples are written into the system, but also because it allows the program to behave on a more personal level. When using Jasper and relying on the recognition of Google’s speech API, while this speech recognition is one of the best out available to users today, the ability to train the speech recognition directly on the Raspberry Pi allows the system to be configured and customized to the user’s tendencies. For example, it can be seen in the video that the two group members are pronouncing the same word differently: because of the training that has been done on the group members’ voices, the system is able to identify the keyword correctly.
Specific to the system that has been created, the system has been trained to recognize the following three words: “Lumos”, “Nox” and “Close”. When “lumos” is recognized, the LEDs on a breadboard will light up. These will stay on until “nox” is said by the user, where the lights will turn off. If the user says “close” to the system, the system will quit the program.
This portion of the project went by smoothly as well. In order to test this training system, several recordings were already made to both train and test the system for accuracy and consistency.
Comparison
With the two implementations explained above, it can be concluded that speech recognition using MFCC certainly has its advantages and disadvantages. Here, there is no need for an internet connection since the Raspberry Pi 2 itself has the fingerprints of the speech stored and recognizes based off these values. This thus allows for a completely independent embedded device to operate without additional external online dependencies. Besides this, regardless of the language or accent, any word or phrase can be trained or pre-defined using this method, as proved by the demonstration of our “Deluminator”. This provides an ocean of opportunities for practical applications.
The flaw with regards to the offline speech recognition implemented is fact that words have to be trained to be recognized. Of course, the more the training values provided, the better would the results. For a dictionary of words, storing on the Raspberry Pi 2’s memory alone would not be viable and traversing through the entire memory for a particular word is quite tedious. This could be implemented over the cloud or elsewhere, but in terms of making the device purely embedded, this is not viable. The greater the training sets, the greater would be the delay in recognition. While the system can be optimized to decrease this delay, this would futher complicate the overall implementation. With this being said, one way to improve the speed of searching through a large database is to utilize all four cores of the Raspberry Pi 2.
Software
Jasper:
Developing modules for Jasper using the Developer API is user friendly and provides a wide range of applications that can be implemented. Considering a standard module implemented such as “Music,” the first step involves defining single-word strings known as “WORDS”, this is used to determine whether the module evoked is a Jasper module or not. For example,
WORDS = ["Jason", "Derulo", "Music", "Play"]
The ‘def handle(text, mic, profile)’ function is used to specify the operations to be executed when the appropriate module is evoked. Further, ‘mic.say’ is used to specify what Jasper must tell the user while ‘mic.activeListen’ emits a beep sound and waits for user input. Here, mic.say is used to tell the user the artist of the song being played. ‘subprocess.call’ executes subprocesses as well under the ‘def handle’ function. The ‘def isValid(text)’ function is used to define the input required by Jasper from the user to evoke the particular module. Here, “music” is the keyword to evoke the module.
These commands can be further expanded to suit the requirements of the developer as explained in the example for the Music module.
Offline Speech Recognition - "Deluminator"
Once the program is up and running, the microphone will passively stay on in the background, listening until a sound that is greater than the threshold value (coded in) is detected. Once this signal is detected, then the following function will be called, which will record using the microphone and save to the path provided:
record_to_file(‘recording.wav’)
The record_to_file() function above will call the record() function, which does the actual recording. This function is in charge of making sure that the amplitude of the input signal is greater than the threshold value that has been set. Once the amplitude drops before this threshold value, then the input signal will stop recording. After this is completed, the recorded signal will be normalized with respect to the maximum volume level set by the user. The purpose of doing this is to help smooth out the audio signal. Finally, the trim() function is called.
The purpose of the trim() function is to clip the recording. As stated above, the microphone will continue to listen in the background until it hears a signal which is greater than some coded threshold value. The trim() function will take the recorded signal and ensure that everything that is being saved is greater than the programmed threshold value.
In this project, the Mel Frequency Cepstral Coefficients (MFCC) for offline speech recognition are stored in numpy arrays. These arrays are two dimensional (2D) arrays and they are compared with one another using numpy functions.
The numpy boolean function used for comparison in the numpy.allclose(a, b, rtol, atol). This function will return TRUE if the following equation is satisfied,
absolute(a - b) <= (atol + rtol * absolute(b))
where ‘a’ and ‘b’ are the input numpy arrays to be compared and 'rtol' and 'atol' stand for the relative and absolute tolerance parameters.
The input values could be adjusted as per the requirements of the condition to be satisfied. In our project, we set ‘rtol’ to 0, allowing us to simply check the absolute difference of the two numpy array for a tolerance level specified by 'atol'. This allowed us to set a threshold of difference between the input array and stored arrays in the database, allowing a certain level of variation.
Training
In terms of the software written for training the system to recognize words, the recording and comparing coefficients remains the same as explained above. The main difference in this program is that it will call the training() function. The training function will write to a .wav file, obtain the MFCC values, and then check it against the most recent database. The program will then check or verify with the user on whether the recognition was completed correctly or not. If the program was able to successfully recognize the word (there is a hit against the dataset), then the new values will be added to the database of values, allowing the system to continue to learn. If, however, the program is not able to successfully recognize the word (either the word was recognized to be a different word - false positive - or there is no match whatsoever), the user is able to input the correct word that corresponded with the recording. After this is completed, the MFCC coefficients will be added to the database.
Drawings top
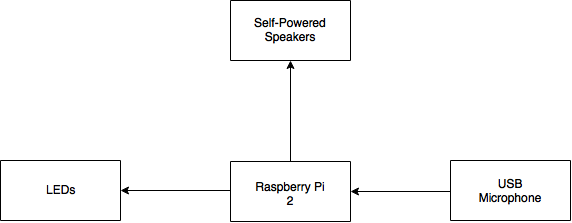
Figure 6: High-level Block Diagram of Setup
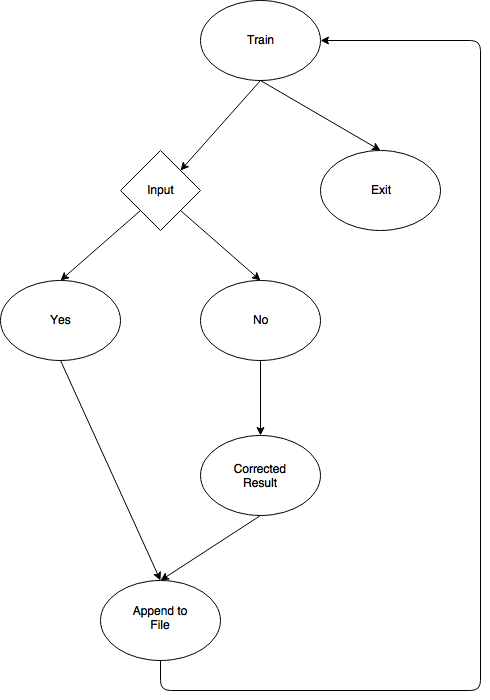
Figure 7: Training flowchart
Results top
Everything performed as planned. While the goal of utilizing an online and offline system was similar in terms of creating a voice activated assistance, there was a clear distinction between the online and offline systems established based off the implementations on the Raspberry Pi 2. For the Jasper implementation, an open source framework was developed upon and modules were added to the existing ones provided. Doing this gave the team a sense of what improvments can be made to the voice recognition system as a whole. In terms of the offline system, we were able to create a personalized system that can train to the user's voice. In terms of specific results that per portion of the entire project, modules were added to the online speech recognition system (Jasper) such as playing music on evoking the respective module. For the offline “Deluminator” system (based off Mel Frequency Cepstral Coefficients), the user is able to toggle LEDs based on the user's input "Lumos" and "Nox" (inspired from the Harry Potter series).
In terms of accuracy of the system, as explained above, the Google's speech recognition system is a very robust system that has been trained over several years. While using this API, however, we noticed that it was not able to recognize the desired keyword when the user speaks with a different accent. With this being said, the offline system was developed to be a highly accurate system, as the user can train the system to work directly with the user's voice.
Conclusions top
We successfully implemented speech recognition both online and offline on the Raspberry Pi 2, with additional implementation of additional applications. In terms of the online system, we were able to add to the existing open source platform provided. For the offline system, the system was trained and interfaces with hardware to prove the accuracy of the speech. Having completed both implementations successfully and robustly testing the systems, we were ablel to distinctly differentiate the benefits and drawbacks of each of the implementations.
In terms of setbacks, one setback that took a while to resolve was the initial recording method that was utilized for the offline speech recognition system. We realized that ‘arecord’ is a poor method to record user inputs onto ‘.wav’ files as a lot of noise is embedded in the recorded speech, which had a detrimental impact on the MFCC computed.
Future Work top
To speed up the process of comparing the input speech’s MFCC with the trained dataset, one thing that could be done is to utilize all four cores of the Raspberry Pi 2 and execute the search in parallel. Currently the training set contains approximately 10 arrays of training data for a single user for a single word, this could be further expanded to achieve better recognition of the offline speech recognition system.
In addition to this, if we had more time to work on this project, we would implement even more complex applications such as home automation functionalities using a custom voice on an embedded system devoid of the internet. In addition to this, we would make the system respond back to the user using an offline text to speech application.
Appendices top
A. Commented Program Listing
B. Bill Of Materials (BOM)
| Part | Unit Price | Quantity | Total Price | Vendor |
|---|---|---|---|---|
| Raspberry Pi 2 | $35 | 1 | $35 | Adafruit |
| eBerry USB Microphone | $8 | 1 | $8 | Amazon |
| Logitech Multimedia Speakers | $13 | 1 | $13 | Amazon |
| Breadboard | $6 | 1 | $6 | ECE 5990 Lab |
| LEDs | $0.20 | 4 | $0.80 | ECE 5990 Lab |
| TOTAL: | $62.80 |
C. Specific Tasks of Each Member
Jacob and Kevin implemented Jasper on the Raspberry Pi 2. Further, Jacob developed the additional modules to the Jasper such as playing music on command. Both Jacob and Kevin extracted the Mel Frequency Cepstral Coefficients. Jacob compared the results from input MFCC computed and stored fingerprints using the numpy functions creating the initial offline system. Kevin developed the training set for automating the process of appending onto the training set and check the inputs from the user. He expanded the same onto blinking LEDs on the offline system. Both Jacob and Kevin, trained the training set to execute “Deluminator”. They combinedly implemented every step of the project, brainstorming and constructively improving the implemented code and procedure.
References top
[1] “Detect & Record Audio in Python,” Stack Overflow. [Online]. Available at: http://stackoverflow.com/questions/892199/detect-record-audio-in-python. [Accessed: Dec-2015].
[2] J. Lyons, “Mel Frequency Cepstral Coefficient (MFCC) tutorial,” Practical graphy. [Online]. Available at: http://practicalcryptography.com/miscellaneous/machine-learning/guide-mel-frequency-cepstral-coefficients-mfccs/. [Accessed: Dec-2015].
[3] S. Saha and C. Marsh, “Control Anything with your Voice,” Jasper. [Online]. Available at: http://jasperproject.github.io/. [Accessed: Dec-2015].
[4] D. Sinclair, “Raspberry Pi 2 Jasper,” Dan Sinclair. [Online]. Available at: http://www.dansinclair.co.uk/. [Accessed: Dec-2015].
Acknowledgements top
We would like to acknowledge and thank Professor Joe Skovira for helping us throughout this project and for the wonderful class. We would also like to acknowledge the FALL 2015 TA, Gautham Ponnu, for his support.
About Us top

Jacob George
Master of Engineering in Electrical and Computer Engineering at Cornell University ’16
I’m passionate about embedded systems and its applications. I have a wide realm of interests especially in combining business and technology. I believe in creating sustainable and efficient technology for the betterment of humanity.
Kevin J. Wang
Masters of Engineering Electrical and Computer Engineering at Cornell University '16
I have always had a passion in digging in and building new things. Although I was not presented with any opportunities within the realm of robotics before college, this interest has always stuck with me. Now being a Masters student, I have not only worked in robotics labs developing autonomous solutions using computer vision, and have been a part of a team that won world champions in the AUVSI Unmanned Air Systems competition, CUAir, but I have also had the opportunity to work in the fast-paced industry.