ECE5725 Project:Mechanical 7-segment digital clock
Spring 2025
Mingxu He and Yuhang Cheng
Demonstration Video
Introduction
This project demonstrates the design and implementation of a fully mechanical four-digit digital clock that blends classic seven-segment aesthetics with modern embedded control. At its core is a Raspberry Pi 4, which coordinates the timing logic and precise motion control of 28 SG90 micro servos arranged in four seven-segment modules. Each servo module is an 8cm×2cm aluminum bar that rotates 90 degrees when driven by a servo, allowing numbers to appear and disappear in three-dimensional space rather than on a flat LED display. In order to drive so many channels without exhausting the Pi's limited GPIO pins, two 16-channel PCA9685 PWM driver boards are cascaded at I²C addresses 0x40 and 0x41, providing pulses with 12-bit resolution, which translates to approximately 1 degree of positioning accuracy for each servo. In addition to simple time-telling functionality, the clock supports user-selectable one, two, five and ten minute countdowns, making it ideal for classrooms, workshops or fitness facilities where visual cues need to be clearly displayed across the room. When idle, the individual modules perform animated patterns such as a "loading snake" chase and a smooth "cartoon wave". All modes are accessible via a touchscreen GUI rendered by Pygame on the PiTFT, while physical buttons provide quick navigation in environments where touch input is not convenient. Power integrity and reliability are achieved via an external 5V/22A regulated power supply that isolates servo transients from the Pi, and software safeguards that reset all modules at startup and after a fault is detected.

Project Objective:
- The underlying goal was to build a four-digit mechanical digital display that could accurately show local time and a one-minute countdown.
- The high-level goal is to allow users to switch between "clock/countdown" modes via the touch screen and personalize the countdown time (1 minute, 2 minutes, 5 minutes, 10 minutes). In addition, the goal is to integrate the function of displaying the current time in multiple time zones.
- The goal of this extension is to implement the idle animation and merge the switching functionality between 24-hour and 12-hour time.
Design
Hardware design
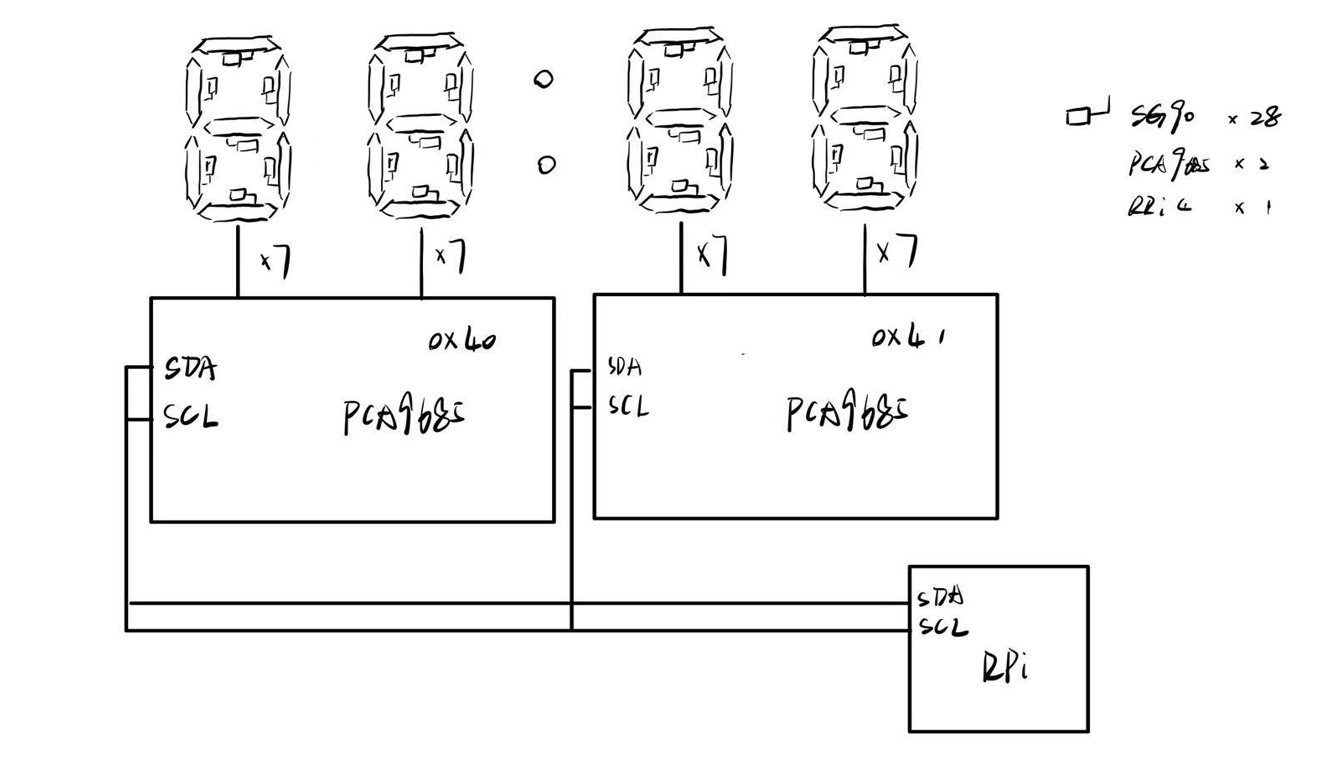
The hardware includes a Raspberry Pi 4 (for reading time and logic scheduling), PCA9685x2 (28 pulse-width modulation PWM signals total), SG90 servos (for 28 servos), and 22A independent power supplies and wiring. The software uses Python, calling RPi.GPIO, Adafruit_Motor, and Adafruit_PCA9685 to control the servos, and uses datetime to get the real time and zoneinfo to get the time in other time zones. The PiTFT touch UI is then completed using pygame. The reason for choosing dual PCA9685s instead of TB6612FNGs (as outlined earlier in the course) is that the latter can only drive two channels and has insufficient GPIO. In contrast, the SG90 has built-in control circuitry, and a single PWM can accurately position it, making it more suitable for 90° segment flipping than DC motors.
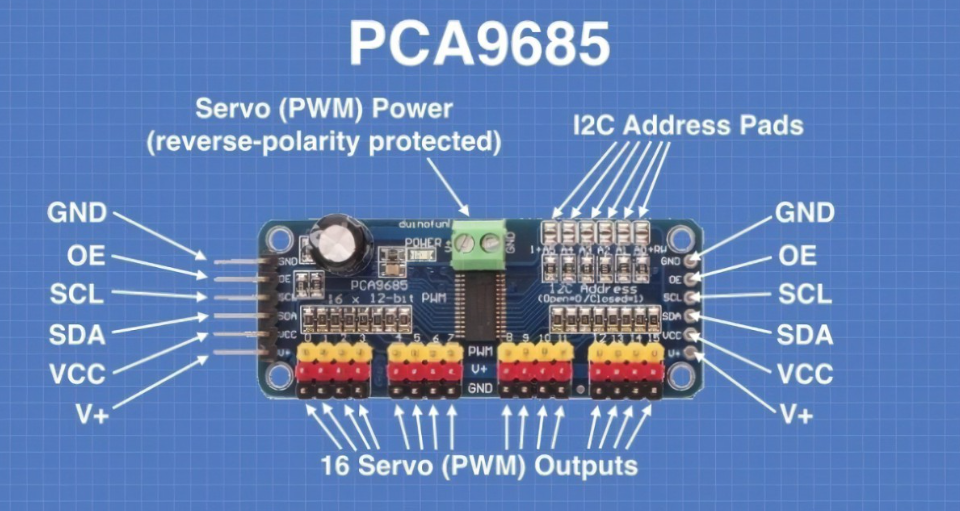
The PCA9685 is a 16-channel, 12-bit resolution PWM generator chip controlled via the I²C bus. It allows the frequency and duty cycle of each output to be set independently. Compared to directly generating PWM with a microcontroller or MCU, the PCA9685 can support cascading multiple modules on a bus to expand more channels.In this project, we used two PCA9685 modules (address 0x40 and 0x41) to drive a total of 28 servos
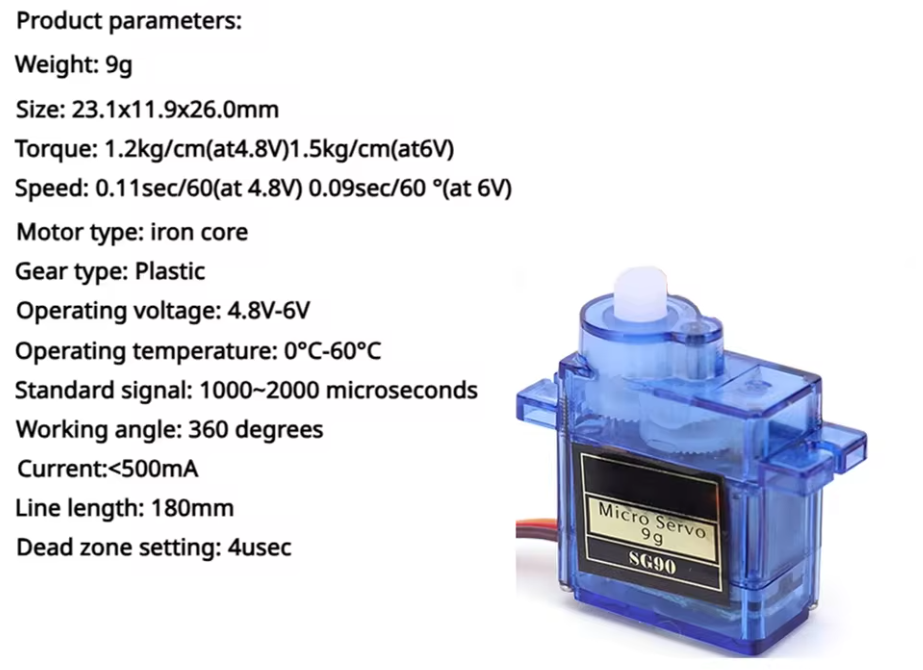
SG90 is an extremely common small servo with a size of 22.4 × 12.5 × 22.8 mm and a response speed of about 0.1 s/60°. It uses a plastic gear structure and can work stably within the voltage range of 4.8 V–6 V. In this project, all the "seven-segment digital tube" segment flips, as well as the "Loading Snake" and "Cartoon Wave" animations are completed using the SG90 servo. With the help of the 50 Hz PWM drive of the PCA9685 module, we can accurately control the angle of the SG90 by setting the pulse width (500 µs–2500 µs), achieving a resolution of about 1° per step.
Software design
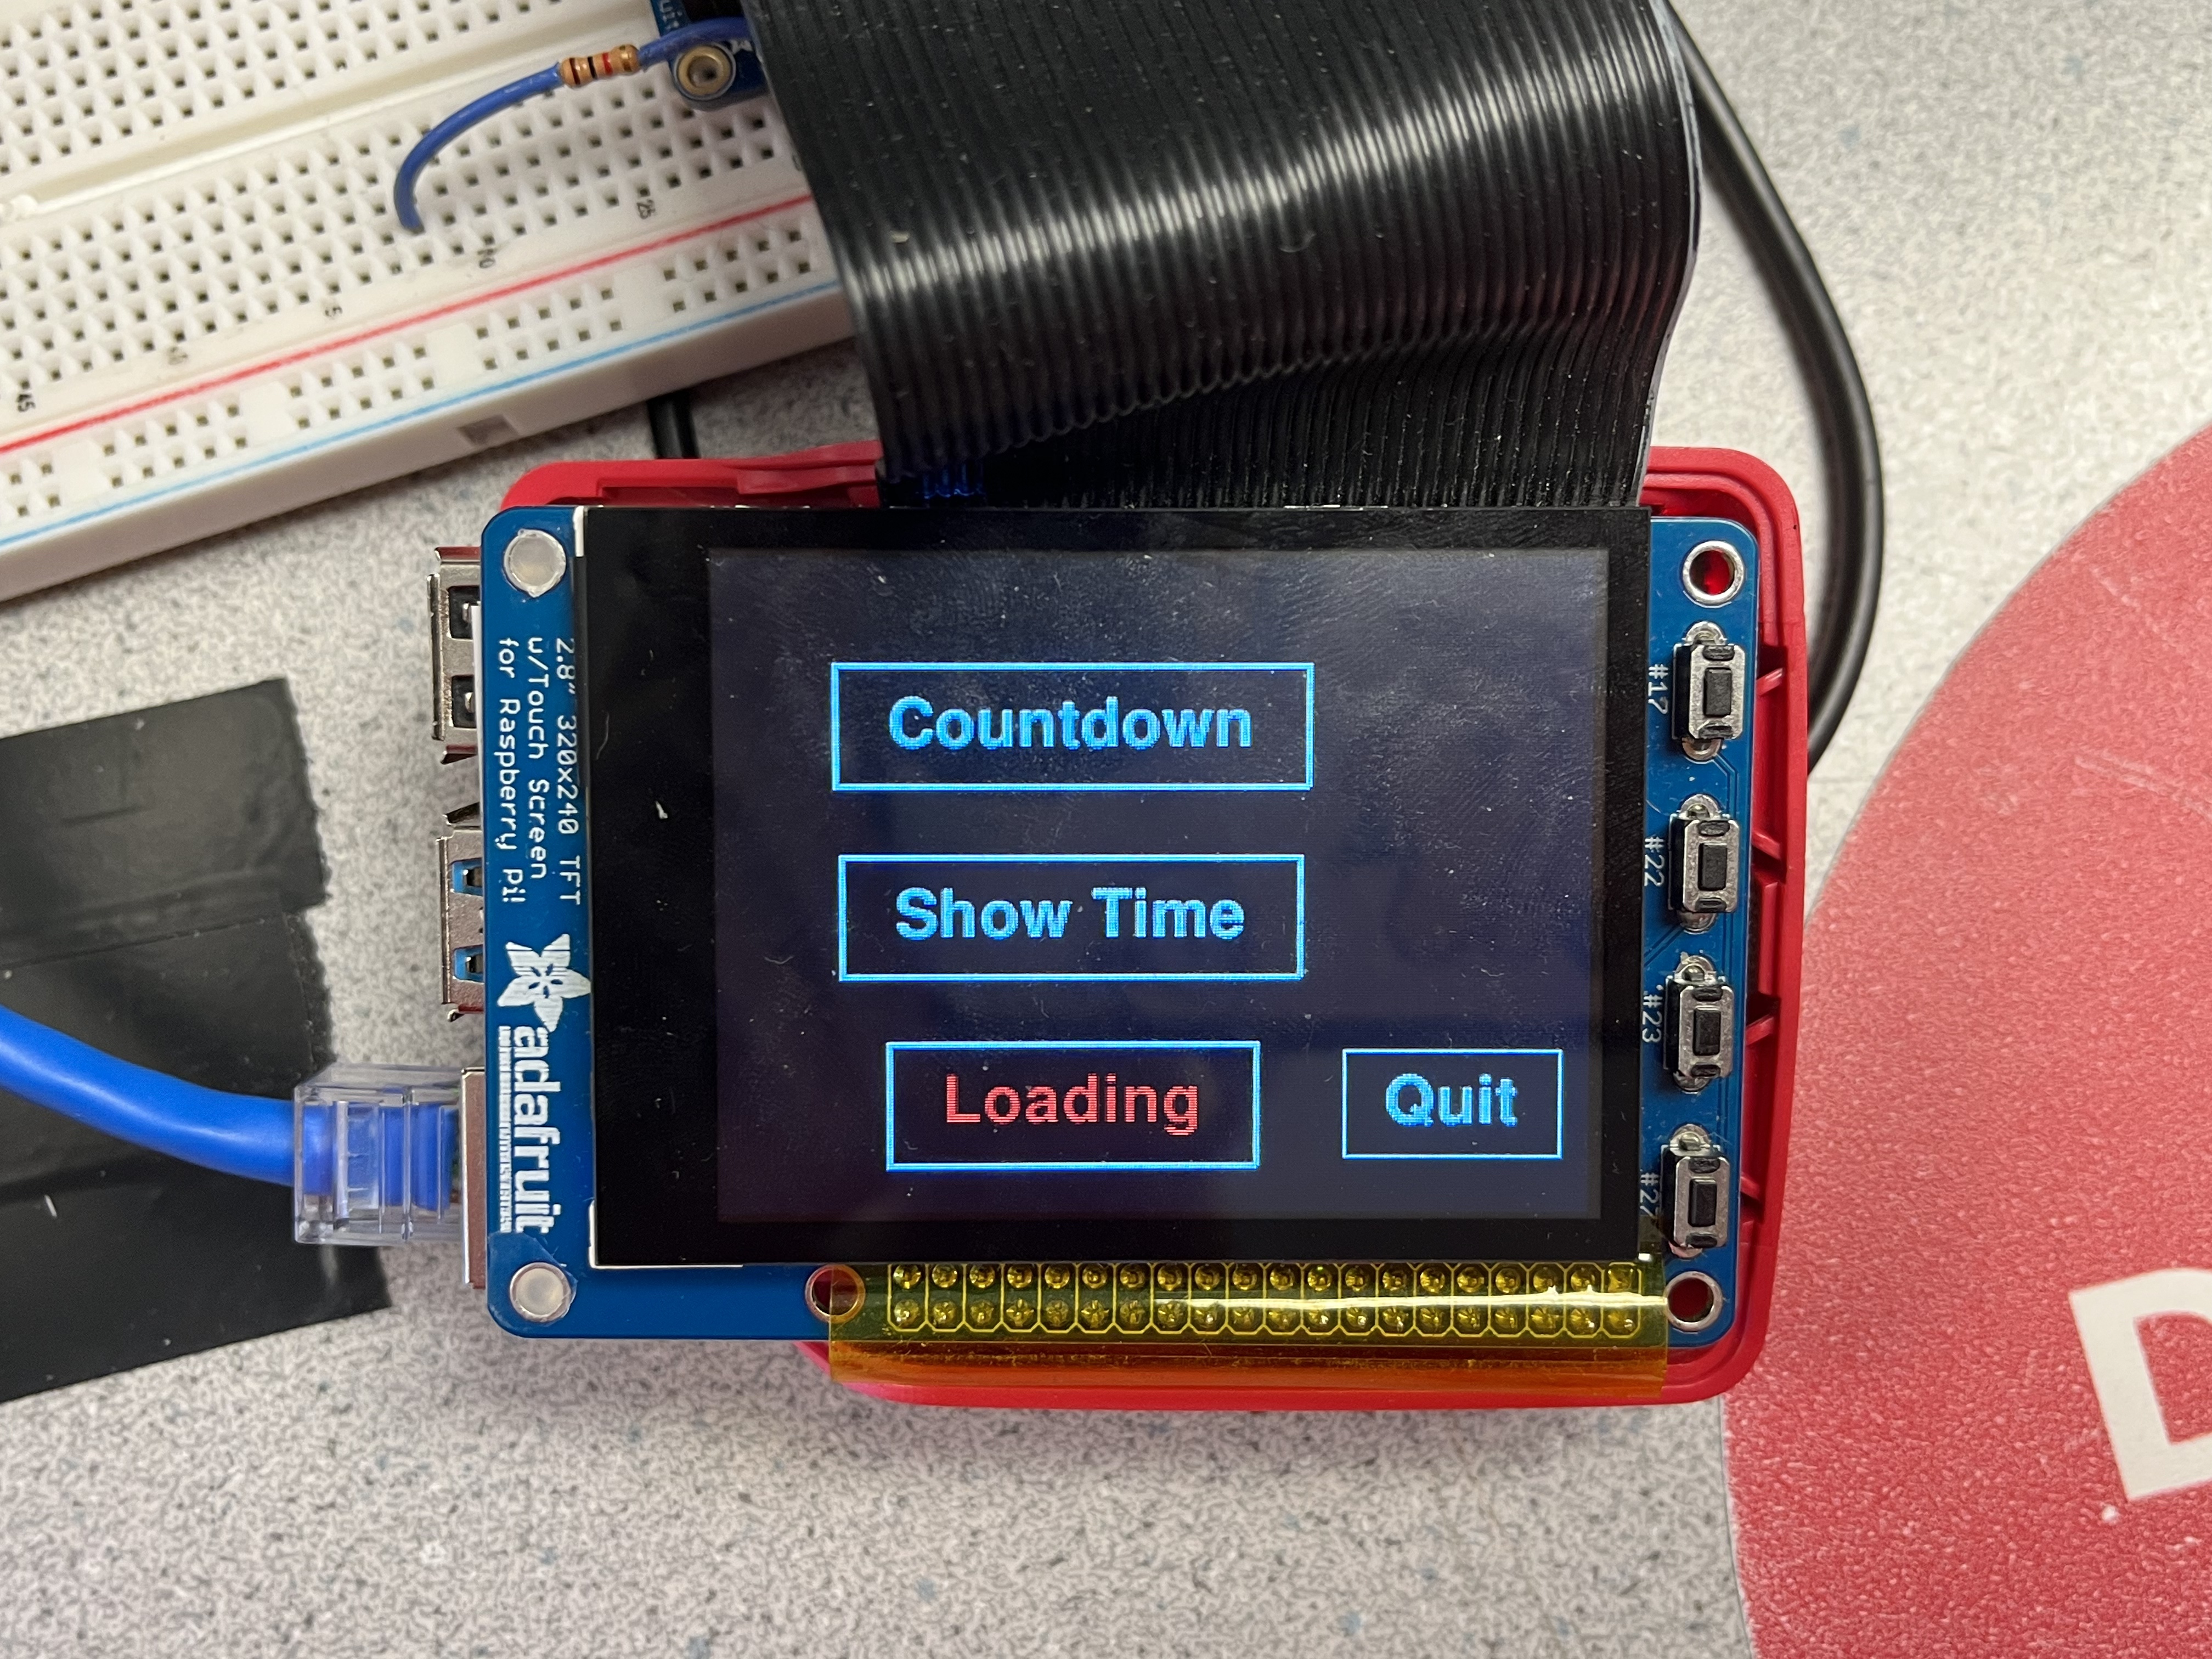
The main interface consists of three menu items arranged vertically side by side: Countdown, Show Time and Loading. They are integrated in the offset position on the left side of the screen to avoid visual or touch conflicts with the Quit button in the lower right corner. Each menu item is marked with a white rectangular frame, and the currently selected item is highlighted in red font. The overall style is simple and easy to read. A Back/Quit area is reserved at the bottom center of the interface, which is always used to return to the previous level or exit the application, ensuring that you can quickly exit or return in any case.
All support both touch operation and physical buttons (GPIO 17/22) to move the cursor up and down, and GPIO 23 to confirm the selection. Users can switch freely between the three functions without a mouse or keyboard, just click or press the button; after selection, the application will enter the corresponding function page and start the corresponding background thread. Press the physical "Back" again or touch the Back button to return to the main interface. This dual-mode design is not only convenient for touch, but also takes into account the fast response of physical buttons.
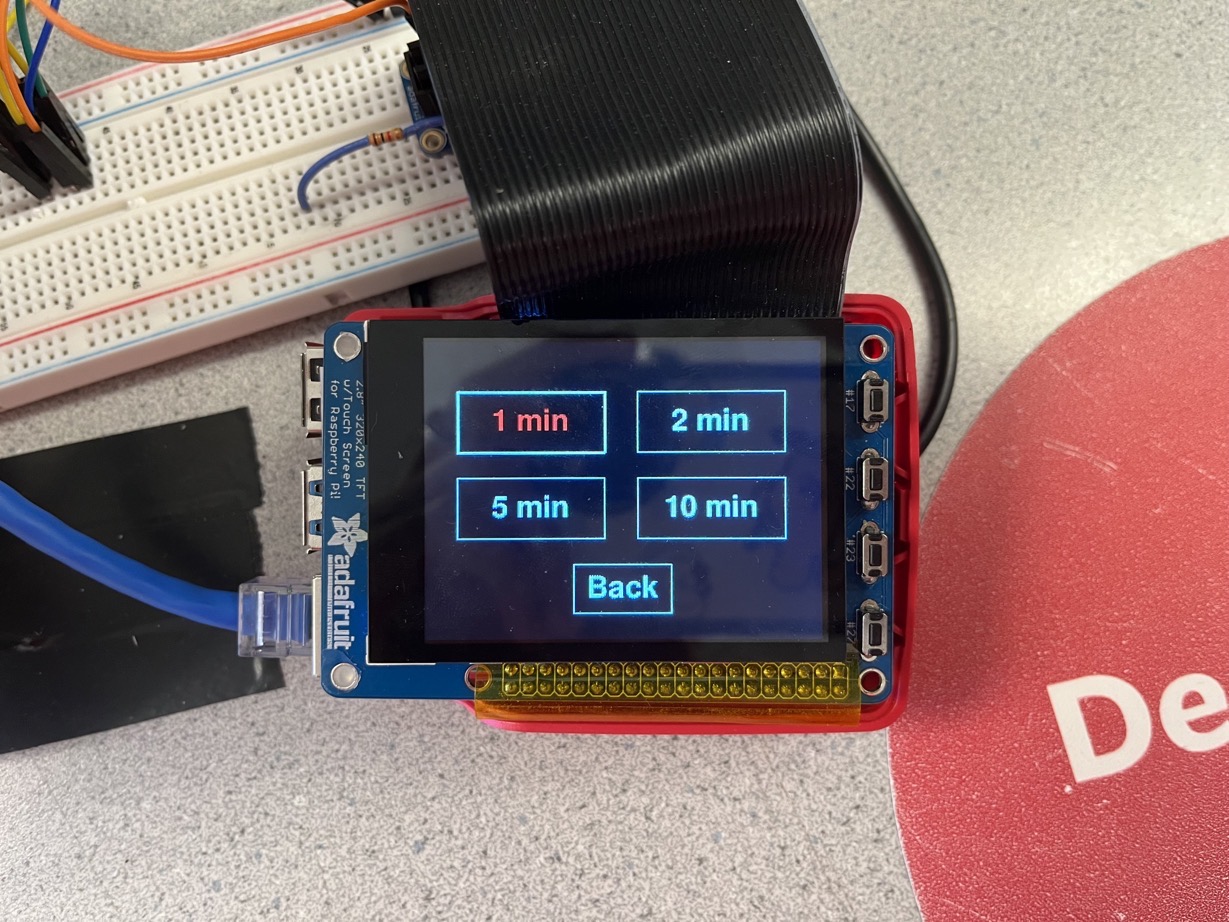
Countdown function
In terms of function, the user first selects one of the four preset durations of 1, 2, 5, and 10 minutes on the selection page, and then enters the countdown operation page:
During the countdown, the physical buttons Up/Down/Confirm are blocked to avoid misoperation; only the Back and touch Back buttons are retained for midway cancellation.
When the countdown ends, the thread automatically stops, all servos return to zero, the screen flashes "Time Up" for 1 second, and then automatically returns to the main interface to wait for the next input.
This design allows users to intuitively view the remaining minutes through the screen, and obtain synchronized physical feedback on the mechanical clock tower, forming a "digital + mechanical" dual experience.
After entering Countdown, the remaining time is displayed in white font in the center of the screen in the format of "X min left". The time text is surrounded by a thin white border, and the overall visual effect is consistent with the main menu. The Back button is retained at the bottom of the interface, and users can click it to return to the main interface at any time; if a physical button is used, GPIO 27 can also trigger the return.
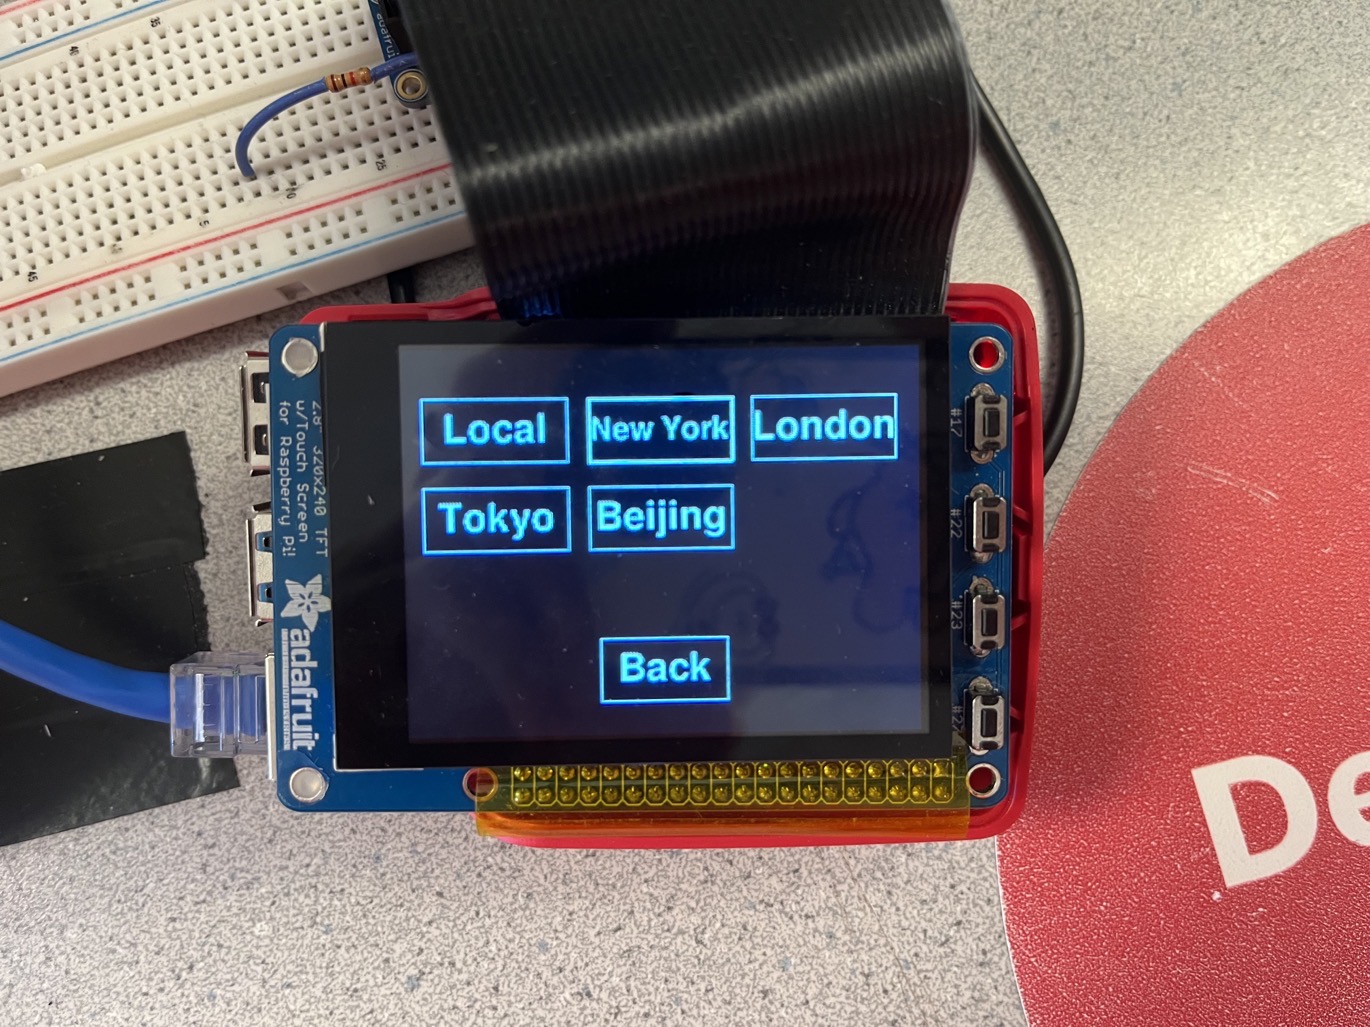
Show Time – Selection interface (time zone list)
Click Show Time, and the screen switches to the time zone selection page: the top half lists five options, "Local, New York, London, Tokyo, Beijing", in a 3×2 grid, each of which is placed in a 90 × 40 px white border; the currently highlighted entry turns red and bold, making it easy to identify at a glance when using the physical Up/Down buttons or touch operations. The general Back button is retained at the bottom. After the selection is completed, enter the real-time display page.
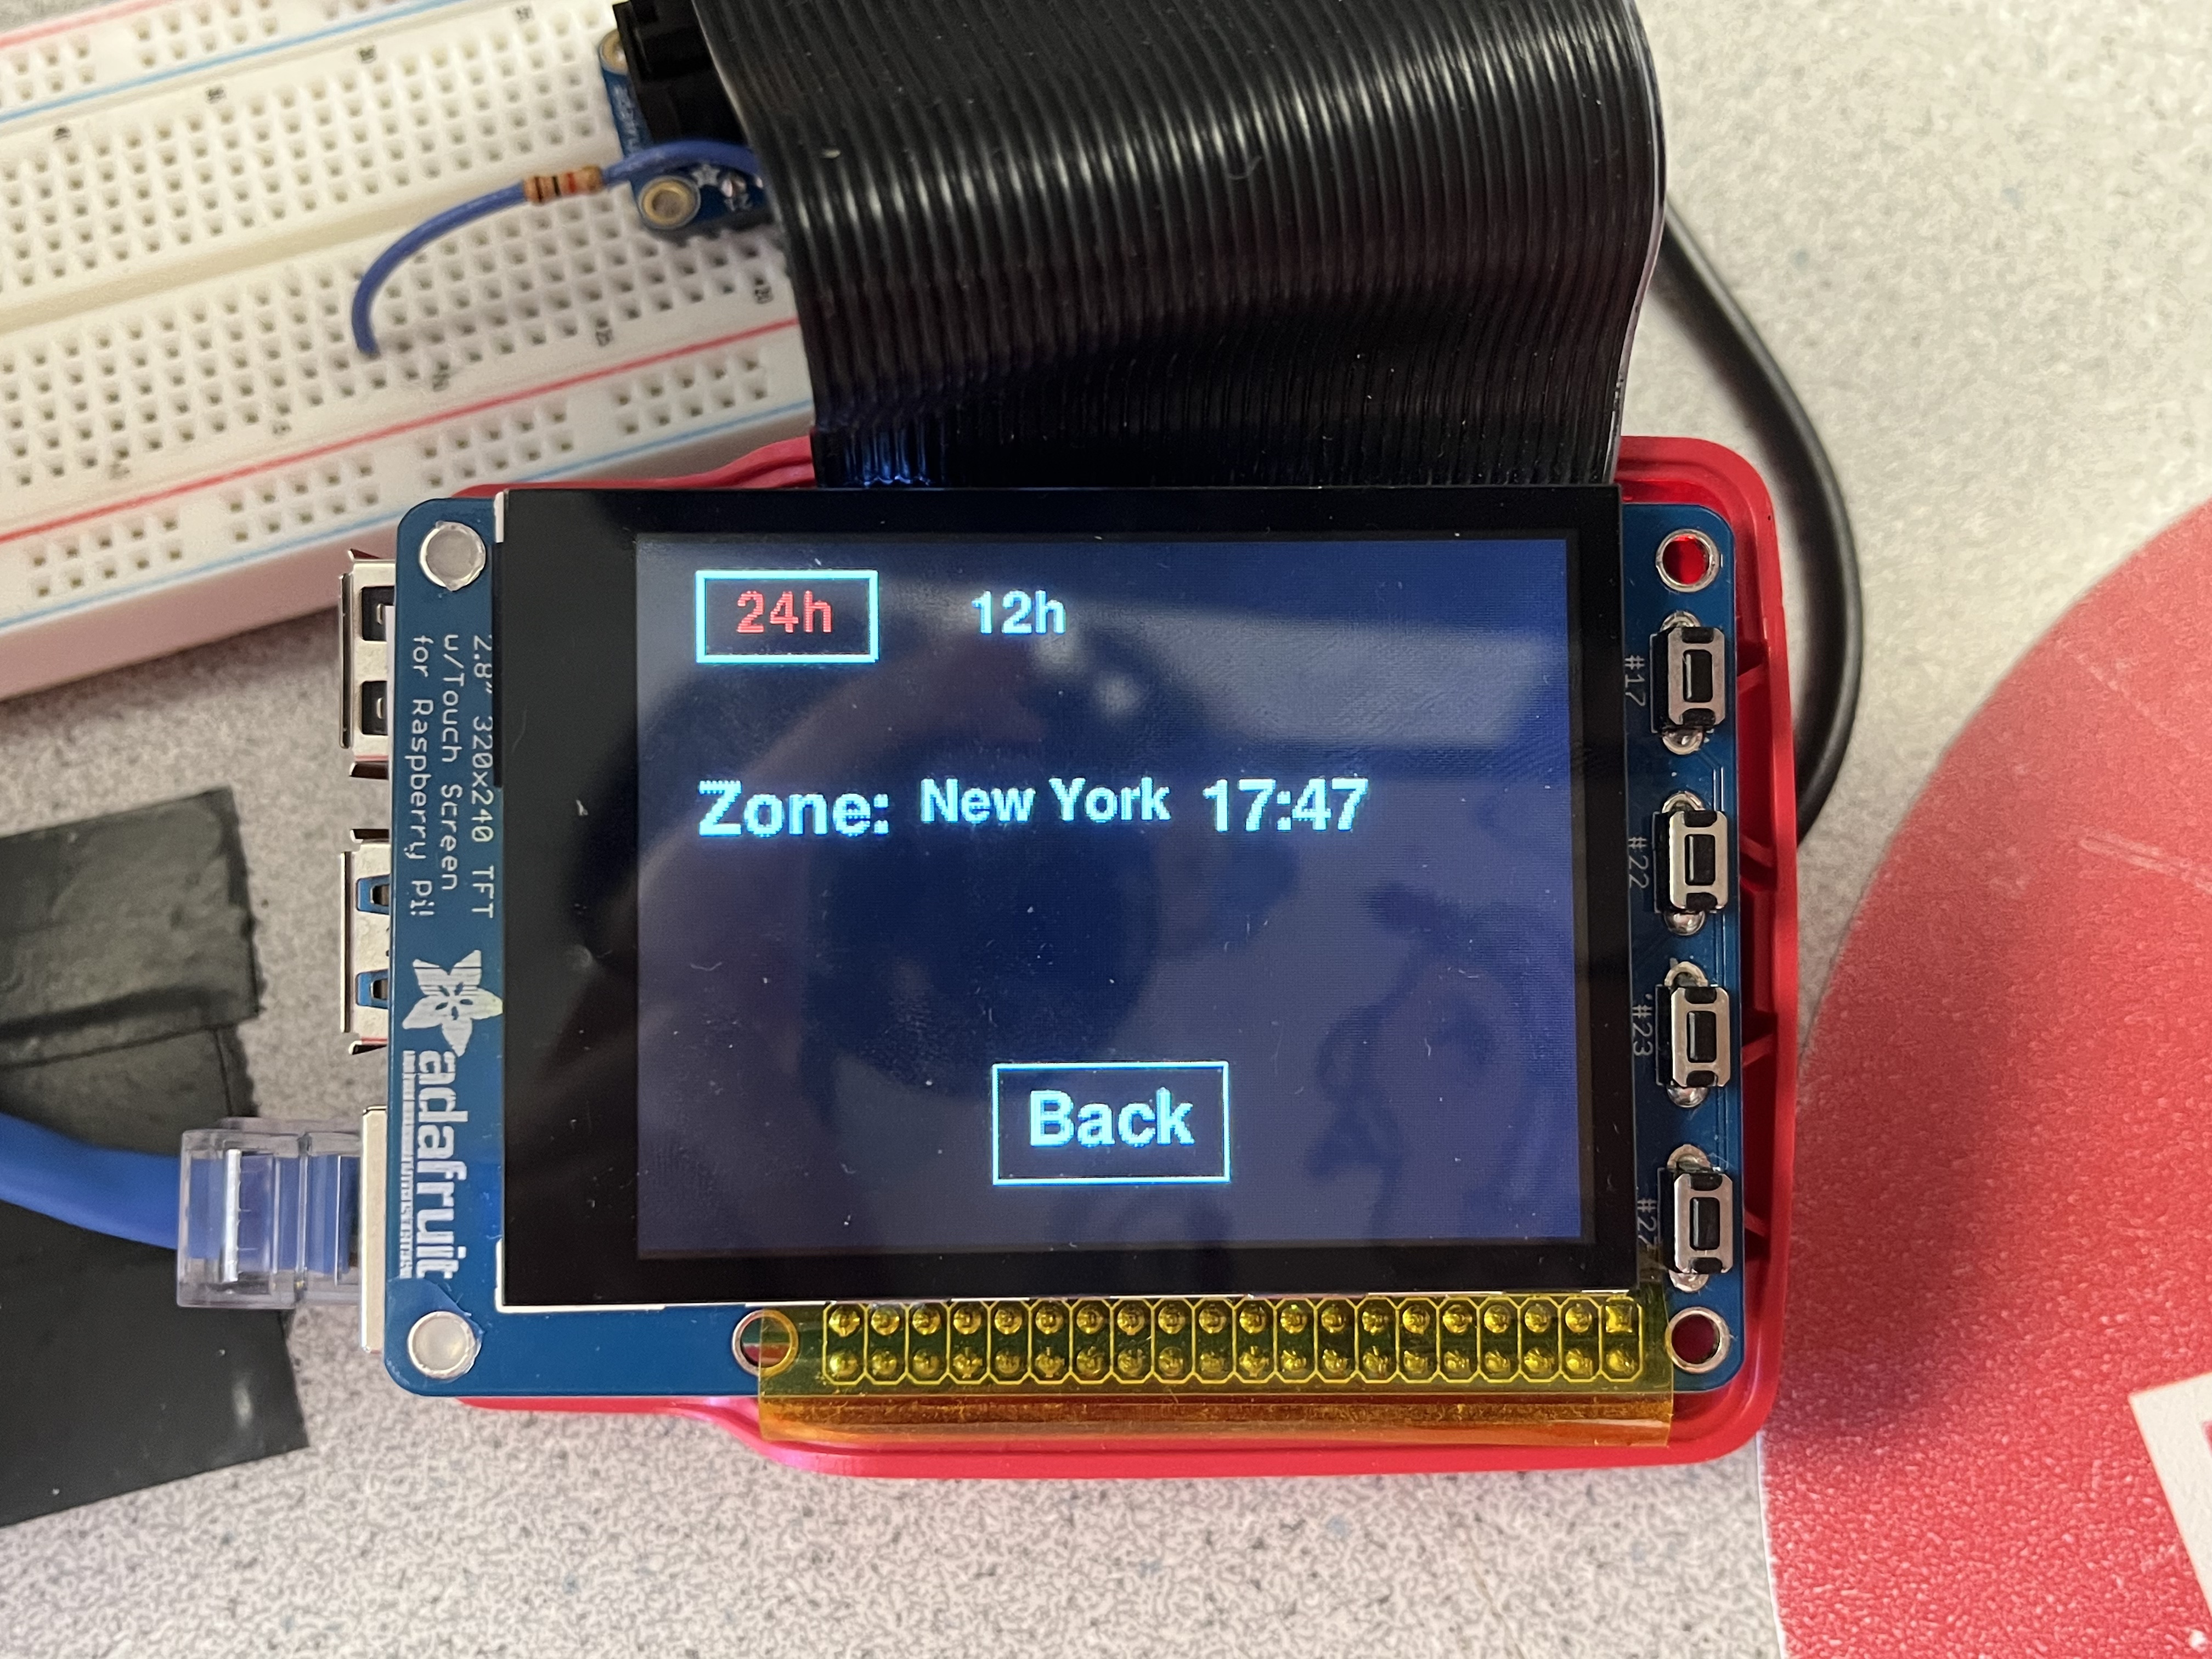
Show Time – Real-time display page (24h / 12h switchable)
The real-time page arranges the time information in a row: Zone: New York 23:14.
The Zone: label is always fixed on the left; followed by the name of the selected time zone; the rightmost end is a dynamic clock, with the numbers refreshed every minute.
Two small buttons 24h / 12h are placed in the upper right corner: with the guidance and suggestions of TA, we added the 24/12 time system switching function. When selected, the current format text turns red and a white box is drawn outside it. The entity Up/Down can also jump between the two, and Confirm switches the format immediately.
The servo seven-segment clock is synchronized with the screen: the hour digits are written into the hours[] servo array, and the minute digits are written into ms[]. If switched to 12h mode, 0 o'clock and noon will be swapped 12/0 in real time.
Return logic: Press the physical Back button or touch the Back button to exit; when exiting, the thread is terminated, the servo is reset and returns to the main interface. The entire operation page does not respond to other buttons to avoid misoperation.
With dual-mode display, instant time zone switching and physical/touch dual input, the interface can serve as a world clock and form a synchronized physical-digital fusion demonstration with the mechanical clock tower.
Loading – Run interface (animation playback page)
After startup, the screen displays “Loading Snake…” or “Cartoon Wave…” in the center, indicating the type of animation being played; the Back button is still reserved below for exiting at any time.
Loading Snake
Light up 4 bright blocks on the circular runway composed of 12 seven-segment servos, slide clockwise to form a "snake" effect, and play it in a loop until exiting.
Cartoon Wave
The mechanical array is divided into 8 "columns" in groups of two. The program allows 3 groups of servos to swing back and forth from 0 → 180 → 0° at the same time, and then the window slides forward one group (looping) to form a continuous three-wave; each half cycle is 0.5 s, and up to three groups are concurrent, and the physical effect is like a wave.
When exiting (physical Back or touch Back), the corresponding thread will be terminated, all servos will be reset to the static angle, and return to the main interface.
For animation performance, please see Result.
Drawings
The model and size of 3D printing comes from an open source project and you can see the project in references. We borrowed the 3D printing model and specific dimensions of the pendulum from that open source project. We use 3D printing technology to ensure that the size of each black pendulum is 8 x 2 cm, and the width is also 2cm (the distance from the rear connection of the pendulum to the horizontal plane of the pendulum). After we fix the position of the pendulum on the electrode, we measure that its swing distance of 90° rotation is 2cm.
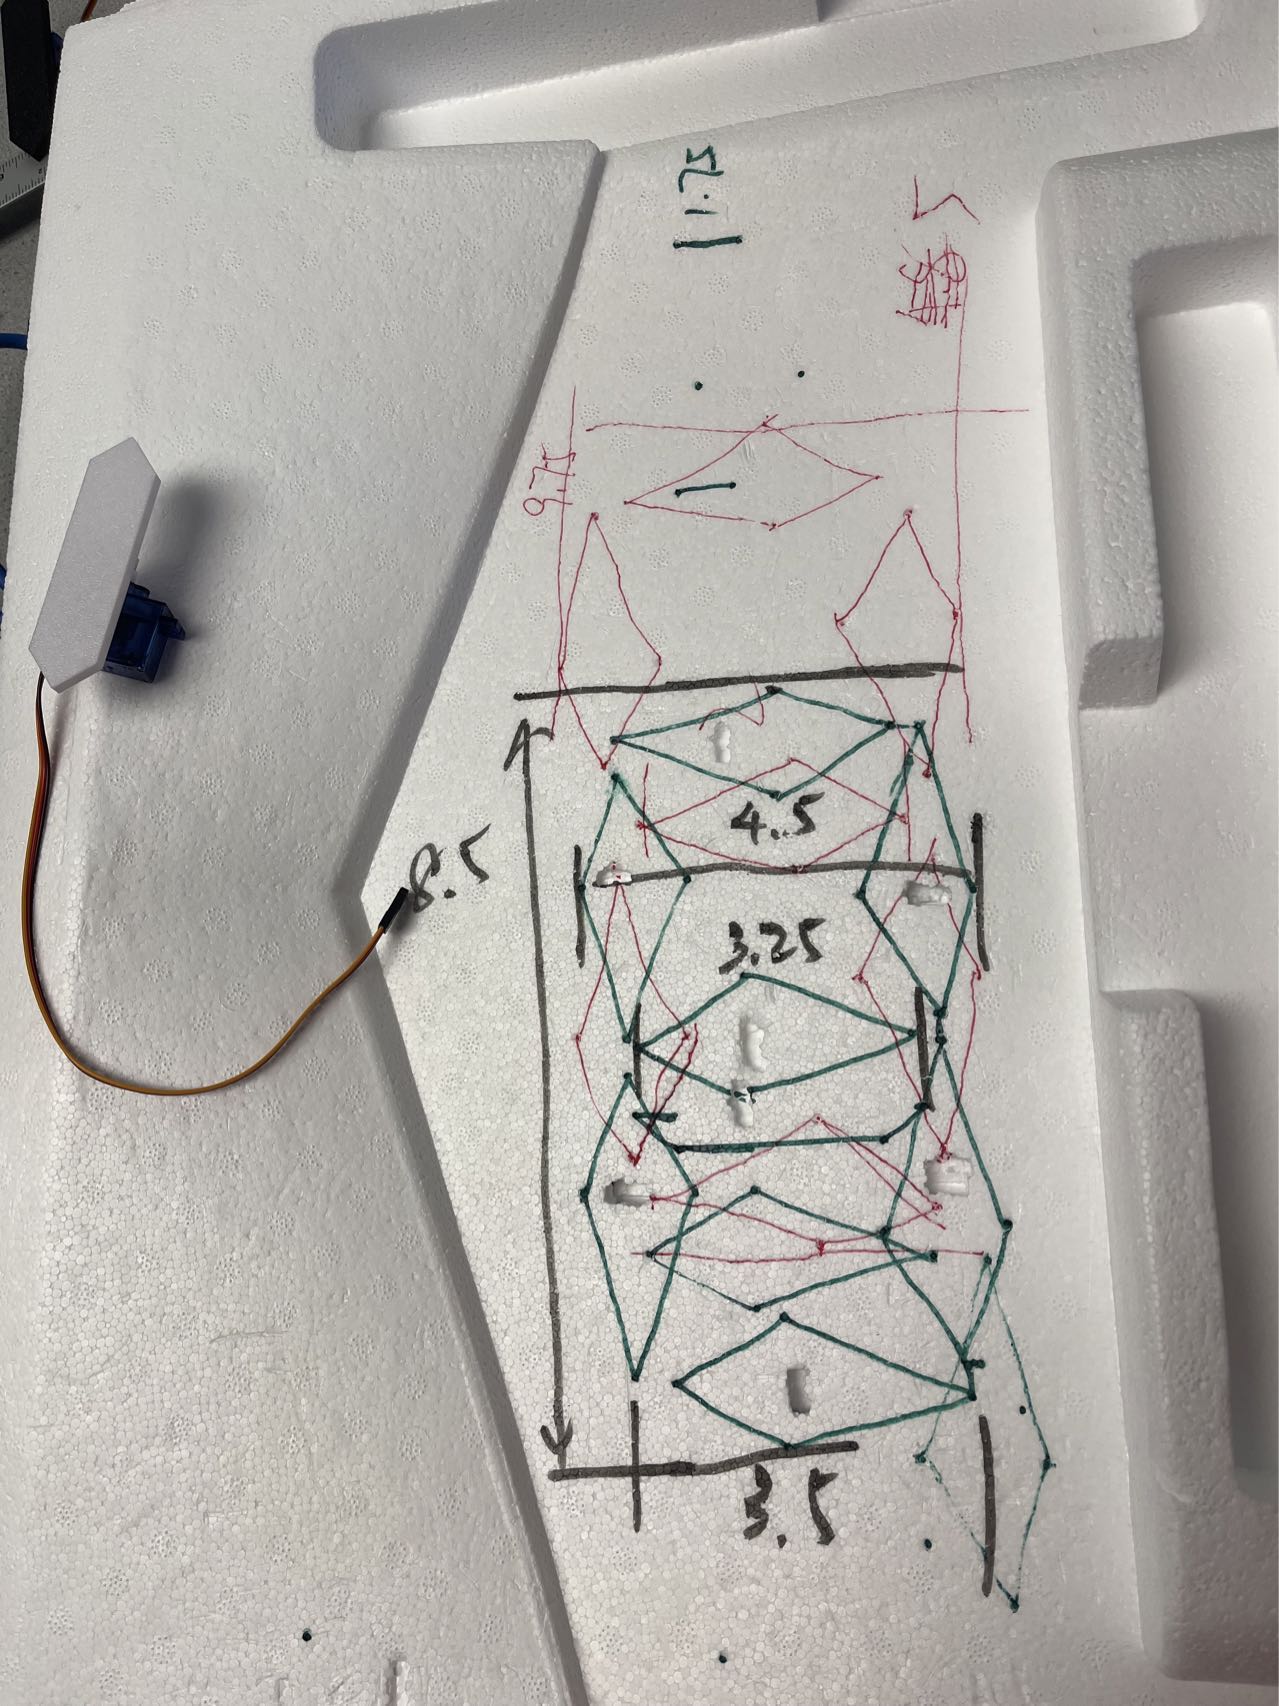
We reserve extra space for the middle motor to prevent it from rubbing against the pendulum below. By measuring the positions of the seven motors, we ensure that the four numbers can be reasonably placed on our foam board.
After determining the position, we use a screwdriver to punch holes to ensure that the three-in-one wire can pass through the small hole, and use hot melt glue to fix the position of the motor. After completing the installation of all motors, we run the program to initialize it, and then manually adjust the initial position of the motor pendulum one by one to ensure that it can present a clear digital image after rotating 90°.
In terms of layout configuration, each group of seven motors forms a basic digital unit, and four digital units are arranged horizontally. The two numbers on the left represent the clock time, and the two numbers on the right represent the minute time, which are used to display the time and countdown. The GPIO2/3 (SDA/SCL) interface facilitates the connection of two PCA9685. In addition, the second board is re-addressed to 0x41 by soldering jumpers. Each PCA9685 can control 14 servo motors. All servo motors are powered by an external power supply with a current of 22A, which is grounded to ensure safety and sufficient current when the 28 servo motors are flipped at the same time.
Testing
1. Automatic discovery and initialization of touch screen devices
In the initial version, we relied on the fixed path /dev/input/touchscreen; once the system kernel was changed or a USB mouse or keyboard was connected, the event number would be reallocated and the program would directly throw a FileNotFoundError. In addition, the new kernel seemed to cause the link between eventX and Touchscreen to fail after each restart, which made the entire PiTFT interface unable to start on some Raspberry Pis.
To solve this problem, we rewrote the input layer in the Design phase: when starting, we first traverse evdev.list_devices() and lock the real touch screen node based on whether the device name contains "EP0110M09". If found, write the full path to os.environ["PIGAME_TS"] and print a confirmation message in the log. In this way, no matter how the event number changes, the system can adapt. Later, we discovered that SDL must be initialized after setting PIGAME_TS, otherwise pygame will still reference the invalid mouse device (which we need to hide); so we moved all os.environ settings forward to before importing pygame, completely eliminating the timing problem.
2. Overlapping wave window sliding algorithm
The original "Cartoon Wave" simply started 8 groups of servos at 0.25 s intervals and ran a complete round trip. After the cycle ended, they were reset and restarted. During the demonstration, it was found that the odd and even columns were lifted alternately, lacking a sense of coherent flow, and the interval period was too long.
The redesign uses a sliding triplet window: up to three groups of servos move at the same time, and the window translates one group and loops back to the head after each round trip. In this way, the stage always maintains "3 columns of wave peaks" and has richer layers. When implementing, we use idx to record the central group number of the current window, corresponding to the triplet [(idx-1) % 8, idx, (idx+1) % 8]. At the end of each cycle, idx = (idx + 1) % 8, thus obtaining a scrolling effect of 0-1-2→…→ 6-7-0. In order to keep the reverse group at 180° and the normal group at 0° during the static period, clear_wave() is called before and after the loop to reset them - this detail ensures that there will be no angle jumps when the window slides.
3. GUI element overlap and touch error
The earliest main menu and loading menu were completely horizontally centered, so Quit was too close to the last item; on PiTFT, finger clicks often accidentally touched both (if two options were touched at the same time, there would be no response). After user testing, we moved the main menu to the left as a whole by MENU_X_OFFSET = 20 px, and raised the button in the loading menu by a gap_y, while retaining the unified Back button at the bottom.
The adjustment also brought a side effect - the text and the outer frame position were no longer aligned. To this end, each time a button was drawn, (WIDTH - tw)//2 - MENU_X_OFFSET was used to calculate the text x, and the outer frame rect.x = x - 20, keeping the relative position of the text and the frame unchanged; the loading menu recalculated the y coordinate in draw_ld_sel() to ensure that the button left at least > 12 px of the safety zone from the bottom. After multiple rounds of finger click verification, the false touches were reduced to an acceptable range.
4. Unify the behavior of physical buttons and touch logic
Since RPi itself has only four physical buttons (GPIO 17/22/23/27), the first version fixed GPIO27 as the Back button, which made it impossible to exit the program in the main interface (to implement the Quit function); at the same time, if you press Back during the Loading animation, the servo action will be "residual" because the thread is not released in time.
We defined a layer matrix for the four buttons: the main interface directly maps BTN27 to Quit; the other interfaces are still Back. GPIO17/22 switches options or switches 12 h/24 h in the time interface; GPIO23 is always Confirm. The behavior matrix writes four functions up_action / down_action / confirm_action / back_action and uses the mode state machine branch to ensure that any interface only responds to a "reasonable" set of buttons.
In addition, we know from previous Lab experiments that the jitter of physical buttons is about 50 ms, so we uniformly use BOUNCE_MS = 200 ms; add mode_lock in logic to prevent users from triggering a new Confirm/Back before the animation thread ends. Stop signals such as ld_evt.set() always precede mode=None to ensure that a new thread is created after the interface is refreshed.
5. Power supply challenge
During early debugging, we quickly discovered that the servos could not be lifted at the same time when there were too many of them. According to the data sheet, each 9 g servo requires ≈ 750 mA at the startup peak; and our mechanical clock may need to lift multiple servos at a time (displaying numbers or playing animations), and the theoretical peak current can reach 21 A. The 5 V/3 A power supply available in the laboratory cannot support such a load at all, so the voltage was instantly pulled down to below 4 V.
For further verification, we plugged and unplugged the servos in batches: when driving 3 to 5 servos at the same time (≈4 A), the system can still work, but when the sixth servo is inserted, the servos will only be lifted one by one and slowly, and the red light can be clearly seen on the overload display of the power supply. This indirectly proves that insufficient power supply current is the root cause, not PWM duty, I²C rate or code logic problems; if we continue to use a 3 A power supply, even if we do grouping and peak shifting at the software level, we cannot completely avoid peak superposition.
With the help of the professor, we replaced it with a 5 V / 22 A high-current switching power supply, and the ground wire was shared with the Raspberry Pi. After the replacement, we ran the most extreme "all 28 servos synchronized 0→90°" self-test, and the servos no longer jammed, and the Raspberry Pi power indicator remained on. Under the actual wave animation, the whole thing can also work completely; at this point, the power bottleneck was completely eliminated, and the entire mechanical clock can run reliably without any peak-shifting strategy.
6. Screen performance
After installing the digital unit, we found that the display effect of the entire clock was not very obvious. There are two main reasons for this: (1) When the black pendulum is not raised, the background board is a white foam board, which can still produce a certain visual appeal. Therefore, we added a 6 x 2 cm oval yellow paper in the center of the black pendulum to simulate the display effect of the digital clock and enhance the performance of the picture. At the same time, under the advice and guidance of the professor, we used correction fluid to paint the side of the clock white to highlight the image of the numbers. (2) Since the overall tone of our 28 servo motors is blue, the color of the motors will attract attention when the pendulum is in the lowered state. Therefore, we used white paper to cover the motors and wires to highlight the display of the numbers while maintaining the appearance.
Result
The implementation of all basic, advanced and advanced functions was completed within a week. In order to facilitate the countdown function, four levels were set, namely one minute, two minutes, five minutes and ten minutes. In order to display the current time in different time zones, five time zones were selected: local, New York, Beijing, London and Tokyo. The switch button between the 24-hour system and the 12-hour system was successfully added. In order to enhance the screen performance of the clock, two main functions, "Loading Snake" and "Cartoon Wave", were added to the loading animation. All the above functions have been successfully set up with touch screen programs, and GPIO interaction functions have been added for operation on Raspberry Pi. According to the suggestions made by the professor and the teaching assistant, corresponding modifications were made, including pasting white paper blocks and applying white paint to highlight the display effect of the digital clock. In addition, the standby animation and 12-hour system were added.
Future work
Network time synchronization + local OTA update
Precise time synchronization: Using the Raspberry Pi's Wi-Fi, the background script (python-ntplib) automatically synchronizes the system clock to pool.ntp.org every 12 hours, and the long-term time error can be controlled within ±1 second/month.
Local OTA: Enable a Flask lightweight web service on the Raspberry Pi. The upload page allows users to upload .zip files containing new animations or scripts to the /animations/ directory; the control page provides a "one-click restart" button, and executes systemctl restart clock.service in the background to make the new content take effect immediately.
Browser control panel
Provides REST API: /api/countdown?min=5 starts a 5-minute countdown; /api/mode?name=clock switches the display mode; /api/toggle12h switches between 12/24 hour systems. The backend only needs to write the command to the existing event flag or queue without changing the servo driver layer. The front end uses Bootstrap + Ajax to build a simple dashboard, which displays the current mode, remaining time and time zone in real time, and calls the above API through buttons or drop-down boxes. Mobile phones or computers can be remotely controlled after connecting to the same Wi-Fi, as a supplement or replacement for the PiTFT touch screen.
User-defined animation scripts
Agree on a simple JSON format: such as [{"t":0,"seg":[1,1,0,0,1,1,0]},{"t":200,"seg":[0,1,1,0,0,0,1]}], t is milliseconds, seg is a seven-segment switch array. Add animation_player.py thread, read the timeline and call the existing set_seg(); 50ms linear interpolation can be performed for consecutive frames, and the amount of code does not exceed 200 lines. Add an "upload animation" entry in the control panel: after the user uploads JSON, it is stored in /animations/ and automatically appears in the playlist.
Work Distribution

Mingxu He
mh2598@cornell.edu
Designed the circuit and loading animation, designed touchscreen UI, configured the clock, upgrading basic functions and testing.

Yuhang Cheng
yc2852@cornell.edu
Designed countdown and timezone functions, configured and decorated the clock, testing and making the website.
Parts List
- Raspberry Pi 4 (Provided by Cornell ECE 5725 Lab)
- PCA9685 Servo Driver × 2 $13.99
- SG90 Servo Motor × 28 $46.97
- Extension cord × 30 $15.98
- Correction fluid $3.89 (in Cornell store)
- 5V Power Adapter (Provided by Cornell ECE 5725 Lab)
- Breadboard + Jumper Wires (Provided by Cornell ECE 5725 Lab)
Total: $80.83 (low than the budgut of $100)
References
Lab 1_Spring_2025_v2Lab 2_Spring2025_v2
The Python Standard Library
Final Report Guidelines
Pigpio Library
R-Pi GPIO Document
sample_cool_website
Note: 1. Our idea is from an open source project, the website of that project is Mechanical 7 Segment Display Clock Using An Arduino & 28 Servos. The original project used Arduino and C, but we only used his 3D printed segment. The hardware used was RPi and the language was Python.
2. The code of this project uses ChatGPT to help debug and annotate the software logic, and the text content is polished and optimized by Chat based on the self-written content.
Code Appendix
"""
Touchscreen_Function.py

PiTFT menu-driven:
  1) Countdown
  2) Show Time (12h/24h toggle)
  3) Loading → [Loading Snake, Cartoon Wave]
Automatically finds touchscreen by name “1-0038 EP0110M09”
"""
import os
import sys
import time
import threading
import evdev

import board
import busio
import RPi.GPIO as GPIO
from pygame.locals import MOUSEBUTTONDOWN
from datetime import datetime
from zoneinfo import ZoneInfo
from adafruit_pca9685 import PCA9685
from adafruit_motor import servo

# ----- Global offsets -----
# Shift main menu left to avoid bottom-right Quit button
MAIN_X_OFFSET = 30
# Shift loading menu up to avoid bottom Back button
LOAD_Y_OFFSET = 40

# --- Debug: list all /dev/input/event* devices ---
print("Available /dev/input/event* devices:")
for d in evdev.list_devices():
    dev = evdev.InputDevice(d)
    print(f"  {d} -> '{dev.name}'")

# --- Auto-detect touchscreen (name contains 'ep0110m09') ---
ts = None
for d in evdev.list_devices():
    name = evdev.InputDevice(d).name.lower()
    if "ep0110m09" in name:
        ts = d
        print(f"Found touchscreen device: {d} -> {name}")
        break
if not ts:
    raise RuntimeError("Touchscreen device not found (name should contain 'ep0110m09')")
os.environ["PIGAME_TS"] = ts

# ----- SDL/pygame environment -----
os.environ['SDL_VIDEODRIVER'] = 'fbcon'
os.environ['SDL_FBDEV']       = '/dev/fb0'
os.environ['SDL_MOUSEDRV']    = 'dummy'
os.environ['SDL_MOUSEDEV']    = '/dev/null'
os.environ['DISPLAY']         = ''

# ----- Initialize pygame & PiTft -----
import pygame, pigame
pygame.init()
pitft = pigame.PiTft()
WIDTH, HEIGHT = 320, 240
screen = pygame.display.set_mode((WIDTH, HEIGHT))
pygame.mouse.set_visible(False)
font       = pygame.font.Font(None, 36)
small_font = pygame.font.Font(None, 28)
BLACK, WHITE, RED = (0,0,0), (255,255,255), (255,0,0)

# ----- Button areas -----
QUIT_RECT       = pygame.Rect(WIDTH-90, HEIGHT-60, 80, 40)
BACK_RECT       = pygame.Rect((WIDTH-80)//2, HEIGHT-60, 80, 40)
FORMAT_24_RECT  = pygame.Rect( 20,  10, 60, 30)
FORMAT_12_RECT  = pygame.Rect(100,  10, 60, 30)
TOUCH_BACK_RECT = BACK_RECT.move(0, 20)   # Offset down by 20px

# ----- Physical buttons -----
GPIO.setmode(GPIO.BCM)
BTN_UP, BTN_DOWN, BTN_CONFIRM, BTN_BACK = 17, 22, 23, 27
for p in (BTN_UP, BTN_DOWN, BTN_CONFIRM, BTN_BACK):
    GPIO.setup(p, GPIO.IN, pull_up_down=GPIO.PUD_UP)
BOUNCE_MS = 200

# ----- I2C & servos -----
i2c = busio.I2C(board.SCL, board.SDA)
pca_h = PCA9685(i2c, address=0x40); pca_h.frequency = 50
pca_m = PCA9685(i2c, address=0x41); pca_m.frequency = 50
hours = [servo.Servo(pca_h.channels[i], min_pulse=500, max_pulse=2500) for i in range(14)]
ms    = [servo.Servo(pca_m.channels[i], min_pulse=500, max_pulse=2500) for i in range(14)]

def clear_all():
    for s in hours + ms:
        s.angle = 0
clear_all()
time.sleep(0.5)

# ----- Seven-segment code mapping -----
SEG = {
    0: [1,1,1,1,1,1,0], 1: [0,1,1,0,0,0,0],
    2: [1,1,0,1,1,0,1], 3: [1,1,1,1,0,0,1],
    4: [0,1,1,0,0,1,1], 5: [1,0,1,1,0,1,1],
    6: [1,0,1,1,1,1,1], 7: [1,1,1,0,0,0,0],
    8: [1,1,1,1,1,1,1], 9: [1,1,1,1,0,1,1],
}
def set_seg(servos, digits):
    t, u = digits
    for i in range(7):
        servos[i].angle   = 90 if SEG[t][i] else 0
        servos[7+i].angle = 90 if SEG[u][i] else 0

# ----- Menu & state -----
MAIN_MENU   = ["Countdown", "Show Time", "Loading"]
LOAD_MENU   = ["Loading Snake", "Cartoon Wave"]
DURATIONS   = [1, 2, 5, 10]
DUR_LABELS  = [f"{m} min" for m in DURATIONS]
TIME_ZONES  = ["Local", "New York", "London", "Tokyo", "Beijing"]
ZONE_MAP    = {
    "Local": None,
    "New York": "America/New_York",
    "London":   "Europe/London",
    "Tokyo":    "Asia/Tokyo",
    "Beijing":  "Asia/Shanghai"
}

mode        = None   # None / CD_SEL / CD_RUN / TZ_SEL / TZ_RUN / LD_SEL / LD_RUN
main_idx = cd_idx = tz_idx = ld_idx = 0
hour_format = "24"
fmt_idx     = 0
mode_lock   = threading.Lock()
cd_evt      = threading.Event()
tz_evt      = threading.Event()
ld_evt      = threading.Event()

# ----- 'Loading Snake' animation -----
ring = [
    hours[0], hours[7], ms[0],  ms[7],
    ms[8],    ms[9],    ms[10], ms[3],
    hours[10],hours[3], hours[4], hours[5]
]
N = len(ring)
def clear_ring():
    for s in ring:
        s.angle = 0

def loading_snake(cycle=0.5, length=4):
    idx = 0
    try:
        while not ld_evt.is_set():
            clear_ring()
            for j in range(length):
                ring[(idx+j) % N].angle = 90
            time.sleep(cycle)
            idx = (idx+1) % N
    except:
        pass
    clear_ring()
    with mode_lock:
        global mode
        mode = None

# ----- 'Cartoon Wave' overlapping waves -----
groups = [
    [hours[4], hours[5]],     # PCA0 (5,6)
    [hours[1], hours[2]],     # PCA0 (1,2) ← reversed
    [hours[11],hours[12]],    # PCA0 (11,12)
    [hours[8], hours[9]],     # PCA0 (8,9) ← reversed
    [ms[4],    ms[5]],        # PCA1 (5,6)
    [ms[1],    ms[2]],        # PCA1 (1,2) ← reversed
    [ms[11],   ms[12]],       # PCA1 (11,12)
    [ms[8],    ms[9]],        # PCA1 (8,9) ← reversed
]
reverse_idx = {1,3,5,7}
TOTAL_PERIOD = 1.0
HALF_PERIOD  = TOTAL_PERIOD / 2
STEPS        = 50
OFFSET       = TOTAL_PERIOD / 4
CYCLE        = TOTAL_PERIOD + OFFSET * (len(groups) - 1)

def clear_wave():
    for idx, grp in enumerate(groups):
        tgt = 180 if idx in reverse_idx else 0
        for s in grp:
            s.angle = tgt

def run_wave_overlap():
    clear_wave()
    time.sleep(0.5)
    start = time.monotonic()
    try:
        while not ld_evt.is_set():
            now = (time.monotonic() - start) % CYCLE
            for idx, grp in enumerate(groups):
                t_rel = now - idx * OFFSET
                if t_rel < 0 or t_rel > TOTAL_PERIOD:
                    angle = 180 if idx in reverse_idx else 0
                else:
                    if idx in reverse_idx:
                        if t_rel <= HALF_PERIOD:
                            angle = 180 - (t_rel/HALF_PERIOD)*180
                        else:
                            angle = (t_rel-HALF_PERIOD)/HALF_PERIOD*180
                    else:
                        if t_rel <= HALF_PERIOD:
                            angle = (t_rel/HALF_PERIOD)*180
                        else:
                            angle = 180 - ((t_rel-HALF_PERIOD)/HALF_PERIOD)*180
                for s in grp:
                    s.angle = angle
            time.sleep(HALF_PERIOD / STEPS)
    except:
        pass
    clear_wave()
    with mode_lock:
        global mode
        mode = None

# ----- Draw main screen shifted left by MAIN_X_OFFSET -----
def draw_main():
    screen.fill(BLACK)
    for i, label in enumerate(MAIN_MENU):
        y = 60 + i*70
        color = RED if i == main_idx else WHITE
        txt = font.render(label, True, color)
        tw, th = txt.get_size()
        # Horizontal offset
        base_x = (WIDTH - tw - 40) // 2 - MAIN_X_OFFSET
        rect = pygame.Rect(base_x, y - th//2 - 10, tw + 40, th + 20)
        pygame.draw.rect(screen, WHITE, rect, 2)
        screen.blit(txt, (base_x + 20, y - th//2))
    pygame.draw.rect(screen, WHITE, QUIT_RECT, 1)
    qb = font.render("Quit", True, WHITE)
    qw, qh = qb.get_size()
    screen.blit(qb, (
        QUIT_RECT.x + (QUIT_RECT.width - qw)//2,
        QUIT_RECT.y + (QUIT_RECT.height - qh)//2))
    pygame.display.update()

# ----- Other draw_* functions remain unchanged -----

def draw_cd_sel():
    screen.fill(BLACK)
    bw, bh = 120, 50; gap = (WIDTH - 2*bw)//3
    for i, lbl in enumerate(DUR_LABELS):
        r, c = divmod(i, 2)
        x = gap + c*(bw + gap); y = 40 + r*(bh + 20)
        rect = pygame.Rect(x, y, bw, bh)
        pygame.draw.rect(screen, WHITE, rect, 2 if i == cd_idx else 1)
        txt = font.render(lbl, True, RED if i == cd_idx else WHITE)
        tw, th = txt.get_size()
        screen.blit(txt, (x + (bw - tw)//2, y + (bh - th)//2))
    pygame.draw.rect(screen, WHITE, BACK_RECT, 1)
    bb = font.render("Back", True, WHITE)
    bw2, bh2 = bb.get_size()
    screen.blit(bb, (
        BACK_RECT.x + (BACK_RECT.width - bw2)//2,
        BACK_RECT.y + (BACK_RECT.height - bh2)//2))
    pygame.display.update()

def draw_cd_run():
    screen.fill(BLACK)
    txt = font.render(f"{DURATIONS[cd_idx]} min left", True, WHITE)
    tw, th = txt.get_size()
    screen.blit(txt, ((WIDTH - tw)//2, HEIGHT//2 - th//2))
    pygame.draw.rect(screen, WHITE, BACK_RECT, 1)
    bb = font.render("Back", True, WHITE)
    bw2, bh2 = bb.get_size()
    screen.blit(bb, (
        BACK_RECT.x + (BACK_RECT.width - bw2)//2,
        BACK_RECT.y + (BACK_RECT.height - bh2)//2))
    pygame.display.update()

def draw_tz_sel():
    screen.fill(BLACK)
    bw, bh = 90, 40; gap = (WIDTH - 3*bw)//4
    for i, lbl in enumerate(TIME_ZONES):
        r, c = divmod(i, 3)
        x = gap + c*(bw + gap); y = 30 + r*(bh + 15)
        rect = pygame.Rect(x, y, bw, bh)
        pygame.draw.rect(screen, WHITE, rect, 2 if i == tz_idx else 1)
        fnt = small_font if lbl == "New York" else font
        txt = fnt.render(lbl, True, WHITE)
        tw, th = txt.get_size()
        screen.blit(txt, (x + (bw - tw)//2, y + (bh - th)//2))
    pygame.draw.rect(screen, WHITE, BACK_RECT, 1)
    bb = font.render("Back", True, WHITE)
    bw2, bh2 = bb.get_size()
    screen.blit(bb, (
        BACK_RECT.x + (BACK_RECT.width - bw2)//2,
        BACK_RECT.y + (BACK_RECT.height - bh2)//2))
    pygame.display.update()

def draw_tz_run():
    screen.fill(BLACK)
    zone = TIME_ZONES[tz_idx]
    now = datetime.now(ZoneInfo(ZONE_MAP[zone])) if ZONE_MAP[zone] else datetime.now()
    h = now.hour if hour_format == "24" else (now.hour%12 or 12)
    t1 = font.render("Zone:", True, WHITE)
    screen.blit(t1, (20, HEIGHT//2 - 40))
    fnt = small_font if zone == "New York" else font
    t2 = fnt.render(zone, True, WHITE)
    screen.blit(t2, (20 + t1.get_width() + 10, HEIGHT//2 - 40))
    t3 = font.render(f"{h:02d}:{now.minute:02d}", True, WHITE)
    screen.blit(t3, (
        20 + t1.get_width() + 10 + t2.get_width() + 10,
        HEIGHT//2 - 40))
    txt24 = small_font.render("24h", True, RED if hour_format=="24" else WHITE)
    txt12 = small_font.render("12h", True, RED if hour_format=="12" else WHITE)
    screen.blit(txt24, (
        FORMAT_24_RECT.x + (FORMAT_24_RECT.width - txt24.get_width())//2,
        FORMAT_24_RECT.y + (FORMAT_24_RECT.height - txt24.get_height())//2))
    screen.blit(txt12, (
        FORMAT_12_RECT.x + (FORMAT_12_RECT.width - txt12.get_width())//2,
        FORMAT_12_RECT.y + (FORMAT_12_RECT.height - txt12.get_height())//2))
    if fmt_idx == 0:
        pygame.draw.rect(screen, WHITE, FORMAT_24_RECT, 2)
    else:
        pygame.draw.rect(screen, WHITE, FORMAT_12_RECT, 2)
    pygame.draw.rect(screen, WHITE, BACK_RECT, 1)
    bb = font.render("Back", True, WHITE)
    bw2, bh2 = bb.get_size()
    screen.blit(bb, (
        BACK_RECT.x + (BACK_RECT.width - bw2)//2,
        BACK_RECT.y + (BACK_RECT.height - bh2)//2))
    pygame.display.update()

# ----- Draw loading selection screen shifted up by LOAD_Y_OFFSET -----
def draw_ld_sel():
    screen.fill(BLACK)
    bw, bh = 200, 50; gap_y = 20
    for i, lbl in enumerate(LOAD_MENU):
        y = LOAD_Y_OFFSET + i * (bh + gap_y)
        rect = pygame.Rect((WIDTH - bw)//2, y, bw, bh)
        pygame.draw.rect(screen, WHITE, rect, 2 if i == ld_idx else 1)
        txt = font.render(lbl, True, RED if i == ld_idx else WHITE)
        tw, th = txt.get_size()
        screen.blit(txt, (rect.x + (bw - tw)//2, rect.y + (bh - th)//2))
    pygame.draw.rect(screen, WHITE, BACK_RECT, 1)
    bb = font.render("Back", True, WHITE)
    bw2, bh2 = bb.get_size()
    screen.blit(bb, (
        BACK_RECT.x + (BACK_RECT.width - bw2)//2,
        BACK_RECT.y + (BACK_RECT.height - bh2)//2))
    pygame.display.update()

def draw_ld_run():
    screen.fill(BLACK)
    txt = font.render(LOAD_MENU[ld_idx] + "...", True, WHITE)
    tw, th = txt.get_size()
    screen.blit(txt, ((WIDTH - tw)//2, HEIGHT//2 - th//2))
    pygame.draw.rect(screen, WHITE, BACK_RECT, 1)
    bb = font.render("Back", True, WHITE)
    bw2, bh2 = bb.get_size()
    screen.blit(bb, (
        BACK_RECT.x + (BACK_RECT.width - bw2)//2,
        BACK_RECT.y + (BACK_RECT.height - bh2)//2))
    pygame.display.update()

# ----- Thread start -----
def run_countdown(sec):
    st = time.time()
    while not cd_evt.is_set():
        rem = sec - int(time.time() - st)
        if rem < 0: break
        m, s = divmod(rem, 60)
        set_seg(hours, (m//10, m%10)); set_seg(ms, (s//10, s%10))
        time.sleep(0.2)
    clear_all()
    with mode_lock:
        global mode
        mode = None
    draw_main()

def run_timezone(tz):
    while not tz_evt.is_set():
        now = datetime.now(ZoneInfo(tz)) if tz else datetime.now()
        h = now.hour if hour_format=="24" else (now.hour%12 or 12)
        set_seg(hours, (h//10, h%10)); set_seg(ms, (now.minute//10, now.minute%10))
        time.sleep(0.5)
    clear_all()
    with mode_lock:
        global mode
        mode = None
    draw_main()

# ----- Action handlers -----
def up_action():
    global main_idx, cd_idx, tz_idx, ld_idx, fmt_idx
    with mode_lock:
        if mode is None:
            main_idx = (main_idx - 1) % len(MAIN_MENU); draw_main()
        elif mode == "CD_SEL":
            cd_idx = (cd_idx - 1) % len(DUR_LABELS); draw_cd_sel()
        elif mode == "TZ_SEL":
            tz_idx = (tz_idx - 1) % len(TIME_ZONES); draw_tz_sel()
        elif mode == "TZ_RUN":
            fmt_idx = (fmt_idx - 1) % 2; draw_tz_run()
        elif mode == "LD_SEL":
            ld_idx = (ld_idx - 1) % len(LOAD_MENU); draw_ld_sel()

def down_action():
    global main_idx, cd_idx, tz_idx, ld_idx, fmt_idx
    with mode_lock:
        if mode is None:
            main_idx = (main_idx + 1) % len(MAIN_MENU); draw_main()
        elif mode == "CD_SEL":
            cd_idx = (cd_idx + 1) % len(DUR_LABELS); draw_cd_sel()
        elif mode == "TZ_SEL":
            tz_idx = (tz_idx + 1) % len(TIME_ZONES); draw_tz_sel()
        elif mode == "TZ_RUN":
            fmt_idx = (fmt_idx + 1) % 2; draw_tz_run()
        elif mode == "LD_SEL":
            ld_idx = (ld_idx + 1) % len(LOAD_MENU); draw_ld_sel()

def confirm_action():
    global mode, fmt_idx, hour_format
    with mode_lock:
        if mode is None:
            sel = MAIN_MENU[main_idx]
            if sel == "Countdown":
                mode = "CD_SEL"; draw_cd_sel()
            elif sel == "Show Time":
                mode = "TZ_SEL"; draw_tz_sel()
            else:
                mode = "LD_SEL"; draw_ld_sel()
        elif mode == "CD_SEL":
            mode = "CD_RUN"; cd_evt.clear()
            threading.Thread(target=run_countdown,
                             args=(DURATIONS[cd_idx]*60,),
                             daemon=True).start()
            draw_cd_run()
        elif mode == "TZ_SEL":
            mode = "TZ_RUN"; tz_evt.clear()
            fmt_idx = 0 if hour_format=="24" else 1
            threading.Thread(target=run_timezone,
                             args=(ZONE_MAP[TIME_ZONES[tz_idx]],),
                             daemon=True).start()
            draw_tz_run()
        elif mode == "LD_SEL":
            mode = "LD_RUN"; ld_evt.clear()
            if ld_idx == 0:
                threading.Thread(target=loading_snake, daemon=True).start()
            else:
                threading.Thread(target=run_wave_overlap, daemon=True).start()
            draw_ld_run()
        elif mode == "TZ_RUN":
            hour_format = "24" if fmt_idx==0 else "12"
            draw_tz_run()

def back_action():
    global mode
    if mode is None:
        pygame.quit(); GPIO.cleanup(); sys.exit()
    if mode in ("CD_SEL","TZ_SEL","LD_SEL"):
        mode = None; draw_main()
    else:
        cd_evt.set(); tz_evt.set(); ld_evt.set()
        mode = None; draw_main()

# ----- GPIO registration -----
GPIO.add_event_detect(BTN_UP, GPIO.FALLING, callback=lambda ch: up_action(), bouncetime=BOUNCE_MS)
GPIO.add_event_detect(BTN_DOWN, GPIO.FALLING, callback=lambda ch: down_action(), bouncetime=BOUNCE_MS)
GPIO.add_event_detect(BTN_CONFIRM, GPIO.FALLING, callback=lambda ch: confirm_action(), bouncetime=BOUNCE_MS)
GPIO.add_event_detect(BTN_BACK, GPIO.FALLING, callback=lambda ch: back_action(), bouncetime=BOUNCE_MS)

# ----- Main loop -----
try:
    draw_main()
    while True:
        pitft.update()
        for ev in pygame.event.get():
            if ev.type == MOUSEBUTTONDOWN:
                x, y = pygame.mouse.get_pos()
                if mode is None:
                    if QUIT_RECT.collidepoint(x,y):
                        pygame.quit(); GPIO.cleanup(); sys.exit()
                    for i, l in enumerate(MAIN_MENU):
                        y0 = 60 + i*70
                        tw, th = font.size(l)
                        r = pygame.Rect((WIDTH-tw-40)//2 - MAIN_X_OFFSET,
                                        y0-th//2-10, tw+40, th+20)
                        if r.collidepoint(x,y):
                            main_idx = i; confirm_action(); break
                elif mode == "CD_SEL":
                    handled = False
                    bw, bh, gap = 120, 50, (WIDTH - 2*120)//3
                    for i in range(len(DUR_LABELS)):
                        r, c = divmod(i,2)
                        rx, ry = gap + c*(120+gap), 40 + r*(50+20)
                        if pygame.Rect(rx, ry, 120, 50).collidepoint(x,y):
                            cd_idx = i; confirm_action(); handled = True; break
                    if not handled and TOUCH_BACK_RECT.collidepoint(x,y):
                        back_action()
                elif mode == "CD_RUN":
                    if TOUCH_BACK_RECT.collidepoint(x,y):
                        back_action()
                elif mode == "TZ_SEL":
                    handled = False
                    bw, bh, gap = 90, 40, (WIDTH-3*90)//4
                    for i in range(len(TIME_ZONES)):
                        r, c = divmod(i,3)
                        rx, ry = gap + c*(90+gap), 30 + r*(40+15)
                        if pygame.Rect(rx, ry, 90, 40).collidepoint(x,y):
                            tz_idx = i; confirm_action(); handled = True; break
                    if not handled and TOUCH_BACK_RECT.collidepoint(x,y):
                        back_action()
                elif mode == "TZ_RUN":
                    if FORMAT_24_RECT.collidepoint(x,y):
                        hour_format = "24"; draw_tz_run()
                    elif FORMAT_12_RECT.collidepoint(x,y):
                        hour_format = "12"; draw_tz_run()
                    elif TOUCH_BACK_RECT.collidepoint(x,y):
                        back_action()
                elif mode == "LD_SEL":
                    bw, bh, gap_y = 200, 50, 20
                    for i, lbl in enumerate(LOAD_MENU):
                        ry = LOAD_Y_OFFSET + i*(bh+gap_y)
                        r = pygame.Rect((WIDTH-bw)//2, ry, bw, bh)
                        if r.collidepoint(x,y):
                            ld_idx = i; confirm_action(); break
                    if TOUCH_BACK_RECT.collidepoint(x,y):
                        back_action()
                elif mode == "LD_RUN":
                    if TOUCH_BACK_RECT.collidepoint(x,y):
                        back_action()
        time.sleep(0.05)

finally:
    GPIO.cleanup()
    pygame.quit()