MidiKey Conductor
04/14/2024
Angela Chao (ac2323), Crystal Shi (cys37), Vivian Fan (xf37)
Demonstration Video
Introduction
Want to get started with recording music, but don’t know how to use the complicated settings in music production software? This project allows you to do the basics of recording a MIDI file and changing the dynamics using intuitive motion controls. With our system, the user can set a metronome to their desired Beats Per Minute (BPM) and play the keyboard as if it were a piano. They can then edit the dynamics of this audio by conducting it through motion gestures. The dynamics for the modified audio are then also written into the MIDI file along with the BPM and other track information. This exported MIDI file can then be opened on any major musical software, allowing you to integrate and continue your production elsewhere.
Project Objective
The objective is to create a Graphical User Interface (GUI) and Raspberry Pi (RPi) system that can turn a keyboard input and video recording into a MIDI file with appropriate dynamics. The keyboard input plays notes like a piano, which is then converted to a MIDI file. Then, the camera records user hand gestures while the audio plays to modify the audio dynamics of the MIDI file. Then, the combined audio with dynamics is exported as a MIDI file.
Design and Testing

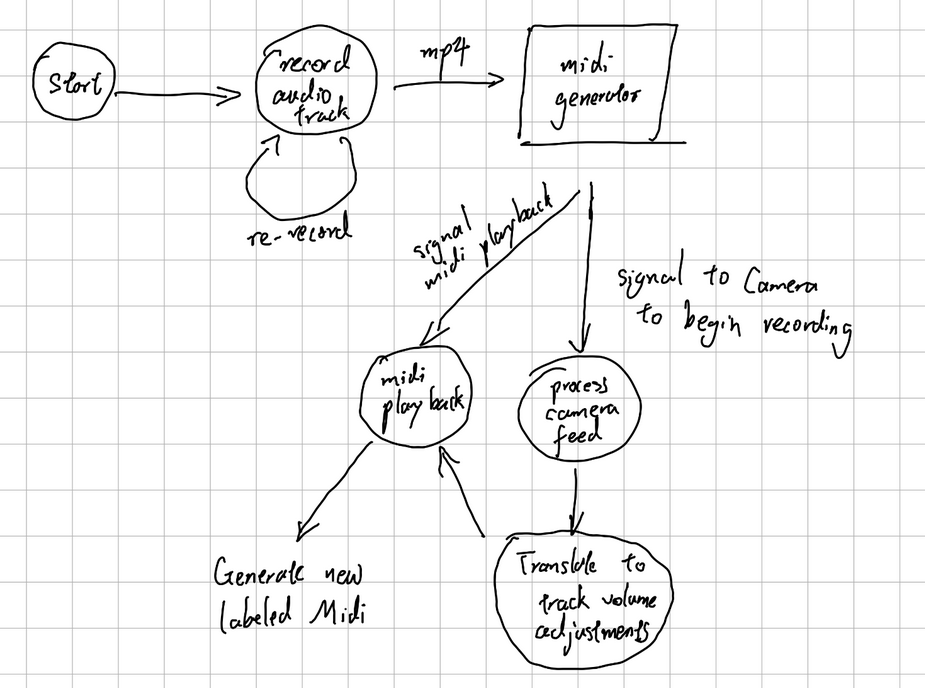
Figure 1. Original design diagram with audio recording
In our initial design, we originally planned to have an audio input instead of the keyboard. We planned to perform a Fast Fourier Transform (FFT) on the input audio in order to get the notes and then to write those notes to a MIDI file; however, we ran into many issues getting the audio input to work well. Our code for the FFT could run, but the MIDI output that it got from the audio file would often get the wrong note, or invent notes that didn’t exist. While you could tell that the output did vaguely follow the original melody if you knew the original melody, there were so many extra or incorrect notes that it didn’t sound like the original melody.
We tried various methods to get around this, such as focusing only on detecting single notes so it would only output the detected note with the highest amplitude, and also played around with our FFT time window size to see if larger windows would lead to more accurate detection. We also tested our code on different kinds of input, such as piano sounds and singing. While this helped a little, the output was still ultimately too incorrect to be very usable. However, not wanting to give up on the audio input, we tried looking at previous class projects that used FFTs in order to see if we were missing anything that would help. One project we looked at was the Real Guitar Hero project from last year, since in Guitar Hero the accuracy of the detected notes is very important. Our FFT was similar to theirs, with the same window size and similar parameters, but we noticed that they streamed the electric guitar audio input directly into the USB port with a guitar cable. This probably led to a much less noisy input than our microphone input, and thus led to them being able to detect the notes with more accuracy. Concluding that this was likely somewhat of a limitation of our hardware, we decided to give up on audio input and switch to a keyboard MIDI input.
For our keyboard MIDI input, we programmed the Pi so that the keys on the keyboard correspond to various keys on the piano. This gave us a two octave keyboard that we could use to play and record songs into MIDI file format. Compared to the audio input, programming this part of the project went very smoothly since the keyboard was a much more straightforward and reliable input source. However, we realized that MIDI files required a constant BPM, and with human input people have a tendency to go off beat. Thus, we also programmed a metronome, so that the user can input a desired BPM and then the metronome plays while they record so they can stay on beat.
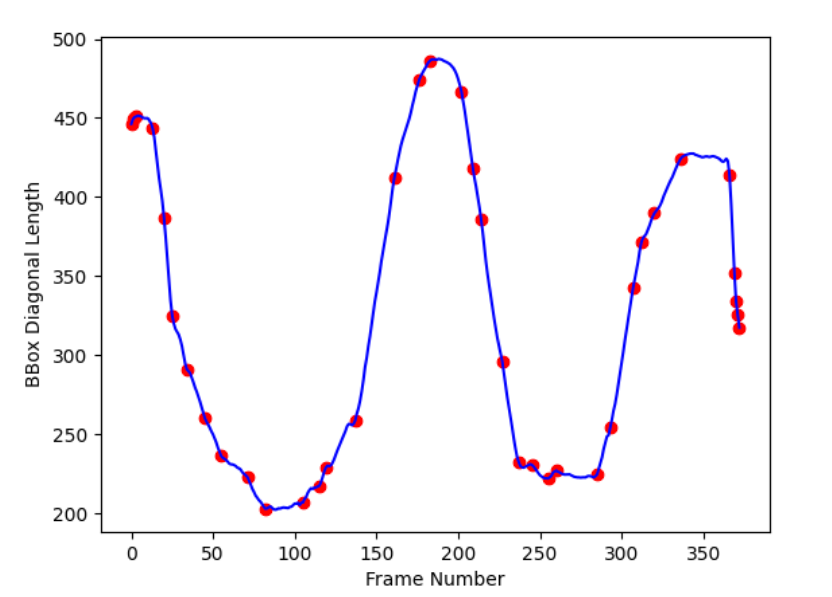
After the audio recording is captured, the next stage is to start conducting. To do this, we used a camera attached to the Raspberry Pi and used OpenCV to display the video on screen and record the video. Then we used the mediapipe library to analyze the video and detect the hand motions. In order to get the mediapipe library to work on the RPi, we had to downgrade our OS to Buster. The controls for the conducting were based on how open or closed someone’s hand was— a more open hand meant a louder volume, and a more closed hand meant a quieter volume, similar to how a conductor will close their hands to silence a band. To detect this, we used mediapipe’s ability to detect a bounding box for the hand on the screen, and used the diagonal length of the bounding box to determine how open or closed the hand was. We used the timestamps of the beginning of each note on the audio recording to determine which video frame to look at to determine the volume of that note. An example graph of how our bounding box diagonal length changes over time is shown below.

Figure 2. Graph of bounding box diagonal length across frames
As you can see in the graph, the values of the length go from 200 to 500. Thus, we needed to scale these values to fit in the 0 to 127 range that MIDI volumes have. Then, the timestamps for these scaled values are converted to BPM so they can be matched with the notes in the MIDI file. To make it easier to match the timestamps, we had the video capture start at the same time as the audio started playing, and automatically ended the capture when the audio ended as well, so the timestamps would be the same for both video and audio.
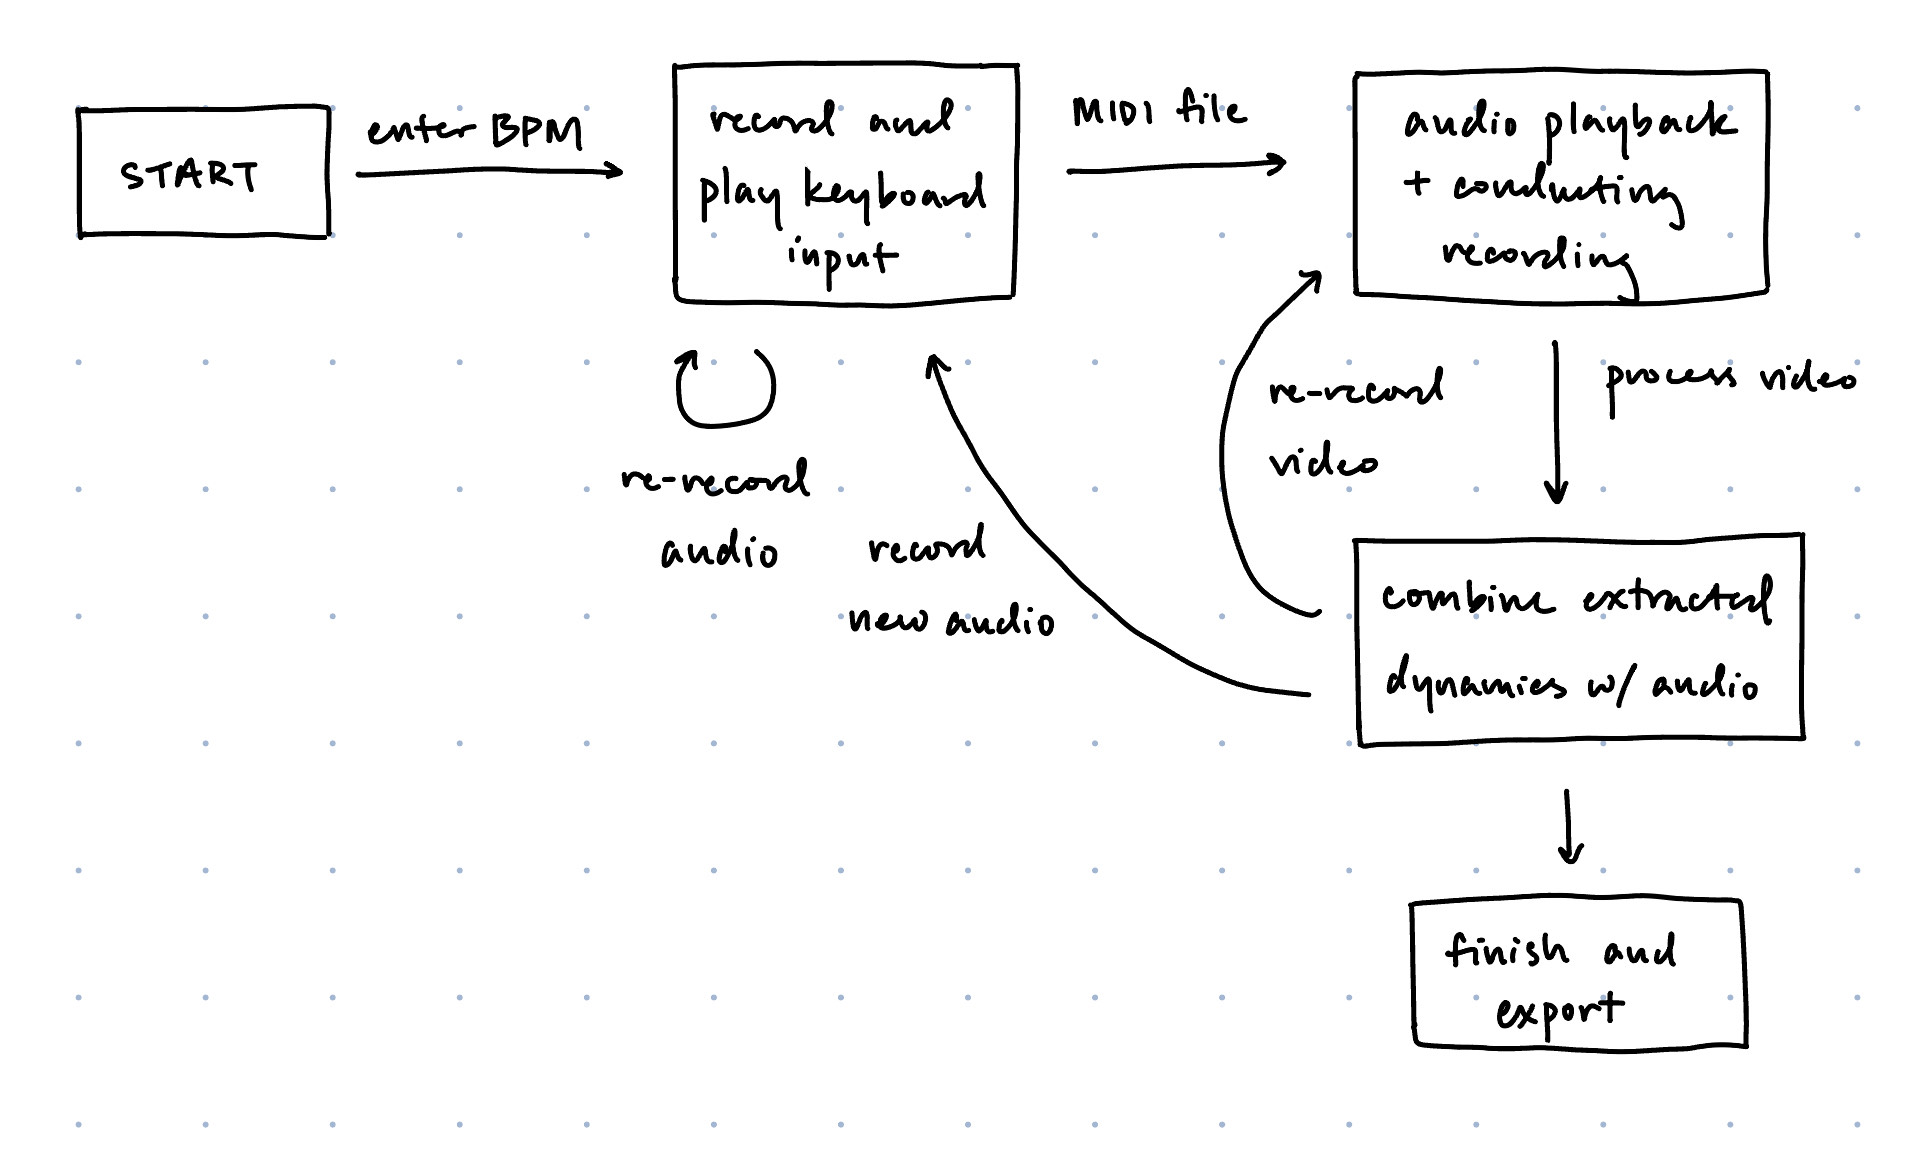
After the conducting dynamics are combined with the audio, the user has the option to hear it played back, and then decide whether they would like to record the conducting video again if they are unsatisfied with the dynamics or finish with this audio file and record another one. If the user decides to move on and record another audio, the MIDI file with the dynamics will be automatically exported, and the GUI will return to the start screen.
We implemented our GUI with the PyGame library, as it provides many helpful features such as drawing on screens, audio playback, etc. Our GUI takes the user through the various stages of our processing pipeline, prompting the user with buttons to direct them through the stages. The simple nature of the GUI makes it easy to learn and intuitive to use, unlike other music softwares.
We split up the project into different modules: the keyboard input MIDI module, the gesture recognition module, and the MIDI volume modification module. We developed each of these functionalities and tested them separately, the modular design allowing us to test various parts of our code and isolate problems efficiently before we combined them all. When integrating, we first manually ran the various parts of the code and passed in the inputs/outputs from each of the modules to each other to make sure that the data was compatible and that it all worked together properly. Once we ensured that this worked, we then put everything together in the GUI so that the pipeline would automatically create and communicate the correct inputs and outputs. We tested everything in the GUI by playing through it multiple times and trying different melodies and BPMs to see if everything worked.

Figure 3. Final design diagram
Result
For the most part, everything performed as planned. Though we had to modify things partway through and quickly pivot to a new input method when we couldn’t get the audio input to work, our project worked as we intended it to during demo time, and our original intention of conducting the audio dynamics through gestures was still realized even though we had to change our input method. We were also able to develop a simple and user-friendly GUI to guide the user through the whole process. Thus, we were able to meet the goals outlined in the description.
Conclusion
Our project was able to achieve its goal of creating a user-friendly audio recording and editing system using gesture controls. We discovered that it was very difficult to get the correct notes through audio input using our USB microphone, so we ended up switching to a keyboard input instead. We also learned a lot about the MIDI file format and about computer vision using OpenCV and mediapipe.
Future Work
For the future, we would like to be able to implement multi-tracking: having multiple audio inputs overlaid on top of each other, and being able to control the volume of each of these inputs and then write them all to one MIDI file. Another useful feature we could add would be the volume changes playing back in real-time as the user moves their hand, so that they could hear the changes as they take place. It would also be good to add more controls beyond volume, such as sustain and reverb effects, or to add different instruments. This would allow the user to do more with their track and give it more functionality similar to a music production software.
Work Distribution
Each of us worked on a different module at first: Crystal worked on audio input to MIDI, Angela worked on the gesture recognition, and Vivian worked on modifying and writing the MIDI file. Angela also worked on writing the GUI. All three of us worked on integrating the modules and writing the report.

Angela
ac2323@cornell.edu

Crystal
cys37@cornell.edu

Vivian
xf37@cornell.edu
Parts List
- Raspberry Pi 4, provided in lab
- USB Microphone $5.95
- Raspberry Pi Camera Board V2 $29.95
- Speakers, provided in lab
Total: $35.90
References
Real Guitar HeroGestureHome
PiCamera Documentation
Piano UI with Python
Modify MIDI File
Audio to Midi Module
PyGame Documentation
MediaPipe Documentation
OpenCV Documentation
Code Appendix
Our code can be found at this github repo.