RASPBERRY PI MULTI-GAME ARCADE
Alex Kluver(abk98), Ian Ress (ir232), Richard Seibert (rs2585)
Objective:
The goal of this project was to build a portable gaming device based around the Raspberry Pi, PiTFT, and a joystick module. On this device, the group wanted users to have the ability to play either Pong against an AI computer, Brickbreaker, or Tetris.
Project Video:
Introduction:
For this project, our team created a miniature arcade with three different games. We implemented Tetris, Brick Breaker, and Pong completely from scratch utilizing python and the pygame library. To create a cohesive gaming experience, we also created a game launcher home screen for these three games. The PiTFT was utilized as the display for this arcade and the on-board buttons are used for game control. Pong and Brick Breaker incorporate an I2C joystick, which is used for paddle movement. Tetris uses the PiTFT buttons to control the pieces. The Raspberry Pi, PiTFT, and Joystick are also all fitted into a 3D printed case for the optimal gaming experience.
Design:
Objectives:
Hardware objectives revolved around the design and development of a custom case to encapsulate all of the necessary components, including: the Raspberry Pi, PiTFT, PiTFT buttons, joystick module, and a LiPo battery. Software objectives revolved around the creation of the user interface, logic, and level difficulty framework for the three games. This additionally included a main home screen where users have the ability to select either one of these three games.
Hardware Design:
The case was designed for 3D printing, however slight modifications can be made in order to make it compatible with injection molding. Autodesk Fusion360 was used to create the 3D model of the case and assembly, as well as the necessary STL files for 3D printing. Everything was printed on an Ultimaker S5 using standard PLA. The main goal of the design was to encapsulate a LiPo battery, joystick module, PiTFT, PiTFT buttons, Raspberry Pi, wiring connections, and cables into a compact and portable case.
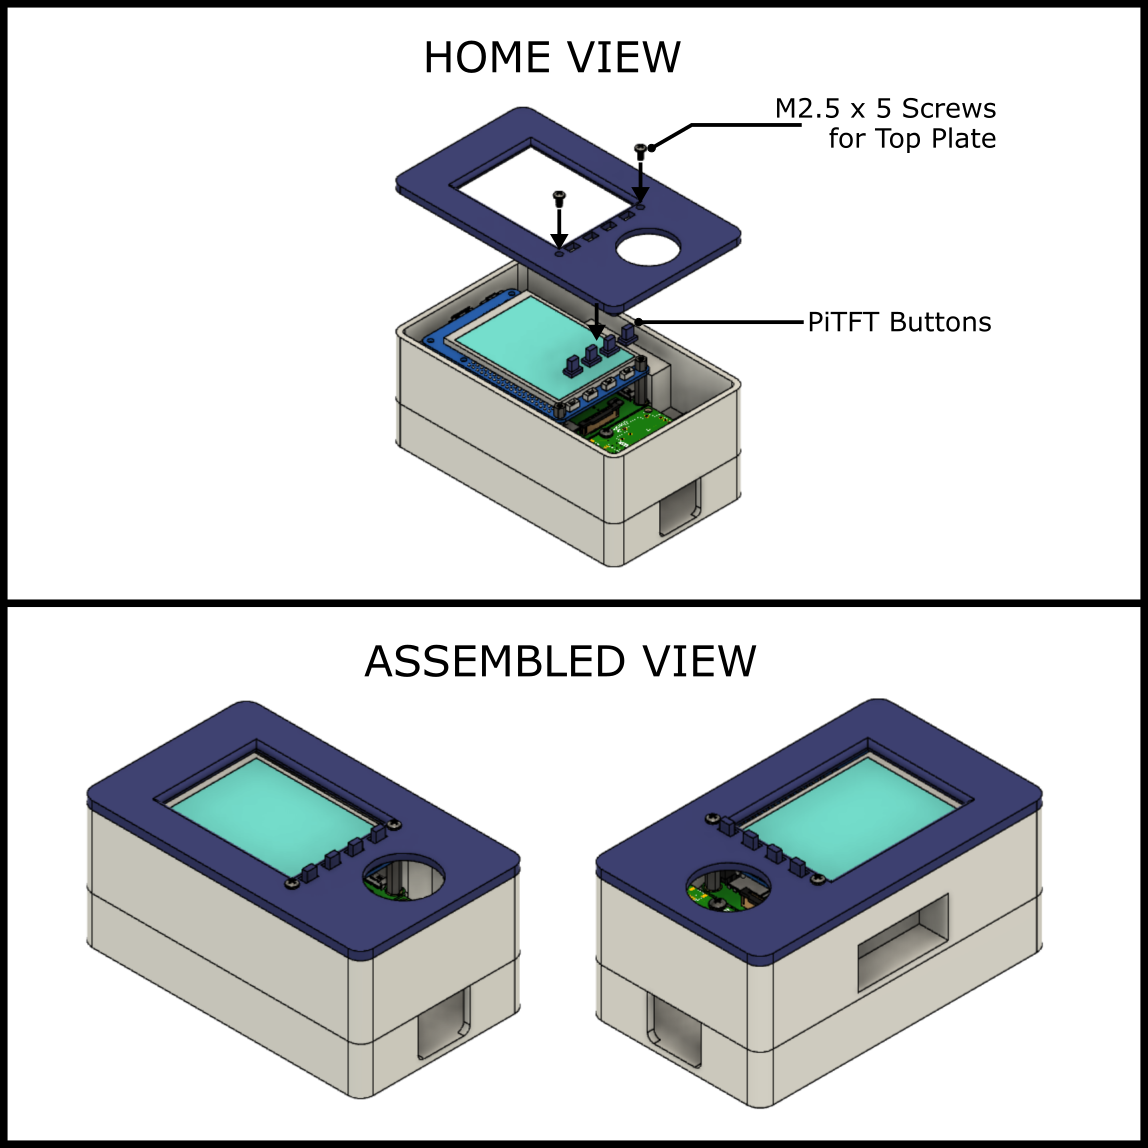
A bottom plate, middle plate, and top plate formed the entire case. The bottom plate housed the LiPo battery and had an opening for the battery’s USB cable. The middle plate housed the Raspberry Pi, PiTFT, PiTFT buttons, and the joystick module. Threaded inserts were fit into mounting holes in order to screw in the Raspberry Pi and joystick module to this section of the case. The PiTFT was then mounted on top of the Raspberry Pi using the already soldered-on pin headers, as well as additional offsets that had threads to screw the top plate onto. The top plate was then screwed onto the PiTFT. This also had necessary openings for the joystick and PiTFT buttons. Images of this assembly are included in the Drawings and Parts List section.
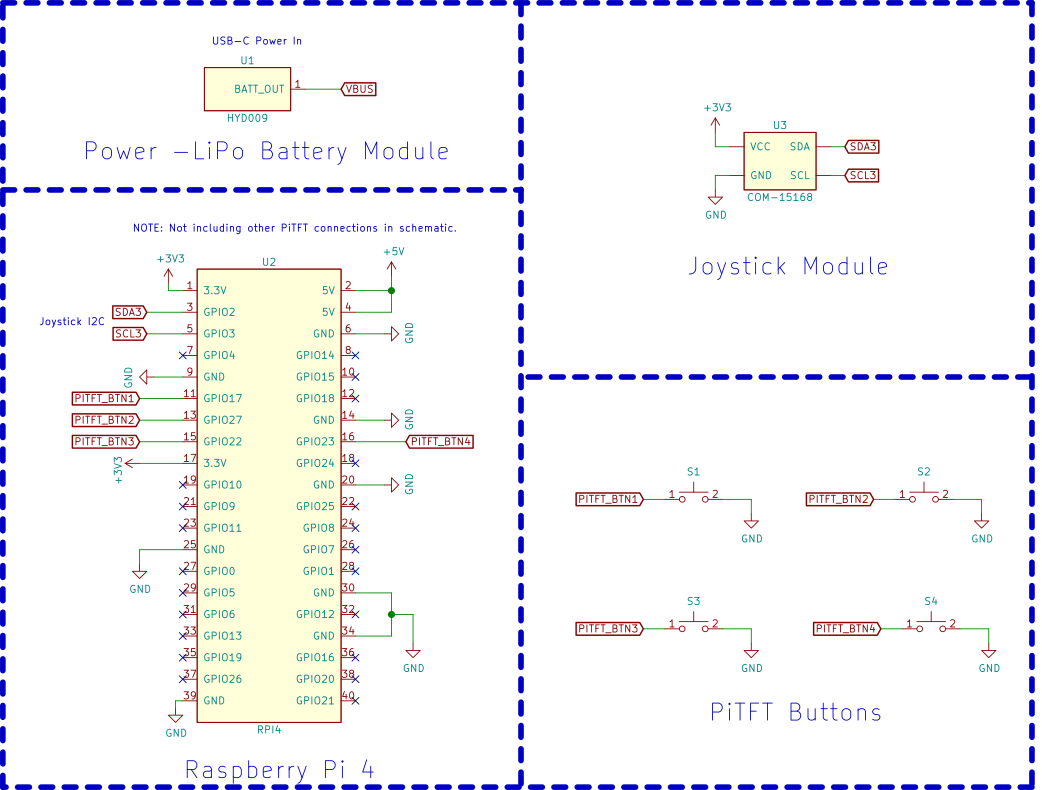
The Joystick module used I2C and was wired to SDA3 (pin 3) and SCL3 (pin 5) of the Raspberry Pi. 3.3V (pin 1) and ground (pin 6) supplied power to the module.
Software Design:
A separate module was created for each game (Pong, Brickbreaker, Tetris). These three modules contained the code for the creation of the user interface on the PiTFT and the overarching game logic. Within each module, a method named run() exists. If this method is called, the game actually runs on the Raspberry Pi.
Main.py housed the main application code. Three instances of the Pong, Brickbreaker, and Tetris modules are created. A home screen is then created where the user is able to choose between these three games. Within the main while loop, the user input is constantly polled until one of the games is selected. When this occurs, the run() method within the selected module is executed and the game begins. Organizing the software this way made it easy to separately develop each game, and combine everything together in a home screen. This made the development process much easier in the long run.
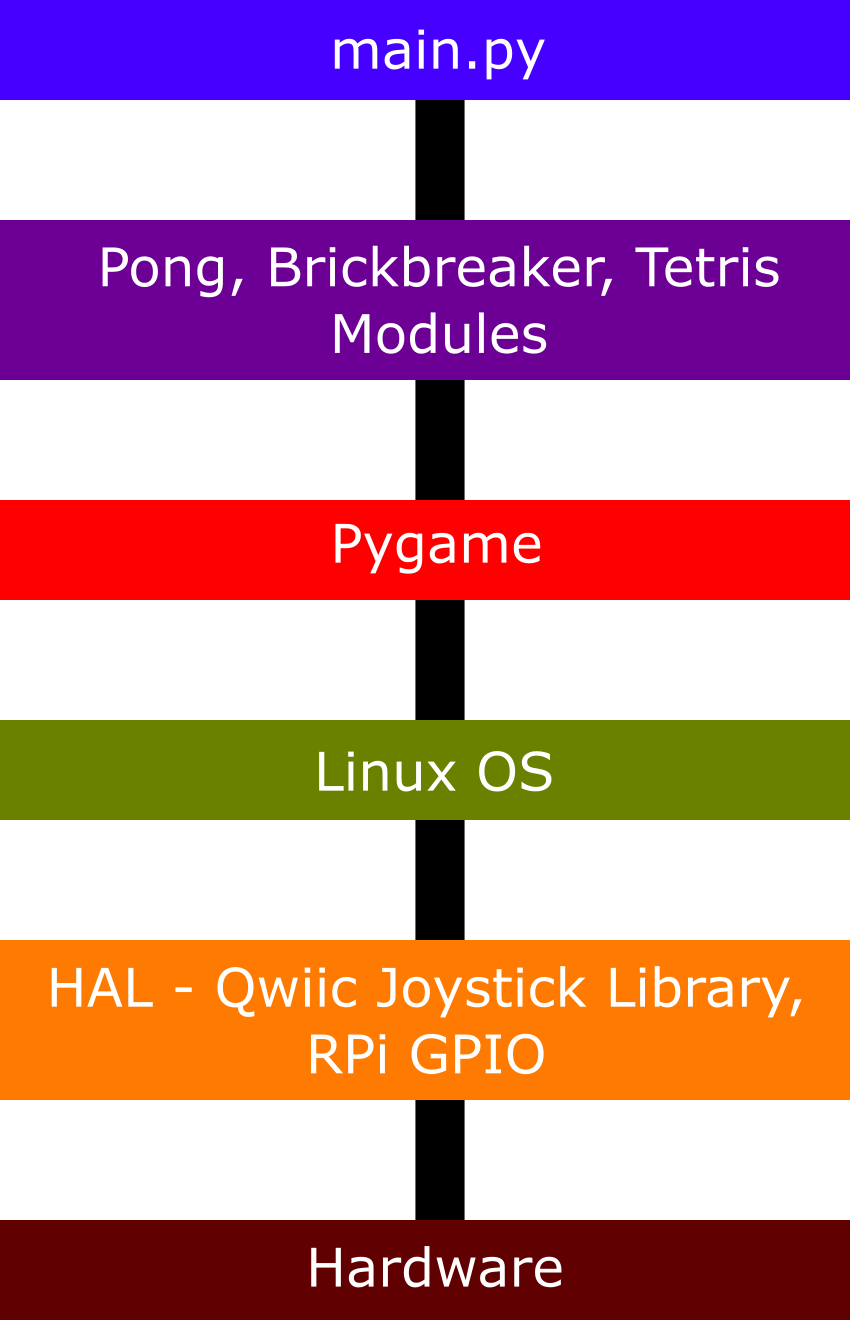
The Pong, Brickbreaker, and Tetris modules as well as main.py comprised the main application code. However this project also includes lower level software layers that are shown in the figure below. On the first layer is the actual hardware including the Raspberry Pi, PiTFT, and Joystick module. The software that directly interfaces with this hardware is known as a Hardware Abstraction Layer. For this project, this includes the Raspberry Pi GPIO library to detect button presses on the PiTFT and the Joystick module library supplied by Sparkfun to read the raw data values from the joystick. The libraries themselves are written in low level code in order to interact directly with the necessary hardware registers. However the libraries provide functions that can be called to provide all of the necessary hardware interaction capabilities while abstracting this low level code away. So within the game modules and main.py, these HAL functions are called to poll the PiTFT buttons and detect where the joystick is currently located. For the actual user interface, Pygame is used to control the PiTFT. This library provides similar abstraction capabilities in order for rapid user interface development.
Software Layers and Structure
Testing:
Case:
Three iterations of the case were created and tested for fits. These iterations were necessary for two reasons: (1) tolerance errors experienced due to the nature of 3D printing and (2) design errors not originally accounted for in the assemblies. Changes in the first iteration were mainly due to reason (2). Certain mounting holes and ribs interfered with the actual through-hole connections, and surface mount chips on the joystick module. This was not accounted for in the original model and was changed in the second iteration. Additional stabilizers were also created in order for the Raspberry Pi and PiTFT to not deform downwards when the user presses the PiTFT buttons. Finally, the joystick was mounted higher.
The second iteration was tested and changes needed to be made mainly for reason (1). The tolerances were off for the Raspberry Pi power cable opening, top plate screw holes, and PiTFT button heights. These were changed accordingly in order to account for dimensional errors due to the 3D printer.
The third iteration was the final case and it successfully integrated all of the previous design changes. The rapid prototyping capability that 3D printing allows for made it possible to test the case for fits and change the design accordingly until a proper one was made.
Game Testing:
All games were originally created and tested on our PCs using windowed pygame tools. After functional completion of the games, they were then reformatted to work on the PiTFT and incorporated the on-board buttons and joystick. When developing on our laptops, we used our keyboard as an alternative input when testing the games using the pygame libraries, but when moving to the Pi, we needed to change those inputs to the corresponding GPIO pins of the PiTFT buttons. Each game was created so that it can be launched in a stand alone state as well as be launched using the main program.
Incrementally testing our games was a large part of the development process as we needed to understand how each piece of hardware worked with the libraries. One instance of this was when we were figuring out how the joystick position was input. For this, we pulled a piece of sample code from the corresponding sparkfun library, and determined that to incorporate the movements that we desired, we must use the vertical axis of the joystick, and set thresholds on each side to map to the onscreen movement, as the neutral position of the joystick was 512, and ranged between 0 and 1024.
Another aspect that was pivotal in getting the desired outcome was testing the speed of the components on screen and determining what amount of time we wanted the program to sleep so that the desired speed was met. In addition to the speed of the components on screen, we also needed to incorporate sleep statements after button presses for debounce purposes. The amount of debounce was determined through trial and error.
To ensure that the controls of our arcade device was comfortable and intuitive, we personally tested each game throughout the development process as well as had peers test the controls of the games to determine if any of them needed to be altered. This user testing was done in an incremental manner while we were creating each game in addition to final user testing after the game suite was completed.
Drawings and Parts List
Mechanical Drawings:
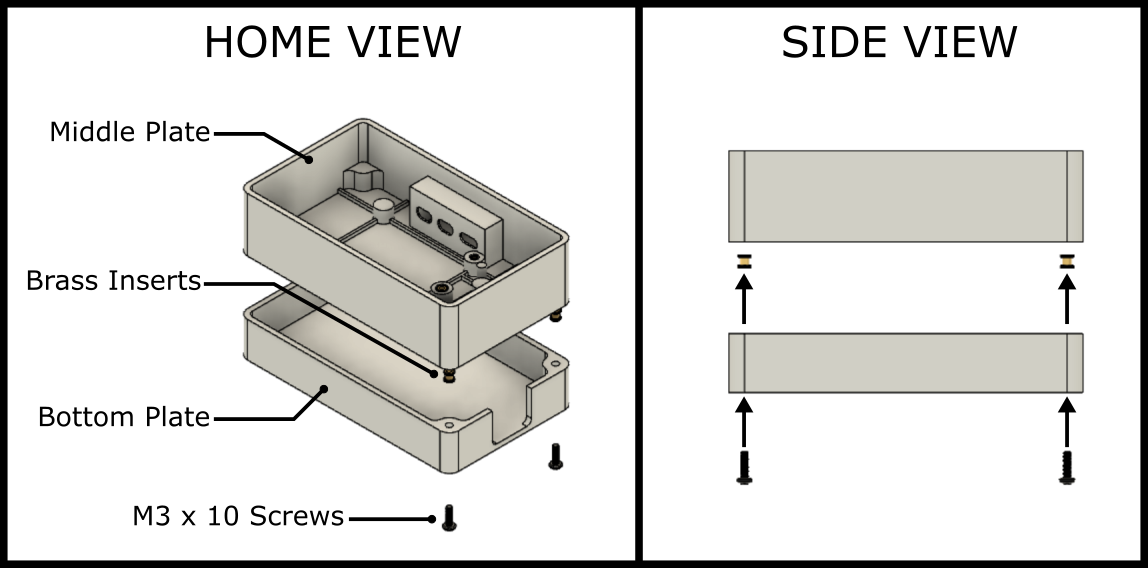
Assembly Part 1 - Attach Bottom and Middle Plates
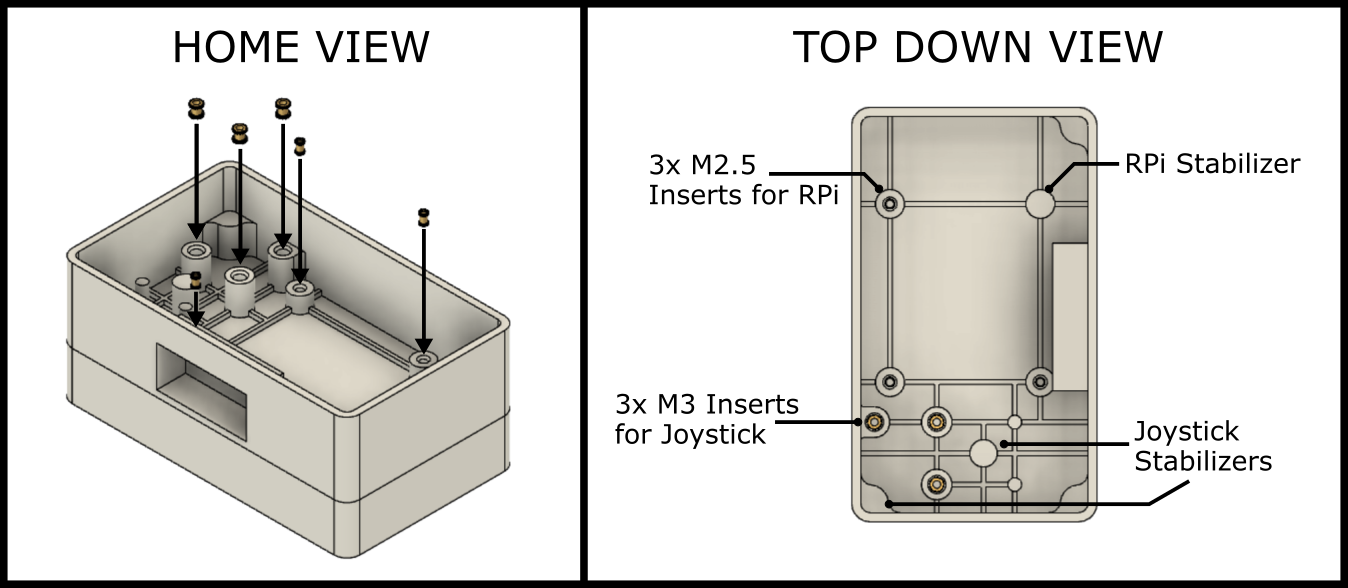
Assembly Part 2 - Put Brass Inserts Into Middle Plate Mounting Holes
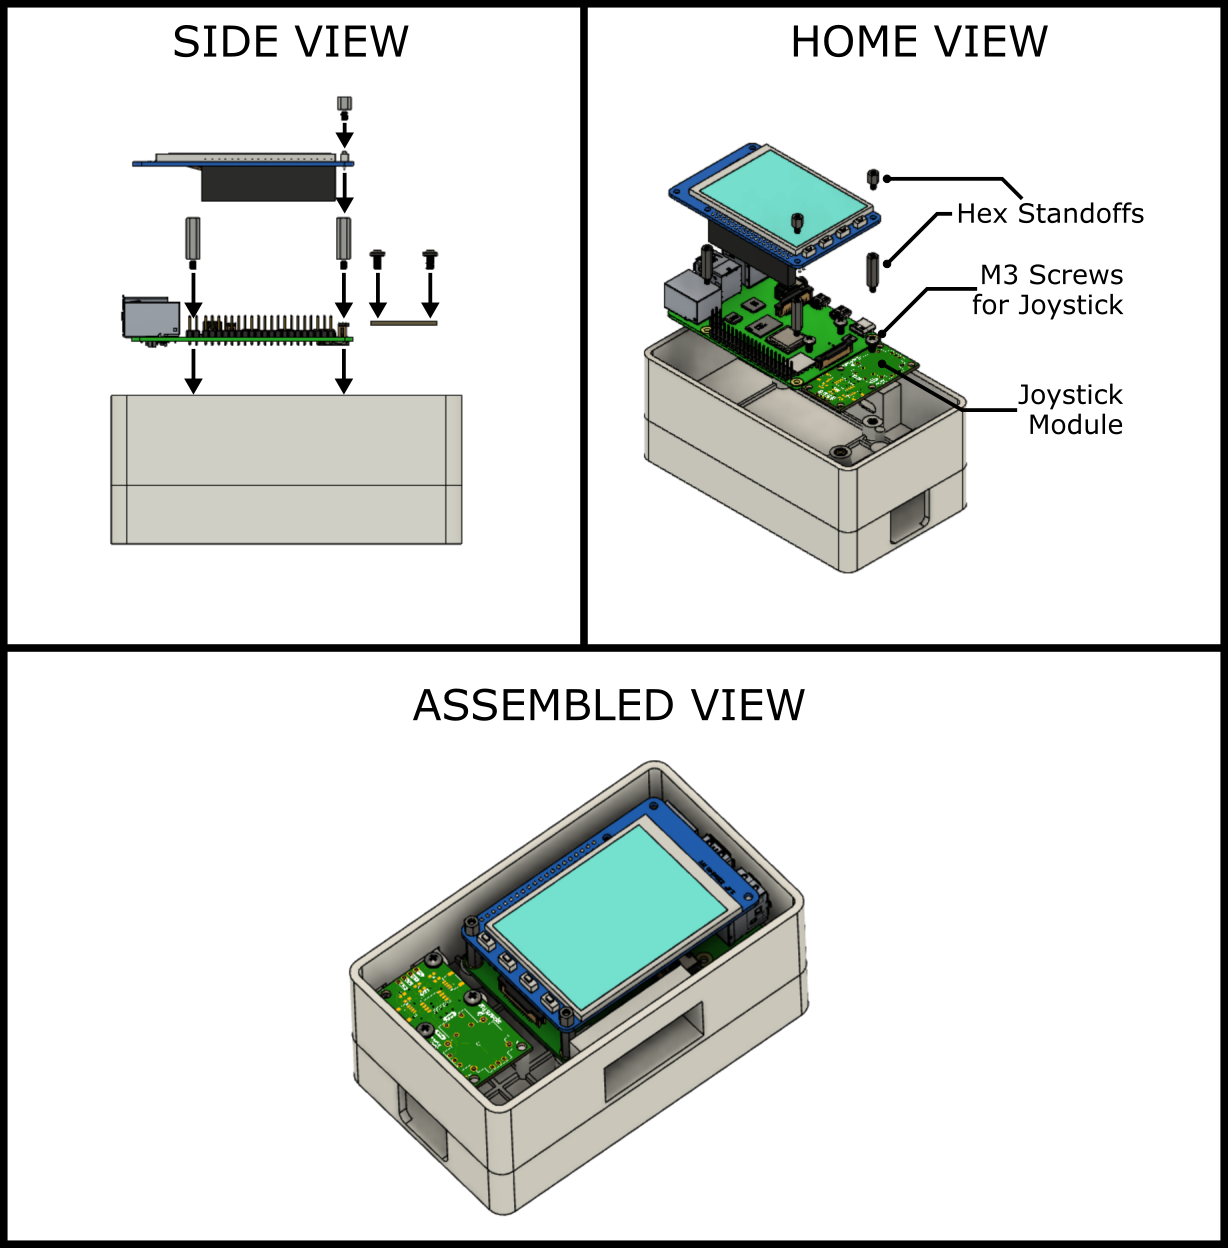
Assembly Part 3 - Attaching RPi and Joystick Module to Middle Plate
Assembly Part 4 - Attaching Top Plate and PiTFT Buttons
Parts List & Budget:
Part | Part Number | Quantity | Total Price | Additional Description | URL |
Raspberry Pi 4 | - | 1 | $0.00 | Included | - |
PiTFT | - | 1 | $0.00 | Included | - |
Wire & Solder | - | - | $0.00 | Included in lab. | - |
PLA | - | - | $0.00 | For 3D printed case - included in lab. | - |
Joystick Module | Sparkfun: COM-15168 | 1 | $11.50 | I2C | |
LiPo Battery Module & Charging Cable | Amazon: HYD009 | 1 | $13.99 | Power | |
M3 x 0.5mm x 10mm Screws | McMaster: 92000A120 | 1 (100 pack) | $6.22 | - | |
M3 x 0.5mm x 5mm Screws | McMaster: 92000A114 | 1 (100 pack) | $5.45 | - | |
M2.5 x 0.45mm x 5mm Screws | McMaster: 92000A103 | 1 (100 pack) | $4.63 | - | |
M2.5 x 0.45mm x 16mm Hex Standoffs | McMaster: 98952A113 | 3 | $6.33 | - | |
M2.5 x 0.45mm x 5mm Hex Standoffs | McMaster: 98952A101 | 3 | $5.64 | - | |
Total Price | - | - | $53.76 | - | - |
Electrical Schematics:
Product Schematic
Results, Conclusion, and Future Work:
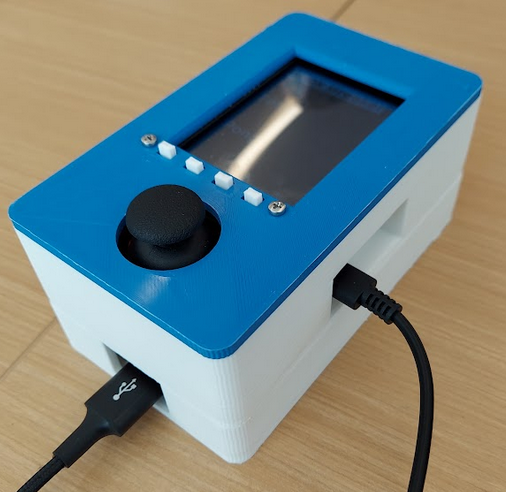
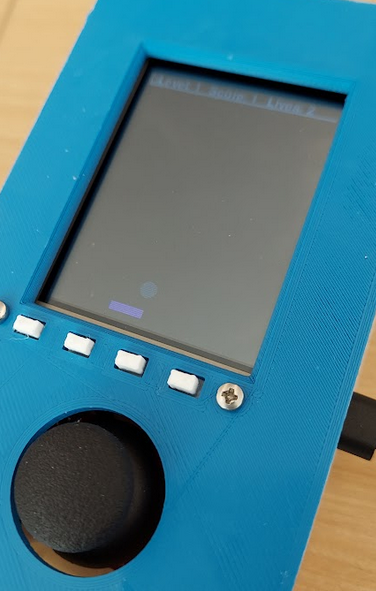
Picture showing printed case and joystick. We used a Ultimaker S5 3D printer with PLA filament
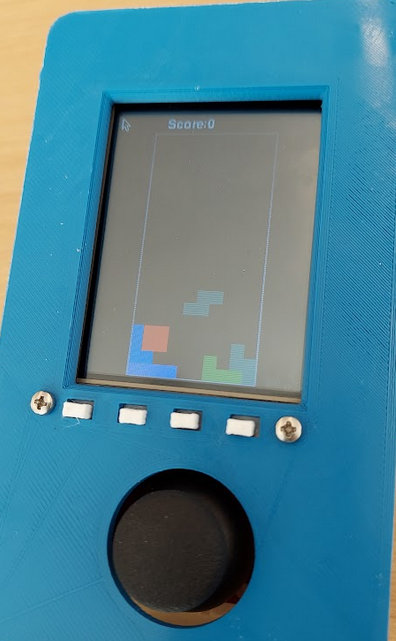
Main menu screen where player can select one of the three games - Brick Breaker, Tetris, Pong
From right to left: Brick Breaker, Tetris, and Pong
We were able to implement three different games, Tetris, Brick Breaker, and Pong using the pygame library. We were also able to integrate the raspberry pi with hardware such as a 3d printed case, and joystick for control.
For future work, we thought of the following list of additional functionalities:
References:
PyGame Library: https://www.pygame.org/docs/
Sparkfun Joystick Library: https://learn.sparkfun.com/tutorials/qwiic-joystick-hookup-guide/all
ECE 5725 Lecture Notes
Raspberry Pi Official Specification and Documentation: https://www.raspberrypi.com/documentation/
PiTFT Official Specification and Documentation: https://learn.adafruit.com/adafruit-pitft-28-inch-resistive-touchscreen-display-raspberry-pi/downloads
Pygame Integration and Game Design: https://www.techwithtim.net/tutorials/game-development-with-python/
Header Image Reference: http://assets.stickpng.com/images/585fd0e7cb11b227491c35d0.png
Work Distribution:
Ian Ress Alex Kluver Richard Seibert
3D printed case Tetris Gameplay Main Game Launcher
Hardware integration Multi-game integration Pong Gameplay
Overall Device Design Device controls(buttons, joystick) Brick Breaker Gameplay
Code Appendix:
Main.py
import time |
Pong.py
import pygame |
BrickBreaker.py
import pygame |
Tetris.py
import pygame |
Joystick_test.py
import qwiic_joystick |


