We set out to create a remoteless gaming console that would map different poses and movements of the players to video game controls allowing you to play a video game without any sort of physical remote. The movements and posees of the players are detected through computer vision. In order to test the system, we mapped various movements to a popular 2 player Linux racing game called Super Tux Kart. The video below demonstrates the final result.
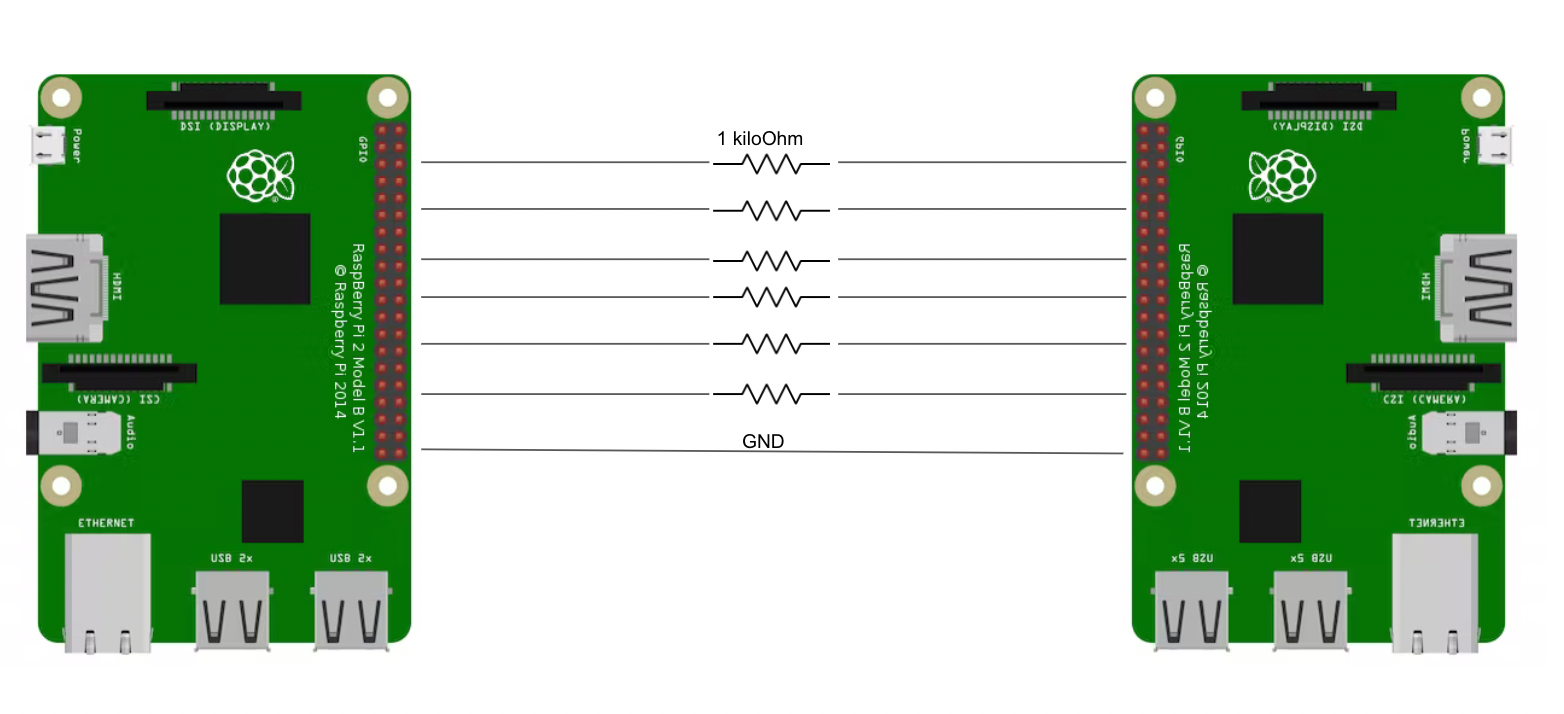
The system consists of two Raspberry Pi 4s. One of the Raspberry Pis is in charge of running the computer vision and the other is responsible for running the game. We needed to use two Raspberry Pis because running the game and performing computer vision were both computationally very heavy and neither of them ran very well when they were running together on the same Pi. With a more powerful processor, this system could be moved to a single board quite easily. The two Pis communicated using GPIO pins. The Pi running the game had 6 input GPIO pins connected to 6 output GPIO pins on the Pi running the computer vision. The 6 GPIO pins essentially communicated the relevant information about the poses of each of the 2 players so that they could be translated into input to the video game by the Pi running the game. We will provide the details about what was being communicated over the pins shortly. The hardware schematic for this system is shown below.
In order to perform computer vision we utilized the mediapipe Python library from Google. This library allows you to easily perform pose detection where you extract the coordinates of landmark body parts on a person in an image. The image below from the official mediapipe website illustrates what landmarks mediapipe is capable of detecting.
![]()
The mediapipe library does have one major shortcoming that we had to design around however. The mediapipe library is only capable of detecting one person per image. From the beginning of this project, we were adamant on this being a two person system. We thought that it would be a lot more fun to race against another person rather than the AI in the game. For it to be a two person system, we would need to detect two people simultaneously which as we mentioned, was not allowed by mediapipe. In order to solve this problem, we ran two processes that each had their own instance of the mediapipe detector. More accurately, the rule is that each mediapipe detector can detect a single person. One process fed images from the left side of the frame to one pose detector and the other process fed images from the right side of the image to the other pose detector. This allowed two pose detectors to run in parallel which allowed us to perform pose detection on two people simultaneously!
There are three important processes running in parallel on the system, the two detection processes, which were just described, as well as the main process. The main process is responsible for capturing the frame, splitting it in half, and sending the two halves off to the appropriate detector processes so that they can be analyzed. The detector processes do their analysis and fill up shared memory arrays (which are used to communicate between processes) with the coordinates of the various landmarks of the person in the image. The main process then takes these coordinated and uses them to interpret the pose and movements of the players. For example, the main process looks at the coordinates of the right and and left hands of each of the players and calculates the angle between the two hands. It then uses this angle to determine whether or not a player is turning. In addition to using the hand coordinates of the players to detect whether or not they are turning, it also looks at the foot coordinates of each of the players to determine whether they are driving forward or in reverse. When a player is driving forward and brings their feet together, their car reverses. When a player is driving in reverse and moves their feet apart, their car switches to driving forward. The system actually looks at the rate of change of the distance between a player's feet to determine whether or not they have brought their feet together or moved them apart. This is better than just looking at the distance between a player's feet because it makes the system perform the same no matter how close to or far away from the camera a player is. The main script also draws points on the detected feet and hands and a line down the middle of the frame, and then displays the frame on a TFT attached to the computer vision Pi. This is really helpful when you are trying to get setup and figuring out where to sit in front of the camera. The TFT, though small adds, a lot to the user experience.
One principle that was used to help reduce latency in our system was to only have the main script try to send even number frames to the detectors. This helped the detectors not be bombarded with images to process. Additonally, we followed the principle of always having the detector look at the most recent even numbered frame that it could. Originally the flow was to have the detector process pull an image from a shared memory queue which would open up space for the main process to put an image into the queue. The detector would then go on to do the image analysis which took a relatively long amount of time compared to the other things that were happening in the system. All the while however, a frame was just sitting in the queue getting more and more outdated. Once the detector finished it would circle back around to the image in the queue. However, as I mentioned this was an old image by this point in time. Becuase of this the detector was constantly analyzing older frames. To combat this, we implemented a shared memory value that was always either 0 or 1. This value allowed the detector to communicate to the main process when it was actually ready for the newest frame. When the detector was busy analyzing a frame it told the main process to keep collecting new frames and only when the detector was ready to actually start analyzing a new frame did it tell the main process to send the newest frame over. The detector signaled this by flipping the value of that shared memory value. This allowed the detectors to always be analyzing the most recent frames that they could and reduced latency by an amount that considerably improved the gameplay experience of our system.
Each player has six possible game states. They can either be going forward or in reverse while either not turning, turning right, or turning left. The main script determines which state each player is in and communicates that to the Pi running the game over the six GPIO pins. Each player's state is described by three bits. The first bit states whether a person is going in forward or reverse. The second bit determines whether a person is turning or not. If a person is indeed turning, then the third bit represents whether they are turning left or right, otherwise the third bit is irrelevant to the game state. Because each player's game state is represented by three bits and there are two players you need six GPIO lines between the two Pis where each line carries one bit in one player's game state three bit number.
In order to receive the decided commands from our computer vision program and correctly inform Supertuxkart, we needed a separate Python script that would receive remote commands and enter them as local keypresses. This script ran on our second Pi, along with the racing game.
Our first obstacle was to send the input information from the players on our first Pi over to our second. We decided on using UART serial communication at first as it was very easy to implement in hardware and software and would give us instant and accurate feedback. However, upon trying this method, we noticed that we were getting a lot of errors in our transmissions. Our communication scheme was to use 6 bits to inform the game of the player’s actions, with 3 bits for each player. The first bit in each group would represent either going forward or backward in the game’s cars. The second would signal a turn event and the third would describe which way to turn if there was a turn event. We then added 2 more zeros so that it formed a whole byte which we could send over UART. However, when sending these bits over the serial line, we found we were getting multiple inconsistent bit errors, which lead us to trying some other way to share the player control information. Our second idea, which turned out to be the one we went with, was to trigger GPIO pins for each of the bits and have our second Pi use these pins to send commands as was briefly described previously. We used 6 pins on each Pi, one for each bit, and then used callbacks to monitor each pins’ current voltage on our second Pi in order to dictate what inputs we would be sending to our game. In our game Python script, we had a 6 bit variable which held the current command that should be used to control our game. When a GPIO pin flipped polarity, we would use bitwise AND and OR statements to flip a singular bit in this command variable in order to correctly change the game to its desired state. This can be seen in the code at the bottom of the report.
Now that we could correctly decipher what our computer vision script was sending us and what we needed the karts to do based on that information, we just needed a way to automate sending input to the game in order to influence the movement of the karts. As our game was controlled by keyboard inputs, we needed a way to replicate key presses in a Python script. Our first solution was to use the library Pyautogui. At the start, this seemed to work well enough. While being very laggy, our in-game cars would change direction as we changed poses but we discovered some issues when using our two car split-screen game mode that we wanted to use from the start. What would happen is that only one of the two cars seemed to be able to get any commands from our local Python script, even though the keys controlling the second car were also seemingly being pressed. This led us to run some separate tests on the library to see what was actually happening with our missing key presses. What turned out to be happening was that the library was only ccapable of holding down on key at a time. The first key was held only until the script started holding down the second key at which point the first key was released. However, we needed simultaneous key presses for our system to support two players. Additionally, we noticed that there was a substantial amount of latency being generated from our second Pi. At first we thought this was just the result of running our racing game in parallel with our script, but after running more tests with our keyboard input library, we discovered that each key press took approximately one tenth of a second to complete. And as at least two keys were being pressed at any given time in our game, we were seeing a lot of lag created from trying to input commands based on the command we received from our computer vision Pi. We tried to solve this by creating a state machine to lower latency by reducing the number of key presses triggered by every new incoming command, but this did not help with our multiplayer problem, as it still only allowed one car to be controlled. We managed to fix this by completely switching the library we were using to control key presses. Instead, we found a new library that was able to “press down” on a key in the span of 7 milliseconds. This allowed us to press keys repeatedly so quickly that to the game, it appeared as if keys were being held. Now, by pressing multiple keys repeatedly very quickly, we could achieve the illusion that multiple keys were being held at the same time allowing 2 players to play the game at the same time!
Super Tux Kart is essentially a Mario Kart knock-off for Linux machines. We picked this particular game because it allowed for two player split-screen gameplay and because it seemed fun. To install it we ran the command "sudo apt install supertuxkart". In order to get the game to run at a high enough fps, we needed to overclock the Pi running the game. We overclocked both the CPU and GPU of the Pi by altering the /boot/config.txt file. To overclock the Pi we followed the instructions from here https://beebom.com/how-overclock-raspberry-pi-4/ . Overclocking the Pi was very simple. In addition to overclocking the Pi, we set the game resolution to be very low. Additionally, we added in a small sleep in the Python script that was running at the same time as the game. Only the Pi running the game was overclocked.
Another problem we had with Super Tux Kart is that the game is pretty fast. Our final system had some lag and was a bit hard to control. It was very fun once you got used to it, but you needed some practice. In order to make the game easier, we went into the game files and turned down the speed of the karts. To do this we altered an xml file that contained characterestics of the karts in the game. This file was found in /usr/share/games/supertuxkart/data/. We changed both the top speed and the power of the karts. The power seemed to effect how fast the kart was able to get up to top speed. Looking back, we likely should not have reduced the power becuase our karts struggled to get up hills in some of the maps. Lowering the top speed however greatly improved user experience.
We used a bash script to start Super Tux Kart in the background and then to start the Python script which generated key presses based on the GPIO inputs.
The commented code for the project can be found below.
from multiprocessing import Process, Array, Queue, Value
import cv2
import mediapipe as mp
import numpy as np
import time
import math
import pygame
from pygame.locals import *
import os
import RPi.GPIO as gpio
import os

###RUN WITH A HIGHER PRIORIRTY!
os.sched_setscheduler(0,os.SCHED_FIFO,os.sched_param(49))
# ser=serial.Serial('/dev/ttyS0',9600)

gpio.setmode(gpio.BCM)

gpio.setup(12,gpio.OUT) #right gas
gpio.setup(16,gpio.OUT) #right turn
gpio.setup(21,gpio.OUT) #right wheel
gpio.setup(4,gpio.OUT) #left gas
gpio.setup(17,gpio.OUT) #left turn 17
gpio.setup(22,gpio.OUT) #left wheel 22

###Organizational mapping for code readability
nose=0
rightShoulder=12
leftShoulder=11
leftElbow=13
rightElbow=14
leftWrist=15
rightWrist=16
rightThumb=22
leftThumb=21
leftHip=23
rightHip=24
leftKnee=25
rightKnee=26
leftAnkle=27
rightAnkle=28
leftFoot=31
rightFoot=32
### these serve as the indecies for the shared memory arrays later on


rightImage=Queue(maxsize=1)  ###I found that queues work well for passing image object between processes
leftImage=Queue(maxsize=1)	###I found that pipes did not work well for passing images between processes


leftLandmarksx=Array("i",33) #the x coordinates of the features detected on the left side of the frame
leftLandmarksy=Array("i",33) #the y coordinates of rthe features detected on the left side of the frame
rightLandmarksx=Array("i",33) #the x coordinates of the features detected on the right side of the frame
rightLandmarksy=Array("i",33) #the y coordinates of the features detected on the right side of the frame

### Process that analyzes the right side of the frame and updates the shared right landmark arrays accordingly
def rightDetector(q,rlx,rly,done): ##pass in the right image queue and the two shared memory right landmark arrays
	detector=mp.solutions.pose.Pose(min_detection_confidence=.5,min_tracking_confidence=.5)
	# print('right entered')
	while True:
		starttime=time.time()
		img=q.get()
		done.value=0
		h,w,c=img.shape
		landmarks=detector.process(cv2.cvtColor(img,cv2.COLOR_BGR2RGB))
		# print('right processed')
		if landmarks.pose_landmarks:
			for num, lm in enumerate(landmarks.pose_landmarks.landmark):
				px,py=int(lm.x*w),int(lm.y*h) ###figure out how to use id?
				rlx[num]=px+320
				rly[num]=py
		done.value=1
		# endtime=time.time()
		# print('the right detector is taking ',(endtime-starttime))

### Process that analyzes the left side of the frame and updates the shared left landmark arrays accordingly
def leftDetector(q,llx,lly,done): ##pass in the left image queueu the and the two shared memory left landmark arrayes
	detector=mp.solutions.pose.Pose(min_detection_confidence=.5,min_tracking_confidence=.5)
	while True:
		starttime=time.time()
		img=q.get()
		done.value=0
		h,w,c=img.shape
		# print("left detector grabbed an image")
		landmarks=detector.process(img)
		# print('left processed')
		if landmarks.pose_landmarks:
			for num, lm in enumerate(landmarks.pose_landmarks.landmark):
				px,py=int(lm.x*w),int(lm.y*h) ###figure out how to use id?
				llx[num]=px
				lly[num]=py
		done.value=1
		# endtime=time.time()
		# print('left detection is taking ',(endtime-starttime))

		###fill the shared arrays

def anim(leftangle,rightangle): ###a process we used for testing purposes
	pygame.init()
	size=width,height=640,480
	WHITE=255,255,255
	BLACK=0,0,0
	screen=pygame.display.set_mode(size)
	# screen= pygame.display.set_mode((0,0),pygame.FULLSCREEN)
	fps = 10
	clock=pygame.time.Clock()
	font_big = pygame.font.Font(None,30)
	lwheel = pygame.image.load("wheel2.png")
	lwheelRect = lwheel.get_rect()
	lwheelRect.center = (160,120)

	rwheel = pygame.image.load("wheel2.png")
	rwheelRect = rwheel.get_rect()
	rwheelRect.center = (500,120)
	r=0
	while True:
		# print("shared angle is "+str(angle.value))
		deg=leftangle.value*180/math.pi
		# print('angle read was '+str(deg))
		if deg>20:
			r=90
		elif deg<-20:
			r=-90
		else:
			r=0

		deg=rightangle.value*180/math.pi
		# print('angle read was '+str(deg))
		if deg>20:
			q=90
		elif deg<-20:
			q=-90
		else:
			q=0

		screen.fill(BLACK)
		lwheel = pygame.transform.rotate(lwheel, r)
		rwheel = pygame.transform.rotate(rwheel, q)
		clock.tick(fps)
		screen.blit(rwheel,rwheelRect)
		screen.blit(lwheel,lwheelRect)
		pygame.display.flip()
		lwheel = pygame.transform.rotate(lwheel, -r)
		rwheel = pygame.transform.rotate(rwheel, -q)


langle=Value('d',0.0) ###shared memory for the animation
rangle=Value('d',0.0)

rightDone=Value('i',1)
leftDone=Value('i',1)


###set up the processes: specifically the left and right frame detection processes
jobs=[]
rDetector=Process(target=rightDetector,args=(rightImage,rightLandmarksx,rightLandmarksy,rightDone,),daemon=True)
lDetector=Process(target=leftDetector,args=(leftImage,leftLandmarksx,leftLandmarksy,leftDone,),daemon=True)
lanim=Process(target=anim,args=[langle,rangle],daemon=True)

#initialise camera
cap=cv2.VideoCapture(0)

#initialise these for later on
leftLeftFoot=50
leftRightFoot=100
rightLeftFoot=150
rightRightFoot=200
gasRight=False
gasLeft=False

frames=0
while True:
	starttime=time.time()
	suc,frame=cap.read()
	frames+=1
	frame=cv2.cvtColor(frame,cv2.COLOR_BGR2RGB)

	frame.flags.writeable=False ###hopefully speeding up by passing by reference
	if frames%2==0 and rightDone.value==1:
		try:
			rightImage.put(frame[:,320:,:],False) ###this blocks until there is a place to put it
		except:
			pass

	if not rDetector in jobs: #start rDetector at the appropriate time
		rDetector.start()
		print('right detector started')
		jobs.append(rDetector)
	if frames%2==0 and leftDone.value==1:
		try:
			leftImage.put(frame[:,:320,:]) ###this blocks until there is a place to put it
		except:
			pass

	if not lDetector in jobs: #start the left detector at the appropriate time
		lDetector.start()
		print('left detector started')
		jobs.append(lDetector)

	#####	HANDS ########
	#### draw dots on the hands for debugging
	if leftLandmarksx[leftWrist]<320 and leftLandmarksx[rightWrist]<320:
		frame=cv2.circle(frame,(leftLandmarksx[leftWrist],leftLandmarksy[leftWrist]),radius=5,color=(255,255,0),thickness=-1)
		frame=cv2.circle(frame,(leftLandmarksx[rightWrist],leftLandmarksy[rightWrist]),radius=5,color=(255,0,255),thickness=-1)
	if rightLandmarksx[leftWrist]>320 and rightLandmarksx[rightWrist]>320:
		frame=cv2.circle(frame,(rightLandmarksx[leftWrist],rightLandmarksy[leftWrist]),radius=5,color=(0,255,0),thickness=-1)
		frame=cv2.circle(frame,(rightLandmarksx[rightWrist],rightLandmarksy[rightWrist]),radius=5,color=(0,0,255),thickness=-1)

	#calculate the angle between the two hands on each side
	try:
		lWheelAngle=math.atan2(leftLandmarksy[rightWrist]-leftLandmarksy[leftWrist],abs(leftLandmarksx[rightWrist]-leftLandmarksx[leftWrist]))
		langle.value=lWheelAngle
		# print("alkdlkjdflkj adf "+str(langle.value))
	except:
		lWheelAngle=0
	# print("the wheel angle is "+str(lWheelAngle))

	try:
		rWheelAngle=math.atan2(rightLandmarksy[rightWrist]-rightLandmarksy[leftWrist],abs(rightLandmarksx[rightWrist]-rightLandmarksx[leftWrist]))
		rangle.value=rWheelAngle
	except:
		rWheelAngle=0
	# print("the wheel angle is "+str(rWheelAngle))
	#####	HANDS ########


	#########	FEET ###############
	#draw dots on the feet for debugging and user friendliness
	if leftLandmarksx[rightFoot]<320 and leftLandmarksx[leftFoot]<320:
		frame=cv2.circle(frame,(leftLandmarksx[leftFoot],leftLandmarksy[leftFoot]),radius=5,color=(124,124,124),thickness=-1)
		frame=cv2.circle(frame,(leftLandmarksx[rightFoot],leftLandmarksy[rightFoot]),radius=5,color=(200,0,200),thickness=-1)

	if rightLandmarksx[rightFoot]>320 and rightLandmarksx[leftFoot]>320:
		frame=cv2.circle(frame,(rightLandmarksx[leftFoot],rightLandmarksy[leftFoot]),radius=5,color=(185,255,0),thickness=-1)
		frame=cv2.circle(frame,(rightLandmarksx[rightFoot],rightLandmarksy[rightFoot]),radius=5,color=(255,88,185),thickness=-1)


	###detect an update in foot position: if the feet get closer or farther apart quickly then flip gas/brake
	if rightLandmarksx[rightFoot]!=rightRightFoot and rightLandmarksx[leftFoot]!=rightLeftFoot: #there has been an update
		#think this is addressed with "and" concern that the right foot gets updated and the left foot does not
		try:
			rrc=((rightLandmarksx[rightFoot]-rightLandmarksx[leftFoot])-(rightRightFoot-rightLeftFoot))/abs(rightRightFoot-rightLeftFoot) #current distance - previous distance divided by previous distance  ##rate of change for right side right foot
			rightRightFoot=rightLandmarksx[rightFoot]
			rightLeftFoot=rightLandmarksx[leftFoot]
			if rrc>=.6 and  gasRight:
				gasRight=not gasRight
				print("right gas event detected")
				print('rrc was ' + str(rrc))
			# print("rrc was "+str(rrc))
			elif rrc<=-.6 and not gasRight:
				gasRight= not gasRight
				print('right braking')
		except:
			rightRightFoot=rightLandmarksx[rightFoot]
			rightLeftFoot=rightLandmarksx[leftFoot]
			print('rightRightFoot was '+str(rightRightFoot)+' and right left foot was '+str(rightLeftFoot))
	if leftLandmarksx[rightFoot]!=leftRightFoot and leftLandmarksx[leftFoot]!=leftLeftFoot: #there has been an update
		try:
			lrc=(abs(leftLandmarksx[rightFoot]-leftLandmarksx[leftFoot])-abs(leftRightFoot-leftLeftFoot))/abs(leftRightFoot-leftLeftFoot) #current distance - previous distance divided by previous distance  ##rate of change for right side right foot
			leftRightFoot=leftLandmarksx[rightFoot]
			leftLeftFoot=leftLandmarksx[leftFoot]
			if lrc>=.6 and not gasLeft:
				gasLeft=not gasLeft
				print('left gas event detected')
				print('lrc was ' + str(lrc))
			# print("lrc was "+str(lrc))
			elif lrc<=-.6 and gasLeft:
				gasLeft= not gasLeft
				print('left braking')
		except:
			leftRightFoot=leftLandmarksx[rightFoot]
			leftLeftFoot=leftLandmarksx[leftFoot]
			print('leftRightFoot was '+str(leftRightFoot)+' and left left foot was '+str(leftLeftFoot))
	# print('gas left '+str(gasLeft))
	# print('gas right '+str(gasRight))

	########	FEET #####################

	frame=cv2.cvtColor(frame,cv2.COLOR_RGB2BGR) #convert the frame back to the proper color
	frame=cv2.line(frame,(320,0),(320,480),color=(255,0,0),thickness=3) #draw a line down the middle of the frame for debugging and user frienliness
	# frame=cv2.cvtColor(frame,cv2.COLOR_BGR2GRAY)
	cv2.imshow('testing',frame) ### get the image ready to show
	if cv2.waitKey(1)==ord('q'): ###show the image and quit if q is pressed
		cap.release() ###this does not seem to be working for some reason
		cv2.destroyAllWindows()
		break


	###right gas | right turn? | right wheel | left gas | left turn? | left wheel
	if gasRight:
		gpio.output(12,gpio.HIGH)
	else:
		gpio.output(12,gpio.LOW)

	if rWheelAngle*180/math.pi>20 or rWheelAngle*180/math.pi<-20:
		# print('right turning gpio should go high')
		gpio.output(16,gpio.HIGH)
	else:
		# print('the right wheel angle was ',rWheelAngle)
		gpio.output(16,gpio.LOW)

	if rWheelAngle*180/math.pi>20:
		gpio.output(21,gpio.HIGH)
	else:
		gpio.output(21,gpio.LOW)

	if gasLeft:
		gpio.output(4,gpio.HIGH)
	else:
		gpio.output(4,gpio.LOW)

	if lWheelAngle*180/math.pi>20 or lWheelAngle*180/math.pi<-20:
		# print('left turning gpio should go high')
		gpio.output(17,gpio.HIGH)
	else:
		gpio.output(17,gpio.LOW)

	if lWheelAngle*180/math.pi>20:
		gpio.output(22,gpio.HIGH)
	else:
		gpio.output(22,gpio.LOW)

	endtime=time.time()


	# print("time through the loop was "+str(endtime-starttime))
cap.release() ###try again to see if it works now and it still doesn't seem to work
gpio.cleanup()
---------------------------------------------------------------------------
ModuleNotFoundError                       Traceback (most recent call last)
Input In [5], in <module>
      1 from multiprocessing import Process, Array, Queue, Value
----> 2 import cv2
      3 import mediapipe as mp
      4 import numpy as np

ModuleNotFoundError: No module named 'cv2'
import os
import pyautogui
import time
import subprocess as sub
import serial
import random
import RPi.GPIO as gpio
import pynput
from pynput.keyboard import Key, Controller


#os.sched_setscheduler(0,os.SCHED_FIFO,os.sched_param(35))

command = 0b100100
lastCommand = command
keyboard = Controller()
gpio.setmode(gpio.BCM)
#using pins 2 3 4 14 15 18
gpio.setup(2,gpio.IN,pull_up_down=gpio.PUD_DOWN)
gpio.setup(3,gpio.IN,pull_up_down=gpio.PUD_DOWN)
gpio.setup(4,gpio.IN,pull_up_down=gpio.PUD_DOWN)
gpio.setup(14,gpio.IN,pull_up_down=gpio.PUD_DOWN)
gpio.setup(15,gpio.IN,pull_up_down=gpio.PUD_DOWN)
gpio.setup(18,gpio.IN,pull_up_down=gpio.PUD_DOWN)

def callback2(channel):
    global command
    if gpio.input(2):
        command|=0b100000
    else:
        command&=0b011111
def callback3(channel):
    global command
    if gpio.input(3):
        command|=0b010000
    else:
        command&=0b101111
def callback4(channel):
    global command
    if gpio.input(4):
        command|=0b001000
    else:
        command&=0b110111
def callback14(channel):
    global command
    if gpio.input(14):
        command|=0b000100
    else:
        command&=0b111011
def callback15(channel):
    global command
    if gpio.input(15):
        command|=0b000010
    else:
        command&=0b111101
def callback18(channel):
    global command
    if gpio.input(18):
        command|=0b000001
    else:
        command&=0b111110


gpio.add_event_detect(2,gpio.BOTH,callback=callback2)
gpio.add_event_detect(3,gpio.BOTH,callback=callback3)
gpio.add_event_detect(4,gpio.BOTH,callback=callback4)
gpio.add_event_detect(14,gpio.BOTH,callback=callback14)
gpio.add_event_detect(15,gpio.BOTH,callback=callback15)
gpio.add_event_detect(18,gpio.BOTH,callback=callback18)


#sub.Popen('supertuxkart')

time.sleep(10)
screenX, screenY = pyautogui.size()
pyautogui.click((screenX/2), (screenY/2))

# pyautogui.typewrite(['enter'],.25) ###uncomment for story mode debugging

#Game Mode Select
pyautogui.typewrite(['right', 'right', 'enter'],.25)
#Player Enter and difficulty selection
pyautogui.typewrite(['enter', 'enter', 'q', 'q','enter'],.25)
#Map Select
for i in range(random.randint(0,3)):
    pyautogui.typewrite(['right'],.25)
pyautogui.typewrite(['enter', 'enter'],.25)
running=True
while(running):
    starttime=time.time()
    #print('command is ' + str(command))
    #print(bin(command))
    if (command & 0b100000) != 0:
        #pyautogui.keyUp('down')
        keyboard.release(Key.down)
        keyboard.press(Key.up) #right gas
        #print('the binary is ', bin(command[0] & 0b100000))
    elif (command & 0b100000) == 0:
        keyboard.release(Key.up)
        keyboard.press(Key.down)
        #pyautogui.keyDown('down')
        #print('the binary is ', bin(command[0] & 0b100000), ' 0 detected')
    if (command & 0b010000) != 0: ###there was a turn event
        if (command & 0b001000) != 0:
            keyboard.release(Key.left)
            keyboard.press(Key.right)
        else:
            keyboard.release(Key.right)
            keyboard.press(Key.left)
    else:
        keyboard.release(Key.right)
        keyboard.release(Key.left)
    if (command & 0b000100) != 0:
        #pyautogui.keyUp('s')
        keyboard.release('s')
        keyboard.press('w') #left gas
    else:
        keyboard.release('w')
        keyboard.press('s')
        #pyautogui.keyDown('s')
    if (command & 0b000010) != 0:
        if (command & 0b000001) != 0:
            keyboard.release('a')
            keyboard.press('d')
        else:
            keyboard.release('d')
            keyboard.press('a')
    else:
        keyboard.release('d')
        keyboard.release('a')
    time.sleep(0.08)
    endtime=time.time()
    #print("total time was", endtime-starttime)
    #rxedCommands = ser.read()
    #data_left = ser.inWaiting()
    #rxedCommands += ser.read(data_left)
    #print(rxedCommands)
gpio.cleanup()