PiCat
A Cat Reminder and Laser Toy that helps owners take care of their felines better
Created by: Kunpeng Huang (kh537), Xinyi Yang (xy98)
05/21/2021
Demonstration Video
Introduction
Are you a busy cat owner who would like to take care of your cats while you’re away? What are those cute felines doing when you are not home? Don’t worry! PiCat meets all your needs. PiCat is a cat reminder and laser toy that makes you a better owner. This multifunctional system implemented on a Raspberry Pi 4 has three functions: reminder, play, and photo.
The reminder mode shows critical information about the cat on a PiTFT display with a colorful user interface, such as its birthday, as well as the date for the next health check and insurance update. The play mode keeps your cat active and engaged using a laser toy. The toy is implemented using a laser diode actuated by two servo motors. The laser toy can be activated automatically when a Pi Camera detects a cat using computer vision. Alternatively, the toy can be controlled remotely by the user through a webserver. The photo mode takes pictures of the cat periodically once the camera recognizes it. The system saves all the images locally and displays the latest photos on the webserver.
Project Objective:
Our project is a multifunctional system implemented based on a Raspberry Pi 4 that allows cat owners to take care of their felines remotely. The system has three functions: reminder, play, and photo. The reminder mode reminds the owner of the time of the cat’s birthday and when it needs a physical examination or insurance update. The play mode allows the cat to play with a laser toy controlled automatically or by the owner remotely. The photo mode takes pictures of the cat periodically.
Design
Hardware
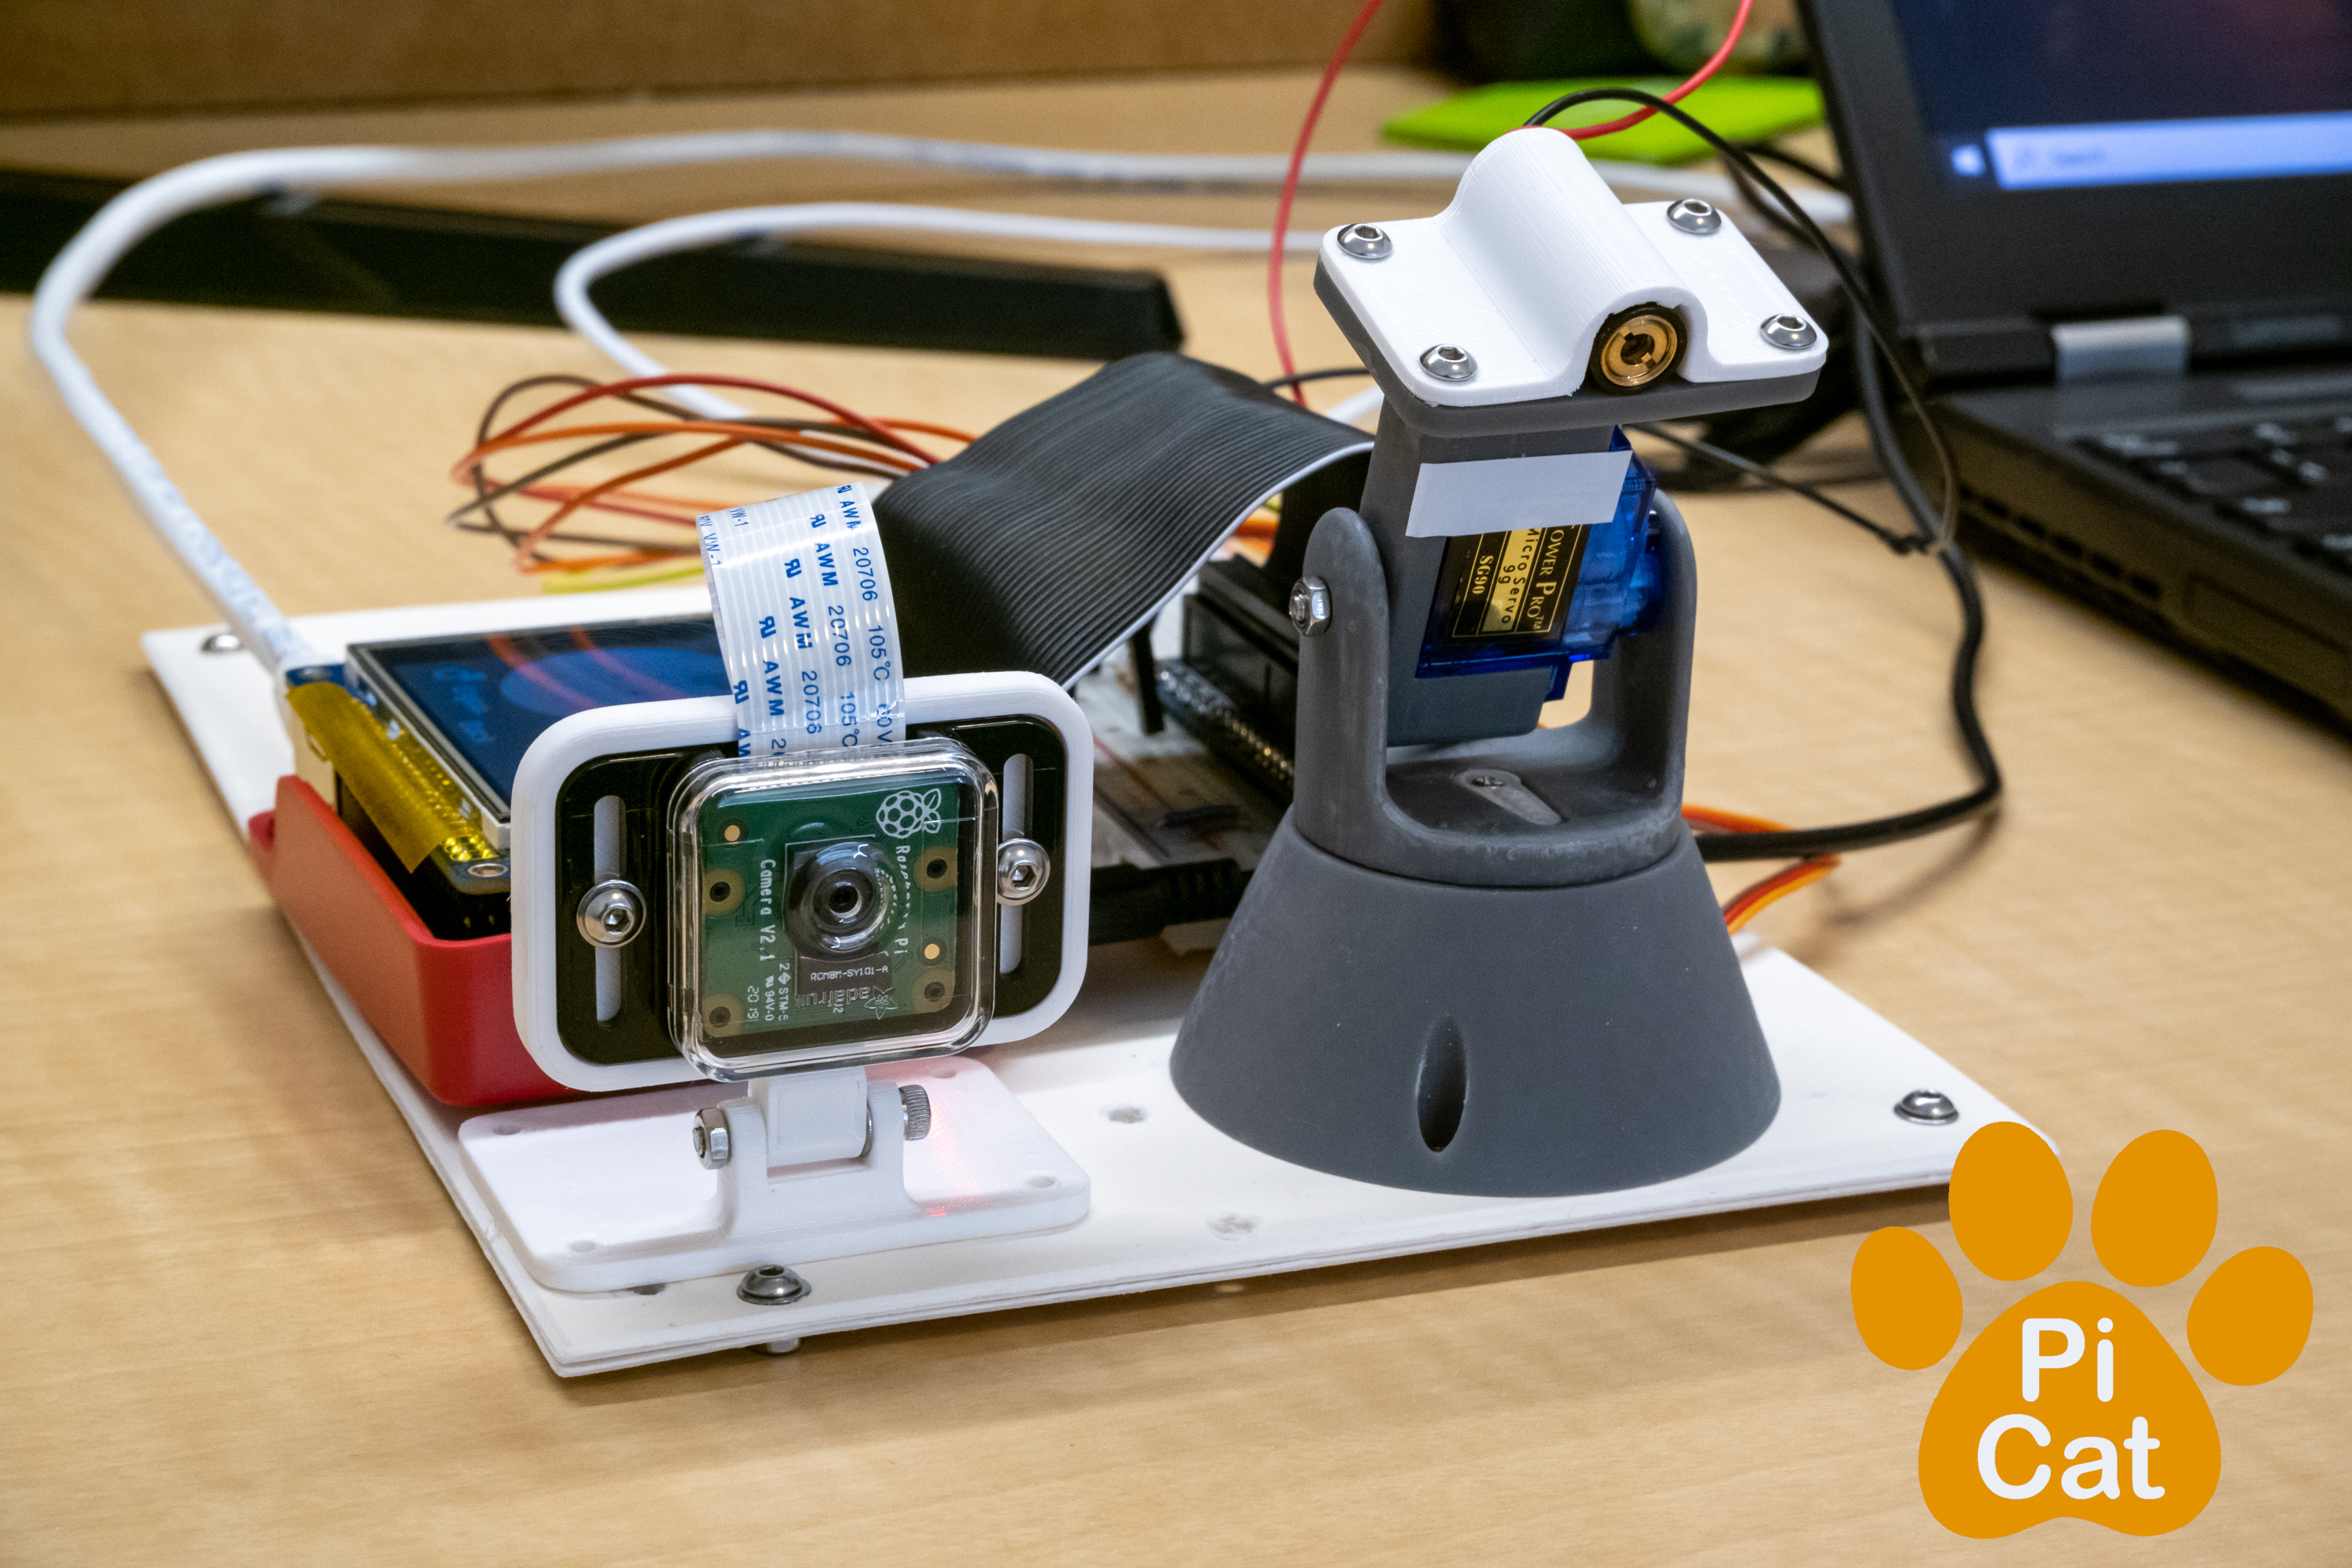
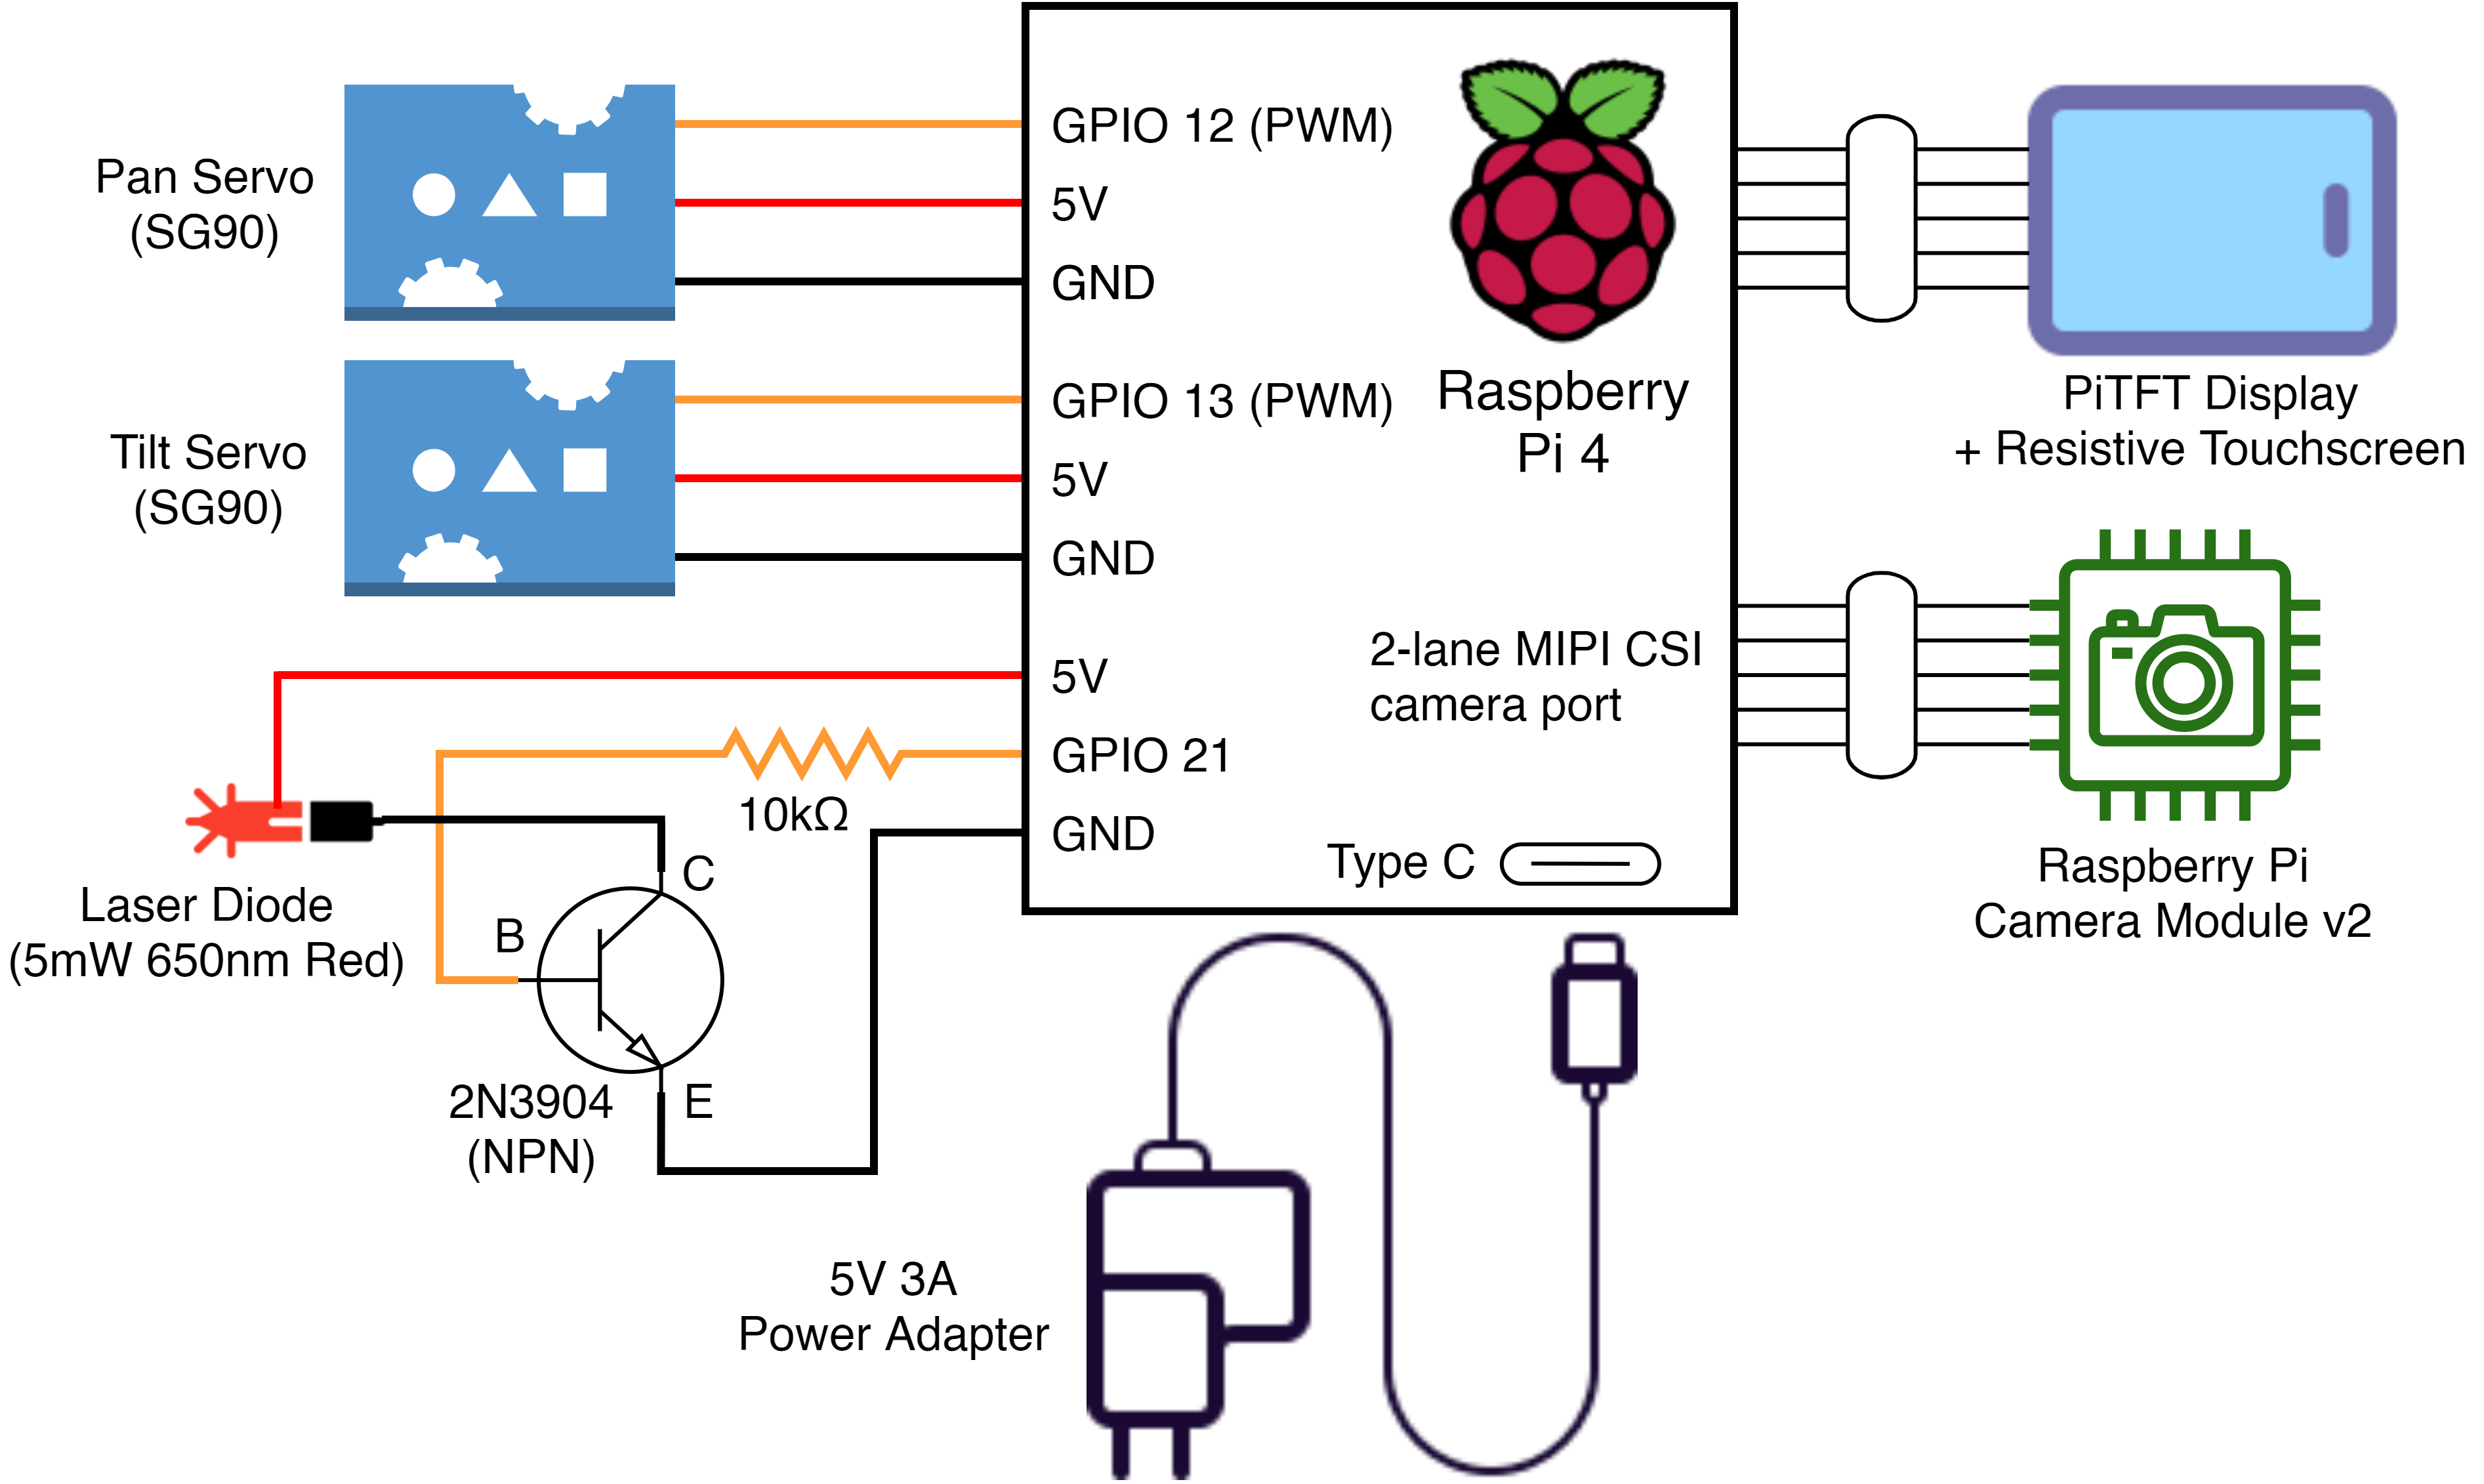
The overall hardware schematics are shown in Figure 2. The major components include the Raspberry Pi 4, PiTFT display, Pi Camera Module v2, two micro servo motors (SG90), and a laser diode. The links to the components are listed in the Bill of Materials section at the end.
Camera
We used the Raspberry Pi Camera Module v2
for streaming video and capturing photos. We installed and configured the camera following
the “Getting Started” section in the PiCamera tutorial [1].
To enable the camera, we ran sudo raspi-config in the terminal and selected <3 Interface Options -> P1 Camera -> Yes>.
Then, we rebooted the RPi to finish the configuration.
We noticed that the field of view output by the camera depends on the aspect ratio of the image. The widest angle is achieved using the camera’s native aspect ratio, i.e., 4:3. Since we would like to capture a wide field of view, we selected 640 x 480 as the resolution. The full resolution of the camera, i.e., 3280 × 2464, is not ideal since it will slow down the image processing by OpenCV significantly.
Laser Diode
Cats are known to be attracted by a laser pointer, which makes it an ideal toy in our design. We selected a 5mW red laser diode from Adafruit, which could be driven at 2.8V to 5.2V. We powered the laser using the 5V line on the RPi, which could provide more than enough current. To be able to turn on and off the laser, we used an NPN BJT (2N3904) as a switch [2]. The base (B) of the transistor is connected to GPIO 21 on the RPi in series with a 10kΩ current-limiting resistor, as shown in Figure 2. The laser diode is then connected between the 5V line and the collector (C).
Servo Motor
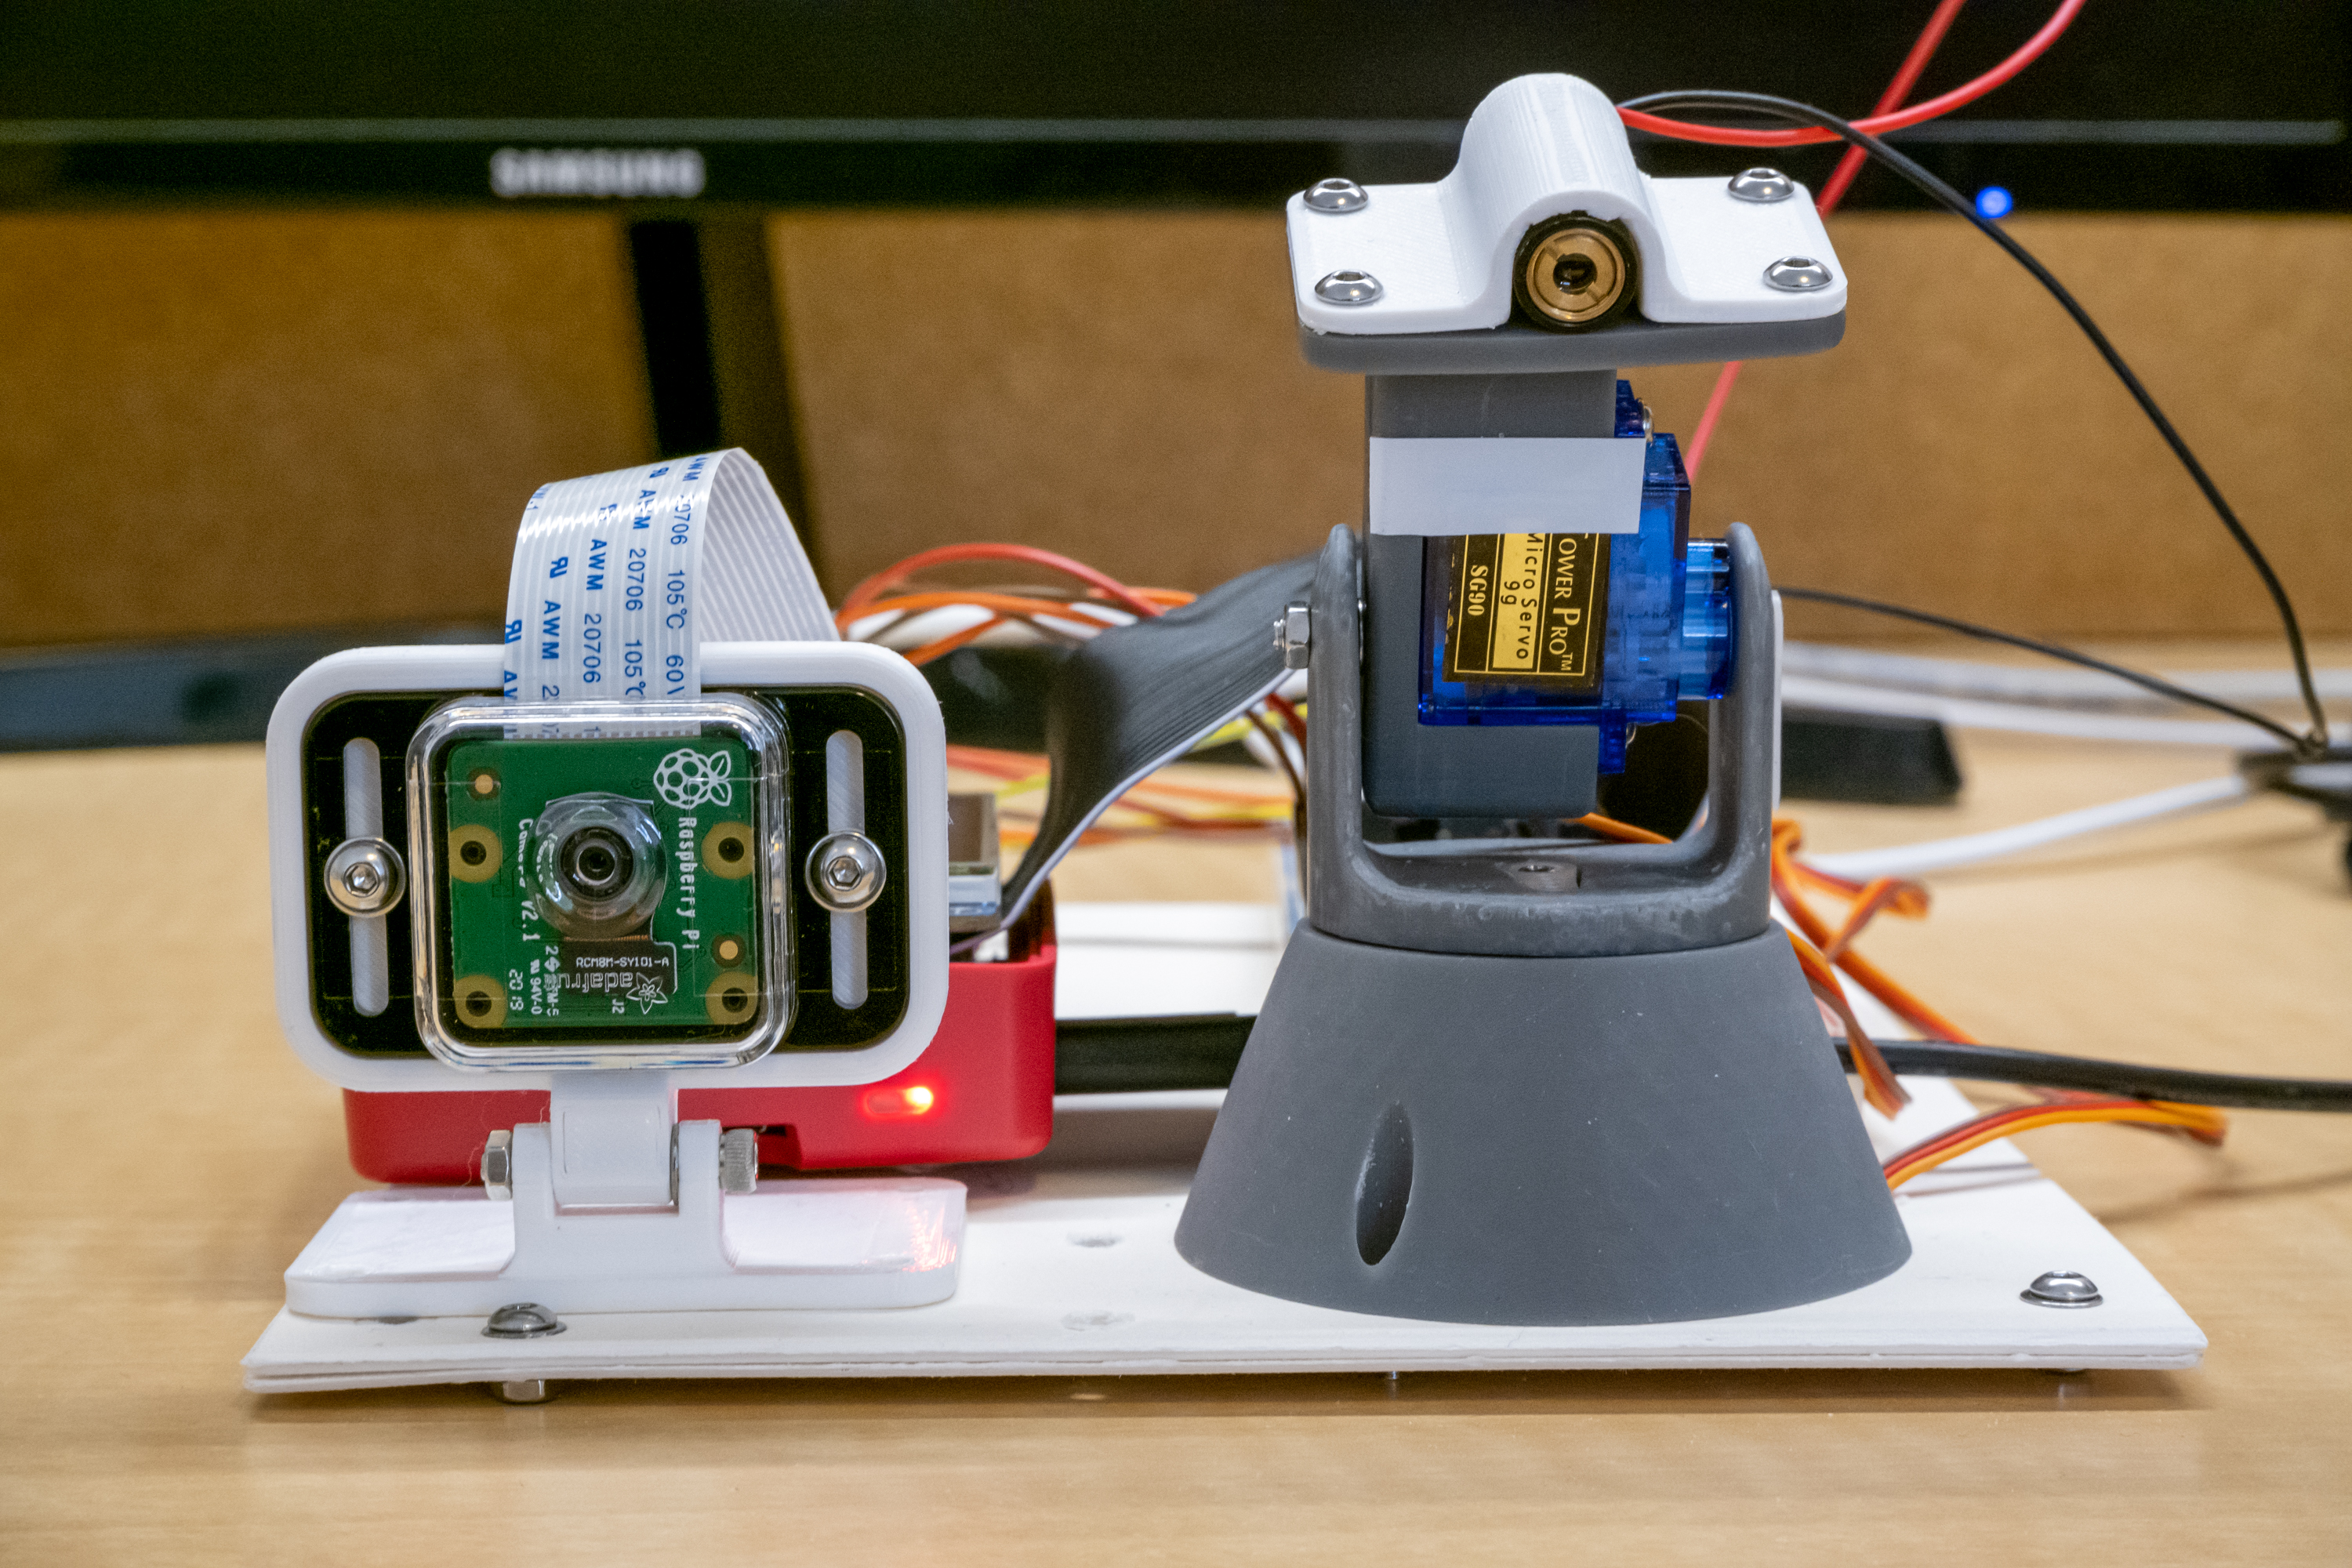
We mounted the laser diode on a pan-tilt platform, which could point the laser at an arbitrary angle in a hemisphere. Since the laser diode is lightweight, we selected the SG90 micro servo motor to actuate the platform [3]. The pan-tilt platform was 3D-printed using a model from Thingiverse (grey part, Figure 3 right) and we custom-designed a mounting plate for the laser diode (white part with screws) [4].
While we did not find any specific documentation for the SG90 servo, the general control of a servo motor, i.e., PWM frequency and duty cycle, is similar across all designs. After some experimentation, we found that a PWM frequency of 50Hz works well with our servos, and a pulse width of 0.5ms to 2.5ms corresponds to the full 180-degree rotation approximately.
Initially, we used the PWM function in the RPi.GPIO module to
control the servos - the same function used in the DC motor control in previous labs. However, we discovered that the software PWM used
in RPi.GPIO was sensitive to system load and thus would cause the servo to jitter periodically.
To make the servos operate more smoothly, we switched to hardware PWM which is independent
of the system load. We used the hardware_PWM function in the pigpio Python module [5].
The function call, hardware_PWM(gpio, PWMfreq, PWMduty), starts hardware PWM on a GPIO pin at the specified frequency and dutycycle.
gpio is a GPIO pin with a PWM channel. Two PWM channels are available on RPi and we selected channel 0 (GPIO 12) for the pan servo
(bottom, mounted in the cone-shaped base) and channel 1 (GPIO 13) for the tilt servo (top, below the laser diode). PWMfreq is set to 50 for 50Hz. PWMduty
takes value between 0 and 1,000,000, e.g. a value of 10,000 corresponds to a 1% duty cycle. For example, to set the pan servo to approximately 90 degrees (1.5ms pulse width),
we would call hardware_PWM(12, 50, 75000). Note that to use this function, we need to start the pigpio daemon by running sudo pigpiod and import the module with
import pigpio at the start of a python script.
Software
PiTFT (picat_gui.py)
We used PiTFT to implement our reminder mode.
As shown in Figure 5, the home page shows two pictures of cats bouncing with each other.
The collision mechanism is the same as our implementation in lab2. The top left corner of the screen shows the time,
and the top right corner shows the PiCat logo. If a user clicks on a cat's photo, it will take them to that cat's personal page.
The program detects the event MOUSEBUTTONDOWN and checks if there is a collide point in the cat’s picture and which
cat the user clicked on. The code for detecting user input is shown below.
                  for event in pygame.event.get():
                    if (event.type is MOUSEBUTTONDOWN):
                      pos = pygame.mouse.get_pos()
                      if ballrect1.collidepoint(pos):
                        print ("ergou")
                        state = 1
                      elif ballrect2.collidepoint(pos):
                        print ("huahua")
                        state = 2
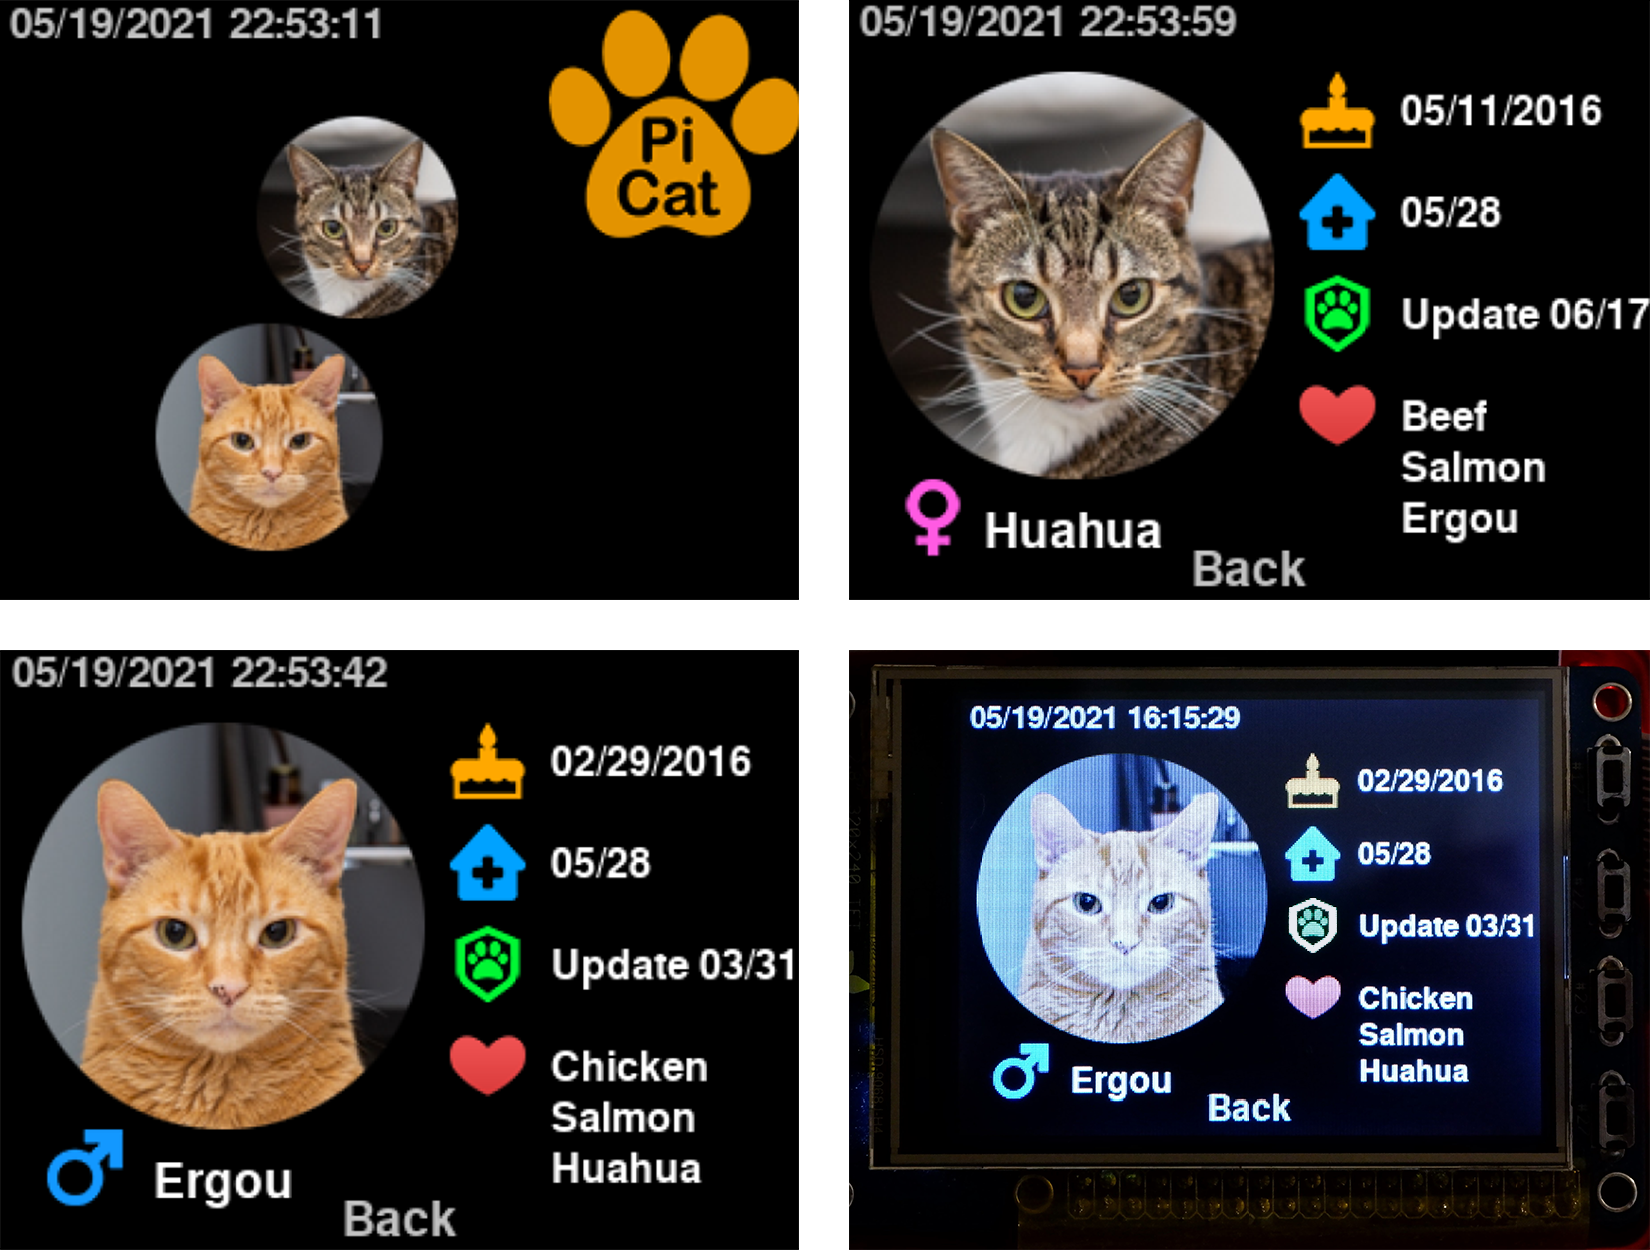
In the personal profile, we listed the cat's name, gender,
birthday, insurance update time, health checkup time, and its
favorite items. Clicking the "Back" button returns to the home
page. The top left corner of each page has a real-time clock that
is implemented with the datetime library in Python.
We used the following code to get the date and time, and then
converted the value to a printable format.
time_now = datetime.now().strftime("%m/%d/%Y %H:%M:%S")
Web server
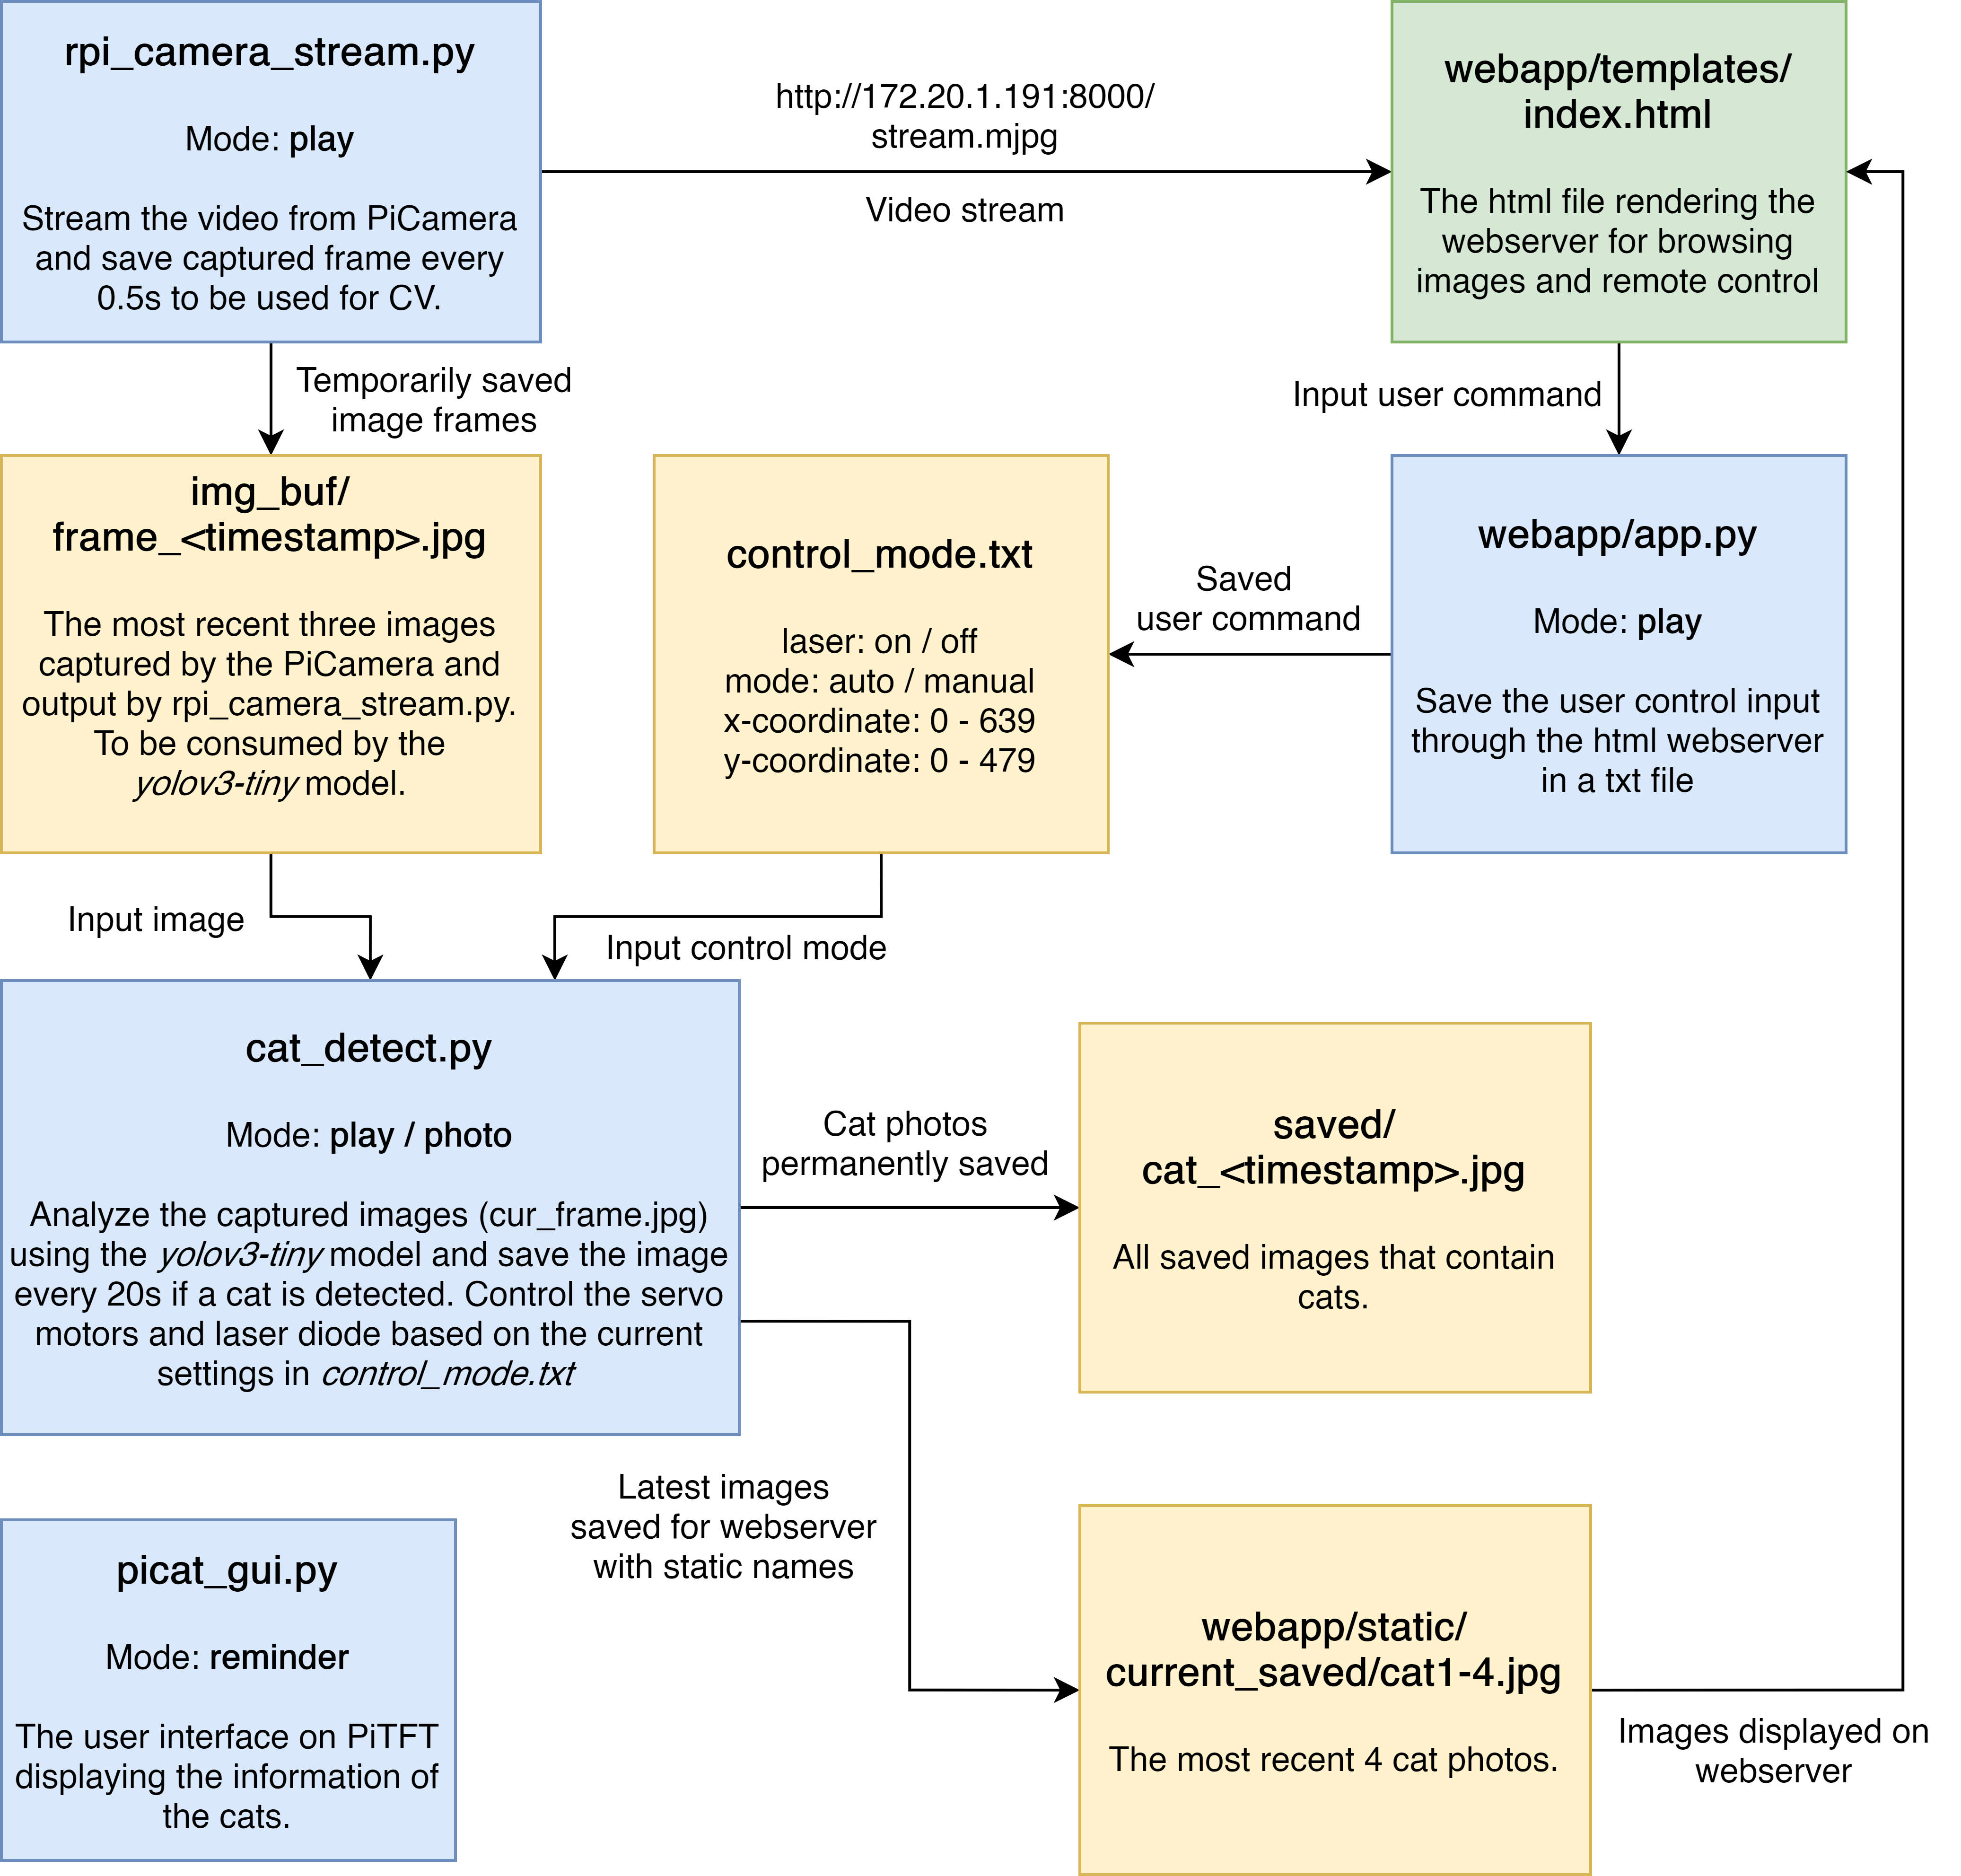
We implemented a web server based on Flask, a python web framework that allows cat owners to remotely control the laser toy and play with their cats. Currently, users must be on the same wifi network to access the webserver. We followed the Flask tutorial [6] to install the library and create a simple website. The website includes a PiCamera video stream, laser control form, and cat images (Figure 6).
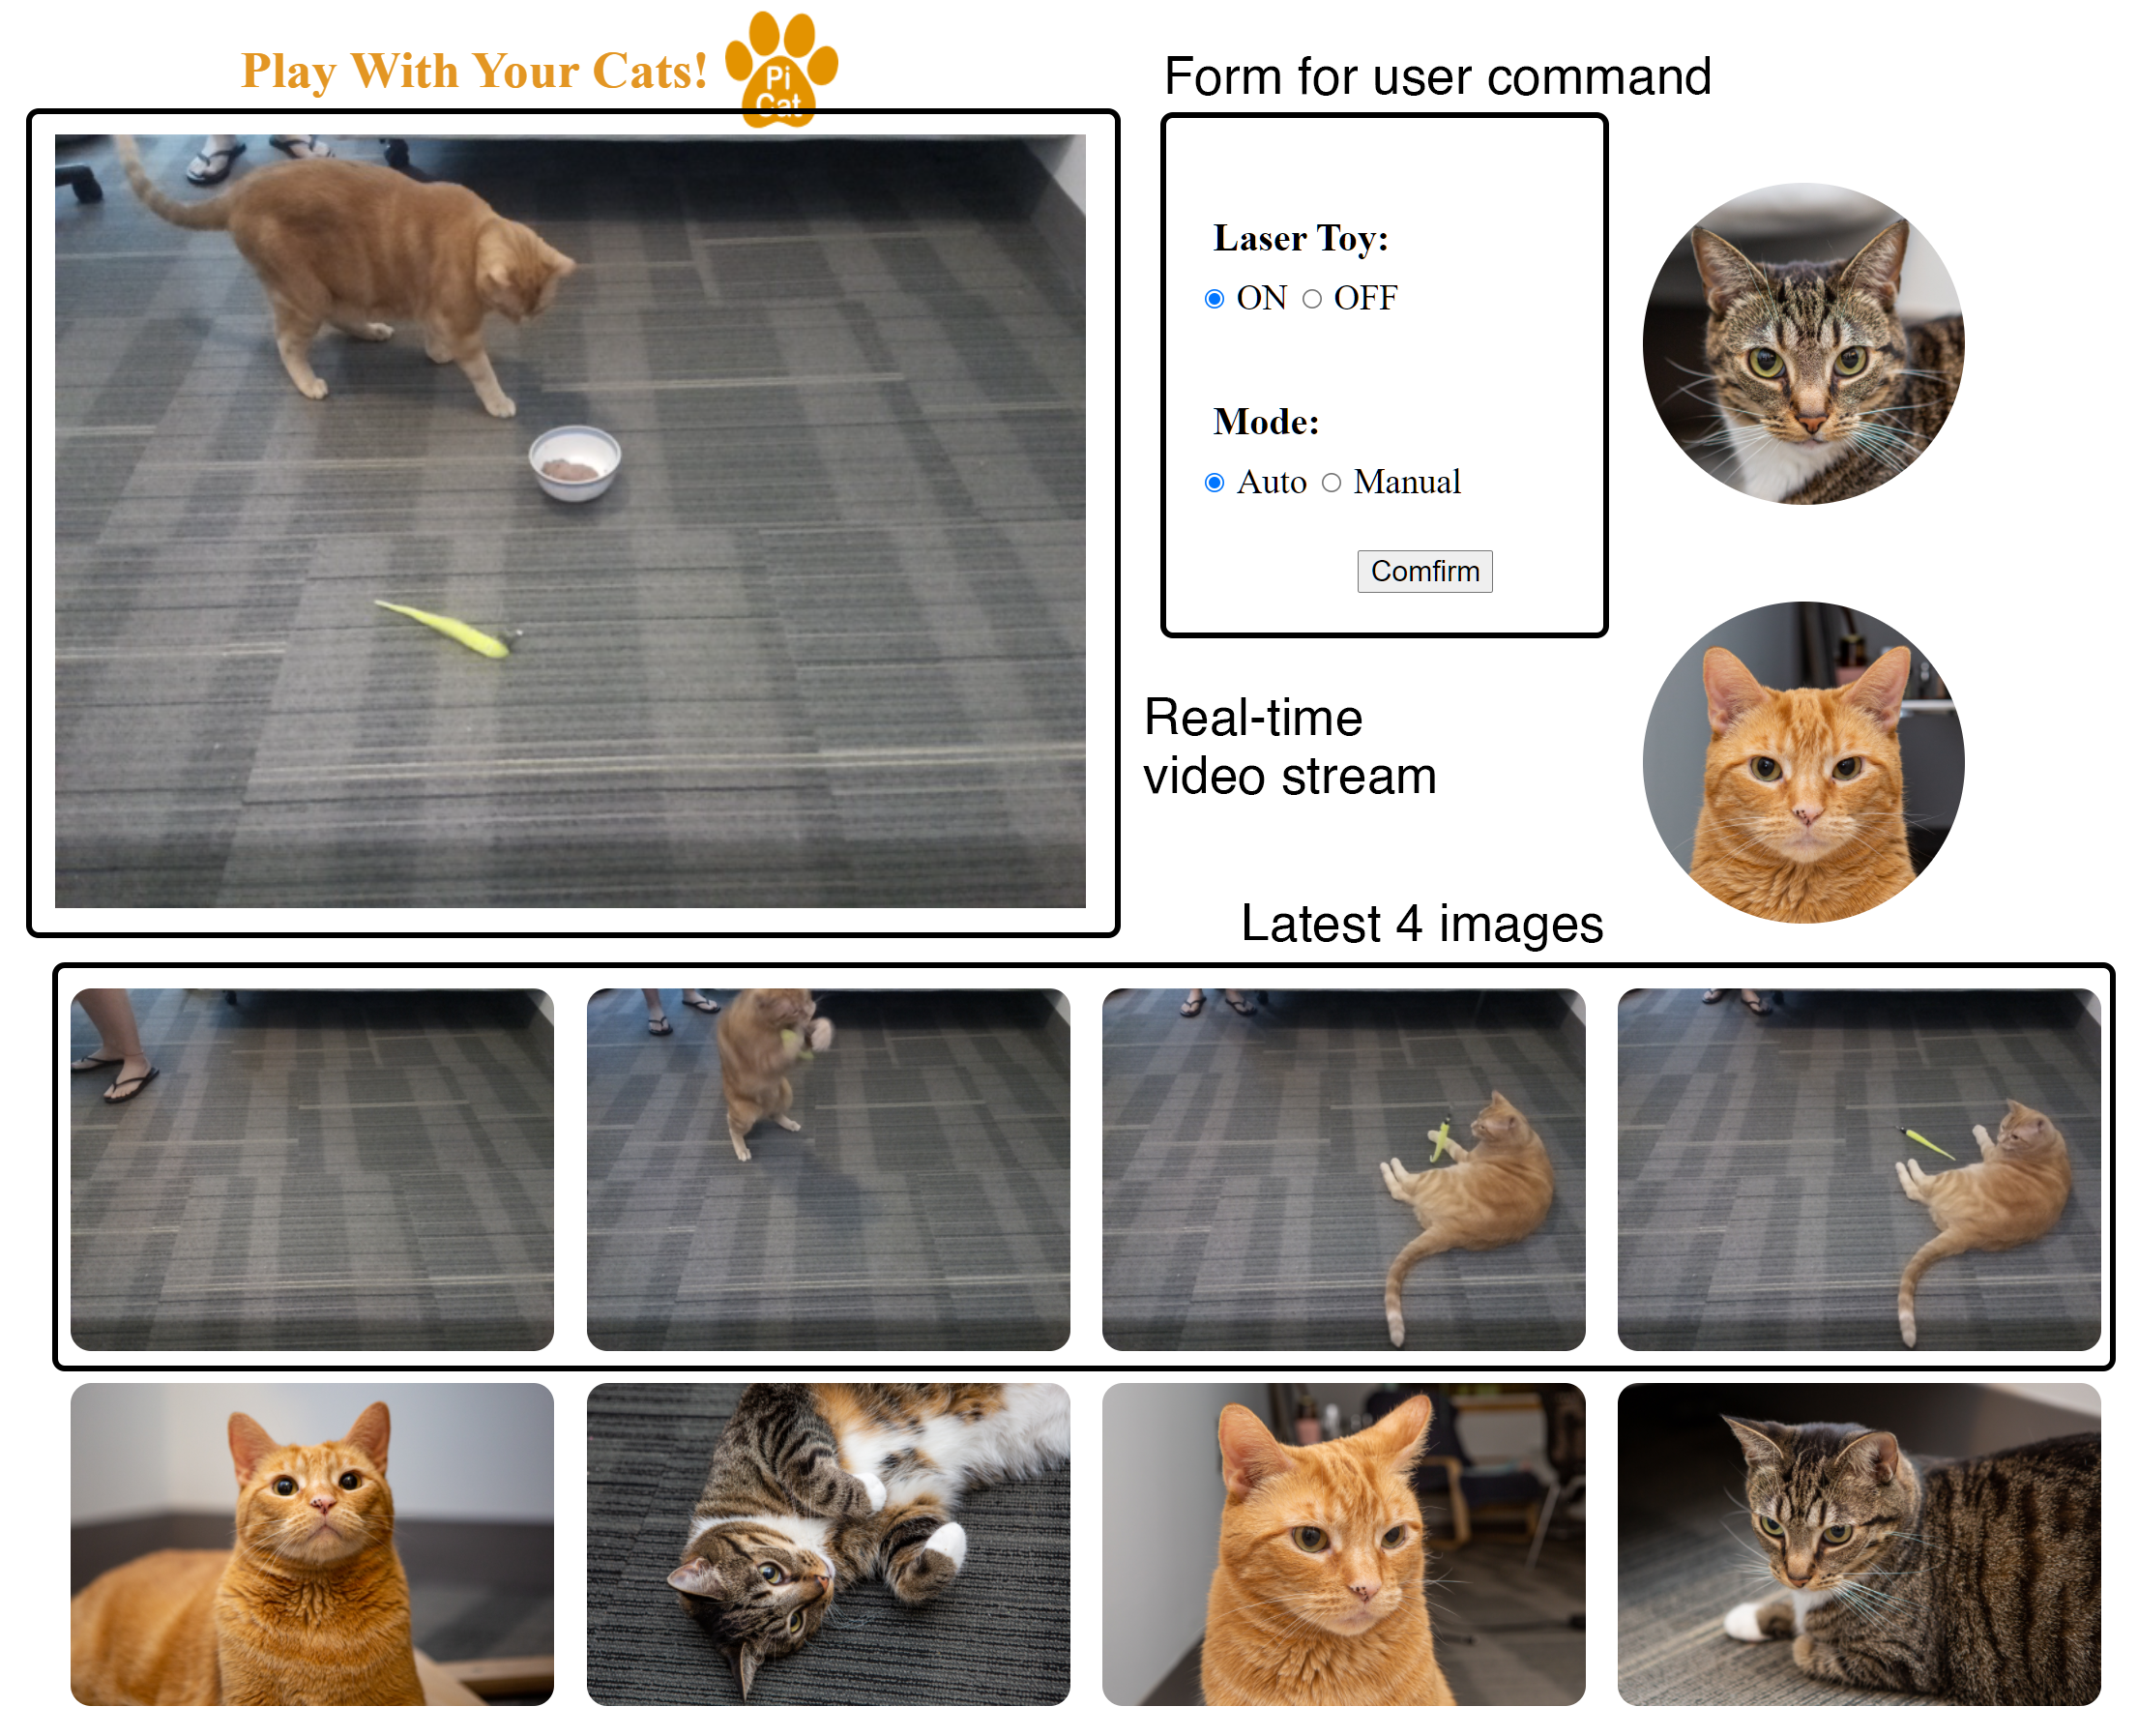
The video stream shows the real-time video from the PiCamera, we created the web video stream by following the documentation of PiCamera [7], and got the URL of the video, which can be directly put in an HTML file, using the following code.
img id = "video" onclick="mouseclick(event)" src="http://172.20.1.191:8000/stream.mjpg"
While the webserver streams video continuously,
the image recognition model we were using requires individual photos.
To save image frames from the video, we overwrote the service_actions()
function in the StreamingServer class and saved a new frame from
the stream every 0.5 second. During the testing, we discovered that the python
script running the computer vision model will report an exception if it attempts to read an
image while the same file is being overwritten by the server. To resolve the conflict,
we keep a buffer of the 3 most recent image frames and update them iteratively.
The model will only read the second last image, which will not be removed for at least the next 0.5 second.
The service_actions() function is shown below.
                def service_actions(self):
                  now = datetime.now()
                  timestamp = now.strftime('%Y%m%d_%H%M%S_%f')
                  img_list = os.listdir('img_buf')
                  img_list.sort()

                  camera.capture('img_buf/frame_' + timestamp + '.jpg', use_video_port=True)
                  if len(img_list) > 2:
                    os.remove('img_buf/' + img_list[0])
In the form for controlling the laser, the user can select whether to turn on the laser toy or not. The laser toy has auto and manual modes. In the auto mode, PiCat turns on the laser toy if it detects a cat with the camera, and then changes the position of the laser randomly according to the position of the cat detected. In order to prevent the laser from hitting the cat's eyes, the laser will only appear randomly near the edge of the cat's bounding box. If no cat is detected, the laser is automatically turned off. In the manual mode, the user can enter numbers in the text boxes or click the specific position in the video to change the position of the laser. All changes need to be made by clicking the confirm button. The input values will go back to the python file, and then be written into a text file control_mode.txt, which will be used in cat_detect.py to control the laser. The following code shows how to get the inputs from web server:
                @app.route('/save', methods=['POST'])
                def save():
                  dic = {"laser":"off", "mode":"manual", "x":"0", "y":"0"}
                  try:
                    dic["laser"] = request.form["laser"]
                    dic["mode"] = request.form["mode"]
                    dic["x"] = request.form["x"]
                    dic["y"] = request.form["y"]
                    with open('control_mode.txt', 'w') as f:
                      f.write(str(dic))
                  except:
                    with open('control_mode.txt', 'w') as f:
                      f.write(str(dic))
At the bottom of the website, we show the four most recent photos taken in photo mode. When a cat is detected, the photo mode is automatically turned on to take a picture every 20 seconds.
Cat Detection
We used
the yolov3-tiny model based on NNPACK to detect the cats.
NNPACK is an acceleration library for neural networks. It can run on
multicore CPUs and improve the performance of the yolov3-tiny model.
We followed the tutorial to install the NNPACK [8]. We encountered
some problems with the system environment. Because the author used an old version of the required libraries, we redownloaded the older version and finally installed it successfully.
We used a precompiled executable darknet.exe to
analyze the images using the yolov3-tiny model and the
related configuration files. The program outputs the objects detected as well as their
locations and dimensions. With our selected resolution (640 x 480), it took the program 0.6 second on average to analyze the image. During testing, we discovered that there was a chance that a cat would be detected as a dog or a teddy bear instead. Since the floor we were using to test our system is relatively clean with no other objects, we decided to detect any moving object instead of just the cat.
Laser Toy
To control the laser toy, we mapped the coordinates on an image captured by the PiCamera to the angles of the servos based on the field of view of the camera. Then, the angles are mapped to the duty cycles of the servo motors. The PWM signals to the servos are updated each time after the program finishes analyzing an image based on control mode, i.e., auto or manual.
Result & Conclusion
Overall, we accomplished our goal listed in the proposal. We displayed various information about our cats on the PiTFT, and users can play with their cats through the web server or by turning on the automatic play mode. At the same time, we detect the cat's position in real-time, prevent the laser pointer from shining into the cat's eyes and take a picture every 20 seconds.
The project was more complicated than we expected, and we encountered a lot of problems. We spent some time studying how to generate web video streams, how to get the input values from a web server, how to improve the running speed of yolov3-tiny, etc. We resolved most of the problems and got satisfactory results, but there are still some areas that deserve improvement. Please read future work for details.
Future Work
- During the test we found that the cat was not very interested in the laser toy. We think it may be because the cat prefers continuous laser movement. In the future, we may try to make the laser move continuously for a distance to attract the cat's attention.
- Currently our webserver can only be used in the same wifi network. In the future, we can build a website so that users can use PiCat no matter how far away they are.
- Running yolov3-tiny on the RPi is still very slow and the screen latency is obvious. In the future, we can try to train our own model specifically for cat detection or find a model that runs faster.
Work Distribution

Kunpeng Huang (ECE 21')
kh537@cornell.edu
Designed the hardware architecture and worked on cat detection. Tested the overall system.

Xinyi Yang (ECE 21')
xy98@cornell.edu
Designed the PiTFT and webserver and worked on cat detection. Tested the overall system.
Parts List
- Raspberry Pi
- Raspberry Pi Camera V2 $25
- Laser Diode - $5.95
- Servo motors * 2 - $5.5
- 3D Printer Materials -$4
Total: $40.45
References
Code Appendix
The code on the Github