ECE5725 Project: RaspberryPi-based Smart Translator
Spring 2020
By Jingwen Ye (jy879), Yuxiang long (yl3377).
Auto Translate Machine Demonstration Video
Project Objective:
- Translation is needed when people pay a visit to new counites with unlearned language. It is time consuming if we type in the sentences or words into the translators when we need translation.
- Hence, we hope to get text information from different kinds of input (such as images, voice and so on) instead of typing in them every time, which can bring a lot of convenience.
- Online Translation service is introduced since they have a better performance with Machine Learning training
Introduction
Our goal is designing an auto translation machine on R-Pi since recently, people all over the world are more willing to travel to different counties. Sometimes they cannot understand the local language on the sign, spoken language and so on.
They need a translator to help them to understand the language. Some e-dictionary or app on mobile phone has the function of translate, but most of them need the user to type the sentences or words by hand. It is easy to make mistakes and because
they do not understand the language, they do not know how to type in.
Some companies develop technology about AI to get information from pictures, audios and so on. For example, Google can use image as input and get result about for the image
and Siri in the iPhone can execute the corresponding instruction according to the user’s speaking. As a result, our project focus on making translation easier by extracting the text message from the picture taken by the camera using OCR technology
and send the text information into the interpreter API to translate it into the language we desire.
Also, the QR code is a hot technology recently and it can transform information in a private format. Some language information can be embedded in QR code. For example, for smart mobile phone, the account and key of WIFI can be shared by scanning
QR code without providing text information. However, someone who forget to bring smart phone cannot access Internet. Hence, we hope to get text information from QR code directly and if you want, we can translate it to another language.
In addition, we are also considering making it possible for the Raspberry pi to recognize the voice input and then extract the information from the voice and perform the translation instead of just relying on the camera. Embedded system
is a computing system which possesses the ability of executing a specific function and real-time computation. And this device will be designed to achieve the specific function of translation on the mobile device based on Raspberry Pi,
and we can import the voice into the device and it will give real-time response. Thus, we just need to carry this embedded device instead of carrying a heavy computer with us.
Design
The function of our project contains three main functions that focuses on performing language translation, which are image to text translation, voice to text translation, and the QR code translation.
Fig.1 Hardware design
Fig.2 Software design
Image to Text translation
The first function is the image to text translation, the user could take an image of the words or sentences that they want to translate, and then the piTFT will display the translated result. In order to do this, the text in the image need to firstly be extracted. As a result, an OCR (Optical Character Recognition) library need to be implemented here to recognize the text information in the image. The OCR library we chose to use is Tesseract, which is an open source engine. It has wrappers for different languages, and the wrapper we implemented in our program is pytesseract because the program is based on Python. In the beginning, pytesseract need to be installed on the raspberry pi. Then it can be called by our program. The operation procedure of this function is shown below in Figure 3.
Fig.3 Stage of Image Translation
The first stage is image taking, here we connect PiCamera to the raspberry pi and initialize the camera when function is called. Then the program will wait for the key press from the keyboard to take an image. When the specific key is pressed, the image will be taken and pytesseract will be used to extract the text from the image using the command “text = pytessearct.image_to_string(image)”. This command will return the extracted text and then the program will transfer to the third stage, which calls the Microsoft text translator API to translate the text into the specific language. In order to call the API and send request to the API, we need to specify the API key and the endpoint, so that the message could be successfully send to the API and the API could response with the result. Here we set the API key and the endpoint as the environment variable. So that the program could check the environment variable to see if the key and endpoint is correct. The language we want to translate to could also be specified by the user, we will discuss the language setting in the following section. Finally, the translate result will be displayed on the piTFT.
Voice to Text translation
The second function is the voice to text translation, the user could say some words or sentences through the microphone which is connected to the raspberry pi and the voice could be recorded and saved to a specific path. Then it is important to recognize the text content in the voice file. In order to perform voice recognition, we chose Google Speech-to-Text API, which could recognize more than 120 languages. It can also process real-time streaming or prerecorded audio. The operation procedure of this function is shown below in figure KK. In the first stage, the user could input voice through the microphone, which is connected to the raspberry pi. In order to realize this, the pyaudio will be firstly initialized. Meanwhile, the sampling rate and channel are set to be 44100 and 1 respectively. The reason that the channel need to be set as 1 is that pyaudio could only support single channel input. In order to start the recording, we implement button 17 to control the recording procedure. If the button 17 is pressed, which will pull down the GPIO 17, the recording will start and stop until the button 17 is released. The voice file will be saved and the state will transfer to the second stage. In this stage, the voice file will be sent to the Google speech-to-text API, then the API will response with the extracted text message. The text message will then be sent to the Microsoft text translator API and the translated result will be displayed on the piTFT.
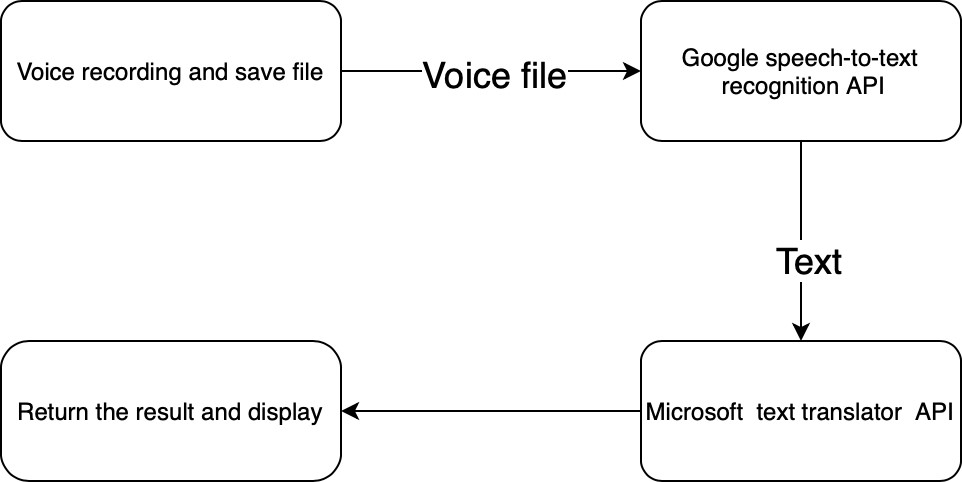
Fig.4 Stage of Voice Translation
QR code to Text translation
The third function is the QR code to text translation, this function will make it possible for the translator to recognize the QR code and response with the text information behind it. In order to recognize the QR code, we implemented pyzbar, which is a QR code recognition library that could be used in Python. This function is quite similar to the image translation function. Firstly, the user could take a image of the QR code, the stage taking procedure is same as the image translation function. Then the image will be saved to a specific path. Pyzbar will read in the image from that specific path and decode the image into text message using the command “pyzbar.decode(image)”, the command will return the extracted text message and the message will be sent to the Microsoft Translation API.
Translating Language setting
Our translator will also allow the user to modify the language they want to translate to by choosing the language from the language setting mode of our translator. The language we implemented into our translator are Chinese, Deutsch, Italian. The Microsoft Translation API could support more than 50 languages, we will add more languages into our translator in the future to support wider usage.
Testing
UI design of the translator
The UI design of our translator is shown below in figure 5, there are four buttons in the first level, “image-T”, “voice-T” and “QR_Scan” are the translation function buttons. If the user click “settings” button, the language will be set.
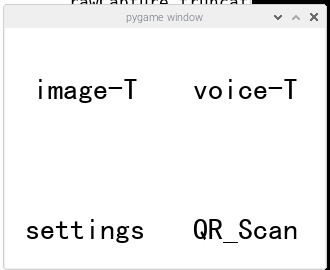
Fig.5 Our UI of project
Some problems appear in the progress of tesing. First, the operation of the mouse is not so sensitive and the program ran quite slowly. Then we found out that the execution of the program occupied most of the resources of the CPU.
The reason that caused this problem is that we didn’t add enough sleep time before the start of next iteration in Pygame UI, so that the loop just kept iterating all the time, and the mouse operation could not get enough resource.
When we tried to use piTFT, the piTFT had some problems and we found the error information as shown below in Figure 6. We guessed the piTFT was broken and could not be used as a touch screen(the functions of display is normal). The Reason that caused this
problem is that we left the outside connection of the piTFT in the air instead of connecting to the breadboard. So the pins of the piTFT got shorted and destroyed the chip that control the touchscreen.
We designed the UI for our whole project. It had a 3-level menu and we used 4 buttons. At first, a problem happened as shown below in Figure 7. But when we used the original document, no problem happened. The reason is we ran the original document, we used “python XXXX.py”
and the pytesseract is installed in the home/pi/lib and the UI version is run by “sudo python XXXX.py”, the library in usr/lib does not have this library. The way to solve this problem is by copying the tesseract file into the Python 2.7 file under
the usr/lib route.

Fig.6 piTFT error

Fig.7 sudo error
Image Translation test
First, we chose the image-T button, and the default language is Chinese. The program called the Picamera, a frame window would be initialized, as shown in figure 8. The text in the image is Accelerator and the result could be sent back and displayed on the piTFT, as shown in figure 9.
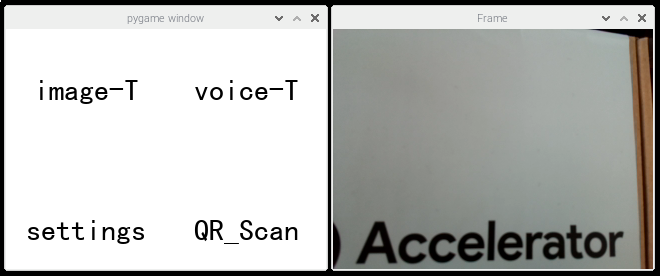
Fig.8 Take a photo
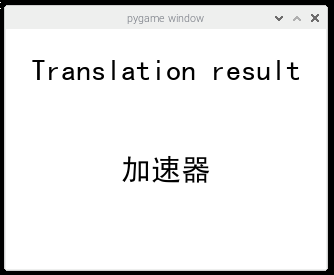
Fig.9 Return result
When we tested English, Chinese and Japanese in the tesseract program, it reported the “ascii” error of encoding and decoding . We found that some used text contained special letters and symbols and in
python it used ascii encode format as default. The solution to this problem is using UTF-8 encode format. We added a header clarifying using UTF-8 encode in this program to our program, and fixed this problem.
In the translation step of our program, the text received from Microsoft Service was in the format of JSON, so the result of translation showed “\n” . This is caused by “new line” coding in ascii, which is used in python. To solve this problem, we
deleted “\n” in the result of OCR and replaced it with a blank space, but the translation result with multiple paragraphs only has one paragraph. To solve this problem, we took a picture with one paragraph at a time.
Voice Translation test
After the image translation test was finished, we pressed the button 17 on the piTFT, the program went back to the first page. Then we chose voice-T button and started the test for the Voice translation. As shown below in figure 10, the program started voice recording as soon as the button 17 was pressed and stopped recording when button 17 was released. We said Good morning through the microphone and the translated text was successfully displayed on the piTFT, as shown below in figure 11.
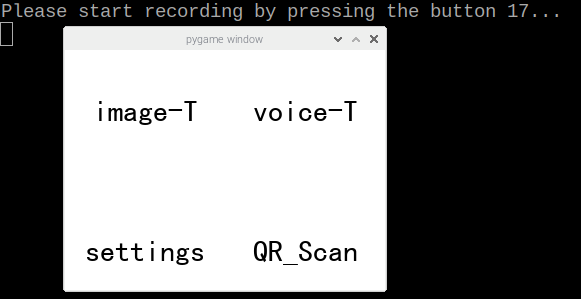
Fig.10 Prepare for recording
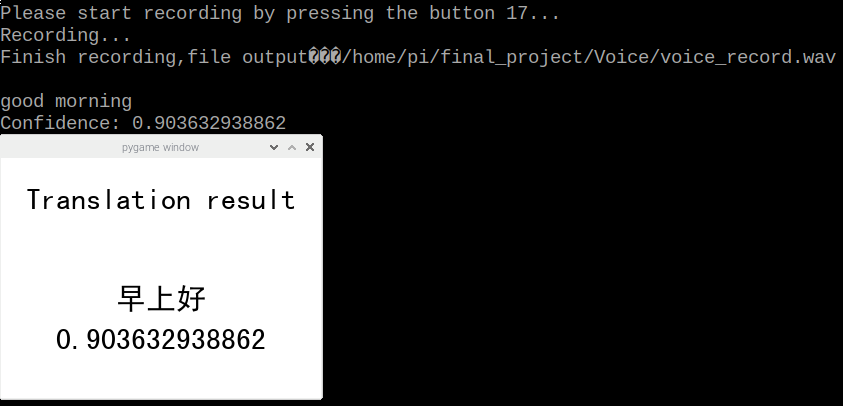
Fig.11 Return result
When we chose a speech recognition API for R-Pi, at first, we hoped to use the online API directly. However, almost all the speech recognition only provided SDK API and we had to give up the original method and choose this new method. Then, we chose Recognize speech from Microsoft Cloud Service and we thought this is a simple method. But the SDK of Cloud service requires the 64-bit Operating System and the Debian Ver.10 Operating System for R-Pi 3 B+ is a 32-bit system. Hence, we had to install Google-cloud service SDK. After initialization, we could get a text output from a voice input. In addition, we should upload the audio document in the format of wav with one voice channel and sample rate in range from 8000 to 48000.
QR Code Translation test
Then we began the test for QR Code translation. To begin with, we used a QR Code online generator to generate a QR code which contain “Hello World” text. Then we chose the third function “QR_Scan” and took an image of the QR Code, as shonwn in figure 12 Then the translated text was successfully displayed on the piTFT, as shown in figure 13.
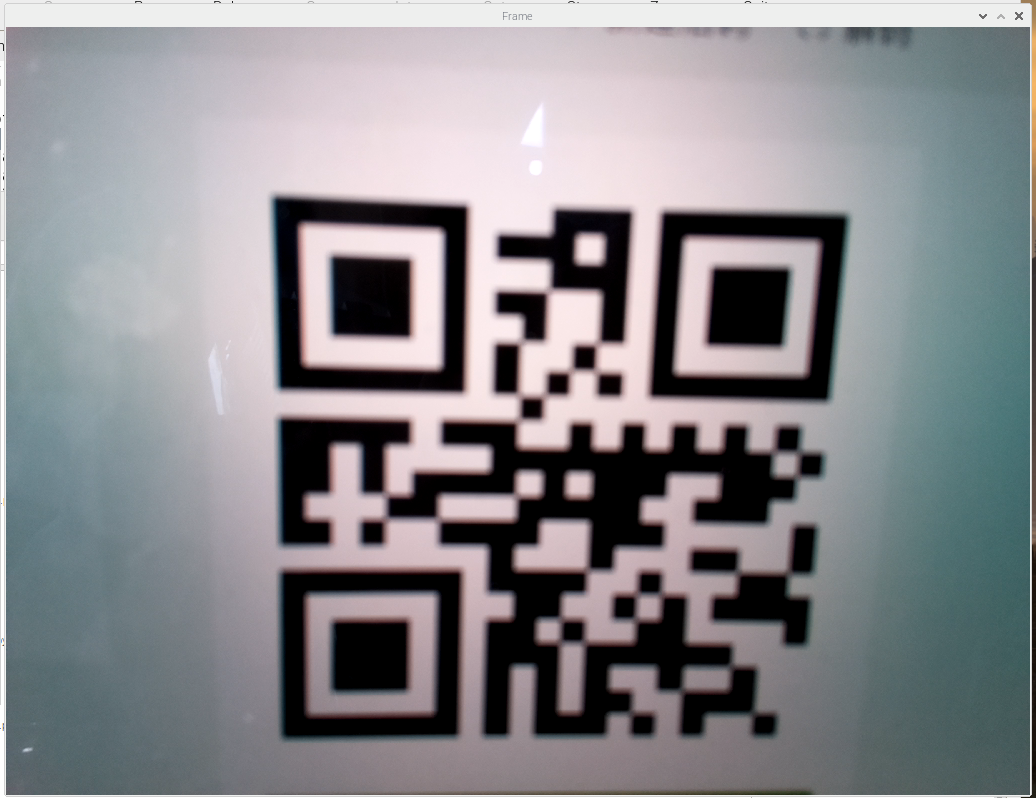
Fig.12 Scan QR code
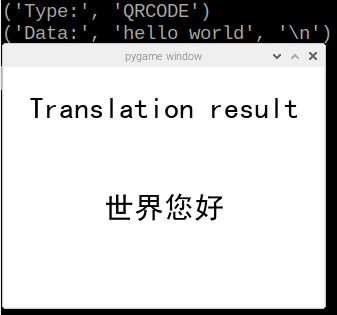
Fig.13 Return result
Language Setting test
The default language is Chinese, the user could select language from the “settings” button on the first page, the page button layout of the language setting page is shown below in figure 14. And the test result for both Deutsch and Italian are shown below in figure 15 and figure 16. The voice input is “Good Morning”.
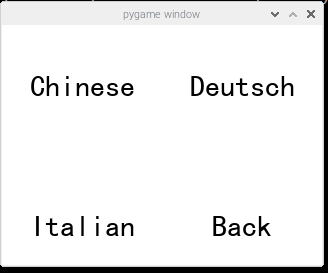
Fig.14 Menu of language
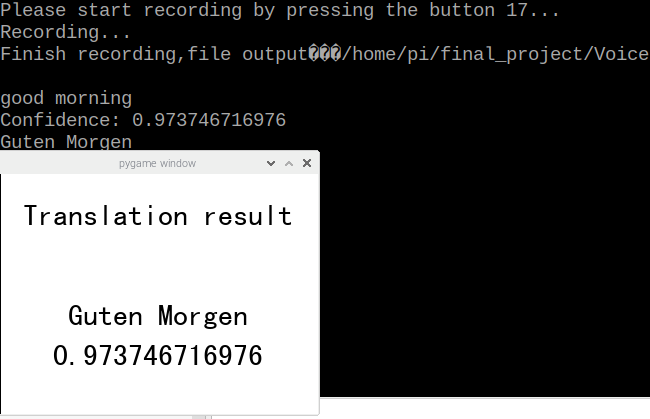
Fig.15 Deutsch
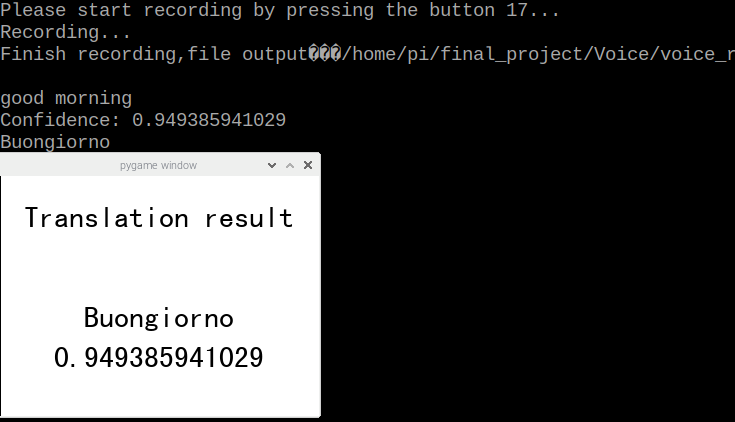
Fig.16 Italian
Result
We compiled the OpenCV “cmake” in our R-Pi, it took a lot of time to finish this process. But we found it was useless for us to do this step, we only imported the cv2 library in the Python program and installing OpenCV is enough.
All in all, the three translation function could perform accurate text recognition and translation. The language setting function could make the translator to have wider applications.
Although the translator has reached our expectation and our team has perfectly met the goal outlined in the description, there still remains a lot of improvement for us to do. We will keep
making the performance of our translator better in the future.
Conclusion & Future Work
In summary, all the three main functions and language selection function are successfully achieved. The UI could change the language without problem. Everything did work. We took image from packing box and the R-Pi system recognize text on its surfac
e and Microsoft returned correct translation result in different languages. We pressed button 17 and recorded voice and Google cloud service returned a reasonable result with the highest probability. Then, Azure translation service could turn back
the result of translation. At last, the system could scan the QR code effectively and it provided correct information for translating service. The shift between L1 menu and L2 menu were normal. In addition, the UI could run different functions
alternatively and for many times and the system showed no performance crash or jam.
In the future, we hope to take a image with more text. In our project, the piTFT can only show not many words. We have one idea to solve this problem. The first is that divide the OCR result in several sentences and send them to online translation
indecently for many times. Explore the scrolling function for piTFT just like mobile phone screen or scroll bar in the Laptop. Hence, the small piTFT can show more text at the same time.
The program actually runs normally with correct operations. But when we make some wrong operations, the program exit immediately without any warning. As a result, we plan to add more code about warning and show error to let users correct their mistakes.
For example, in the function of recording, if the audio document records a voice which is less than 3 seconds, Google cloud service will not receive this document and the program exit immediately. We can add the waring before program sends document
to Google and the user can know they make a mistake.
When we take the photo, the image and camera have angle. In addition, the environment for photographing is not ideal such as bad illumination. Hence, We need to calibrate the image by algorithm. The noise should be removed from image and the location
of image should be changed to a normal format. The following is an example.
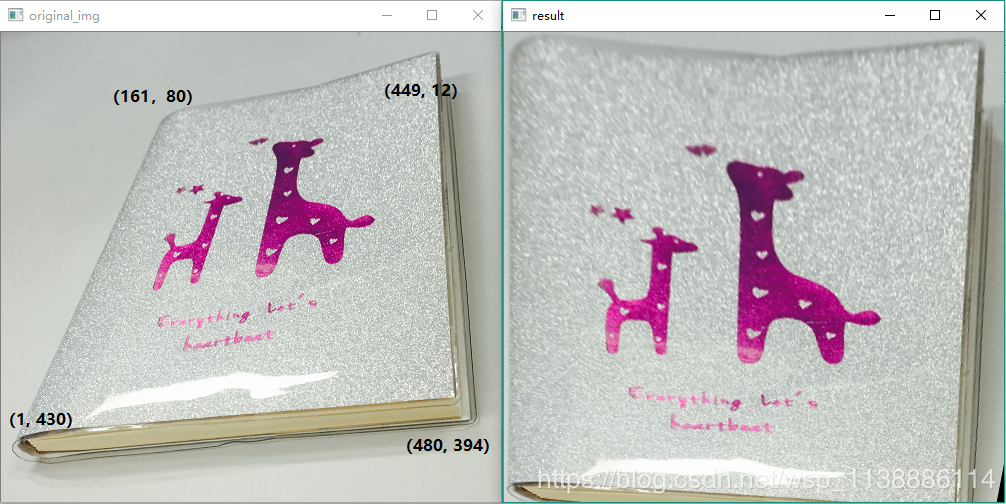
Fig.17 Image calibration
If we can achieve this function, taking photo will be easier and the system can give fewer errors about not ideal images.
In addition, in this project, we can translate English to 3 kinds of language. We hope to realize more languages but
for piTFT, different languages need the support from different kinds of font and the system provides limited several kinds of font. We need to find more kinds of uncommon font and add them to R-Pi system to achieve this seemingly simple task.
Work Distribution

Project group picture
Jingwen(Jack)
jy879@cornell.edu
Image translator by OCR.
Scan QR code based on Pyzbar.
Translation online service of Microsoft Azure.
Design the UI and display result on piTFT.
Record audio by PyAudio.
Yuxiang(Louis)
yl3377@cornell.edu
Record audio by PyAudio.
Speech recognition API of Google.
Display multiple languages on R-Pi and piTFT.
Design function of changing language.
Design the UI and display result on piTFT.
Record audio by PyAudio.
Parts List
- Raspberry Pi $35.00
- Raspberry Pi Camera V2 $25.00
Total: $60.00
References
PiCamera DocumentTurn your Raspberry Pi into a Translator with Speech Recognition and Playback
Optical Character Recognition (OCR) using Tesseract on Raspberry Pi
pyzbar 0.1.8
PyAudio 0.2.11
OpenCV 3.4
R-Pi GPIO Document
ECE5725 Project RaspberryPi-based Smart Camera "The Eye"
Pygame
Code Appendix
Our source code in Githubimage-text-translate_final.py
#!/usr/bin/env python
  #-*- coding: utf-8 -*-
  import cv2
  import pytesseract
  import os
  import pygame
  from pygame.locals import*
  import time
  import RPi.GPIO as GPIO
  import numpy as np
  from picamera.array import PiRGBArray
  from picamera import PiCamera
  import requests, uuid, json
  from pygame.locals import *
  import io
  import pyaudio
  import wave
  import sys
  import pyzbar.pyzbar as pyzbar
  # Imports the Google Cloud client library
  from google.cloud import speech
  from google.cloud.speech import enums
  from google.cloud.speech import types
  # Initial GPIO
  GPIO.setmode(GPIO.BCM)
  GPIO.setup(17, GPIO.IN, pull_up_down = GPIO.PUD_UP) # voice recording
  GPIO.setup(22, GPIO.IN, pull_up_down = GPIO.PUD_UP) # turn back to upper menu level
  GPIO.setup(23, GPIO.IN, pull_up_down = GPIO.PUD_UP)
  GPIO.setup(27, GPIO.IN, pull_up_down = GPIO.PUD_UP) # quit button

  #os.putenv('SDL_VIDEODRIVER','fbcon')
  #os.putenv('SDL_FBDEV','/dev/fb1')
  #os.putenv('SDL_MOUSEDRV','TSLIB')
  #os.putenv('SDL_MOUSEDEV','/dev/input/touchscreen')

  # Initial Pygame UI
  pygame.init()
  Clock = pygame.time.Clock()
  count = 0
  pygame.mouse.set_visible(True)
  WHITE = 255,255,255
  BLACK = 0,0,0
  screen = pygame.display.set_mode((320,240))
  # set the UI surface
  my_font = pygame.font.Font('/home/pi/final_project/simhei/SimHei.ttf', 30)
  my_buttons = {'image-T':(80,60),'voice-T':(240,60),'remain':(80,200),'quit':(240,200)}
  screen.fill(WHITE) #Erase the work space
  rectList = []
  surList = []

  global language
  language = '&to=zh'

  for my_text, text_pos in my_buttons.items():
      text_surface = my_font.render(my_text, True, BLACK)
      surList.append(text_surface)
      rect = text_surface.get_rect(center=text_pos)
      rectList.append(rect)
      screen.blit(text_surface, rect)

  pygame.display.flip()

  def quit():
      global code_running
      code_running = False
  # take a picture and translate the text in image
  def ImageTrans():
      camera = PiCamera()
      camera.resolution = (320, 240)
      camera.framerate = 30
      rawCapture = PiRGBArray(camera, size=(320, 240))
      flag = True # true

      for frame in camera.capture_continuous(rawCapture, format="bgr", use_video_port=True):
          image = frame.array
          cv2.imshow("Frame", image)
          key = cv2.waitKey(1) & 0xFF
          rawCapture.truncate(0)

          if key == ord("s"):
              text = pytesseract.image_to_string(image).encode('utf-8','ignore')
              print(text)
              cv2.imshow("Frame", image)
              cv2.waitKey(0)
              break

      key_var_name = 'TRANSLATOR_TEXT_SUBSCRIPTION_KEY'
      if not key_var_name in os.environ:
          raise Exception('Please set/export the environment variable: {}'.format(key_var_name))
      subscription_key = os.environ[key_var_name]

      endpoint_var_name = 'TRANSLATOR_TEXT_ENDPOINT'
      if not endpoint_var_name in os.environ:
          raise Exception('Please set/export the environment variable: {}'.format(endpoint_var_name))
      endpoint = os.environ[endpoint_var_name]

      path = '/translate?api-version=3.0'
      params = language
      constructed_url = endpoint + path + params

      headers = {
          'Ocp-Apim-Subscription-Key': subscription_key,
          'Content-type': 'application/json',
          'X-ClientTraceId': str(uuid.uuid4())
      }
      text = text.replace('\n','')
      body = [{
          'text': text
      }]

      request = requests.post(constructed_url, headers=headers, json=body)
      response = request.json()
      json_string = json.dumps(response, sort_keys=True, indent=4,
                   ensure_ascii=False, separators=(',', ': '))
      json_string = json_string.encode('utf-8')
      s1 = json_string.replace("[","").replace("]","")
      s2 = json.loads(s1)
      translated_result = s2["translations"]["text"]
      translated_result = translated_result.encode('utf-8')
      print(translated_result)
      camera.close()
      cv2.destroyAllWindows()
      return translated_result
  # record the voice and translate the text in audio
  def Voicetrans():

      global stream
      global p
      # hide the wrong information
      os.close(sys.stderr.fileno())
      BUTT = 17    # GPIO 17, the button that start recording when pressed
      # the button voltage become low when pressed
      # CHUNK could be intepreted as data package or pieces
      CHUNK = 512
      FORMAT = pyaudio.paInt16
      RATE = 44100  # 44100 samples/second, sampling rate
      WAVE_OUTPUT_FILENAME = "/home/pi/final_project/Voice/voice_record.wav"
      print('Please start recording by pressing the button 17...')
      GPIO.remove_event_detect(17)
      GPIO.wait_for_edge(BUTT, GPIO.FALLING)
      # To use PyAudio, first instantiate PyAudio using pyaudio.PyAudio(), which sets up the portaudio system.
      p = pyaudio.PyAudio()
      stream = p.open(format = FORMAT,
                      channels = 1,
                      rate = RATE,
                      input = True,
                      frames_per_buffer = CHUNK)
      print("Recording...")
      # Recoding when button pressed, and stop when button released
      frames = []
      while GPIO.input(BUTT) == 0:
          data = stream.read(CHUNK)
          frames.append(data)
      print("Finish recording,file output:" + WAVE_OUTPUT_FILENAME + '\n')
      stream.stop_stream()
      stream.close()
      p.terminate()

      wf = wave.open(WAVE_OUTPUT_FILENAME, 'wb')
      wf.setnchannels(1)
      wf.setsampwidth(p.get_sample_size(FORMAT))    # Returns the size (in bytes) for the specified sample format.
      wf.setframerate(RATE)
      wf.writeframes(b''.join(frames))
      wf.close()

      client = speech.SpeechClient()
      # The name of the audio file to transcribe
      file_name = os.path.join(
          os.path.dirname(__file__),
          '/home/pi/final_project/Voice/voice_record.wav')
      # Loads the audio into memory
      with io.open(file_name, 'rb') as audio_file:
          content = audio_file.read()
          audio = types.RecognitionAudio(content=content)

      config = types.RecognitionConfig(
          encoding=enums.RecognitionConfig.AudioEncoding.LINEAR16,
          sample_rate_hertz=44100,
          language_code='en-US')

      # Detects speech in the audio file
      response = client.recognize(config, audio)

      for result in response.results:
          print(format(result.alternatives[0].transcript))
          print('Confidence: {}'.format(result.alternatives[0].confidence))
      text = format(result.alternatives[0].transcript)
      key_var_name = 'TRANSLATOR_TEXT_SUBSCRIPTION_KEY'
      if not key_var_name in os.environ:
          raise Exception('Please set/export the environment variable: {}'.format(key_var_name))
      subscription_key = os.environ[key_var_name]

      endpoint_var_name = 'TRANSLATOR_TEXT_ENDPOINT'
      if not endpoint_var_name in os.environ:
          raise Exception('Please set/export the environment variable: {}'.format(endpoint_var_name))
      endpoint = os.environ[endpoint_var_name]

      path = '/translate?api-version=3.0'
      params = language
      constructed_url = endpoint + path + params
      headers = {
          'Ocp-Apim-Subscription-Key': subscription_key,
          'Content-type': 'application/json',
          'X-ClientTraceId': str(uuid.uuid4())
      }
      text = text.replace('\n','')
      body = [{
          'text': text
      }]

      request = requests.post(constructed_url, headers=headers, json=body)
      response = request.json()
      json_string = json.dumps(response, sort_keys=True, indent=4,
                   ensure_ascii=False, separators=(',', ': '))
      json_string = json_string.encode('utf-8')
      s1 = json_string.replace("[","").replace("]","")
      s2 = json.loads(s1)
      translated_result = s2["translations"]["text"]
      translated_result = translated_result.encode('utf-8')
      print(translated_result)
      return translated_result,format(result.alternatives[0].confidence)
  # scan QR code and translate text in QR code
  def QR_recog( ):
      camera = PiCamera()
      camera.resolution = (1024, 768)
      camera.framerate = 30
      rawCapture = PiRGBArray(camera, size=(1024, 768))

      for frame in camera.capture_continuous(rawCapture, format="bgr", use_video_port=True):
          image = frame.array
          cv2.imshow("Frame", image)
          key = cv2.waitKey(1) & 0xFF
          rawCapture.truncate(0)

          if key == ord("s"):
              cv2.imshow("Frame", image)
              cv2.imwrite('test.png',image)
              cv2.waitKey(0)
              break

      image = cv2.imread("test.png")
      decodedObjects = pyzbar.decode(image)

      for obj in decodedObjects:
          print("Type:", obj.type)
          print("Data:", obj.data, "\n")
      text = obj.data
      cv2.imshow("Frame", image)
      cv2.waitKey(0)

      key_var_name = 'TRANSLATOR_TEXT_SUBSCRIPTION_KEY'
      if not key_var_name in os.environ:
          raise Exception('Please set/export the environment variable: {}'.format(key_var_name))
      subscription_key = os.environ[key_var_name]

      endpoint_var_name = 'TRANSLATOR_TEXT_ENDPOINT'
      if not endpoint_var_name in os.environ:
          raise Exception('Please set/export the environment variable: {}'.format(endpoint_var_name))
      endpoint = os.environ[endpoint_var_name]

      path = '/translate?api-version=3.0'
      params = language
      constructed_url = endpoint + path + params

      headers = {
          'Ocp-Apim-Subscription-Key': subscription_key,
          'Content-type': 'application/json',
          'X-ClientTraceId': str(uuid.uuid4())
      }
      text = text.replace('\n','')
      body = [{
          'text': text
      }]

      request = requests.post(constructed_url, headers=headers, json=body)
      response = request.json()

      json_string = json.dumps(response, sort_keys=True, indent=4,
                   ensure_ascii=False, separators=(',', ': '))
      json_string = json_string.encode('utf-8')
      s1 = json_string.replace("[","").replace("]","")
      s2 = json.loads(s1)
      translated_result = s2["translations"]["text"]
      translated_result = translated_result.encode('utf-8')
      print(translated_result)
      camera.close()
      cv2.destroyAllWindows()
      return translated_result

  code_running=True
  x = -1
  y = -1
  while code_running :
      time.sleep(0.1)
      x = -1
      y = -1
      my_buttons = {'image-T':(80,60),'voice-T':(240,60),'settings':(80,200),'QR_Scan':(240,200)}
      screen.fill(WHITE) #Erase the work space

      for my_text, text_pos in my_buttons.items():
          text_surface = my_font.render(my_text, True, BLACK)
          surList.append(text_surface)
          rect = text_surface.get_rect(center=text_pos)
          rectList.append(rect)
          screen.blit(text_surface, rect)

      pygame.display.flip()

      for event in pygame.event.get():
          if(event.type is MOUSEBUTTONDOWN):
              pos = pygame.mouse.get_pos()
          elif(event.type is MOUSEBUTTONUP):
              pos = pygame.mouse.get_pos()
              x,y = pos

      if (y > 40 and y < 80 and x > 40 and x < 120):
          flag_s = True
          translated_text = ImageTrans()
          while (flag_s):
              x = -1
              y = -1
              time.sleep(0.01)
              my_result = {translated_text:(160,140),'Translation result':(160,40)}
              rectList2 = []
              surList2 = []
              screen.fill(WHITE) #Erase the work space
              for my_text, text_pos in my_result.items():
                  my_text = my_text.decode(encoding='UTF-8')
                  text_surface = my_font.render(my_text, True, BLACK)
                  surList2.append(text_surface)
                  rect = text_surface.get_rect(center=text_pos)
                  rectList2.append(rect)
                  screen.blit(text_surface, rect)
              pygame.display.flip()

              if(not GPIO.input(22)): # go back to the first page
                  flag_s = False

              if(not GPIO.input(27)): # exit the program
                  flag_s = False
                  code_running = False

      elif (y > 40 and y < 80 and x > 200 and x < 280):
          text,confidence = Voicetrans()
          flag_s = True
          while (flag_s):
              x = -1
              y = -1
              my_result = {text:(160,140),confidence:(160,180),'Translation result':(160,40)}
              rectList2 = []
              surList2 = []
              screen.fill(WHITE) #Erase the work space
              for my_text, text_pos in my_result.items():
                  my_text = my_text.decode(encoding='UTF-8')
                  text_surface = my_font.render(my_text, True, BLACK)
                  surList2.append(text_surface)
                  rect = text_surface.get_rect(center=text_pos)
                  rectList2.append(rect)
                  screen.blit(text_surface, rect)
              pygame.display.flip()

              if(not GPIO.input(22)): # go back to the first page
                  flag_s = False

              if(not GPIO.input(27)): # exit the program
                  flag_s = False
                  code_running = False
      elif (y > 180 and y < 220 and x > 40 and x < 120): #language change
          flag_s = True
          while (flag_s):
              x = -1
              y = -1
              time.sleep(0.01)
              language_sel = {'Chinese':(80,60),'Deutsch':(240,60),'Italian':(80,200),'Back':(240,200)}
              screen.fill(WHITE) #Erase the work space

              for my_text, text_pos in language_sel.items():
                  text_surface = my_font.render(my_text, True, BLACK)
                  surList.append(text_surface)
                  rect = text_surface.get_rect(center=text_pos)
                  rectList.append(rect)
                  screen.blit(text_surface, rect)

              pygame.display.flip()

              for event in pygame.event.get():
                  if(event.type is MOUSEBUTTONDOWN):
                      pos = pygame.mouse.get_pos()
                  elif(event.type is MOUSEBUTTONUP):
                      pos = pygame.mouse.get_pos()
                      x,y = pos
              if (y > 40 and y < 80 and x > 40 and x < 120):
                  language = '&to=zh'
              elif (y > 40 and y < 80 and x > 200 and x < 280):
                  language = '&to=de'
              elif (y > 180 and y < 220 and x > 40 and x < 120):
                  language = '&to=it'
              elif (y > 180 and y < 220 and x > 200 and x < 280):
                  flag_s = False
              if(not GPIO.input(22)): # go back to the first page
                  flag_s = False

              if(not GPIO.input(27)): # exit the program
                  flag_s = False
                  code_running = False
      elif (y > 180 and y < 220 and x > 200 and x < 280): # QR_code scanning
          QR_text = QR_recog()
          flag_s = True
          while (flag_s):
              time.sleep(0.01)
              x = -1
              y = -1
              my_result = {QR_text:(160,140),'Translation result':(160,40)}
              rectList2 = []
              surList2 = []
              screen.fill(WHITE) #Erase the work space
              for my_text, text_pos in my_result.items():
                  my_text = my_text.decode(encoding='UTF-8')
                  text_surface = my_font.render(my_text, True, BLACK)
                  surList2.append(text_surface)
                  rect = text_surface.get_rect(center=text_pos)
                  rectList2.append(rect)
                  screen.blit(text_surface, rect)
              pygame.display.flip()

              if(not GPIO.input(22)): # go back to the first page
                  flag_s = False

              if(not GPIO.input(27)): # exit the program
                  flag_s = False
                  code_running = False

      if(not GPIO.input(27)):
          code_running = False
          flag_s = False
          print("physical button")