SmartKart - Your Ultimate Shopping Assistant!
ECE 5725 (Spring 2020)
May 20, 2020
Aditya Shah(as2564) & Caroline Azadze(cea95) & Pooja
Menon(pjm355)

ECE 5725 (Spring 2020)
May 20, 2020
Aditya Shah(as2564) & Caroline Azadze(cea95) & Pooja
Menon(pjm355)
The ShopBot is our take on the cashierless shopping experience! The idea was inspired by the Amazongo cashierless shops available is selected states across the country. We wanted to make something similar and portable for an experience as such. The smartKart was made using the Raspberry-Pi as the central processor with the Pi-camera attached on the shopping basket to detect objects continuously.
With a combination of Haar Cascade Classifiers, trained to detect specific objects and Scale-invariant Feature Transform(SIFT), we accurately detect objects as the user puts them in or takes them out of the shopping basket in real time. The objects placed in the cart are displayed on the interactive Pi TFT screen, along with their costs and quantity. To give the users an enhanced shopping experience, we have also enabled a touch checkout button on the Pi TFT screen that would send the user an email of the items purchased during their visit.
.png)
We initially planned to use a pretrained Neural Networks such as Convolutional Neural Network or Yolo to detect objects, due to their high accuracy and robustness. On running one such model on the Pi, we got an error message stating that the model needed to use 110% of the current memory that the Pi provided. So, even with Virtual Memory support available, we needed to scale down the method we used to detect the object.
We then came across TinyYolo, which is a model based on Darknet, a neural network framework written in C and CUDA. This gave average results, but took about 30 seconds to run the detection. We needed to improve the accuracy, and we definitely needed to improve the speed.
We decided to explore Haar Cascades, and also started training object logos, as opposed to training the entire object. This was because object logos have more features that are detectable by commonly used Machine Learning and Computer Vision Techniques.
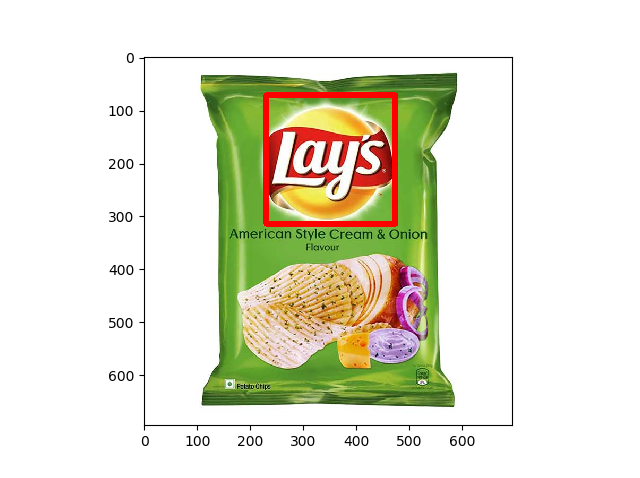
Our current model uses a combination of Haar Cascade Classifiers and SIFT(Scale Invariant Feature Transform) to detect objects. For training the Haar Cascade model, we provide it with positive images(Containing the object of choice), and negative images (which does not have any of the objects being trained in them). The classifier uses a convolutional kernel to extract features of the object during training. For detection, the features are grouped into multiple stages of classifiers and applied one-by-one.
If a test object meets most of the qualities of the features, then it will be classified as that object by the Haar cascade classifier. For this project, we had 6 trained Haar Cascade Classifiers, one for each of the objects we wanted to detect. We began by training more classifiers of course but the Haar Classifier is not very effective for some items. To get a good classification, the object to be trained need to possess special interesting features since the Haar Cascade also uses K Nearest Neighbour (KNN) in its detection.
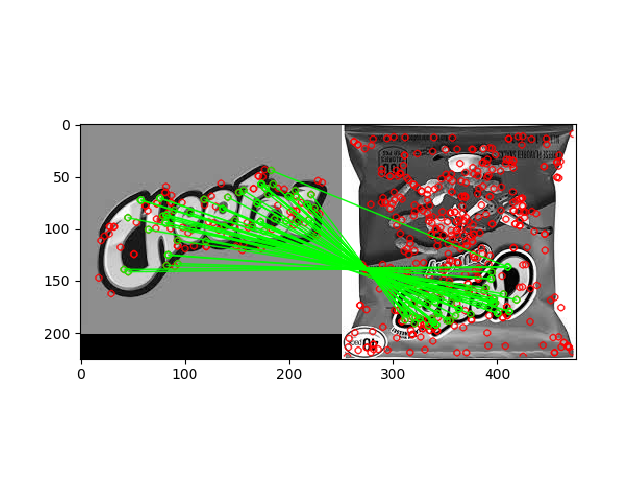
SIFT is a method that detects features in an image by localizing keypoints, making them invariant to orientation, lighting and other transforms. It then matches keypoints to those in another image. For the SIFT detection, we needed images of the items which is then passed to the SIFT function together with the image from the Pi Camera for comparison.
For the detection, we took a snap of the basket containing the objects and then save that image on the RPi. We then run our 6 processes to detect the items. For each process, the model called will read the image that was saved by the first part of the detection code and will try to identify on of the objects. The object detection algorithm returns a True or False if an item was detected or not and the information is used to populate the correct arrays with the item type and quantity detected.
The detected object's information are then displayed on the PiTFT, and are constantly updated on every iteration of the detection code. This ensures that if the user were to remove a particular product, it would not be detected in the next few iterations and would not be displayed on the screen anymore.
We maintain a history of the most recent 4 detections for each object. After every iteration, we remove the oldest detection for that object, and append the most recent detection result to the array. An object is deemed to have been detected, if it has been detected positively 3 or more times of the last 4 times. This method helps prevent sudden and unnecessary fluctuations in the display. However, it also took some time to show a detected item for the first time or if an item is removed, it takes some time to update the screen.Although, this does not cause any problems with the functioning of the detection.
In order to speed up the computation, we thought of resizing the image captured by the Pi camera to be smaller. However, that failed to give a good number of matches with SIFT, because the resized (50,50) image had features that were too small to be distinctly detectable. So, we reverted back to using the original size of the images captured. To speed up the computation, we decided to use the computational power of the Pi's multiple cores through the multiprocessing library.
The Rapberry Pi 3 model B which was used to for the smartKart is built with a 1.2 GHz 64-bit quad-core ARM processor. Which means that we can run four process at the same time on the Rapsberry Pi from start to finish. Since we had to detect each object using their corresponding Haar Cascade Classifier and/or SIFT, we decided to utilize the quad-core processor and speed up the detection process. By doing so, we were able to run the detection about 2 times faster than with a for-loop or multiple if statements. This enabled us to get the information we needed in a short amount of time to determine if an object was present or not.
To run processes concurrently, we needed to import the concurrent.futures library which is a standard library in Python. We used that as our executor to run the 6 detection processes as shown in the code snippet below. Know that this has more code lines and could be reduced to a single line by using map instead of submit.
          #create Multiprocessing
          with cf.ProcessPoolExecutor() as executor:
            f0= executor.submit(object_detector,item_list[0])
            f1= executor.submit(object_detector,item_list[1])
            f2= executor.submit(object_detector,item_list[2])
            f3= executor.submit(object_detector,item_list[3])
            f4= executor.submit(object_detector,item_list[4])
            f5= executor.submit(object_detector,item_list[5])

            f= [f0.result(),f1.result(),f2.result(),f3.result(),f4.result(),f5.result()]
In the above code, we have 6 processes running but since we have only 4 processors on the RPi, 2 of the processes will have to wait for 4 processes to run and then they can run. Due to this, the processes do not complete their run time at the same time. The latter processes add to the total time it took to run the entire process that is why we could only reduce the time taken by half. Also. some of the detections use either Haar Cascade or SIFT and others use both which is also a contributing factor since all the processes do not have the same lines of code and tasks to perform. So some of the processes took more time than others. The following diagram shows the stages of running the quad-core processor with 6 processes.
| Processes | 1 | 2 | 3 | 4 | 5 | 6 | 7 |
|---|---|---|---|---|---|---|---|
| Process 1 | F | D | X | M | W | ||
| Process 2 | F | D | X | X | M | W | |
| Process 3 | F | D | X | M | W | ||
| Process 4 | F | D | X | X | M | W | |
| Process 5 | F | D | X | X | M | W | |
| Process 6 | F | D | X | M | W |
Table 1. The table shows the stages of the processes as they go through the quad-core processor in the RPi.The processes with two X stages are ones that need to run detections of the Haar Cascade and the SIFT and the ones with one X stage are just Haar Classifier or SIFT. This is not exactly how it is in the Pi but to serve as a pictorial representation. F is fetch stage, D is decode stage, X is execute stage, M is memory stage, W is write stage.
To enhance user experience, we decided to send an email to the user on pressing the checkout button. To do so, we had to set up a connection to a Simple Mail Transfer Protocol (SMTP) server for Gmail on the Pi. To enhance security, we were given an application specific password that would enable us to login to the email when needed by the application. When the user press the checkout button, the mail server is setup and the item list and details are formated and sent as a receipt to the email of the user. This function may serve as a log keeping for the user to keep track of items purchased within a period of time such as weeks or months.

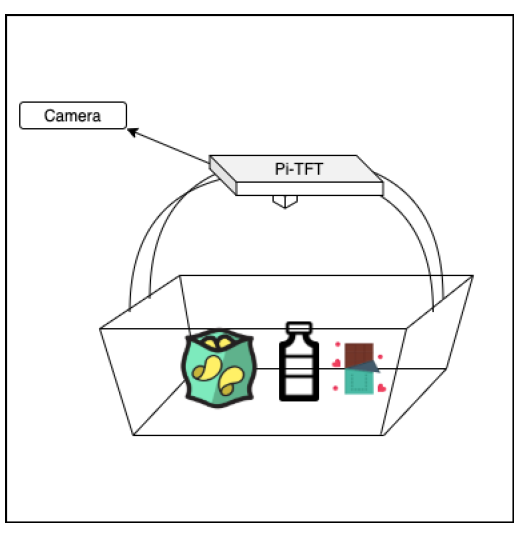
The Raspberry Pi and the Pi TFT was mounted on the handle of a shopping basket with the Pi camera attached to the bottom. A portable power bank was used to power the RPi module. The camera is used to capture images for detection and classification of an item placed in the basket. We are using a Pi-TFt to display the outputs of our detection, and it also acts as a interactive user interface with multiple levels.
The smartKart has been designed in such a way that the user can decide when he/she wants to start shopping by clicking on the start button on the Pi-Tft. The second level displays the price and quantities of the items in the cart in real time. The consumer can finally complete shopping by clicking on the checkout button which will send the consumer a receipt on their email id and go back to the intial level(i.e. start button). On the external buttons on the RPi there is a quit button that stops the program entirely. For convenience, the program is made to start back on on rebooting the system.
We were successful in implementing all the goals we had thought of for the project. The training of the object detection code was challenging but we were able to find a combination (Haar and SIFT) that provided reliable accuracy. Futhermore, we realised that the speed of each detection cycle was slow for real time detection, thus to increase speed with multicore processing. In conclusion, SmartKart is an user friendly smart shopping bot that helps the consumer to shop on the go, without wasting time standing in long queues and this was possible through highly advanced machine learning and computer vision algorithms.
We have a lot of scope for extending the project and making it scalable for real world use. As of now, we are running the Haar/SIFT code corresponding to each item in the database as a process. Naturally, if we were to scale this to the real world, even with multiprocessing, our speeds would slow down. We could look at ways of making this more scalable.
We might have to include an accelerator to speed up the image caption so we can process more frames per second. It would also be good to have a single machine learning algorithm that would be able to identify multiple items at a time so as to increase the speed of detection.
Another factor we could use would be to use multiple cameras that take images at fixed intervals, and run the code on images captured from a particular camera on a particular core. This would speed up the rate at which we get results from the cameras as a whole. We could also add a feature to allow the user to manually add an item if it was not detected (or remove an item that was falsely detected). This would improve the user experience.
Another crucial addition woud be to add accesss to a payment gateway, and allow the user to input payment details. Finally, we can improve the object detection techniques and reduce chances of missing the object due to items being piled on top of each other.

Trained Haar Cascades to detect objects, implemented multiprocessing, hardware setup and testing, and compiled and edited project demo film.

Worked on the Pi-Tft pipeline alongside Aditya. Trained the Haar classifier to detect a couple of objects and compared the results with SIFT.

Designed the pipeline for user interaction and screen displays to the object detection and impementation of the mail server. Worked on using SIFT to complement the Haar cascades.
| Part Name | Part Description | Site | Quantity | Unit Price | Total |
|---|---|---|---|---|---|
| Raspberry-Pi | Central controller | Provided in lab | 1 | $35 | $35 |
| Raspberry-Pi camera | Camera | Provided in lab | 1 | $19.95 | $19.95 |
| Pi-Tft | Display Interface | Provided in lab | 1 | $32 | $32 |
| 5V RPi Battery | Rechargable battery bank | Provided in lab | 1 | $12.99 | $12.99 |
Detection code for the smartKart
        import RPi.GPIO as GPIO
        import time
        import numpy as np
        import pygame
        from pygame.locals import *
        import os
        import smtplib
        from email.mime.multipart import MIMEMultipart
        from email.mime.text import MIMEText
        import numpy as np
        import cv2
        import matplotlib.pyplot as plt
        from collections import defaultdict
        import concurrent.futures as cf

        # display on pitft

        os.putenv('SDL_VIDEODRIVER','fbcon')
        os.putenv('SDL_FBDEV','/dev/fb1')
        os.putenv('SDL_MOUSEDRV','TSLIB')
        os.putenv('SDL_MOUSEDEV','/dev/input/touchscreen')

        pygame.init()
        pygame.mouse.set_visible(False)

        #color
        WHITE = 255,255,255
        BLACK= 0,0,0

        #display setup
        screen=pygame.display.set_mode((320,240))
        my_font=pygame.font.Font(None,26)

        cam = cv2.VideoCapture(0)
        cam.set(cv2.CAP_PROP_BUFFERSIZE,1)

        def detectobject(name,test_image, haar_cascade):
          test_image_gray = cv2.cvtColor(test_image, cv2.COLOR_BGR2GRAY)
          faces_rects = haar_cascade.detectMultiScale(test_image_gray)
          #print(f'{name}: Objects detected {len(faces_rects)}')
          return True if len(faces_rects)>0 else False

        def sift(name,img2, img1, thresh):
          img1 = cv2.cvtColor(img1, cv2.COLOR_BGR2GRAY)
          img2 = cv2.cvtColor(img2, cv2.COLOR_BGR2GRAY)

          #sift
          sift = cv2.xfeatures2d.SIFT_create()
          keypoints_1, descriptors_1 = sift.detectAndCompute(img1,None)
          keypoints_2, descriptors_2 = sift.detectAndCompute(img2,None)

          FLANN_INDEX_KDTREE = 0
          index_params = dict(algorithm = FLANN_INDEX_KDTREE, trees = 5)
          search_params = dict(checks=50)   # or pass empty dictionary

          flann = cv2.FlannBasedMatcher(index_params,search_params)
          matches = flann.knnMatch(descriptors_1,descriptors_2,k=2)

          # Need to draw only good matches, so create a mask
          matchesMask = [[0,0] for i in range(len(matches))]
          count = 0
          #print(f'{name}: Matches are {len(matches)}')
          retval = False
          # ratio test as per Lowe's paper
          for i,(m,n) in enumerate(matches):
            if m.distance < 0.7*n.distance:
               count +=1
               matchesMask[i]=[1,0]
          print(f'{name}: Count is {count}')

          if count>=thresh:
            retval = True

          return retval

        def object_detector(name):
          test_image = cv2.imread('/home/pi/finalProj/test_img.jpg')

          if name =='Lays':
            lays_clf = cv2.CascadeClassifier('/home/pi/finalProj/Cascades/Lays_classifier.xml')
            benchmark = cv2.imread('/home/pi/finalProj/image/lays1.jpg')
            n='Lays'
            sift_true = sift(n,test_image,benchmark,12)
            return detectobject(n,test_image, lays_clf) or sift_true

          elif name=='Kellogs':
            benchmark = cv2.imread('/home/pi/finalProj/image/kellogs.png')
            n='Kellogs'
            return sift(n,test_image,benchmark,12)

          elif name=='Kitkat':
            kitkat_clf = cv2.CascadeClassifier('/home/pi/finalProj/Cascades/kitkat_classifier.xml')
            benchmark = cv2.imread('/home/pi/finalProj/image/kitkat.jpg')
            n = 'kitkat'
            sift_true = sift(n,test_image,benchmark,12)
            return detectobject(n,test_image, kitkat_clf) or sift_true

          elif name=='Cheetos':
            cheetos_clf = cv2.CascadeClassifier('/home/pi/finalProj/Cascades/cheetos_classifier.xml')
            benchmark = cv2.imread('/home/pi/finalProj/image/cheetos.jpg')
            n = 'cheetos'
            sift_true = sift(n,test_image,benchmark,12)
            return detectobject(n,test_image, cheetos_clf) or sift_true

          elif name=='Clif':
            n = 'Clif'
            benchmark = cv2.imread('/home/pi/finalProj/image/clif-logo.jpg')
            return sift(n,test_image,benchmark,35)

          elif name=='Clorox':
            clorox_clf= cv2.CascadeClassifier('/home/pi/finalProj/Cascades/Clorox_classifier.xml')
            n ='Clorox'
            #benchmark = cv2.imread('/home/pi/finalProj/image/clorox.jpg')
            #sift_true = sift(n,test_image, benchmark,35)
            return detectobject(n,test_image, clorox_clf)

        #mail code

        def mail(items,cost, quantity):
          server = smtplib.SMTP('smtp.gmail.com', 587)
          server.starttls()
          msg = MIMEMultipart()
          #message = message_template.substitute(PERSON_NAME=name.title())
          msg['From']= 'shopbot5725@gmail.com'
          msg['To'] = 'as2564@cornell.edu'
          msg['Subject']= "Your Order from SmartKart"

          total = sum(cost)
          lines = [None]*len(cost) #Array of strings per line

          print(lines)
          for i in range(len(cost)):
            lines[i] = items[i] + "\t   $" + str(cost[i]) + "\t   Quantity: " + str(quantity[i]) + "\n"


          summary = '\n\n********************************\n'+'Total: $' + f'{total: .2f}' +'\tTotal Items$

          print(lines)
          display = ''.join(lines)
          message = "Thank you for shopping with SmartKart. We have attached your receipt with the mail" $
          msg.attach(MIMEText(message, 'plain'))
          #Next, log in to the server
          server.login("shopbot5725", "wifhuvbgimobchom")
          server.send_message(msg)
          del msg
          server.quit()


        #buttons
        my_checkout={'CHECKOUT':(250,220)}
        my_start={'START':(160,120)}

        #GPIO mode setup
        GPIO.setmode(GPIO.BCM)
        cost_db = {'Lays':2.79,'Kellogs':3.19, 'Kitkat':3.79,'Cheetos':4.49, 'Clif': 5.99, 'Clorox': 4.48}


        # arrays for items, quantity and cost
        my_font_item =pygame.font.Font(None,18)
        # font setup for log display
        total_items={(80,40):'List of items in your cart'}
        quantity={(180,40):'Quantity'}
        cost={(240,40):'Cost'}

        #GPIO 27 callback function to end the program
        def GPIO27_cb(channel):
          screen.fill(BLACK)
          pygame.display.quit()
          GPIO.cleanup()

        # GPIO 27 setup
        GPIO.setup(27,GPIO.IN,pull_up_down=GPIO.PUD_UP)
        GPIO.add_event_detect(27,GPIO.FALLING,callback=GPIO27_cb)

        #image setup for buttons
        start_img = pygame.image.load("/home/pi/finalProj/image/start.png")
        start_rect = start_img.get_rect(center = (160,120))


        a = True  #to run level 1
        b = False #for level 2

        while a:
          # in level 1
          screen.fill(BLACK)
          screen.blit(start_img,start_rect)

          for my_text,text_pos in my_start.items():
            text_surface=my_font.render(my_text,True,WHITE)
            rect=text_surface.get_rect(center=text_pos)
            screen.blit(text_surface,rect)

          pygame.display.flip()

          #Define x and y to get touch
          for event in pygame.event.get():
            if(event.type is MOUSEBUTTONUP):
                pos=pygame.mouse.get_pos()
                x,y=pos
                if 120=2:
                    item_amt['Lays'] = 1
                    item_cost['Lays'] = cost_db['Lays']

                  if sum(akellogs) >=2:
                    item_amt['Kellogs'] = 1
                    item_cost['Kellogs'] = cost_db['Kellogs']

                  if sum(akitkat) >=2:
                    item_amt['Kitkat'] = 1
                    item_cost['Kitkat'] = cost_db['Kitkat']

                  if sum(acheetos) >=2:
                    item_amt['Cheetos'] = 1
                    item_cost['Cheetos'] = cost_db['Cheetos']

                  if sum(aclif) >=2:
                    item_amt['Clif'] = 1
                    item_cost['Clif'] = cost_db['Clif']

                  if sum(aclorox) >=2:
                    item_amt['Clorox'] = 1
                    item_cost['Clorox'] = cost_db['Clorox']

                  if f[0]:
                    alays.append(1)
                  else:
                    alays.append(0)

                  if f[1]:
                    akellogs.append(1)
                  else:
                    akellogs.append(0)

                  if f[2]:
                    akitkat.append(1)
                  else:
                    akitkat.append(0)

                  if f[3]:
                    acheetos.append(1)
                  else:
                    acheetos.append(0)

                  if f[4]:
                    aclif.append(1)
                  else:
                    aclif.append(0)

                  if f[5]:
                    aclorox.append(1)
                  else:
                    aclorox.append(0)

                  alays.pop(0)
                  akellogs.pop(0)
                  akitkat.pop(0)
                  acheetos.pop(0)
                  aclif.pop(0)
                  aclorox.pop(0)

                  #Print on tft screen
                y = 60
                for key,value in item_cost.items():
                  item_text = my_font_item.render(key,True,WHITE)
                  item_rect = item_text.get_rect(center=(50,y))
                  cost_text = my_font_item.render(str(value),True,WHITE)
                  cost_rect = cost_text.get_rect(center = (250,y))
                  quant_text = my_font_item.render(str(item_amt[key]),True,WHITE)
                  quant_rect = quant_text.get_rect(center=(160,y))
                  screen.blit(item_text,item_rect)
                  screen.blit(cost_text,cost_rect)
                  screen.blit(quant_text,quant_rect)
                  y+=20

                pygame.display.flip()

                for event in pygame.event.get():
                  if(event.type is MOUSEBUTTONUP):
                    u,v=pygame.mouse.get_pos()

                      #checkout button has been pressed
                      if u>200 and v>160:
                        screen.fill(BLACK)
                        b = False
                        itemarray = list(item_cost.keys())
                        costarray = list(item_cost.values())
                        quantarray = list(item_amt.values())
                        mail(itemarray,costarray, quantarray)