Mimic Robot
ECE5725 Spring 2019 Final Project
Mark Li (mkl53) and Serena Krech (sk2282)
Project Demo (May 14, 2019)
Project Objective:
- Detect location of hands and elbows
- Determine angles between these points
- Control servos to move arms
- Mimic human movement
Introduction
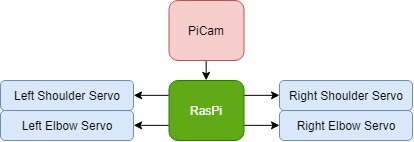
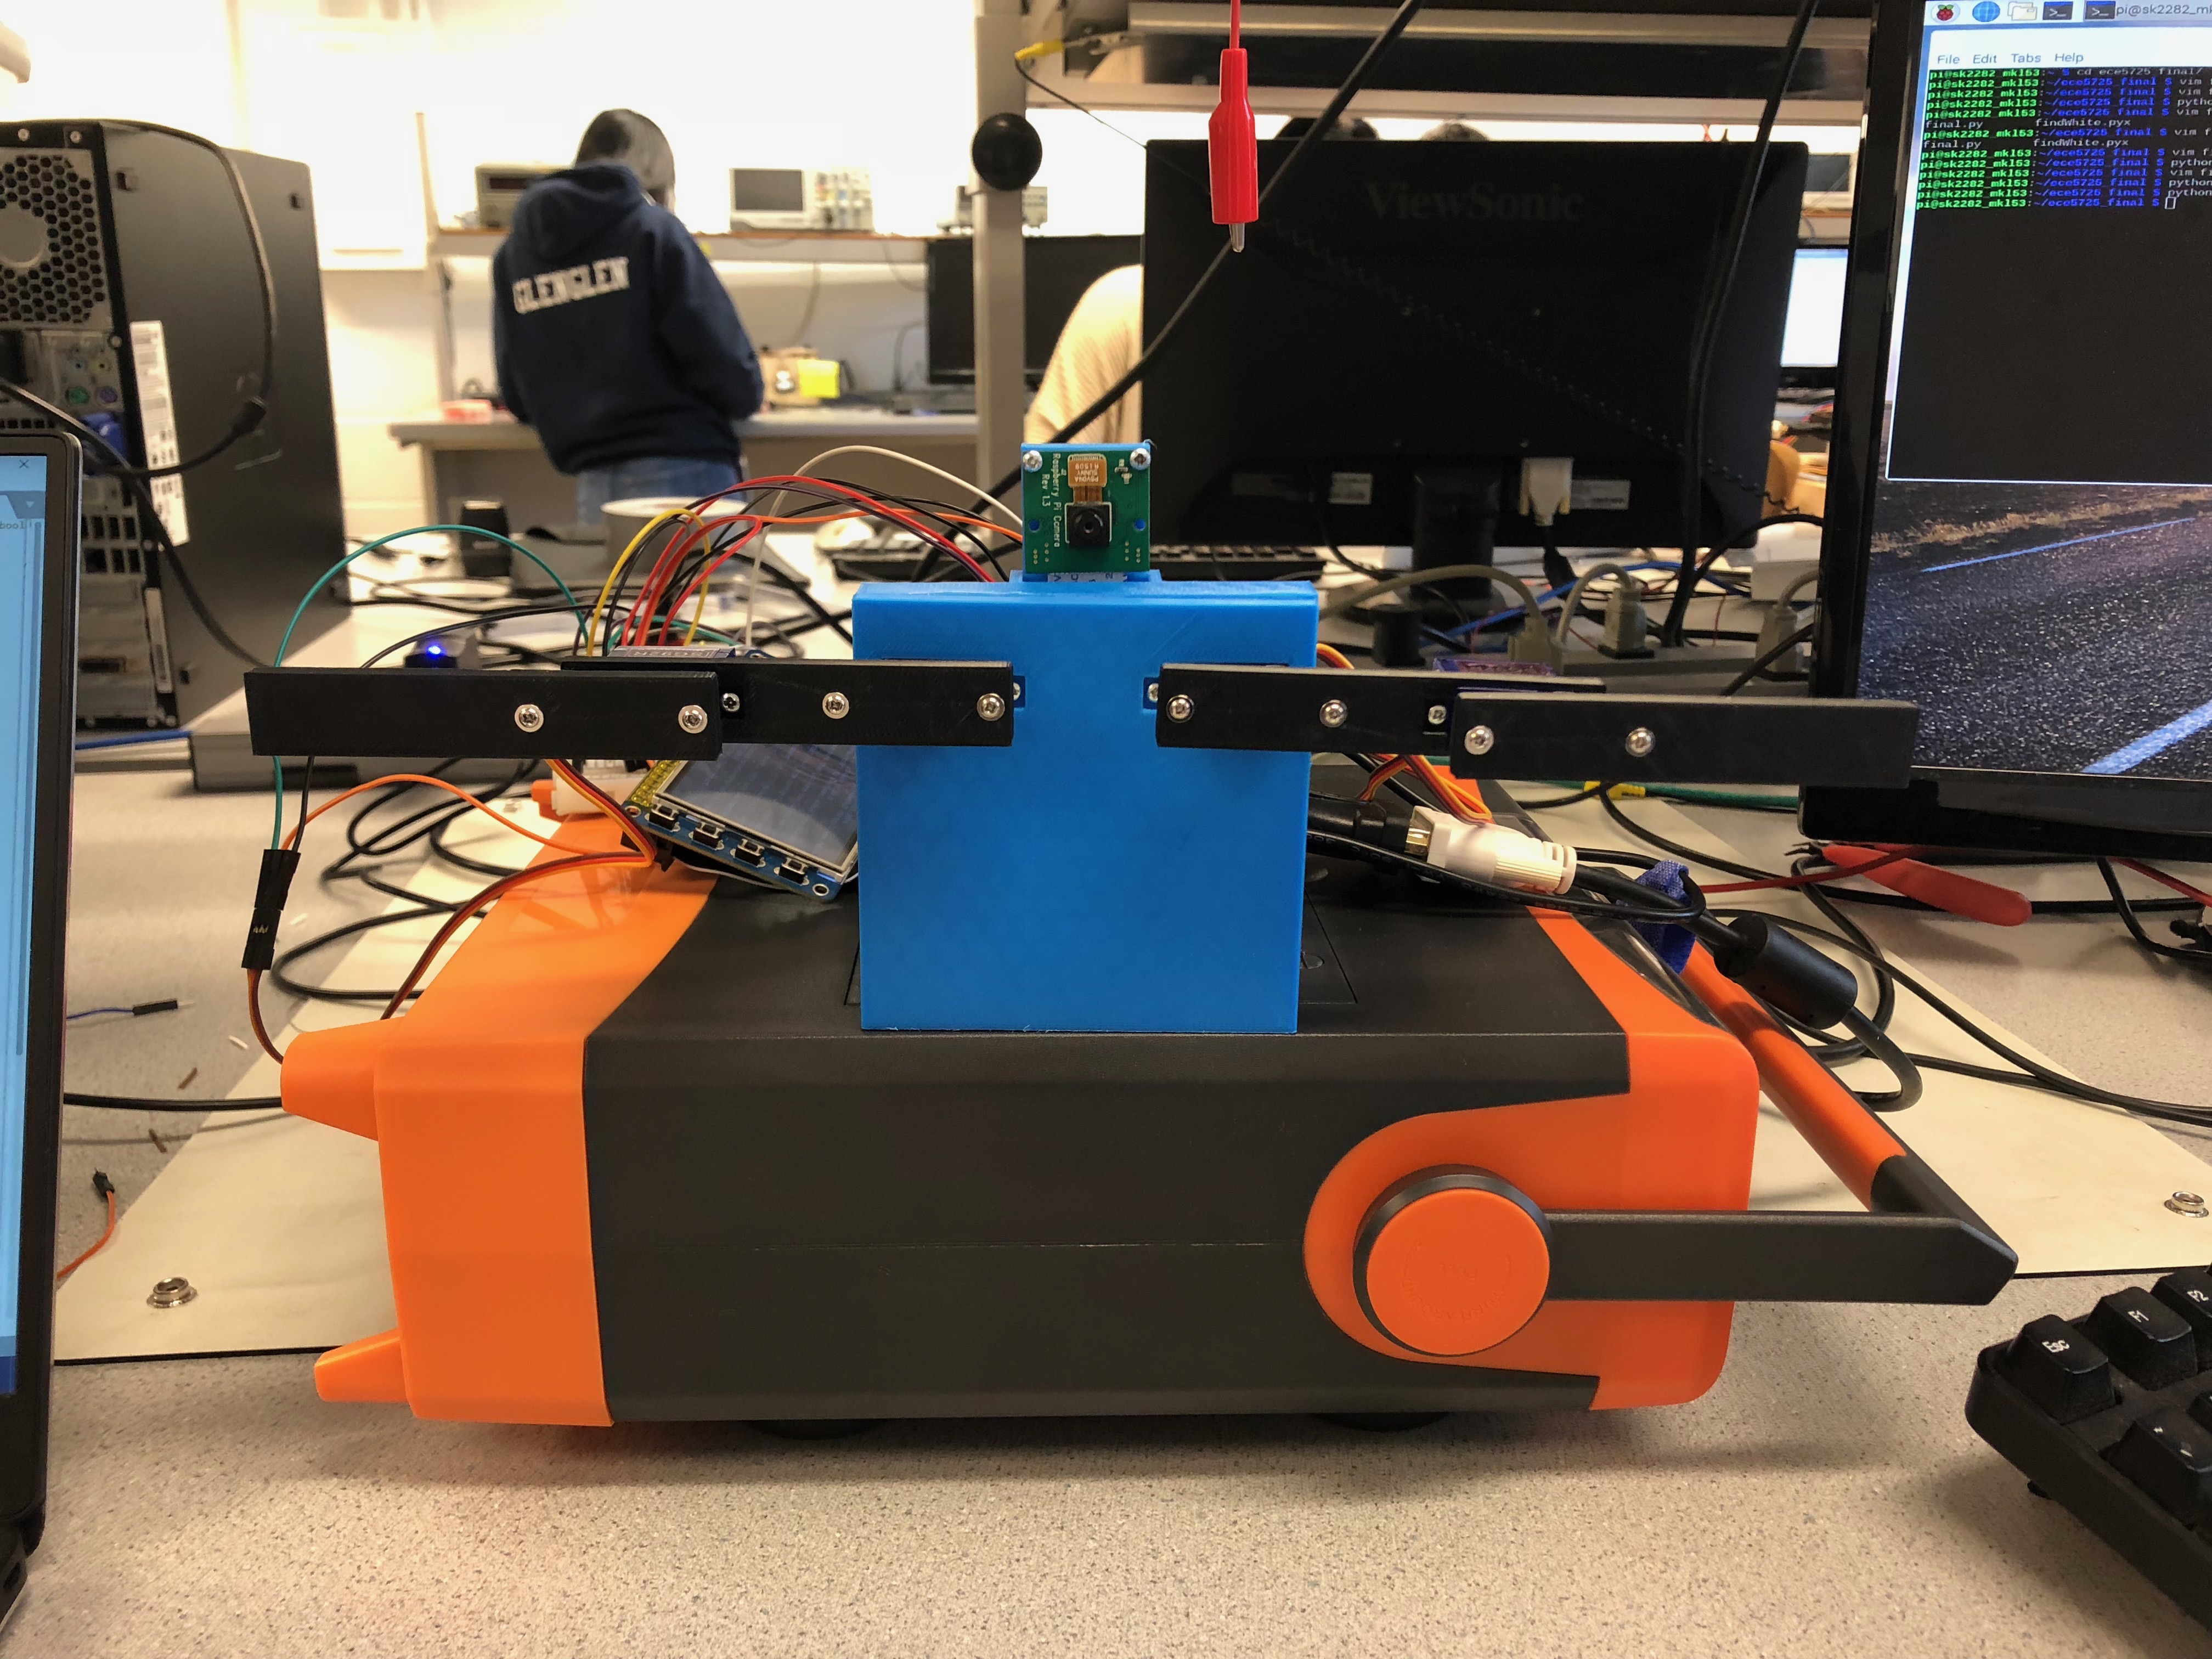
In this project, we used a Raspberry Pi to process images and control servos to create a small robot that would mimic a person's movements. The RasPi recieved images as input from a PiCam and processed them in real time. We used OpenCV to identify the person as well as find their chest, elbow, and arm points. These points were then used to find angles between the upper arm and forearm as well as the angle of the upper arm at the shoulder. With this angle, we were able to map the value to a PWM pulsewidth to control each of our four servos in order for our robot to copy the movements of the person.
Software Design
Body Detection
 Body detection starts with noise reduction. To reduce small imperfections in the image which may affects good detection, we run our initial frame through a Gaussian filter. Since the thresholding operation requires a grayscale image, we also convert from standard RGB to grayscale in this step.
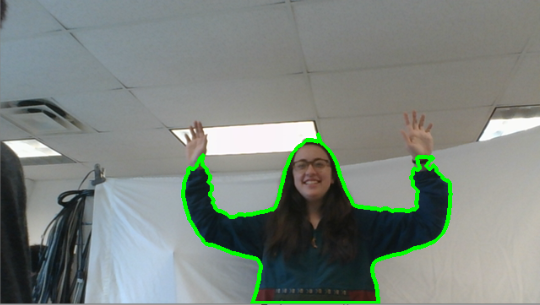
For thresholding, we use Otsu's Binarization. This method of thresholding attempts to separate pixels in the image into two categories, based on brightness. We found that this method works the best when performed on a person wearing dark clothes, standing against a white background. The output of the thresholding operation is a binary image, with darker pixels set to value 1, and lighter pixels set to value 0.
We then draw contours in the image, which finds all non-contiguous blobs of dark colors, and choose the largest blob to be our person. An example of this contour is shown on the right.
Elbow Detection
 To perform elbow detection, we first draw the person contour onto a blank canvas, resulting in the left image below. To restrict the search, we then perform an erosion on the image, which cuts away from the edges. The result is the right image below.
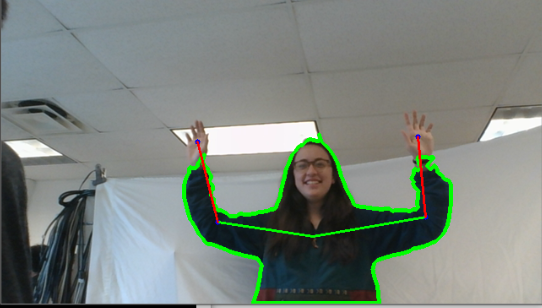
Using a designated chest point, we perform a sweeping angle search, following rays from the chest point to the edge of the body. The longest rays found are the arms, which are highlighted as green lines in the image to the right. Since following the ray returns the intersection point between the ray and edge of the body, we can step backwards from this point into the body, which gives a decent elbow point.

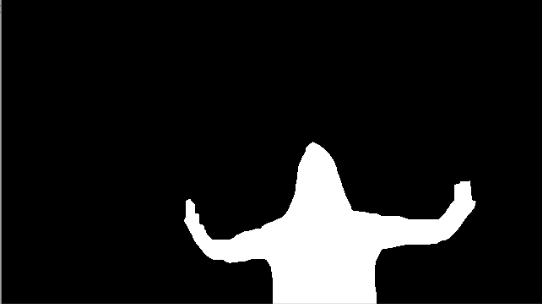
Redrawing the contour onto a blank canvas. The right image is after erosion
Hand Detection
 According to this paper, a simplified YUV colorspace conversion, coupled with a few simple checks are enough to determine human skin colors. The U component, which is normally a float operation, can be simplified to U = R - G. For human skin, 10 < U < 74. Another simple check, described in this paper, is R > B.
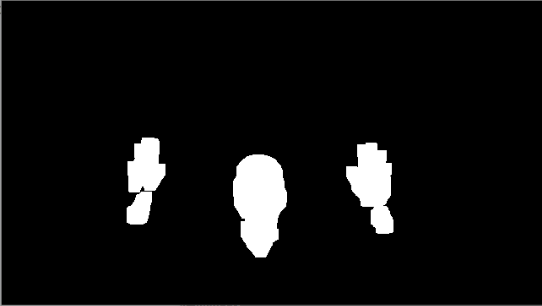
After performing these operations, we are left with a somewhat noisy, but binary image of where human skin is found. To reduce noise, we use the morphological transformation, opening, which is erosion followed by dilation. This removes small patches of noise. We then perform an additional dilation, which closes small holes between larger blobs, and makes contours more accurate. The final image is shown to the left.
Similar to body detection, we draw contours to find all the blobs, and choose the biggest three. From left to right, we label these left hand, head, and right hand. The centroid points of these blobs, found using the moments of the contours, are used instead of the blobs themselves. A small y-axis offset from the head centroid gives us a suitable chest point.
Angles
There were two angles that we needed to know per arm, the angle of the shoulder joint, and the angle at the elbow. Finding the angle of the shoulder joint was relatively easy since we iterated through angles to find the elbow point. We just returned this angle from the function to use. The angle of the elbow was calculated based on three points: chest, elbow, and hand. From these points we created two vectors and found the angle between them using dot product, cross product and acos. We also needed to find a way to determine which way the angle was opening, up or down. We discovered that the sign of the cross product revealed this information so we returned that value along with the angle.
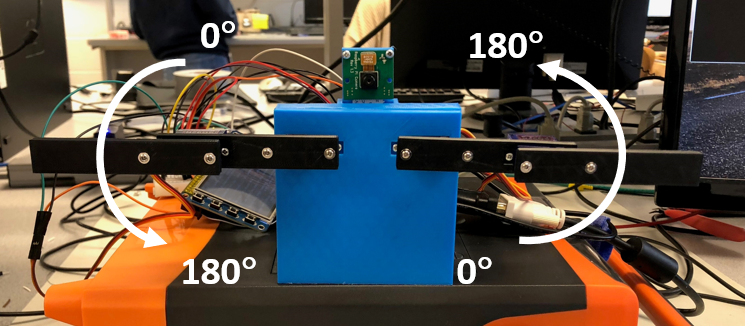
From here, we needed to map this angle to an angle based on our robot's orientation. So for the left side, straight down was 180 degrees and straight up was 0 degrees. This means that if the arm is straight, the getAngleABC() function would return 180, and this would be mapped to the robots 90 degrees.
Software Optimization
Multithreading
Without any optimization, the code uses just a single core. On a larger computer this is fine, but on the Raspberry Pi, we need a bit more processing power. The solution is multithreading, as each frame can be processed somewhat individually of other frames. Although Python does offer a Threading module, it is still limited by the Global Interpreter Lock. To get around this, we use the Multiprocessing module, which creates worker processes that bypass the GIL.
Spawning 4 worker threads saturates the Rapsberry Pi's 4 cores, as the main thread mostly waits for asynchronous results. Because the main thread can blocking wait for results from the worker threads, only 4 processes are ever doing meaningful work at one time.
The result is going from about 25-30% CPU usage to about 95% CPU usage at all times. This gives a big increase in throughput, but frame delay still remains the same.
Cython
To help with frame delay, speeding up any function that gets run often helps a lot. For our implementation, this function is findWhite, which performs the raytrace described in Elbow Detection. Since it is pure python, fairly simple, and run almost constantly, it is a prime candidate for precompiling using Cython. Just precompiling using Cython gives a ~2x speed increase for the function, but with a couple of small changes, we achieved up to ~100x over pure python. The major changes that we needed to make were just static type declarations and a couple of Cython compiler directives. Below is a comparison between the original code and the code with static declarations:
def findWhite(fX, fY, l, default, test):
    for idx in range(0,len(l)-4,4):
        point = l[idx]
        if (point[1]<fY and point[0]<fX and
            point[1]>0 and point[0] > 0 and
            test[int(point[1]),int(point[0])]) != 255:
            return idx
    return default
def findWhite(int fX, int fY, int[:,:] l, int default, unsigned char[:,:] test) -> int:
    cdef int point0, point1
    cdef int idx
    for idx in xrange(0,len(l)-4,4):
        point0 = l[idx][0]
        point1 = l[idx][1]
        if (point1<fY and point0<fX and
            point1>0 and point0 > 0 and
            test[point1][point0]) != 255:
            return idx
    return default
Function findWhite. Right is pure python, and left is statically typed.
Adding a few Cython compiler directives helps as well. We disable array bounds checking, array index wraparound, and Nonetype checks.
The result is a python module that can be imported and functions identically to the original, but 100 times faster. Although we don't get 100 times more frames per second, the difference is very noticeable. Coupled with the multiprocessing changes, we're able to run at full resolution without it being unreasonably slow.
Hardware Design
Robot Design
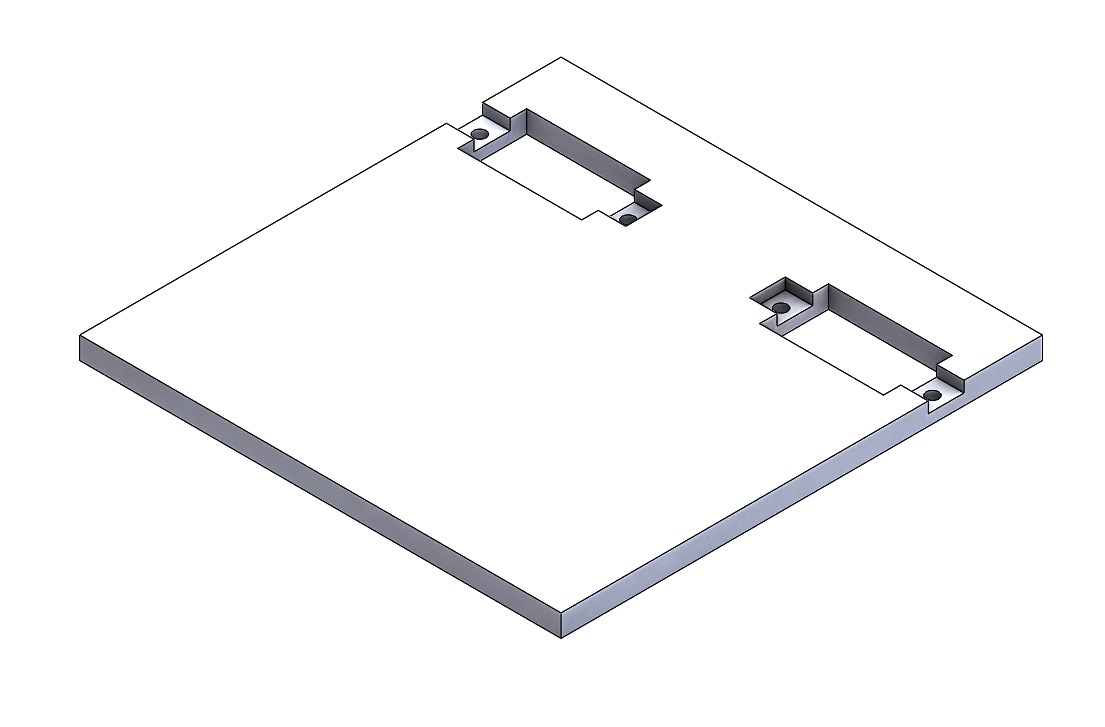
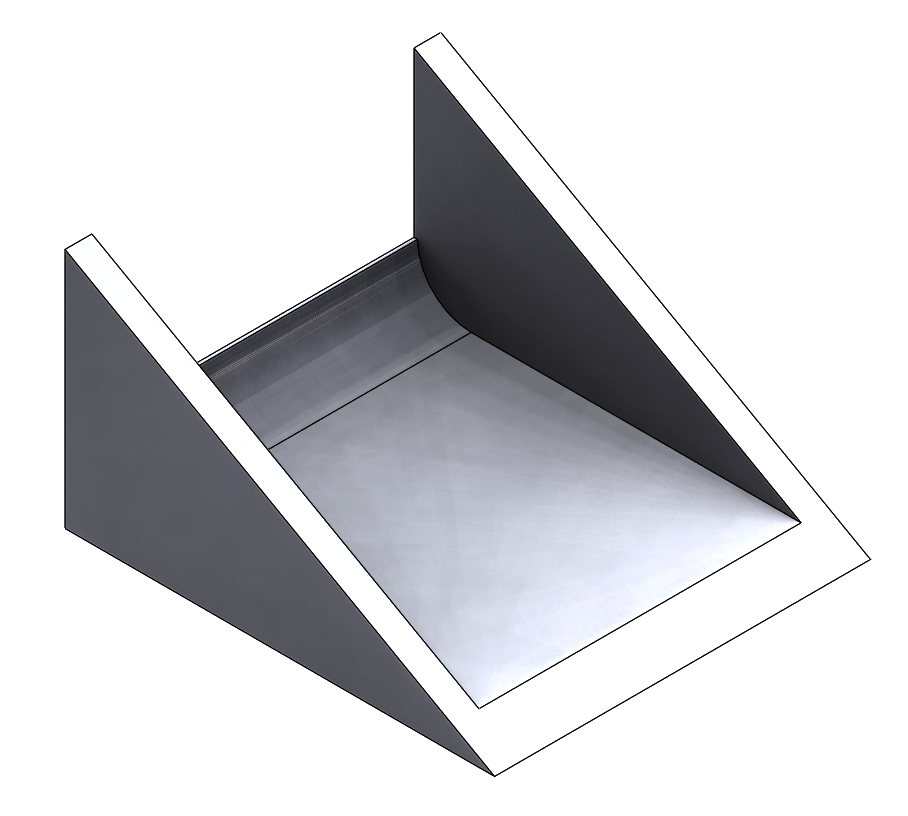
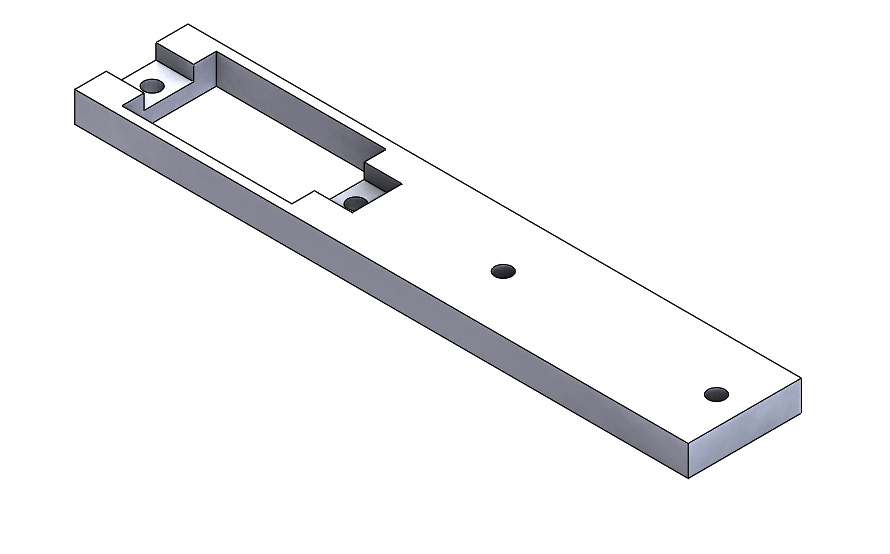
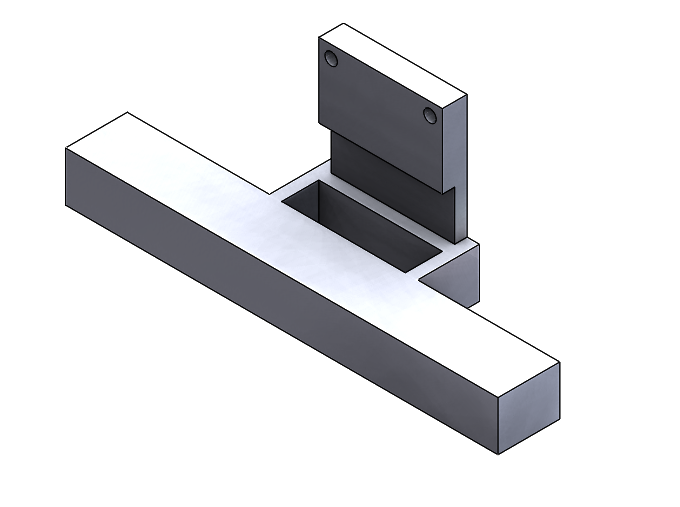
The body of the robot was a relatively simple design. For the front, two rectangular holes were made for the motors to fit through as well as two screw holes for each motor for mounting. We originally 3D printed two triangles to make the body stand up. However we found during testing that these were not very strong and were too light compared to the front of the robot, causing it to easily tip over. We then made the base larger, filling in the area between the triangles. This helped balance he robot as well as created more surface area to epoxy the base on, creating a stronger hold. As for the camera, this was mounted to the top. It protrudes from the back of the body and two screws are used to hold the camera in place. The arms have the same mounting structures for the servos as the main body. The arms also include two other holes to mount the servo horns to connect each arm segment together.
Servos
We used four micro servos in this project. Each servo was controlled by a different GPIO pin. In order to generate a PWM signal, we used the Pigpio library. This allowed us to use hardware timed PWM signals, creating a stable signal so the motor wouldn't jitter. The motors required 5V for power which we sourced from a power supply. The motor ground connection was wired to the ground of the RasPi so that they would have a common reference ground for the signal. We also added resistors between the RasPi pins and the connection to the servo in order to protect the GPIO pins from current spikes. Once we knew we could control the servos, we found their PWM range for the 180 degrees that we wanted. We found that our lower bound was a pulsewidth of 670, middle was 1550, and the upper bound was 2475. The middle value was used in initialization to attach the arms in the correct orientation, and the upper and lower bounds were used in the mapping function to convert angles to pulsewidths.
Testing
Software and hardware were mainly tested separately until we had a stable working algorithm since early tracking was quite jumpy. Testing of the servos was relatively simple. We started with testing the control of a software PWM signal. The motors could not hold in once position, which was expected since we knew from earlier labs that a software PWM signal was generally not accurate or stable. We then looked into using hardware PWM signals. The RasPi has two hardware PWM modules that we could have used, however with four motors this was not sufficient. We next turned to the Pigpio library which used hardware timers to create a PWM signal on any of the GPIO pins. Once the timers were set, they would constantly create the signal until updated with a new PWM. With this method, we were able to stably control our servos. We also tested the servos ability to lift weight using thin popsicle sticks found in lab. We wanted to make sure the servos would have enough power to lift an arm with another servo attached. This test was succesful and we proceeded with our servos.
Software was first tested on our own computers where processing would be faster. When we started testing we used a neural network based library, OpenPose. It was extremely accurate, but also ran very slow even on our computers. A single frame took up to 50 seconds on the Raspberry Pi, so we had to move on to different methods. We first experimented with contours and obtaining points from the outline as well as optical flow. While we did use contours to an extent in our final version, we did not use the outline of points that we were originally considering since the group of points didn't tell us a lot of information. As for optical flow, test code was developed to select hands, elbows, and chest points to track. However if a point didn't have a good reference the point was easily lost so we did not continue with this method.
A lot of testing and iteration was performed on the raytracing method for both performance and accuracy, and we put a lot of work into trying to get hand locations using ray tracing. However, we eventually settled on the fact that it wasn't accurate enough, and with the help of an old ECE 5760 project, put together the current hand detection algorithm. However, we were satisfied with its elbow detection, and kept that part for the final code.
Optimization was a slightly bigger challenge, as on our laptops there was no significant drop in framerate from the webcam's 30 frames per second, even for processing-heavy versions of the code. Careful examination of the code, and timing tests on the Cythonized findWhite function helped us achieve better performance on the Raspberry Pi despite no real difference on our laptops.
When choosing where we were going to display the image of the person and their limbs, we wanted to use the PiTFT at first. However, OpenCV is unable to easily output to the PiTFT, and duplicating the desktop to the PiTFT was both unwieldy and took precious processing power. We settled on displaying it on the big screen.
Once confident in the code, we put the system together to test. Software and hardware integrated easily as we already had the angles we needed within the code, all we needed to do was map the values. We first initialized the motors to horizontal so we could attach the arms in the correct orientation. When running the full program, we found that the arms would shake a lot and often wouldn't stay in one place. This was most likely because the motors at the elbows would shake a bit when they moved, and the torque that the shoulders needed to move the upper arm was higher than the motor could provide. In order to rectify this, we reprinted each arm 0.75" shorter than they were previously. After installing the new arms, the robot was much more stable.
We found during testing that the arms would be pretty jumpy, responding to every little change of the detected arms. This wasn't great because the detection was jumpy on it's own. We decided to add a rolling average of angles from the last five frames to help smooth out the movements. We also added bounds to the angles that we could move to so that the system would not overexert itself attempting to ove to an angle over 180 degrees, which would be impossible for it go to.
Results and Future Work
In the end we were successfully able to create a robot that would accurately mimic a user's movements in real time, as shown in the video above. The only limitation on the system is that the servos are restricted to 180 degrees so we were not able to have sharper angles at the elbow. Overall, we were able to meet the goals that we had set in the project outline.
This project could be further expanded to body movements such as moving up and down or possibly angling the upper body side to side by adding other servos to control the movement in the chest area. By tracking the chest point, up and down motion would be relatively simple. To track side to side motion, another point of reference might be needed. Controlling more servos wouldn't be a problem since any GPIO can use a hardware timer for PWM. The body of the robot would need to be modified to be able to move at all since it is currently just a stand.
Conclusion
Our project was able to successfully mimic the arm movements of a person. We origninally found a program do detect all body parts and overlay a stick figure onto each frame, however this ran in a neural net which took 40 seconds per frame to process. We were able to achieve a similar program using OpenCV than ran much more effiently so we were able to track movements in real time. On limitation of our system was that the robots arms were limited in their motion since they can only rotate 180 degrees. So while the software can detect sharper angles, our robot could not move to that location.
Work Distribution

Project group picture
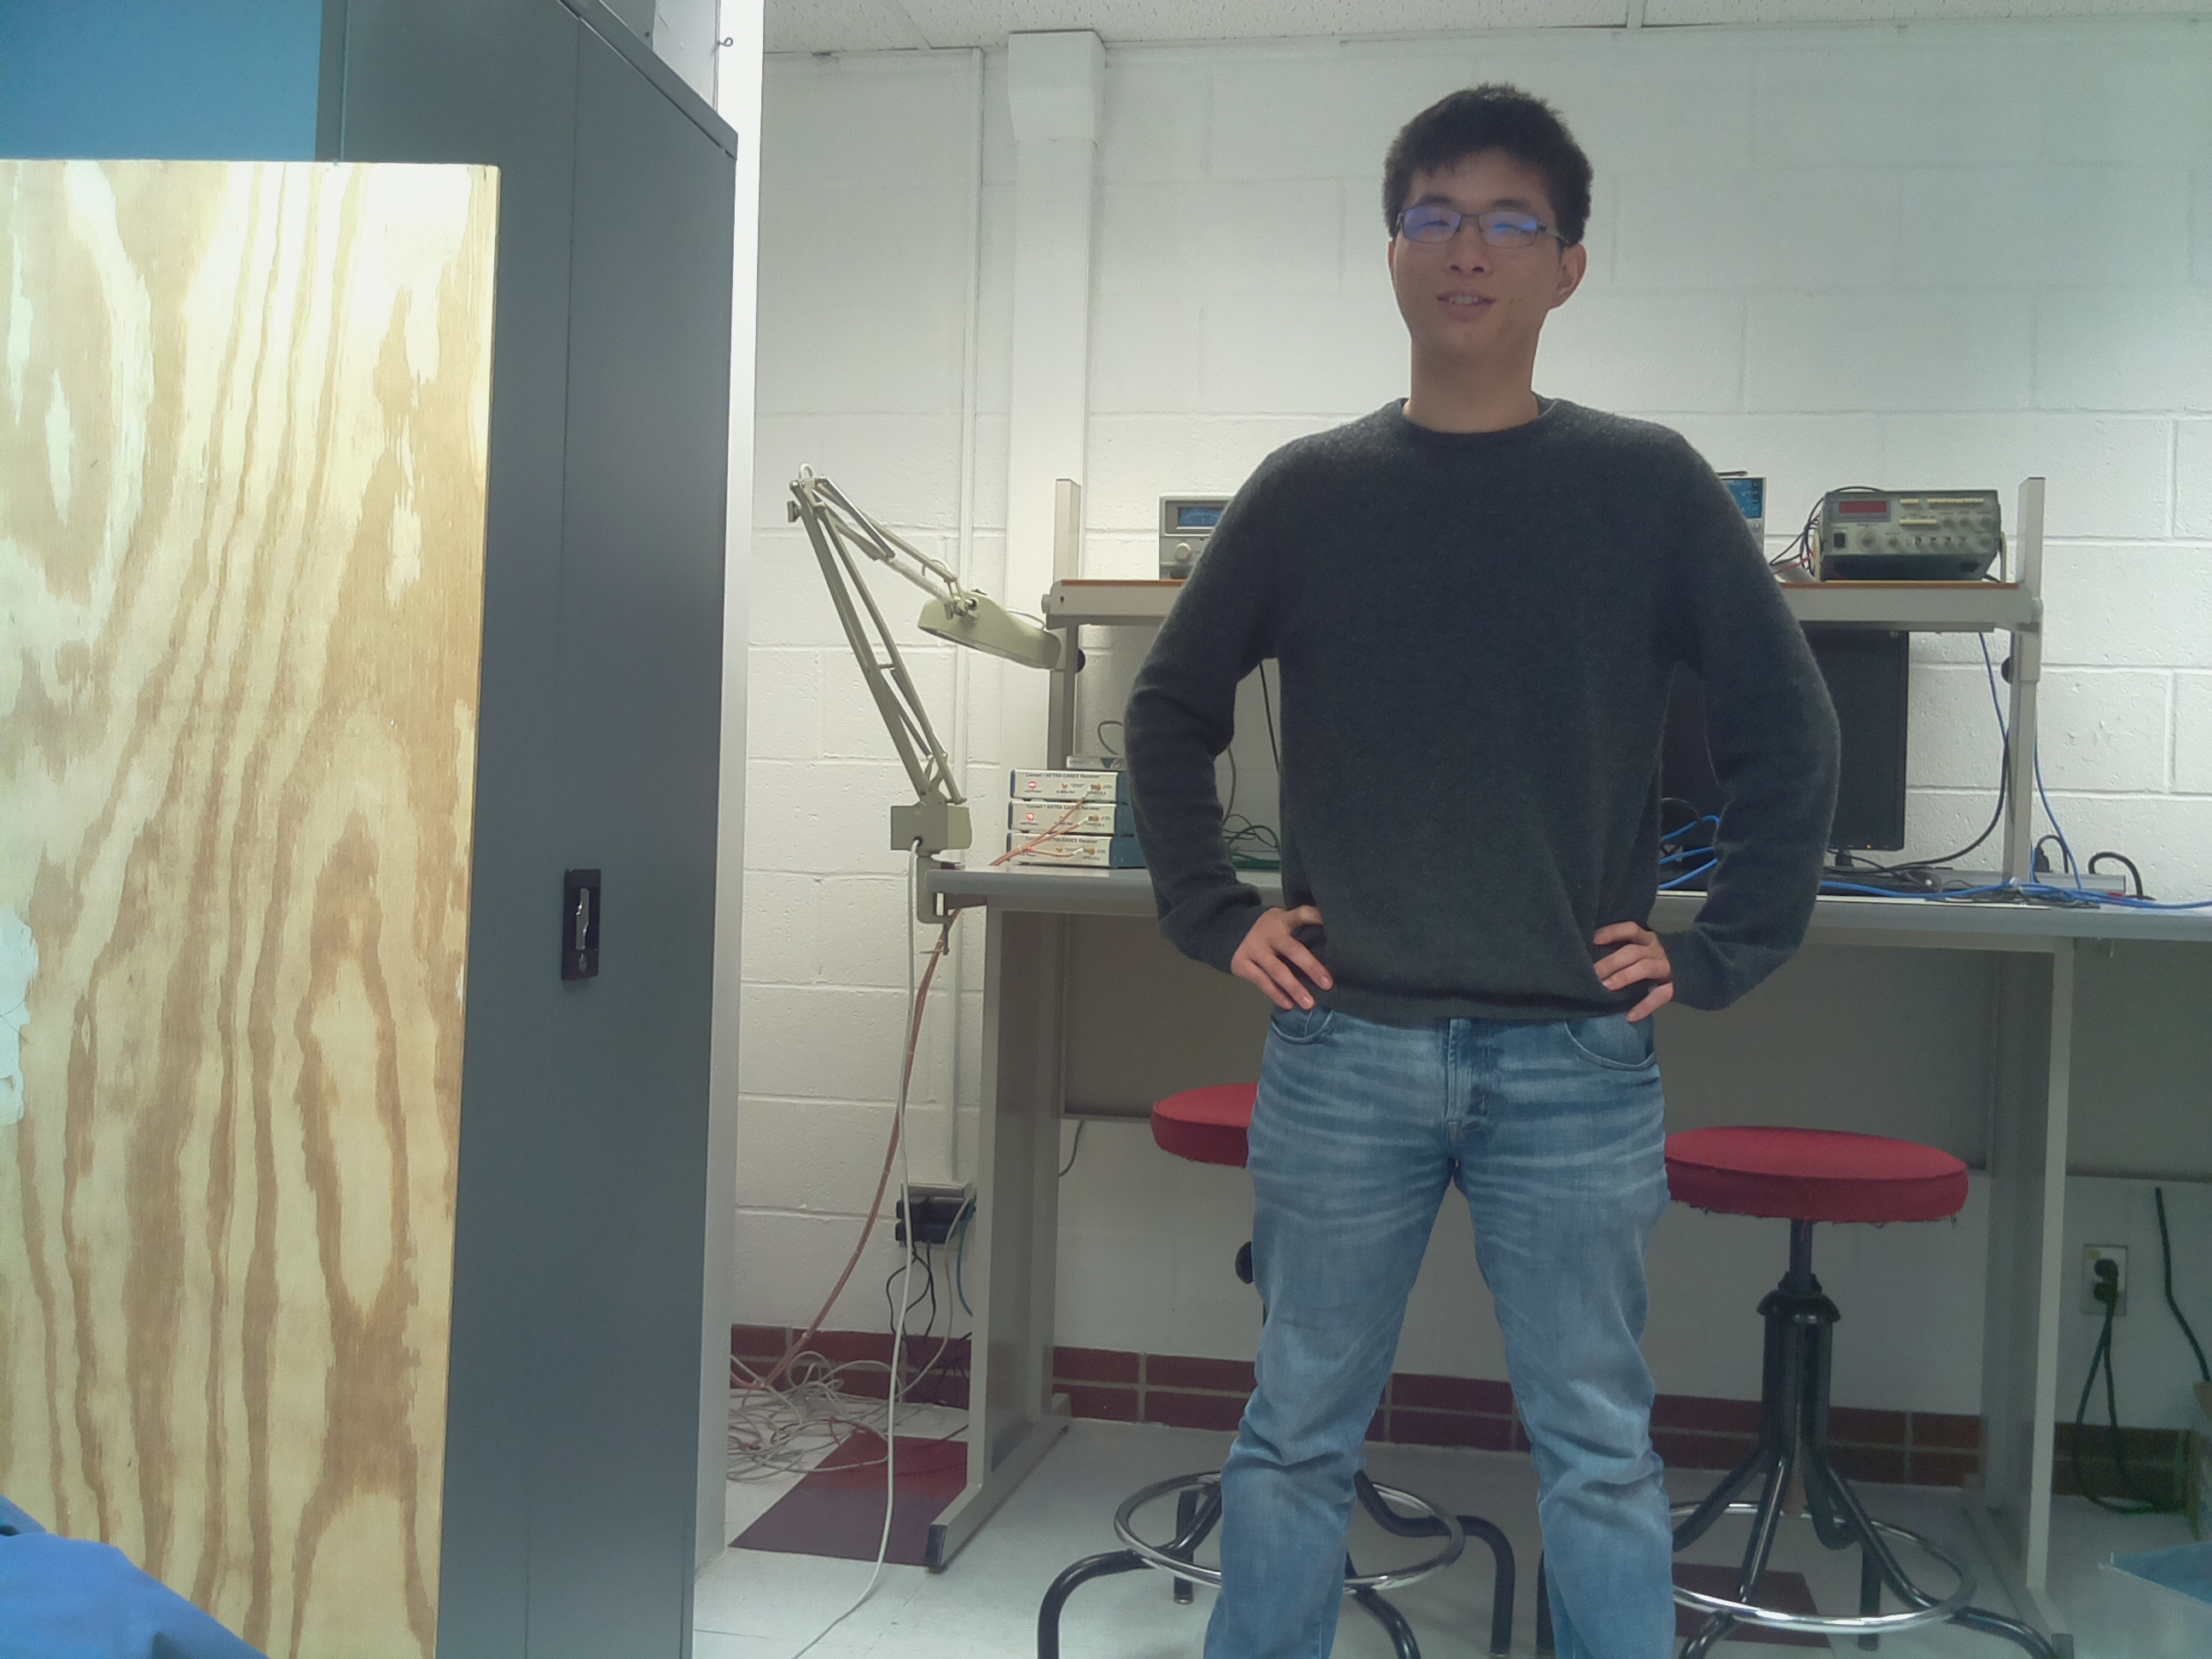
Mark
mkl53@cornell.edu
Software design, system testing
George
Photographer
Serena
sk2282@cornell.edu
Robot and hardware design, system testing
Parts List
| Part | Quantity | Price | Total |
|---|---|---|---|
| Pi Cam | 1 | 29.88 | 29.88 |
| Tower Pro Micro Servos | 4 | 5.95 | 23.80 |
| Final Total: | $53.78 |
Note: 3D printed parts were printed by the school and incurred no cost. Wires, resistors, and Raspberry Pi were provided in lab.
References
PiCamera DocumentTower Pro Micro Servo Datasheet
Pigpio Library
Cython
OpenPose
Real-Time Upper Body Motion Tracking System
Otsu's Binarization
Face detection using color space (YUV)
Face detection and tracking using color space (R, B)
Bootstrap
Code Appendix
setup.py:
from distutils.core import setup
from distutils.extension import Extension
from Cython.Build import cythonize
setup(ext_modules=cythonize("findWhite.pyx", build_dir="build", annotate=True, compiler_directives={'boundscheck': False, 'wraparound' : False, 'initializedcheck' : False, }),
                                           script_args=['build'],
                                           options={'build':{'build_lib':'.'}})
findWhite.pyx
def findWhite(int fX, int fY, int[:,:] l, int default, unsigned char[:,:] test) -> int:
    cdef int point0, point1
    cdef int idx
    for idx in xrange(0,len(l)-4,4):
        point0 = l[idx][0]
        point1 = l[idx][1]
        if point1<fY and point0<fX and point1>0 and point0 > 0 and test[point1][point0] != 255:
            return idx
    return default
final.py:
# Mark Li (mkl53) and Serena Krech (sk2282)
# ECE5725 Spring 2019 - Monday Lab
# Final Project - Mimic Robot
# Note: The following commands must be run before running this program:
#      sudo modprobe2835-bcmv4l2
#      sudo pigpiod
#      python setup.py

import cv2
import numpy as np
import math
import multiprocessing as mp
import os
import pigpio
from findWhite import findWhite


def createLineIterator(P1, P2, img):
   imageH = img.shape[0]
   imageW = img.shape[1]
   P1X = P1[0]
   P1Y = P1[1]
   P2X = P2[0]
   P2Y = P2[1]

   #difference and absolute difference between points
   #used to calculate slope and relative location between points
   dX = P2X - P1X
   dY = P2Y - P1Y
   dXa = np.abs(dX)
   dYa = np.abs(dY)

   #predefine numpy array for output based on distance between points
   itbuffer = np.empty(shape=(np.maximum(dYa,dXa),3),dtype=np.int)
   itbuffer.fill(np.nan)

   #Obtain coordinates along the line using a form of Bresenham's algorithm
   negY = P1Y > P2Y
   negX = P1X > P2X
   if P1X == P2X:      #vertical line segment
       itbuffer[:,0] = P1X
       if negY:
           itbuffer[:,1] = np.arange(P1Y - 1,P1Y - dYa - 1,-1)
       else:
           itbuffer[:,1] = np.arange(P1Y+1,P1Y+dYa+1)
   elif P1Y == P2Y:    #horizontal line segment
       itbuffer[:,1] = P1Y
       if negX:
           itbuffer[:,0] = np.arange(P1X-1,P1X-dXa-1,-1)
       else:
           itbuffer[:,0] = np.arange(P1X+1,P1X+dXa+1)
   else:               #diagonal line segment
       steepSlope = dYa > dXa
       if steepSlope:
           slope = dX.astype(np.float32)/dY.astype(np.float32)
           if negY:
               itbuffer[:,1] = np.arange(P1Y-1,P1Y-dYa-1,-1)
           else:
               itbuffer[:,1] = np.arange(P1Y+1,P1Y+dYa+1)
           itbuffer[:,0] = (slope*(itbuffer[:,1]-P1Y)).astype(np.int) + P1X
       else:
           slope = dY.astype(np.float32)/dX.astype(np.float32)
           if negX:
               itbuffer[:,0] = np.arange(P1X-1,P1X-dXa-1,-1)
           else:
               itbuffer[:,0] = np.arange(P1X+1,P1X+dXa+1)
           itbuffer[:,1] = (slope*(itbuffer[:,0]-P1X)).astype(np.int) + P1Y

   return itbuffer


def findPeak(fX, fY, sumx, sumy, test, guess, ang1, ang2):
    longestU = 0
    longestD = 0
    angU = [0,0]
    ang2U = [0,0]
    ang3U = 90
    angD = [0,0]
    ang2D = [0,0]
    ang3D = 90
    breakerU=True
    breakerD=True
    for angle in range(0,max(ang2-guess,guess-ang1)):
        if guess + angle <= ang2 and breakerU:
            a = angler(fX, fY, guess+angle, sumx, sumy, test);
            if a[0]>longestU:
                angU = a[1]
                ang2U = a[2]
                ang3U = guess+angle
                longestU = a[0]
            elif a[0] < longestU-20:
                breakerU=False
        if guess - angle >= ang1 and breakerD:
            a = angler(fX, fY, guess-angle, sumx, sumy, test);
            if a[0]>longestD:
                angD = a[1]
                ang2D = a[2]
                ang3D = guess-angle
                longestD = a[0]
            elif a[0] < longestD-20:
                breakerD=False
        if not breakerD and not breakerU:
            break
    if longestU > longestD:
        return (int(angU[0]),int(angU[1])), (int(ang2U[0]),int(ang2U[1])), ang3U
    else:
        return (int(angD[0]),int(angD[1])), (int(ang2D[0]),int(ang2D[1])), ang3D


#def findWhite(fX, fY, l, default, test):
#    for idx in range(0,len(l)-4,4):
#        point = l[idx]
#        if point[1]<fY and point[0]<fX and point[1]>0 and point[0] > 0 and test[int(point[1]),int(point[0])] != 255:
#            return idx
#    return default


def angler(fX, fY, angle, sumx, sumy,test):
    if angle == 0:
        l=createLineIterator(np.array([sumx, sumy]),np.array([sumx, 0]),test)
    elif angle<90:
        tan = math.tan(math.radians(angle))
        a = int(tan*sumy)
        if a < sumx:
            l=createLineIterator(np.array([sumx, sumy]),np.array([sumx-a,0]),test)
        else:
            l=createLineIterator(np.array([sumx,sumy]),np.array([0,sumy-int(sumx/tan)]),test)
    elif angle == 90:
        l=createLineIterator(np.array([sumx, sumy]),np.array([0,sumy]),test)
    elif angle < 180:
        tan = math.tan(math.radians(angle))
        a = int(tan*(sumy-fY))
        if a < sumx:
            l=createLineIterator(np.array([sumx, sumy]),np.array([sumx-a,fY]),test)
        else:
            l=createLineIterator(np.array([sumx,sumy]),np.array([0,sumy-int(sumx/tan)]),test)
    elif angle == 180:
        l=createLineIterator(np.array([sumx, sumy]),np.array([sumx, fY]),test)
    elif angle < 270:
        tan = math.tan(math.radians(angle))
        a = int(tan*(sumy-fY))
        if a < fX-sumx:
            l=createLineIterator(np.array([sumx, sumy]),np.array([sumx-a,fY]),test)
        else:
            l=createLineIterator(np.array([sumx,sumy]),np.array([fX,sumy+int(sumx/tan)]),test)
    elif angle == 270:
        l=createLineIterator(np.array([sumx, sumy]),np.array([fX, sumy]),test)
    else:
        tan = math.tan(math.radians(angle))
        a = int(tan*sumy)
        if a < fX-sumx:
            l=createLineIterator(np.array([sumx, sumy]),np.array([sumx-a,0]),test)
        else:
            l=createLineIterator(np.array([sumx,sumy]),np.array([fX,sumy+int(sumx/tan)]),test)
    idx = findWhite(fX, fY, l, len(l)-1,test)
    idx2 = idx-20
    if idx2<0:
        idx2 = 0
    try:
        return (math.sqrt((l[idx][0]-sumx)**2+(l[idx][1]-sumy)**2), l[idx2], l[idx])
    except:
        return (0,(sumx, sumy), (sumx, sumy))


# Find arm points - chest, elbows, hands
def armDetect(fX, fY, frame, guessLeft, guessRight):
    # Initial blurring for noise reduction
    blur = cv2.GaussianBlur(frame,(5,5),0)

    # Split the frame into three frames, one for each color
    b,g,r = cv2.split(blur)

    # Create the U of YUV colorspace. This implementation is simplified compared to other YUV implementations
    u = cv2.subtract(r,g)

    #for human skin detection, R > B
    bminr = cv2.subtract(r,b)

    # Human skin 10 < U < 74 AND R > B
    mask = cv2.bitwise_and(cv2.inRange(u, 10, 74), cv2.inRange(bminr, 1, 255))

    # Perform a small open operation (erode then dilate) to reduce noise
    kernel = np.ones((7,7),np.uint8)
    mask = cv2.morphologyEx(mask, cv2.MORPH_OPEN, kernel)

    # For easy sorting and centroids, draw contours
    contours, _ = cv2.findContours(mask,cv2.RETR_TREE,cv2.CHAIN_APPROX_SIMPLE)

    # Find the 3 largest contours, easiest to just sort it
    contours.sort(key=len, reverse=True)

    try:
        centroids = [(-1,-1),(-1,-1),(-1,-1)] # centroid init

        # To get the centroid of contours, use moments
        M = cv2.moments(contours[0])
        centroids[0] = (int(M['m10']/M['m00']), int(M['m01']/M['m00']))
        M = cv2.moments(contours[1])
        centroids[1] = (int(M['m10']/M['m00']), int(M['m01']/M['m00']))
        M = cv2.moments(contours[2])
        centroids[2] = (int(M['m10']/M['m00']), int(M['m01']/M['m00']))
        centroids.sort(key=lambda x: x[0])
    except:
        # One of lh/rh/head was not found, so dont even bother with this frame
        return (None, None, None, guessLeft, None, None, guessRight)

    # Chest point is somewhere beneath the head for most people so offset y point
    sumx = centroids[1][0]
    sumy = centroids[1][1] + 70

    # From now on we need grayscale
    gray = cv2.cvtColor(blur,cv2.COLOR_BGR2GRAY)

    # otsu thresholding to detect person by contrast to background
    _,thresh = cv2.threshold(gray,100,255,cv2.THRESH_BINARY_INV+cv2.THRESH_OTSU)

    # Find ALL contours, including internals and whatnot
    contours, _ = cv2.findContours(thresh,cv2.RETR_TREE,cv2.CHAIN_APPROX_SIMPLE)

    contours.sort(key=len, reverse=True)

    # The largest contour is probably the person
    contour = contours[0]

    # Create two images to raytrace on, one with erosion and one without
    test = np.zeros_like(gray)
    cv2.drawContours(test,contours, 0, 255, -1)
    kernel = np.ones((17,17),np.uint8)
    test2 = cv2.erode(test,kernel,iterations = 1)

    # Bound guesses for elbow - reduces jumpyness
    if guessLeft>130:
        guessLeft=130
    if guessRight<230:
        guessRight=230

    # Left arm elbow find
    leftElbow = findPeak(fX, fY, sumx, sumy, test2, 90, 35,145)

    # Right arm elbow find
    rightElbow = findPeak(fX, fY, sumx, sumy, test2, 270, 215,325)

    if leftElbow[0] < 20 or rightElbow[0] < 20:
        return (None, None, None, guessLeft, None, None, guessRight)

    # Return chest, left elbow, left hand, left shoulder angle, right elbow, right hand, right shoulder angle
    return ((sumx, sumy), leftElbow[0], centroids[0], leftElbow[2], rightElbow[0], centroids[2], rightElbow[2])


# Mapping function used for angles to PWM
def angle_map(angle, in_min, in_max, out_min, out_max):
   x = ((out_max - out_min)/(in_max-in_min))*(angle-in_min)
   return x + out_min


# Determine angle between 3 popints
def getAngleABC(a, b, c):
    ba = [a[0] - b[0], a[1] - b[1]]          # Get vectors
    bc = [b[0] - c[0], b[1] - c[1]]

    ba_mag = math.sqrt(ba[0]**2 + ba[1]**2)  # Get vector magnitudes
    bc_mag = math.sqrt(bc[0]**2 + bc[1]**2)

    dot = (ba[0]*bc[0]) + (ba[1]*bc[1])      # Dot product
    cross = ((ba[0]*bc[1]) - (ba[1]*bc[0]))  # Cross product, magnitude

    if ba_mag*bc_mag != 0:
        cos = dot/(ba_mag*bc_mag)
        if abs(cos) > 1:                     # Domain check for acos
            return None
        rad = math.acos(cos)
    else:
        return None

    # Return correct angle and cross product
    return 180- math.degrees(rad), cross    # Sign of cross indicates direction of angle opening


if __name__ == "__main__":

    pi = pigpio.pi()                        # Init pi gpio
    video_capture = cv2.VideoCapture(0)     # Init video capture

    ret,frame = video_capture.read()        # Get first frame
    fY,fX,_ = np.shape(frame)

    cv2.namedWindow('frame')                # create window

    # Initialize variables
    avgLeftAngle     = [0, 0, 0, 0, 0]  # holds last 5 left elbow angles
    avgRightAngle    = [0, 0, 0, 0, 0]  # holds last 5 right elbow angles
    avgLeftShoulder  = [0, 0, 0, 0, 0]  # holds last 5 left shoulder angles
    avgRightShoulder = [0, 0, 0, 0, 0]  # holds last 5 right shoulder angles
    guessLeft      = 90
    guessRight     = 270
    leftHand       = (0,0)
    rightHand      = (0,0)
    avgIdx         = 0                  # index for averaging
    lavg           = 0                  # left hand average
    ravg           = 0                  # right hand average
    lshould_avg    = 0                  # left shoulder average
    rshould_avg    = 0                  # right shoulder average

    # Multiprocessing
    procNum = -1
    procs   = [[None, frame.copy()], [None, frame.copy()], [None, frame.copy()], [None, frame.copy()]]
    pool    = mp.Pool(processes=4)

    # Motor GPIO Pin Definitions
    LH_motor = 6
    LE_motor = 4
    RH_motor = 5
    RE_motor = 26

    while True:
        procNum  = (procNum+1)%4

        if procs[procNum][0] is not None:   # If process is not None
            ret = procs[procNum][0].get()   # Get returned values
            if ret[0] is not None:          # If returned actual values
                guessLeft = ret[3]
                guessRight = ret[6]

                cv2.circle(procs[procNum][1],ret[1],3,255,-1)               # Left elbow point
                cv2.line(procs[procNum][1], ret[0], ret[1], (0,255,0), 2)   # Draw line from chest to left elbow
                cv2.circle(procs[procNum][1],ret[4],3,255,-1)               # Right elbow point
                cv2.line(procs[procNum][1], ret[0], ret[4], (0,255,0), 2)   # Draw line from chest to right elbow

                # Store new hand locations if found
                if ret[2] is not None:
                    leftHand = ret[2]
                if ret[5] is not None:
                    rightHand = ret[5]

                cv2.circle(procs[procNum][1], leftHand,3,255,-1)                # Left hand point
                cv2.line(procs[procNum][1], leftHand, ret[1], (0,0,255), 2)     # Line from left elbow to left hand
                cv2.circle(procs[procNum][1], rightHand,3,255,-1)               # Right hand point
                cv2.line(procs[procNum][1], rightHand, ret[4], (0,0,255), 2)    # Line from right elbow to right hand

                # Find elbow angle and direction angle opens
                lelb_ang, l_dir = getAngleABC(ret[0], ret[1], leftHand)
                relb_ang, r_dir = getAngleABC(ret[0], ret[4], rightHand)

                # Map returned angles to correct angle 0 - 180 depending on side
                if lelb_ang is not None or relb_ang is not None:
                    if l_dir >=0:   # up
                        lelb_ang = lelb_ang - 90
                    else:           # down
                        lelb_ang = 180 - (lelb_ang-90)

                    if r_dir >= 0:  #down
                        relb_ang = 180 - (relb_ang - 90)
                    else:           # up
                        relb_ang = relb_ang - 90

                   # bound the elbow angle due to motor constraints
                    if lelb_ang < 0:
                        lelb_ang = 0
                    elif lelb_ang > 180:
                        lelb_ang = 180
                    if relb_ang < 0:
                        relb_ang = 0
                    elif relb_ang > 180:
                        relb_ang = 180

                    # Add values to rolling average
                    avgLeftAngle[avgIdx%5] = lelb_ang
                    avgRightAngle[avgIdx%5] = 180 - relb_ang
                    avgLeftShoulder[avgIdx%5] = guessLeft
                    avgRightShoulder[avgIdx%5] = guessRight - 180

                    # Reinit average values
                    lavg = ravg = lshould_avg = rshould_avg = 0

                    # Calculate averages
                    for i in range(0, 5):
                        lavg += avgLeftAngle[i]
                        ravg += avgRightAngle[i]
                        lshould_avg += avgLeftShoulder[avgIdx%5]
                        rshould_avg += avgRightShoulder[avgIdx%5]

                    avgIdx += 1
                    lavg = lavg/5
                    ravg = ravg/5
                    lshould_avg = lshould_avg/5
                    rshould_avg = rshould_avg/5

                    # Move the Arms
                    pi.set_servo_pulsewidth(LE_motor, angle_map(math.floor(lshould_avg), 0, 180, 670, 2475))
                    pi.set_servo_pulsewidth(LH_motor, angle_map(math.floor(lavg), 0, 180, 670, 2475))
                    pi.set_servo_pulsewidth(RE_motor, angle_map(math.floor(rshould_avg), 0, 180, 670, 2475))
                    pi.set_servo_pulsewidth(RH_motor, angle_map(math.floor(ravg), 0, 180, 670, 2475))

            cv2.imshow("frame",procs[procNum][1])   # Display

        ret,frame = video_capture.read()

        procs[procNum][0] = pool.apply_async(armDetect, args=(fX, fY, frame, guessLeft, guessRight,))
        procs[procNum][1] = frame.copy()

        # If 'q' is pressed on the keyboard, quit
        if cv2.waitKey(1) & 0xFF == ord('q'):
            break

    # After 'q' is pressed, close up peripherals
    video_capture.release()
    cv2.destroyAllWindows()
    pi.stop()