Autonomous Car

Brian Dempsey (bjd86), Liam Patterson (lgp36)

May 16, 2019 | ECE 5725

Objective

We set out to modify a traditional, off-the-shelf remote control car to incorporate autonomous driving features. We engineered the car to include self-parallel-parking ability, providing ease of use for the “driver” in hard-to-otherwise-park spots. The car can also detect oncoming obstacles and pedestrians and apply emergency braking action to stop before a collision occurs.

Introduction

In this project, we set out to transform a traditional remote control car to a semi-autonomous, self-parallel-parking vehicle. With a myriad of sensors, including a camera, proximity sensors, and line detectors, we aimed to allow the car to drive around a predetermined track, while being on the lookout for possible obstacles and pedestrians that may run in front of the vehicle. The Raspberry Pi was to be the brain of the car, processing sensor inputs and sending PWM drive signals to our motor driver. Given the 1GB of RAM and four-core 1.2GHz ARM processor, the Pi was the perfect candidate for processing all available information. The system is built upon a multithreaded architecture, with all modules written in Python. A modular codebase allowed for a clear system architecture and made it easy for fixes and improvements to be made. This also allows for concurrent programs, with each signalling back to a single drive thread that continually reacts to variables that have been set in the global space. This polling-reactive nature allows for quick response times and efficient data transfer.

Design and Testing

Design Process and Schedule Tracking

We followed a phased design process, tackling different aspects of the car each week, throughout the six-week period. Our full schedule is shown in the table below.

Week of:

Tasks

4/15

Order parts and determine how to control the RC car with the Raspberry Pi. Create mounts for camera, Raspberry Pi, proximity sensors, breadboard.

4/22

Get RC car driving with the Raspberry Pi, set up OpenCV and start working on OpenCV object detection (specifically for parking spots and object avoidance). Get the proximity sensors working.

4/29

Continue working with OpenCV and proximity sensors. Integrate both to work together. Begin testing parking and object avoidance. Order line sensors.

5/6

Finish programming and complete final tests. Mount and integrate line detector sensors.

5/14 @ 4:30pm

Demo

Table 1: Detailed Schedule

We tracked our initial schedule fairly consistently. At the end of each week, we’d identify the items left to complete, and finish them as necessary. We recognized that, as with any project, our schedule required some contingency and elasticity. As such, we did modify our schedule slightly from its initial form. We did not identify the need for line sensors until the week of 4/22, as we had not yet fully ruled out using OpenCV as a line follower. However, we rush ordered our line sensors and received them the week after, resulting in minimal schedule impact.

Hardware Design and Testing

We knew the chassis we chose was to be versatile and utilitarian, while also being sleek and presentable. To this end, we chose a 1:14 scale Porsche Cayenne Turbo. The 1:14 scale gave us ample room to install sensors (and for the passengers) and otherwise work on the car, while not being so large as to be obtrusive and unparkable. We specifically chose the turbo model of our car because we wanted to optimize performance and maximize the airflow over the Raspberry Pi as we drove to improve cooling performance. However, we quickly realized we did not have the budget to accommodate the popular Cayenne Turbo S, so we simply looked on with envy.

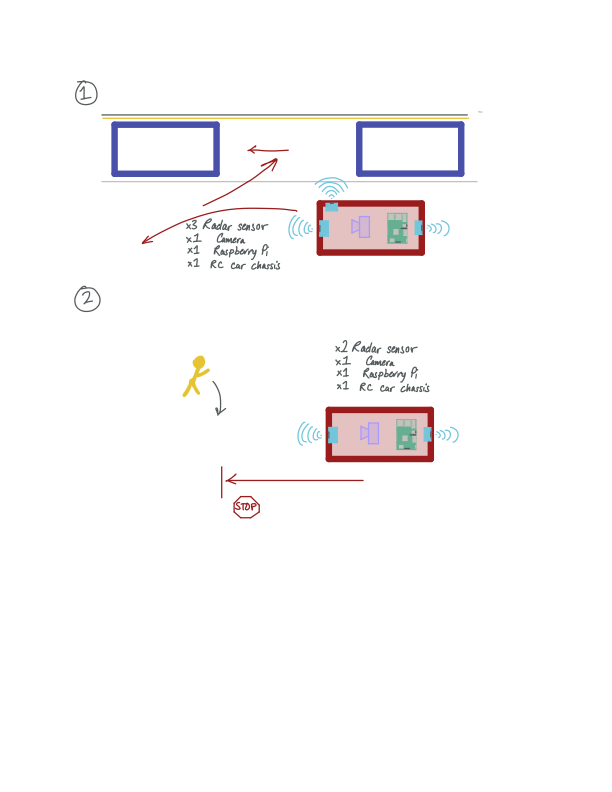
All jokes aside, the physical design of our car is relatively straightforward. We started with the initial sketch, as shown in the figure below.

Figure 2: Initial Concept

When we first set out, we looked into just using three ultrasonic distance sensors—one in front, one in back, and one on the side. We had expected the camera to aid us in this regard, but quickly found vision tracking to be too resource intensive and, thus, too slow for the purposes of parking.

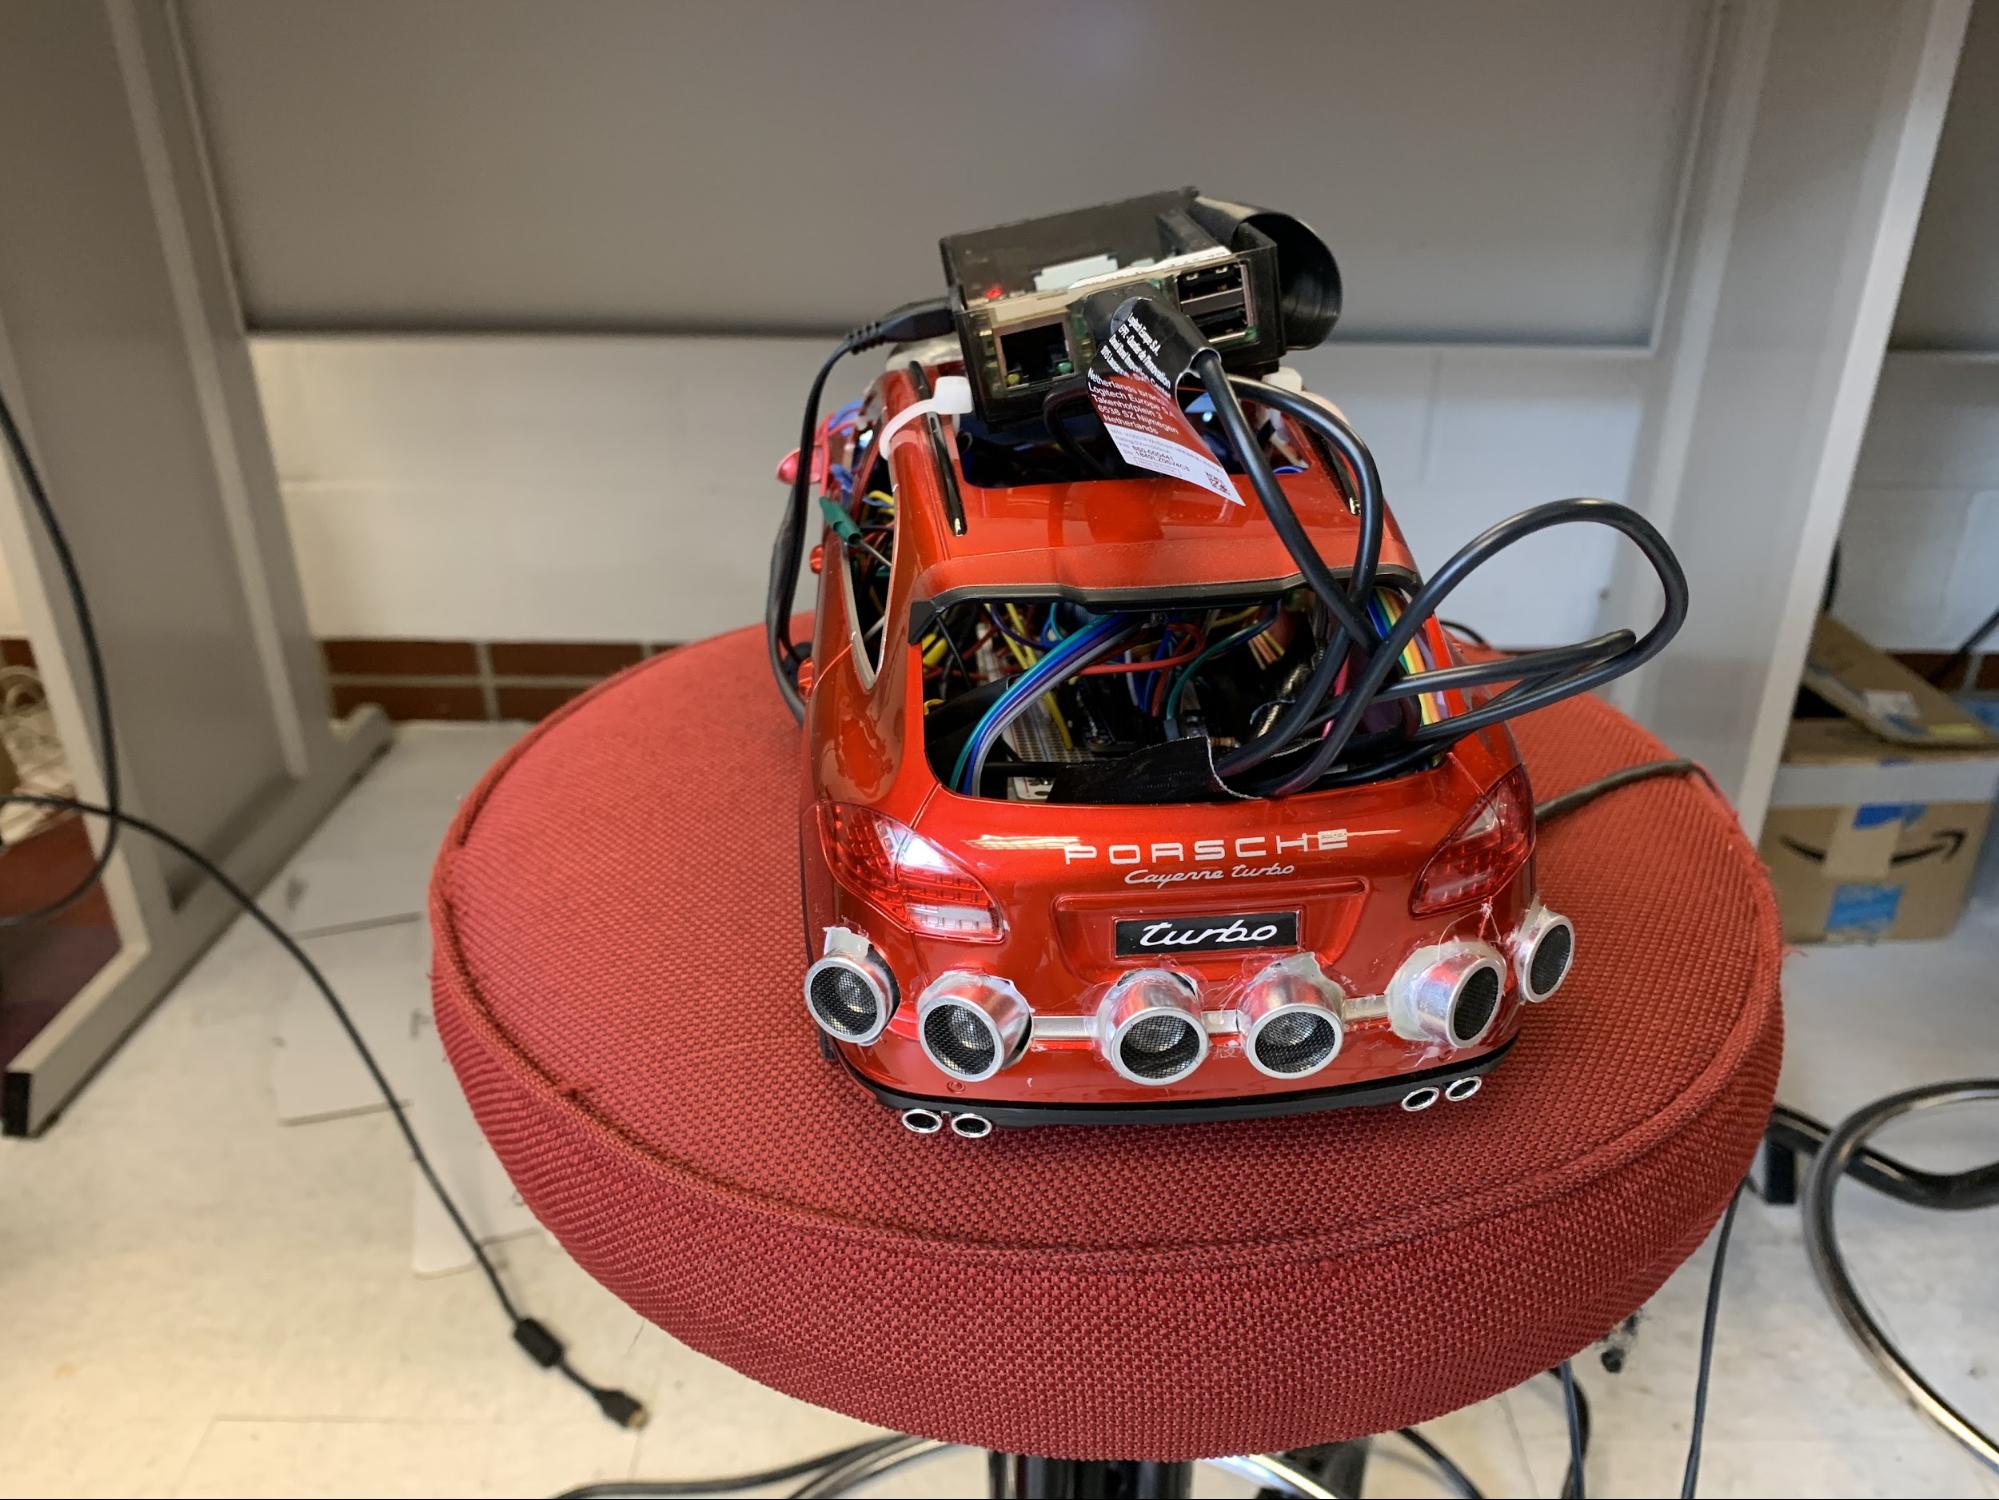
Instead, we opted for an array of ultrasonic distance sensors. Much like modern cars on the road today, we installed three sensors in the front bumper and three sensors in the rear bumper, spaced at an approximately -30º/0º/30º offset from the centerline of the car. An additional sensor was installed in-line with the passenger-side side mirror. The side sensor allowed us to identify a suitable open parking spot, while the front and rear sensors allowed us to identify parked cars and properly align with the parking space. Our process will be further explained in the software design section.

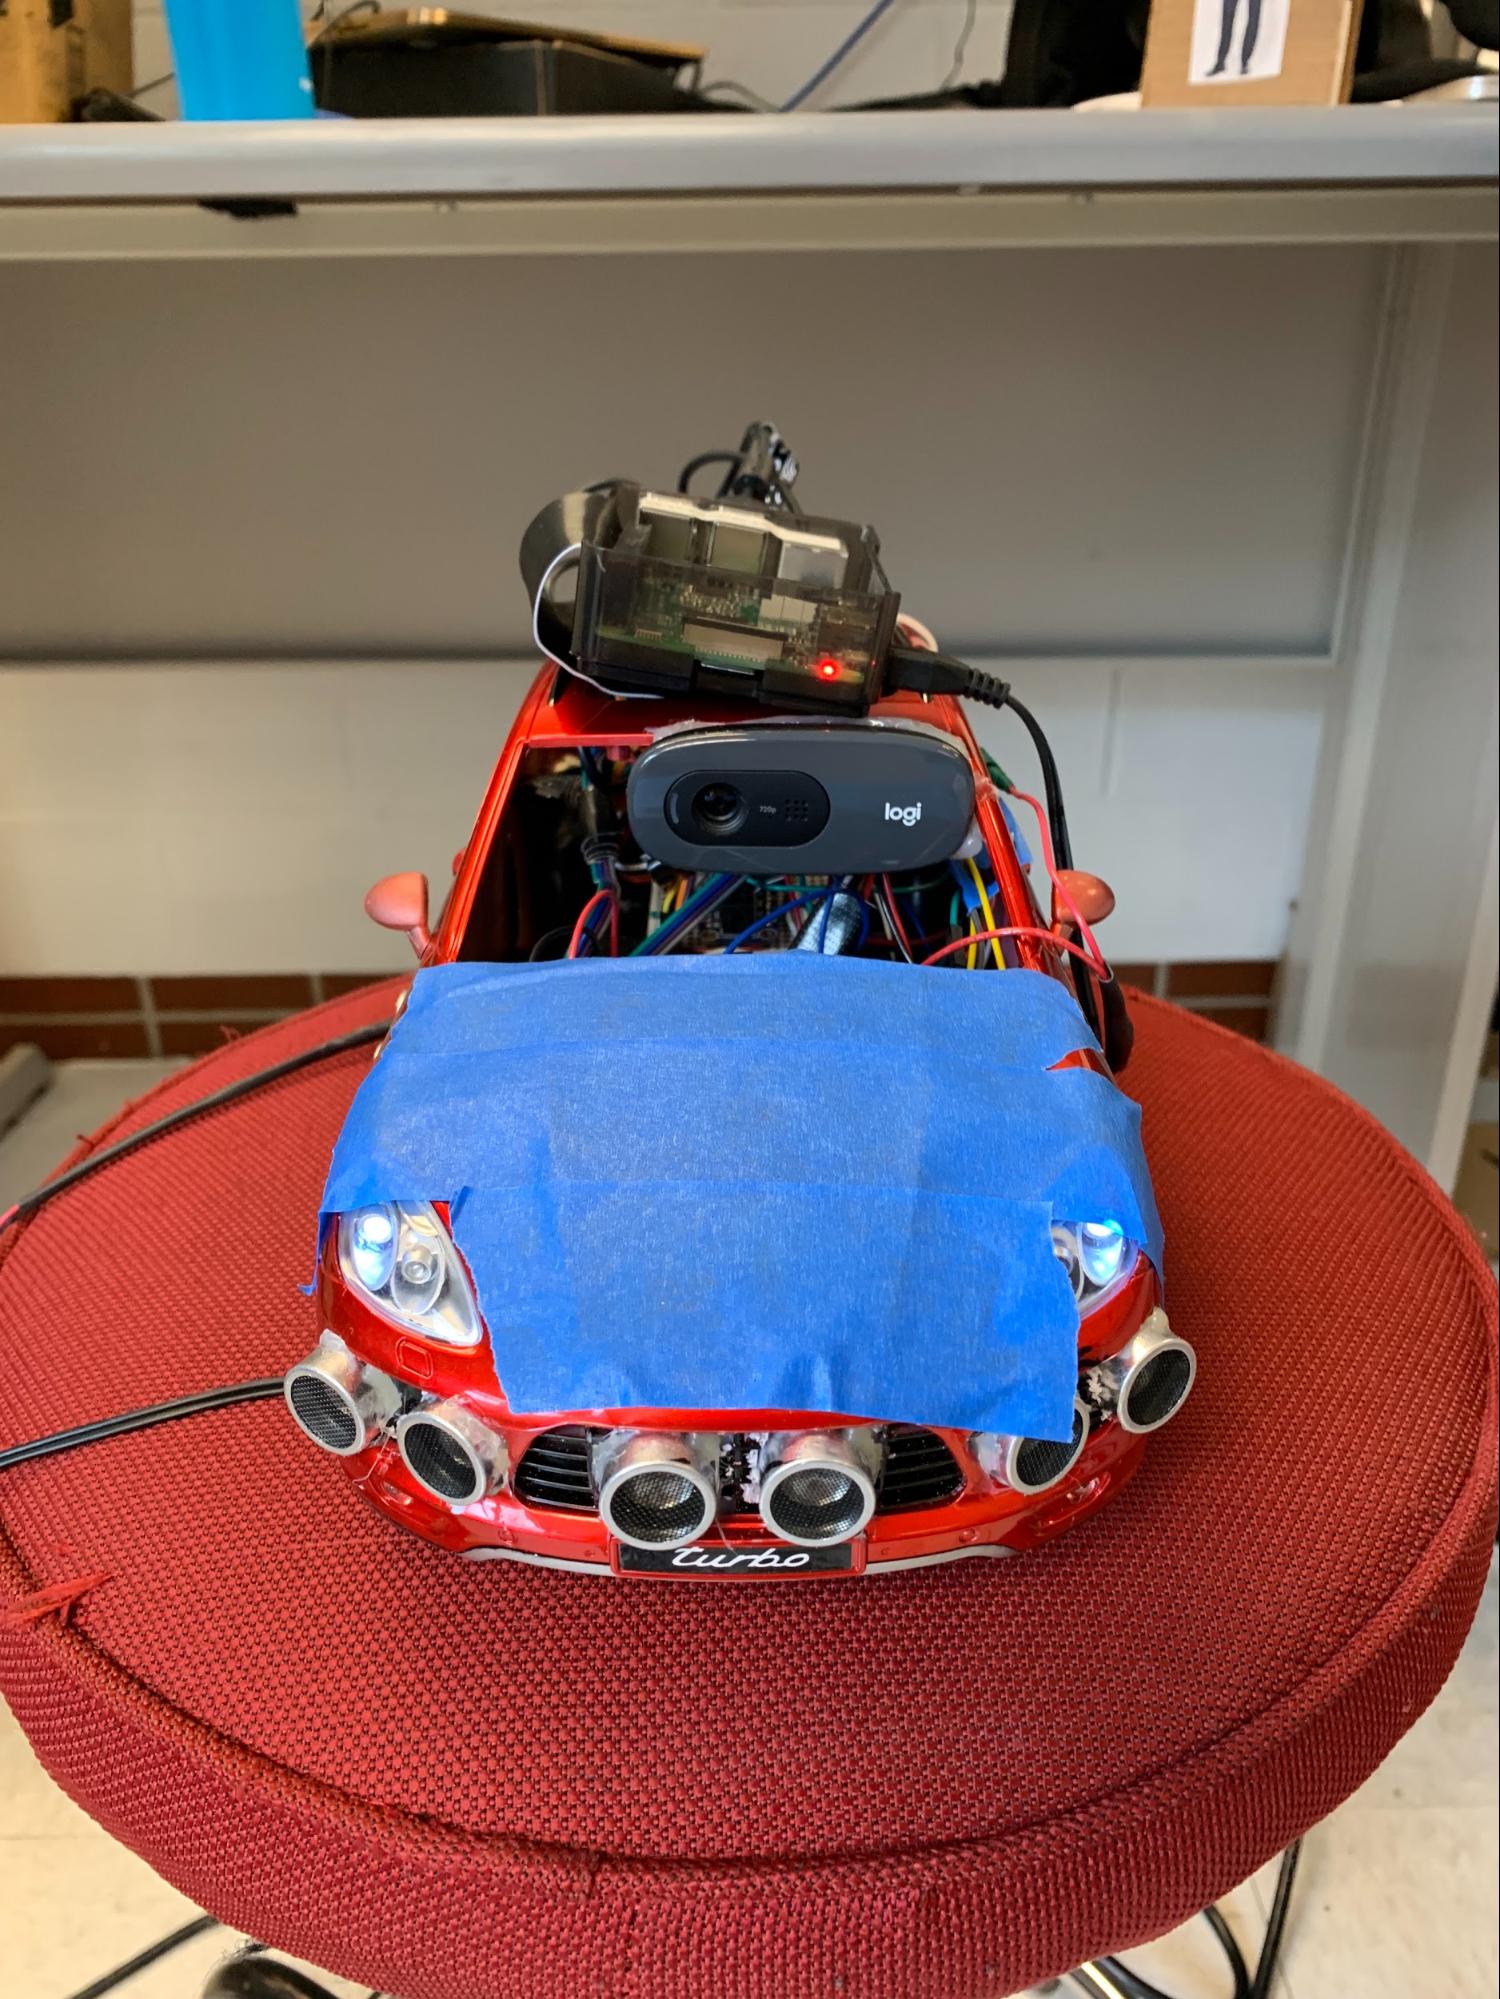
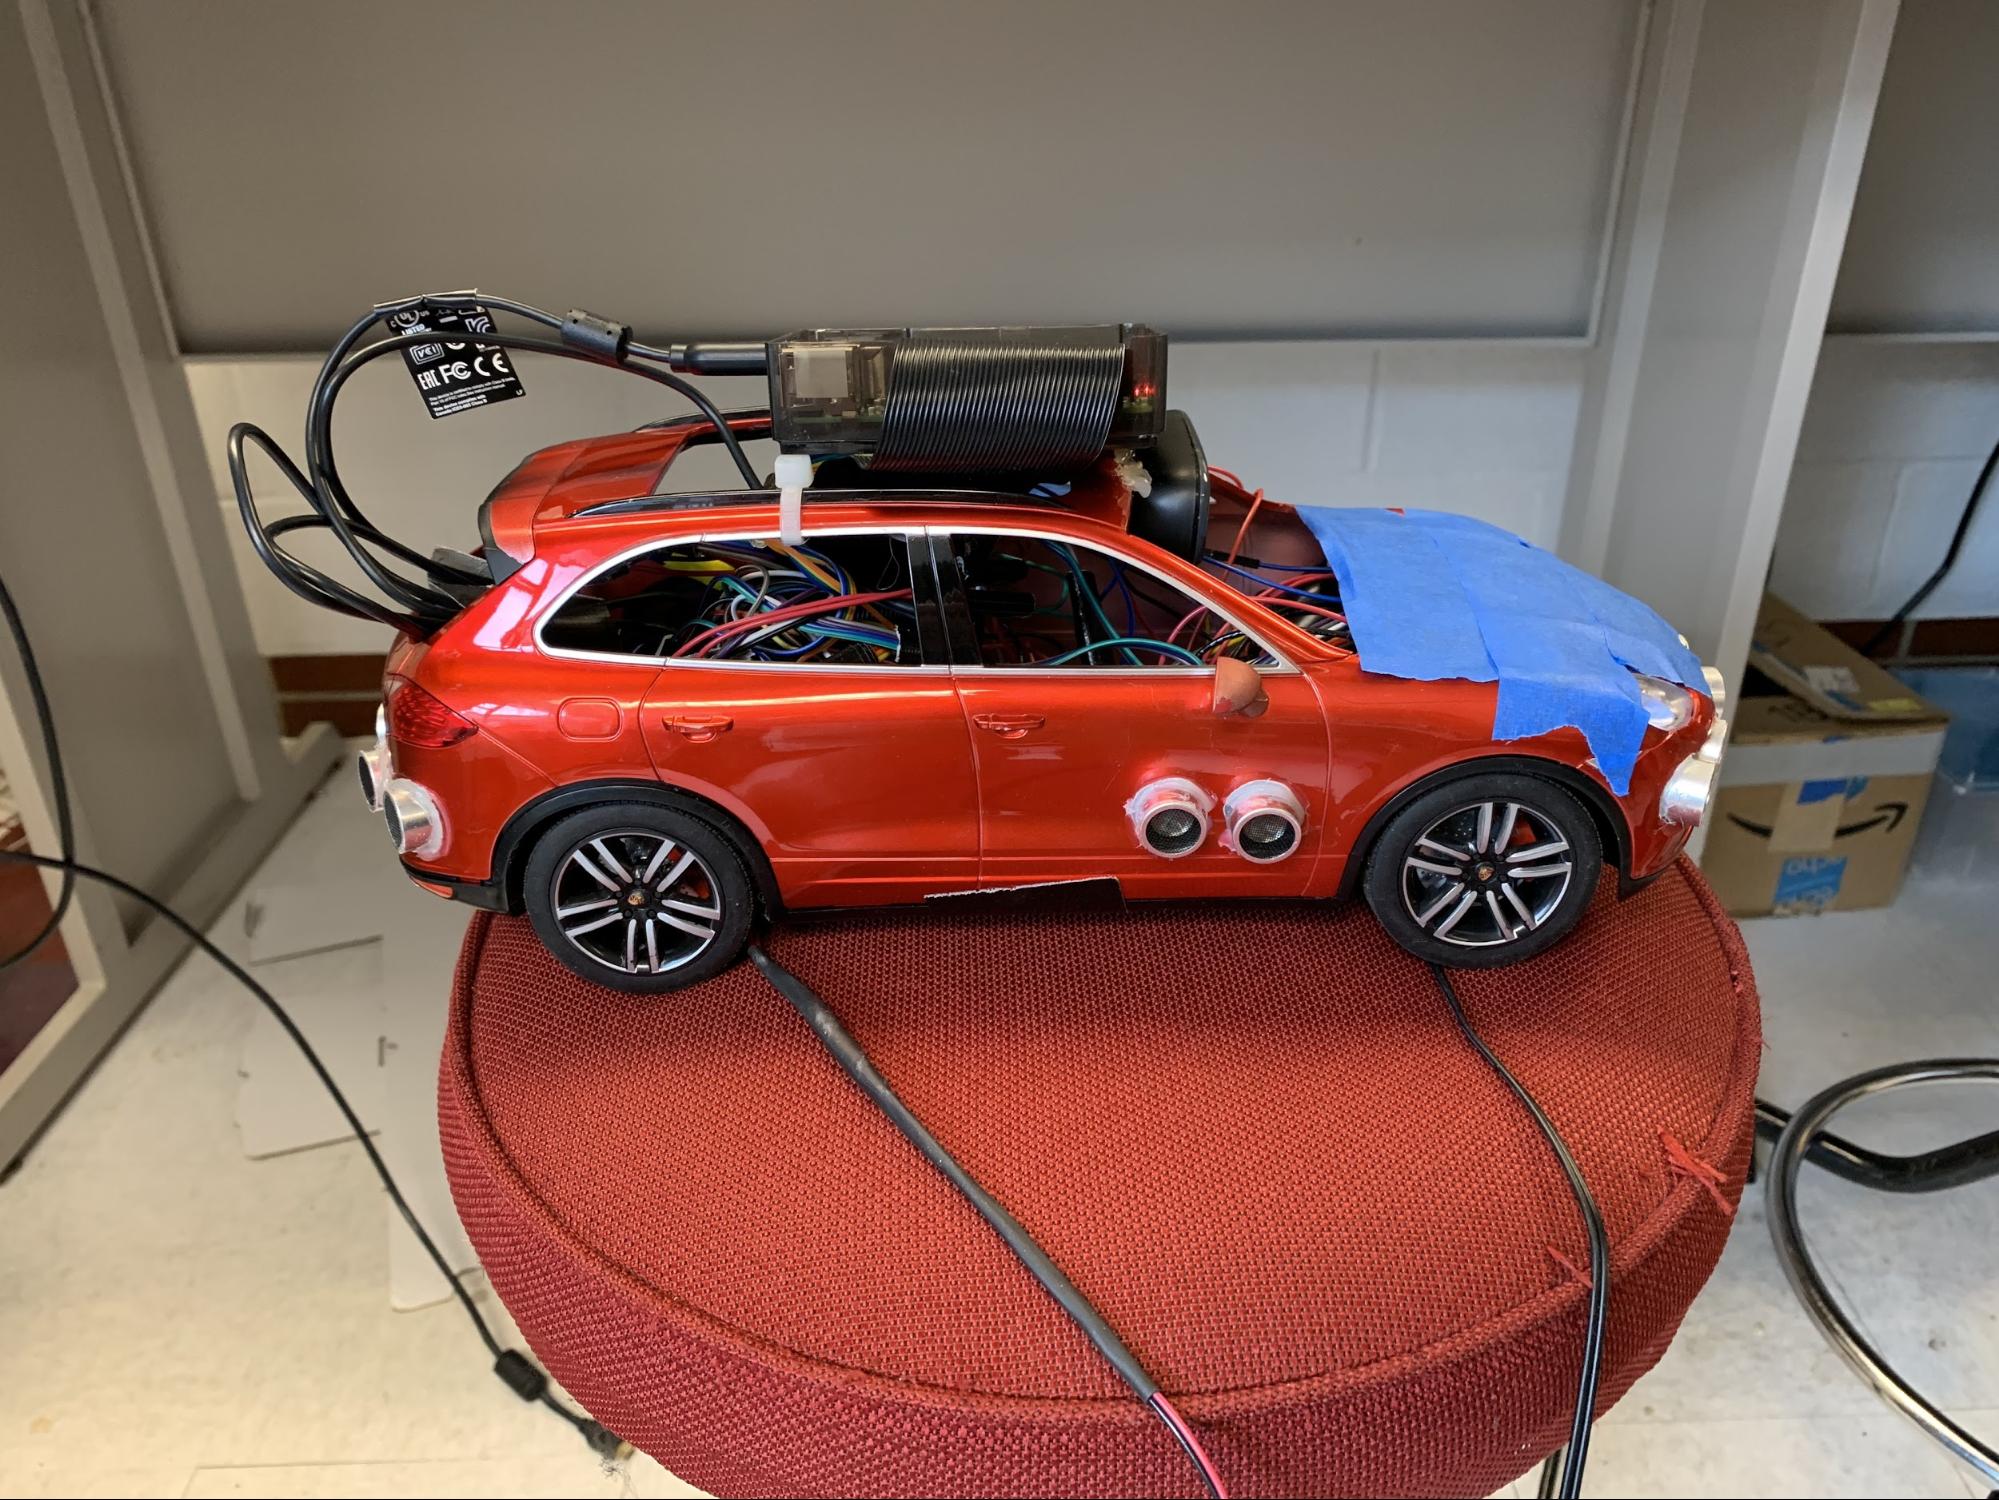
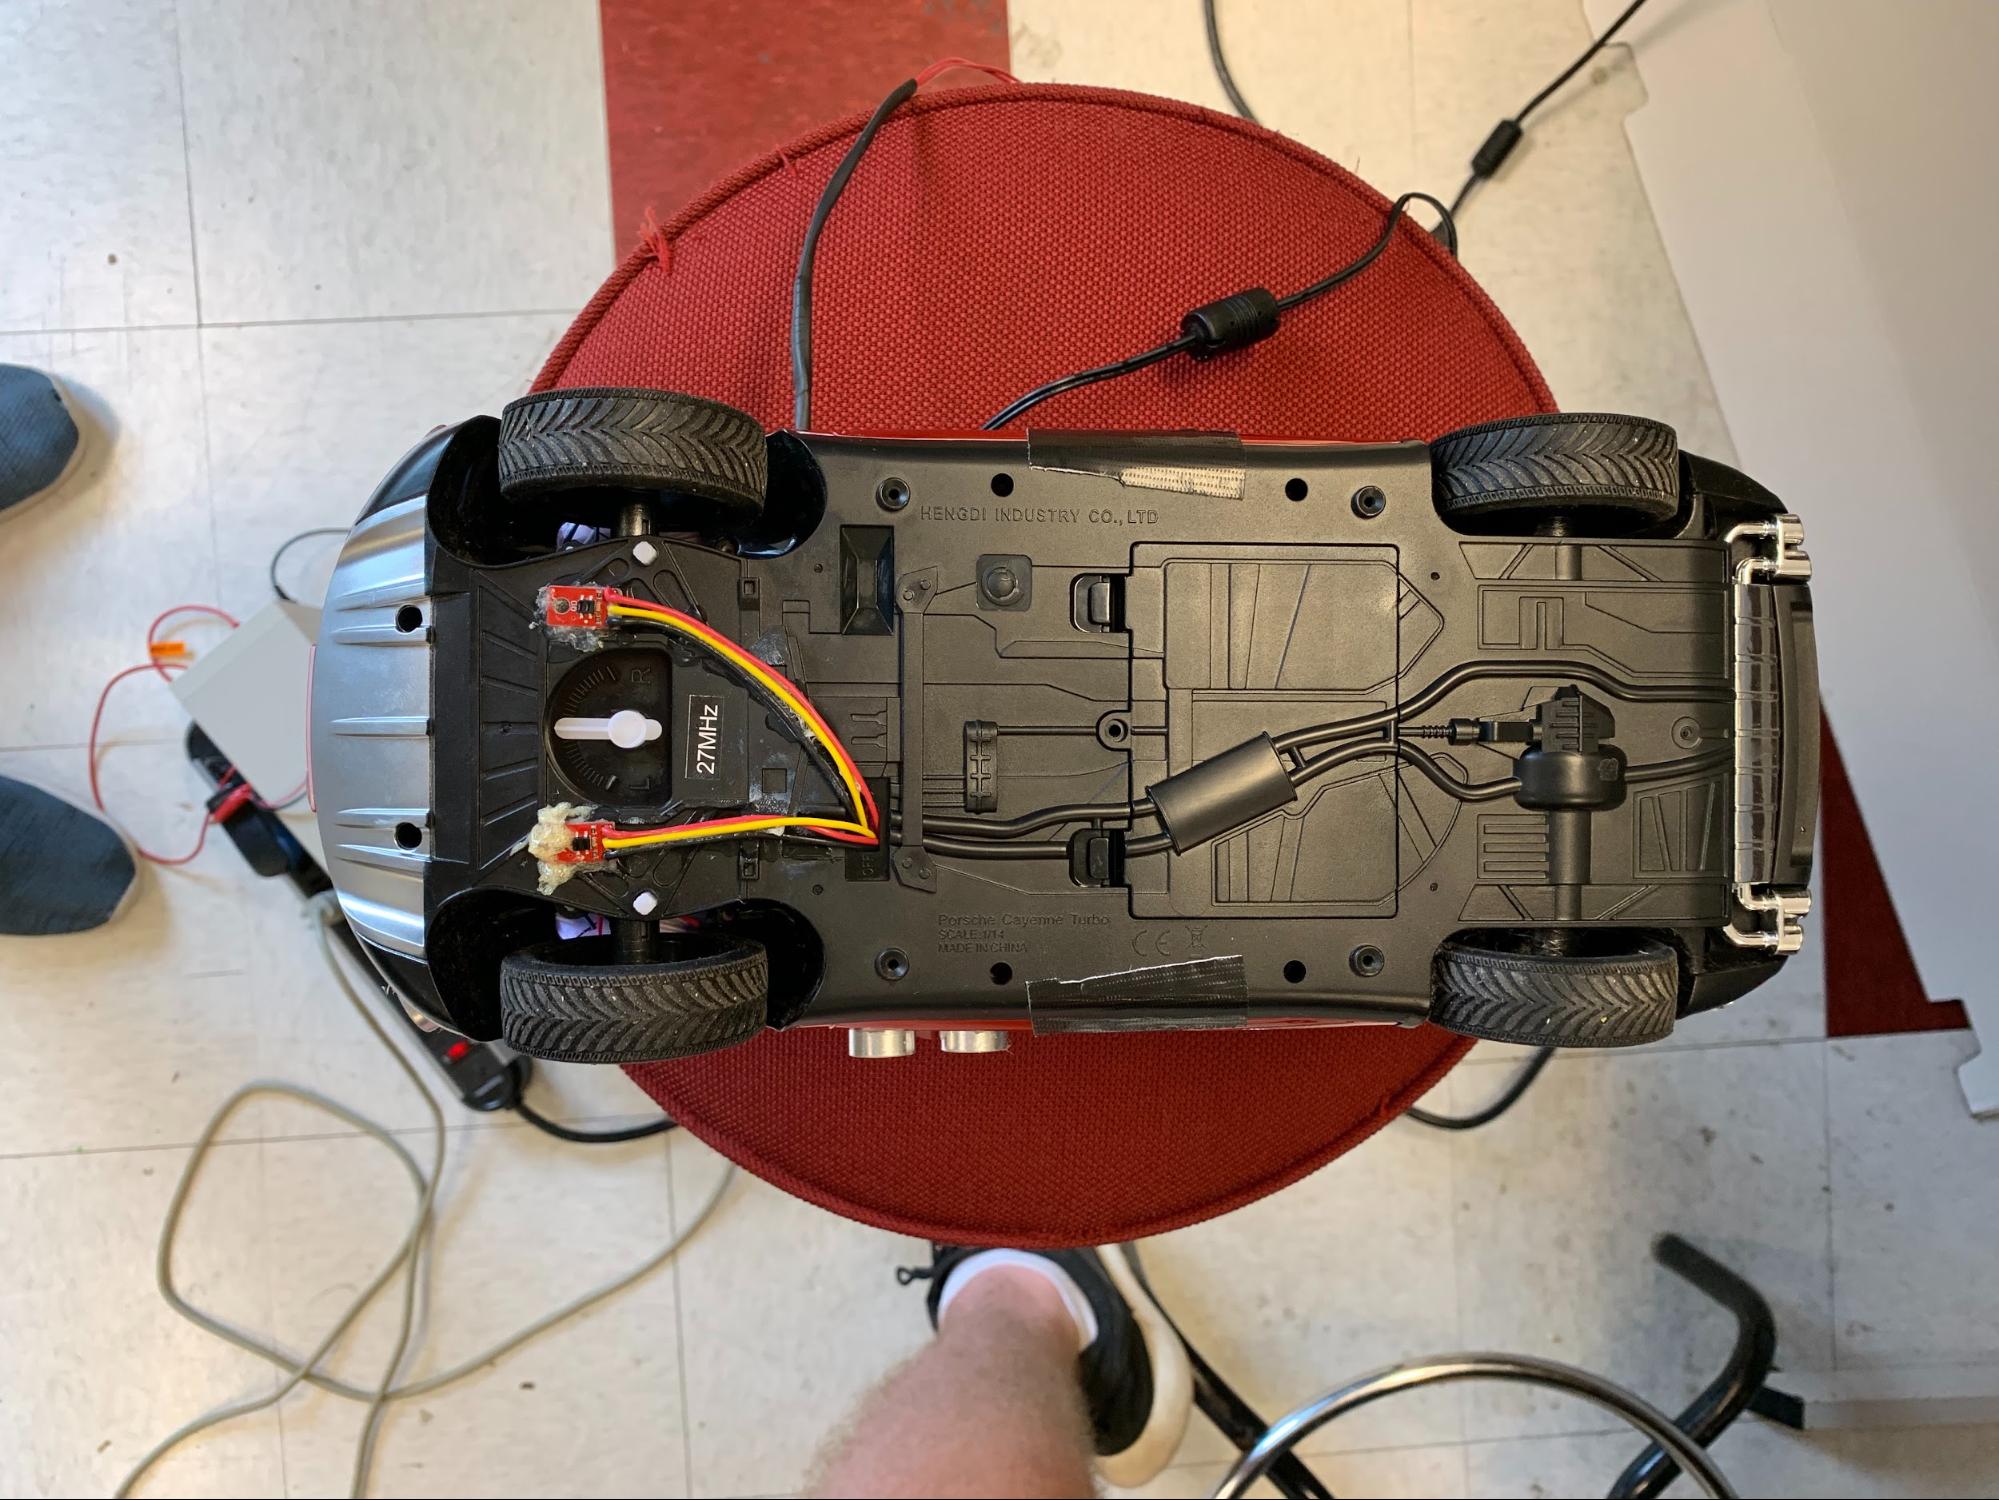
Figure 3: Whole Car Overview

A camera was installed and mounted with high temperature adhesive (hot glue), and positioned in such a way so as to include the front of the car and a majority of the straight-on image in the field of view.

A pair of line sensors was installed on the underside of the forward part of the vehicle, between the front two wheels. This allowed for accurate measurements close the the turning wheels, providing additional accuracy in movement.

Figure 4: Line Sensor Placement

Before we installed our proximity sensors, line sensors, and camera, we first tested that they were not dead on arrival. We ran them through some reference logic given by each manufacturer as a way of verifying their functionality. We saw that all our components behaved within tolerance and as expected.

Beyond simply installing input devices (sensors), we also required a method to control the vehicle’s speed and direction. We made use of the existing DC motors installed within the car, attaching them to an L293D h-bridge motor driver. This was then wired directly to the Pi’s GPIO pins, to which a PWM signal would be output.

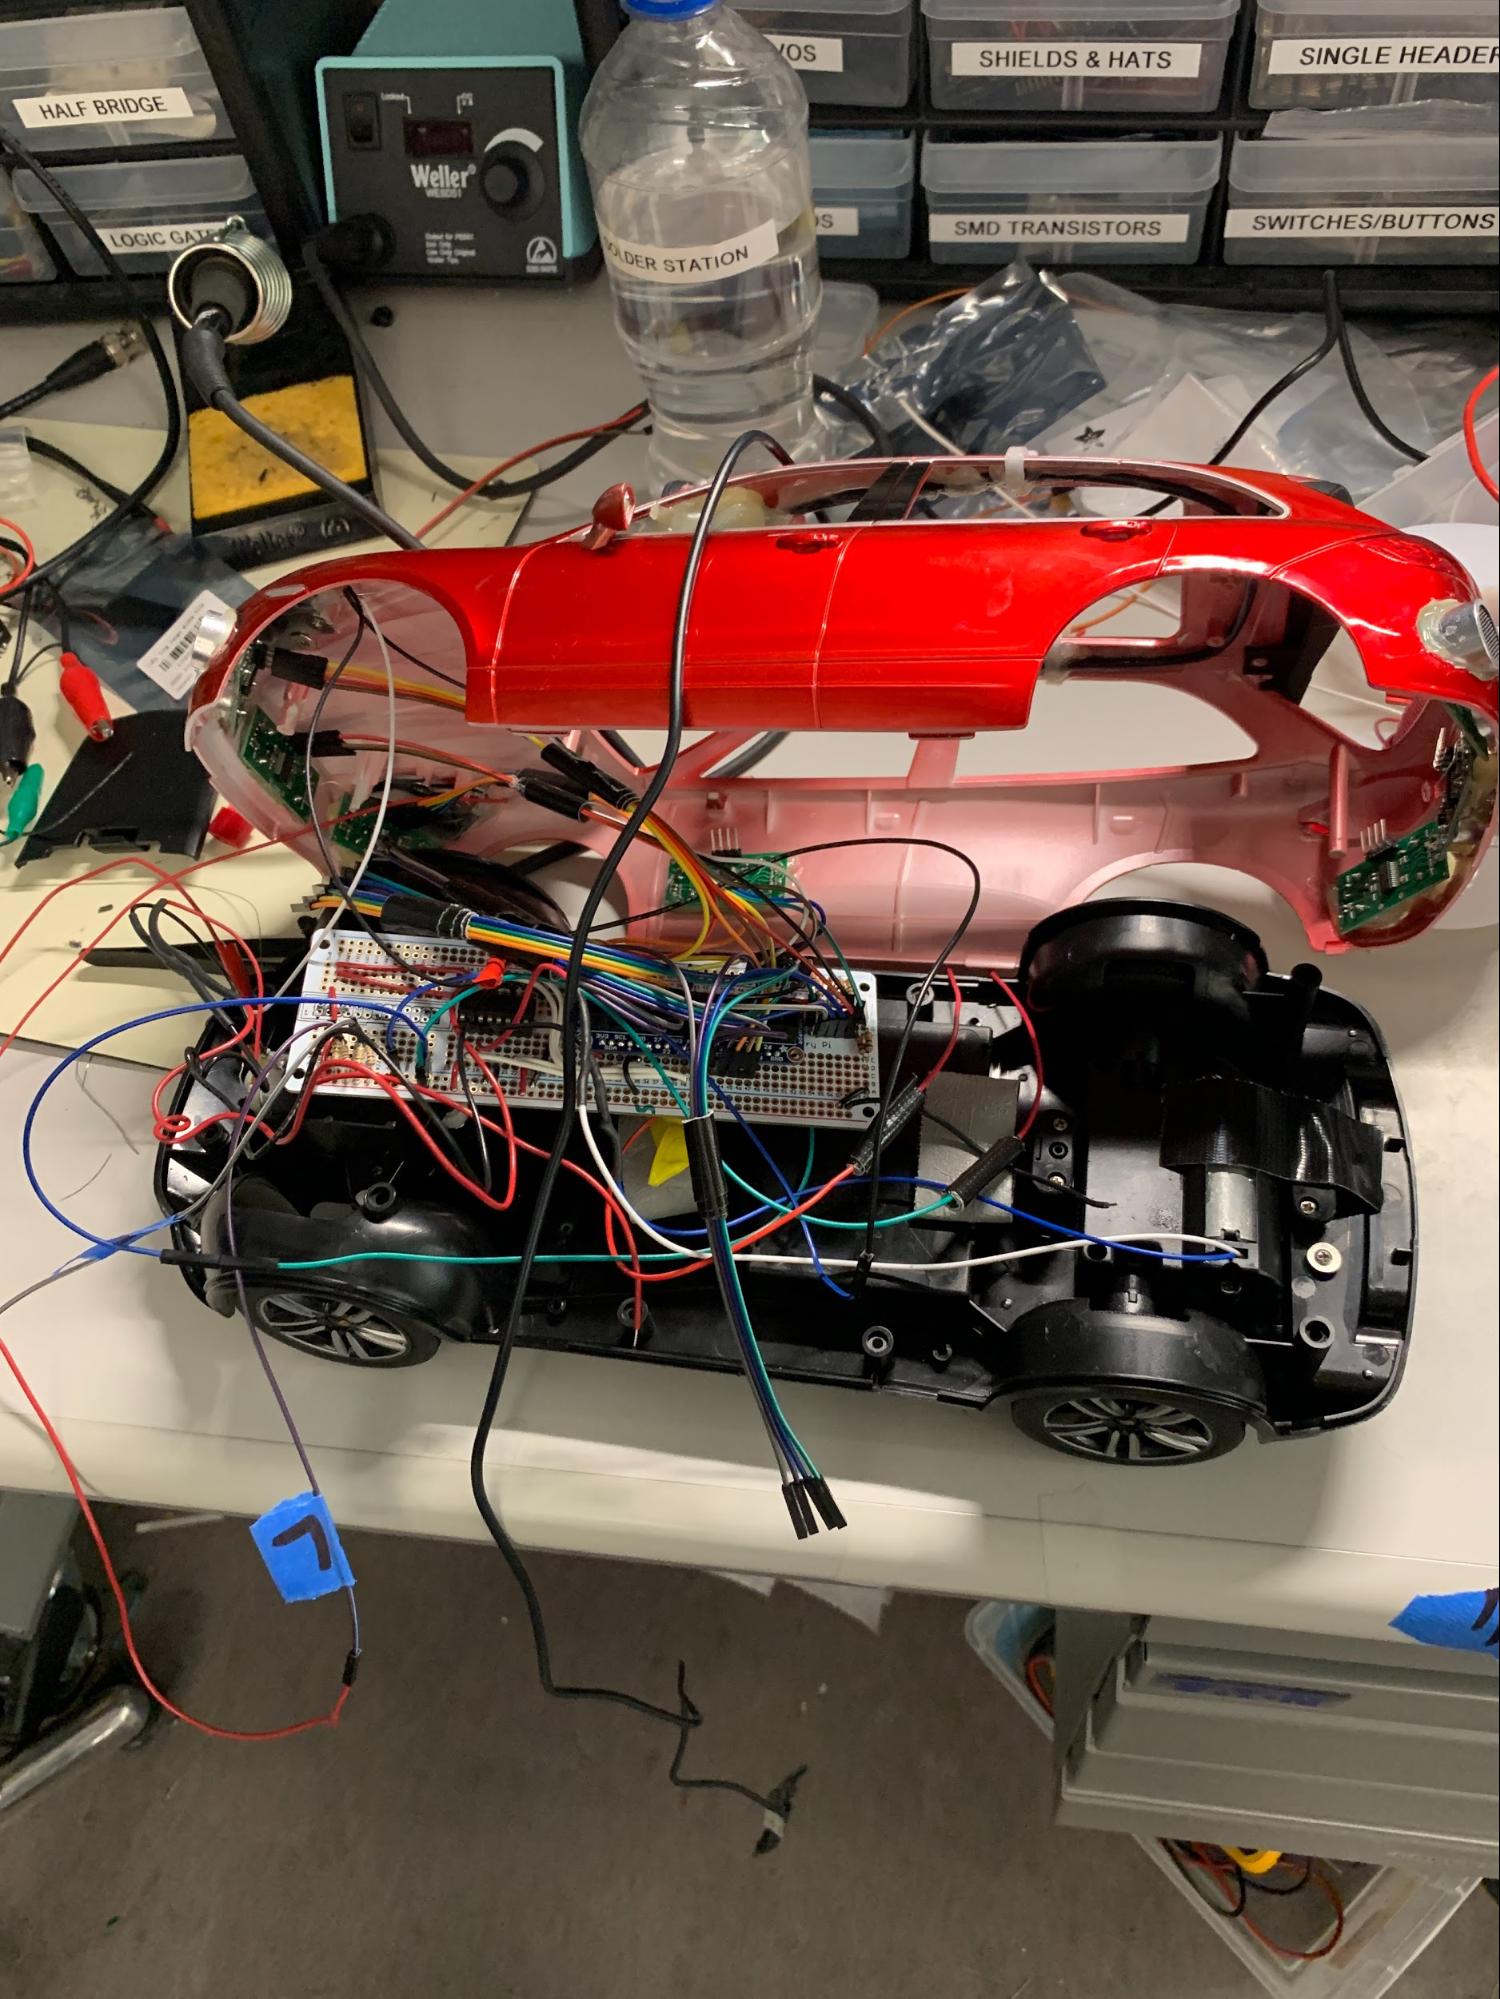
After breadboarding components, we soldered the required sensors and their reference circuits to a semi-permanent protoboard. This was then installed in the vehicle, after removing the interior seats and windows. The Pi was placed atop the vehicle, to allow for easy access to USB ports, Ethernet, and allow for ample Wi-Fi reception.

Figure 5: Protoboarding

Initially, our plan included a provision to add a battery to power the Pi, and a separate battery to power the 6v DC motors. However, we quickly discovered that we had added too much weight to the car, and the existing DC motors could not possibly pull more weight. Even further, throughout testing, we noticed a steady decline in the motors’ performance, particularly the drive motor. Towards the end, the motor performance declined entirely, and the car was unable to drive on its own. We attribute this failure to the brushes within the motor degrading over excessive testing and usage.

Bill of Materials

Part

Vendor

Qty

Total Cost

Porsche Cayenne Turbo 1:14 RC car

Hobbytron

1

$24.95

Logitech C270, 720p webcam

Amazon

1

$19.86

SparkFun line sensor breakout, QRE1113

Sparkfun

2

$5.90

Dual h-bridge motor driver, L293D

Adafruit

1

$2.95

Ultrasonic distance sensor, HC-SR04

Adafruit

7

$24.92

Adafruit Perma-Proto breadboard

Adafruit

1

$7.95

Jumper wires pack of 100, asst.

Amazon

2

$5.79

Billable Total

$92.32

Raspberry Pi, model 3B

lab stock

1

-

SanDisk Ultra microSD card, 16GB

lab stock

1

-

Generic 2.5A microUSB power supply

lab stock

1

-

Adafruit GPIO breakout cable

lab stock

1

-

Driving and Steering Design and Testing

The first aspect of the car we worked on was driving since everyone that gets an RC car wants to drive it as soon as possible. But, as excited as we were, we had to make very modular code so that it would be easy and intuitive to drive the car from other scripts. To this extent, we created a function to initialize all the GPIO required to run the motors in one function, then three functions for controlling the direction the car drove (forward, reverse, or stop) that took  duty cycle as an input, and finally three functions to control the steering (straight, right, and left). We decided to use PWM for the car so that we would be able to control the speed at which the DC motors drive. In the end, the brushes on the motors all began to wear out, and the direction functions became obsolete, but we used the steering function until the end.

To test the driving code, we made sure that each of the functions worked as we expected by driving the car around for several hours.

Object Avoidance and Line Following Design and Testing

The object avoidance uses 7 ultrasonic sensors distance sensors to detect any objects surrounding the car and runs in the threadsensortest.py script. If the objects are too close to the car, and the car is heading in the direction of the object, the car will automatically stop to ensure the object is not hit. Since the sensors are quite noisy, we had to use a basic low pass filter by using the previous 5 values and then taking a simple average of those values to assign the new value.

Another issue with the sensors is that if there is no object in range (or the object is too close to the sensor), they will not hear a response from the wave they send out. When the object is too far away, there will not be a reflected wave response. When the object is too close, the code cannot switch from outputting a high pulse to inputting quick enough, and the sensor will not receive anything. This necessitates a timeout in the monitoring code so that the code doesn’t hang in the case where no object is in range. Originally when we were only working with 1 sensor, we set this timeout value to be 1.5s, which worked well. However, once we started adding more sensors, this value slowed down the rate at which the car could ‘see’ what was around it. Since we used polling for the sensors, when the car was not surrounded by objects on all sides, checking each sensor could take up to 1.5s, which means the whole loop could take up to and in excess of 10.5s. This was usually not the case because the maximum range on the sensors is 200cm and the object had to be within about 1cm of the car for the timeout to be necessary. However, even when a few of the sensors were requiring a timeout, the loop was slowed down significantly and the car struggled to detect objects before it collided. When we changed the value of the timeout parameter to 0.0001s (which corresponds to 30cm), all of our code ran much faster and the car was capable of detecting objects better.

Because we are running all of our functions in threads, we needed a way for threadsensortest.py (which runs the ultrasonic sensors) to communicate with other processes, mainly the script in charge of driving the car. Using global variables proved to be difficult because we had issues with scope and importing variables from other scripts, so we decided to make a new python script that held variables called threadvars.py. Since we only had one thread writing to any given variable at a time, and the other processes would only read from the variable, we did not have to use locks or semaphores. One of the variables in this script is a  list of three ints where the first represented whether an object was detected in the front, the second represented whether an object was detected on the side, and the third represented a detected object in the rear. We found this method to be highly useful, allowing us to run threads rather than one extremely complicated script that took care of all the functions the threads performed in one script. Additionally, after coming to the realization that we would need threads to run all of these functions, we updated the driving script to update several variables in threadvars.py indicating the direction the car is driving.

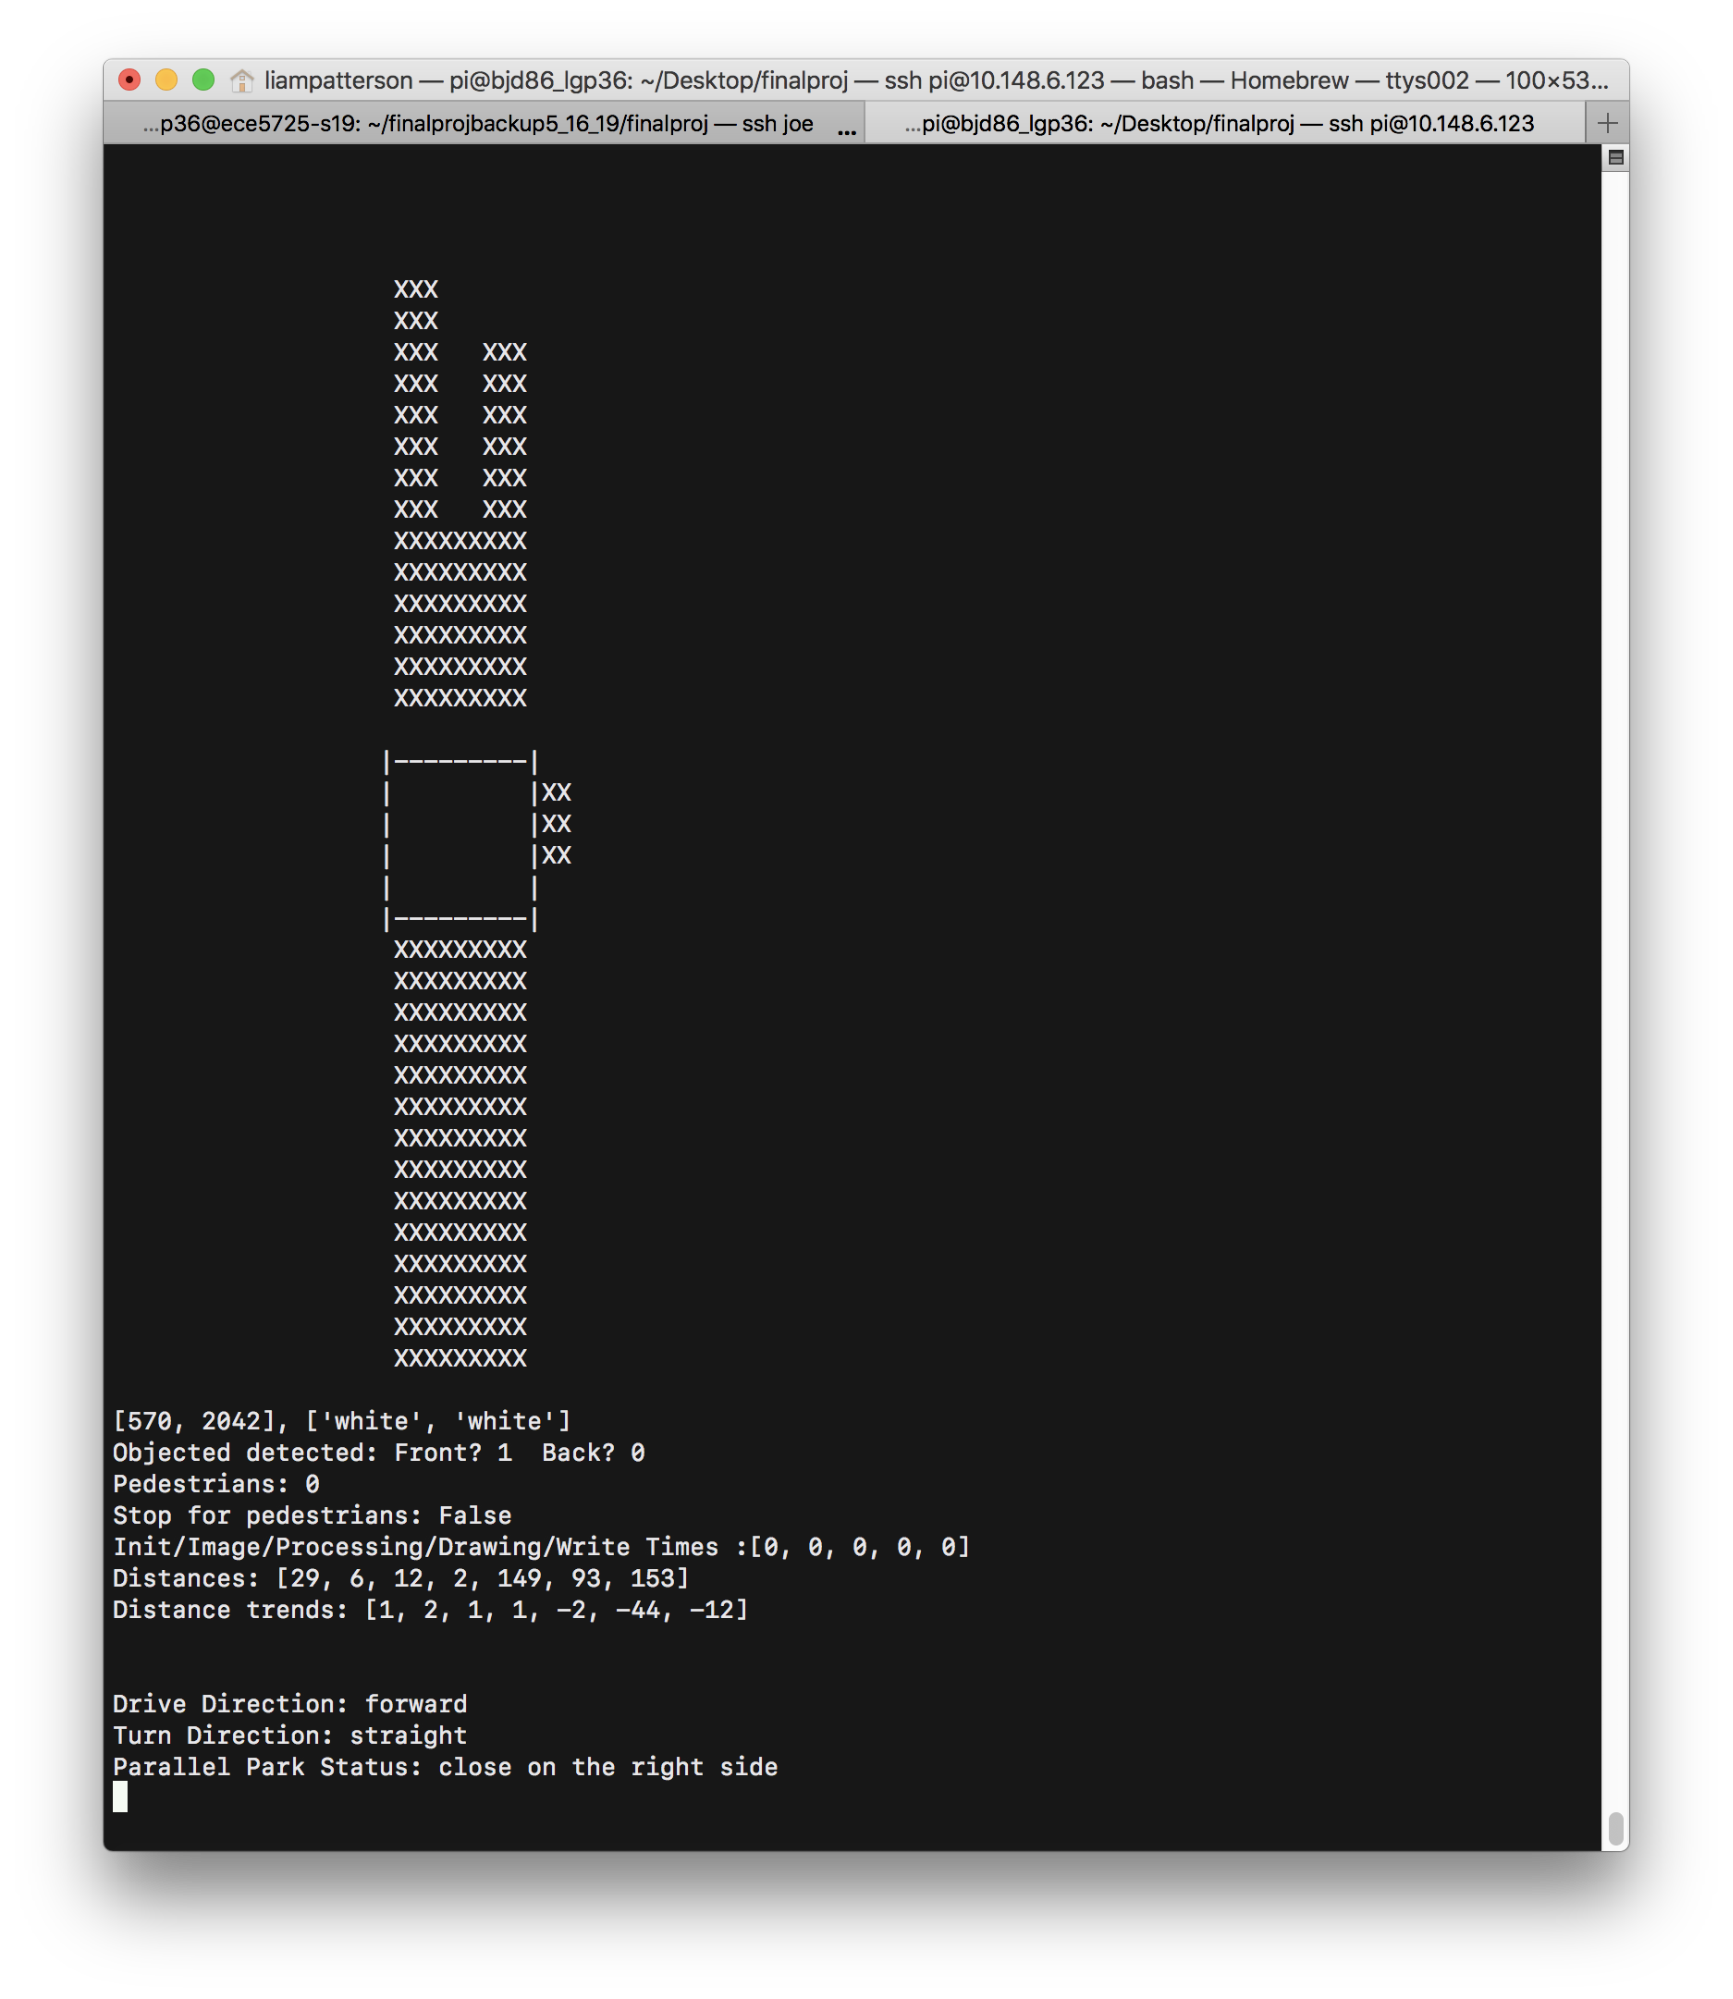
To test this code we created a script called visualize.py that shows the car in the middle of the terminal and then a series of X’s surrounding the car indicating where surrounding objects are with respect to the car. Additionally, the visualize script shows information regarding pedestrian detection, the color the line sensors are seeing, and the direction the car is driving/steering. The output can be seen below in Figure 6, which shows that an object is close on the right hand side of the car and one is close to the sensor in the middle, front of the car. By watching the outputs on visualize.py, we could see that the car was detecting objects we placed around the car, and we could figure out how quickly the car saw the objects if they were moving (simulating the car approaching an object).

Figure 6: visualize.py output

Pedestrian Detection Design and Testing

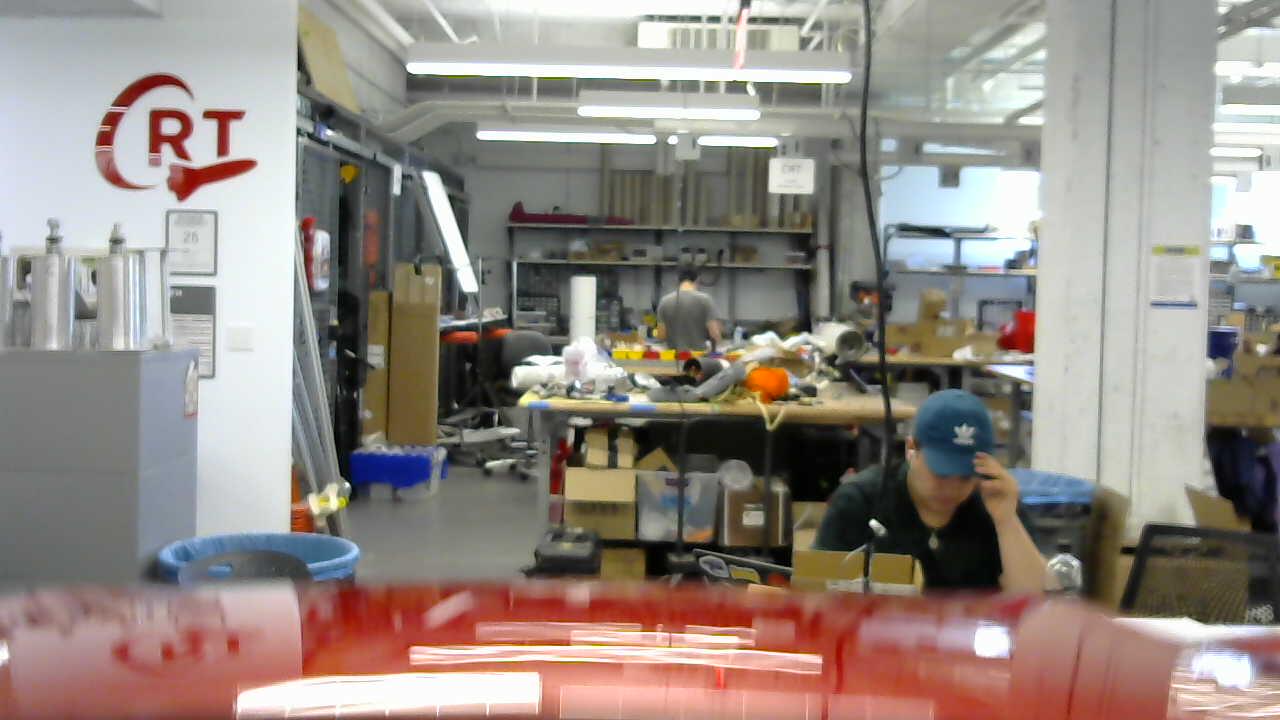
The pedestrian detection aspect of our project drew inspiration from a feature that is only now attaining popularity in consumer vehicles. While heralded as a safety feature, the truth is that many cars nowadays charge a premium for a potentially life saving module, and we wanted to prove how it could be done on low cost hardware. As we mentioned in the hardware design section, we mounted a camera to mimic placement near the rearview mirror, allowing us the perfect point of view. A sample image is shown below.


Figure 7: Camera View

In general, our pedestrian detection follows a simple architecture according to the following steps: snap a picture, load the image, process the image, cleanup the image, report the results, repeat.

Snapping a picture is relatively straightforward on Linux. Since we were using a webcam, we made use of v4l (Video for Linux) drivers to mount our webcam in the /dev/v4l directory as a usb device, allowing our device to be accessible to any Linux application. We picked an open source video capture command line application called streamer, written by Gerd Knorr to snap pictures with the camera and control resolution and exposure settings. The built in auto exposure and white balance especially helped us here and was the primary reason for us choosing the Logitech C270 over the often heralded Raspberry Pi camera.

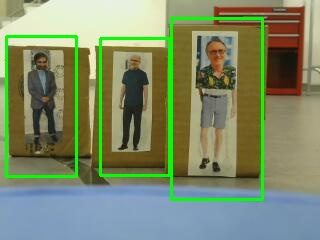
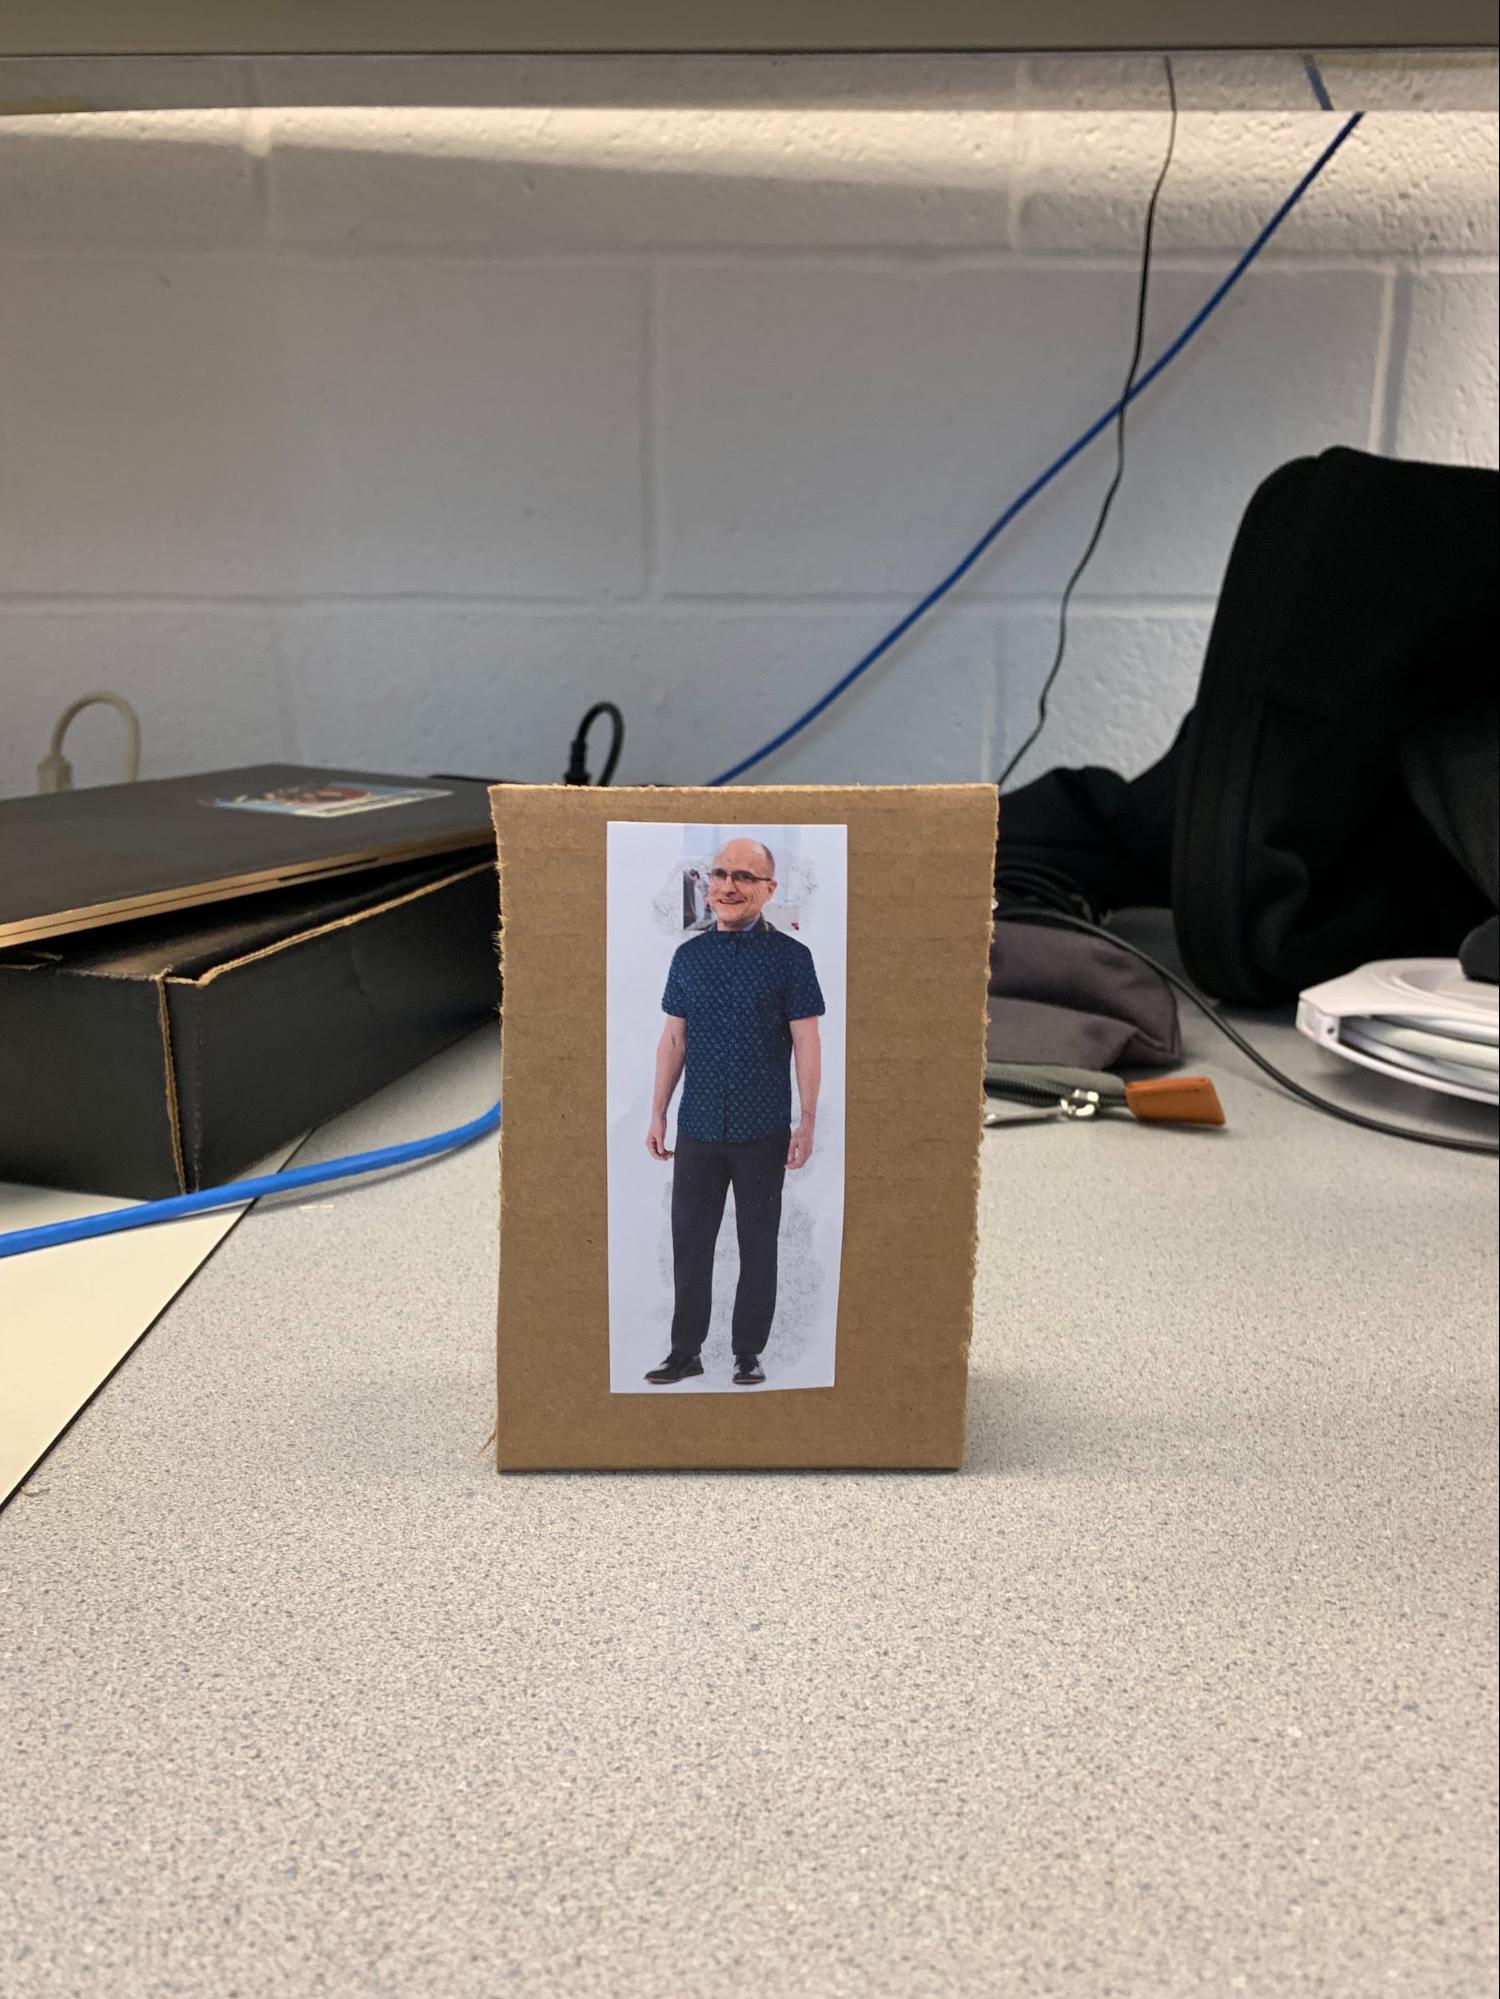
The rest, as far as image processing and reporting go, were handled by OpenCV. OpenCV reads the image as a NumPy array and, after slight image resizing to increase performance, runs a histogram of oriented gradients (HOG) processor on the image.  We can further use HOG in conjunction with OpenCV’s built in detectPeople classifier to further refine our accuracy. On top of all this, we use imigtools’ non-maxima suppression to eliminate false positives and duplicate bounding boxes. The bounding boxes are drawn and saved to the image, for verification and testing purposes. An example output is shown below, properly detecting three pedestrians. An additional image is also shown, showcasing our innovative method of producing predictable, static pedestrians for testing.

Figure 8: “Pedestrian” Detection

Figure 9: “Pedestrian” Creation

After we’ve established our final number of people detected, we output that number to our global variable instantiation of threadvars.pedestriansDetected, to allow other threads to react to the results. Additionally, in the thread that continually runs pedestrian detection (independent and concurrent to the drive and proximity detection threads) we also run a sort of filtering, by ensuring that the pedestrian avoidance function continually finds a person, and not a one-off error. If a valid person is detected, we set threadvars.stopForPeople = True, and the drive thread reacts accordingly.

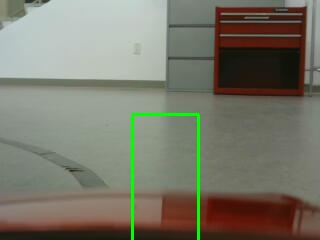
Observant readers will notice that the car hood has changed from a brilliant, firecracker red to a dull matte blue. Our car did not get a new paint job halfway through, but we did notice an issue with the reflective nature of the hood. As shown in the images below, we actually had an issue with false positives when some objects were reflected in the hood. The matte blue of 3M Blue® painter’s tape has fixed that issue for now, though.

Figure 10: False Pedestrian Detection

Parallel Parking Design and Testing

To develop the code for the parallel parking aspect, we first made a script that only steered the car and we pushed it along to determine which sensors would be needed for each maneuver. Maneuver 1 is driving straight while an object is close on the right side, continuing to drive straight after the object on the right side goes further away (indicating an open spot), and waiting until the right sensor detects an object close to the right side again (indicating the car in front of the open spot). Maneuver 2 is turning left and continuing to go forward for 1 second, which helps us orient the car to enter the spot since our turning radius was rather poor. Maneuver 3 is reversing with the front wheels turned right until two of the rear sensors detect they are about 10 cm from the wall. At this point, maneuver 4 is continuing to reverse while turning left to help get the front of the car into the spot. We continue this until the rear sensors are within 1-2cm of the car behind us. Finally, maneuver 5 is turning right and going right until the front sensors are close to the car in front or the sensor on the right hand side is close to the wall (curb).  After getting the algorithm working by pushing, we tried to get the script to run with the actual motors driving the car, but at about this point the motors began to give out which made the car very jerky, and only capable of driving if the car was at full speed. Since parallel parking is not advisable at top speed, or when your engine is failing, we decided to stick with pushing the car. To test the script, we simply pushed the car into the spot repeatedly and made sure the car reacted as we expected over multiple attempts.

To write the parallel parking exit script, we had the car go straight forward until it was almost touching the car in front, then cut backwards turning right until the rear of the car is almost touching the car in the reverse, and finally leaving the spot by turning left and going forward. Again, we tested this script by driving the car out of the spot repeatedly and making sure no damage was done to our beloved Porsche (Porsche maintenance is expensive) or the cars surrounding our Porsche.

Results

If we’d have said that everything worked one-hundred percent of the time, on the first try, and with no issues, you’d think we were lying. That’s because we would be. The honest truth is that everything did not work on the first try, and some things failed long after we had programmed them to work.

Perhaps the most glaring failure of our project was due to the fact that our motors weren’t powerful enough to accelerate the car from a standstill and eventually burned out after continued testing. This rendered our autonomous car quite dependent on human interaction (we pushed it around).

Additionally, though, with mild filtering, the pedestrian detection works fairly well and accurately identifies the correct number of people ~80% of the time. Our Pi became incredibly resource constrained when running all of our codebase, and as such our image detection only operated at a maximum rate of ~1Hz, with the OpenCV algorithm taking 75% of the processing time of the processImage() method.

Our proximity sensors retail for ~$3.50 each, and, predictably, are not the highest resolution or quality. Our relatively simple functions required high amounts of filtering and averaging to obtain mildly more accurate results. Occasionally, false positives are unable to be filtered, and result in less than ideal occurrences of failing to park properly.

Though these issues seem problematic and have required careful and fine solutions to mitigate them properly, the end result is a car that can actually navigate on its own (when pushed), and can properly identify objects and pedestrians. We’ve proved that consumer hardware isn’t always a replacement for industrial sensors, but that Linux, specifically with the PreemptRT kernel, is a very suitable platform for self driving vehicles.

Conclusions

Even though we’ve encountered quite a few issues as detailed above, we’ve achieved more or less what we set out to accomplish: a self driving car that can navigate around a predetermined track and successfully parallel park in a suitably large parking space.

Our line following proved to be accurate, and consistently could determine the difference between the black line and white surface. We attribute this to the sensor being fairly shielded by the car, as they’re placed on the underside of the vehicle. Pedestrian avoidance, while not suitably fast for true vehicle speeds, proved to be sufficient for the slow speed of the remote control car. Object detection worked stellarly, with enough filtering to prevent false positives, but remain in control of the vehicle at all times. Furthermore, our graphical user interface of the vehicle’s status and sensor readouts proved to be useful not only for debugging, but also as a “passenger display” for passengers more technically inclined. Self parallel-parking proved to be useful, despite issues with the drive motors. While fine tuning was certainly necessary, and can definitely be further refined, we found it to be sufficiently accurate for our track.

Not to beat a dead horse, but the only aspect that we found to definitively be inoperable was the drive motor. Given the remote control car’s cheap nature, we had low expectations to begin with for the motor, but we were surprised when we saw how quickly it degraded.

For just $93, we were certainly able to achieve our goal of a semi-autonomous car, with self-parking ability. Given that modern automakers are investing hundreds of millions of dollars to further develop and refine this growing industry, we are certainly pleased with the results.

We have a live demo available of our project. Please find it embedded below.

Future work

Given more time, we’d certainly switch out the drive motor for a more powerful DC motor, perhaps one that incorporates a gearbox. This would provide us not only with the torque necessary to simply move around, but also allow us finer control over drive speeds, an enhancement that would be well received for the more precise driving maneuvers.

We’d also explore additional filtering mechanisms for the proximity sensors. We found that our rude way of filtering by averaging the five previous values carried many perceptible flaws. Perhaps a more considered approach in control theory is necessary, and we’ve even considered exploring Kálmán filtering to further refine our results.

Work Distribution

This project was wholly created by Brian Dempsey and Liam Patterson. Listed references were used as aids and are given proper credit. Brian worked on the wiring of the car, the drive code, and refining the proximity sensors. Liam worked on the line following, pedestrian detection, GUI visualization, and proximity sensors.

Code Appendix

import subprocess, cv2, imutils
from imutils.object_detection import non_max_suppression
from imutils import paths
import time
import numpy as np
import threadvars
import os

#here we define a class to instantiate.
class CV:
        
#init our variables
        currentImage =
False
        originalImage =
False
        
def __init__(self, res="480x360", \
                cam=
"/dev/v4l/by-id/usb-046d_0825_43A68EA0-video-index0"):
                self.resolution = res
                self.camera = cam
        
#this is what we actually want to do
        
def processImage( self ):
                
#allow us to define timing
                start_time = time.time()
                
#initialize our model
                histogram = cv2.HOGDescriptor()
                histogram.setSVMDetector(cv2.HOGDescriptor_getDefaultPeopleDetector())
                self.imageFile =
'/images/image.jpeg'
                
#set our file path and see how long it took until this point
                init_time = time.time() - start_time
                
#remove any previous image first, then take the image
                subprocess.call(
"rm " + self.imageFile, shell=True )
                subprocess.call(
"streamer -o " + self.imageFile + " -c " + self.camera + " -s " +\
                        self.resolution, shell=
True, stdout=open(os.devnull, 'wb'))
                
#find how long image taking took        
                image_time = time.time() - start_time - init_time
                
#load the image to opencv
                self.currentImage = cv2.imread( self.imageFile )
                
#resize the image to be smaller and easier to operate on
                self.currentImage = imutils.resize( self.currentImage, width=min(
400, self.currentImage.shape[1]))
                self.originalImage = self.currentImage.copy()
                
#detection initial algorithm
                (initialPeds, weights) = histogram.detectMultiScale( self.currentImage, \
                        winStride=(
4, 4 ), padding=(8,8), scale=1.05)
                
#figure out how long that took
                processing_time= time.time() - start_time - init_time - image_time
                
#draw rectangles for initial descriptors
                
for (x, y, w, h) in initialPeds:
                        cv2.rectangle( self.originalImage, (x, y), (x+w, y+h), (
0,0,255), 2)
                initialPeds = np.array( [[x,y,x+w,y+h]
for (x,y,w,h) in rects])
                
#filter overlapping rectangles
                finalPeds = non_max_suppression(initialPeds, probs=
None, overlapThresh=0.65)
                
#draw final rectangles
                
for (x1, y1, x2, y2) in finalPeds:
                        cv2.rectangle( self.currentImage, (x1, y1), (x2, y2), (
0, 255, 0), 2)
                drawing_time = time.time() - start_time - init_time - image_time - processing_time
                
#write the image back
                status = cv2.imwrite(
'/images/processed-image.jpeg',self.currentImage)
                threadvars.peopleDetected = len( finalPeds )
                write_time = time.time() - start_time - init_time - image_time - processing_time - drawing_time
                threadvars.cvTimes = [ round(init_time,
2) , round(image_time,2) , round(processing_time,2), round(drawing_time,2) , round(write_time,2) ]

Figure 11: cv.py

import RPi.GPIO as GPIO
import threadvars

#setup the GPIO and turn off warnings
GPIO.setwarnings(
False)
GPIO.setmode(GPIO.BCM)
GPIO.setup(
17, GPIO.OUT)
GPIO.setup(
27, GPIO.OUT)
GPIO.setup(
22, GPIO.OUT)
GPIO.setup(
10, GPIO.OUT)

#instantiate the pwm objects
def motor_begin():
       
global p17, p27
       p17 = GPIO.PWM(
17, 2)
       p27 = GPIO.PWM(
27, 2)
       p17.start(
0)
       p27.start(
0)
       p17.ChangeDutyCycle(
0)
       p27.ChangeDutyCycle(
0)
       GPIO.output(
22, GPIO.LOW)
       GPIO.output(
10, GPIO.LOW)


#Sets GPIO pins such that we can drive forward if we sleep with this GPIO configuration
def forward(duty=100):
       p17.ChangeDutyCycle(duty)
       p27.ChangeDutyCycle(
0)
       threadvars.drivestatus[
0] = "forward"
       threadvars.drivestatus[
2] = duty
#Sets GPIO pins such that we can stop if we sleep with this GPIO configuration
def stop():
       p17.ChangeDutyCycle(
0)
       p27.ChangeDutyCycle(
0)
       threadvars.drivestatus[
0] = "stop"
       threadvars.drivestatus[
2] = 0
#Sets GPIO pins such that we can drive reverse if we sleep with this GPIO configuration
def reverse(duty=100):
       p27.ChangeDutyCycle(duty)
       p17.ChangeDutyCycle(
0)
       threadvars.drivestatus[
0] = "reverse"
       threadvars.drivestatus[
2] = duty
#Sets GPIO pins such that we can steer right if we sleep with this GPIO configuration
def right():
       GPIO.output(
22, GPIO.HIGH)
       GPIO.output(
10, GPIO.LOW)
       threadvars.drivestatus[
1] = "right"
#Sets GPIO pins such that we can steer straight if we sleep with this GPIO configuration
def straight():
       GPIO.output(
22, GPIO.LOW)
       GPIO.output(
10, GPIO.LOW)
       threadvars.drivestatus[
1] = "straight"
#Sets GPIO pins such that we can steer left if we sleep with this GPIO configuration
def left():
       GPIO.output(
10, GPIO.HIGH)
       GPIO.output(
22, GPIO.LOW)
       threadvars.drivestatus[
1] = "left"

Figure 12: drivetrain.py

import time
from threadsensortest import *
import threadvars
import RPi.GPIO as GPIO
import os
import drivetrain
import math
from visualizeThreaded import *

#instantiate the sensor thread
mythread = MyThread(
1)
mythread.daemon =
True
mythread.start()

#instantiate the thread that prints visualize
visualizethread = visualizeThreaded(
42)
visualizethread.daemon =
True
visualizethread.start()

#motor broken -> no speed :'(
duty =
0
slow =
0;
#initialize the motors
drivetrain.motor_begin()
drivetrain.stop()
time.sleep(
1)
#theoretically go forward, actually go straight
drivetrain.forward(duty)
drivetrain.straight()
#forward while right close
#detect that right goes far away
#forward until close again
endWhile =
False
while ( ( threadvars.proximityValues[3] <= 6 ) and (not endWhile) ):
       drivetrain.forward(duty)
       
#print "close on right side"
       threadvars.parallelParkStatus =
"close on the right side"
       
if threadvars.proximityValues[3] > 8:
               
if threadvars.proximityValues[3] > 8:
                       endWhile =
True
drivetrain.forward(duty-slow)
endWhile =
False
while ( ( threadvars.proximityValues[3] > 6 ) and ( not endWhile ) ):
       
#continue going forward
       drivetrain.forward(duty-slow)
       
#print "open spot"
       threadvars.parallelParkStatus =
"open spot"
       
#if threadvars.proximityValues[3] < 5:
       
#       endWhile = True
#turn left for 1 second
threadvars.parallelParkStatus =
"turn left for 1 sec"
drivetrain.forward(duty-slow)
drivetrain.left()
time.sleep(
1)
#we are at the front of the spot
threadvars.parallelParkStatus =
"at the front of the spot"
#stop
drivetrain.stop()
#turn right
drivetrain.right()
#print "turning right"
threadvars.parallelParkStatus =
"turning right"
#time.sleep(2)
#go backwards until back close
while ( threadvars.proximityValues[6] >= 6 and threadvars.proximityValues[4] > 10 and threadvars.proximityValues[5] > 6 ):
       drivetrain.reverse(duty)
       
#print "reversing right"
       threadvars.parallelParkStatus =
"reversing right"
#turn left
drivetrain.left()
#swing the front into the spot until back nearly touching
while ( threadvars.proximityValues[4] >= 3 and threadvars.proximityValues[5] > 3 and threadvars.proximityValues[3] >= 3 ):
       drivetrain.reverse(duty-slow)
       
#print "reversing left"
       threadvars.parallelParkStatus =
"reversing left"
#stop
#print "stopped"
threadvars.parallelParkStatus =
"stopped"
drivetrain.stop()
drivetrain.right()
#drive straight and turn right to get the front of the car into the spot
while ( threadvars.proximityValues[2] >= 8 ):
       
if ( threadvars.proximityValues[3] > 4 ):
               drivetrain.right()
       
else:
               drivetrain.straight()
       drivetrain.forward(duty)
       
#print " forward right"
       threadvars.parallelParkStatus =
"forward right"

Figure 13: pushparallelpark.py

import RPi.GPIO as GPIO
import time
from threading import Thread
import threadvars
from cv import *
import math

GPIO.setwarnings(
False)
GPIO.setmode(GPIO.BCM)

#Thread class
class MyThread(Thread):
       
def __init__(self, val):
               Thread.__init__(self)
               self.val = val
       
def run(self):
               GPIO.setmode( GPIO.BCM )
               
#Front right
               
#Trig = 13
               
#Echo = 12
               frontright = (
13, 12)

               
#Front center
               
#Trig = 6
               
#Echo = 1
               frontcenter = (
6, 1)

               
#Front left
               
#Trig = 5
               
#Echo = 7
               frontleft = (
5, 7)

               
#Side right
               
#Trig = 0
               
#Echo = 8
               sideright = (
0, 8)

               
#Rear left
               
#Trig = 11
               
#Echo = 25
               rearleft = (
11, 25)

               
#Rear center
               
#Trig = 9
               
#Echo = 24
               rearcenter = (
9, 24)

               
#Rear right
               
#Trig = 18
               
#Echo = 23
               rearright = (
18, 23)

               
#print "measuring distance"
               outputGPIO = [
13, 6, 5, 0, 11, 9, 18]
               inputGPIO = [
12, 1, 7, 8, 25, 24, 23]
               
#initialize the GPIO
               
for i in range(7):
                       GPIO.setup(outputGPIO[i], GPIO.OUT)
                       GPIO.setup(inputGPIO[i], GPIO.IN)
               
for i in range(7):
                       GPIO.output( outputGPIO[i], GPIO.LOW )
               
#print "settling"
               time.sleep(
2)


#list of sensors around the vehicle
               sensorList = [frontleft, frontcenter, frontright, sideright, rearright, rearcenter, rearleft]

               
#previous values for filtering
               prevdistanceValues = [[
0,0,0,0,0], [0,0,0,0,0], [0,0,0,0,0], [0,0,0,0,0],[0,0,0,0,0],[0,0,0,0,0],[0,0,0,0,0]]
               stopcounter =
0
               programStartTime=time.time()
               
while( True ):
                       distance = [
0,0,0,0,0,0,0]
                       visualizer = [
'','','','','','','' ]
                       index =
0
                       trig =
0
                       echo =
0
                       stop =
0
                       
#iterate through all the sensors
                       
for index in range(7):
                               
for side in distance:
                                       
#create the pulse and record the time for the response for ultrasonic sensors
                                       trig, echo = sensorList[index]
                                       GPIO.output( trig, GPIO.HIGH )
                                       time.sleep(
0.00001 )
                                       GPIO.output( trig, GPIO.LOW )
                                       abs_start = time.time()
                                       pulse_start =
0.0
                                       
while ( GPIO.input( echo ) == 0 ):
                                               pulse_start = time.time()
                                               
if pulse_start-abs_start > 0.005:#2:
                                                       
break;
                                       pulse_end =
0.0
                                       
while ( GPIO.input( echo ) == 1 ):
                                               pulse_end = time.time()

                                       pulse_duration = pulse_end - pulse_start
                                       distanceValue = ( pulse_duration *
17150 )
                                       
#set limits on the values so we don't overflow or ruin our filtering
                                       
if distanceValue > 300:
                                               distanceValue = prevdistanceValues[index][
0]
                                       
if distanceValue < 0:
                                               distanceValue = prevdistanceValues[index][
0]
                                       
if (distanceValue - prevdistanceValues[index][0]) > 10:
                                               distanceValue =
0.5 * ( prevdistanceValues[index][0] + distanceValue )
                                       distanceValue = round( distanceValue,
2 )

                                       
#filter
                                       prevdistanceValues[index][
4] = prevdistanceValues[index][3]
                                       prevdistanceValues[index][
3] = prevdistanceValues[index][2]
                                       prevdistanceValues[index][
2] = prevdistanceValues[index][1]
                                       prevdistanceValues[index][
1] = prevdistanceValues[index][0]
                                       prevdistanceValues[index][
0] = distanceValue

                                       
#averaging
                                       distanceValue = ( prevdistanceValues[index][
4] + prevdistanceValues[index][3] + prevdistanceValues[index][2] + prevdistanceValues[index][1] + distanceValue ) / 5
                                       distance[ index ] =
0.5* ( distance[index] + distanceValue )
                       atLeastOneStop =
0
                       
#iterate back through the sensors to figure out whether objects are close to the car
                       
for index in range( 7 ):
                               
#set values for the trend that indicates how quickly distance values changing
                               threadvars.distanceTrend[index] = int(math.ceil(distance[index] - float(threadvars.proximityValues[index])))
                               threadvars.proximityValues[index] = int(distance[index])
                               
#if object in front, change stopSide[0] to 1
                               
if ( index <= 2 ):
                                       
if ( distance[index] <= 15 ):
                                               threadvars.globalstop =
1
                                               atLeastOneStop =
1
                                               threadvars.stopSide[
0] = 1
                               
#if object on side, change stopSide[1] to 1
                               
elif ( index == 3 ):
                                       
if ( distance[index] <= 15 ):
                                               threadvars.globalstop =
1
                                               atLeastOneStop =
1
                                               threadvars.stopSide[
1] = 1
                               
#if object in rear, change stopSide[2] to 1
                               
else:
                                       
if ( distance[index] <= 15 ):
                                               threadvars.globalstop =
1
                                               atLeastOneStop =
1
                                               threadvars.stopSide[
2] = 1
                       
#if we didn't detect anything close, reset all the stopSides
                       
if ( atLeastOneStop == 0 ):
                               threadvars.globalstop =
0
                               threadvars.stopSide[
0] = 0
                               threadvars.stopSide[
1] = 0
                               threadvars.stopSide[
2] = 0
                       
#call the line sensor function so we can drive in a line
                       self.readLight()
                       
#sleep a little so CPU can rest
                       time.sleep(
0.00001)


#reads the line sensors and then calls getColor to figure out what color it has seen
       
def readLight(self):

               GPIO.setmode( GPIO.BCM )
               
#define input pins for light sensor
               left =
19
               right =
26
               pins = left, right
               output = [
0,0]
               
for x in range(2):
                       
#initially we want to output, then we'll measure discharge time
                       GPIO.setup( pins[x], GPIO.OUT );
                       GPIO.output( pins[x], GPIO.HIGH )
                       time.sleep(
0.00001 )
                       GPIO.setup( pins[x], GPIO.IN )

                       micros = int(round(time.time() *
1000000))
                       
#measure time it took
                       
while ( ( GPIO.input( pins[x] ) == GPIO.HIGH ) and (int(round(time.time()*1000000))) ):
                               difference = (int(round(time.time()*
1000000))) - micros
                       output[x] = int(difference)

               threadvars.lightVals = output
               threadvars.colors = self.getColor( output )

       
#returns what value the line sensor has seen
       
def getColor( self,lineVal ):
               colors= [
"",""]
               
#define color based on range of light seen
               
for x in range(2):
                       
if ( ( lineVal[x] >= 2500 ) and ( lineVal[x] <= 4500 ) ):
                               colors[x] =
"gray"
                       
elif ( ( lineVal[x] >= 0 ) and ( lineVal[x] <= 2500 ) ):
                               colors[x] =
"white"
                       
elif ( ( lineVal[x] >= 4500 ) and ( lineVal[x] <= 30000 ) ):
                               colors[x] =
"black"

               
return colors


#thread class for detecting pedestrians (cv)
class pedestrianAvoidance( Thread ):
       
def __init__(self, val):
               Thread.__init__(self)
               self.cam = CV()
               self.val = val
       
def run(self):
               
while( True ):
                       
#runs indefinitely, requires two consecutive trues to say to stop
                       threadvars.prevPeopleDetected = int( threadvars.peopleDetected )
                       self.cam.processImage()
                       
if ( (threadvars.peopleDetected > 0) and ( threadvars.prevPeopleDetected > 0 ) ):
                               threadvars.stopForPeople =
True
                       
else:
                               threadvars.stopForPeople =
False

class timing( Thread ):
       
def __init__(self, val):
               Thread.__init__(self)
               self.val = val
       
def run(self):
               prev_state = threadvars.drivestatus[
0]
               cur_time = time.time()
               
while( True ):
                       
if ( threadvars.drivestatus[0] == prev_state ):
                               threadvars.drivestatus[
3] = time.time() - cur_time
                       
else:
                               prev_state = threadvars.drivestatus[
0]
                               cur_time = time.time()

Figure 14: threadsensortest.py

from threading import Thread
import time
import threadvars
import RPi.GPIO as GPIO
import os

class visualizeThreaded( Thread ):
        
def __init__( self, val ):
                Thread.__init__( self )
                self.val = val

        
def run( self ):
                
#init empty vals
                distance = [
0,0,0,0,0,0,0]
                
#we're going to init a string thats 80 elements long, but make it a list first
                
#so that it's mutable.
                emptystring = range(
80 )
                
for i in range(80):
                        emptystring[i] =
" "

                topbottomstring = list(emptystring)
                middlestring = list(emptystring)
                
for i in range(18,29):
                        
if ( i == 18 ) or ( i == 28 ):
                                topbottomstring[i] =
"|"
                                middlestring[i] =
"|"
                        
elif ( i>18 ) and ( i < 28 ):
                                topbottomstring[i] =
"-"
                
# the above draws our initial box

                
#            0  1  2  3  4  5  6
                
#            fL,fC,fR,bL,bC,bR,rR
                
#            19,22,25,19,22,25,29

                
while( True ):
                        
#run indefinitely, be prepared to blank values        
                        visualizeBlank = range(
35)
                        
for y in range(35):
                                
if (y == 15) or (y == 20):
                                        visualizeBlank[y] = list(topbottomstring)
                                
elif (y > 15) and (y < 20):
                                        visualizeBlank[y]= list(middlestring)
                                
else:
                                        visualizeBlank[y]= list(emptystring)
                        visualize = list(visualizeBlank)
                        distance = threadvars.proximityValues
                        
#print( distance )
                        
for index in range( 7 ):
                                value = distance[index]
                                
if value >= 14:
                                        value =
14;
                                
if index <= 2:        
                                        
for y in range(14-value,14):
                                                
#front left
                                                
if (index == 0):
                                                        visualize[y][
19] = "X"
                                                        visualize[y][
20] = "X"
                                                        visualize[y][
21] = "X"
                                                
#front center
                                                
elif (index == 1):
                                                        visualize[y][
22] = "X"
                                                        visualize[y][
23] = "X"
                                                        visualize[y][
24] = "X"

                                                
#front right
                                                
elif (index == 2):
                                                        visualize[y][
25] = "X"
                                                        visualize[y][
26] = "X"
                                                        visualize[y][
27] = "X"
                                
elif ( (index >= 4) and (index <= 6) ):
                                        
for y in range(21,21+value):
                                                
#back left
                                                
if (index == 6):
                                                        visualize[y][
19] = "X"
                                                        visualize[y][
20] = "X"
                                                        visualize[y][
21] = "X"
                                                
                                                
#back center
                                                
elif (index == 5):
                                                        visualize[y][
22] = "X"
                                                        visualize[y][
23] = "X"
                                                        visualize[y][
24] = "X"

                                                
#back right
                                                
elif (index == 4):
                                                        visualize[y][
25] = "X"
                                                        visualize[y][
26] = "X"
                                                        visualize[y][
27] = "X"
                                
else:
                                        
for x in range(29, 29+value):
                                                
#right right
                                                
if (index == 3):
                                                        visualize[
16][x] = "X"
                                                        visualize[
17][x] = "X"
                                                        visualize[
18][x] = "X"


                        display = range(
35)
                        
for y in range(35):
                                
#join all the initial things, help us aggregate the GUI
                                display[y]= (
"".join( visualize[y] ) )
                        display.append(
"\n" + str( threadvars.lightVals ) + ", " + str( threadvars.colors ) )
                        display.append(
"Objected detected: Front? " + str( ( threadvars.stopSide[0] ) ) + "  Back? " + str( ( threadvars.stopSide[2] ) ) )
                        display.append(
"Pedestrians: " + str( threadvars.peopleDetected ) )
                        display.append(
"Stop for pedestrians: " + str( threadvars.stopForPeople ))
                        display.append(
"Init/Image/Processing/Drawing/Write Times :" + str( threadvars.cvTimes ) )
                        display.append(
"Distances: " + str ( threadvars.proximityValues ) )
                        display.append(
"Distance trends: " + str( threadvars.distanceTrend ) )
                        display.append(
"\n\nDrive Direction: " + str( threadvars.drivestatus[0] ) )
                        display.append(
"Turn Direction: " + str( threadvars.drivestatus[1] ) )
                        display.append(
"Parallel Park Status: " + str( threadvars.parallelParkStatus ) )
                        display =
"\n".join( display )
                        print(chr(
27) + "[2J")
                        print( display )
                        time.sleep(
0.2 )
                GPIO.cleanup()

Figure 15: visualizeThreaded.py

import time
from threadsensortest import *
import threadvars
import RPi.GPIO as GPIO
import os
import drivetrain
import math
from visualizeThreaded import *

#start the sensor thread
mythread = MyThread(
1)
mythread.daemon =
True
mythread.start()

#start the CV thread
pedestrianAvoidance = pedestrianAvoidance(
2)
pedestrianAvoidance.daemon =
True
pedestrianAvoidance.start()

#start thread for printing visualize
visualizeThread = visualizeThreaded(
3)
visualizeThread.daemon =
True
visualizeThread.start()

#wait for values from the line sensors
GPIO.setmode( GPIO.BCM )
while (threadvars.colors[0] == ""):
       start = time.time()

drivetrain.motor_begin()
drivetrain.forward(
0)
drivetrain.straight()
prev_state = threadvars.drivestatus
stopped =
0
direction =
"straight"
duty =
0

output = [
0,0]

while( True ):
       
#only need to stop if going forward and object in front, or if going back and object in rear
       inFront = (threadvars.stopSide[
0]) and (threadvars.drivestatus[0] == "forward" )
       inSide = threadvars.stopSide[
1]
       
#if a person is detected
       people = ( threadvars.stopForPeople )
       inBack = (threadvars.stopSide[
2]) and (threadvars.drivestatus[0] == "reverse")
       
#if any variables ture, need to stop, so store the current values so we can continue after object moves
       
if ( inFront or inBack or people ):
               prev_state = threadvars.drivestatus
               direction = prev_state[
0]
               duty = prev_state[
2]
       
#if any of these variables are ture, we need to stop so we don't hit something
       
if ( inFront or inBack or people ):
               start_stop_time = time.time()
               distanceTrendFront = int( threadvars.distanceTrend[
1] )
               distanceTrendBack = int( threadvars.distanceTrend[
5] )
               
#wait until the objects move, while they are here we reverse a little to put some
               
#distance between us and the object, and then stop
               
while ( threadvars.stopSide[0] or threadvars.stopSide[2] or ( threadvars.stopForPeople ) ):
                       drivetrain.stop()
                       
##print("stopping")
                       stopped =
1
                       
if ( inFront ):
                               drivetrain.reverse(
0)
                               time.sleep(
0.2 )
                       
#elif ( inBack and ( time.time() - start_stop_time < stopDuration ) ):
                       
elif ( inBack ):
                               drivetrain.forward(
0)
                               time.sleep(
0.2 )
                       
else:
                               drivetrain.stop()
                       time.sleep(
0.001)
       
#once the object has moved, we go back to what we were doign before we stopped
       
if stopped:
               
if ( direction == "forward" ):
                       
True = True
                       drivetrain.forward(
0)#duty)
               
elif ( direction == "stop" ):
                       drivetrain.stop()
               
else:
                       
True = True
                       drivetrain.reverse(
0)#duty)
               stopped =
0
       color = threadvars.colors
       
#figure out if we need to turn to stay on the line
       
if( color[0] is not "black" and color[1] is not "black" ):
               drivetrain.straight()
       
elif( color[0] is "black" ):
               drivetrain.left()
       
elif( color[1] is "black" ):
               drivetrain.right()
GPIO.cleanup()

Figure 16: linefollowdetect.py

# a global stop variable
globalstop =
0
#front, side, back
stopSide = [
0, 0, 0]
#straight direction, turning, duty, time
drivestatus = [
"stop","straight", 0, 0]
#how close everything is on each side... goes from front left to front right, then side
#then back right to left
proximityValues = [
0,0,0,0,0,0,0]
#trend for approaching objects
distanceTrend = [
0,0,0,0,0,0,0]
#light sensor readings
lightVals = [
0,0]
#the actual colors the light sensor sees
colors = [
"",""]
#number of people detected
peopleDetected =
0
#used for filtering out extraneous people detection
prevPeopleDetected =
0
#bool for if a person has been detected and we need to stop
stopForPeople =
False
#performance monitoring for cv
cvTimes= [
0, 0, 0, 0, 0 ]
#status of the car while it's parallel parking
parallelParkStatus =
""

Figure 17: threadvars.py

import time
from threadsensortest import *
import threadvars
import RPi.GPIO as GPIO
import os
import drivetrain
import math
from visualizeThreaded import *

#sensor thread
mythread = MyThread(
1)
mythread.daemon =
True
mythread.start()

#thread for printing visualize
visualizethread = visualizeThreaded(
42)
visualizethread.daemon =
True
#visualizethread.start()

#no drive bc broken motor
duty =
0
slow =
0;
drivetrain.motor_begin()
drivetrain.stop()
#wait for values from the line sensors to come in
while ( threadvars.proximityValues[1] == 0 ):
       time.sleep(
0.001)
drivetrain.forward(duty)
drivetrain.straight()
#forward until almost touching in front
while ( ( threadvars.proximityValues[1] >= 4 ) ):
       drivetrain.forward(duty)
       
print "going forward"
#turn right and reverse to back of spot
drivetrain.right()
while ( ( threadvars.proximityValues[5] >= 4 ) ):
       
print "going backwards right"
       drivetrain.reverse(duty)
#go forward and left to leave the spot
drivetrain.left()
print "going left"
time.sleep(
5)

drivetrain.stop()
GPIO.cleanup()

Figure 18: leavepark.py

References

[1] Ultrasound Documentation https://learn.adafruit.com/distance-measurement-ultrasound-hcsr04

[2] Line Sensor Datasheet

https://www.sparkfun.com/datasheets/Robotics/QR_QRE1113.GR.pdf

[3] Steamer man page

         https://linux.die.net/man/1/streamer

[4] Pedestrian detection in OpenCV

        https://www.pyimagesearch.com/2015/11/09/pedestrian-detection-opencv/

[5] ECE 5725 Course Website and Material