To create a simple prototype for a drawing tool that uses hand gesture recognition software to paint on a PiTFT screen. Core objectives include:
Air Canvas is a hands-free digital drawing canvas that utilizes a Raspberry Pi, a PiCamera, and OpenCV to recognize and map hand gestures onto a PiTFT screen. The user’s “brush” can be modified in size and color by using built-in buttons. The direction of the brush is controlled completely using open source OpenCV software and modified to map the pointer finger onto the screen using Pygame following a calibration screen to measure and record the color of the user’s hand. The idea for Air Canvas was a result of our interest in digital drawing and smart photo recognition software.
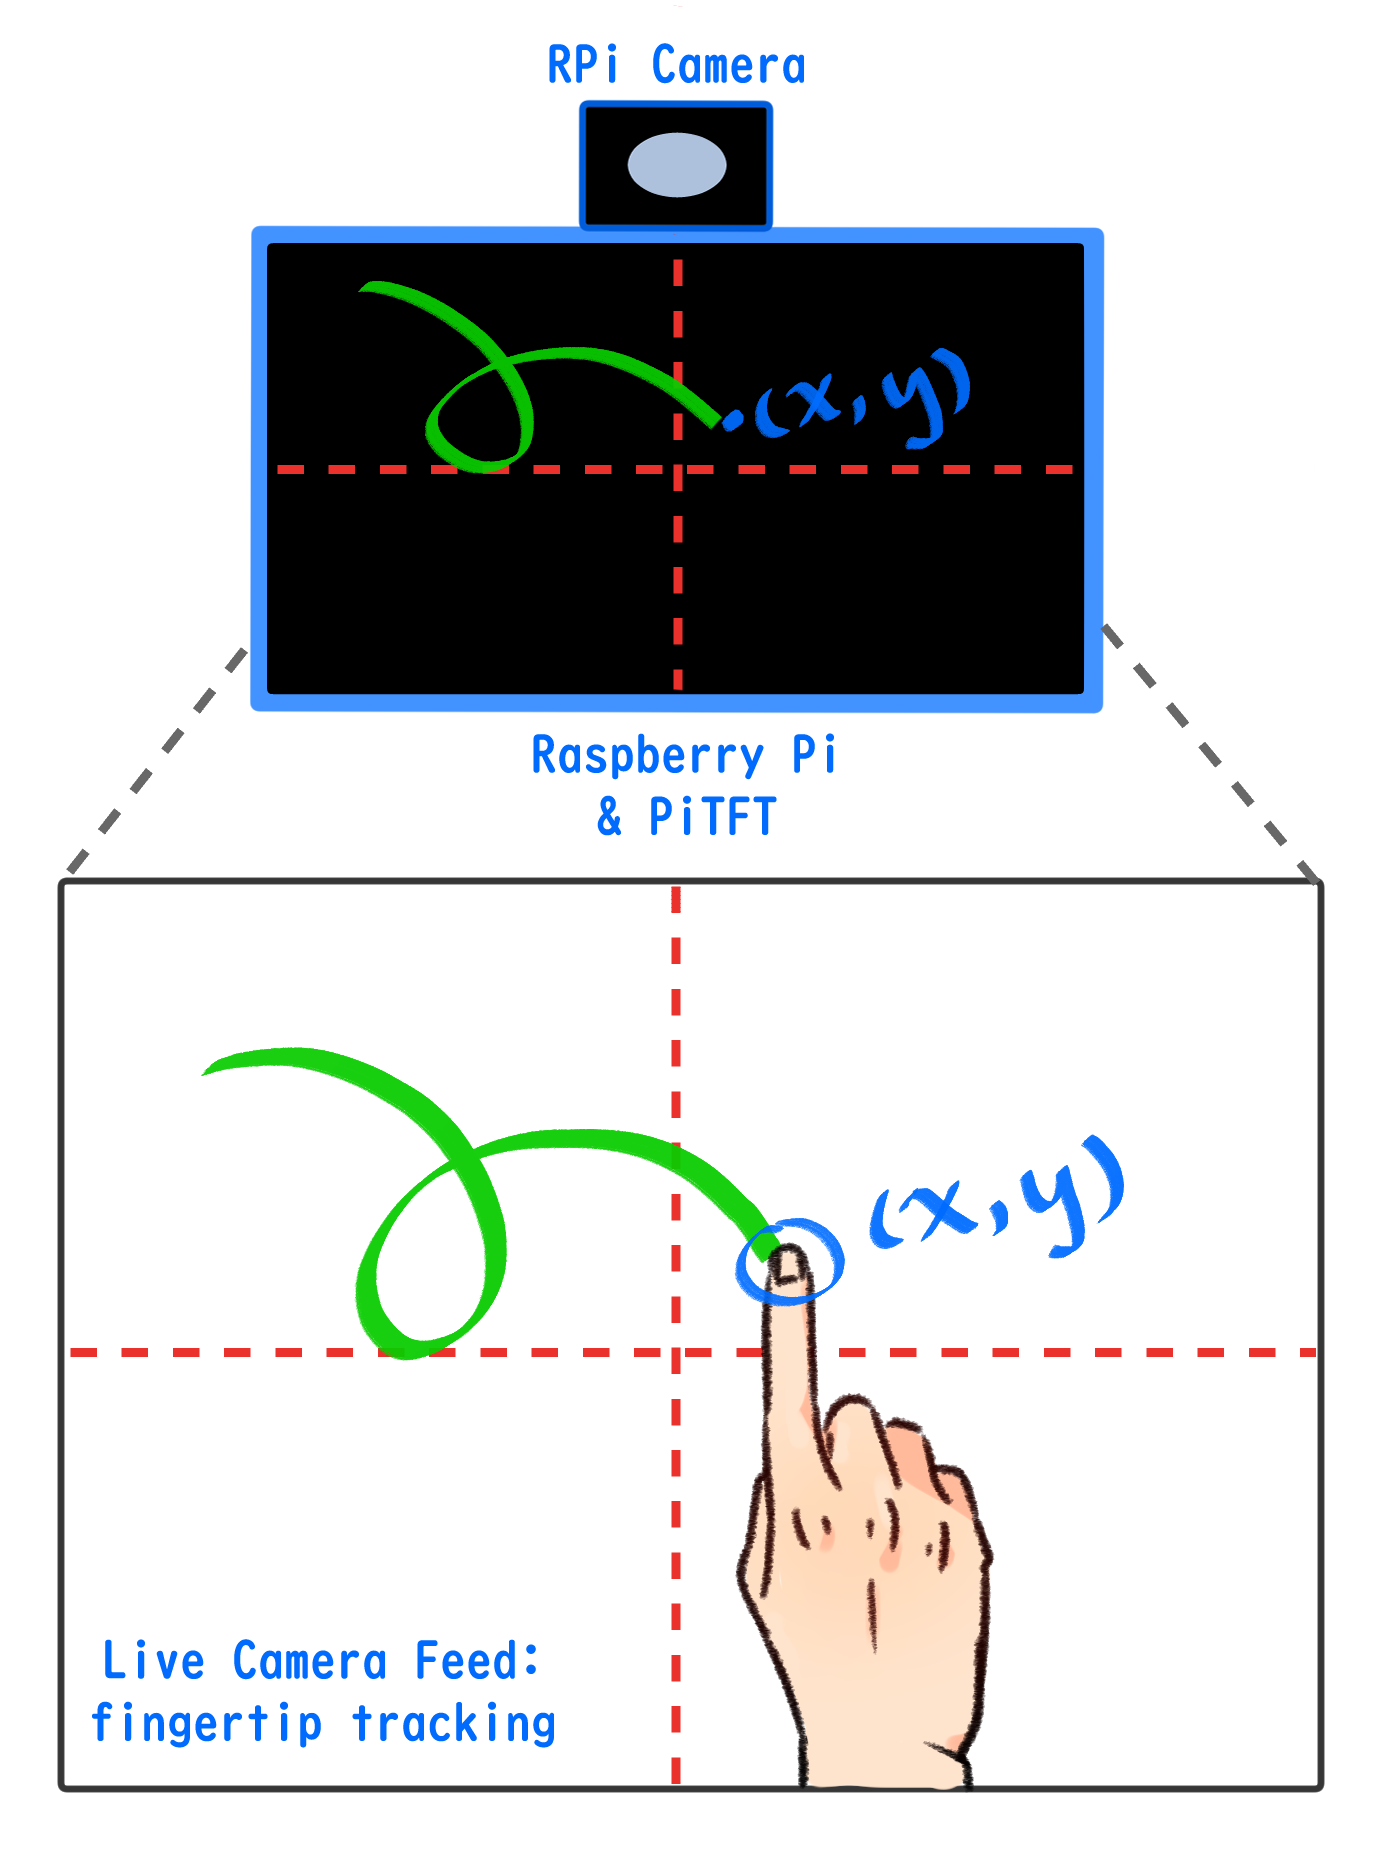
The basic goal of Air Canvas is to map the coordinates of the user’s pointer finger to the screen, where colored circles are drawn and connected to simulate a crude brush stroke. Our project consisted of three hardware devices: a Raspberry Pi board, a PiTFT display screen, and a Raspberry Pi Camera. The PiTFT screen is connected to the RPi’s 40-pin connector, and the camera module is attached directly into the camera port. We designated each of the PiTFT’s physical buttons as program controls:
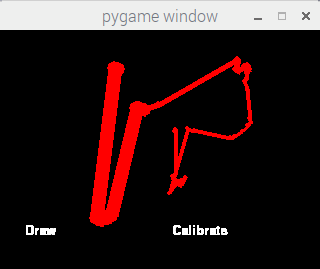
A basic visual of Air Canvas can be seen in Figure 1:
We began our project by searching for open source hand gesture recognition software that utilized OpenCV in combination with Python. In doing so, our project’s design changed as we discovered different image processing algorithms. Our primitive implementation sought to use hand gestures to control our color and size variables. To do so, we first set out to create an image mask that would separate the hand from the background. With some trial and error using OpenCV, we successfully captured an image, Gaussian blurred it, and applied a binary mask to starkly contrast the hand shape from the background. This is a method obtained from Izane’s Finger Detection tutorial1, chosen because of its use of convexity detection; in other words, determining the valleys between the fingers. However, we discovered that the camera’s sensitivity to the lab room’s lighting made this a difficult endeavor, and we often encountered extraneous silhouettes in our processed image.
We then discovered a suitable finger detection algorithm by Amar Pandey2 , which first takes a color histogram of the palm to adapt to changing light conditions. Using a grid of 9 small rectangles, pixel data from each rectangular region is used to create a color histogram. The current image is captured and processed when the user presses Z on the keyboard. The histogram is then used in a built-in OpenCV function, cv2.calcBackProject , to separate the features in an image. In this case, the program is separating all pixels containing the appropriate colors from the rest of the frame. The image is then smoothed via thresholding and filtering, resulting in a frame that contains the hand alone. From here, the contour of the image is found. According to the OpenCV website, contours are curves which join continuous points of the same color or intensity, and are used for shape analysis and detection3. From the contour, Pandey’s algorithm detects convexity defects, which indicate where the fingers might be. Using built-in contour functions, the algorithm returns the center of the largest contour found as well as the farthest point along the contour from that center point. This proved to be very handy because with some abstraction, we could extract the farthest point coordinate to map to our drawing functions. The finger tracking algorithm can be seen in Figure 2.

We abstracted a function that would calculate the farthest point (representing the index fingertip when held up) and pass it along to our PyGame drawing functions. In doing so, we made some modifications and adaptations. First, we had to map proportionately from the live camera feed to the PiTFT screen, which was exactly half the size of the feed. Next, to eliminate the use of the keyboard, we mapped the histogram trigger to an on-screen PiTFT button. Furthermore, due to the abundance of natural-toned colors in our lab room, we decided to use blue nitrile gloves during our work for a stronger contrast with the background. The bold color helped the color histogram better determine the location of the user’s hand.
Our next step was to independently develop the PyGame side of the project, which supported the PiTFT drawing functionality. First, we chose our method of drawing: as with most digital art programs, the brush head is a single shape, and a brush stroke is, simply put, the chosen shape repeated over the length of the stroke. We decided to draw very simple circles at a set of linearly spaced coordinates in PyGame using the function pygame.draw.circle(). The circles were spaced such that the overlap of each dot would resemble a connected line. We were able to display two straight lines in PyGame with this method. Additionally, we added a list of colors — red, blue, and green — to toggle between as desired, as well as a function to increase and decrease the radius of our brush head. With the PyGame end completed, we set off to combine the two main functionalities of our project.
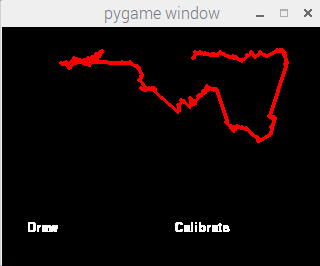
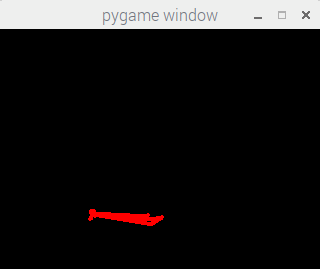
The combined code required us to feed the coordinates acquired from OpenCV processing to the PyGame program we had written. We soon realized that the frequency of images processed was too slow to draw a continuous line. To solve this problem, we chose to interpolate between the current point of drawing and the previous point. After creating these variables, we also reduced any jitter produced by erroneous detection by setting a threshold distance between current and previous point. Should the distance between the two exceed 10 pixels, the current point would not be considered for drawing and discarded as an outlier coordinate. We then interpolated between valid current and previous points by drawing more circles of the same color and radius with the aforementioned method of linearly filling in space. Figure 3 is a screenshot of a drawing made with finger tracking and simple interpolation.
At this point in our project, we attempted to implement our program using multiple processes of the Raspberry Pi. The intended implementation involved capturing the feed with a master process and handing off singular frames via queue to three worker processes for image analysis. The master process would then receive the coordinates of the pointer finger from its workers and draw accordingly. However, using multiple processes did not pan out as desired. The results are discussed in the Results section.
After deciding to stick with one core, we completed the rest of our project design by polishing the front end code, adding brush modification functions, and removing any dependencies on external devices (monitor, mouse, keyboard, etc).
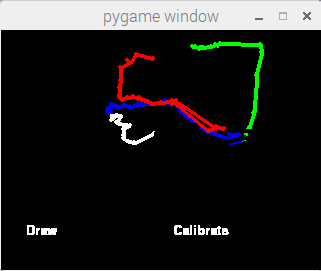
First, we designated user friendly screens: one was the calibration screen, and the other was the actual drawing screen. On the latter, we added two on-screen buttons and a tap functionality. The “draw” button toggles between active drawing and inactivity, allowing the user to stop and start drawing as desired. The “calibration” button allows the user to return to the original calibration screen to start a new drawing or re-calibrate as desired. Finally, we noticed that our physical button mapped to Pin 27 was acting faulty (perhaps due to its long history of being pressed aggressively in previous labs), and would only register clicks with excessive force. Thus, we decided to opt for a screen tap color toggle function, allowing the user to change between brush colors by tapping anywhere on the top half of the screen. Figure 4 shows the three brush colors in one drawing.
Furthermore, we finished connecting the remaining physical PiTFT buttons to their corresponding functions. The two middle buttons, GPIO pins 22 and 23, increase and decrease brush size respectively. The final button acts as a quit button that bails out of the program. Figure 5 shows brush size changes in one drawing.
Next, we transitioned the entire program onto the PiTFT to complete the front end. At this point in our project, we display the live camera feed separately from the drawing screen. We rescaled the captured frame to fit into 320 x 240 pixel window, which has the same resolution as the piTFT screen. We render this rescaled frame onto the PiTFT screen.
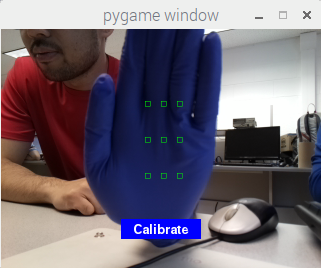
Interestingly, we found the image and color array orderings were reversed. So, we rearranged the arrays to retrieve the original image with correct coloring. Finally, to complete the initial calibration screen, a blue “calibrate” button was overlaid on the live feed. When pressed, the hand color histogram is captured and the program switches to the drawing screen. The calibration screen can be seen in Figure 6.
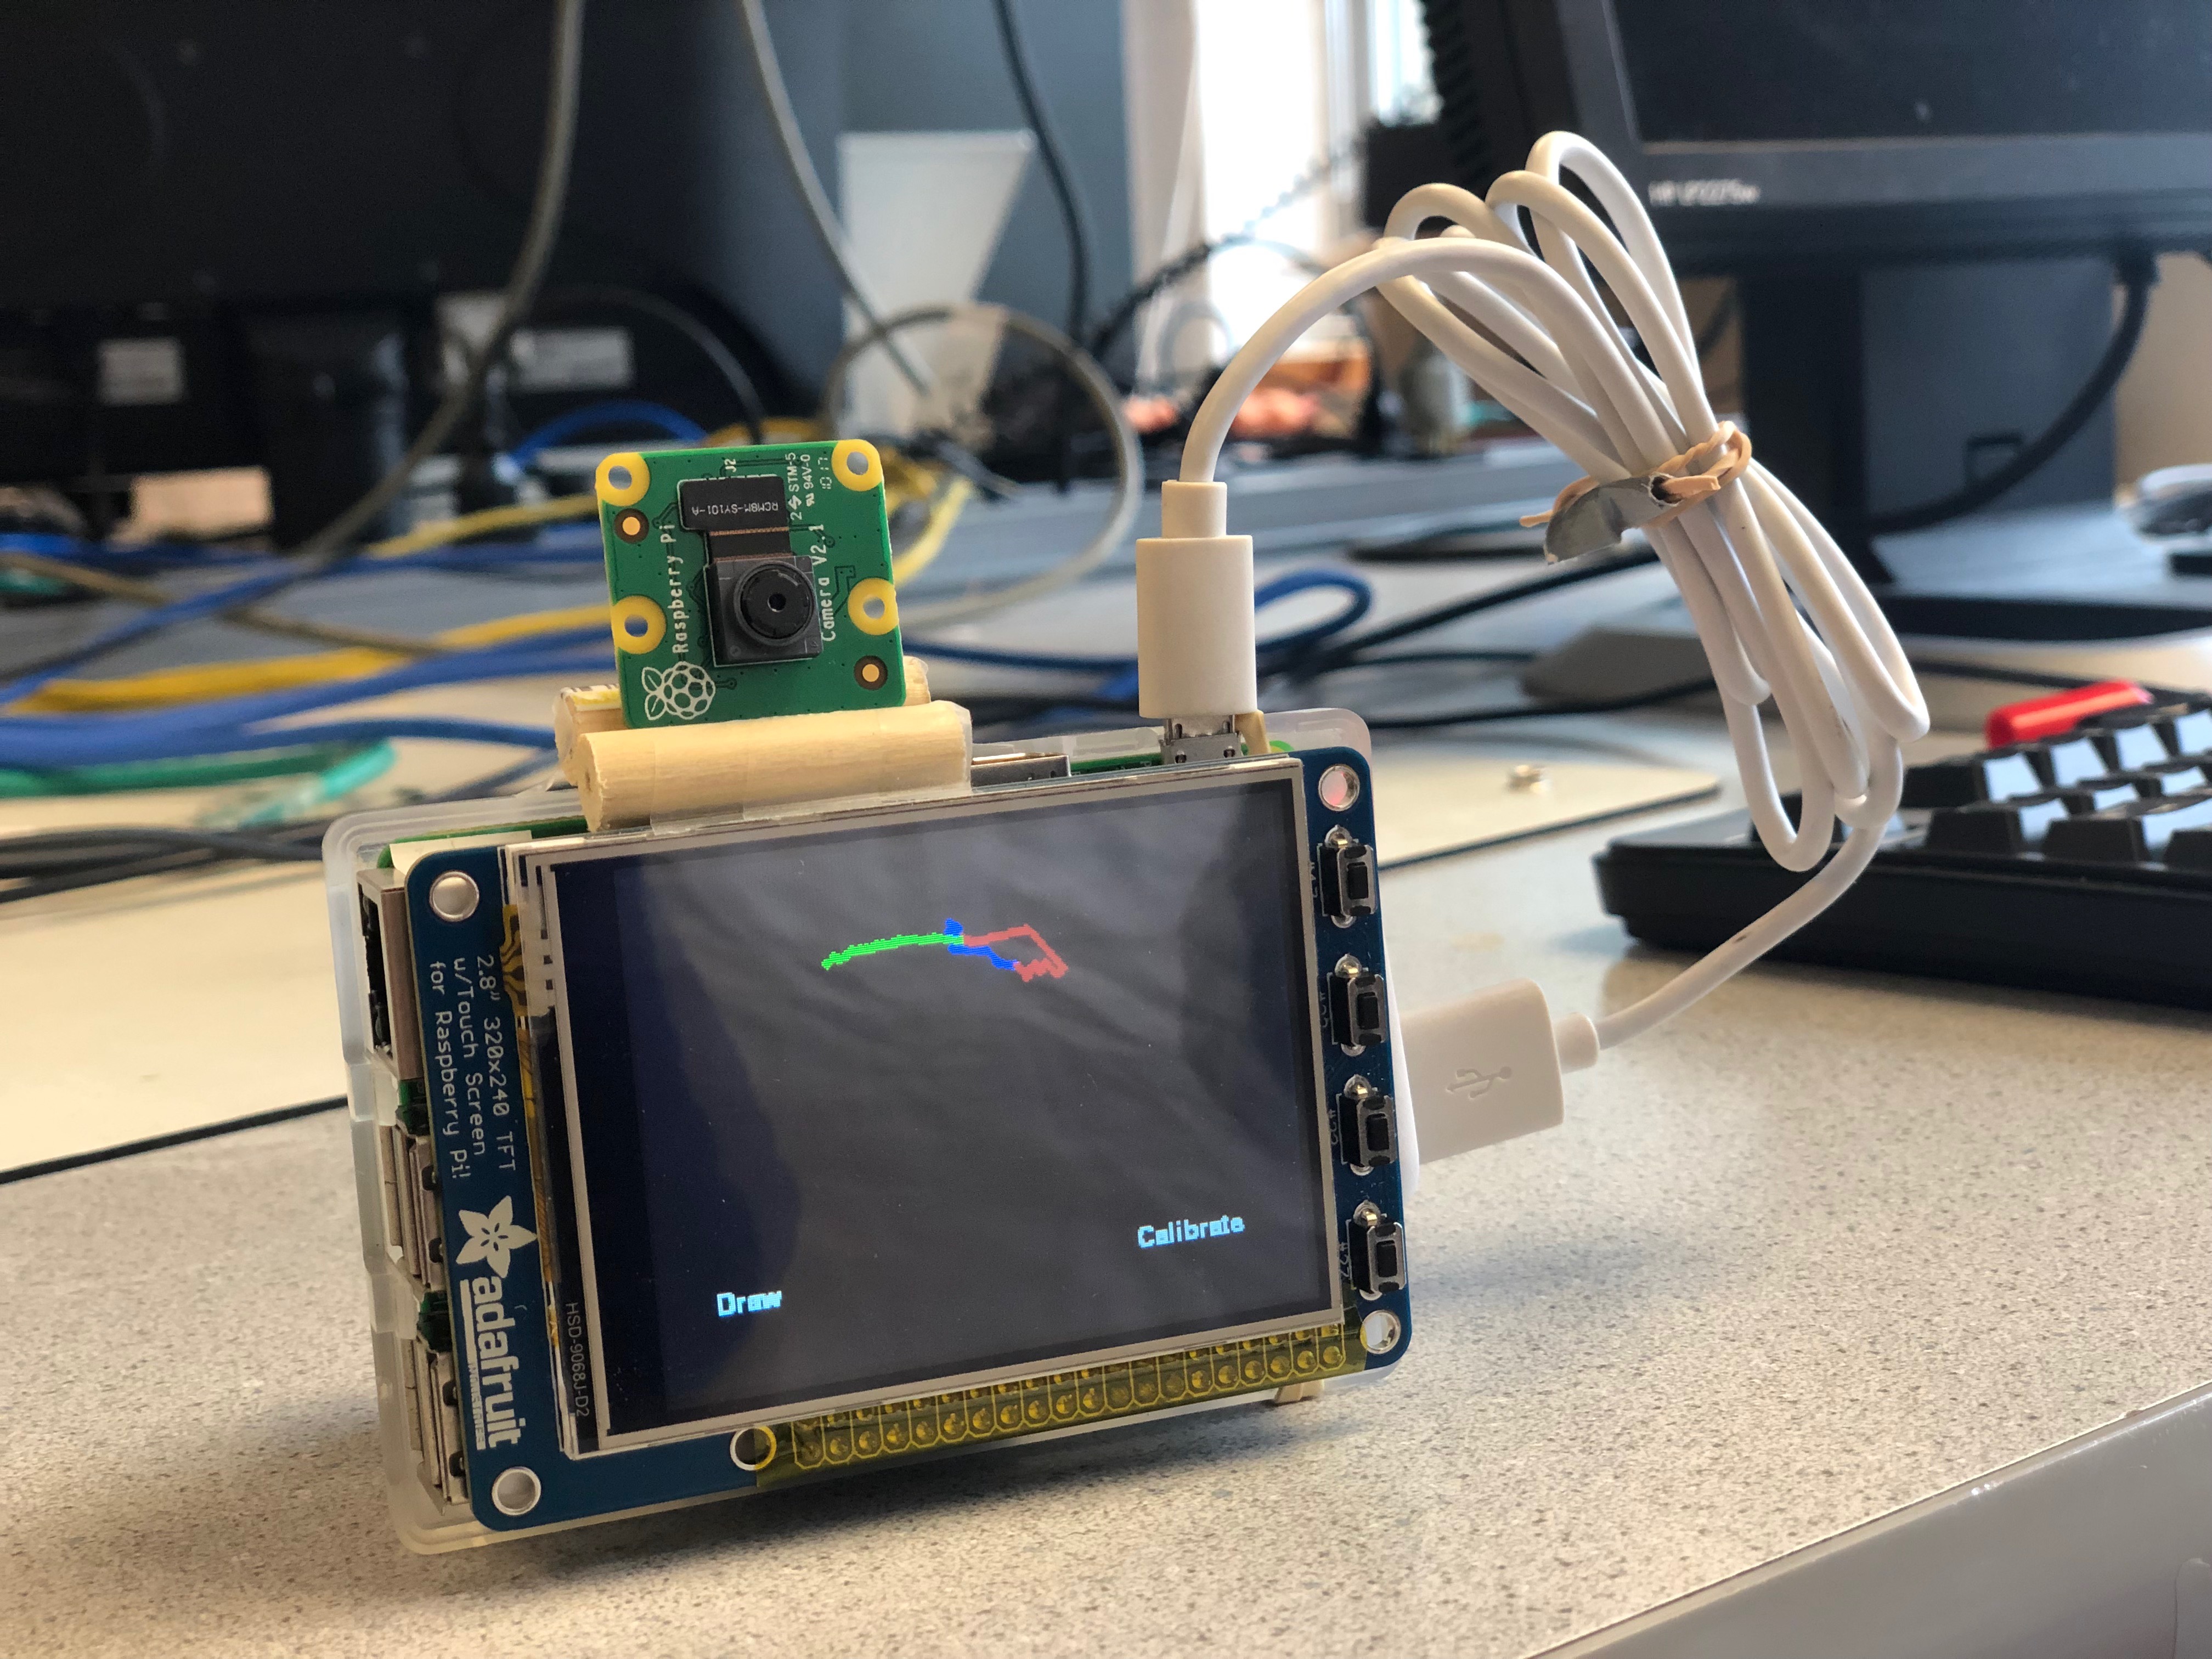
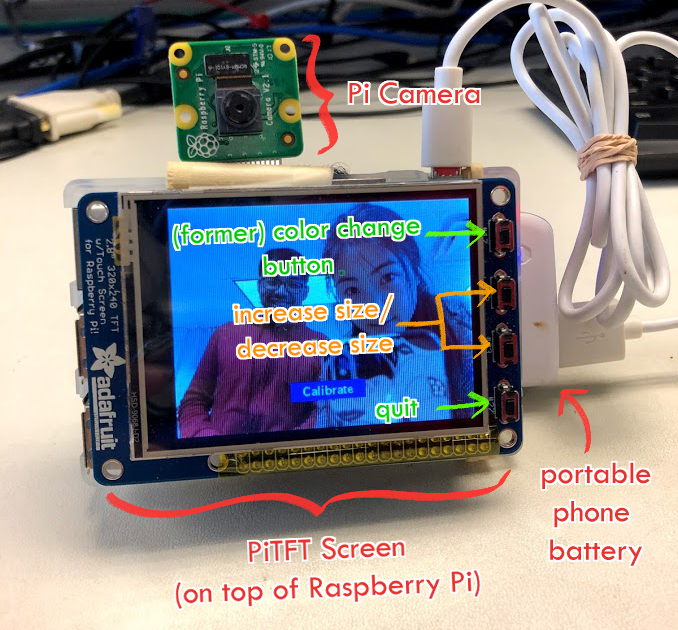
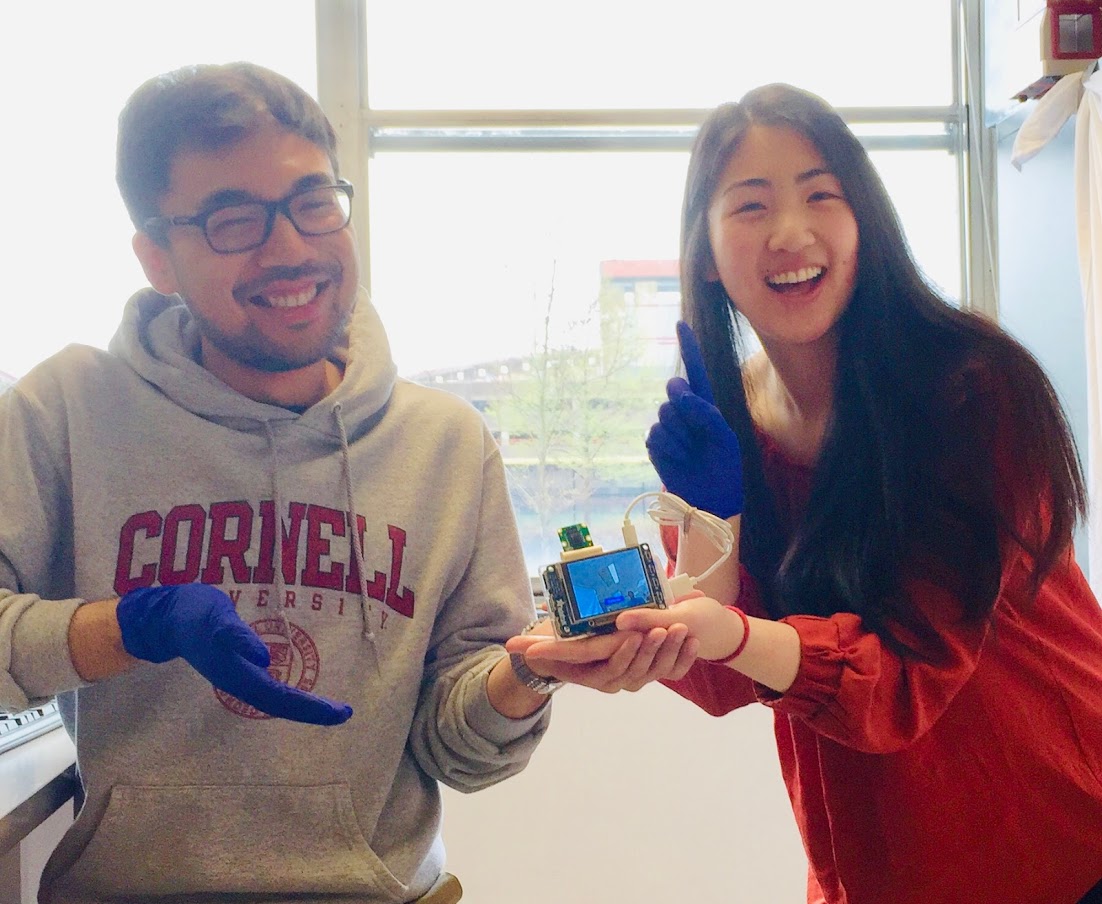
Lastly, we swapped out the wall socket power source for a portable phone battery to make our project entirely self-contained and portable. Figure 7 is the full build of our RPi and PiTFT, with parts labeled.
Overall, we achieved the goals we set out to accomplish and learned a considerable amount about OpenCV, multicore processing, and PyGame programming in the process. In our debugging process, we also encountered some problems involving the PiTFT touchscreen, which we were able to solve by investigating the operating system updates we’d installed during the process of our lab. Our demonstration of Air Canvas is shown in the video below.
Our first and foremost challenge was understanding OpenCV. At first, while experimenting with various open source programs, we were using an older version of OpenCV. To our dismay, heavy image processing dropped our frame rate to around 4 frames per second, even when we only applied a few basic filters, and the lag on the camera feed was unbearably slow. Additionally, our desired open source program by Pandy was only compatible with the newest version of OpenCV. We decided to upgrade our OpenCV, and doing so increased our frame rate dramatically. While our program still showed considerable lag, it was fast enough to be considered functional.
We encountered difficulties with hand contour detection, which in turn affected our ability to draw smoothly on the PiTFT. As mentioned in the design description, occasional erroneous calculations caused the farthest point coordinate to leap erratically to the edges of the screen. The addition of threshold conditions and usage of blue gloves helped reduce the causes of detection jitters, but we also discovered another bug in the process. Since the algorithm looks for the farthest point from the center of the contour, a wrist-length glove triggers the program to register the cuff of the glove as the farthest point instead of the finger. This was discovered during much trial and error, when the highlighted current point frequently bounced to the wrist area. There was not much code correction we could do for this, so we decided on simply rolling up the cuff to limit the glove to only the fingers and the palm. Doing so solved the rest of our jitter problems, but this specific bug opens up room for improvement of the hand detection algorithm in OpenCV.
To increase processing speed, we attempted to increase the usage of the RaspberryPi’s four cores with Python’s multiprocessing module. However, this endeavor revealed negligible speedup in frame rate and also created some timing issues that caused our program to track very erratically. We attributed this problem to timing issues between master and slave processes. Since our program requires frames to be passed and processed in order, any out-of-order delivery into queue from worker to master process resulted in faulty coordinate tracking. This rendered our tracking of previous and current points useless because we could no longer accurately interpolate between drawn dots. Using the htop command in the terminal, we were able to see that the program was utilizing 100% of all four cores without producing significant improvements to frame rate. Notably, using only process to run our project still used a sizable amount of power in all four cores. Thus, we decided it was not worthwhile to pursue multiple processors. A screenshot of our mischievous multiprocess implementation can be seen in Figure 8:
When we first made the move from testing with an external monitor for our display to the PiTFT screen, we discovered that an operating system update was interfering with our touchscreen capabilities. We resorted to using a short piece of code written earlier in the course. The purpose of the code was to register touch events on the PiTFT screen and display the coordinates. When run, we repeatedly tapped the same corner of the screen, but received wildly varying coordinates. We consulted the course staff and transferred our SD card to another RPi to ensure that this was not a hardware issue. The same issue occurred on the second board, proving that there was an issue with our software. It turned out that downloading and installing OpenCV 3 unintentionally updated file libsdl1.2debian:armh to version 1.2.15+dfsg1-4+. As a result, our touchscreen did not function properly. To remedy this, we downgraded libsdl1.2debian:armh to 1.2.15-5, which fixed our touchscreen problem.
During our Air Canvas trial runs, we also found that our previously working color-change button was a fickle fiend. Forceful pushes were required to trigger a click event, and even then it was still operating irregularly. To debug, we used a few print statements to indicate when a button press was properly registered by the PiTFT and discovered that GPIO pin 27 was frequently unresponsive. Thus, we decided to transfer its paired functionality into a touchscreen event. This was a simple change which registered any touch on the top half of the screen as the trigger to cycle through our list of colors.
Any additional touchscreen and/or camera issues were resolved using the following shell commands:
#!/usr/bin/env bash

sudo rmmod stmpe_ts
sudo modprobe stmpe_ts
sudo modprobe bcm2835-v4l2
ls /dev/video0
We consider our project to be an overall success! With Air Canvas, we have achieved a hands-free drawing program that uses OpenCV to detect the user’s pointer finger. Colorful lines can be drawn wherever the user desires and the brush can even be modified. It is truly like drawing in the air!
Of course, Air Canvas has many flaws that may be interesting areas of research in the future. The first is the issue of frame rate: image processing slowed down the camera feed and produced a cumbersome lag that impedes on the usability of the program. It would be best optimized with multicore functionality, which we attempted in this project. If the timing problems with queueing data between processes can be managed such that frame information is passed in order, perhaps Air Canvas can be upgraded to run authentically in real time. Moreover, we relied on open source OpenCV code for hand recognition, which had its own issues that we worked hard to circumvent.
We appreciate the time and effort that Professor Joe Skovira and our TAs (Xitang Zhao, Yixiao Zhang, Yazhi Fan, and Rohit Krishnakumar) have put into helping our project suceed! Without their support, this project would not have been possible.
Given more time to work on this project, we would improve hand contour recognition, explore our original Air Canvas goals, and try to understand the multicore module.
To enhance hand gesture tracking, we would have to delve more into OpenCV. There are many different methods of contour analysis, but in this particular algorithm, it may be worthwhile to take a look at the color histogram used to create the contours in question. Furthermore, we could experiment with different interpolation methods. PyGame includes a line drawing method (pygame.draw.line()) that could prove useful in producing smoother, cleaner lines. On the same vein, implementing a variety of brush shapes, textures, and even an eraser would make Air Canvas more robust as a drawing program. Allowing the user to save their final work or watch their drawing process as a playback animation could also be unique features that resemble real creativity software. Perhaps there would even be a way to connect Air Canvas to actual digital drawing programs such as Adobe Photoshop, Clip Studio Paint, or GIMP! Finally, we could make significant strides by figuring out how multicore processing works with in-order information processing.
The idea for using OpenCV was driven by his interest in the topic!
Air Canvas was inspired by her love of digital art!
| Parts | From | Cost |
|---|---|---|
| Raspberry Pi Model B | Lab | $0 |
| PiTFT Display | Lab | $0 |
| Raspberry Pi Camera v2 | Lab | $0 |
Total cost of additional equipment: $0
'''
ECE 5725 FINAL PROJECT
Stephanie Lin (scl97), Justin Joco (jaj263)
AIR CANVAS

cam_draw.py
'''

import cv2
import numpy as np
import time
from datetime import datetime
import sys
import math
import pygame
from pygame.locals import *
import RPi.GPIO as GPIO
import os

# Set environment variables
os.putenv('SDL_VIDEODRIVER','fbcon')
os.putenv('SDL_FBDEV', '/dev/fb1')
os.putenv('SDL_MOUSEDRV', 'TSLIB')      # track mouse clicks
os.putenv('SDL_MOUSEDEV', '/dev/input/touchscreen')


#Set GPIO mode
GPIO.setmode(GPIO.BCM)


GPIO.setup(17, GPIO.IN, pull_up_down=GPIO.PUD_UP) #Change color
GPIO.setup(22, GPIO.IN, pull_up_down=GPIO.PUD_UP) #Size up
GPIO.setup(23, GPIO.IN, pull_up_down=GPIO.PUD_UP) #Size down
GPIO.setup(27, GPIO.IN, pull_up_down=GPIO.PUD_UP) #Quit


# Initialize game
pygame.init()


# Screen settings
size = width, height = 320, 240
black = 0,0,0
screen = pygame.display.set_mode(size)

pygame.mouse.set_visible(False)

# Brush settings
radius = 2

#Colors
RED = 255,0,0
GREEN = 0,255,0
BLUE = 0,0,255
WHITE = 255,255,255
BLACK = 0,0,0

#Create color list
colors = [RED, GREEN, BLUE]

#Initialize drawing color
color_index = 0
curr_color = RED

# Margin settings
L_MARGIN = 10
R_MARGIN = 310
T_MARGIN = 10
B_MARGIN = 230


BTN_SIZE = 50
CENTER_POS = 160,120

#Fill first screen with black
screen.fill(black)


#Create pygame font
font = pygame.font.Font(None, 20)


# ======= SAMPLE_CAM3.PY CODE ============ # <--- NOT OURS
#Reference: https://dev.to/amarlearning/finger-detection-and-tracking-using-opencv-and-python-586m
hand_hist = None
traverse_point = []
total_rectangle = 9
hand_rect_one_x = None
hand_rect_one_y = None

hand_rect_two_x = None
hand_rect_two_y = None


#Rescales the output frame to 320 x 240 screen
def rescale_frame(frame, wpercent=130, hpercent=130):
    width = int(frame.shape[1] * wpercent / 100)
  #  print("width: " + str(width) "\n height"
    height = int(frame.shape[0] * hpercent / 100)
    return cv2.resize(frame, (320, 240), interpolation=cv2.INTER_AREA)

#Finds the contours of the hand
def contours(hist_mask_image):
    gray_hist_mask_image = cv2.cvtColor(hist_mask_image, cv2.COLOR_BGR2GRAY)
    ret, thresh = cv2.threshold(gray_hist_mask_image, 0, 255, 0)
    cont, hierarchy = cv2.findContours(thresh, cv2.RETR_TREE, cv2.CHAIN_APPROX_SIMPLE)
    return cont


def max_contour(contour_list):
    max_i = 0
    max_area = 0

    for i in range(len(contour_list)):
        cnt = contour_list[i]

        area_cnt = cv2.contourArea(cnt)

        if area_cnt > max_area:
            max_area = area_cnt
            max_i = i

        return contour_list[max_i]

#Draws the rectangles for calibration
def draw_rect(frame):
    rows, cols, _ = frame.shape
    global total_rectangle, hand_rect_one_x, hand_rect_one_y, hand_rect_two_x, hand_rect_two_y

    hand_rect_one_x = np.array(
        [6 * rows / 20, 6 * rows / 20, 6 * rows / 20, 9 * rows / 20, 9 * rows / 20, 9 * rows / 20, 12 * rows / 20,
         12 * rows / 20, 12 * rows / 20], dtype=np.uint32)

    hand_rect_one_y = np.array(
        [9 * cols / 20, 10 * cols / 20, 11 * cols / 20, 9 * cols / 20, 10 * cols / 20, 11 * cols / 20, 9 * cols / 20,
         10 * cols / 20, 11 * cols / 20], dtype=np.uint32)

    hand_rect_two_x = hand_rect_one_x + 10
    hand_rect_two_y = hand_rect_one_y + 10

    for i in range(total_rectangle):
        cv2.rectangle(frame, (hand_rect_one_y[i], hand_rect_one_x[i]),
                      (hand_rect_two_y[i], hand_rect_two_x[i]),
                      (0, 255, 0), 1)

    return frame

#Attains a histogram of the colors that encapsulate the above retangles
def hand_histogram(frame):
    global hand_rect_one_x, hand_rect_one_y

    hsv_frame = cv2.cvtColor(frame, cv2.COLOR_BGR2HSV)
    roi = np.zeros([90, 10, 3], dtype=hsv_frame.dtype)

    for i in range(total_rectangle):
        roi[i * 10: i * 10 + 10, 0: 10] = hsv_frame[hand_rect_one_x[i]:hand_rect_one_x[i] + 10,
                                          hand_rect_one_y[i]:hand_rect_one_y[i] + 10]

    hand_hist = cv2.calcHist([roi], [0, 1], None, [180, 256], [0, 180, 0, 256])
    return cv2.normalize(hand_hist, hand_hist, 0, 255, cv2.NORM_MINMAX)


def hist_masking(frame, hist):
    hsv = cv2.cvtColor(frame, cv2.COLOR_BGR2HSV)
    dst = cv2.calcBackProject([hsv], [0, 1], hist, [0, 180, 0, 256], 1)

    disc = cv2.getStructuringElement(cv2.MORPH_ELLIPSE, (31, 31))
    cv2.filter2D(dst, -1, disc, dst)

    ret, thresh = cv2.threshold(dst, 150, 255, cv2.THRESH_BINARY)

    # thresh = cv2.dilate(thresh, None, iterations=5)

    thresh = cv2.merge((thresh, thresh, thresh))

    return cv2.bitwise_and(frame, thresh)


def centroid(max_contour):
    moment = cv2.moments(max_contour)
    if moment['m00'] != 0:
        cx = int(moment['m10'] / moment['m00'])
        cy = int(moment['m01'] / moment['m00'])
        return cx, cy
    else:
        return None

#Find the farthest point of hand from the centroid
def farthest_point(defects, contour, centroid):
    if defects is not None and centroid is not None:
        s = defects[:, 0][:, 0]
        cx, cy = centroid

        x = np.array(contour[s][:, 0][:, 0], dtype=np.float)
        y = np.array(contour[s][:, 0][:, 1], dtype=np.float)

        xp = cv2.pow(cv2.subtract(x, cx), 2)
        yp = cv2.pow(cv2.subtract(y, cy), 2)
        dist = cv2.sqrt(cv2.add(xp, yp))

        dist_max_i = np.argmax(dist)

        if dist_max_i < len(s):
            farthest_defect = s[dist_max_i]
            farthest_point = tuple(contour[farthest_defect][0])
            return farthest_point
        else:
            return None

# Draw circles on screen at specified point on the screen
def draw_circles(frame, traverse_point):
    if traverse_point is not None:
        for i in range(len(traverse_point)):
            cv2.circle(frame, traverse_point[i], int(5 - (5 * i * 3) / 100), [0, 255, 255], -1)


# ================= TRACE HAND ================= # <-- NOT OURS
#Reference: https://dev.to/amarlearning/finger-detection-and-tracking-using-opencv-and-python-586m

#Finds the center of the hand
def get_centroid(frame, hand_hist):
    hist_mask_image = hist_masking(frame, hand_hist)
    contour_list = contours(hist_mask_image)
    max_cont = max_contour(contour_list)

  # obtain centroid
    ctr = centroid(max_cont)
    return ctr, max_cont


def manage_image_opr(frame, hand_hist):
    '''hist_mask_image = hist_masking(frame, hand_hist)
    contour_list = contours(hist_mask_image)
    max_cont = max_contour(contour_list)

 # obtain centroid
    cnt_centroid = centroid(max_cont)'''

    cnt_centroid, max_cont = get_centroid(frame, hand_hist)
    cv2.circle(frame, cnt_centroid, 5, [255, 0, 255], -1)

    if max_cont is not None:
        hull = cv2.convexHull(max_cont, returnPoints=False)
        defects = cv2.convexityDefects(max_cont, hull)
        far_point = farthest_point(defects, max_cont, cnt_centroid)
        print("Centroid : " + str(cnt_centroid) + ", farthest Point : " + str(far_point))


        cv2.circle(frame, far_point, 5, [0, 0, 255], -1)
        if len(traverse_point) < 20:
            traverse_point.append(far_point)
        else:
            traverse_point.pop(0)
            traverse_point.append(far_point)

        draw_circles(frame, traverse_point)
        return far_point
    else:
  return None
# =================== PYGAME DRAWING ==================== #

#Checks if a coordinate is within the margins we define
def in_bounds(coord):
    return (coord[0] >= L_MARGIN) and (coord[0] <= R_MARGIN) and (coord[1] >= T_MARGIN) and (coord[1] <= B_MARGIN)


# Draw a dot
# Screen res is 640x480

#Measures the Euclidean distance between two points
def l2_distance(prev_coord, curr_coord):
    return math.sqrt((curr_coord[0]-prev_coord[0])**2 + (curr_coord[1]-prev_coord[1])**2)

#Draws a line between two drawn dots
def interpolate(prev_coord, curr_coord):

    if (prev_coord is not None) and (curr_coord is not None):
  prev_scaled = 320 - int(prev_coord[0]/2), int(prev_coord[1]/2)
  curr_scaled = 320 - int(curr_coord[0]/2), int(curr_coord[1]/2)

  pygame.draw.line(screen, curr_color, prev_scaled, curr_scaled, radius*2)
  pygame.display.flip()

#Draws a dot at a given point in the Pygame display
def draw_dot(coord):
    if (coord != None):
  coord_scaled = 320 - int(coord[0]/2), int(coord[1]/2)
  #prev_scaled = 320 - int(prev_coord[0]/2), int(prev_coord[1]/2)
  print("Dot drawn at: " + str(coord_scaled) )
  #time.sleep(.02)

  if in_bounds(coord_scaled):
      pygame.draw.circle(screen, curr_color, coord_scaled, radius)
     #pygame.draw.line(screen, BLUE, prev_scaled, coord_scaled, radius*2)
      pygame.display.flip()

#Changes the color by iterating through the color list defined earlier
def change_color():
    global curr_color, color_index
    color_index +=1
    if color_index >= len(colors):
  color_index = 0
    curr_color = colors[color_index]
    print(curr_color)

#Increases or decreases the drawn dot and line sizes
def change_radius(up_or_down):
    global radius
    if up_or_down:
  radius+=1
    else:
  radius-=1


# ================== MAIN ================== #
def main():
    global hand_hist

    #Do not draw on init
    draw = False
    is_hand_hist_created = False

    #Create a capture variable
    capture = cv2.VideoCapture(0)

    screen.fill(black)
    videoWidth = capture.get(cv2.CAP_PROP_FRAME_WIDTH)
    videoHeight = capture.get(cv2.CAP_PROP_FRAME_HEIGHT)


  #Intialize the current and previous drawn points
    prev = None
    curr = None
    prev_dot = None
    curr_dot = None
    draw_thresh = 10


    pygame.display.flip()

    #Calibrate histogram on input
    calibrate = True

    while capture.isOpened():
    try:

        # wait for keypress
        pressed_key = cv2.waitKey(1)

        #Read a frame from video capture
        _, frame = capture.read()


        if is_hand_hist_created:
        far_point = manage_image_opr(frame, hand_hist)

        # Draw dot located at farthest point
        ctr, mc = get_centroid(frame, hand_hist)


        if far_point is not None:
            curr = far_point

            #If we're drawing, make sure that we only draw dots if two subsequent dots are within a certain distance from each other
            #Interpolate between two drawn dots
            if draw:
            if l2_distance(prev, curr) <= draw_thresh:
                prev_dot = curr_dot
                curr_dot = far_point
                draw_dot(far_point)
                interpolate(prev_dot,curr_dot)
            else:
                interpolate(prev_dot, curr_dot)


            if prev is None:
            prev = far_point
            else:
            prev = curr
        # Interpolate


        else:
        frame = draw_rect(frame)


        #Go through the pygame events
        for event in pygame.event.get():
        if (event.type is MOUSEBUTTONDOWN):
            pos = pygame.mouse.get_pos()
        elif(event.type is MOUSEBUTTONUP):
            pos = pygame.mouse.get_pos()
            x, y = pos

            #If we're calibrating, go to draw screen and create hand histogram if calibrate button is pressed
            if calibrate:
            if y >= 180 and y <=220 and x>=120 and x<=200:
                is_hand_hist_created = True
                hand_hist = hand_histogram(frame)
                calibrate = False
                screen.fill(black)
                pygame.display.flip()

          #If we're drawing,
          #if we hit the draw button, trigger drawing on and off
          #if we hit the calibrate button, disable drawing, reintialize dot variables, and go back to calibrate screen
          #If we hit anywhere on the screen that is not a button, rotate through the color list
            else:
            if y >= 120 and x <160:
                print("Draw/Not Draw")
                draw = not draw

            elif x >= 160 and y >120:
                print("Calibrate")
                draw = False
                is_hand_hist_created = False
                calibrate = True
                prev = None
                curr = None
                prev_dot = None
                curr_dot = None
            else:
                change_color()


        #Rescale the display frame to 320 x 240 pixels
        rescaled_frame = rescale_frame(frame)

        #Draw the calibrate button on the live cam screen if we're calibrating
        if calibrate:
        #print(rescaled_frame.shape)
        surface = pygame.surfarray.make_surface(rescaled_frame.transpose(1,0,2)[...,::-1])
        surface.convert()

        cal_surface = font.render('Calibrate', True, WHITE)

        rect_cal = cal_surface.get_rect(center=(160,200))

        screen.blit(surface, (0,0))
        pygame.draw.rect(screen, BLUE, pygame.Rect(120, 190, 80, 20))
        screen.blit(cal_surface, rect_cal)


        pygame.display.flip()

      #Render the draw and quit buttons on the drawing page
        else:

        pause_surface = font.render('Draw', True, WHITE)
        rect_pause = pause_surface.get_rect(center=(40,200))
        screen.blit(pause_surface, rect_pause)

        cal_surface = font.render('Calibrate', True, WHITE)
        rect_cal = cal_surface.get_rect(center=(260,200))
        screen.blit(cal_surface, rect_cal)
        pygame.display.flip()


        #If we hit button 17, change the color
        if not GPIO.input(17):
        change_color()

        #If we hit button 22, increase the drawn dot size
        if not GPIO.input(22):
        change_radius(True)

        #If we hit button 23, decrease dot size
        if not GPIO.input(23):
        change_radius(False)

      #If we hit button 27, end the program
        if not GPIO.input(27):
        print("End game")
        break

    except KeyboardInterrupt:
        break

  #OpenCV and PIO cleanup before program ending
    cv2.destroyAllWindows()
    capture.release()
    GPIO.cleanup()


# Run main()
if __name__ == '__main__':
    main()