RPi Integrated Smart Home Control System
A simple RPi Z-Wave controller with basic control, scheduling, and alarm clock functionality
A Project By Shaurya Luthra (sl2462) and Patrick Wang (pw349).
Demonstration Video
Introduction
Smart home devices and the Internet of Things are proliferating at an astounding rate, yet controlling a smart home network is both costly and/or difficult. Dedicated controller hubs can cost well over $100 while open-source software requires experience (or a lot of documentation reading and forum diving). On top of that, controllers often need to be accessed over your home network, requiring network and router setup outside the comfort zone of most users. That's when we thought, why not create a simple smart home controller using the RPi and include an integrated GUI? Enter our project, the RPi Integrated Smart Home Control System. This would eliminate much of the hassle of setting up the network yourself, high cost of dedicated controller hardware, as well as provide a direct interface to the network at the same time!
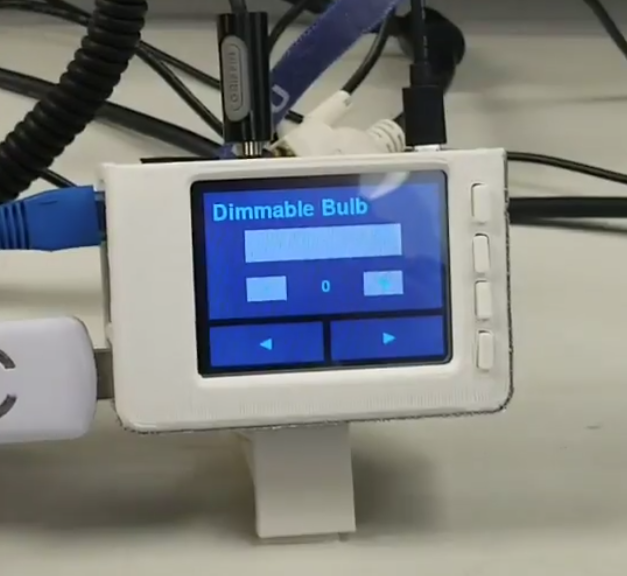
Project Picture
Project Objective:
- Low cost
- Intuitive interface
- Bedside control
- Dynamic node detection and GUI generation
- On/off and dimming control
- Alarm setting with integrated smart home control scheduling
Design and Implementation
There were several software and hardware components that went into putting together this project. The hardware components were tested independently and then integrated into the final system with our custom software
Hardware Design
The hardware for this project is minimal. The main components are the RPi, piTFT, and Aeotec Z-Stick. The RPi is the main embedded device and is the platform on which our program is run. The piTFT allows for user interaction by displaying a GUI and accepting touch and button inputs. The Z-Stick, a Z-Wave antenna, is the crux of our project, allowing the RPi to interface with Z-Wave devices. A basic diagram of our system is seen below
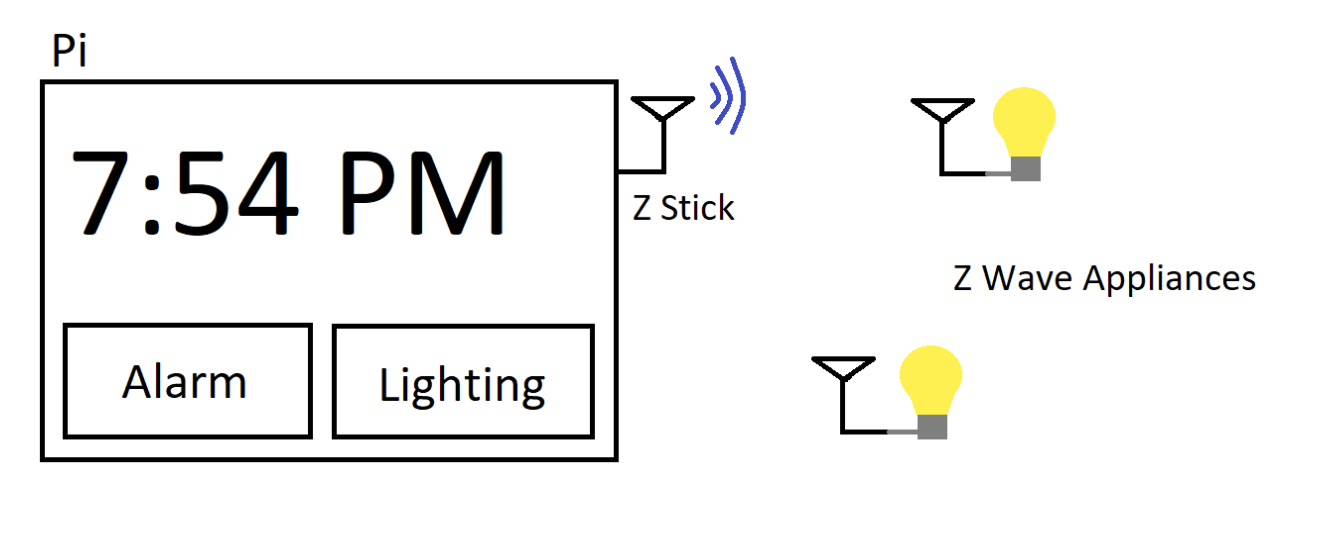
Basic Setup
We chose Z-Wave as our smart home protocol of choice due to it being open source with freely available libraries. The standard itself is released and can be seen by the public, allowing anyone with the time and capability to implement a controller. The Z-Stick further simplifies this process by implementing the protocol but allowing a computer to act as the controller for a Z-Wave network.
For added protection and usability, we also 3D printed a case for the RPi and piTFT (obtained from here). The diagram of the case is shown below.
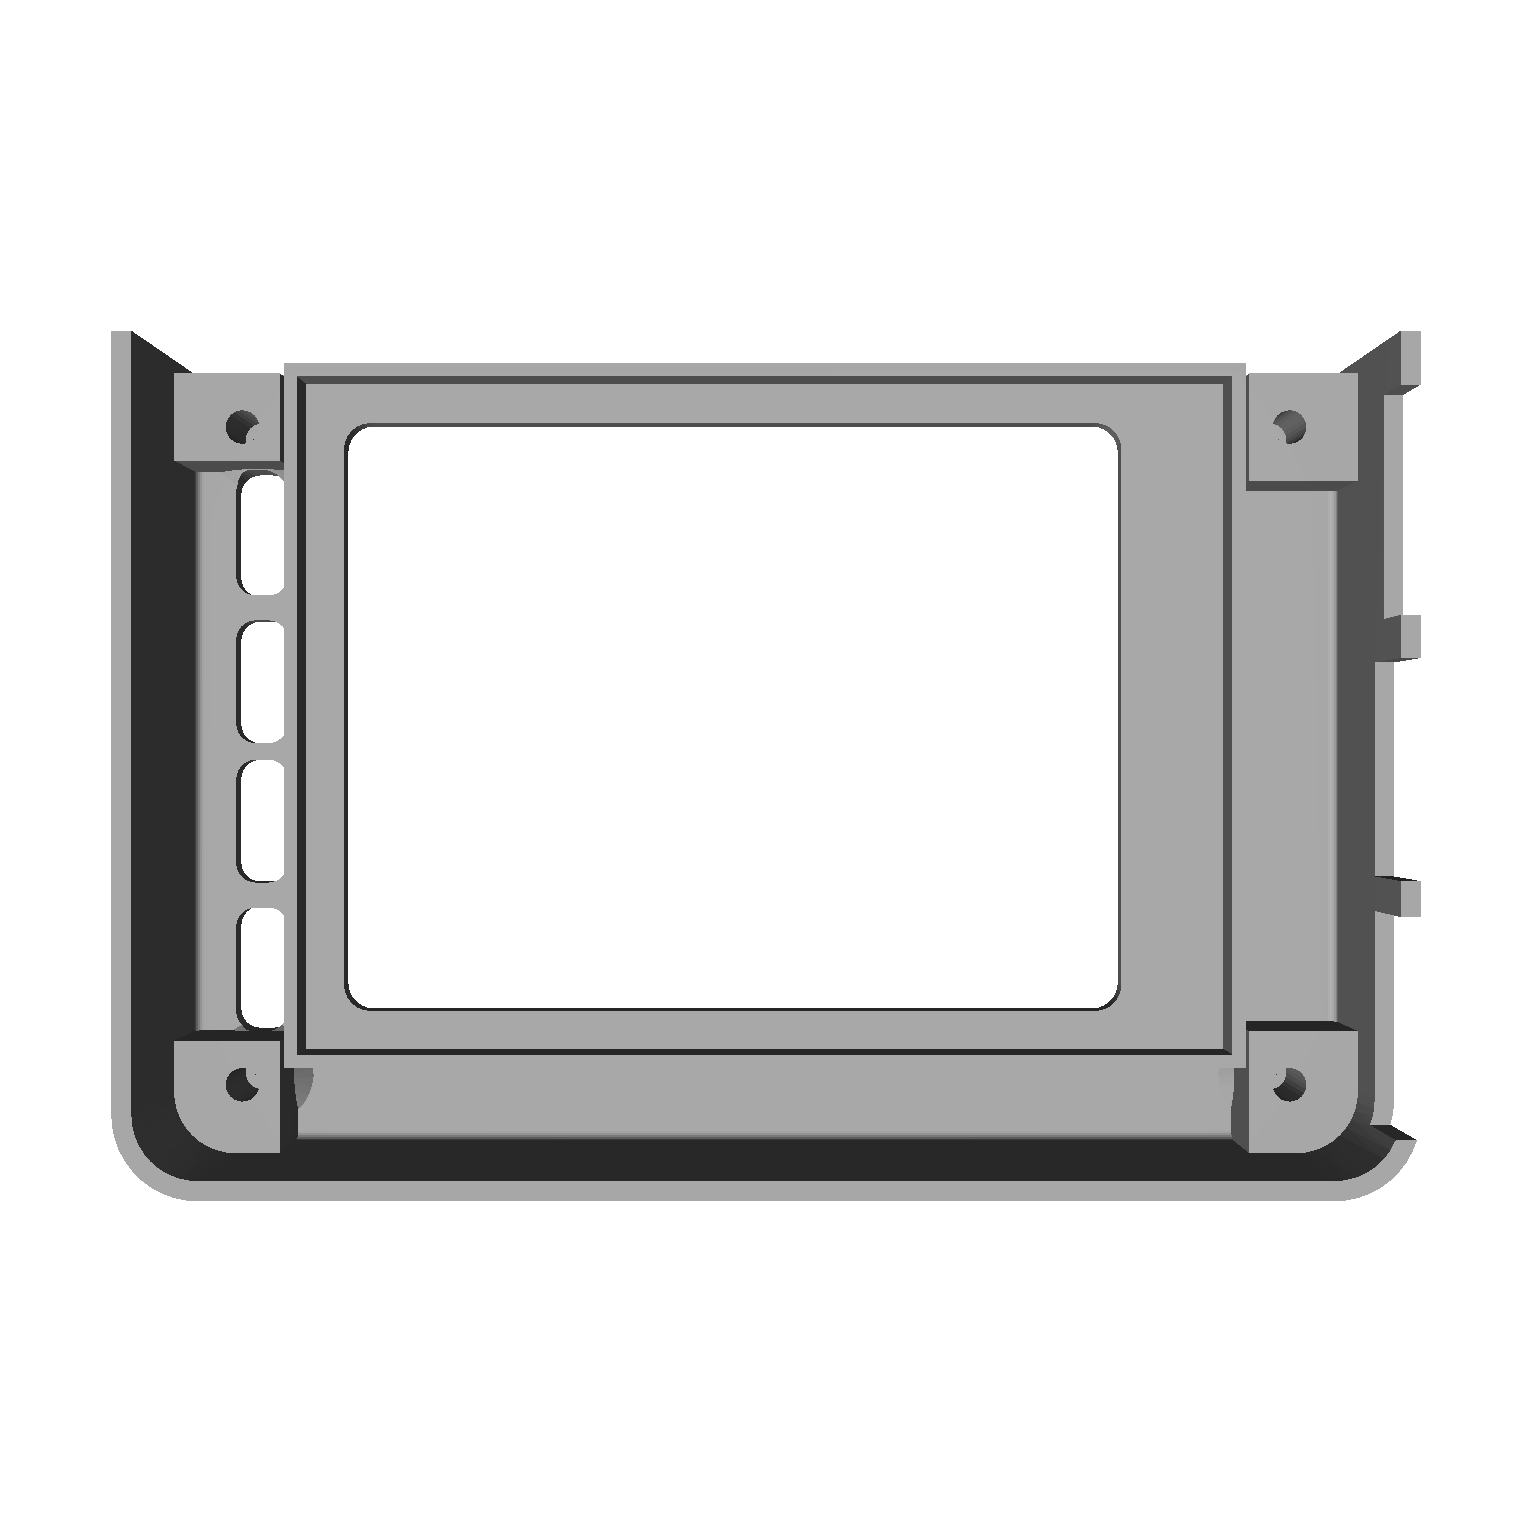
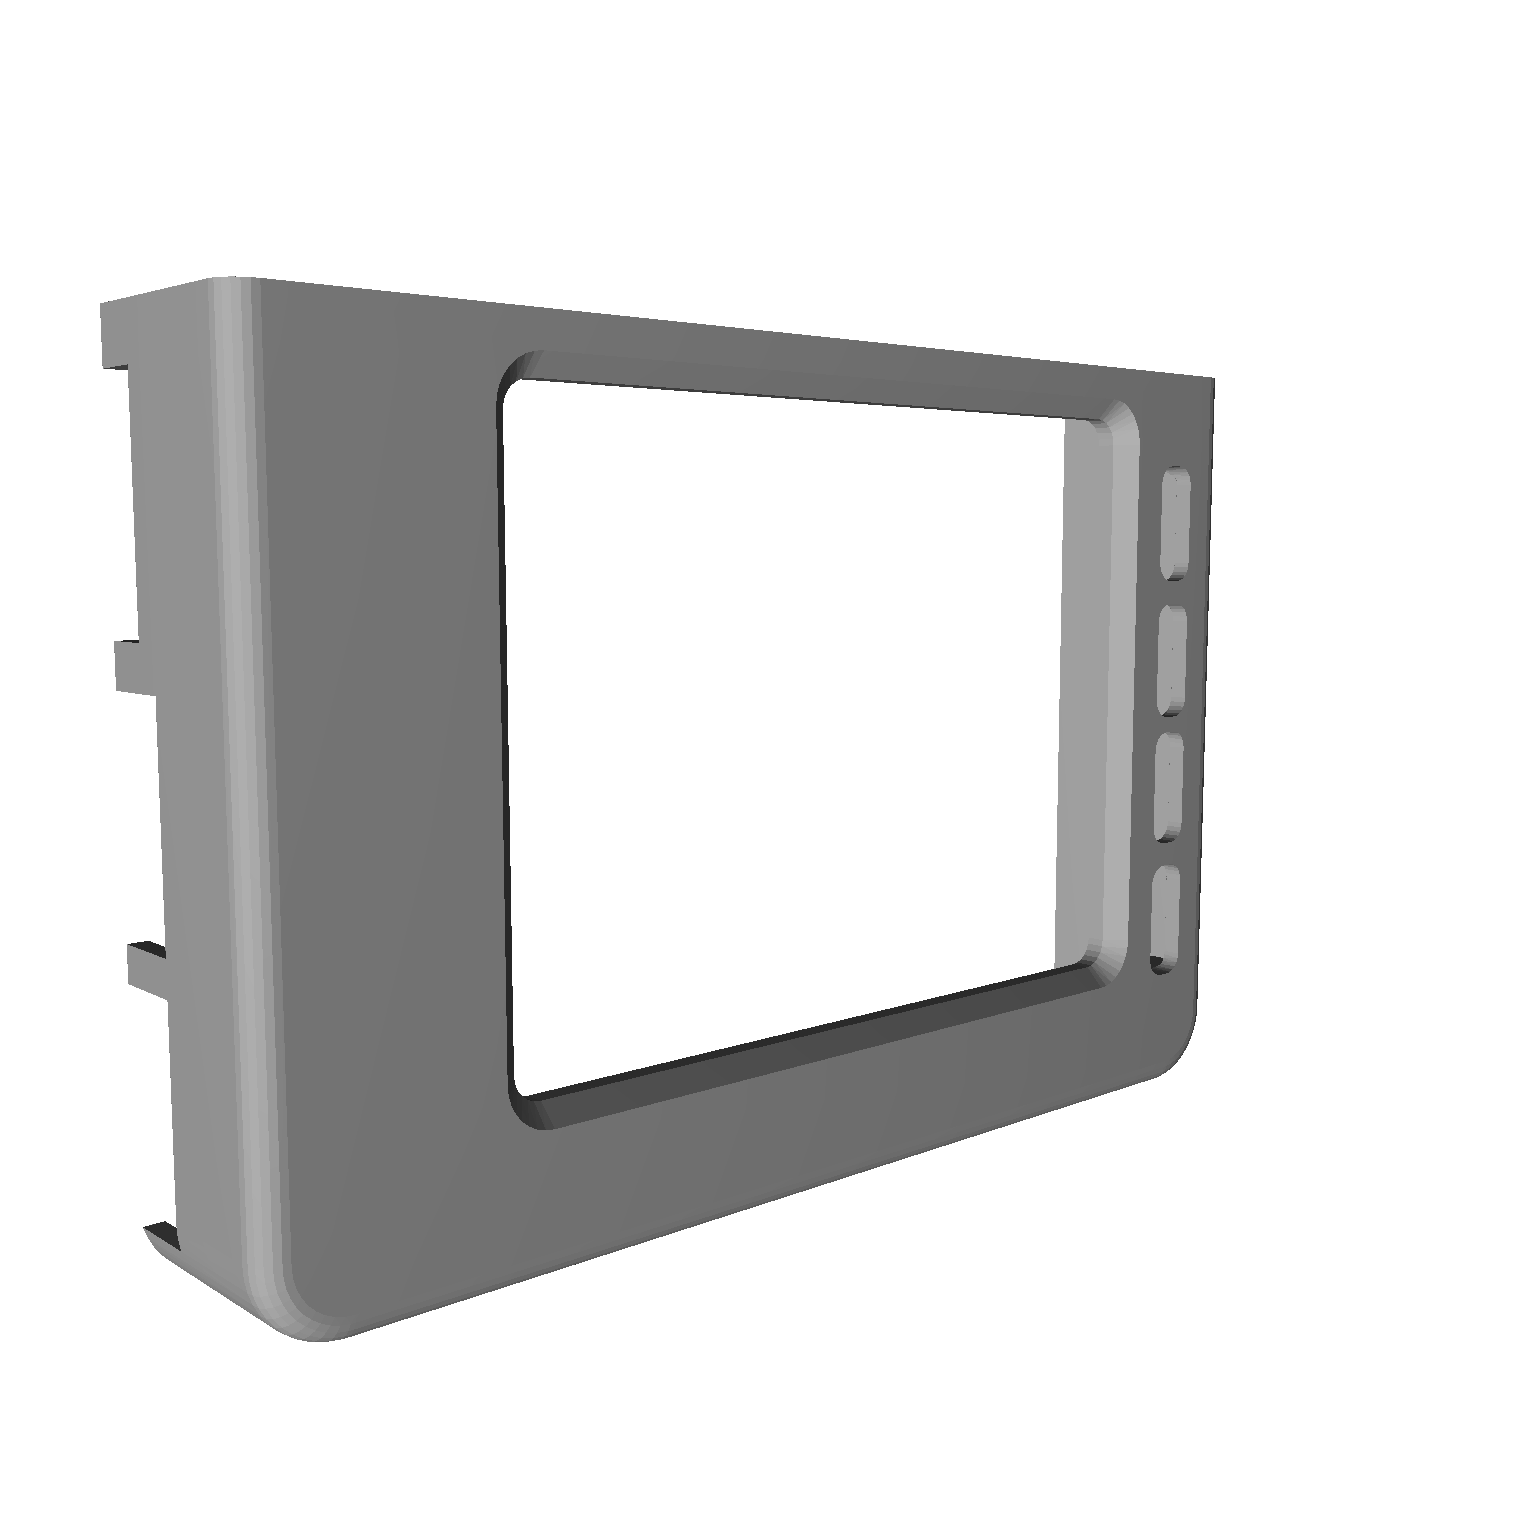
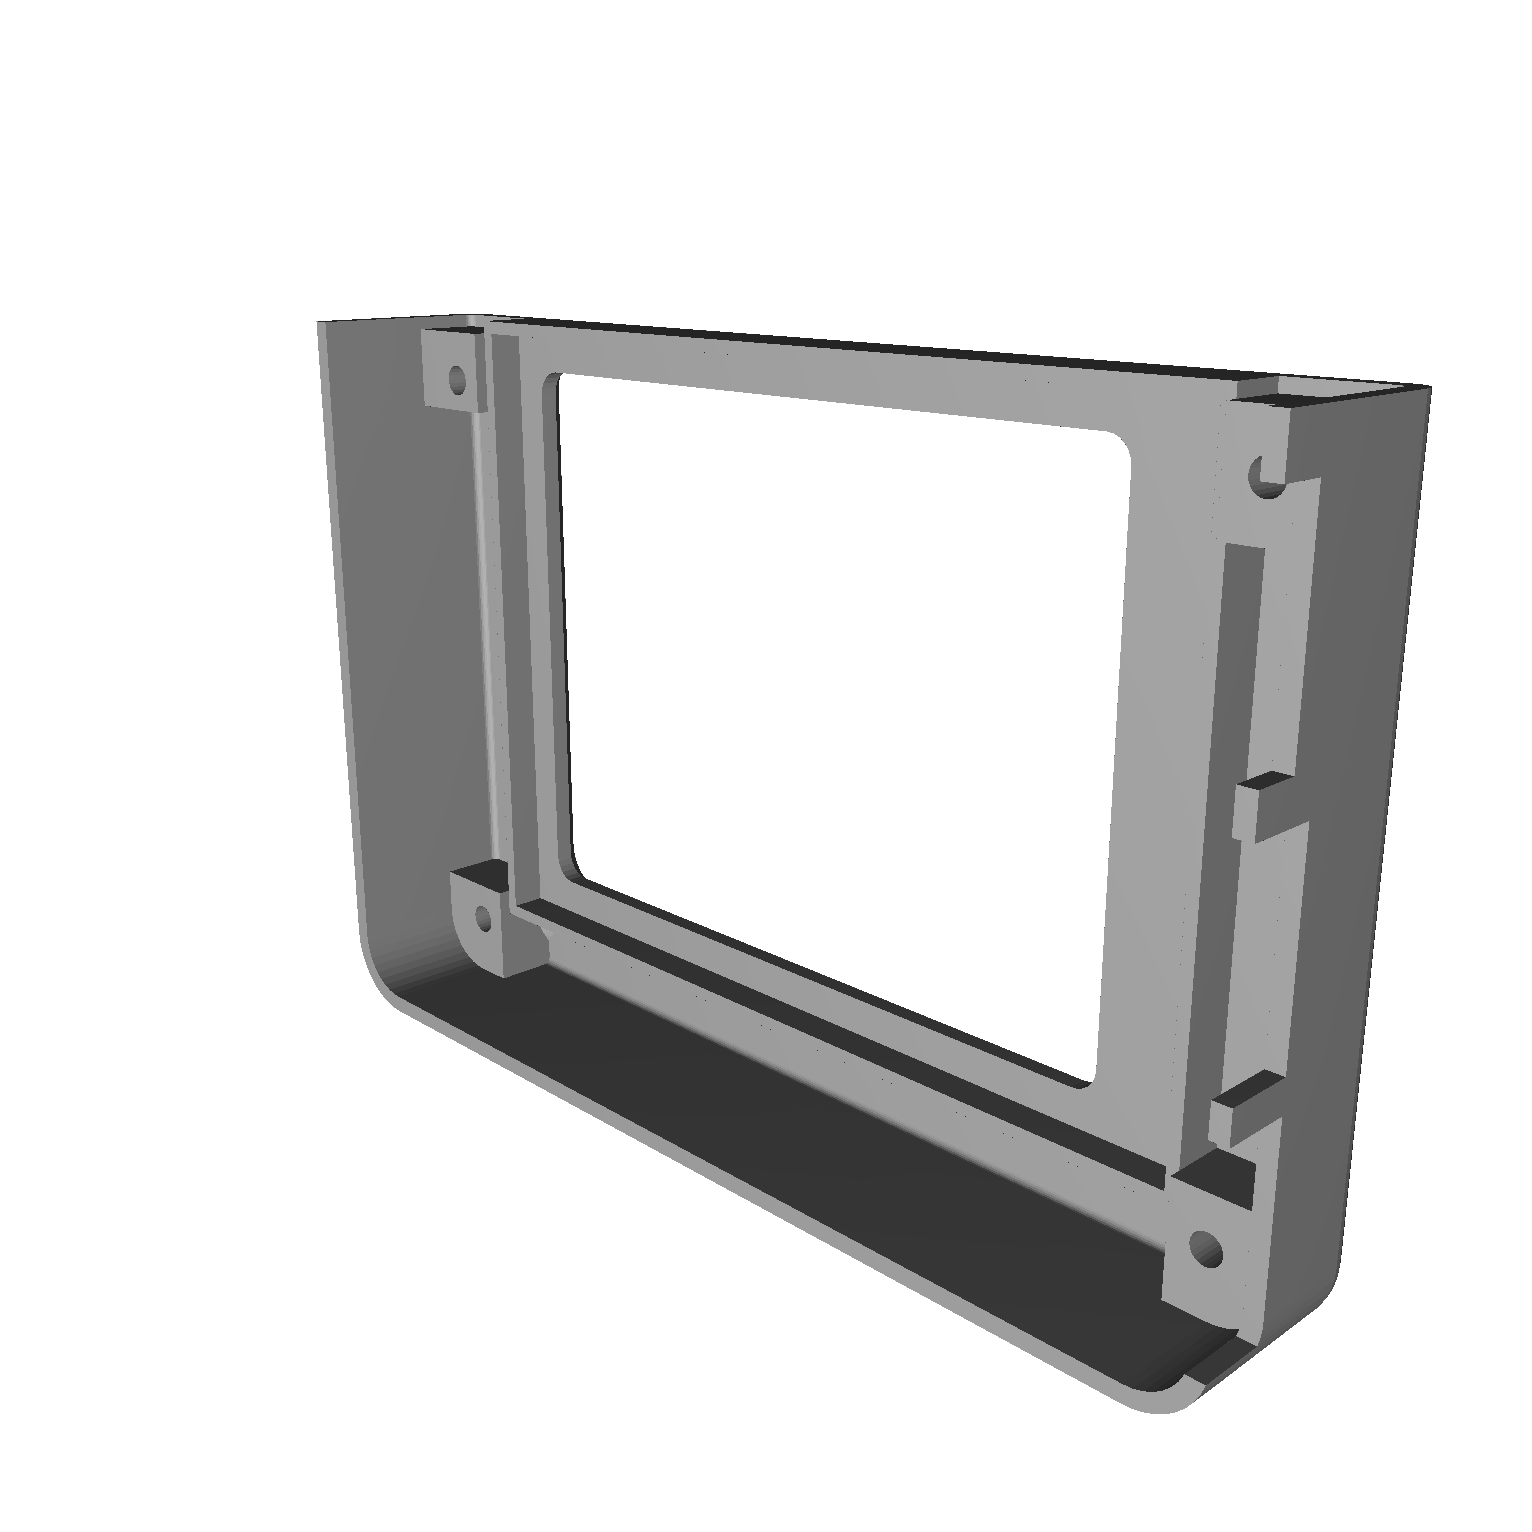
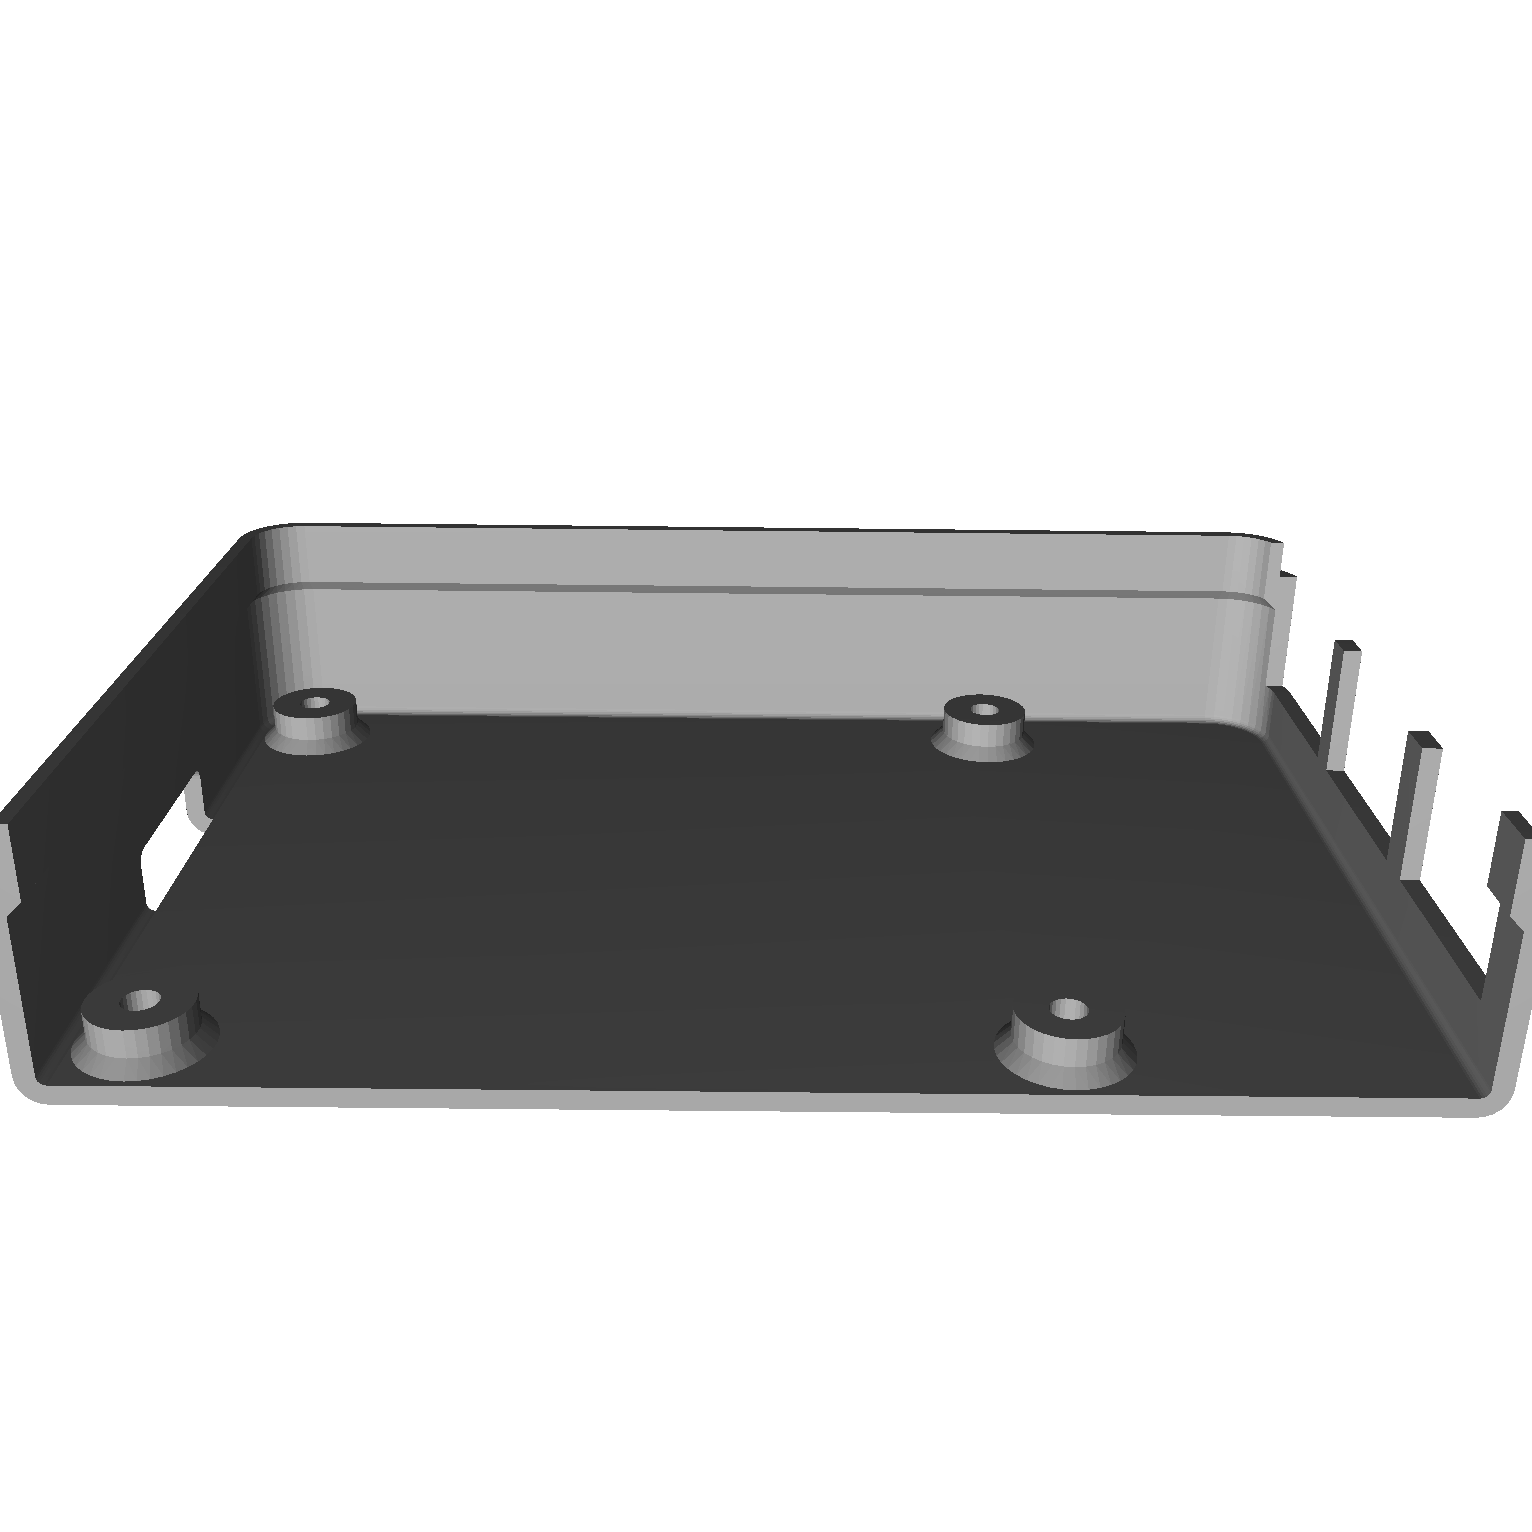
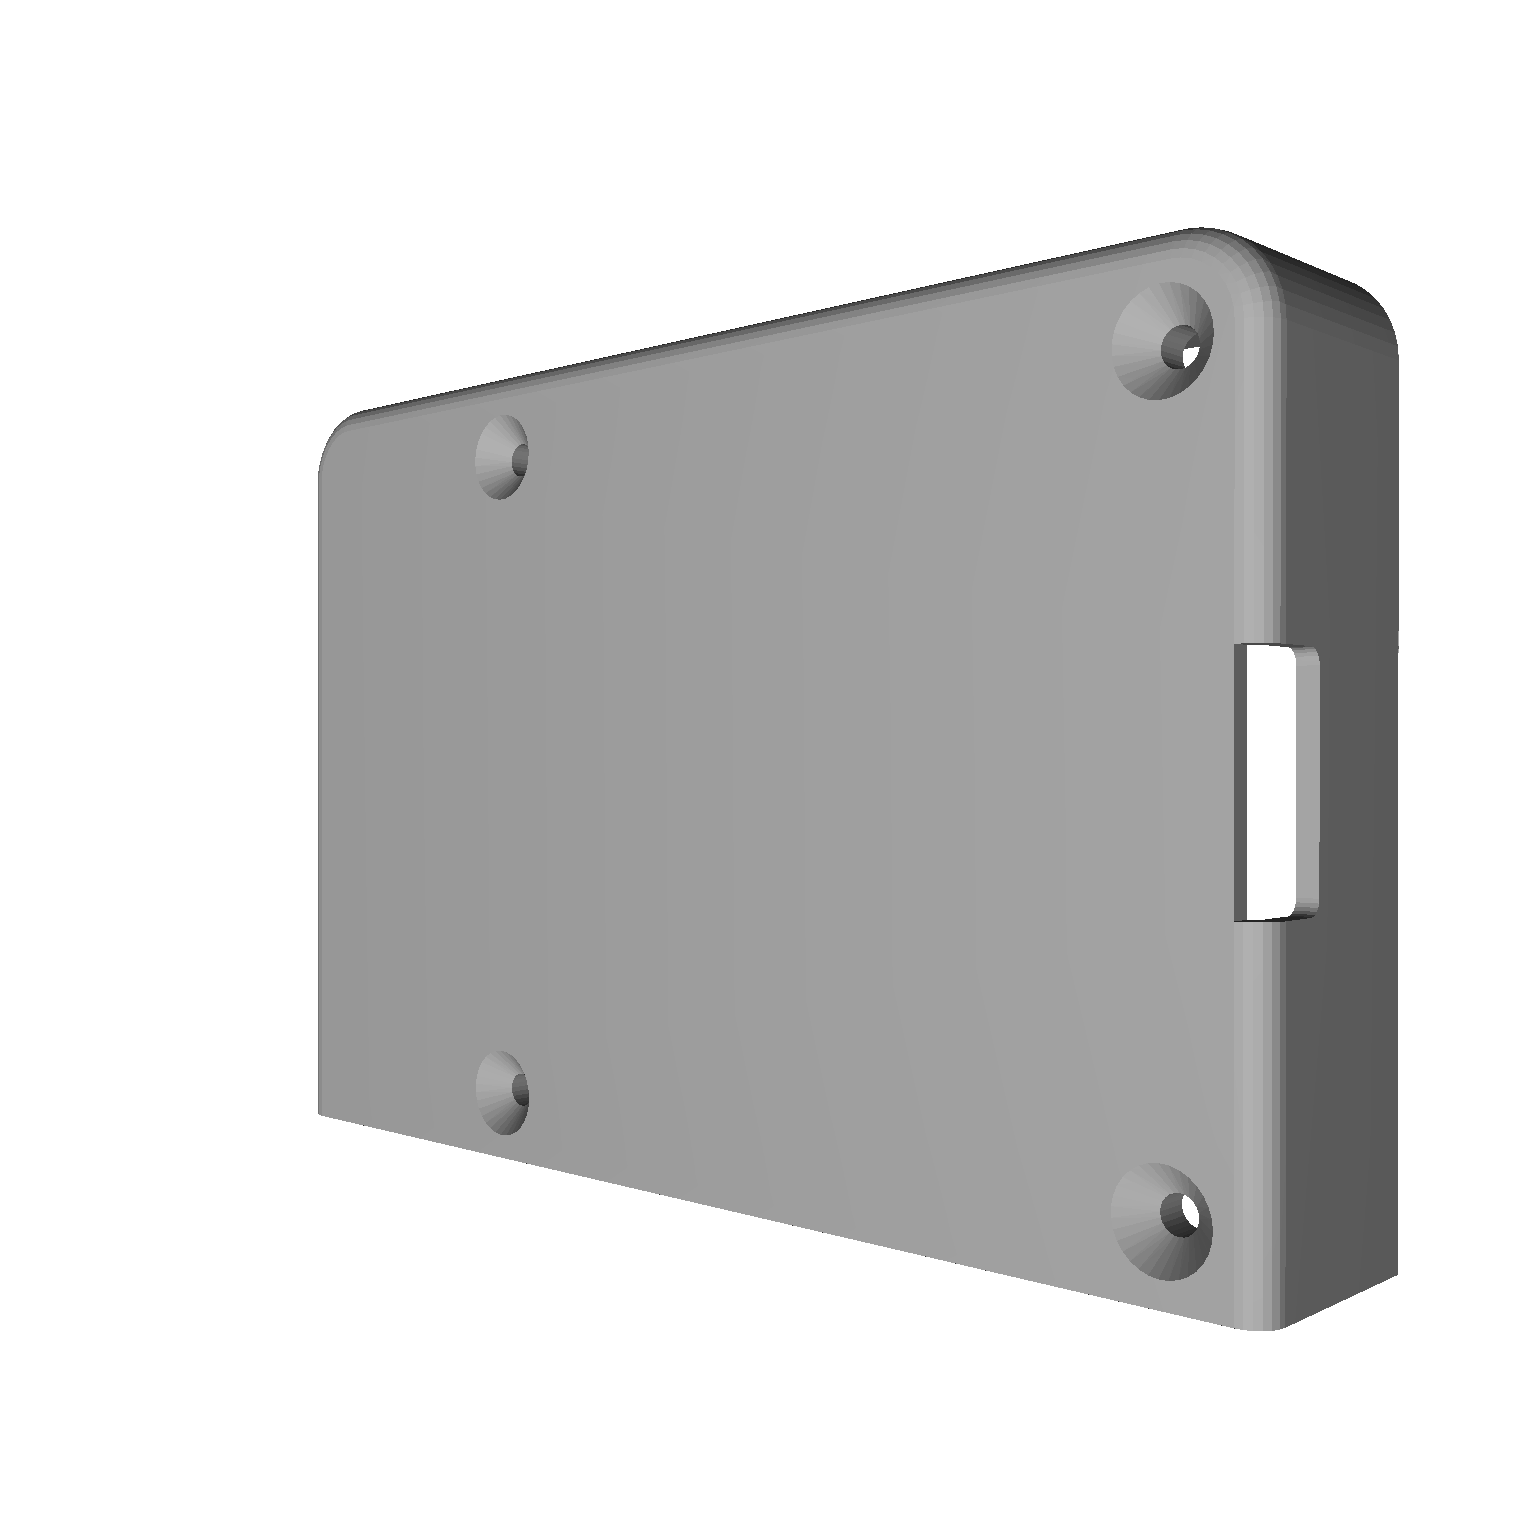
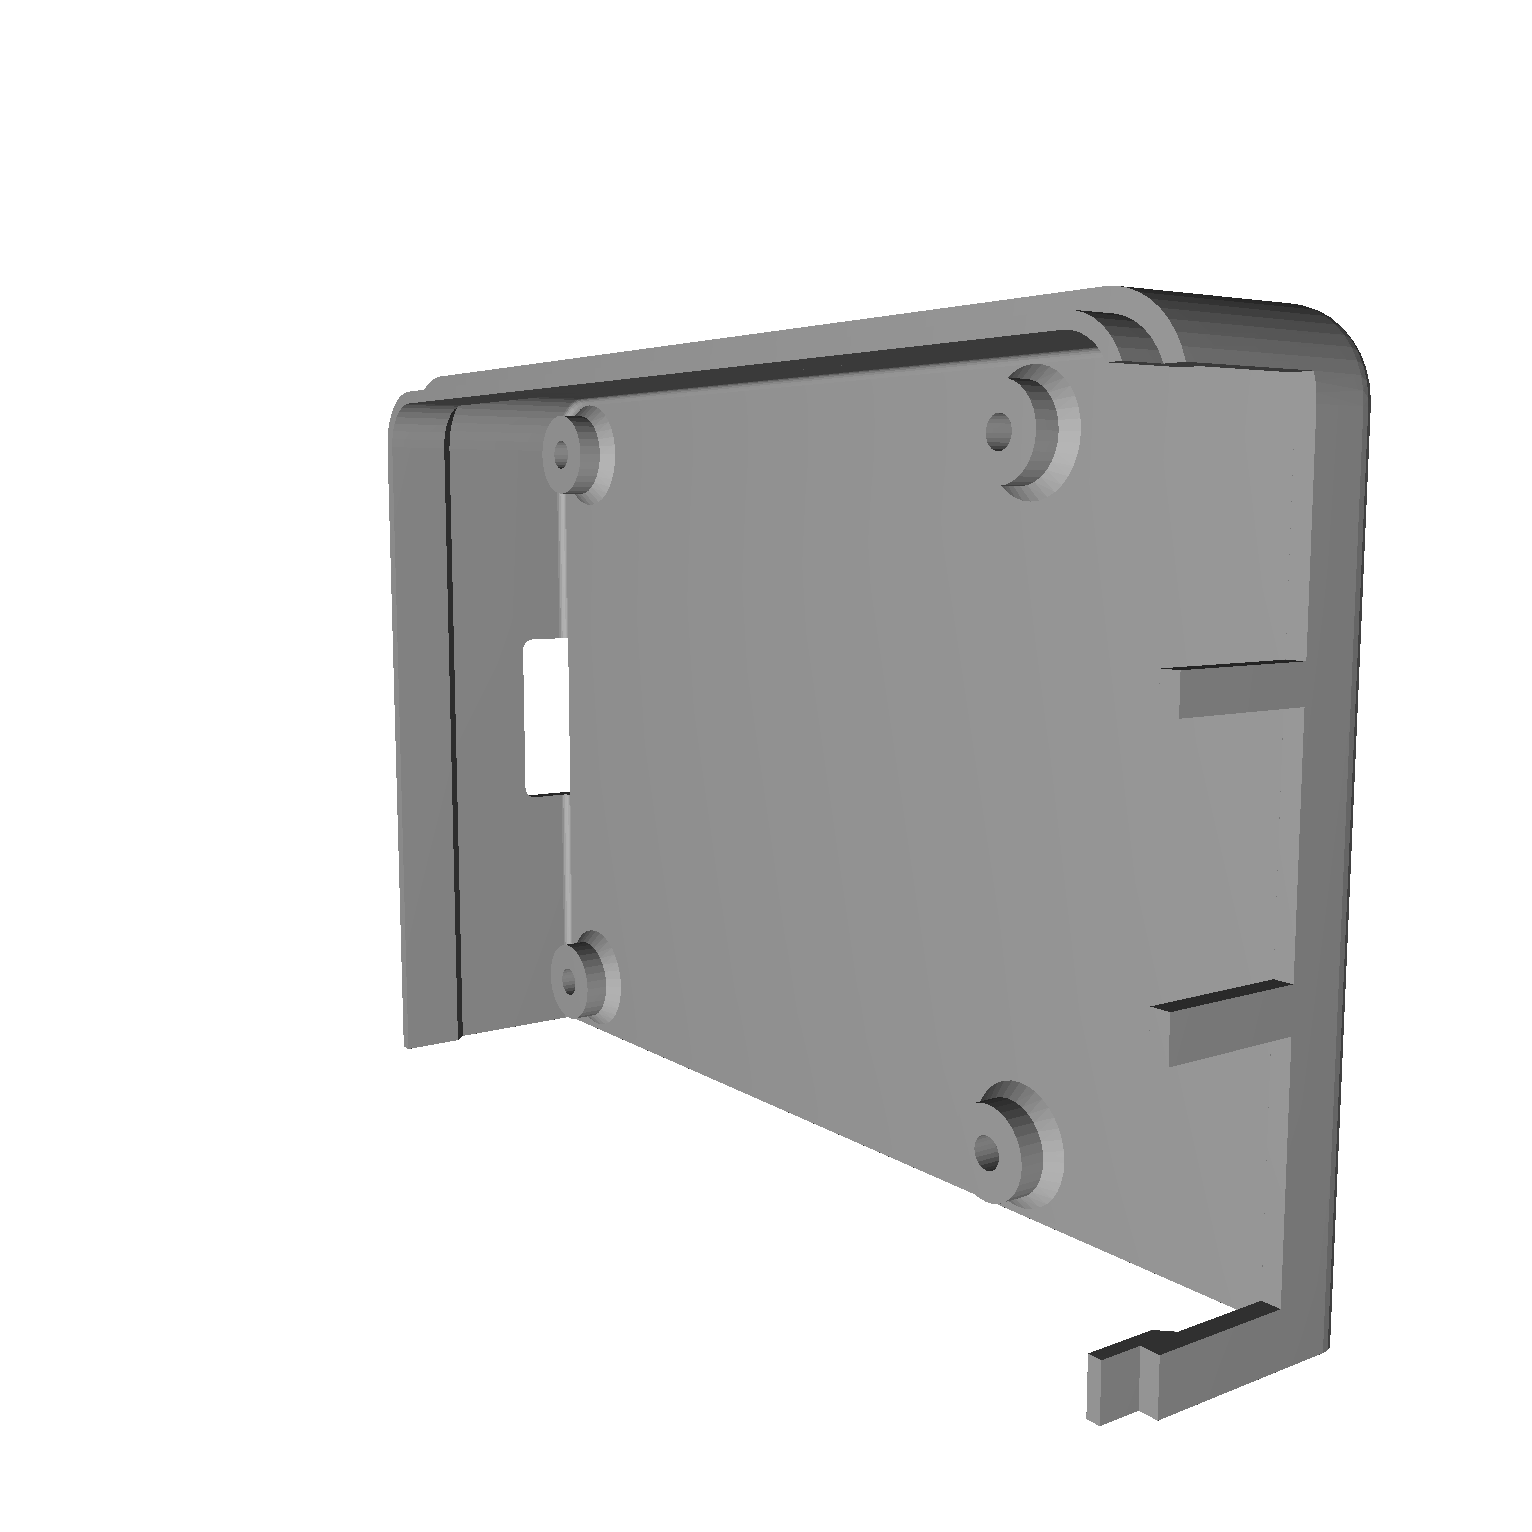
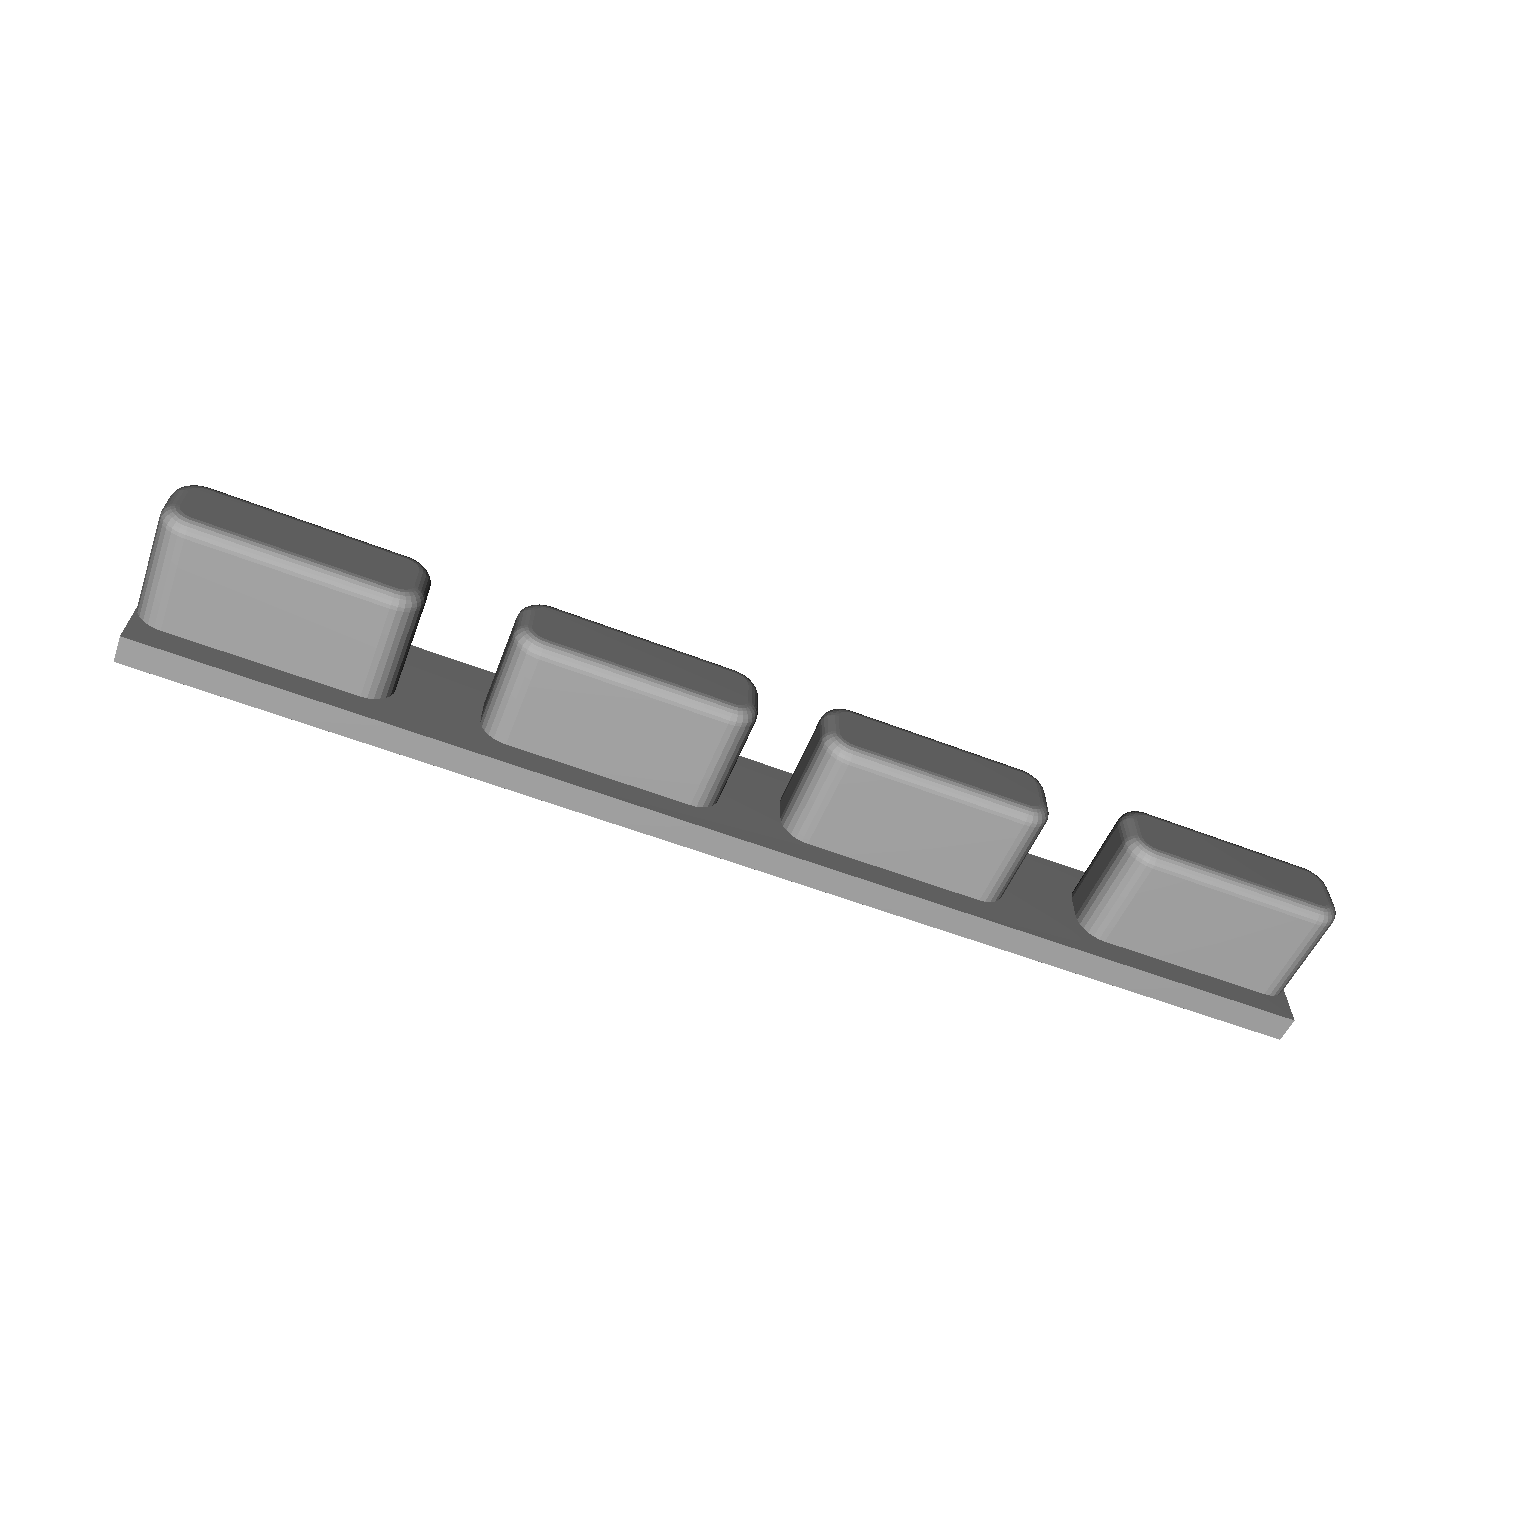
Case
Software Design
The design of the overall program has a few goals. First, the Z-Wave network needs to be initialized with a scan of all nodes. This is the backbone of all the smart home management and all other aspects of the program reference this network’s nodes for control. After this initialization (which may take some time), the GUI starts to be generated by detecting the current state of all nodes and using them to initialize “Things”, a GUI class that has all elements and functions needed to interface with nodes, as well as the node that Thing is bound to. After the things, the alarms are initialized. At this point, enough of the back end is in place for the main body of the program to run. The main loop consists of event detection and handling (clicking of GUI elements), redrawing the GUI (based on state or action) and repeating until an exit condition is hit.
Basic Setup
Openzwave
The first main component of the program deals with the Z-Wave network initialization and management using the openzwave library. The library itself was originally a C++ library but later offered a Python wrapper, which worked out well with our semester-long familiarity with Python. Using the provided hello_world.py example, we learned how to initialize the network and let it discover all connected nodes. Most of this was setting various options and configuration parameters to run the network, then giving it time to become ready. After this period, we loop through all of the network object’s nodes and generate a list of Thing.
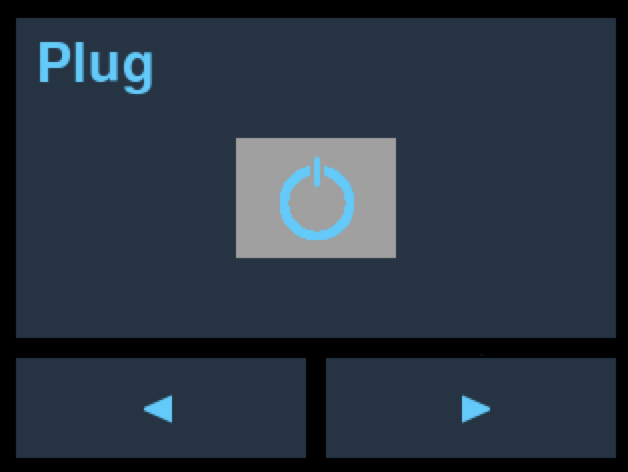
The Thing class is used to display each node in the network and control it. It is initialized to know its index within the list of Things referenced by the rest of the program for control (used for selection for Alarms), node object (enabling direct control over that node), and different fonts used for GUI rendering. The current state of the thing (on/off, dim level) are also extracted from the node and stored. All GUI components needed for control (dimmer slider, power switch, selection button) are included in the Thing. It also contains methods used to draw the thing as well as handle events such as button clicks. The drawing method selectively draws GUI components based on the characteristics of the node. Similarly, the event checking function takes in the state of the program as well as the mouse click location to check for the events befitting the characteristics of the node and/or program state.
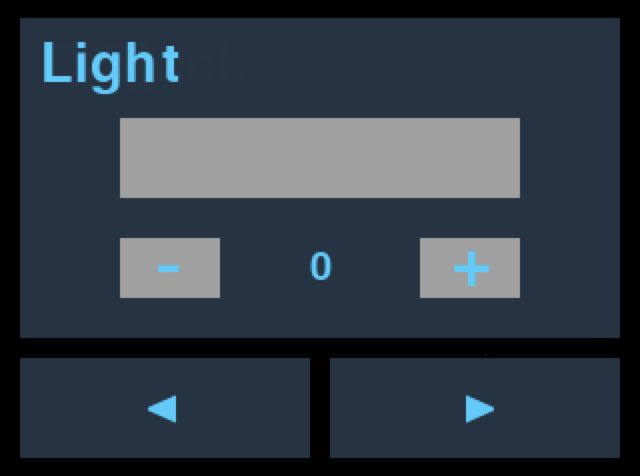
Z-Wave GUI
The generated list is then used for display purposes as well as to access the Things for linking with an Alarm_class object. Furthermore, the generation of all GUI components is done simply by initializing the Thing. Because the GUI generation and control functions are all self contained, this allows for a modular, dynamically generated interface for Things. A new node will be detected upon initialization, as are any missing nodes, and the Thing class will handle these events without problems.
Alarm Management
The A large portion of the functionality of this project was creating a custom alarm system that interacts with our openzwave things - allowing us to turn on and off 4 independant alarms, each with the ability to turn on their own thing. In order to achieve this functionality we created a subsystem of our overall program that was centered around the alarm and alarm set screens shown below.
The first screen we worked on was the alarm screen which displays the four configurable alarms and allows us to configure each of them separately. The background blocks and Z symbol are part of the overall background image, and the alarm time and status (on or off) are drawn dynamically based on each alarms settings. The alarms themselves are held in their own Alarm_class(x,y) that is instantiated with the top left corner of their position on the alarm home screen (allowing us to dynamically draw/redraw each of our alarms). Each alarm also holds information in regards to the time of the alarm, whether or not it is on, and what z function to run when the alarm is triggered.
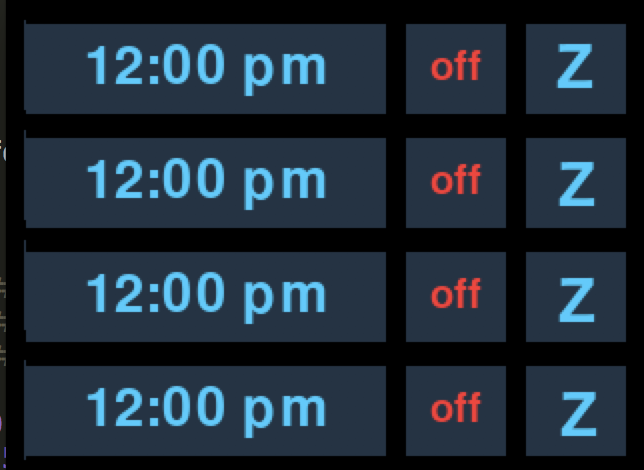
Alarm Home Screen
Clicking on the different buttons above results in several different functions. Clicking the time brings us to the alarm set screen shown here.

Alarm Set Screen
On this screen we can set the alarm time for the selected alarm by using the up and down arrow keys shown above. Cancel will cancel the setting operation and return us to the alarm home screen, set will change the specified alarms time and then return to the alarm home screen as shown below.

Transition
The on/off button, when clicked, will toggle whether or not the specified alarm is on, changing the color, and the text displayed on the button as seen above. Finally by clicking the Z button, we enter the z-wave selection screen shown here.
Z-Wave Selection
This button allows us to choose exactly which z-wave device, if any, we turn on when the alarm goes off. Selecting or deselecting a device will result in us getting back to the alarm home screen. With the above in hand we have our basic alarm set up that is integrated with z-wave functionality. Beyond the above, each of the alarms (fixed to 4 at the moment), is checked every loop (~30 times a second) to see if the alarm time matches the system time. If these times do match and the alarm is on, then our function check_alarm() will perform the specified z-wave function as well as play audio out of the RPi’s audio jack. In order to shutdown the alarm, one can simply hit the 2nd button from the top of the piTFT, at which point the alarm tone will cease to play.
GUI design
The entire project is highly dependant on the GUI, in order to both control the z-wave system and set up the alarms. The original GUI design can be seen below:.
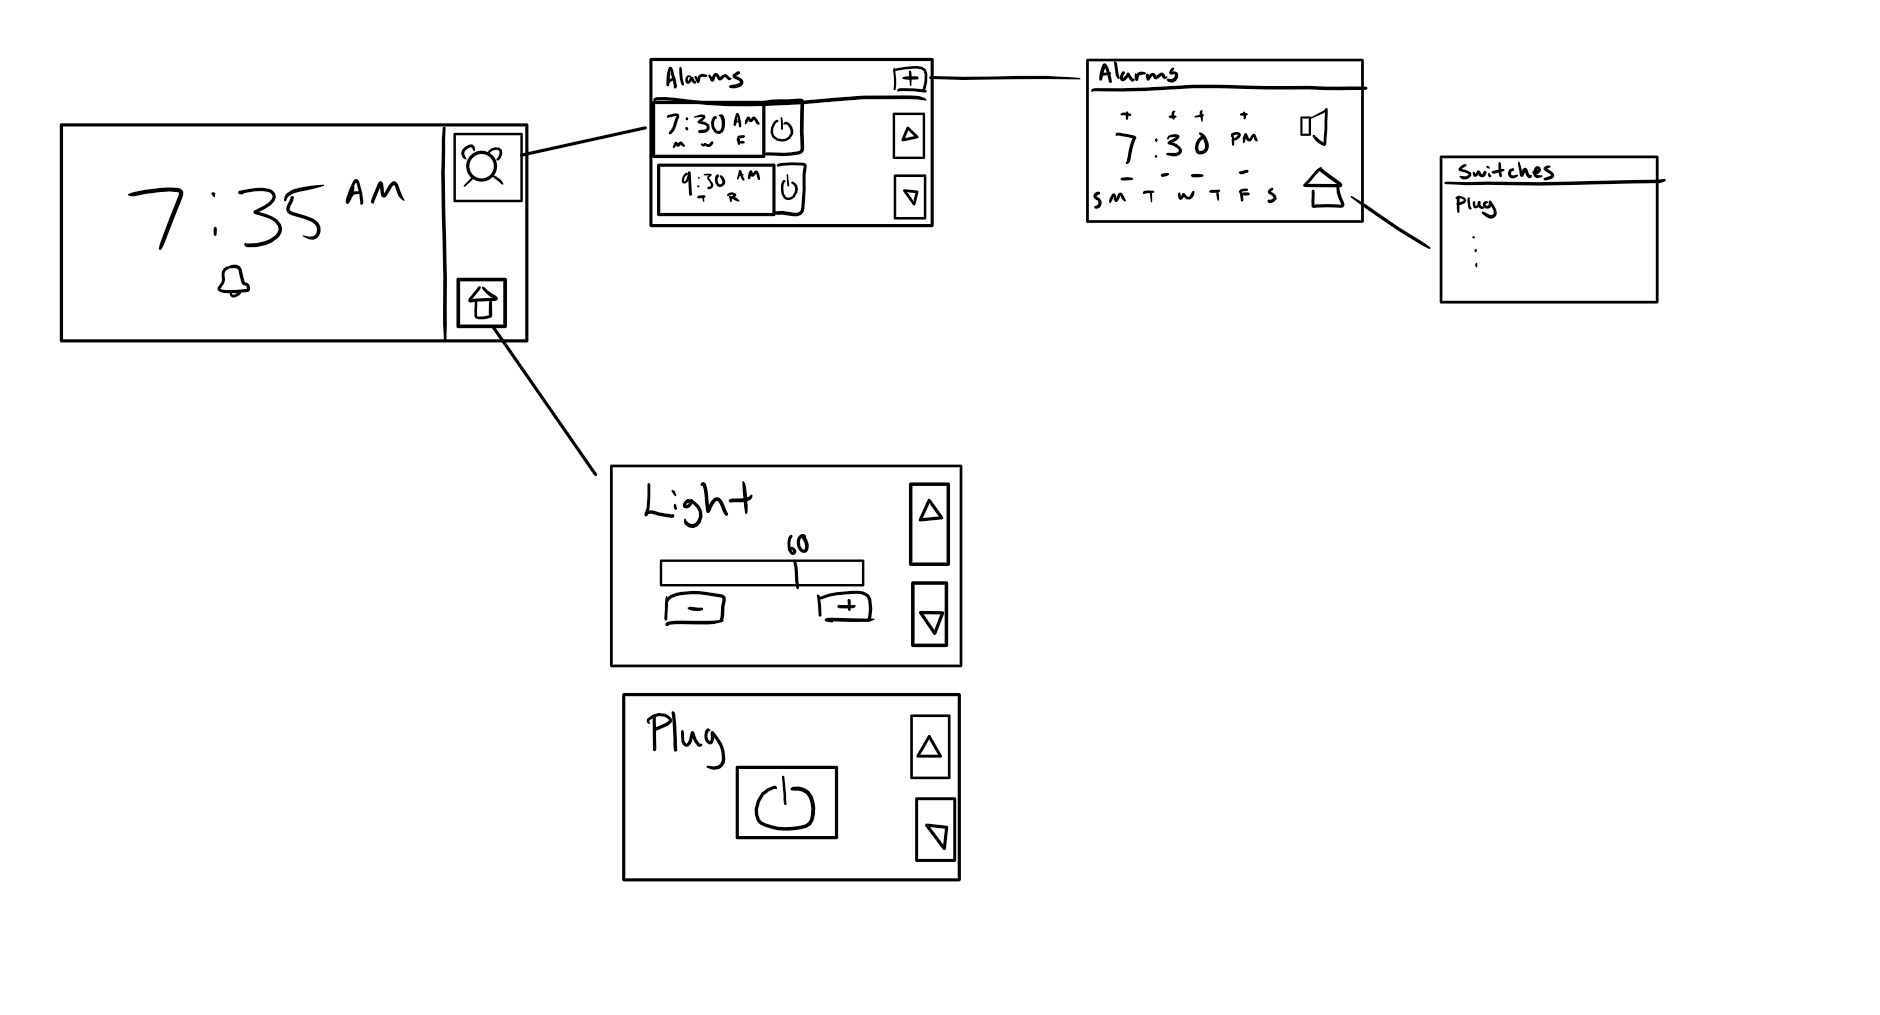
Original Sketch
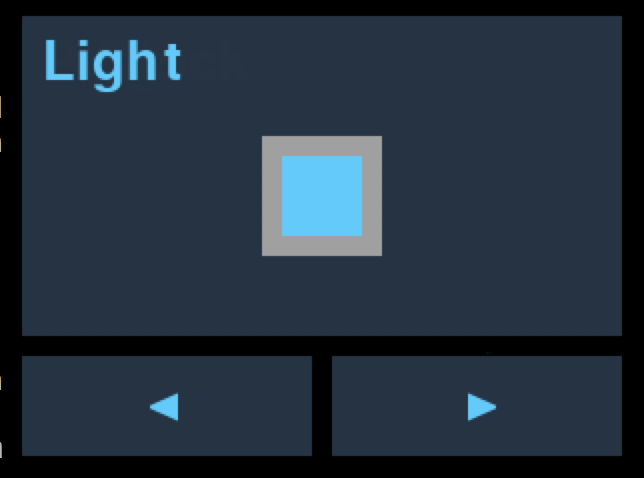
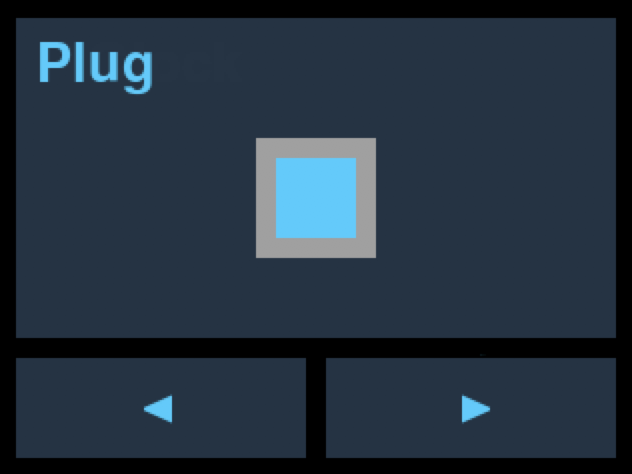
We did not change from the original GUI design that greatly. The largest changes that happened from the original GUI to the final design were the removal of a custom number of alarms (as it proved to be quite a bit of control overhead which we did not have time for), and that the control/toggle buttons were moved to the bottom of the screen, as we did not realize how tall the screen actually was (giving us more room for vertical placement). The GUI itself was created using images to draw static components for each state (background, squares, persistent control buttons) and using Pygame to only draw the more dynamic components, simplifying the code. An example is the main home screen. The entire GUI for this state is an image except for the time, as that is the only component that needs updating, as seen below.
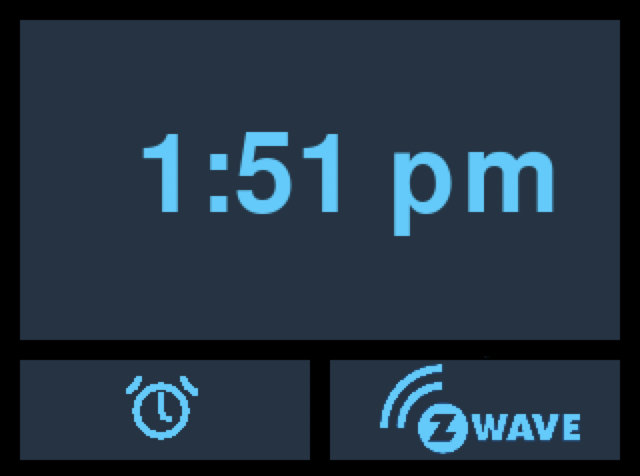
Home Screen
All drawn object use Surface objects for rendering and Rect objects for positioning (Pygame library). However, for components that were part of the background image, only rects were used to capture click events without changing our image. For example, in the main page GUi seen above, the bottom buttons are static and part of the image, but have Rects at their respective locations to handle click events. The final GUI, although slightly different, follows a very straightforward flow as seen below.
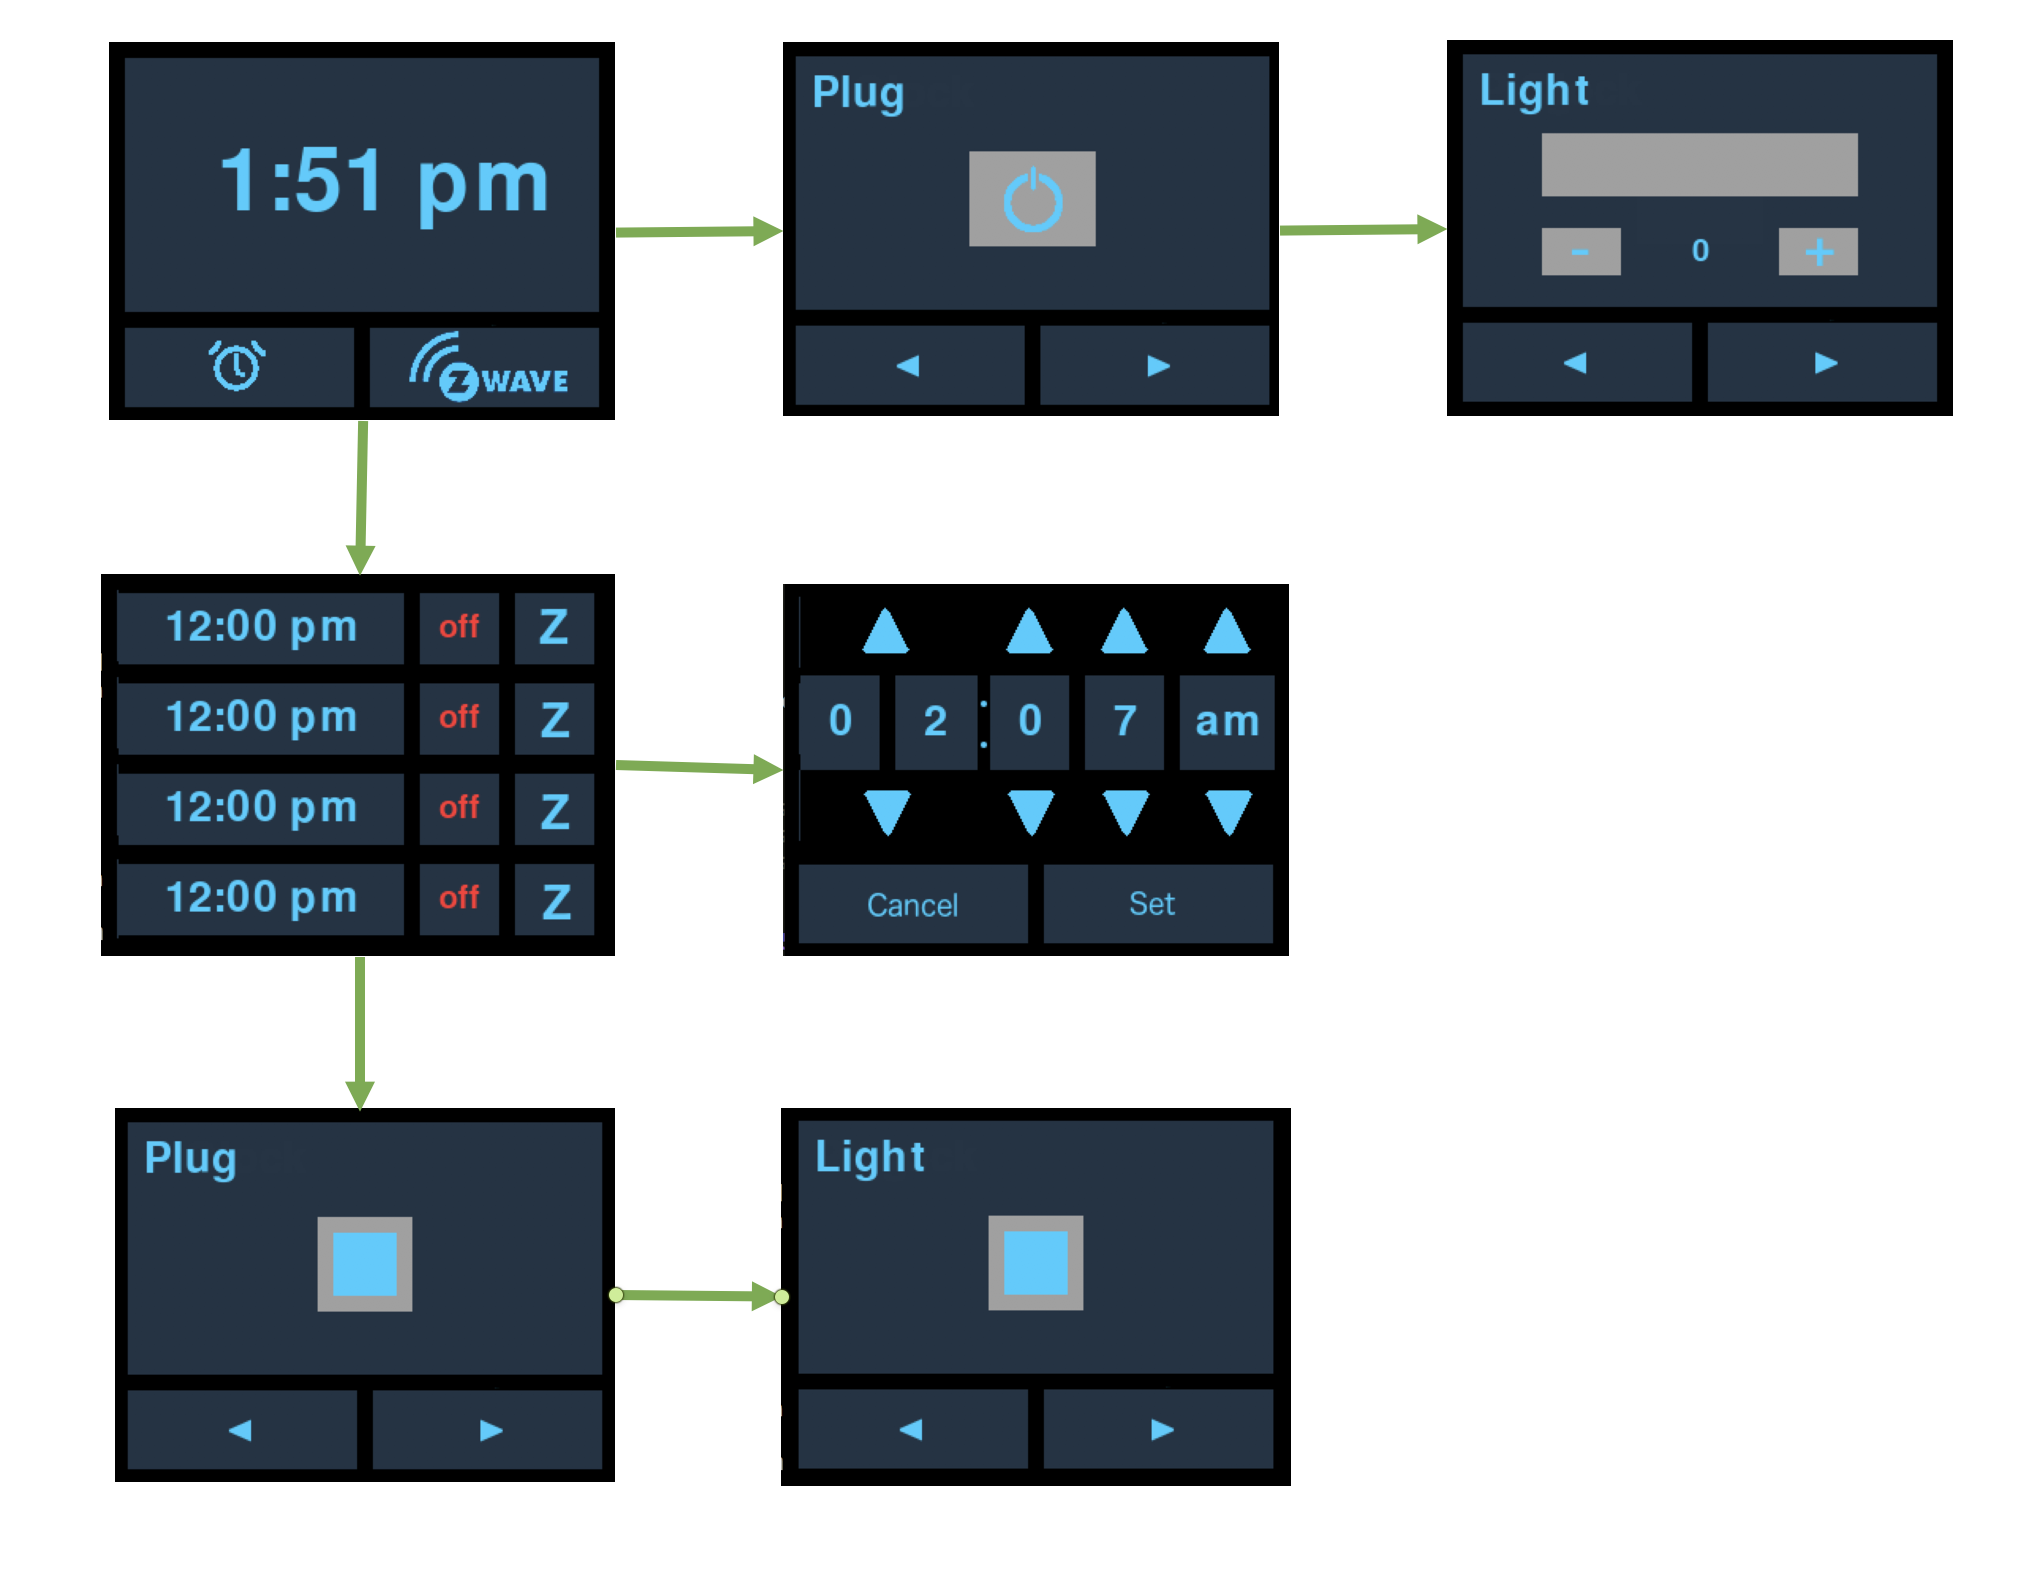
GUI Flow
By using the various on screen buttons as seen above we can maneuver through the entire UI. And then to return home we can simply hit the top most physical button and immediately get taken back to the home screen where the digital clock is displayed.
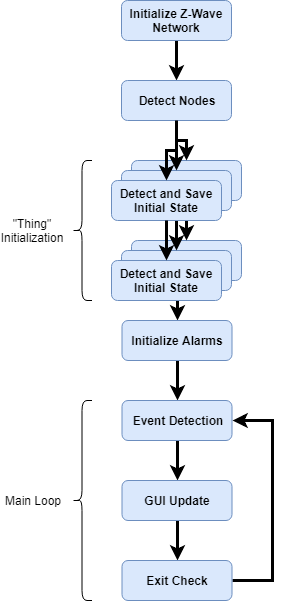
The above seen and discussed GUI was implemented without too much trouble using the FSM seen here.
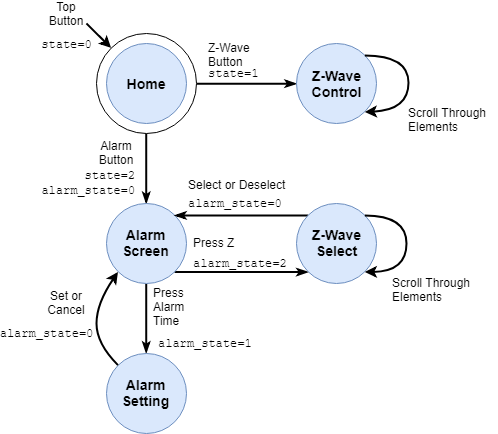
FSM
By breaking down our screen drawing, and click recognition into different, state sensitive callable functions (left_click(), right_click(), display_alarm(), display_set(),etc…), we can simply keep track of the which state our system is in using the above FSM, and then use that state to determine which values and screens to display, as well as what specific actions to take on a touch input.
Testing
While developing our smart home system we took a very iterative and incremental approach, unit testing each component prior to full integration. The first step of this approach was getting openzwave working on the pi. In order to do so we installed the openzwave library, and first tested an example script. After testing an example script we moved on to write our own python-openzwave code. After writing our own code, sans gui, we tested our z-wave controller and made sure we could control our light-bulb and switch the same way the example program allowed us to. After testing this functionality we moved on to integrate the above with our pygame GUI and once again tested this script. While the z-wave GUI script was being written and tested, in parallel, we worked on the alarm setup. In creating the alarm system, we began with developing the GUI that would allow us to display each alarm. After testing the GUI, we went on to develop the alarm class that would store all the relevant information for our alarm. After integrating/instantiating the alarm class, we tested our script to make sure our alarm home screen appeared as intended. From here we went to add on touch event handling that allowed us to toggle the alarms and switch to the yet to be developed z-wave screen, and alarm set screen. After confirming this functionality, we added in the alarm set screen, adding an alarm state variable (embedded FSM) to keep track of which screen should be displayed. We then tested to make sure that we were properly able to change the time for a selected alarm, and successfully get back to our home screen. After confirming this setup, we were then able to bring the openzwave GUI, and combine it with the alarm GUI, combining the FSM’s that controlled both. After testing all the above components in full integration, we added the openzwave alarm screen, the alarm event handling, and button event handling, testing each as we went along. This iterative design and testing approach allowed us to develop readable and functional code, void of bugs in our final system.
Results
We were indeed able to meet all expectations! Our goal of an affordable smart home hub controller with integrated interface and alarm clock functionality geared at bedside use was met. While the alarms were a bit more simplistic (no repeat), the functionality can be added in future revisions. We also implement all basic controls originally planned for, namely the binary switch and dimmer for appliances that support this functionality. The alarms play when the set time is reached, and can also trigger actions.
Conclusion
Overall, the project was a success and went smoothly, especially given the scope and level of integration required for a useful smart home control system. We were able to effectively complete everything that we set out to do, and did so without facing too many roadblocks.By the time of the demonstration we had successfully created a Raspberry Pi integrated smart home system. The smart home system not only allowed us to add and remove z-wave compatible devices but also allowed us to set individual alarms, playing a tone and controlling a z-wave device when the alarm went off. One of the things that allowed the smooth completion of this project was taking on an incremental and iterative approach to both design and testing - establishing a baseline and improving on that baseline as we went. This approach not only allowed for a bug free end result, but also a fairly straightforward final integration. Throughout this project we learned quite a bit about the openzwave protocol and python_openzwave api. We also gained a great deal of experience with the PyGame library, and building a useable GUI using the library. The only true setback we faced during the course of this entire project was having to switch to PyGame from Tkinter in making our GUI - the reason for which was that PyGame was better suited to the piTFT without modification than the Tkinter libraries. All in all, throughout the course of this project we we were able to achieve all of our goals, learning more about embedded systems like the Raspberry Pi along the way.
Future Work
As we have developed a product that we intend to use in the future, there are many improvements we will try to work on. First and foremost is extended alarm functionality, namely the ability to dynamically create alarms and the repeat functionality. Furthermore, it would be useful to allow alarms not to play the sound but simply trigger a smart home action. This could be useful if the goal is to simply schedule an event. On the control side, more functions such as metering can be supported. Finally, a companion web interface would be useful for more fine-grain control than what is comfortable on the piTFT. A connected computer could easily edit node properties and set up more sophisticated actions such as linking different nodes and actions.
Work Distribution

Project group picture

Shaurya Luthra
sl2462@cornell.edu
Designed the alarm system, including both front-end GUI design and back-end management, including alarm checking, setting, and all related functions. Printed case for project. Also assisted in overall testing and design direction.

Patrick Wang
pw349@cornell.edu
Handled interfacing with Z-Wave components (all GUI and back-end) including modular node control and alarm-linking selection. Also designed the overall GUI framework and handled system integration and program organization.
Appendix
User Guide
Software Setup
Several libraries are needed (with Python 3), RPi.GPIO, pygame, and python_openzwave. To install the GPIO library, apt can be used. Use the following command if it isn't already installed.
sudo apt-get -y install python3-rpi.gpioFor the others, simply use pip3 (sudo it).
Additionally, the piTFT needs to be setup. Instructions can be found on Adafruit’s website. If another TFT screen is used, setup as necessary.
Node Management
To add/remove nodes from the network, the Z-Stick must be placed in inclusion/exclusion mode (respectively). To do so, the USB stick must be removed. For inclusion mode, simply tap the button on the device. For exclusion mode, press and hold the button until an orange light begins blinking. Then, the device to be included/excluded must be put into the appropriate mode (see user manual for each device). Note that this must be done before starting the program.
To rename added devices, edit the generated zwcfg configuration file in the zwave_cfg directory (must be done after the program is run once). There, in the xml file, each node will have a name field set to empty quotes directly right of the node_id field. A custom name can be set here.
Changing Alarm Tones
Simply download a new audio file into the alarm_tones directory and set the new alarm tone to that file (line 60 of the code). Furthermore, if downloading the code from this site, please modify the code to point at the right home directory for all GUI resources.
Parts List
- Raspberry Pi B+ $35.00 (provided)
- Adafruit PiTFT $34.95 (provided)
- Z Stick $44.95
- Dimmable Bulb $16.00
- Smart Power Plug $30.48
Total: $161.38
Code Appendix
pygame_home_gui.py
#---------------------------------------------
# Written by: Patrick Wang (pw349)
#             Shaurya Luthra (sl2462)
#---------------------------------------------

# import libs
import logging
import sys, os, pygame
import time, math
import RPi.GPIO as GPIO
import datetime

# Uncomment to run on piTFT
os.putenv('SDL_VIDEODRIVER', 'fbcon') # Display on piTFT
os.putenv('SDL_FBDEV', '/dev/fb1')
os.putenv('SDL_MOUSEDRV', 'TSLIB') # Track mouse clicks on piTFT
os.putenv('SDL_MOUSEDEV', '/dev/input/touchscreen')

# colors
black = 0, 0, 0
cyan = 50, 204, 255
navy = 34, 51, 68
gray = 160, 160, 160
red = 255, 50, 50
green=17,234,79

####################################
# GPIO Setup
####################################

GPIO.setmode(GPIO.BCM)
GPIO.setup(17, GPIO.IN, pull_up_down=GPIO.PUD_UP)
GPIO.setup(27, GPIO.IN, pull_up_down=GPIO.PUD_UP)
GPIO.setup(22, GPIO.IN, pull_up_down=GPIO.PUD_UP)

quit=0; # quit flag
state = 0 # 0 is home, 1 is zwave, 2 is alarm
# callbacks
# quit when button press detected
def GPIO_17_callback(channel):
    global state
    state = 0
def GPIO_27_callback(channel):
    global quit
    quit = 1
def GPIO_22_callback(channel):
    alarm_tone.stop()

GPIO.add_event_detect(17,GPIO.FALLING,callback=GPIO_17_callback,bouncetime=300)
GPIO.add_event_detect(27,GPIO.FALLING,callback=GPIO_27_callback,bouncetime=300)
GPIO.add_event_detect(22,GPIO.FALLING,callback=GPIO_22_callback,bouncetime=300)

####################################
# Init pygame
####################################
pygame.init()
pygame.mixer.init()
alarm_tone= pygame.mixer.Sound(os.path.normcase("/home/pi/Embedded_OS/final/alarm_tones/gucci_gang.wav"))
pygame.mouse.set_visible(False) # toggle True for debugging

# Description:  Class for organizing Things
# Main Fields:
#       - node: Saved node for control and info
class Thing:
    def __init__(self, index, node, font, bigger_font):
        self.node = node
        self.index = index


        ##########################
        # State variables and data extraction
        ##########################
        self.level = 0 # 0- 10, represents 10% increments
        self.on = False

        # data extraction
        for val in node.get_switches():
            self.on = node.get_switch_state(val)

        for val in node.get_dimmers():
            self.level = int(node.get_dimmer_level(val)/10)

        # name extraction
        node_str = str(node)
        name_str = node_str[node_str.find('name'):node_str.find('] ', node_str.find('name'))]
        name_str = name_str[(name_str.find(':')+2):]
        node_name = name_str.strip('[]')

        model_str = node_str[node_str.rfind('model:'):]
        model_str = model_str[(model_str.find(':')+2):]
        node_model = model_str.strip('[]')

        self.name = node_name
        if (node_name == ''):    self.name = node_model

        ##########################
        # GUI components
        ##########################
        # name label things
        self.label_text = bigger_font.render(self.name, True, cyan, None)
        self.label_rect = self.label_text.get_rect(top=20, left=20)

        # dimmer things
        self.minus_surface = pygame.image.load(os.path.normcase("/home/pi/Embedded_OS/final/GUI_resources/minus_button.png"))
        self.minus_rect = self.minus_surface.get_rect(center=[85,135])

        self.plus_surface = pygame.image.load(os.path.normcase("/home/pi/Embedded_OS/final/GUI_resources/plus_button.png"))
        self.plus_rect = self.plus_surface.get_rect(center=[235,135])

        self.level_text = font.render(str(self.level*10), True, cyan, None)
        self.level_rect = self.level_text.get_rect(center=[160,135])

        self.level_back = pygame.Surface([200, 40])
        self.level_back.fill(gray)
        self.level_back_rect = self.level_back.get_rect(center=[160, 80])

        self.level_front =pygame.Surface([int(self.level*20), 40])
        self.level_front.fill(cyan)

        # switch things
        self.switch_surface = pygame.image.load(os.path.normcase("/home/pi/Embedded_OS/final/GUI_resources/power_button.png"))
        self.switch_rect = self.switch_surface.get_rect(center = [160, 100])

        # alarm select button
        self.select_back = pygame.Surface([60,60])
        self.select_back.fill(gray)
        self.select_rect = self.select_back.get_rect(center= [160, 100])

        self.select_front = pygame.Surface([40,40])
        self.select_front.fill(cyan)

    def draw(self, state, screen, font):
        # Draw label
        screen.blit(self.label_text, self.label_rect)

        # If state is zwave control, display controls
        if (state == 1):
            if (self.node.get_dimmers()):
                # draw buttons
                screen.blit(self.minus_surface, self.minus_rect)
                screen.blit(self.plus_surface, self.plus_rect)
                # update level indicator (text)
                self.level_text = font.render(str(self.level*10), True, cyan, None)
                screen.blit(self.level_text, self.level_rect)
                # update level indicator (bar)
                self.level_front = pygame.Surface([int(self.level*20), 40])
                self.level_front.fill(cyan)
                self.level_back.fill(gray)
                self.level_back.blit(self.level_front, (0,0))
                screen.blit(self.level_back, self.level_back_rect)
            if (self.node.get_switches()):
                screen.blit(self.switch_surface, self.switch_rect)

        # if called in alarm state, show selection element
        elif (state == 2):
            if (self.node.get_dimmers() or self.node.get_switches()):
                self.select_back.fill(gray)
                if (alarms[alarm_index].zindex == self.index):
                    self.select_back.blit(self.select_front, (10,10))
                screen.blit(self.select_back, self.select_rect)

    def check(self, state, x, y):
        # if zwave control state, handle control inputs
        if (state == 1):
            if (self.node.get_dimmers()):
                if (self.plus_rect.collidepoint(x,y)):
                    self.level = min(10, self.level+1)
                    print("dim to " + str(self.level*10))
                    for val in self.node.get_dimmers():
                        self.node.set_dimmer(val, self.level*10)

                if (self.minus_rect.collidepoint(x,y)):
                    self.level = max(0, self.level-1)
                    print("dim to " + str(self.level*10))
                    for val in self.node.get_dimmers():
                        self.node.set_dimmer(val, self.level*10)

            if (self.node.get_switches()):
                if (self.switch_rect.collidepoint(x,y)):
                    self.on = not(self.on)
                    print("switch pressed, set to: " + str(self.on))
                    for val in self.node.get_switches():
                        self.node.set_switch(val, self.on)

        # handle selection for alarm state
        elif (state == 2):
            global alarm_state
            if (self.node.get_dimmers() or self.node.get_switches()):
                if (alarms[alarm_index].zindex == self.index):
                    alarms[alarm_index].zindex = 0
                    alarm_state = 0
                else:
                    alarms[alarm_index].zindex = self.index
                    alarm_state = 0

class Alarm_class():

    def __init__(self,corner_x,corner_y):
        self.corner_x=corner_x
        self.corner_y=corner_y
        self.time="12:00"
        self.per="pm"
        self.on=False
        self.zindex=0
        self.time_rect=pygame.Rect(corner_x, corner_y, 180, 45)
        self.on_off_rect=pygame.Rect(corner_x+190, corner_y, 50, 45)
        self.z_rect=pygame.Rect(corner_x+250, corner_y, 50, 45)

    def draw(self,screen,main_font, on_off_font):
        text=main_font.render(self.time+" "+self.per, True, cyan, None)
        t_rect = text.get_rect()
        t_rect.center=self.time_rect.center
        screen.blit(text, t_rect)

        if(self.on):
            text=on_off_font.render("on", True, green, None)
        else:
            text=on_off_font.render("off", True, red, None)

        t_rect = text.get_rect()
        t_rect.center=self.on_off_rect.center
        screen.blit(text, t_rect)

####################################
# ZWave Config Stuff
####################################
logging.basicConfig(level=logging.INFO)

logger = logging.getLogger('openzwave')

import openzwave
from openzwave.node import ZWaveNode
from openzwave.value import ZWaveValue
from openzwave.scene import ZWaveScene
from openzwave.controller import ZWaveController
from openzwave.network import ZWaveNetwork
from openzwave.option import ZWaveOption

import time
import six

if six.PY3:
    from pydispatch import dispatcher
else:
    from louie import dispatcher

# Program options
device="/dev/ttyACM0"
log = "None"
sniff=300.0

# manager options
options = ZWaveOption(device, \
    user_path="/home/pi/Embedded_OS/final/zwave_cfg/", cmd_line="")
options.set_log_file("OZW_Log.log")
options.set_append_log_file(False)
options.set_console_output(False)
options.set_save_log_level(log)
options.set_logging(True)
options.lock()

# fill below with more useful things later
def louie_network_started(network):
    print("Hello from network : I'm started : homeid {:08x} - {} nodes were found.".format(network.home_id, network.nodes_count))

def louie_network_failed(network):
    print("Hello from network : can't load :(.")

def louie_network_ready(network):
    print("Hello from network : I'm ready : {} nodes were found.".format(network.nodes_count))
    print("Hello from network : my controller is : {}".format(network.controller))
    dispatcher.connect(louie_node_update, ZWaveNetwork.SIGNAL_NODE)
    dispatcher.connect(louie_value_update, ZWaveNetwork.SIGNAL_VALUE)

def louie_node_update(network, node):
    print("Hello from node : {}.".format(node))

def louie_value_update(network, node, value):
    print("Hello from value : {}.".format( value ))

#Create a network object
network = ZWaveNetwork(options, autostart=False)

# We connect to the louie dispatcher
dispatcher.connect(louie_network_started, ZWaveNetwork.SIGNAL_NETWORK_STARTED)
dispatcher.connect(louie_network_failed, ZWaveNetwork.SIGNAL_NETWORK_FAILED)
dispatcher.connect(louie_network_ready, ZWaveNetwork.SIGNAL_NETWORK_READY)

# Start the network
network.start()

# Wait for network
print("***** Waiting for network to become ready : ")
for i in range(0,90):
    if network.state>=network.STATE_READY:
        print("***** Network is ready")
        break
    else:
        sys.stdout.write(".")
        sys.stdout.flush()
        time.sleep(1.0)

time.sleep(5.0)

####################################
# GUI components
####################################
# params
size = width, height = 320, 240

# fonts
main_font = pygame.font.Font(None, 40)
small_font = pygame.font.Font(None, 30)
clk_font = pygame.font.Font(None, 80)
on_off_font = pygame.font.Font(None, 30)

# button objects
my_font = pygame.font.Font(None, 40)
back_img = pygame.image.load(os.path.normcase("/home/pi/Embedded_OS/final/GUI_resources/home.png"))
back_rect = back_img.get_rect()
back_rect.move(0,0)

left_rect = pygame.Rect(10, 180, 145, 50)
right_rect = pygame.Rect(165, 180, 145, 50)

# display rect
# screen
screen = pygame.display.set_mode(size)

####################################
# Thing instantiation
####################################
things_index = 0
things = []
for n in network.nodes:
    things.append(Thing(things_index, network.nodes[n], small_font, main_font))
    things_index += 1

things_index = 0

####################################
# Alarm Instantiation
####################################
alarms=[Alarm_class(10,12),Alarm_class(10,69),Alarm_class(10,126),Alarm_class(10,183)]
alarm_state = 0
alarm_index = 0

set_time=alarms[alarm_index].time
set_per =alarms[alarm_index].per
h1=int(set_time[0])
h0=int(set_time[1])
h=h1*10+h0
m1=int(set_time[3])
m0=int(set_time[4])

# Alarm setting GUI components
hu_rect = pygame.Rect(40, 10, 50, 50)
hd_rect = pygame.Rect(40, 120, 50, 50)
m10u_rect = pygame.Rect(130, 10, 50, 50)
m10d_rect = pygame.Rect(130, 120, 50, 50)
m1u_rect = pygame.Rect(190, 10, 50, 50)
m1d_rect = pygame.Rect(190, 120, 50, 50)
pu_rect = pygame.Rect(250, 10, 60, 50)
pd_rect = pygame.Rect(250, 120, 60, 50)

h1_rect=pygame.Rect(10, 60, 50, 60)
h0_rect=pygame.Rect(70, 60, 50, 60)
m1_rect=pygame.Rect(130, 60, 50, 60)
m0_rect=pygame.Rect(190, 60, 50, 60)

per_rect=pygame.Rect(250, 60, 60, 60)

def display_alarm():
    for alarm in alarms:
        alarm.draw(screen, main_font, on_off_font)

def display_set():
    h1_text = main_font.render(set_time[0], True, cyan, None)
    h0_text = main_font.render(set_time[1], True, cyan, None)
    m1_text = main_font.render(set_time[3], True, cyan, None)
    m0_text = main_font.render(set_time[4], True, cyan, None)

    per_text = main_font.render(set_per, True, cyan, None)

    h1_trect = h1_text.get_rect()
    h1_trect.center=(h1_rect.center[0],h1_rect.center[1])
    h0_trect = h0_text.get_rect()
    h0_trect.center=(h0_rect.center[0],h0_rect.center[1])
    m1_trect = m1_text.get_rect()
    m1_trect.center=(m1_rect.center[0],m1_rect.center[1])
    m0_trect = m0_text.get_rect()
    m0_trect.center=(m0_rect.center[0],m0_rect.center[1])
    per_trect = per_text.get_rect()
    per_trect.center=(per_rect.center[0],per_rect.center[1])

    screen.blit(h1_text, h1_trect)
    screen.blit(h0_text, h0_trect)
    screen.blit(m1_text, m1_trect)
    screen.blit(m0_text, m0_trect)
    screen.blit(per_text, per_trect)

def check_alarm():
    #NEED TO FIX FOR 00 time!!!!
    now = datetime.datetime.today()

    seconds = float(str(now)[17:26])

    dt = str(now)
    hr=dt[11:13]
    if (hr == '00'):
        hr = '12'
    mins=dt[14:16]

    if (int(hr)> 12):
        if(int(hr)-12< 10):
            clock="0"+str(int(hr)-12)
        else:
            clock=str(int(hr)-12)

        clock+=":"+mins+" pm"
    else:
        clock=hr+":"+mins+" am"

    for alarm in alarms:

        if (alarm.time+" "+alarm.per==clock and alarm.on == True):
            alarm_tone.play()
            if (alarm.zindex!=0):
                t = things[alarm.zindex]
                if (t.node.get_switches()):
                    for val in t.node.get_switches():
                        t.on = True
                        print("switch pressed, set to: " + str(t.on))
                        t.node.set_switch(val, t.on)
                if (t.node.get_dimmers()):
                    for val in t.node.get_dimmers():
                        t.level = 10
                        print("dim to " + str(t.level*10))
                        t.node.set_dimmer(val, t.level*10)
            alarm.on=False


####################################
# Modular functions
####################################

def redraw(state):
    # erase screen
    screen.fill(black)

    # update background image
    if (state == 0):
        back_img = pygame.image.load(os.path.normcase("/home/pi/Embedded_OS/final/GUI_resources/home.png"))
    elif (state == 1):
        back_img = pygame.image.load(os.path.normcase("/home/pi/Embedded_OS/final/GUI_resources/zwave.png"))

    elif (state == 2):
        if (alarm_state == 0):
            back_img = pygame.image.load(os.path.normcase("/home/pi/Embedded_OS/final/GUI_resources/alarm.png"))
        elif (alarm_state == 1):
            back_img = pygame.image.load(os.path.normcase("/home/pi/Embedded_OS/final/GUI_resources/alarm_set.png"))
        elif (alarm_state == 2):
            back_img = pygame.image.load(os.path.normcase("/home/pi/Embedded_OS/final/GUI_resources/zwave.png"))

    # draw background
    screen.blit(back_img, back_rect)

    # Update content
    # main page
    if (state == 0):
        now = datetime.datetime.today()

        seconds = float(str(now)[17:26])

        dt = str(now)
        hr=dt[11:13]
        if (hr == '00'): hr = '12'
        mins=dt[14:16]

        if (int(hr)>12):
            clock=str(int(hr)-12)+":"+mins+" pm"
        else:
            clock=hr+":"+mins+" am"

        fontimg = clk_font.render(clock, True, cyan, None)
        clock_rect = fontimg.get_rect()
        clock_rect.center=(160,90)
        clock_rect.right=280
        screen.blit(fontimg, clock_rect)

    # zwave control
    elif (state == 1):
        things[things_index].draw(state, screen, small_font)

    # alarm state
    elif (state == 2):
        if (alarm_state == 0):
            display_alarm()
        elif (alarm_state == 1):
            display_set()
        elif (alarm_state == 2):
            things[things_index].draw(state, screen, small_font)

    pygame.display.flip()

def left_button_action(s):
    global state, things_index, things
    global alarm_state, alarms, alarm_index
    # main page
    if (s == 0):
        state = 2
        alarm_state = 0

    # zwave page
    elif (s == 1):
        things_index = (things_index - 1)%(len(things))

    # alarm state
    elif (s == 2):
        # nothing for main alarm page

        # alarm set
        if (alarm_state == 1):
            alarm_state=0

        # zwave selection
        elif (alarm_state == 2):
            things_index = (things_index - 1)%(len(things))

def right_button_action(s):
    global state, things_index, things
    global alarms, alarm_index, alarm_state
    # main page
    if (s == 0):
        state = 1

    # zwave page
    elif (s == 1):
        things_index = (things_index + 1)%(len(things))

    # alarm state
    elif (s == 2):
        # nothing for main alarm page

        # alarm set
        if (alarm_state == 1):
            alarms[alarm_index].time=str(h1)+str(h0)+":"+str(m1)+str(m0)
            alarms[alarm_index].per=set_per
            alarm_state=0

        # zwave selection
        elif (alarm_state == 2):
            things_index = (things_index + 1)%(len(things))

def check_other(s, x, y):
    global things_index, things
    global alarms, alarm_state, alarm_index
    global set_time, set_per, h1, h0, h, m1, m0
    # global hu_rect, hd_rect, m10u_rect, m10d_rect
    # global m1u_rect, m1d_rect, pu_rect, pd_rect

    # nothing on click for main page

    # zwave page
    if (s == 1):
        things[things_index].check(s,x,y)

    # alarm state
    elif (s == 2):
        # base alarm page
        if(alarm_state == 0):
            for i in range(len(alarms)):
                alarm=alarms[i]
                if alarm.time_rect.collidepoint(x,y):
                    alarm_state=1
                    alarm_index=i
                    set_time=alarm.time
                    set_per =alarm.per
                    h1=int(set_time[0])
                    h0=int(set_time[1])
                    h=h1*10+h0
                    m1=int(set_time[3])
                    m0=int(set_time[4])
                if alarm.on_off_rect.collidepoint(x,y):
                    if alarm.on:
                        alarm.on=False
                    else:
                        alarm.on=True
                if alarm.z_rect.collidepoint(x,y):
                    alarm_index = i
                    alarm_state = 2

        # set alarm
        elif (alarm_state == 1):
            if hu_rect.collidepoint(x,y):
                h=(h%12+1)
                h1=int(h/10)
                h0=int(h%10)

            if hd_rect.collidepoint(x,y):
                h=(h%12+1)
                h1=int(h/10)
                h0=int(h%10)

            if m10u_rect.collidepoint(x,y):
                m1=(m1+1)%6

            if m10d_rect.collidepoint(x,y):
                m1=(m1-1)%6

            if m1u_rect.collidepoint(x,y):
                m0=(m0+1)%10

            if m1d_rect.collidepoint(x,y):
                m0=(m0-1)%10

            if pu_rect.collidepoint(x,y) or pd_rect.collidepoint(x,y):
                if(set_per=="pm"):
                    set_per="am"
                else:
                    set_per="pm"

            set_time=str(h1)+str(h0)+":"+str(m1)+str(m0)

        elif (alarm_state == 2):
            things[things_index].check(s,x,y)

####################################
# Main Loop
####################################

while True:

    # check event
    for event in pygame.event.get():
        if event.type == pygame.QUIT:
            network.stop()
            GPIO.cleanup()
            pygame.quit()
            sys.exit()

        if (event.type is pygame.MOUSEBUTTONDOWN):
            pos = pygame.mouse.get_pos()
            x,y = pos
            if (state == 2 and alarm_state == 0):
                check_other(state, x, y)
            else:
                if left_rect.collidepoint(x,y):
                    left_button_action(state)
                elif right_rect.collidepoint(x,y):
                    right_button_action(state)
                else:
                    check_other(state, x, y)

    redraw(state)
    check_alarm()

    if (quit == 1):
        network.stop()
        GPIO.cleanup()
        pygame.quit()
        sys.exit()

    # delay for 30fps nominal
    time.sleep(0.033)