ECE 5725 Final Project: Handheld Gaming Device
By Chris Graef and Arvind Puthige
Objective
The objective of this project was to make a handheld gaming console that can switch controllers. The console would play retro-games using emulators as well as play games designed by us. There are many emulator programs currently available for the Raspberry Pi, however they almost always require an external monitor connected through HDMI. The result is that most RPi emulators are stationary systems hooked up to a TV. In this project, we make a system capable of running the emulator while being entirely portable.
Introduction
In this project, we created a completely portable handheld gaming device which is capable of playing both original games as well as running emulators. The system has its own power supply as well as its own screen and controller, so there is no need for any external connection to get the system running. The only external device possibly required are headphones to hear audio from the games. On bootup, the system starts a menu system which can be navigated with the connected controller. This menu system allows a user to easily choose an original game to play or to boot up the emulation station, allowing access to many different games across multiple different emulator platforms.
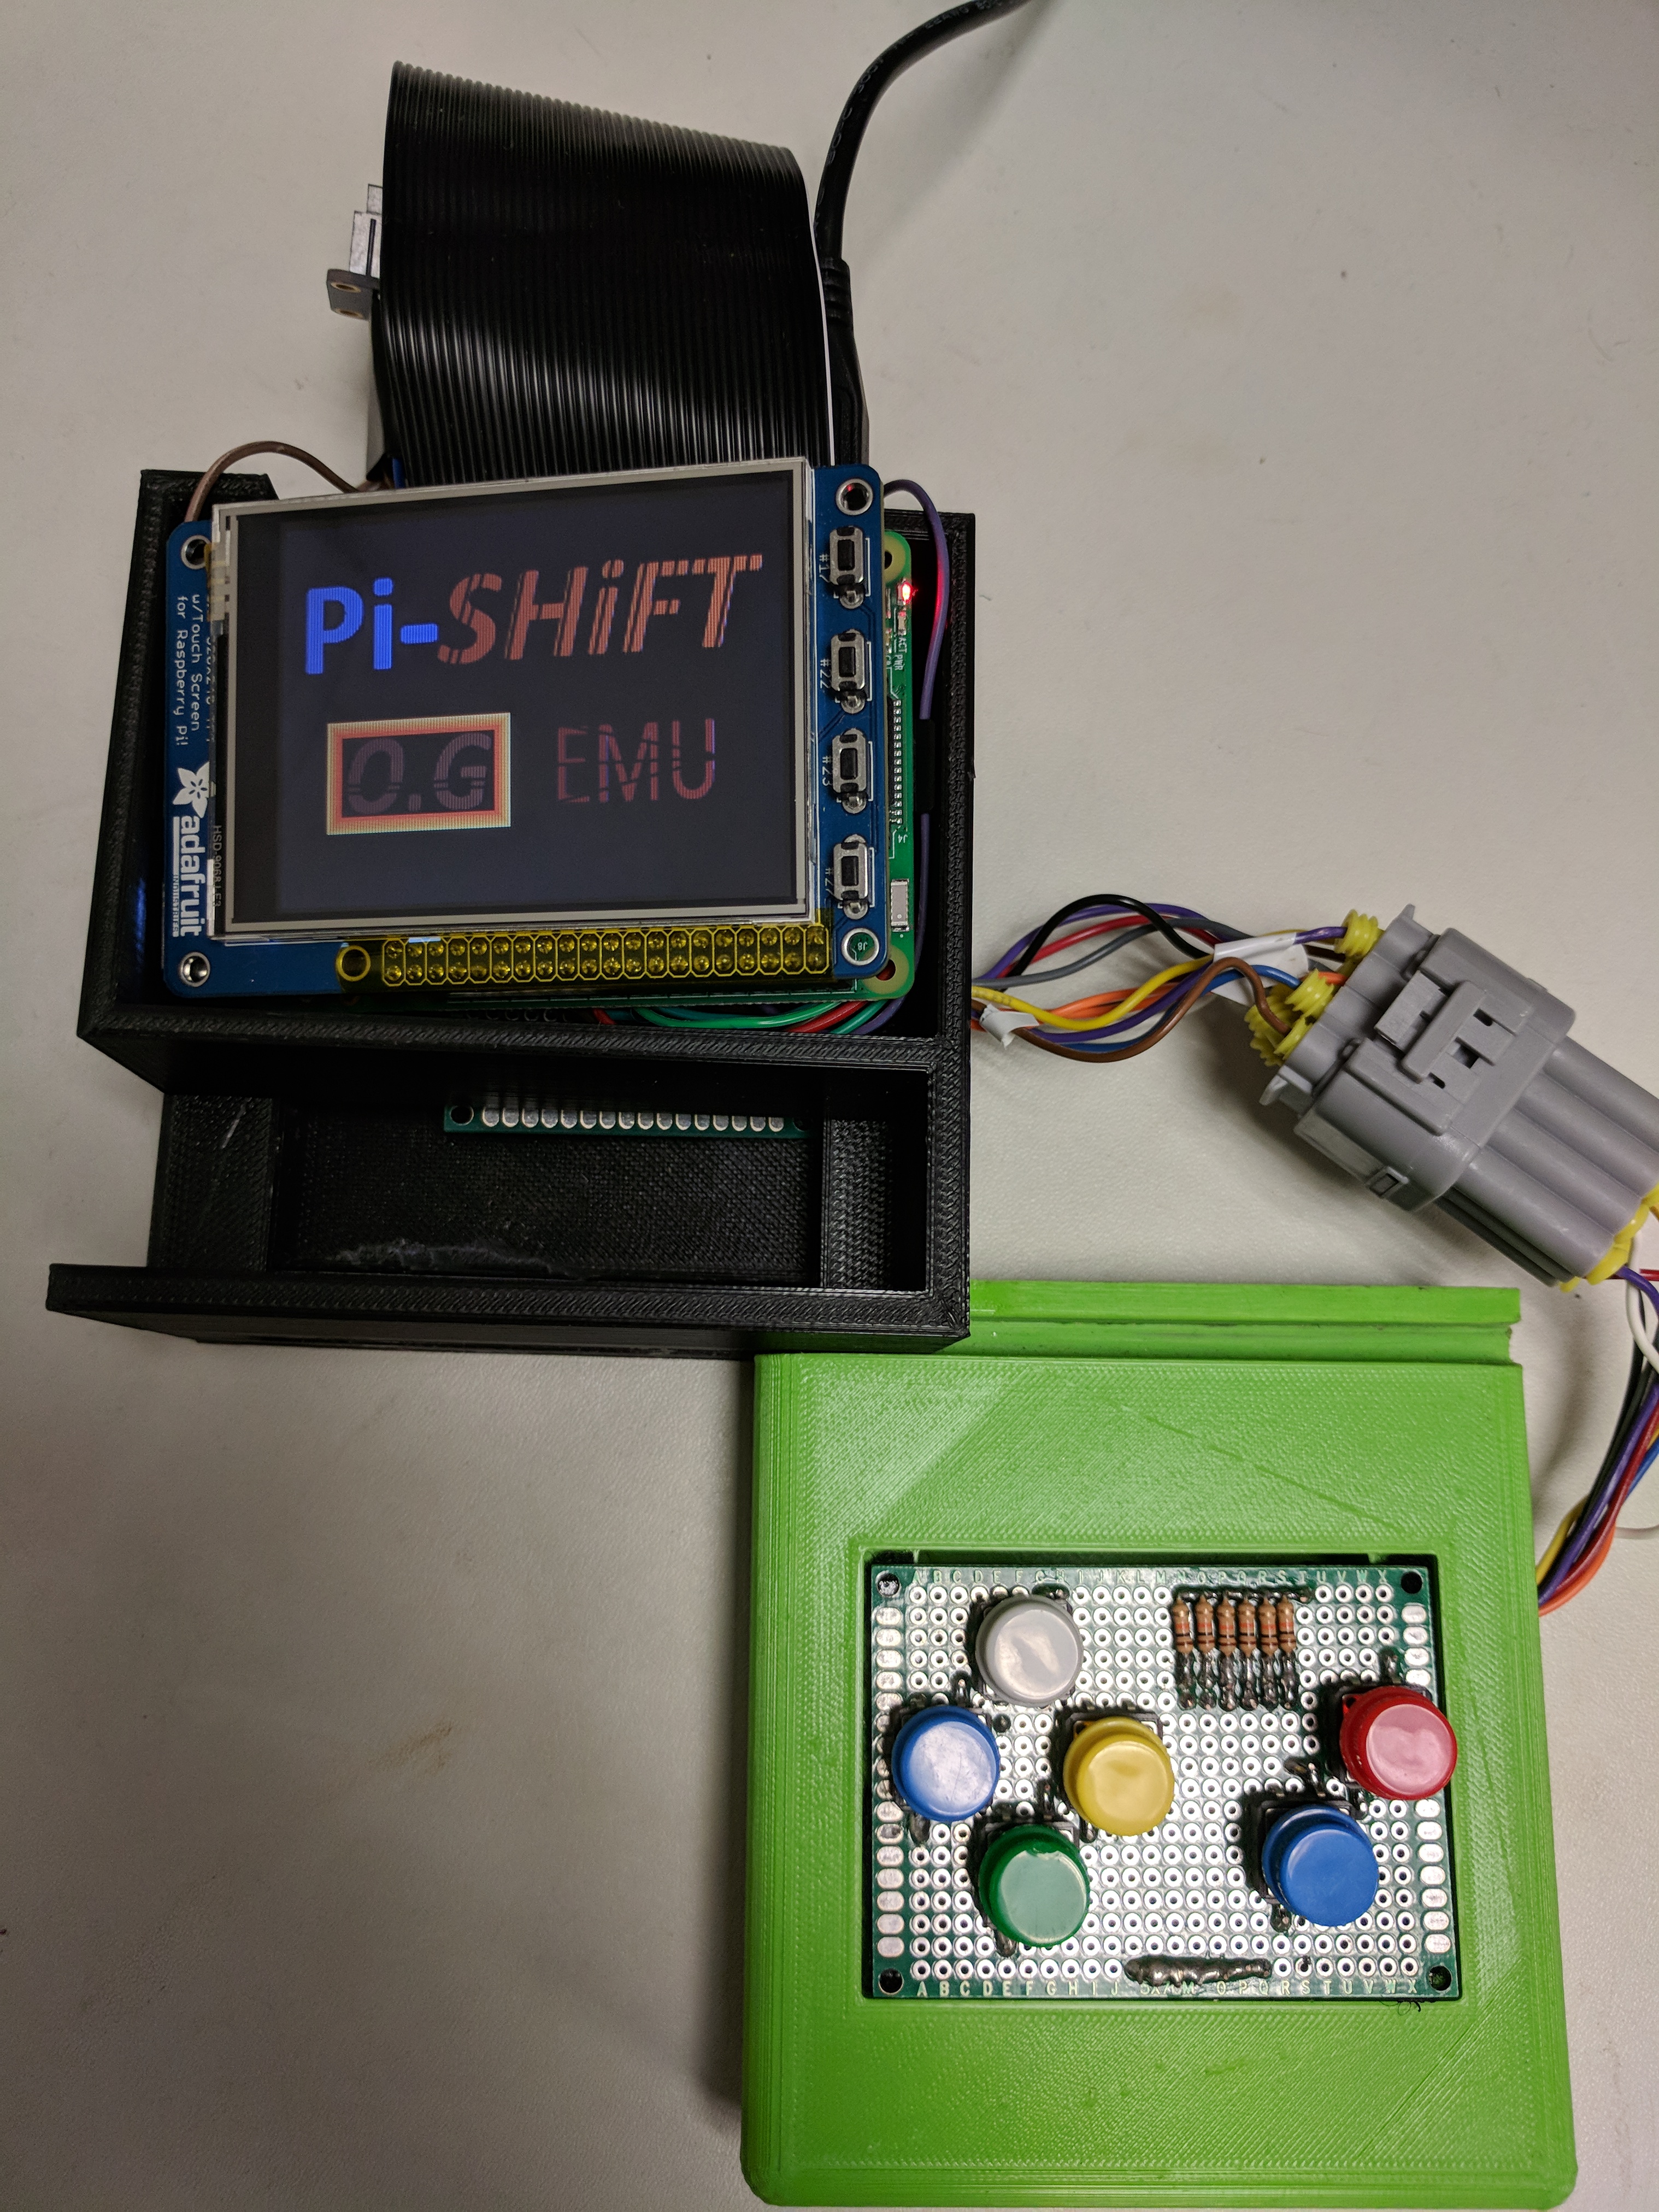
Figure 1: Finished system on menu screen connected to button controller.
Design and Testing
Hardware
Physical Hardware
The physical hardware consisted of three parts: the holder for the Raspberry Pi and the battery, the six button controller, and the thumbstick controller. The cad models for all of the parts can be seen below. The goal for the physical hardware was to provide a secure and neat holder for all of the electrical hardware. Since the goal of the entire project was to create a consumer product, the look of the controllers as well as how they felt when a user was holding them is important. One of the design considerations was a way to allow for the wires coming from the soldered boards to be hidden in the controllers to try and reduce the amount of wires sticking out from all over the place. Space was made underneath where electrical components were seated to allow space for the wires while also giving enough slack for the components to be moved in case we needed to debug the hardware.
Along with creating a neat and secure place for the electrical components, the physical hardware was also designed to allow the handheld controllers to connect and disconnect from the RPi holder. On of the plans for this project was to be able to quickly swap out the different controller designs depending on which game you wanted to play or how you wanted to play the game.
In order to manufacture the mechanical hardware, we decided that 3D printing was the best option. 3D printing would allow us to get a precisely made final piece which would allow us to neatly place and secure all of the electrical components.
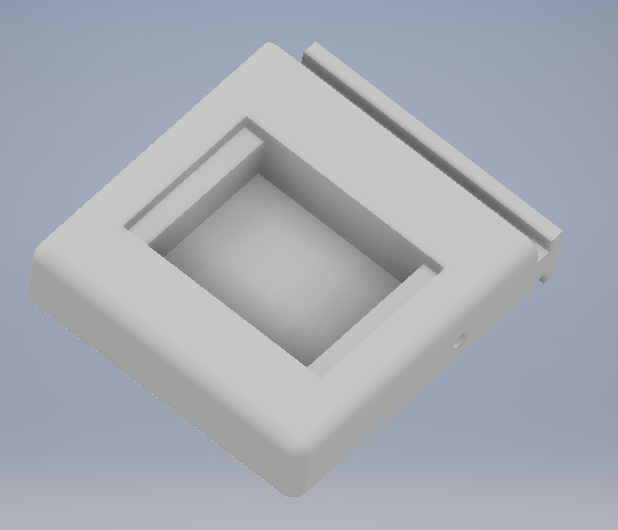
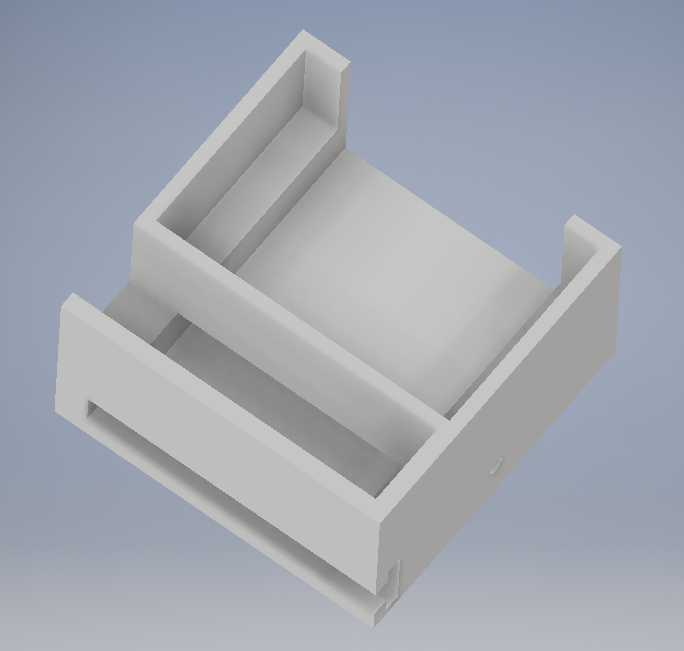
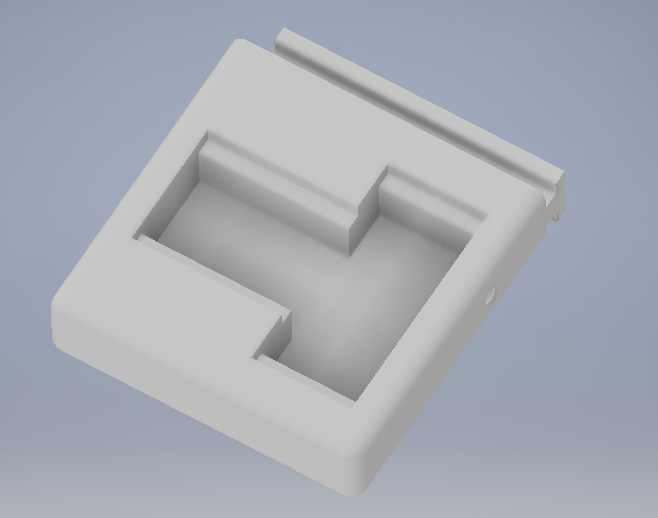
Figure 2: Cad models of the three 3D printed hardware components
Electronics
The electronics were relatively simple. In total, there were three boards: one for each controller and one for the RPi. The RPi one was extremely simply; it only contained wires hooked up to 1k Ohm resistors. This board was simply used as a way to connect the Raspberry Pi to an auto connector while making sure that the RPi pins were safe from over current draw. The schematics for the two other boards can be seen below. The button controller was just six buttons which were put into a specific shape on the solder board similar to a game controller. All of the buttons were active low, so there was a 10k pull up resistor for each button. On the second controller, there were also two active low buttons in the same configuration as on the first board. On this board, however, there was also an ADC converter for the thumbstick. The thumbstick we bought output two analog signals, one for the x axis and one for the y axis. These output signals come from potentiometers in the thumbstick which increase or decrease depending on the thumbstick position. These two analog signals are connected to two of 8 channels on and MCP3008, and ADC converter. This ADC converter interacts with the RPi over SPI using four pins. Finally, the controller boards were connected to the RPi board and thus the RPi through 12-pin auto connectors. These connectors were used to make it simpler to swap out which controller is connected to the Raspberry Pi.
Our testing method for these boards was to check all of the connections using a multimeter to check continuity. By connecting one of the multimeter probes to a button and the second to a place where there should be a connection further and further away from the button, you can see whether there is the desired connection or, if not, exactly where the break in connection occurs.
One thing to note about the build process is that the use of auto connectors, while resulting in a nice and clean final product, can be frustrating if you do not plan very carefully. All of the pins from the controllers had to be connected to very specific locations in the auto connector so that they would connect to the correct pins on the RPi. So, any there can not be any mistake in which wires connect where. The problem with the auto connectors comes from the fact that it is impossible to get the piece which clamps onto the wires to come out of the plastic connector once it has been locked in place. This means that if you put a wire into the wrong slot, you must pull out all of the wires from the connector, scrap the connector, and start again. Because of confusion over orientation changes when placing the wires or simply not paying attention while attaching wires to connectors, we ended up having to scrap 6 connector pairs before getting the correct pairs we wanted.
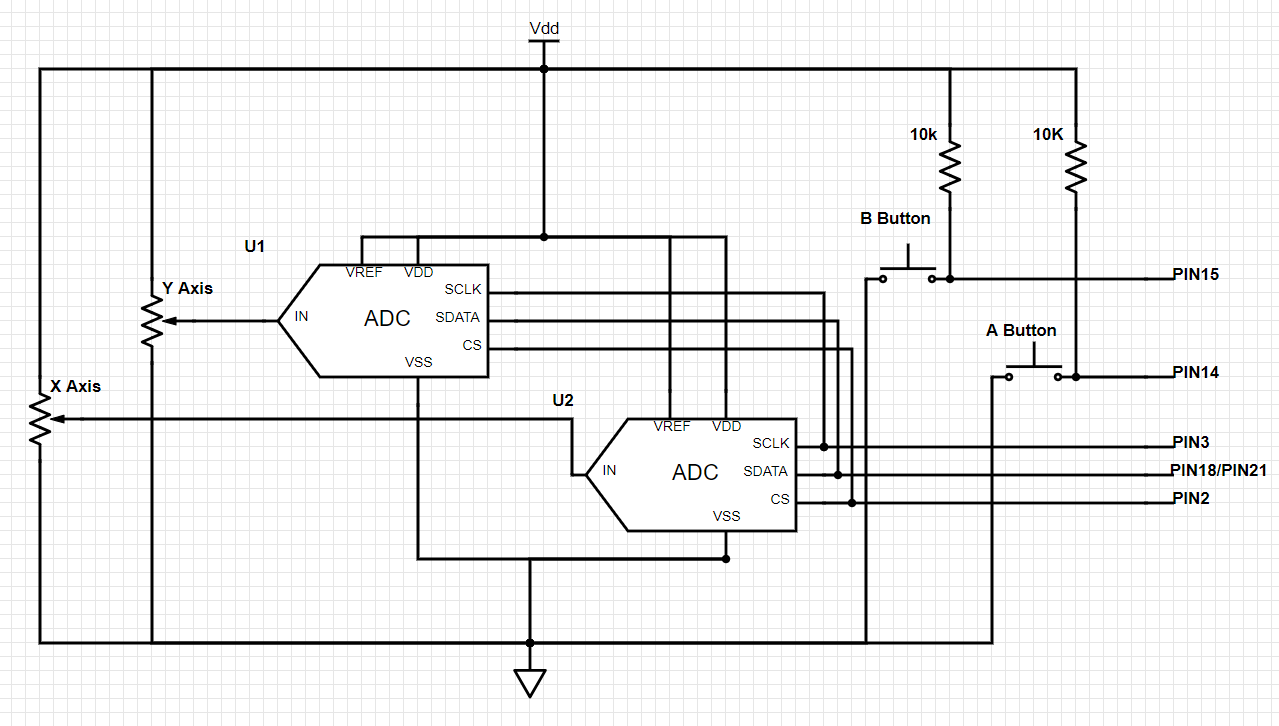
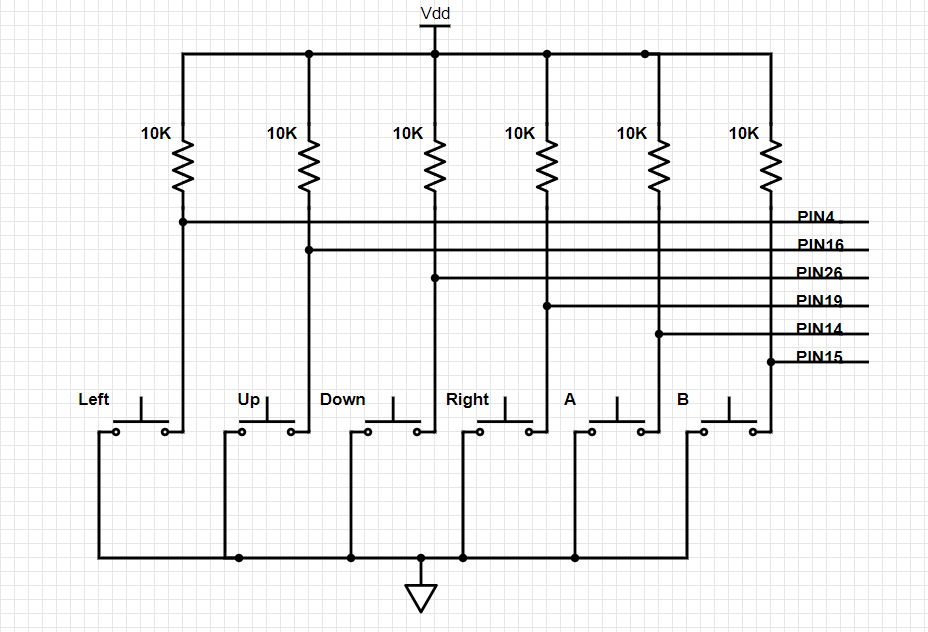
Figure 3: Schamatics of the perf boards for button controller(right) and thumbstick controller(left)
Software
On the software side of things, to be able to play emulator games along with our self-built Pygame games, we had two options before us. We could either use the SD card from our labs and install emulator engines on it or we could start fresh with a pre-built image having the emulator and work towards including our Pygame games on it. We found out that the second way was more popular and decided to go with it. The way we gauged the situation was by listing out the advantages and disadvantages of the decision that we could think of at that point. Advantages were that we wouldn’t have to worry about the complications of installing emulator engines. The possible hurdles that we could foresee at that point were: 1) OS mismatches while trying to download required packages 2) Complications in structure of the system 3) Limited resources for hacking our way into the system to make desired changes. We did meet some of the hurdles discussed above, but were able to resolve them. These are discussed in the following sections.
RetroPi
We used the latest RetroPie image- RetroPie 4.4, for our project. We used the version for RaspberryPi 3B. This can be downloaded from the RetroPie official website for free. The reason for choosing this distribution was that it seemed to be the most popular with emulators and it comes pre-loaded with an emulation engine that support emulators for numerous systems like nintendo 64 and Atari 2600.
The RetroPie image had Linux kernel 4.14, which was the latest at that time. We had some issues while trying to get packages that were required by us. We speculated that it could be because of OS mismatch. We later figured out that the issues could be avoided altogether if we update but don’t upgrade the system. We could then selectively choose the packages required by us. The initial changes in the Raspi-config were done following the instructions on Lab 1.
Emulation Station
We used the front end: “EmulationStation”, for enabling emulators. It has a menu where one can choose among emulators (if respective ROMs are installed) and has quick access to settings and buttons which emulate system commands like shutdown, reboot and raspi-config. Playing around with the EmulationStation front end would give a good idea about emulation station as well as RetroPie. Many powerful system level settings like retropie setup and Raspi-config are accessible from the EmulationStation front-end itself. The unaltered system launches into this front end upon booting. We made some changes to these settings to have the system launch to our designed menu, as is discussed in the later sections. The first time we log into EmulationStation, we are asked to configure our inputs. We configured the inputs to keyboard keys. The idea being that the inputs configured in EmulationStation are followed through in all the emulators launched from EmulationStation. But this does not hold true for all emulators as we will discuss in the results section. We obtained ROMs of some retro-games online and we transferred them into the system using the USB stick method.
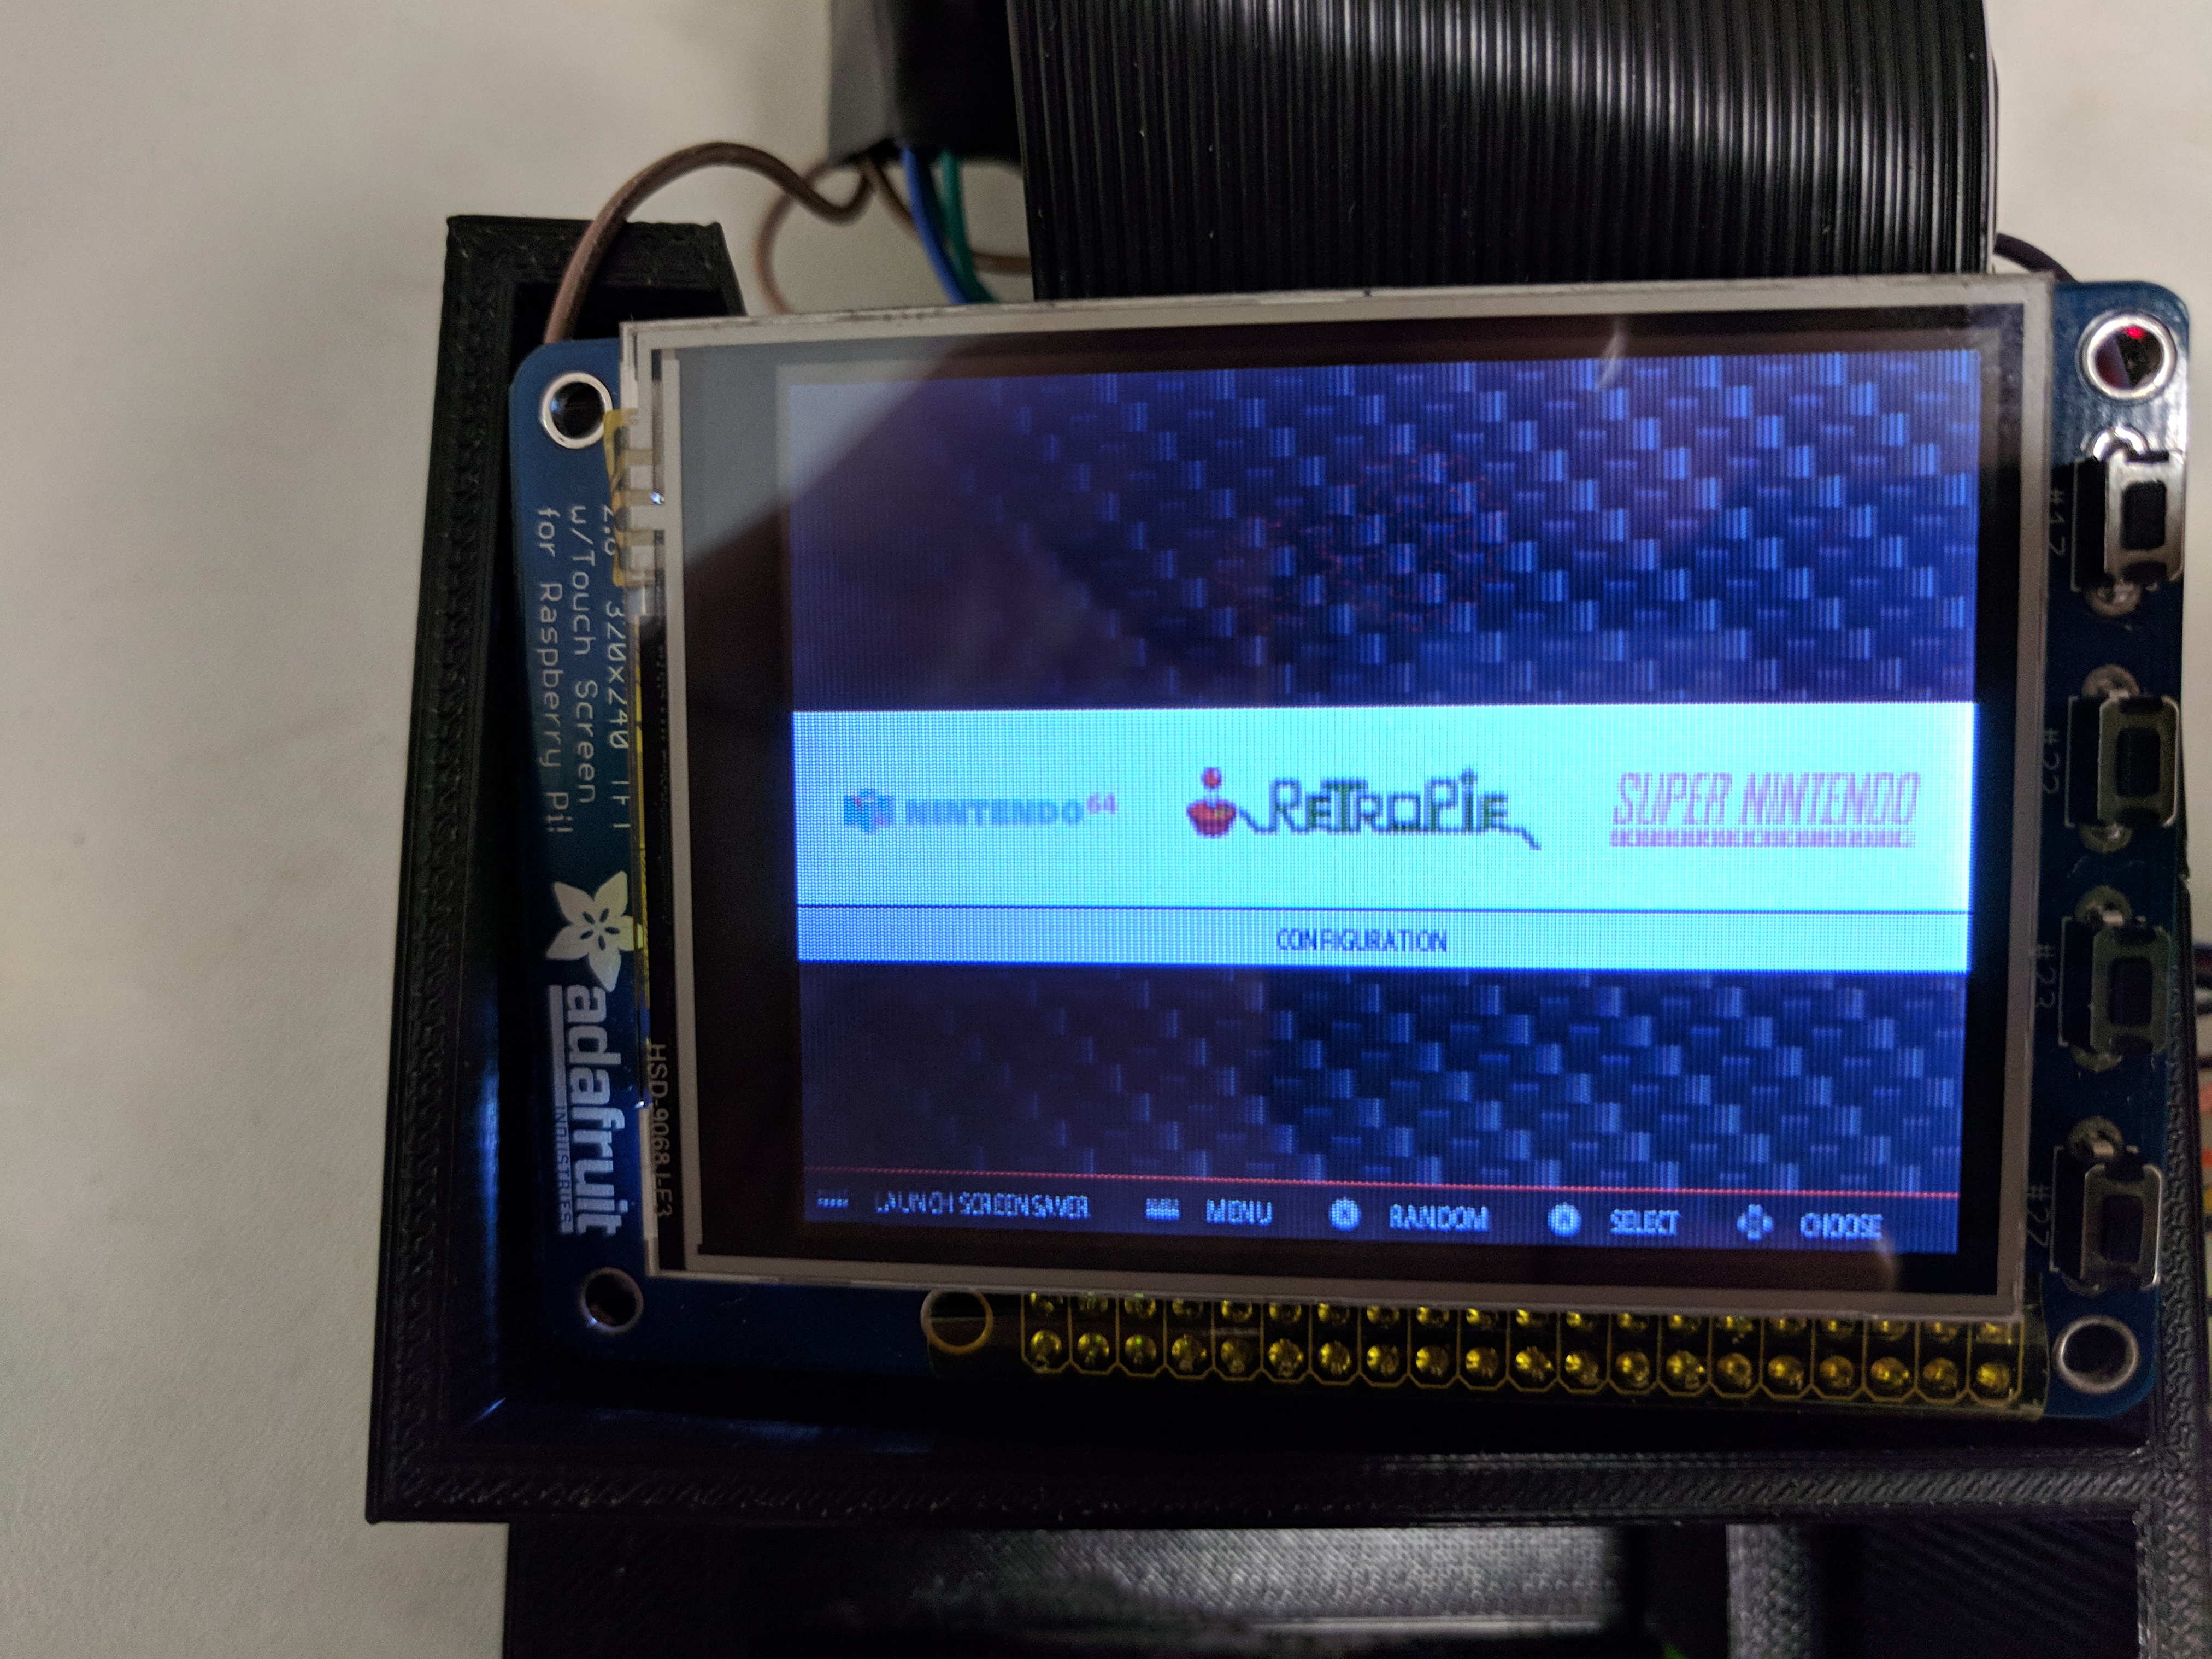
Figure 4: Emulation Station menu
Transferring ROMs
Once the Raspberry Pi is booted we insert a USB stick (which should be mostly empty and must have only one empty folder named retropie ) into the the USB port of the Pi. After the blinking stabilizes to a repetitive blinking, we remove it and then plug it into our computers. One would find two folders inside the retropie folder now, namely configs and roms. We transfer the roms that we had obtained earlier to the respective system folder inside the roms folder. After safely ejecting the USB stick from our computer we then, transfer the roms onto the Pi. Simply plug in the USB stick into the Pi and wait for the blinking to stabilize, that’s when we know the ROM has been transferred. Once the ROM has been transferred, we can view it on the EmulationStation menu inside a particular emulator.
Retrogame Utility
The real challenge came when we had to decide how to make the emulator games respond to our buttons and joystick using GPIOs. In pygame games, we usually have the utility and we include their usage in our code. For the emulator games, we could use GPIO daemon, but upon looking through reviews it seems like there were some issues with it. We went with retrogame utility by Adafruit, that is a software glue that links GPIO-connected controls to “virtual” keyboard inputs. We downloaded the retrogame.sh script, which when run, installs retrogame executable (in /usr/local/bin/retrogame) and configuration file (in the /boot/retrogame.cfg), performs some administrative tasks (../etc/rc.local is amended to make retrogame launch on startup), and a “udev rule” file (/etc/udev/rules.d/10-retrogame.rules) is generated to help it simulate a keyboard. Then we mapped the GPIO numbers used by our buttons to the keyboard buttons we had configured as inputs in EmulationStation. We did this by making suitable changes in the /boot/retrogame.cfg file.
Playing Games on PiTFT
Most of the gaming consoles made using Raspberry Pi use the HDMI to output their video, we were using the PiTFT to make it truly portable. We were initially planning to use the methods discussed in Lab 1 but later found out an easier way to do so by simply using single script.The pitft-fbcp.sh by adafruit makes all the necessary changes required by itself. It install all the PiTFT-related software and performs some related system configurations. After installing and choosing the PiTFT type, we manually made some changes to the fps and screen rotation for our liking. Upon reboot, the system starts on the PiTFT. If an HDMI monitor is attached, and if it supports 320x240 resolution, we might see the same content on both the monitor and PiTFT. But, not all HDMI monitors can display this resolution.
Launching on Boot
As mentioned earlier the retrogame setup launches into EmulationStation on boot. We designed a Menu python program, which is discussed below. We wished to have the Menu show up as the first thing upon boot. First thing we had to do for this was to make the retropie setup launch to command line (console) rather than EmulationStation. Only changes in Raspi-conig is not enough to do this. We had to change the configuration settings on retropie setup as well. Then we made suitable changes to rc.local and .bashrc files to enable this.
Game Menu
The game menu is the menu which instantiates all of the GPIO callbacks and all of the required initalizations for pygame for all of the custom games as well as provide a menu for a user to choose between original games to play and an emulator. The menu python script imports the other game files so that it is able to play the other original games, and the GPIO callbacks are designed to deal this this. The menu system keeps track of whether a game is currently playing or not, and the GPIO callbacks are set to output different things depending on what is currently being played. This was the most efficient way we found to make sure that the GPIO callbacks all interacted correctly with the games which instantiated them.
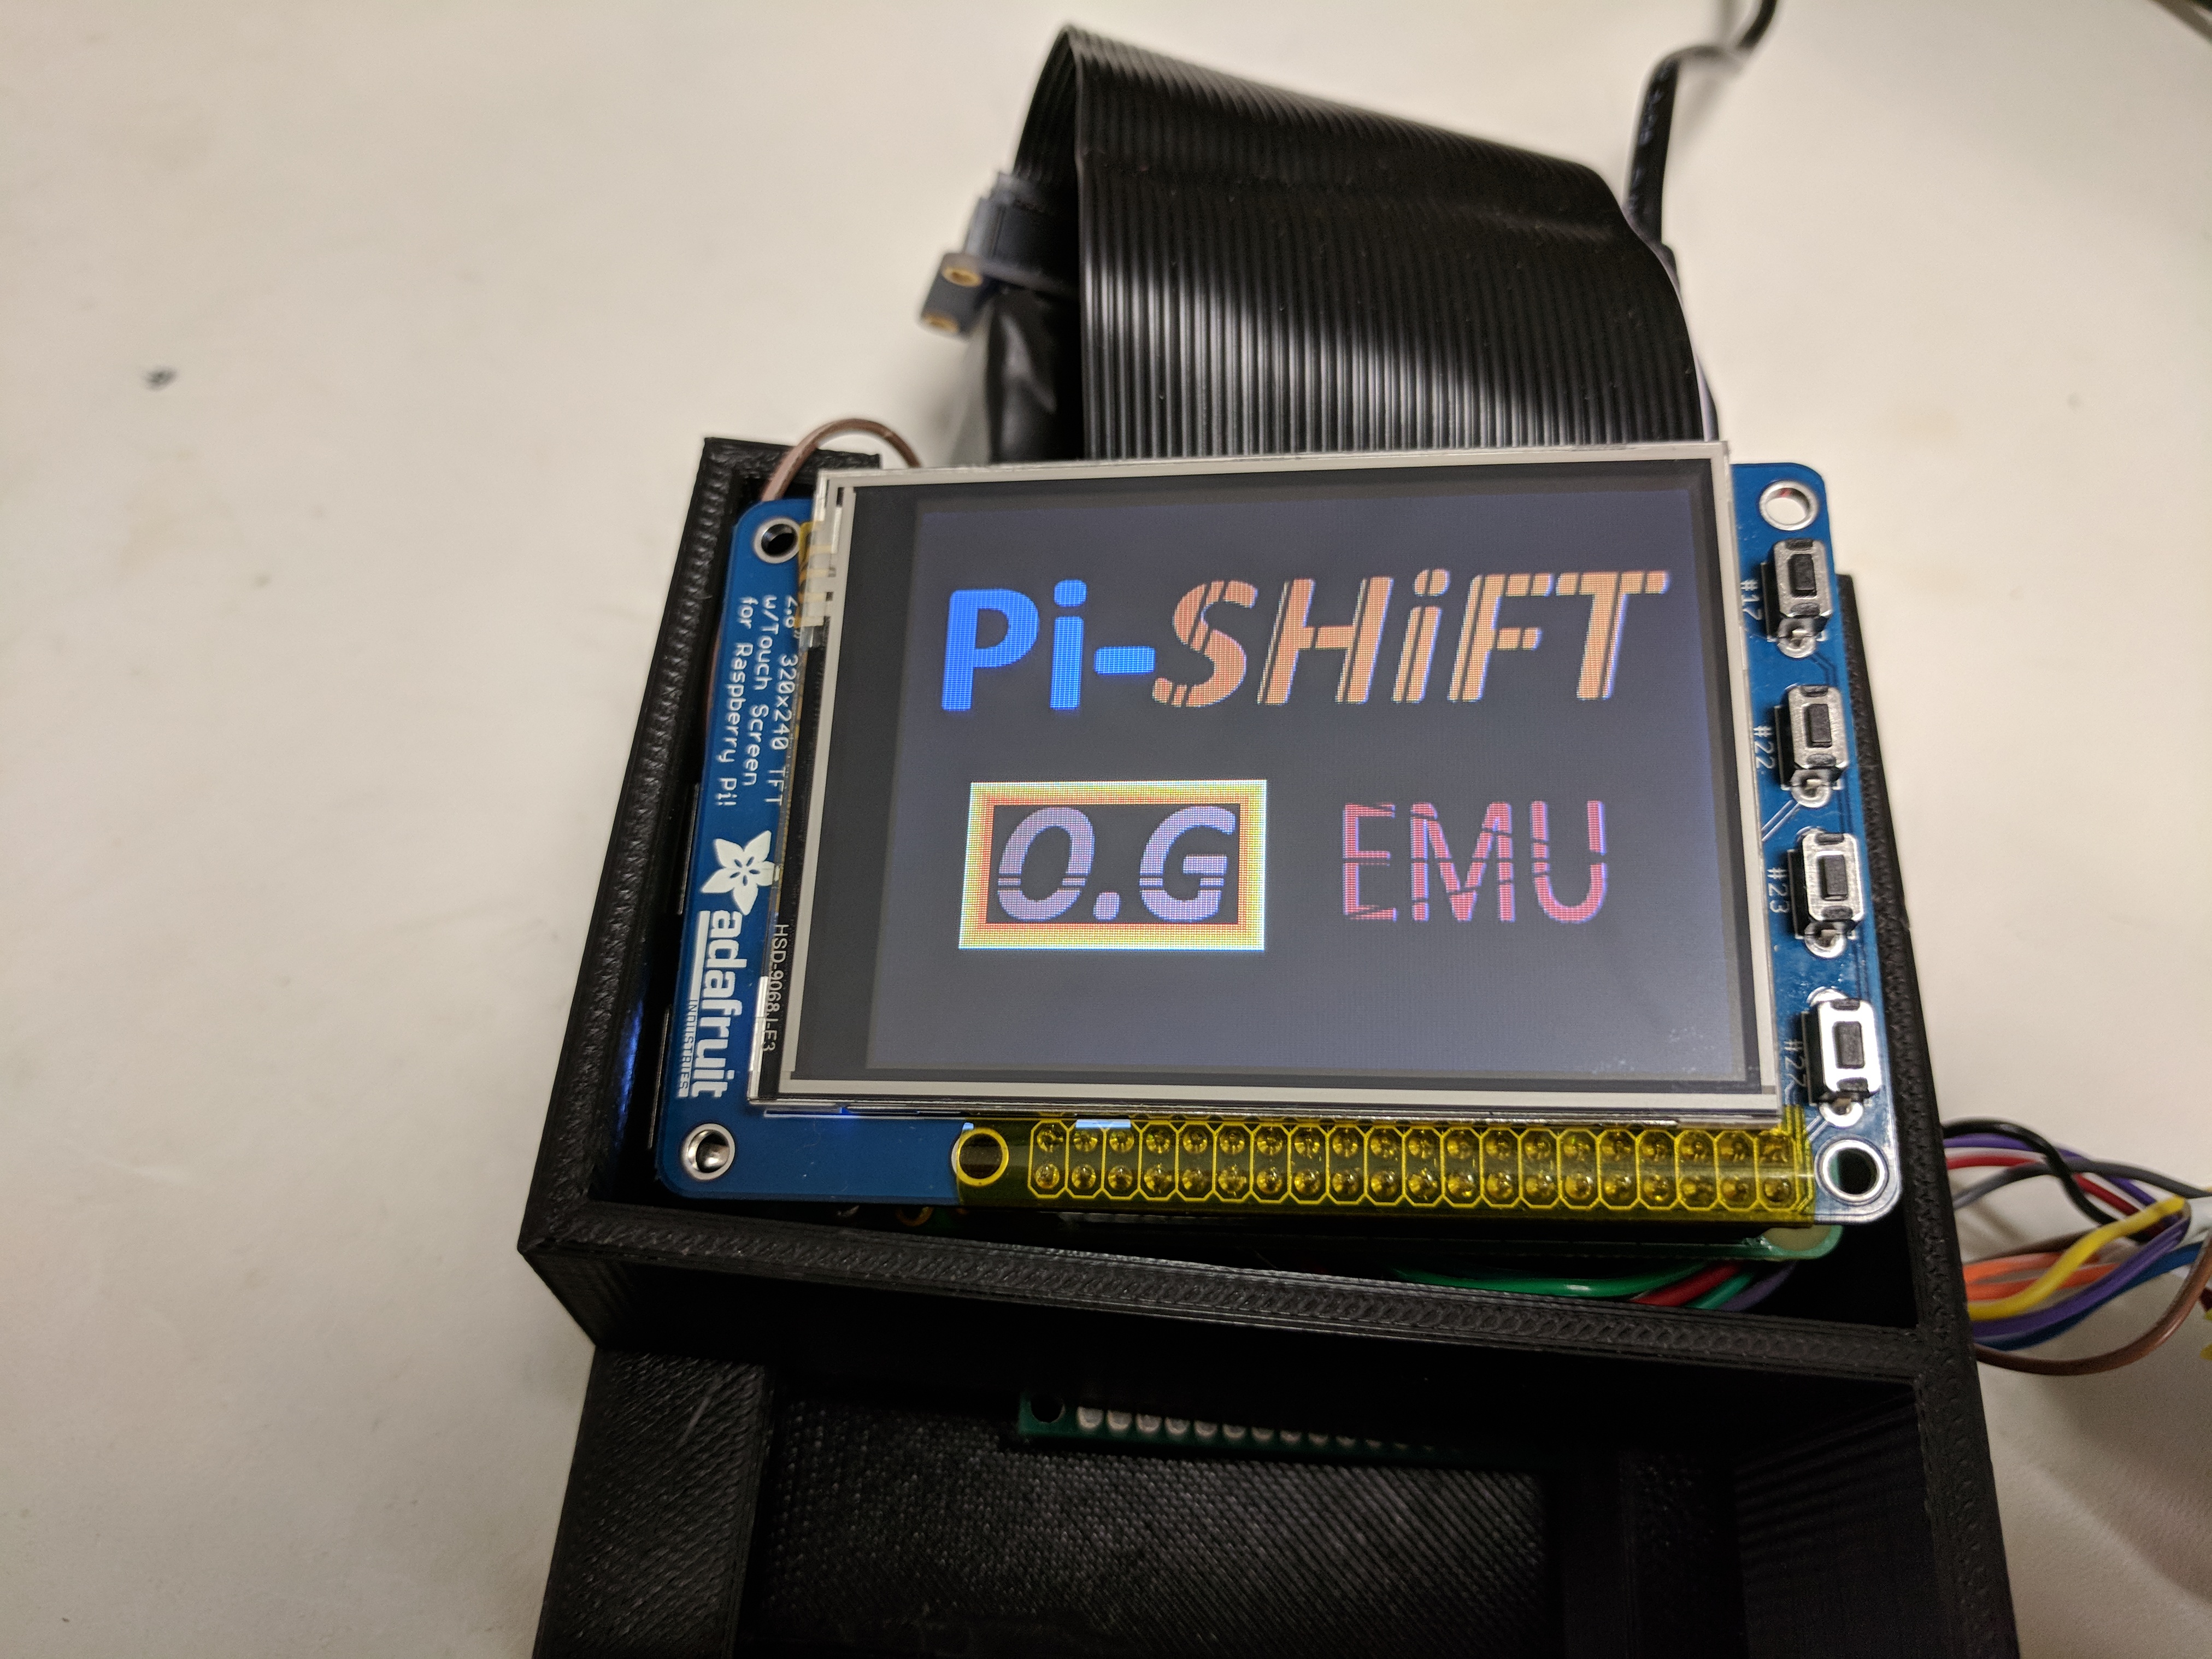
Figure 5: System menu bootup screen
The menu system has three layers: the choosing between original and emulator layer, the choosing between original games layer, and the exit layer. All these layers are navigated by using the directional buttons, the A and B buttons, and the start button (on the TFT). Using the directional button moves the position of the highlighting picture which is placed behind graphics for the various options. When the a button is pressed while an option is highlighted, that option is selected and the actions for that button are performed. If the button is for a game, then the game is started by calling the specified game function. If the button is to navigate to the layer for choosing games, then the menu layer variable is set to 2 and the associated graphics for that layer begin displaying. If the button is to run the emulator, then the menu script is ended so that the emulator can start running. All of the layers are implemented as an if else statements in the while loop. By simply changing the menu level variable, different if else blocks are performed to alter what is currently being displayed.
The software for the menu was not too different than other menus made for this class. However, one thing which was different about this menu system was the importation and use of other Python script functions. When first making this menu, the original idea was to call other python scripts using system calls. However, we found out that this was a very clunky and inefficient way to do things, and this actually caused problems with the display. This method would result in a flickering screen as calling the other python scripts using system calls will result in another process being run with both processes trying to display to the TFT. The method of importing the files and running the game functions was a much cleaner way to do things and it ended up working functionally better.
Pygame Games
Bow Knight
The first game, Bow Knight, is a game where you are a knight which shoots arrows at incoming monsters. The game area is a 15x15 grid composed of 16x16 images. The player can move around from grid space to grid space and shoot at the incoming monsters. The game starts slowly with the game updating at 2Hz, but this is slowly increased to make the game go faster and faster, up to a limit of 20Hz. All of the artwork is original 16x16 pixel art.
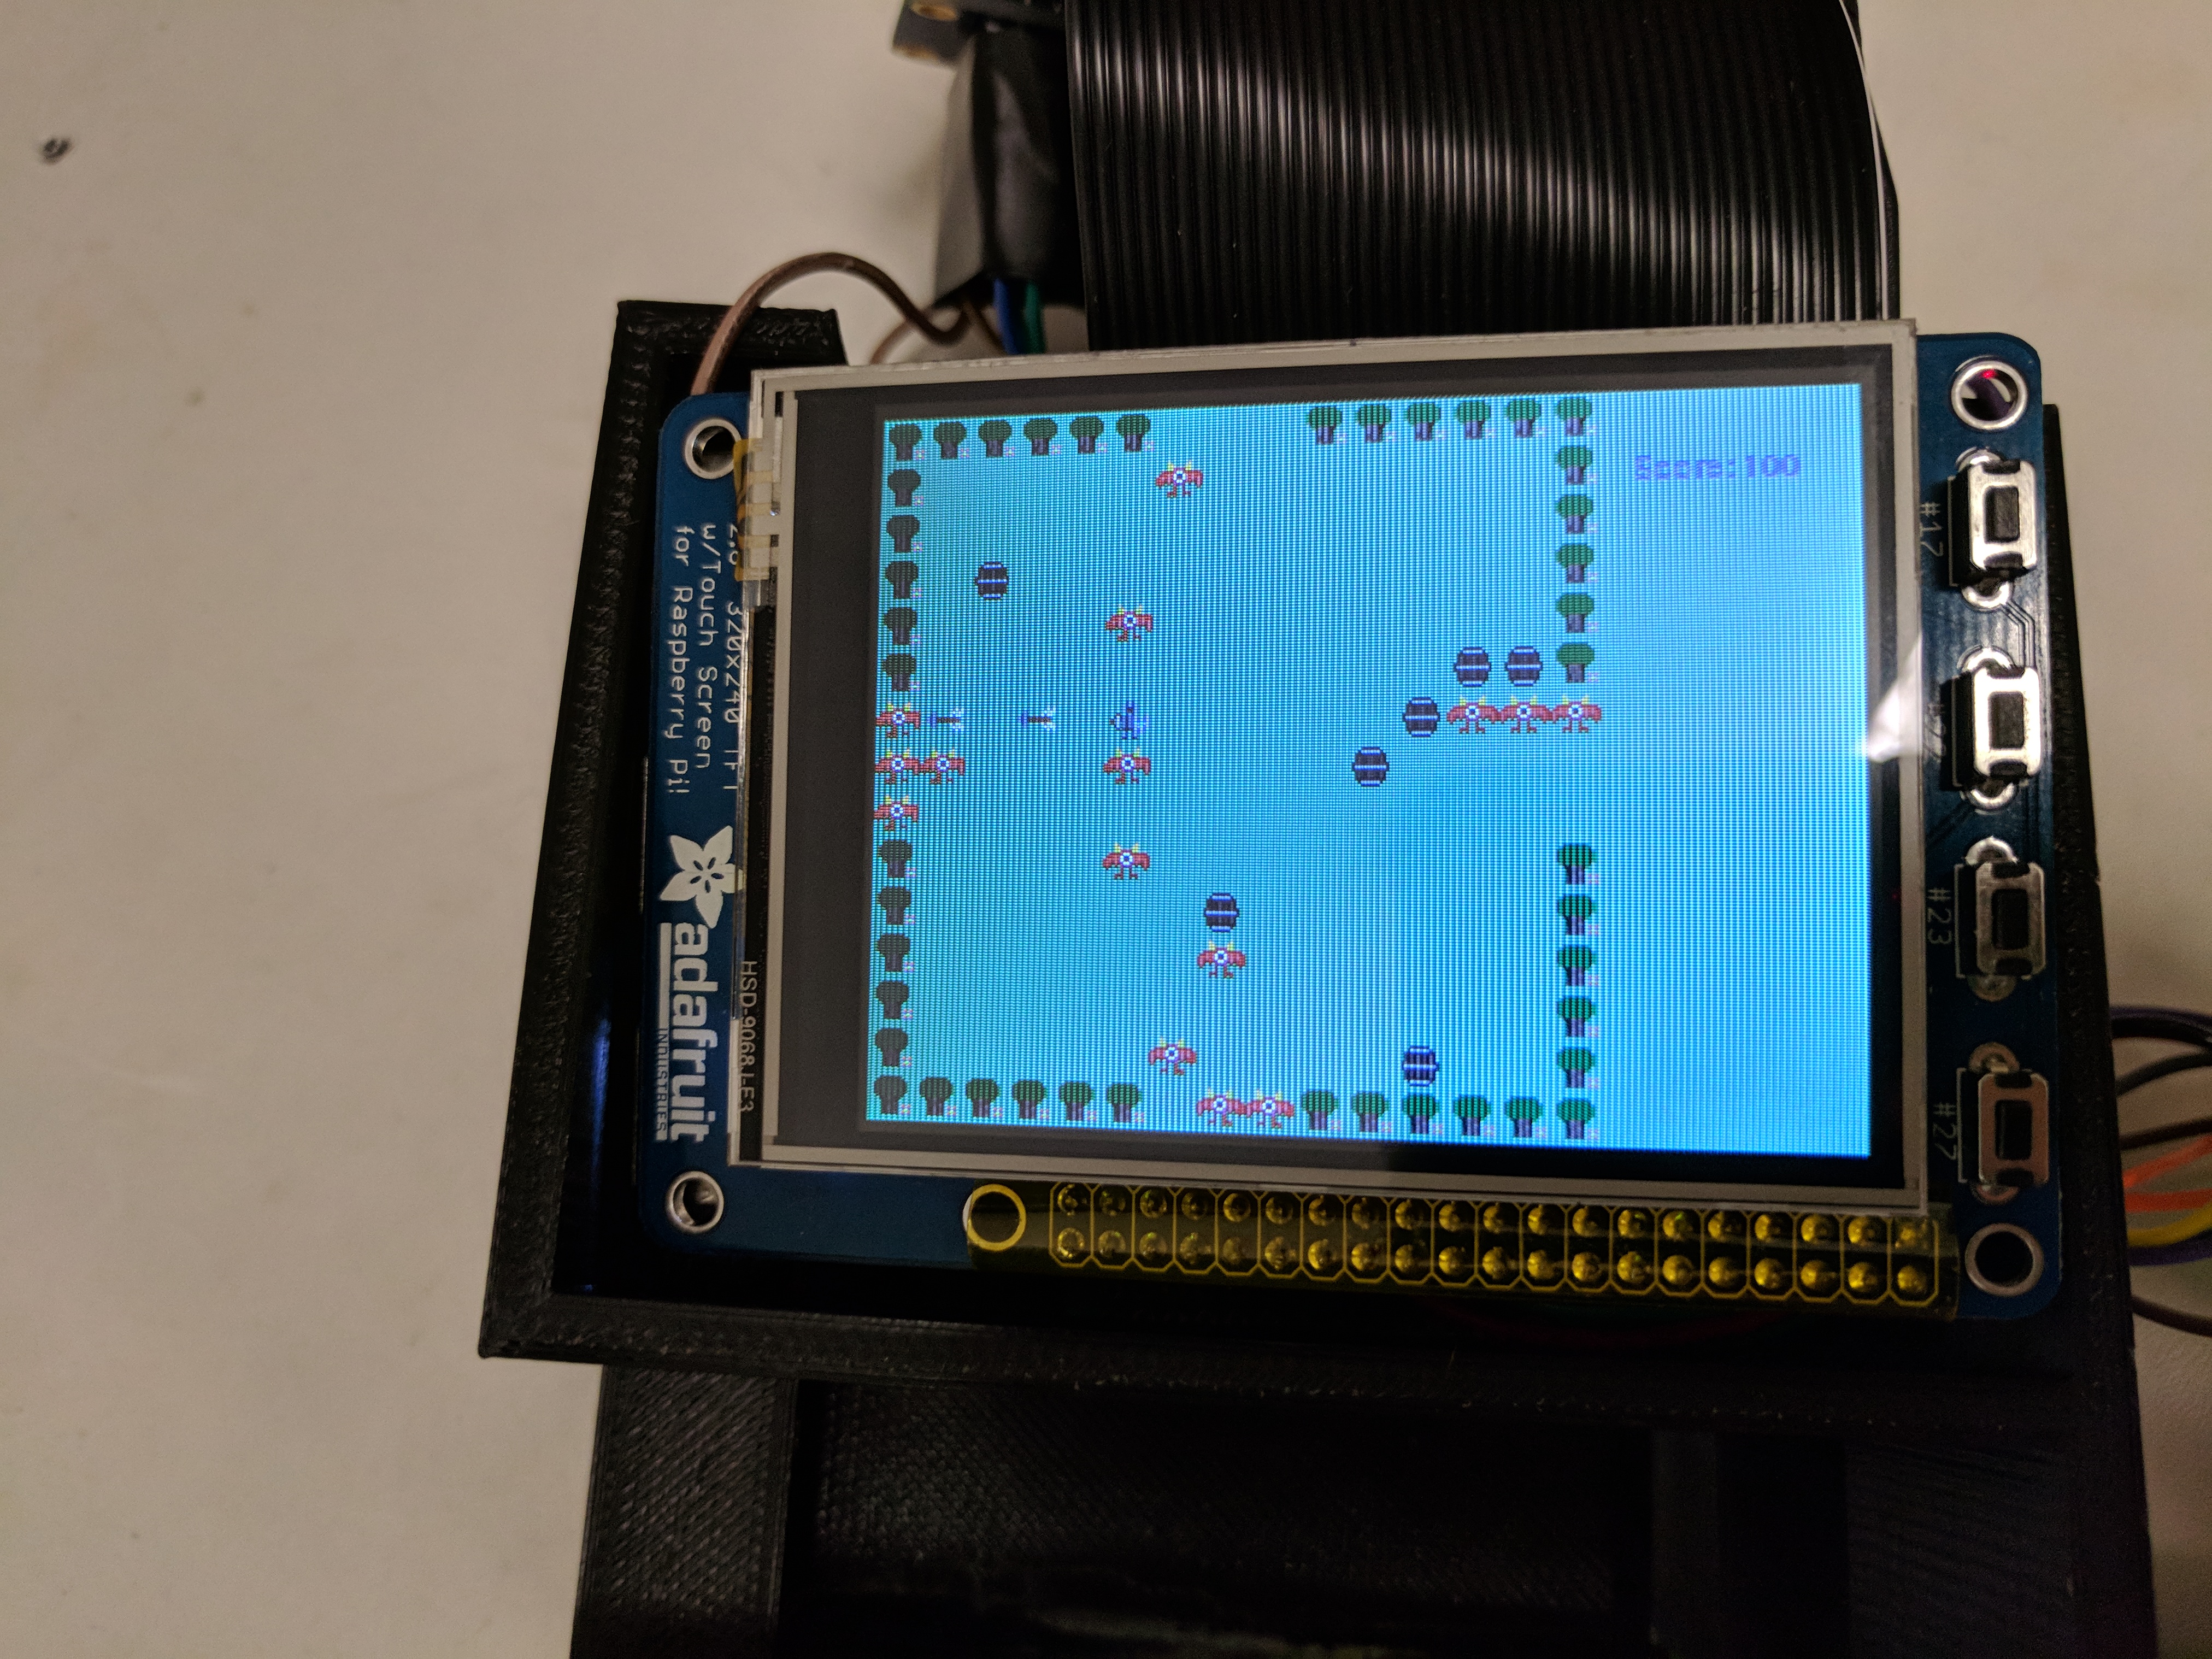
Figure 6: Bow Knight game being played on system
The structure for the game is a Python array of size 15x15. Each entry in this array corresponds to one of the grid positions in the game. Each of the array entries is either a ‘empty’ string or a Sprite object. The Sprite object is an object we defined which contains all of the information required to display and update every object on the game grid. This sprite object contains a label, a path to the 16x16 pixel image for the object, the current position of the sprite object as well as the current velocity of the sprite object. This sprite class also defines methods required to move the sprite objects around the game board, such as set_vel which will set a sprite’s velocity to a new value or update_position which will move the sprite object around the game board while updating all of the sprite’s positional data. The update_position function also handles all of the cases where two sprites collide with one another. For example, whenever an arrow sprite object collides with a monster object, both the monster and the arrow are removed from the game state array. When a monster collides with the knight, the knight dies and a game over flag is set. These interactions can also trigger sounds and update scores. For example, if a bow kills a monster, 100 points are added to the score and a short sound is played. If a knight is killed, a second sound is played to signify game over. These interactions, combined with the knight actions being controlled by callback routines, create the game play.
The game starts by creating a knight sprite in the middle of the game field as well as tree sprites along most of the edges of the edges of the game and barrels placed randomly throughout the game field. These trees and barrels stop arrows and block both the knight and monsters from moving freely about the game field. Once the initialization is done, the game starts by entering a while loop being rate limited by a sleep command. This command starts at .5 to make the game run at about 2Hz, but on every loop the speed is reduced by 2%. This results in the game getting faster and faster the longer the player survives. Next, monster movement is determined. The game state is looped through and, for every monster found, the velocity of the monster is determined based on the relative position of the knight. The monsters movement is based on a probabilistic function which gives moving toward the knight a higher chance than moving away while also giving a chance for the monster to not move at all. Once the monster’s velocities are determined, new monsters are spawned in in each of the four spawning areas on the north, south, east and west side of the game field. Again, the monster spawning is probabilistic. Once the monster spawning stage has completed, the actions of the knight are updated. Depending on which flags were set by GPIO callbacks, the knight’s velocity is updated as well as the whether the knight shoots an arrow in a certain direction. The direction and movement are determined by the direction buttons, and whether an arrow is shot is determined by whether a the A button callback was triggered. All of the new sprites have now been made at this point and all of the velocities have been updated, so it is now time to go through the game state and update the positions of every sprite dependent on their velocities, with all of the sprite interactions being handled by the internal sprite method. Finally, the new game state is run through and all of the images for each sprite are added to the pygame surface to display the new game state. This will create one frame for the game. This process will continue either the start button is pressed to quit out of the game or the knight dies. If the start button is pressed, the while loop is quickly ended and the game is over immediately. If the game ends by the knight losing, the knight sprite is swapped with a grave sprite to show the end of the game along with a game over banner. This is shown for 3 seconds, and then the game is ended.
The first testing of the game was to just get the game initialized. Nothing was added except for the trees around the border to make sure that the sprite class all had data properly initialized and the game state was adequately updating the game state so that the trees which were added were never lost or moved. Once that was done, the next step was testing the interactions between sprites. This was done by hard coding velocities of sprites and so that they collided with each other, and once they collided we made sure they all acted as expected. During this state, we actually encountered an annoying bug in the update state. Since the updates in the game state are all performed sequentially, a bug occured where an update would move a sprite object somewhere else in the game state which had not been processed yet. This meant that a sprite could constantly move itself into a part of the game state not yet updated, so it would be updated multiple times in one update period. To combat this, a deepcopy of the game state had to be made, and the deepcopy was then iterated through when updated the game state.
Once collisions were accomplished, the final things to test were the inputs. Since this game was made before the circuitry for the controllers was made, this testing was done by using the buttons on the TFT. To test the inputs, two tests were performed. One which used the buttons to move the knight, and one which had the knight stay still while having the buttons shoot arrows in the four directions. Once this was done, we waited to do the final testing when the game controller circuits were finished to the fully functioning game.
AirHocky101
Another game we created was AirHockey101. It is a simple game, which follows the rules of Air hockey. There are two racquets that are initialized to be at the center positions of their respective edges. The ball is initialized to drop from the center position randomly towards either direction. In the while loop the program keeps drawing the screen with the updated positions of the ball and the racquets.
The screen is blit with a black fill, then the boundaries and the center circle are drawn. Then the program checks the racquet velocities and positions to make sure that they don’t go beyond the boundaries. Finally, the draw function redraws the ball according to its current position and velocity, and evaluates whether the racquet hit the ball or not or whether the ball hit the wall behind the racquet. If the ball hit the wall then new ball is dropped in the center with random velocity. After the update, it is checked if the buttons for the racquet by player 1 or 2 is pressed. Only two options are available for each player. Either up or down. The paddle position is changed with a fixed velocity in the direction of the button press. The game finishes after either of the player reaches a certain score (3 or 4 ).
Results
Overall, the system worked well and was able to play both original games as well as emulators, though there were some features which ended up not being complete in their entirety. On the physical hardware side, we were able to create all the pieces which we wanted, though we were not able to easily connect the controllers and the RPi holder as we had hoped. The problem lied in tolerances. Our designs for the controllers and RPi holder were designed to be connected by a T section on the controllers along with a T slot on the RPi holder. In the CAD models, these slots and pins were designed to be exactly the same size so that they would fit very snugly together without any part of the system being loose. However, 3D printers do not print to the exact specifications of the CAD model; there needs to be tolerance to allow for the precision range of the printer. The result of not allowing room for the printer’s precision was that the controller and the RPi holder did not fit together at first. We ended up having to sand down the T section on the controllers in order for them to come together and, even with that, only one of the was able to fit entirely. While this is not ideal, we believe the results do show something that could be made to work if we had the time to make a second controller and RPi holder. The only difference the second time would be slightly reducing the size of the T pin on the controllers to allow for the precision constraints of the 3D printers.
On the electronics side, one of the two controllers ended up working. The controller which used only buttons worked very well and integrated into the system as a whole, but the second controller which implemented a thumbstick ended up not being able to interface with the system. We were able to get readings from the thumbstick controller’s ADC using a simple program designed to read from the ADC, but we were not able to integrate these readings into controlling the menu or any of the games. While this is unfortunate that we did not have this feature, the end result is not terrible as we did end up with at least one functioning controller. Additionally, all of the hardware is in place to easily implement the use of the second controller if the readings from the ADC were implemented in software.
On the software side, we were able to get the menu, the emulator and one of the custom games working. We were able to smoothly boot up to the menu system on power up, and the menu system was pretty intuitive to use and choose an original game or emulator to play. Bow knight was also able to be played easily by the controller once chosen by the menu system. Everything played on the TFT, and it ended up being pretty fun. There were some issues with the second game, with regards to following the intended game rules. The ball was supposed the bounce from the side walls, which didn’t happen. The rest of the action of the game was on track.
We also discovered that not all emulators follow the input configuration set in EmulationStation. We wouldn’t have known this if we had tested just a single ROM on those adamant emulators. Only when we observed a pattern in the ROMs for a particular emulator were we able to realize the issue. The issue was that some Emulators tend to respond to keyboard, but they only take in the default controls that the emulators dictate. We worked around this by changing the input configuration in EmulationStation to the input configuration of the adamant emulator. The other emulators usually respond to the changes made in EmulationStation properly so those worked without any issues.
Conclusion
We were able to build an application specific embedded system that could function independently. Being able to do that is the primary takeaway of this course. Using CAD modelling, soldering, wiring, using connectors, making the most out of physical limitations, dealing with various design trade-offs, and a lot more was required for this project. All of which culminated to reward us with a great system design experience that required ample hardware and software involvement. We learnt a lot about combining pre-built software with our own. In this regard we learnt a lot about the OS level settings, files and configurations. Throughout the project we worked on the latest version of stretch which wasn’t covered in class. We were able to troubleshoot our issues by following forums, comments of experts, intuitive tinkering and testing. We also learnt a great deal about hooking up peripherals and emulating inputs. We gained a whole lot of experience in building pygame games as well.
Future Work
If we had more time for this project, the first thing we would do would be to reprint the controllers and the RPi holder with 3D printer precision taken into account. By just changing a few dimensions by possibly .2 mm, the hardware would fit together much nicer than it currently does. The next thing we would do would be to fix up Airhockey101 so that we have one more perfectly functioning pygame game. After that, the final thing to really fix would be the integration of the thumbstick inputs into the menu system, the pygame games, and the emulator. These fixes would give us a truly multi-controller functioning system. Past that, additional work can be made to increase the functionality of the system. For example, we could add the piezo electric speakers which we were never able to add onto the system so that sound could be output without the use of external headphones or speakers. And finally, the system could always be expanded by simply adding more ROMs to the emulator as well as more pygame games. This was a pretty open ended project, so there are numerous ways we could improve and expand the system as a whole.
Work Distribution
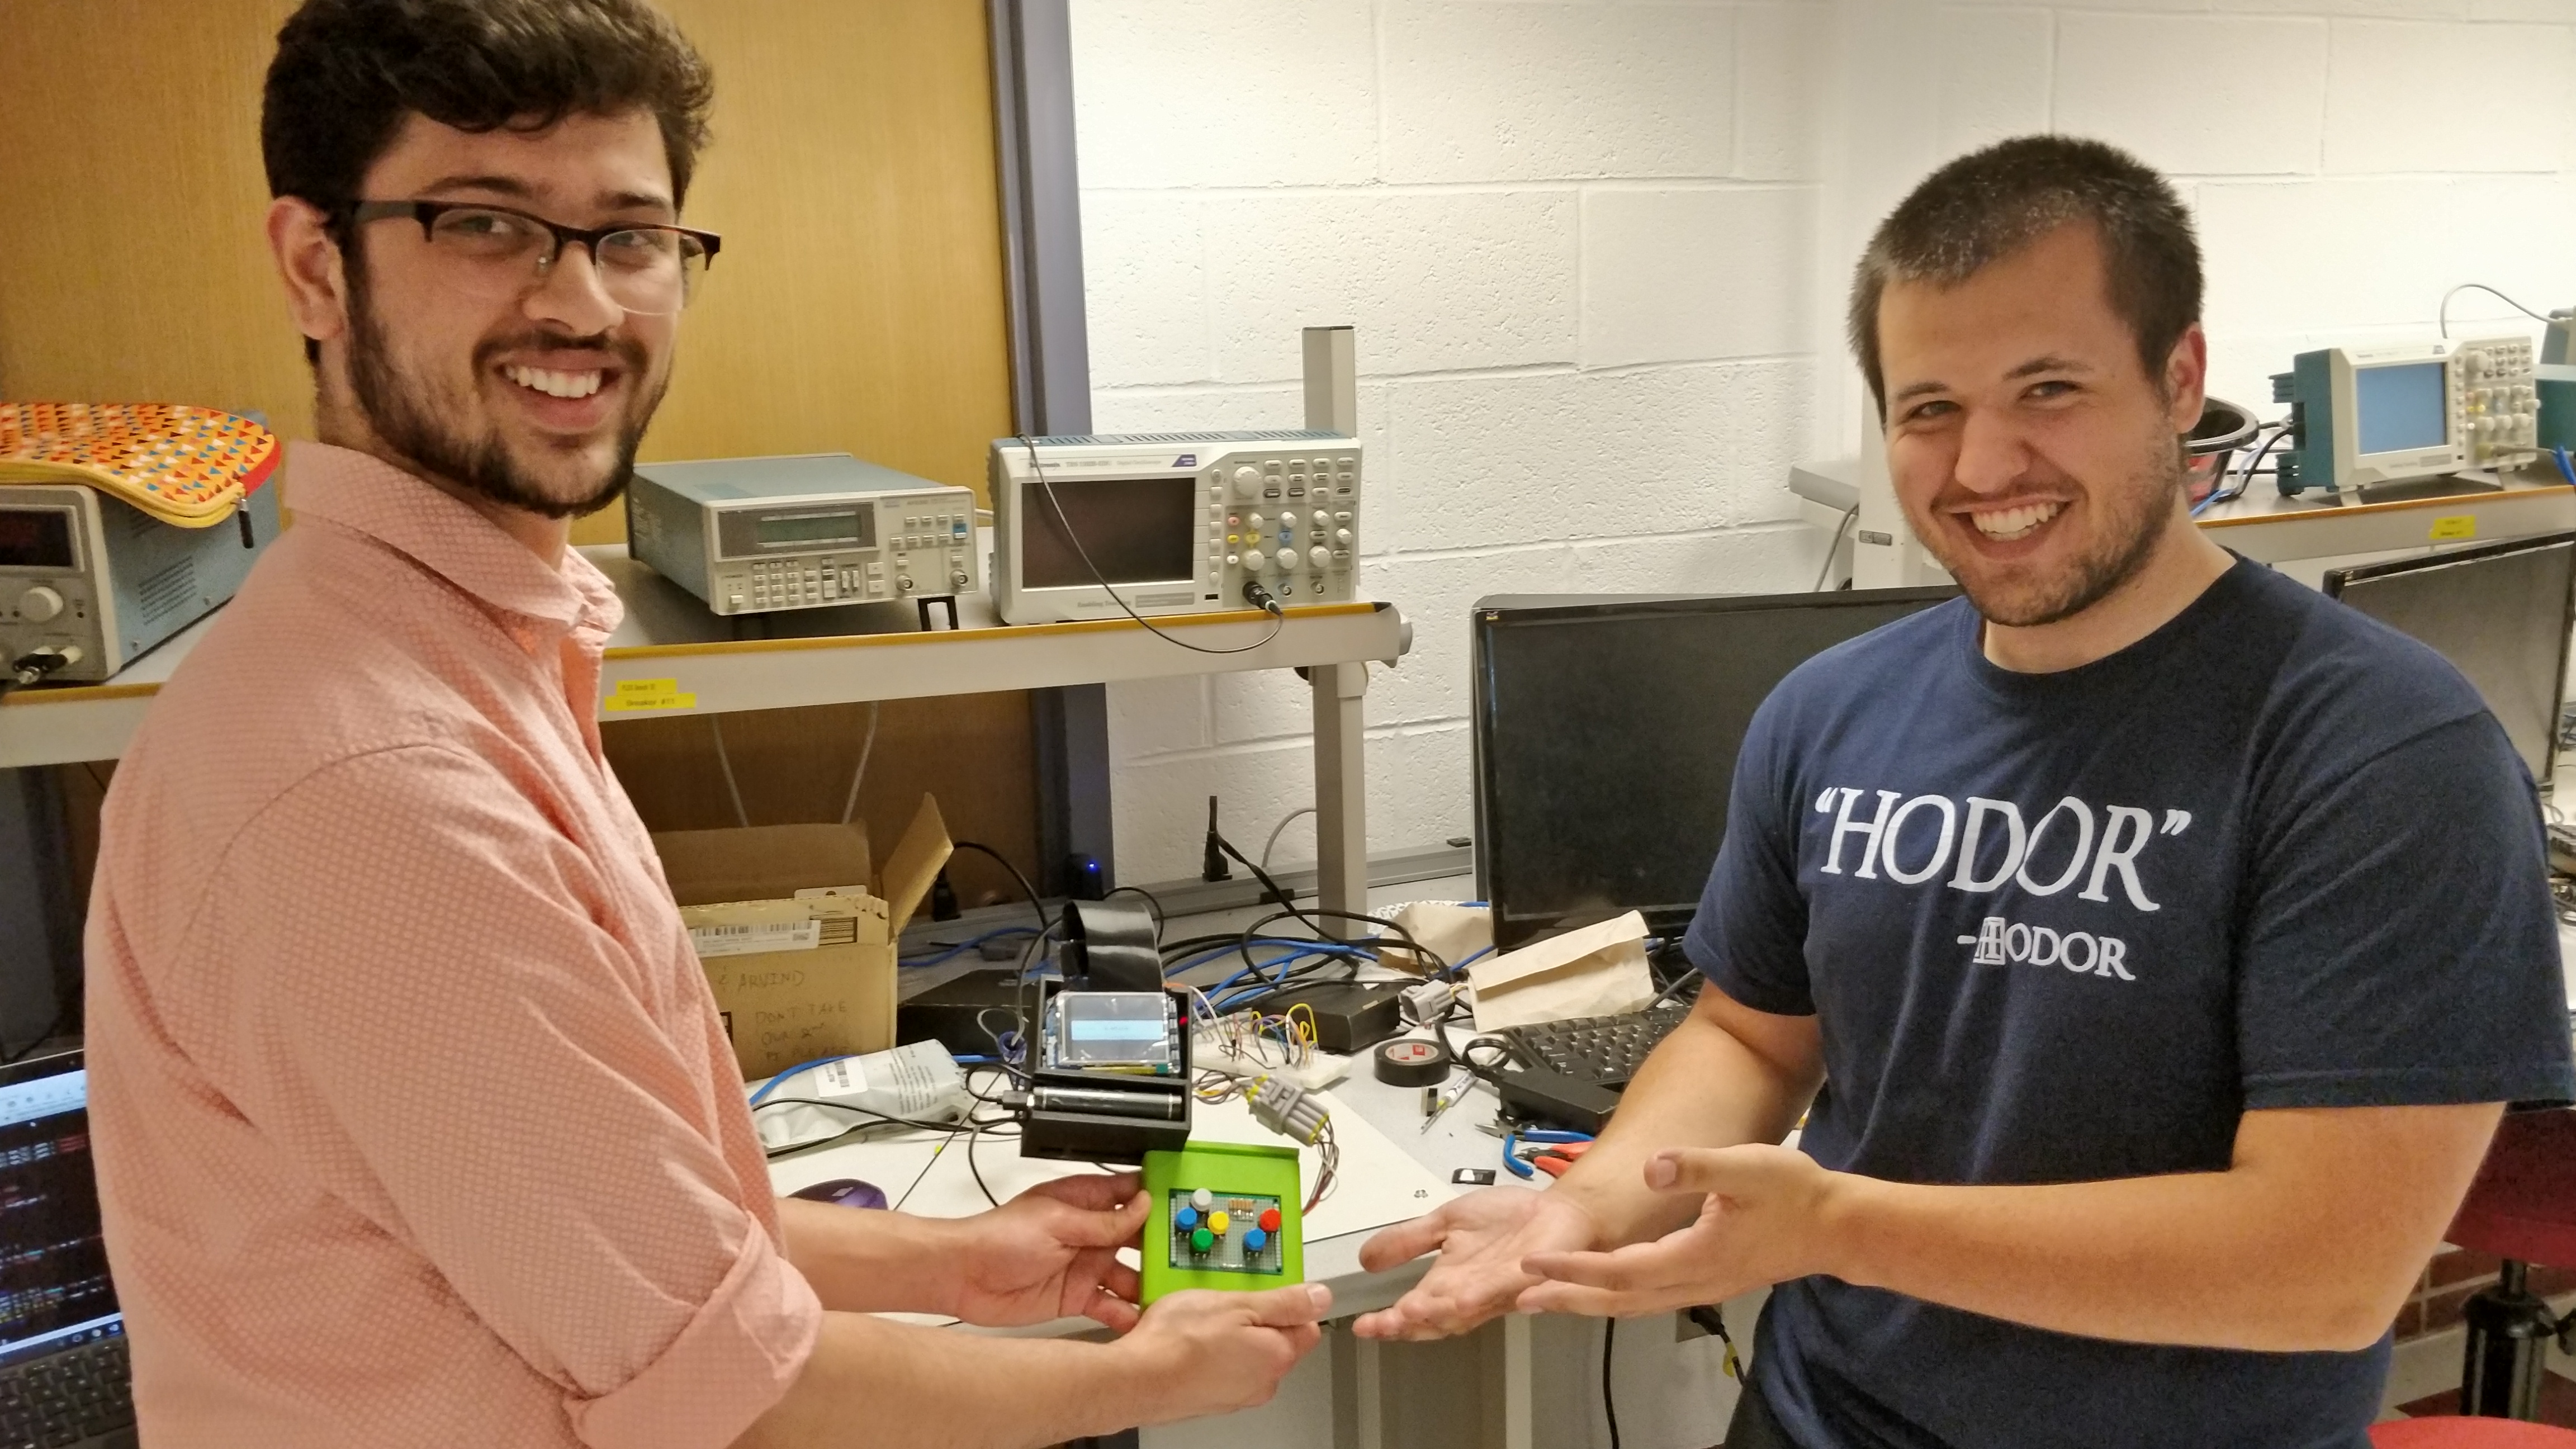
Project group picture

Arvind Puthige
ap2289@cornell.edu
Integrated prebuilt software and self designed one
Wrote the code for AirHockey101
Enabled PiTFT display on emulator and configured GPIO to emulate keypresses

Chris Graef
netid@cornell.edu
Designed all of the 3D printed pieces
Designed and built all of the electronic components
Wrote all of the code for Bow Knight and the system menu
Parts List
- Perfboard - $2
- Buttons - $5.95
- Battery - $15
- Joystick - $6.95
- ADC converter - $3.75
- Auto connectors - $10
- 3D printed parts - $15
- Raspberry Pi - Provided
- PiTFT - Provided
- Wire and Resistor - Provided
Total: $58.65
References
PiCamera DocumentTower Pro Servo Datasheet
Bootstrap
Pigpio Library
R-Pi GPIO Document
Retrogame
PiTFT Setup
Retropie
Introduction to Retropie
Code Appendix
#system_menu.py

import RPi. GPIO as GPIO
import subprocess
from time import sleep
import os
import pygame
from pygame.locals import *

os.putenv('SDL_VIDEODRIVER', 'fbcon')
os.putenv('SDL_FBDEV', '/dev/fb1') #Put onto TFT

pygame.init()

pygame.mouse.set_visible(False)

size = width, height = 320, 240
screen = pygame.display.set_mode(size)

#background_color = 129, 199, 132
background_color = 0, 0, 0

import bow_knight_main
#from  bow_knight_main import * #This must be first of all games imported
menu_state = "menu"

GPIO.setmode(GPIO.BCM)
GPIO.setup( 4, GPIO.IN)
GPIO.setup(26, GPIO.IN)
GPIO.setup(16, GPIO.IN)
GPIO.setup(19, GPIO.IN)
GPIO.setup(14, GPIO.IN)
GPIO.setup(15, GPIO.IN)
GPIO.setup(27, GPIO.IN, pull_up_down=GPIO.PUD_UP)
GPIO.setup(22, GPIO.IN, pull_up_down=GPIO.PUD_UP)

def GPIO4_callback(channel):
    if menu_state == "menu":
        global left_pushed
        left_pushed = True
    elif menu_state == "bow_knight":
        bow_knight_main.direction = 'left'
        knight_x, knight_y = bow_knight_main.knight_pos
        if(bow_knight_main.game_state[knight_y][knight_x] != 'empty' and bow_knight_main.game_state[knight_y][knight_x].name == 'knight'):
            bow_knight_main.game_state[knight_y][knight_x].set_vel(-1,0)

def GPIO26_callback(channel):
    if menu_state == "menu":
        global down_pushed
        down_pushed = True
    elif menu_state == "bow_knight":
        bow_knight_main.direction = 'down'
        knight_x, knight_y = bow_knight_main.knight_pos
        if(bow_knight_main.game_state[knight_y][knight_x] != 'empty' and bow_knight_main.game_state[knight_y][knight_x].name == 'knight'):
            bow_knight_main.game_state[knight_y][knight_x].set_vel(0,1)


def GPIO16_callback(channel):
    if menu_state == "menu":
        global up_pushed
        up_pushed = True
    elif menu_state == "bow_knight":
        bow_knight_main.direction = 'up'
        knight_x, knight_y = bow_knight_main.knight_pos
        if(bow_knight_main.game_state[knight_y][knight_x] != 'empty' and bow_knight_main.game_state[knight_y][knight_x].name == 'knight'):
            bow_knight_main.game_state[knight_y][knight_x].set_vel(0, -1)


def GPIO19_callback(channel):
    if menu_state == "menu":
        global right_pushed
        right_pushed = True
    elif menu_state == "bow_knight":
        bow_knight_main.direction = 'right'
        knight_x, knight_y = bow_knight_main.knight_pos
        if(bow_knight_main.game_state[knight_y][knight_x] != 'empty' and bow_knight_main.game_state[knight_y][knight_x].name == 'knight'):
            bow_knight_main.game_state[knight_y][knight_x].set_vel(1,0)


def GPIO14_callback(channel):
    if menu_state == "menu":
        global A_pushed
        A_pushed = True
    elif menu_state == "bow_knight":
        bow_knight_main.shot_fired = True

def GPIO15_callback(channel):
    if menu_state == "menu":
        global menu_level
        menu_level = 1

def GPIO27_callback(channel):
    #print("EXIT")
    if menu_state == "menu":
        #global still_in_menu
        #still_in_menu = False
        global menu_level
        menu_level = 3
    elif menu_state  == "bow_knight":
        bow_knight_main.game_over = True
        bow_knight_main.exit_by_button = True

def GPIO22_callback(channel):
    if menu_state == "menu":
        pass
    elif menu_state == "bow_knight":
        bow_knight_main.paused = not bow_knight_main.paused

GPIO.add_event_detect(4,  GPIO.FALLING, callback=GPIO4_callback,  bouncetime=200)
GPIO.add_event_detect(26, GPIO.FALLING, callback=GPIO26_callback, bouncetime=200)
GPIO.add_event_detect(16, GPIO.FALLING, callback=GPIO16_callback, bouncetime=200)
GPIO.add_event_detect(19, GPIO.FALLING, callback=GPIO19_callback, bouncetime=200)
GPIO.add_event_detect(14, GPIO.FALLING, callback=GPIO14_callback, bouncetime=200)
GPIO.add_event_detect(15, GPIO.FALLING, callback=GPIO15_callback, bouncetime=200)
GPIO.add_event_detect(27, GPIO.FALLING, callback=GPIO27_callback, bouncetime=200)
GPIO.add_event_detect(22, GPIO.FALLING, callback=GPIO22_callback, bouncetime=200)

#Pygame setup
#os.putenv('SDL_VIDEODRIVER', 'fbcon')
#os.putenv('SDL_FBDEV', '/dev/fb1') #Put onto TFT

#pygame.init()

#size = width, height = 320, 240
#screen = pygame.display.set_mode(size)

#background_color = 129, 199, 132
background_color = 0, 0, 0

#Global flags
up_pushed = False
down_pushed = False
left_pushed = False
right_pushed = False
A_pushed = False

play_orig = False
play_emu = False

logo_pos = 15, 30
orig_button_pos = 40, 135
emu_button_pos = 180, 135
button_sel_pos = 30, 125
bow_knight_button_pos = 60, 60
airhky_button_pos = 60, 160
game_sel_pos = 50, 35

#sensitivity = 4

image_file_path = "/home/pi/Desktop/ECE5725_finalproject/menu/"

menu_level = 1

still_in_menu = True
while(still_in_menu):
    sleep(.2)

    if menu_level == 1:
        #Choose between emulator and original games
        if(left_pushed):
            button_sel_pos = 30, 125
        if(right_pushed):
            button_sel_pos = 170, 125

        right_pushed = False
        left_pushed = False

        #Update scree
        screen.fill(background_color)

        screen.blit(pygame.image.load(image_file_path +"images/Logo.png"), logo_pos)
        screen.blit(pygame.image.load(image_file_path +"images/choose_button_back.png"), button_sel_pos)
        screen.blit(pygame.image.load(image_file_path +"images/EMU_button.png"), emu_button_pos)
        screen.blit(pygame.image.load(image_file_path +"images/original_button.png"), orig_button_pos)

        if(A_pushed):
            if button_sel_pos == (30,125):
                #Play original game
                menu_level = 2
            else:
                #Play emulator
                pass
        A_pushed = False

        pygame.display.flip()
    elif menu_level == 2:
        #Choose between original games
        if(up_pushed):
            game_sel_pos = (50, 35)
        if(down_pushed):
            game_sel_pos = (50, 135)

        up_pushed = False
        down_pushed = False

        screen.fill(background_color)

        screen.blit(pygame.image.load(image_file_path + "images/choose_game_border.png"), game_sel_pos)
        screen.blit(pygame.image.load(image_file_path + "images/airhcky_button.png"), airhky_button_pos)
        screen.blit(pygame.image.load(image_file_path + "images/bow_knight_button.png"), bow_knight_button_pos)

        pygame.display.flip()

        if(A_pushed):
            if(game_sel_pos == (50, 35)):
                #Play bow knight
                menu_state = "bow_knight"
                bow_knight_main.bow_knight_game()
                menu_state = "menu"
            else:
                #Play air hcky
                pass
        A_pushed = False
    else:
        #Quit menu
        screen.fill(background_color)

        text_surface = pygame.font.Font(None, 30).render("Are you sure you want to quit?", True, (255, 255, 255))
        screen.blit(text_surface, (10, 90))

        pygame.display.flip()

        if(A_pushed):
            #TODO Shut down RPi
            still_in_menu = False
#bow_knight.py

import pygame
from pygame.locals import *
import os
import RPi.GPIO as GPIO
import copy
import random
from time import sleep

test = "TEST"

#A sprite class is an object which can easily be written to the screen
#with pygame
class Sprite:
    global game_state
    global temp_game_state

    def __init__(self):
        self.image = ""
        self.x_pos = 0
        self.y_pos = 0
        self.x_vel = 0
        self.y_vel = 0

    def __init__(self, name, x_pos, y_pos, x_vel, y_vel):
        self.name  = name
        self.image = pygame.image.load(game_path + "images/" + name + ".png")
        self.x_pos = x_pos
        self.y_pos = y_pos
        self.x_vel = x_vel
        self.y_vel = y_vel
        game_state[y_pos][x_pos] = self

    def set_vel(self, x_vel, y_vel):
        self.x_vel = x_vel
        self.y_vel = y_vel

    def update_pos(self):
        #print("Update")
        new_x_pos = self.x_pos + self.x_vel
        new_y_pos = self.y_pos + self.y_vel
        #Check bounds
        if(new_x_pos > 14 or new_x_pos < 0) or (new_y_pos > 14 or new_y_pos < 0):
            #If arrow, arrow dies
            if((self.name == "arrow_right" or self.name == "arrow_left") or (self.name == "arrow_up" or self.name == "arrow_down")):
                temp_game_state[self.y_pos][self.x_pos] = 'empty'
        #Check interaction
        else:
            res = interactions(self, game_state[new_y_pos][new_x_pos])

            #Move: move current sprite to new spot on game_state
            if(res == 'move'):
                temp_game_state[self.y_pos][self.x_pos] = 'empty'
                temp_game_state[new_y_pos][new_x_pos] = self

                self.x_pos = new_x_pos
                self.y_pos = new_y_pos

            #Move: remove current and new position from game state
            elif(res == 'kill'):
                temp_game_state[self.y_pos][self.x_pos] = 'empty'
                temp_game_state[new_y_pos][new_x_pos] = 'empty'

            #Die: remove current sprite from gameboard
            elif(res == 'die'):
                temp_game_state[self.y_pos][self.x_pos] = 'empty'

            #Block: dont update position
            else:
                pass
        if(self.name == "knight"):
            global knight_pos
            knight_pos = (self.x_pos, self.y_pos)

def interactions(mover, stayer):
    global game_over
    global grave_marker_y, grave_marker_x

    if(stayer == 'empty'):
        return 'move'
    else:
        #Arrow
        if(mover.name == "arrow_up" or mover.name == "arrow_right") or (mover.name == "arrow_down" or mover.name == "arrow_left"):
            if(stayer.name == "barrel" or stayer.name == "tree"):
                return 'die'
            elif(stayer.name == "knight"):
                return 'kill'
            elif(stayer. name == "monster"):
                #Play monster dying sound and increment points
                global monster_dying
                monster_dying.play()
                global score
                score = score + 50

                return 'kill'

            else:
                return 'block'

        #Knight
        elif(mover.name == "knight"):
            if(stayer.name == "barrel" or stayer.name == "tree"):
                return 'block'
            elif(stayer.name == "arrow_up" or stayer.name == "arrow_right") or (stayer.name == "arrow_down" or stayer.name == "arrow_left"):
                return 'block'
            elif(stayer.name == "monster"):
                game_over = True
                grave_marker_x = stayer.x_pos
                grave_marker_y = stayer.y_pos
                return 'die'
            else:
                return 'block'

        #Monster
        elif(mover.name == "monster"):
            if(stayer.name == "barrel" or stayer.name == "tree"):
                return 'block'
            elif(stayer.name == "arrow_up" or stayer.name == "arrow_right") or (stayer.name == "arrow_down" or stayer.name == "arrow_left"):
                return 'block'
            elif(stayer.name == "knight"):
                global knight_dying
                knight_dying.play()
                game_over = True
                grave_marker_x = stayer.x_pos
                grave_marker_y = stayer.y_pos
                return 'kill'
            else:
                return 'block'
        else:
            return 'block'


size = width, height = 320, 240
screen = pygame.display.set_mode(size)

background_color = 129,199,132

game_path = "/home/pi/Desktop/ECE5725_finalproject/bow_knight/" #TODO

game_state = []
temp_game_state = []
game_over = False

#Initialize sounds
monster_dying = pygame.mixer.Sound(game_path + 'sounds/floop.wav')
knight_dying = pygame.mixer.Sound(game_path + 'sounds/peeoop.wav')

#Player inputs
shot_fired = False
move = False
direction = 'right'
arrow_shot = 'none'
#Score
score = 0

#Speed
speed = .5

monster_dying = pygame.mixer.Sound(game_path + 'sounds/floop.wav')
knight_dying = pygame.mixer.Sound(game_path + 'sounds/peeoop.wav')

grave_marker_x, grave_marker_y = 0, 0
knight_pos = (7, 7)

exit_by_button = False

paused = False

#Initialize path to folder
def bow_knight_game():
    global game_state
    global temp_game_state
    global game_over
    global shot_fired
    global move
    global direction
    global arrow_shot
    global score
    global grave_marker_x, grave_marker_y
    global knight_pos
    global exit_by_button

    #Initialize game State
    game_state = []
    temp_game_state = []
    for i in range (15):
        game_state.append(['empty']*15)
        temp_game_state.append(['empty']*15)

    #Monster spawn stuff
    monster_spawn = [(0, 6), (0, 7), (0, 8), (14, 6), (14, 7), (14, 8), (6, 0), (7, 0), (0, 8), (6, 14), (7, 14), (8, 14)]
    monster_spawn_rate = 5

    #Initialize starting sprites
    Sprite("knight", 7, 7, 0, 0)

    #Tree generation
    for i in range(6):
        Sprite("tree",    i,   0, 0, 0)
        Sprite("tree",    i,  14, 0, 0)
        Sprite("tree", 14-i,   0, 0, 0)
        Sprite("tree", 14-i,  14, 0, 0)


    for i in range(5):
        Sprite("tree", 0,     i+1, 0, 0)
        Sprite("tree", 14,    i+1, 0, 0)
        Sprite("tree", 0,  14-i-1, 0, 0)
        Sprite("tree", 14, 14-i-1, 0, 0)

    #Random barrel generation
    num_barrels = random.randint(4, 10)
    for i in range(num_barrels):
        random_x = random.randint(1, 13)
        random_y = random.randint(1, 13)
        if(game_state[random_y][random_x] == 'empty'):
            Sprite("barrel", random_x, random_y, 0, 0)


    #Player inputs
    shot_fired = False
    move = False
    direction = 'right'
    arrow_shot = 'none'
    #Score
    score = 0

    #Speed
    speed = .5
    game_over = False
    grave_marker_x, grave_marker_y = 0, 0
    knight_pos = (7, 7)

    exit_by_button = False
    while(not game_over):

        if(speed > .05):
            speed = speed*.98
        sleep(speed)

        if(not paused):

            screen.fill(background_color)

            #Determine monster movement
            for i in range(15):
                for j in range(15):
                    if(game_state[i][j] != 'empty'):
                        if(game_state[i][j].name == 'monster'):
                            sprite = game_state[i][j]
                            knight_x, knight_y = knight_pos
                            diff_x = knight_x - sprite.x_pos
                            diff_y = knight_y - sprite.y_pos
                            wait_factor = 30
                            smooth_factor = 5
                            move_decision = random.randint(0, abs(diff_x)+abs(diff_y)+2*smooth_factor+wait_factor)
                            if(move_decision < (abs(diff_x) + smooth_factor)):
                                #Move toward hero along x direction
                                if(diff_x > 0):
                                    sprite.set_vel(1, 0)
                                else:
                                    sprite.set_vel(-1, 0)

                            elif(move_decision < (abs(diff_x) + abs(diff_y) + 2*smooth_factor)):
                                #Move toward hero along y direction
                                if(diff_y > 0):
                                    sprite.set_vel(0, 1)
                                else:
                                    sprite.set_vel(0, -1)
                            else:
                                #Don't move
                                sprite.set_vel(0, 0)

            #Monster spawn
            for i in monster_spawn:
                x, y = i
                if(game_state[y][x] == 'empty'):
                    #print("X: " + str(x) + " Y: " + str(y))
                    spawn_chance = random.randint(1, 100)
                    if(spawn_chance < monster_spawn_rate):
                        #Create monster and add to game state
                        Sprite('monster', x, y, 0, 0)

            #Shoot arrow
            if(shot_fired):
                arrow_shot = direction

            if(arrow_shot == 'right'):
                x, y = knight_pos
                if(x+1 < 15):
                    current_occ = game_state[y][x+1]

                    #Empty, can shoot arrow
                    if(current_occ == 'empty'):
                        Sprite("arrow_right", x+1, y, 1, 0)

                    #Monster in position, arrow kills monster
                    elif(current_occ.name == 'monster'):
                        game_state[y][x+1] = 'empty';

                    #Blocked by other occupancy, don't shoot
                    else:
                        pass

            elif(arrow_shot == 'left'):
                x, y = knight_pos
                if(x-1 > 0):
                    current_occ = game_state[y][x-1]

                    #Empty, can shoot arrow
                    if(current_occ == 'empty'):
                        Sprite("arrow_left", x-1, y, -1, 0)

                    #Monster in position, arrow kills monster
                    elif(current_occ.name == 'monster'):
                        game_state[y][x-1] = 'empty';

                    #Blocked by other occupancy, don't shoot
                    else:
                        pass


            elif(arrow_shot == 'up'):
                x, y = knight_pos
                if(y-1 < 15):
                    current_occ = game_state[y-1][x]
                    #Empty, can shoot arrow
                    if(current_occ == 'empty'):
                        Sprite("arrow_up", x, y-1, 0, -1)

                    #Monster in position, arrow kills monster
                    elif(current_occ.name == 'monster'):
                        game_state[y-1][x] = 'empty';

                    #Blocked by other occupancy, don't shoot
                    else:
                        pass


            elif(arrow_shot == 'down'):
                x, y = knight_pos
                if(y+1 < 15):
                    current_occ = game_state[y+1][x]

                    #Empty, can shoot arrow
                    if(current_occ == 'empty'):
                        Sprite("arrow_down", x, y+1, 0, 1)

                    #Monster in position, arrow kills monster
                    elif(current_occ.name == 'monster'):
                        game_state[y+1][x] = 'empty';


                    #Blocked by other occupancy, don't shoot
                    else:
                        pass

            shot_fired = False
            arrow_shot = 'none'

            #Update positions and velocities
            temp_game_state = copy.deepcopy(game_state)
            for i in range(15):
                for j in range(15):
                    if not game_over:
                        sprite = game_state[i][j]
                        if(sprite != 'empty'):
                            sprite.update_pos()

            game_state = copy.deepcopy(temp_game_state)

            knight_x, knight_y = knight_pos
            if(game_state[knight_y][knight_x] != 'empty' and game_state[knight_y][knight_x].name == "knight"):
                game_state[knight_y][knight_x].set_vel(0,0)
            #Update score
            score_surface = pygame.font.Font(None,15).render("Score: " + str(score), True, (5,5,255));
            screen.blit(score_surface, (250,20))

            #Update Screen
            for i in range (15) :
                for j in range(15) :
                    sprite = game_state[i][j]
                    if sprite != 'empty':
                        #screen.blit(sprite.image, (16*sprite.x_pos,16*sprite.y_pos))
                        screen.blit(pygame.image.load(game_path + "images/" + sprite.name + ".png"), (16*sprite.x_pos,16*sprite.y_pos))

            pygame.display.flip()

        else:
            #Paused
            screen.fill((0,0,0))
            text_surface = pygame.font.Font(None, 80).render("PAUSED", True, (255, 0, 0))
            screen.blit(text_surface, (40, 80))
            pygame.display.flip()

    if(not exit_by_button):
        #Ending animation of adding gravestone
        screen.fill(background_color)
        for i in range (15) :
            for j in range(15) :
                sprite = game_state[i][j]
                if sprite != 'empty':
                    #screen.blit(sprite.image, (16*sprite.x_pos,16*sprite.y_pos))
                    screen.blit(pygame.image.load(game_path + "images/" + sprite.name + ".png"), (16*sprite.x_pos,16*sprite.y_pos))

        screen.blit(pygame.image.load(game_path + "images/gravestone.png"), (grave_marker_x*16, grave_marker_y*16))
        score_surface = pygame.font.Font(None,15).render("Score: " + str(score), True, (5,5,255));
        screen.blit(score_surface, (250,20))
        screen.blit(pygame.font.Font(None, 60).render("GAME OVER", True, (255, 0, 0)), (10, 90))
        pygame.display.flip()
        sleep(3)
#airhocky101.py

import RPi.GPIO as GPIO
import random
import pygame
import sys
import time
from pygame.locals import *

BALL_RAD = 6
PADDLE_WIDTH = 12
PADDLE_HEIGHT = 100
SCREEN_WIDTH = 320
SCREEN_HEIGHT = 240
HALF_PADDLE_WIDTH = PADDLE_WIDTH / 2
HALF_PADDLE_HEIGHT = PADDLE_HEIGHT / 2

p1_score = 0
p2_score = 0
p1_velocity = 0
p2_velocity = 0
ball_position = [0,0]
ball_velocity = [0,0]

image_file_path = "/home/pi/Desktop/ECE5725_finalproject/air_hcky/images/"

GPIO.setmode(GPIO.BCM)
GPIO.setup(26, GPIO.IN)
GPIO.setup(16, GPIO.IN)
GPIO.setup(14, GPIO.IN)
GPIO.setup(15, GPIO.IN)

GPIO.add_event_detect(26, GPIO.FALLING, bouncetime = 200)
GPIO.add_event_detect(16, GPIO.FALLING, bouncetime = 200)
GPIO.add_event_detect(14, GPIO.FALLING, bouncetime = 200)
GPIO.add_event_detect(15, GPIO.FALLING, bouncetime = 200)

# New ball spawns at the center of the field with the input direction. If the
# input direction is 1 then spawn to the right, otherwise spawn to the left
def new_ball(dir):
    global ball_position, ball_velocity
    global SCREEN_WIDTH, SCREEN_HEIGHT

    vertical_velocity = random.randrange(1,3)
    horizontal_velocity = random.randrange(2,5)
    ball_position = [SCREEN_WIDTH/2,SCREEN_HEIGHT/2]

    if dir == 0:
        horizontal_velocity = -horizontal_velocity

    ball_velocity = [horizontal_velocity,vertical_velocity]

# Draw a new screen based on the game updates
def draw(screen):
    global paddle1_pos, paddle2_pos, ball_position
    global ball_velocity, p1_score, p2_score
    global image_file_path
    global SCREEN_WIDTH, SCREEN_HEIGHT,PADDLE_WIDTH, PADDLE_HEIGHT
    global HALF_PADDLE_WIDTH, HALF_PADDLE_HEIGHT
    global BALL_RAD

    BLACK = (0,0,0)
    WHITE = (255, 255, 255)
    RED = (255, 0, 0)

    # Fill the screen with black, redraw the paddles, field, banner, etc.
    screen.fill(BLACK)
    pygame.draw.line(screen, WHITE, [SCREEN_WIDTH / 2,0],[SCREEN_WIDTH / 2, SCREEN_HEIGHT], 1)
    pygame.draw.circle(screen, WHITE, [SCREEN_WIDTH//2, SCREEN_HEIGHT//2], 100, 1)

    # Update the paddles' vertical positions
    if p1_velocity < 0:
        if paddle1_pos[1] + p1_velocity > HALF_PADDLE_HEIGHT:
            paddle1_pos[1] += p1_velocity
        else:
            paddle1_pos[1] = HALF_PADDLE_HEIGHT+1

    elif p1_velocity > 0:
        if paddle1_pos[1] + p1_velocity < SCREEN_HEIGHT - HALF_PADDLE_HEIGHT:
            paddle1_pos[1] += p1_velocity
        else:
            paddle1_pos[1] = SCREEN_HEIGHT - HALF_PADDLE_HEIGHT - 1

    if p2_velocity < 0:
        if paddle2_pos[1] + p2_velocity > HALF_PADDLE_HEIGHT:
            paddle2_pos[1] += p2_velocity
        else:
            paddle2_pos[1] = HALF_PADDLE_HEIGHT + 1

    elif p2_velocity > 0:
        if paddle2_pos[1] + p2_velocity < SCREEN_HEIGHT - HALF_PADDLE_HEIGHT:
            paddle2_pos[1] += p2_velocity
        else:
            paddle2_pos[1] = SCREEN_HEIGHT - HALF_PADDLE_HEIGHT - 1

    # Update the position of the ball
    ball_position[0] = ball_position[0] + int(ball_velocity[0])
    ball_position[1] = ball_position[0] + int(ball_velocity[1])

    # Redraw the paddles and the ball
    pygame.draw.circle(screen, WHITE, ball_position, 20, 0)

    pygame.draw.polygon(screen, RED, [[paddle1_pos[0] - HALF_PADDLE_WIDTH, \
        paddle1_pos[1] - HALF_PADDLE_HEIGHT], \
        [paddle1_pos[0] - HALF_PADDLE_WIDTH, \
        paddle1_pos[1] + HALF_PADDLE_HEIGHT], \
        [paddle1_pos[0] + HALF_PADDLE_WIDTH, \
        paddle1_pos[1] + HALF_PADDLE_HEIGHT], \
        [paddle1_pos[0] + HALF_PADDLE_WIDTH, \
        paddle1_pos[1] - HALF_PADDLE_HEIGHT]], 0)

    pygame.draw.polygon(screen, RED, [[paddle2_pos[0] - HALF_PADDLE_WIDTH, \
        paddle2_pos[1] - HALF_PADDLE_HEIGHT], \
        [paddle2_pos[0] - HALF_PADDLE_WIDTH, \
        paddle2_pos[1] + HALF_PADDLE_HEIGHT], \
        [paddle2_pos[0] + HALF_PADDLE_WIDTH, \
        paddle2_pos[1] + HALF_PADDLE_HEIGHT], \
        [paddle2_pos[0] + HALF_PADDLE_WIDTH, \
        paddle2_pos[1] - HALF_PADDLE_HEIGHT]], 0)

    # Check to see if theres a collision on the top or bottom walls
    if int(ball_position[1]) <= BALL_RAD+1:
        ball_velocity[1] = -ball_velocity[1]

    if int(ball_position[1]) >= SCREEN_HEIGHT - BALL_RAD - 1:
        ball_velocity[1] = -ball_velocity[1]

    # Check to see if ball has hit paddle and update accordingly
    if int(ball_position[0]) <= BALL_RAD + PADDLE_WIDTH and \
    int(ball_position[1]) in range(paddle1_pos[1] - HALF_PADDLE_HEIGHT,paddle1_pos[1] + HALF_PADDLE_HEIGHT,1):
        ball_velocity[0] = -ball_velocity[0]
        ball_velocity[0] = ball_velocity[0]*1.01
        ball_velocity[1] = ball_velocity[1]*1.01
    elif int(ball_position[0]) <= BALL_RAD + PADDLE_WIDTH:
        p2_score += 1
        new_ball(True)

    if int(ball_position[0]) >= SCREEN_WIDTH + 1 - BALL_RAD - PADDLE_WIDTH and \
    int(ball_position[1]) in range(paddle2_pos[1] - HALF_PADDLE_HEIGHT, \
        paddle2_pos[1] + HALF_PADDLE_HEIGHT,1):
        ball_velocity[0] = -ball_velocity[0]
        ball_velocity[0] = ball_velocity[0]*1.01
        ball_velocity[1] = ball_velocity[1]*1.01
    elif int(ball_position[0]) >= SCREEN_WIDTH + 1 - BALL_RAD - PADDLE_WIDTH:
        p1_score += 1
        new_ball(False)

    #banner = pygame.image.load\
    #(image_file_path + "banner_air.png").convert()
    #screen.blit(banner,(0, 0))

    # Update the game scores on the banner
    #myfont = pygame.font.Font(None, 50)
    #label1 = myfont.render("P1 Score: " + str(p1_score), 1, BLACK)
    #screen.blit(label1, (60, 16))
    #label2 = myfont.render("P2 Score: " + str(p2_score), 1, BLACK)
    #screen.blit(label2, (550, 16))

# Main function for the  game
def pong_game():
    global paddle1_pos, paddle2_pos, p1_score, p2_score
    global p1_velocity, p2_velocity
    global SCREEN_WIDTH, SCREEN_HEIGHT
    global HALF_PADDLE_WIDTH, HALF_PADDLE_HEIGHT

    # Initialize fps clock
    fps = pygame.time.Clock()

    # Create a new screen instance for the pong game
    window = pygame.display.set_mode((SCREEN_WIDTH, SCREEN_HEIGHT), 0, 32)

    # Initialize the paddle positions, scores, and create a new ball
    paddle1_pos = [HALF_PADDLE_WIDTH - 1,SCREEN_HEIGHT/2]
    paddle2_pos = [SCREEN_WIDTH +1 - HALF_PADDLE_WIDTH,SCREEN_HEIGHT/2]

    p1_score = 0
    p2_score = 0

    if random.randrange(0,2) == 0:
        new_ball(True)
    else:
        new_ball(False)

    done = 0

    while not done:
        # On every iteration of main while loop, redraw screen
        draw(window)
        if(GPIO.input(26) == 0):   #P1 down
            p1_velocity = -5
        if(GPIO.input(16) == 0):   #P1 up
            p1_velocity = 5
        if(GPIO.input(14) == 0):    #P2 down
            p2_velocity = -5
        if(GPIO.input(15) == 0):    #P2 up
            p2_velocity = 5
        if(GPIO.input(26) == 1 and GPIO.input(16) == 1):
            p1_velocity = 0
        if(GPIO.input(14) == 1 and GPIO.input(15) == 1):
            p2_velocity = 0

        pygame.display.update()

        # Evaluate end game condition to see if game is over
        win_val = 4
        if p1_score >= win_val or p2_score >= win_val:
            # If game is over,display winner text
            #font = pygame.font.Font(None,100)
            #game_over = font.render("GAME OVER", 1,(255,255,255))
            #if p1_score >= win_val:
               # score_text = font.render("P1 Wins!", 1,(255,255,255))
           # elif p2_score >= win_val:
               # score_text = font.render("P2 Wins!", 1,(255,255,255))

            # Fill the window and blit/display text
            window.fill((0,0,0))
            window.blit(game_over, (200, 50))
            window.blit(score_text, (260, 125))
            pygame.display.flip()

            # Wait for player to press Start or enter to go back to main screen
            while(1):
                # Get the next event
                e = pygame.event.wait()
                try:
                    if e.type == 22:
                        break
                    elif e.key == pygame.K_RETURN:
                        break
                except:
                    pass
            return

        # Tick the clock
        fps.tick(60)

pong_game()