ECE 5725 Final Project
Music Robot
Shengfeng Tang st825 & Chen Yu cy436
May 2017
Introduction
The goal of this project is building a robot, which can dance with the rhythm, and showing a flowing wave of the music. By using the Raspberry Pi as the controller, we designed and built a six levels LED strip panel using 120 LEDs to show a dynamic moving music waveform. By using these LEDs, we shown music wave with different colors, which depended on the frequency spectrum. At the same time, we used frequency and amplitude of music to decide what kind of movements and how fast is the speed should our robot dance.
Objective
Build a music robot, which constructed by several steps:
1) Extract and show music wave from WAV.file, then play the music
2) Analyze it to get dominating frequency as well as amplitude
3) Using LED strips to show frequency spectrum with various colors
4) Establish robot movement policy to move with frequency and amplitude
Design & Testing
1. System Setup
1) Neopixel LED strip:
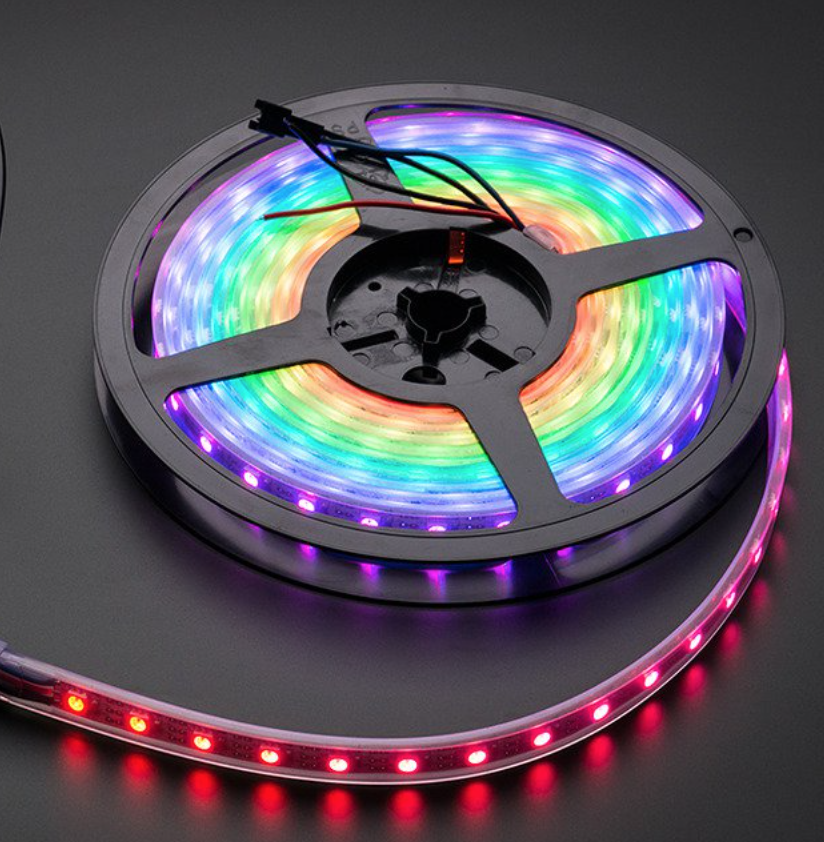
Figure 1 LED strip
The advantage of these neopixel LED strip is that they are programmable. We can control each LED in the strip individually since each LED has its own address. At the same time, we can set the color of each LED’s red, green and blue component with 8-bit PWM precision, which means 24-bit color per pixel. The LEDs are controlled by shift-registers that are chained up down the strip like following:

Figure 2. WS2812 LED
Only 1 digital output pin are required to send data (DO pin) down and receive data (DI pin). The PWM is built into each LED-chip so once we set the color we can stop talking to the strip and it will continue to PWM all the LEDs for us.
During we using this strip, we encountered a problem with GPIO pin 18. Since the python rpi_ws281x library is using the PWM module (GPIO 18) to drive the data line of the neopixels, which unfortunately conflicts with the built-in audio hardware which uses that same GPIO 18 to drive the audio output, we created a kernel module blacklist file to prevents all the sound drivers from loading by using the codes in Appendix file blacklist-rgb-matrix.conf.
2) USB audio adapter:
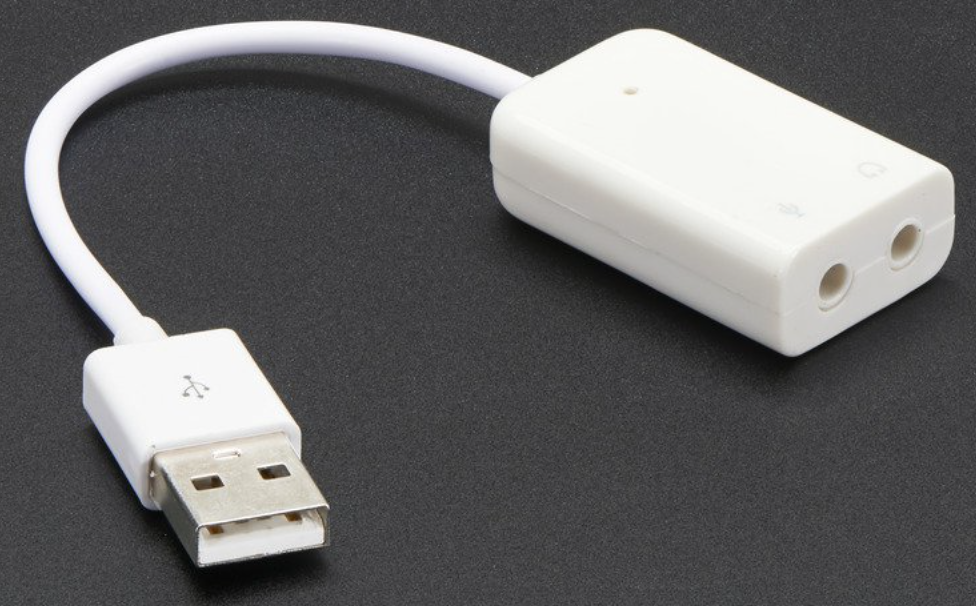
Figure 3. USB adapter
As we mentioned above, we disabled Raspberry Pi’s built-in audio hardware because of the conflicts with our LED strip. We decided to use a USB audio card to play our music instead of on-board audio jack. At the same time, USB audio card can greatly improve the sound quality and volume, which can provide us a better audio experience, because on-board audio generated by a PWM output and is minimally filtered.
3) 74AHCT125 level converter:
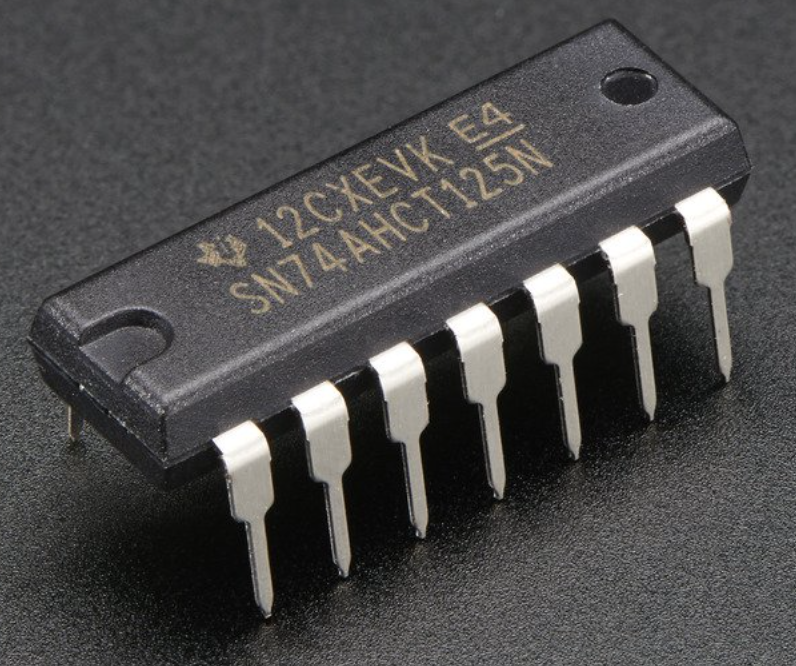
Figure 4. Level converter
Level shifting chips let us connect 3V and 5V devices together safely. By using this property, we can convert the Pi’s GPIO from 3.3v up to about 5V for the NeoPixel to read since a 5V voltage need to transmit the signal for data in and data out pin. Also, the reason why we choose a level converter chip like the 74AHCT125 is that it will convert the Pi’s 3.3V output up to 5V without limiting the power drawn by the NeoPixels. The following is how we connect Raspberry Pi, level converter and LED strip together:
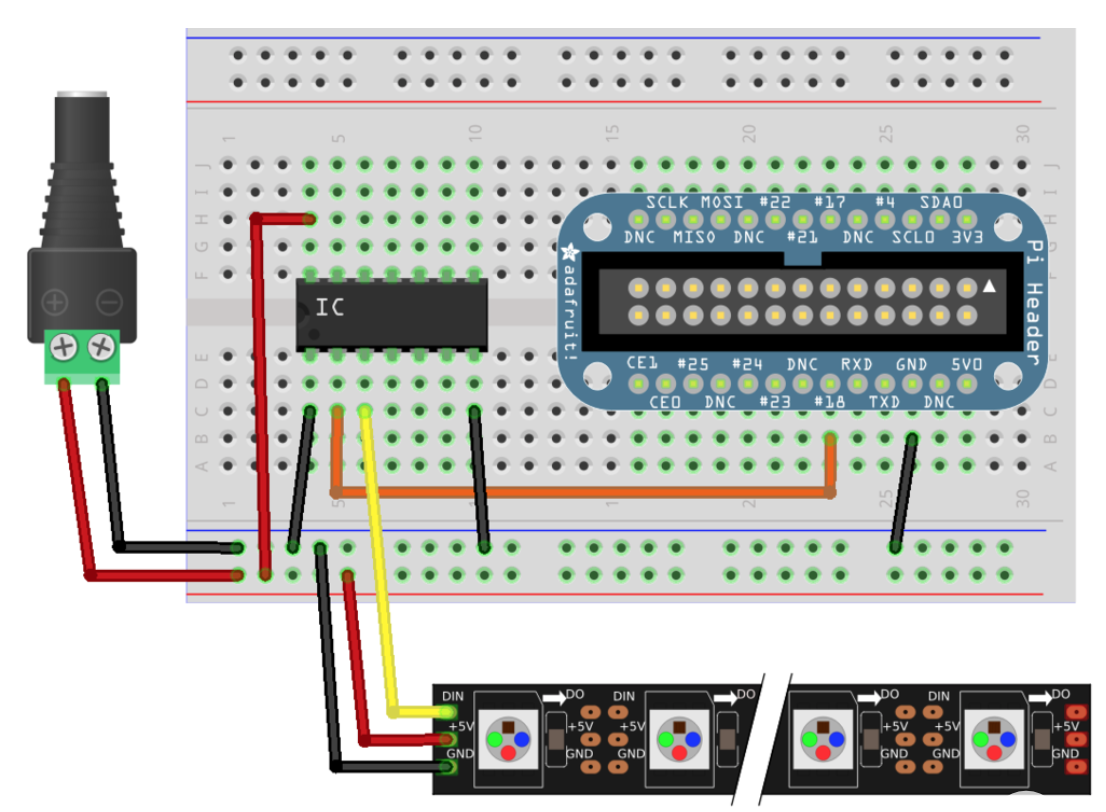
Figure 5. Circuit wiring
4) Non-Isolated switching regulator DC-DC:
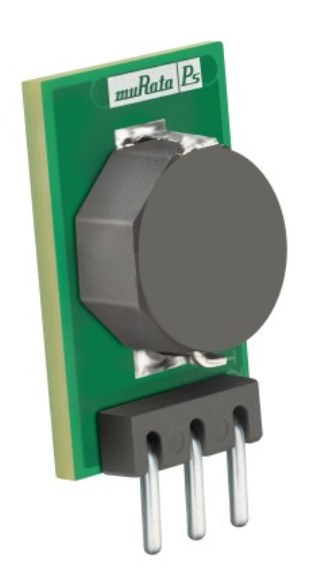
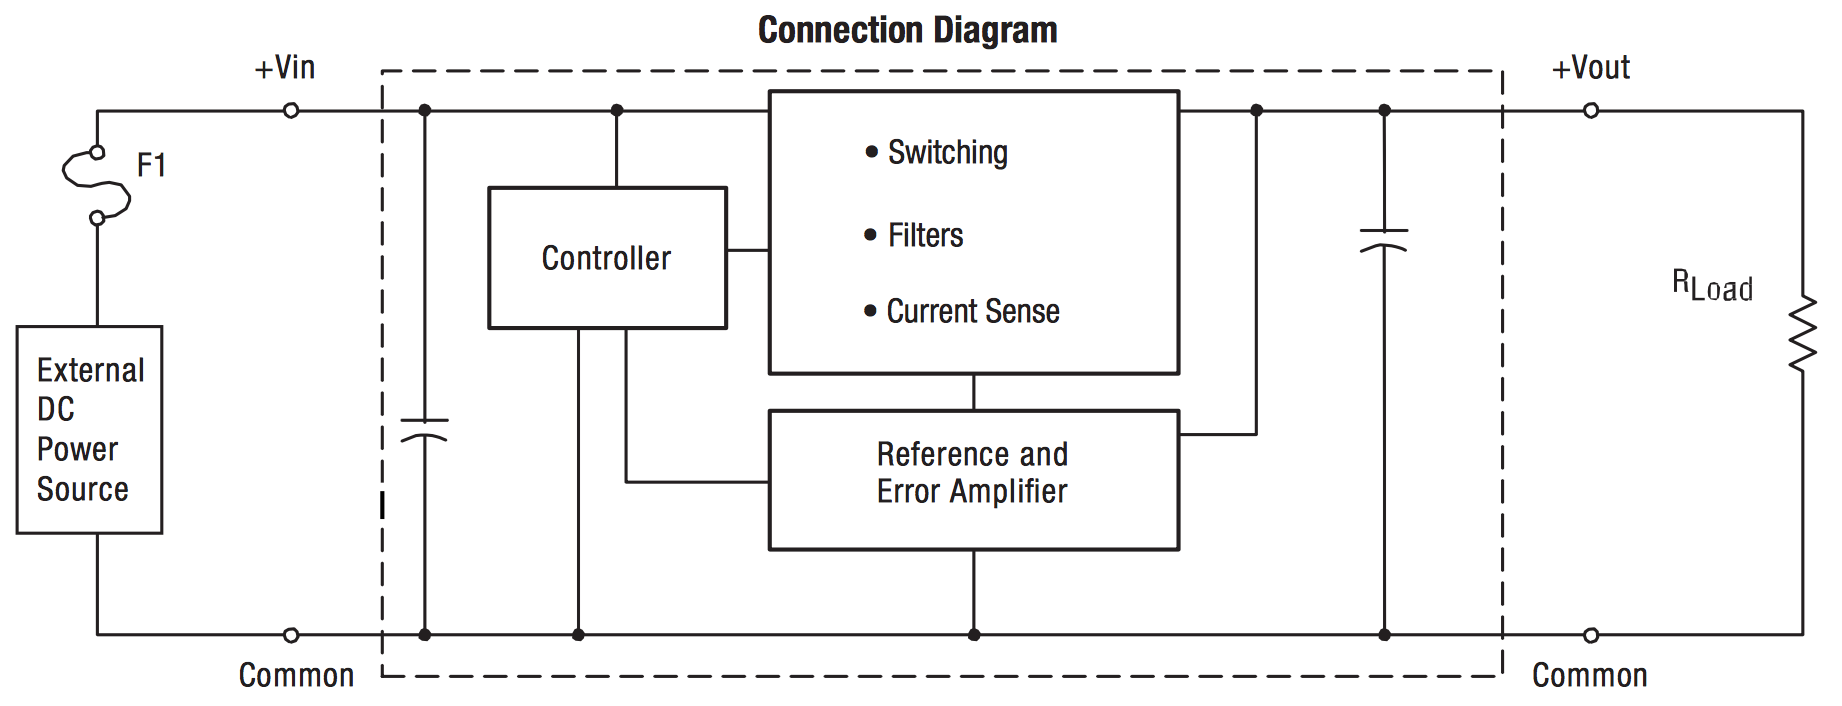
Figure 6. OKI-78SR regulator and datasheet
The OKI-78SR series are non-isolated switching regulator (SR) DC-DC power converters for embedded applications. Three nominal output voltages are offered (3.3, 5 and 12 VDC), up to 1.5 Amp maximum output. The 3.3 and 5 Vout models have an ultra wide input range of 7 to 36 Volts DC.
During the project, we found that 5V input give us the most stable LED flowing wave. While we are using 4 brand new AA battery, which provide 6V input, the LED strip will have some shaking blink. If we have voltage around 4V or lower, the color of LED will change since we cannot provide enough current. Therefore, we need this regulator (SR) to output a relatively stable 5V to our LED strip.
5) Parallax Standard Servo:
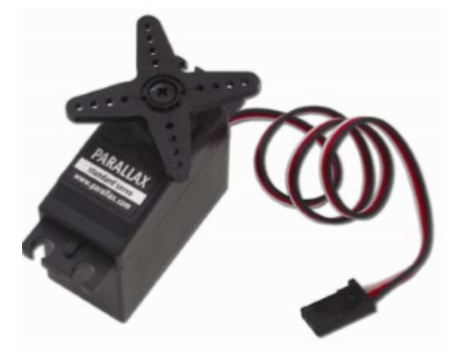
Figure 7. Servo motor
We use servo as motor to provide mechanical energy to robot in order to make robot move.
The servo is controlled by PWM signal. The center point, which PWM keeps servo from moving, is a 1.5ms pulse every 20ms. To control the movement speed, we just need to control the length of that pulse every 20ms. If length > 1.5ms, servo move clockwise, and vice versa. There is an upper limit of servo, and we call that full speed which occurs when the pulse width is 2.25ms. In python, we control the servo movement by adjust the duty cycle, which equals pulse width divided by the sum of pulse width and 20ms.
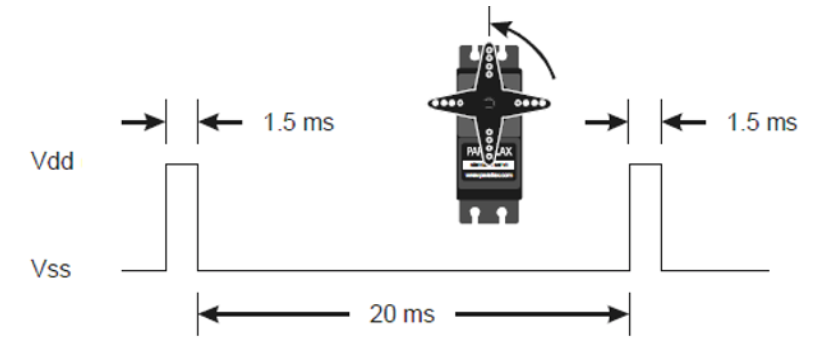
Figure 8. Servo PWM signal
2. Wave extract
For the wave extract, we utilized the wave library to get the wav.file information, such as, number of audio channels, sampling frequency, number of audio frames, etc. Then, we read music wave from number of audio frames.
As for how we deal with these wave frames, we need to talk more about our wave information cube. The following table are the basic structure of our cube:
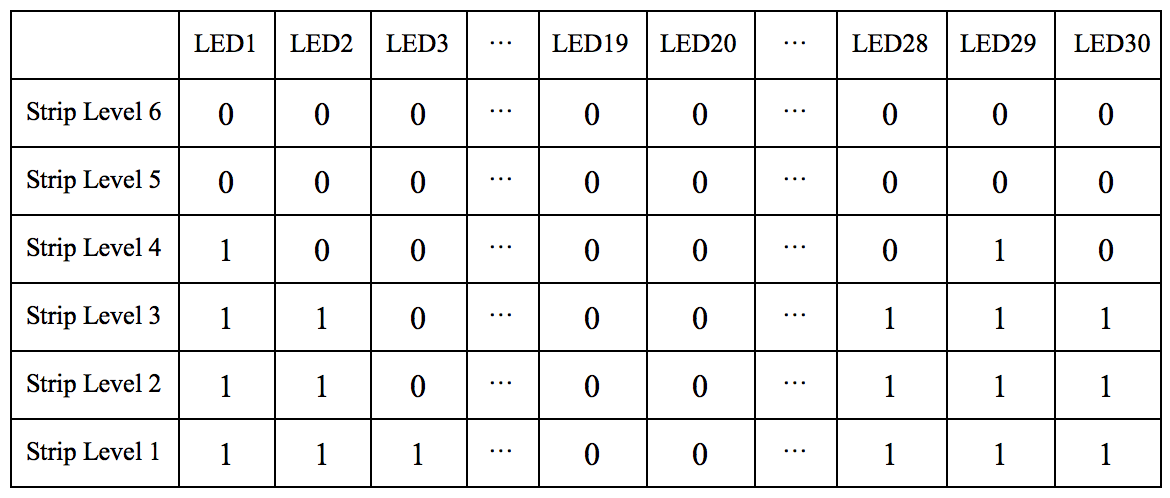
In the table, row represents the strip level in the LED strip panel and ‘0’/‘1’ represents LED on and off. We know in each row, we will have 20 LEDs. So the first 20th LEDs are the current wave, which is showing on LEDs now, the following 10 LEDs are buffered in the cube waiting for display. Also, each LED column is the average wave shape for 0.2 second. Therefore, the total LED strip panel shows 4 seconds waveform of the music.
During the experiment, every 2 seconds, we took out the number of frames in this duration of time and divided it to 10 small sections. For each small section, we found out the average wave amplitude and stored it in a template array. Then, we updated the cube by removing first 10 LED information out and inserting 10 template LED information cube at the end of cube. At the same time, every 0.2 second, we will refresh the LEDs’ states to make the waveform move one slot ahead. In this way, our waveform looks like moving forward on the LED strip panel.
3. Fast Fourier Transform (FFT):
As mentioned above, we analyzed wave data every 2s and separated it into 10 sections. At the beginning we tried to get frequency directly by using numpy.fft.fft command on 10 extracted wave data, each representing 0.2s wave data. The frequency values we got starting from 1kHz to hundreds of kHz, which is impossible as what Nyquist points out, the maximum frequency could only be a half of sampling frequency, where the sampling frequency of our wave data is well defined to be 44.1kHz, which means there’s no way to get a frequency over 22kHz. Then we realized that we have made a mistake that what the numpy.fft.fft returns was not frequency itself but power spectrum of frequency.
Therefore, we compared the numpy.fft.fft result with the frequency space, when we found out the maximum power spectrum, the dominating frequency is the frequency corresponding to that maximum fft value in power spectrum. In this time, the frequency range was strictly less than 6kHz and generally less than 1kHz. As I listened to the music and compared my personal feeling with sampling 1kHz frequency sound as well as 100Hz sound, I felt the result from that FFT analysis is reasonable.
As the result, guided by the same high level design idea, we have 10 dominating frequency every 2s which representing the frequency of every 0.2s sound wave for next 2s.
4. Color selection:
After we got the dominating frequency from Fourier Transform, we found the maximum and minimum dominating frequency in that 2 seconds duration. Then, we divided the frequency difference between maximum and minimum frequency to seven ranges. For each range, we assigned a unique color for the frequency in that range. The following is the rule between frequency and color:
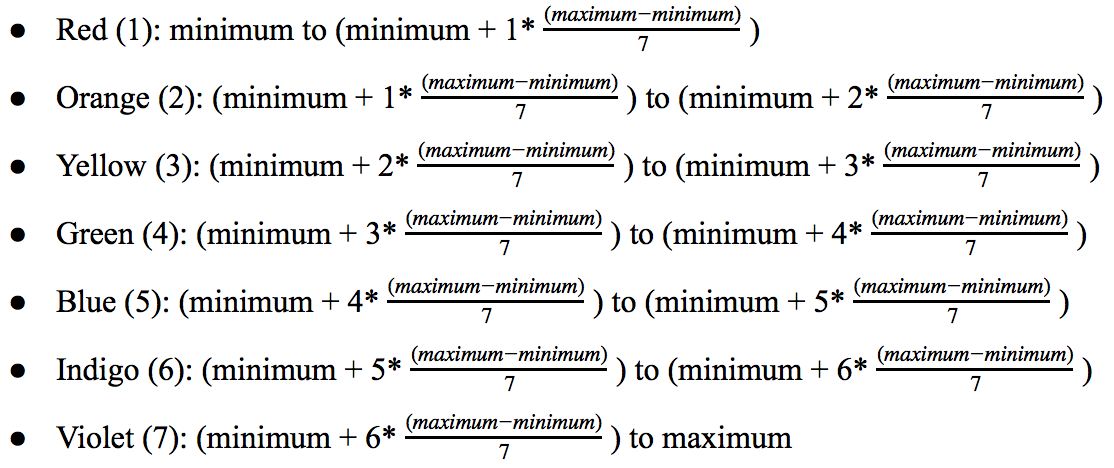
As for the number behind each label, we used these numbered labels in our wave information cube to help our strip library to set the color of each column LEDs. Therefore, our new wave information cube is as following:
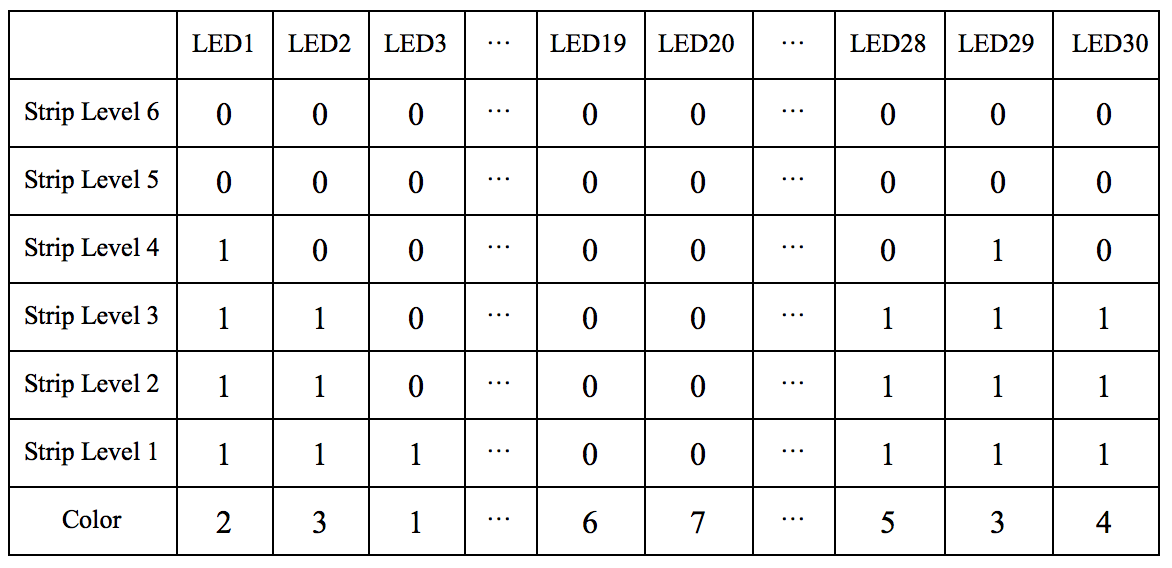
Finally, as the table provided above, each column of LEDs will have their own color and amplitude shown on LED strip panel.
5. Movement control:
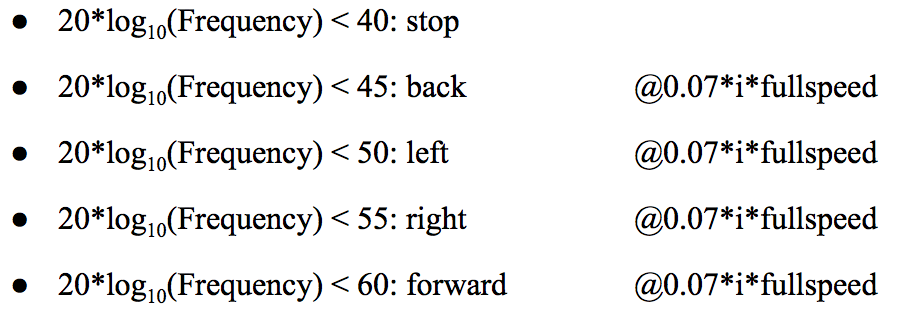
We want the robot to move depending on low frequency signal more because generally low frequency sound such as drum beating works more important in rhythm control. Therefore, from the given dominating frequency and corresponding amplitude, we splitted it into two parts first: low frequency (20*log(frequency) < 60) and high frequency part (20*log(frequency) > 60).
The reason for why I classified the frequency in log function instead of linearity, is that when I tried 1kHz and 2kHz sampling frequency sound, I found there’s little difference between them by manual detection while the difference between 100Hz and 200Hz sounds like a clear gap. As the result, I realized that when people hearing sound and trying to tell which one is high and which one is low, people generally convert unit in Hz to dB first and then compare, and it sounds like nature.
In low frequency part, the movement direction is determined by frequency. From the lowest to 60dB, the movement directions are in order: stop, back, left, right and forward. The movement speed is controlled by the WAVE amplitude. The higher amplitude, the higher moving speed. In addition, there is an upper limit for moving speed in low frequency region because I want to tell difference between low frequency region and high frequency region resolution. The limit is slightly less than half of the full speed of servo(motor).
In high frequency part, the directions are left, right and forward. The speed level is set directly to full speed. In practice, the classification follows the rule:( i means amplitude integer level,min = 0 and max=6)
Low frequency:
High frequency:

Results
Although there were some problems happened during project so often, finally we successfully solved these problems. Generally, we make the robot work as expected. It delivers a good visual and audio performance. Multiple processing improve the cores efficiency and robot performance and the processor distribution is still reasonable because totally Rpi has 4 cores and we only call 3 multiple processes.
Here is two videos to give you an impression about what our music robot looks like.
Music Robot Demo
Music Robot Demo 2
Conclusion
During this project, we explored how to use external library on Raspberry Pi, how allocate tasks to different CPU cores and so on. The most important is that all our planned work and proposed functions has been finished at the end of the project and all the function has been proved to be functional. We really enjoy the process of the project.
Future work
On the other hand, we still have potential to enhance the performance of the robot.
1)Since the computation time caused by different processes are different, even the time cost is very low, it accumulates throughout the music and make some influence to worsen the performance of the robot. We could quantitatively get how these three processes cost in execution time, and balancing it by adjust refresh time.
2) Add more components such as arms to give the dancing movement more diversity, in order to improve the visual performance.
3) Change the USB adapter into a wireless component to connecting speakers or combined speaker on the robot, which make the robot outlines clear and better speaker location somehow improve both the visual and audio performance.
Contribution
Shengfeng Tang:
· Hardware design
· Basic project structure design
· Waveform display
· Color of waveform selection
· Debugging and testing
· Webpage design
· Project report
Chen Yu:
· Hardware design
· Basic project structure design
· FFT extraction and analysis
· Robot movement design
· Debugging and testing
· Project report
Cost
| Part | Unit Price | Quantity | Total Price |
| Breadboard | $3.00 | 2 | $6.00 |
| Neopixel 120 LED strip | $15.00 | 1 | $15.00 |
| USB audio adapter | $8.00 | 1 | $8.00 |
| 74AHCT125 converter | $1.50 | 2 | $1.50 |
| Non-Isolated regulator | $4.00 | 1 | $4.00 |
| Total | $34.50 |
References
[1] NeoPixels on Raspberry P
https://learn.adafruit.com/neopixels-on-raspberry-pi/overview
[2] LED - SMD RGB (WS2812) Datasheet
http://cdn.sparkfun.com/datasheets/Components/LED/WS2812.pdf
[3] 74AHCT125 - Quad Level-Shifter (3V to 5V) - 74AHCT125
https://www.adafruit.com/product/1787
[4] Userspace Raspberry Pi PWM library for WS281X LEDs
https://github.com/jgarff/rpi_ws281x
[5] Neopixel on Raspi 3
https://www.raspberrypi.org/forums/viewtopic.php?f=29&t=151460
[6] USB Audio Cards with a Raspberry Pi
https://learn.adafruit.com/usb-audio-cards-with-a-raspberry-pi
[7] ECE 5725 Lab 3 Instruction Note
[8] Parallax Continuous Rotation Servo Motor Datasheet
https://www.parallax.com/sites/default/files/downloads/900-00008-Continuous-Rotation-Servo-Documentation-v2.2.pdf
[9] OKI-78SR Serier Datasheet
http://power.murata.com/datasheet?/data/power/oki-78sr.pdf
Code Appendix
Thanks
We'd like to thank our professor Joseph Skovira for his advice and help not only for project and lab but also teach us how to logically plan and design the project. And We also want to thank our TAs, Jacob George and Steven (Dongze) Yue.
Contact
Shengfeng Tang: st825@cornell.edu
Chen Yu: cy436@cornell.edu