PiSpeed Camera
A Project by Chenxi Qian and Kuan Lu
Demonstration Video
Introduction
Driving around Ithaca is challenging due to the narrow streets with steep slopes and sharp turns. Speed limitation is a good way to ensure safe driving under such road conditions. This PiSpeed Camera project intends to implement a device that can be placed at the roadside measuring the speed of passing vehicles. The project used Raspberry Pi 4 to be the microcontroller; two ultrasonic sensors to measure and calculate the speed of cars, and a Raspberry Pi Camera to capture an image of the license plate. The OpenCV library was used to process the captured image to crop the area of the license plate. Finally, optical character recognition (OCR) was used to transform the image into text information. A local server on Raspberry Pi was also set up so that the detected history over a speeding car with its license plate can be displayed on a website.
Project Objective
- Measure the speed of a moving car.
- Capture the image of a moving car using a Raspberry Pi Camera.
- Process the captured image using OpenCV to only preserve the license part.
- Recognize the license text using OCR.
- Set up the local server and database on Raspberry Pi.
- Create a website and display information.
Design and Testing
- Big Picture
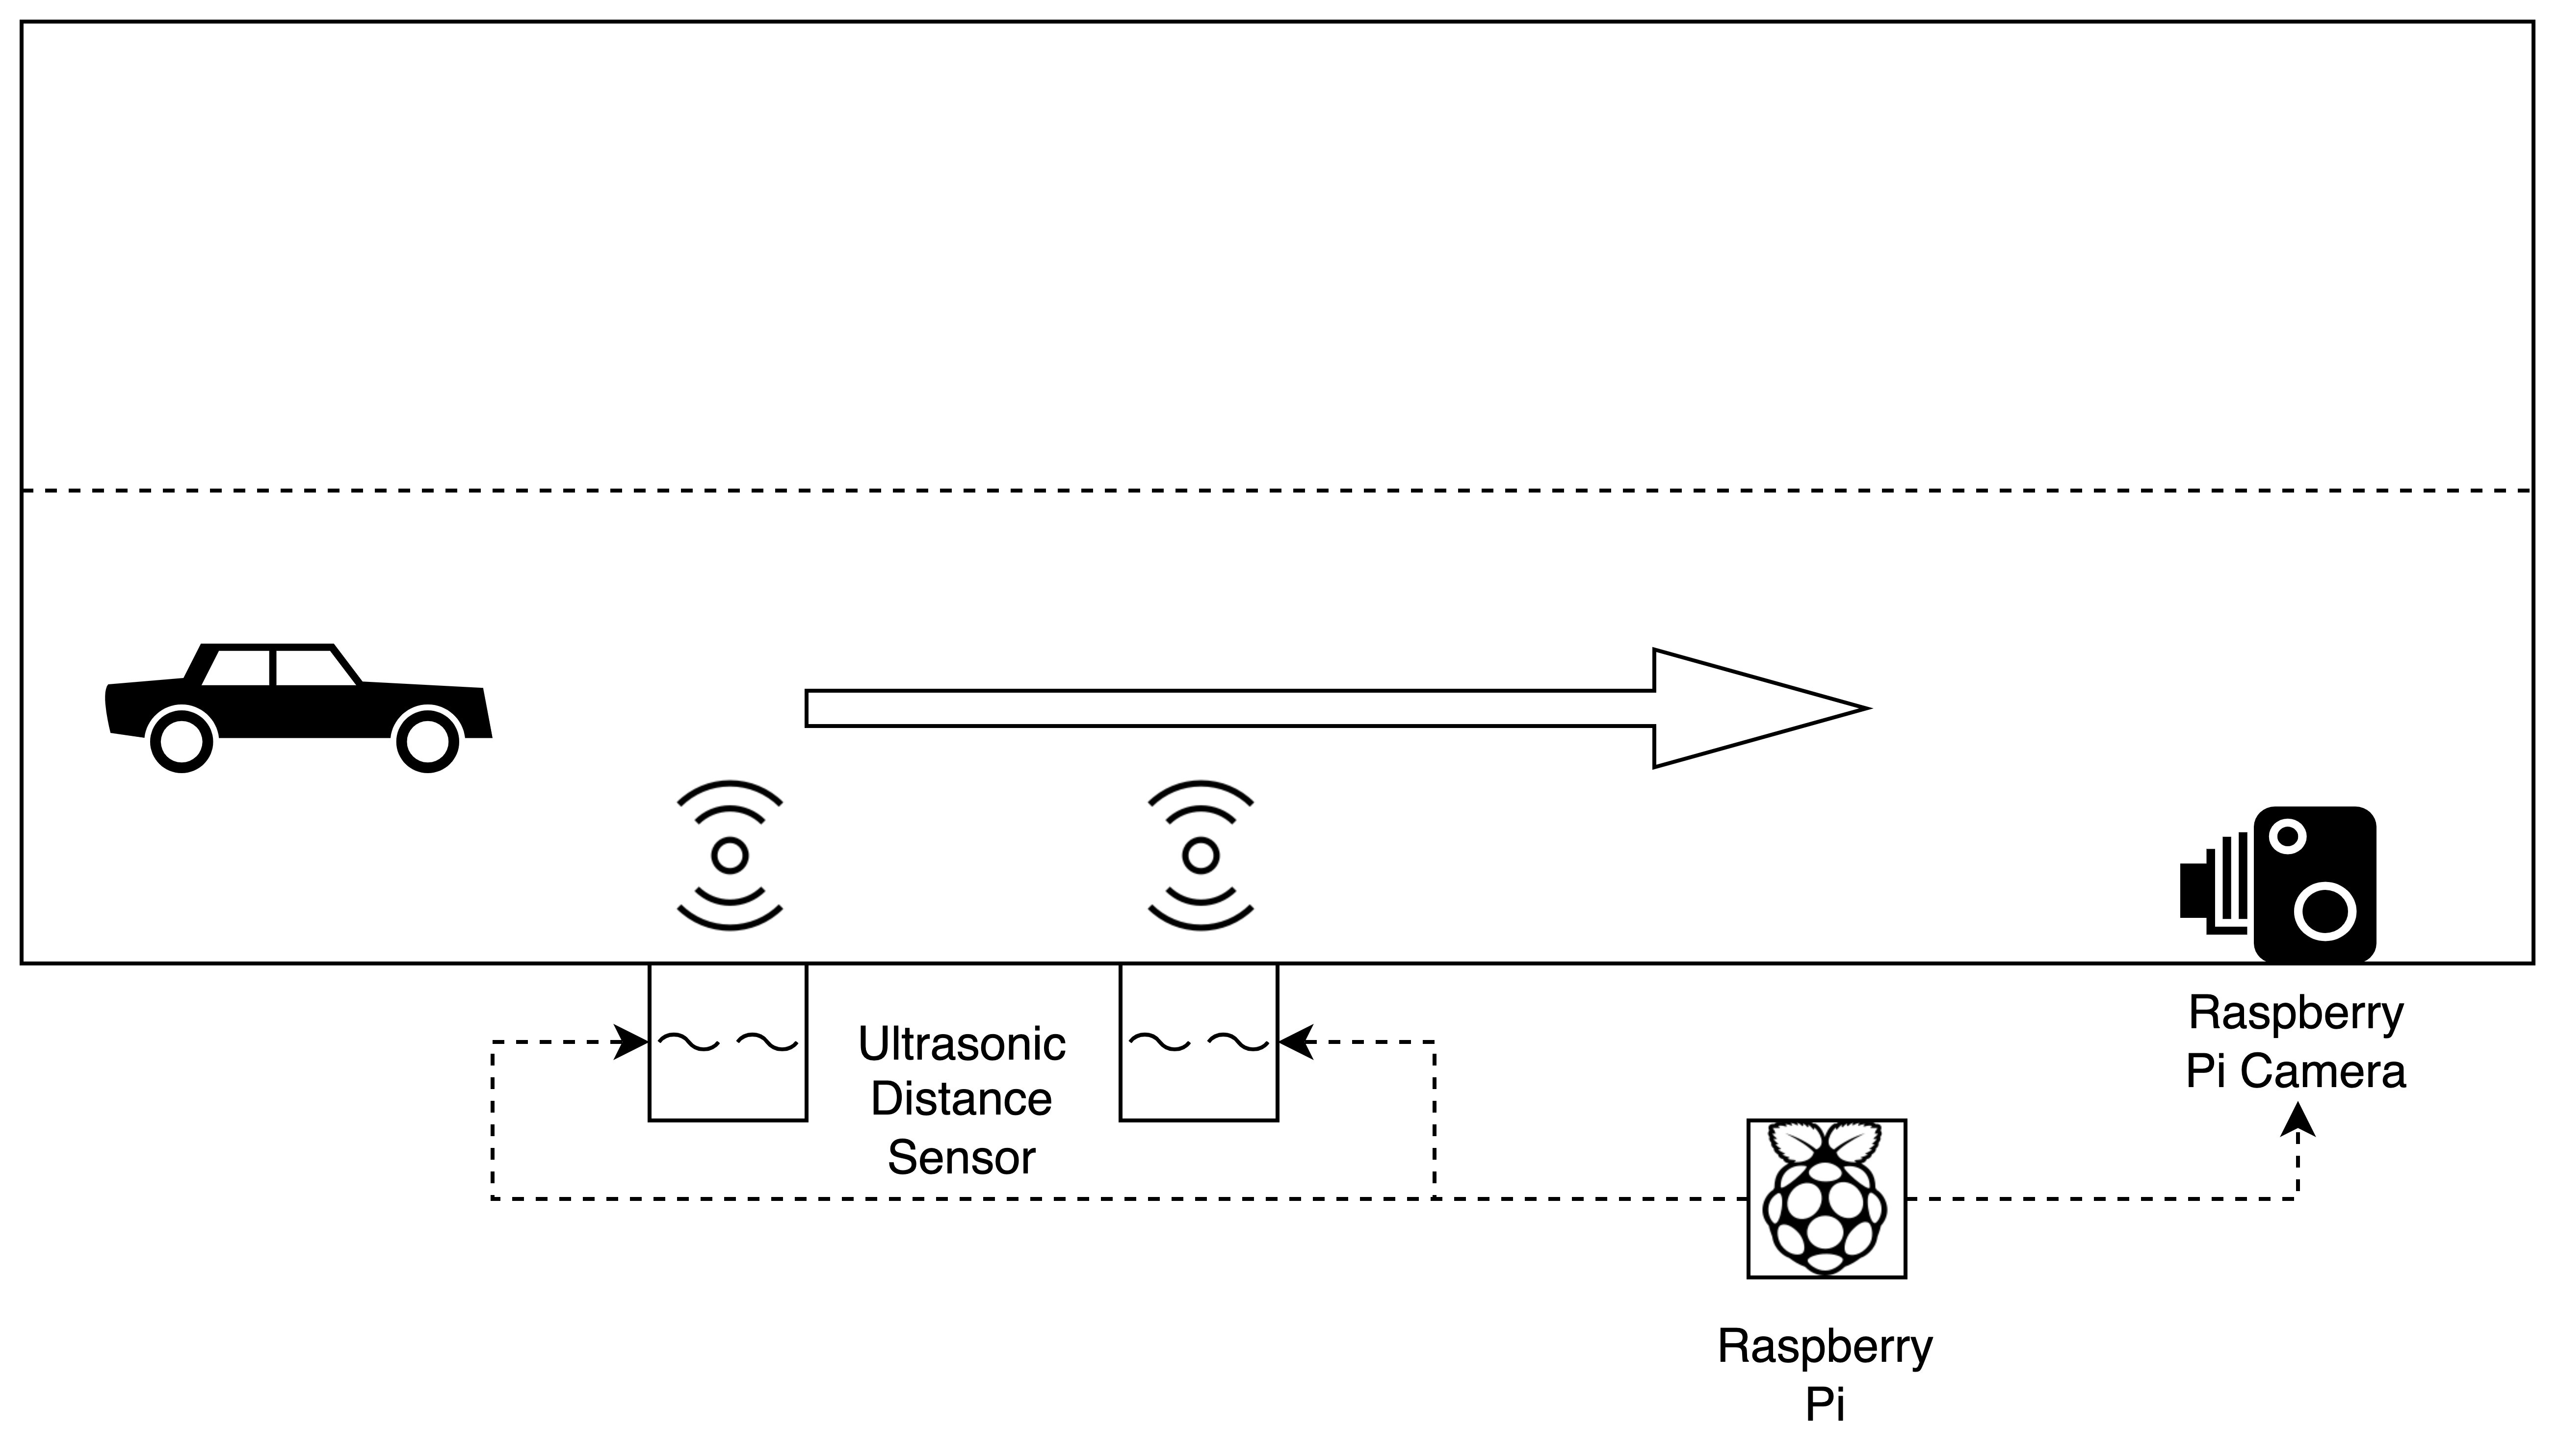
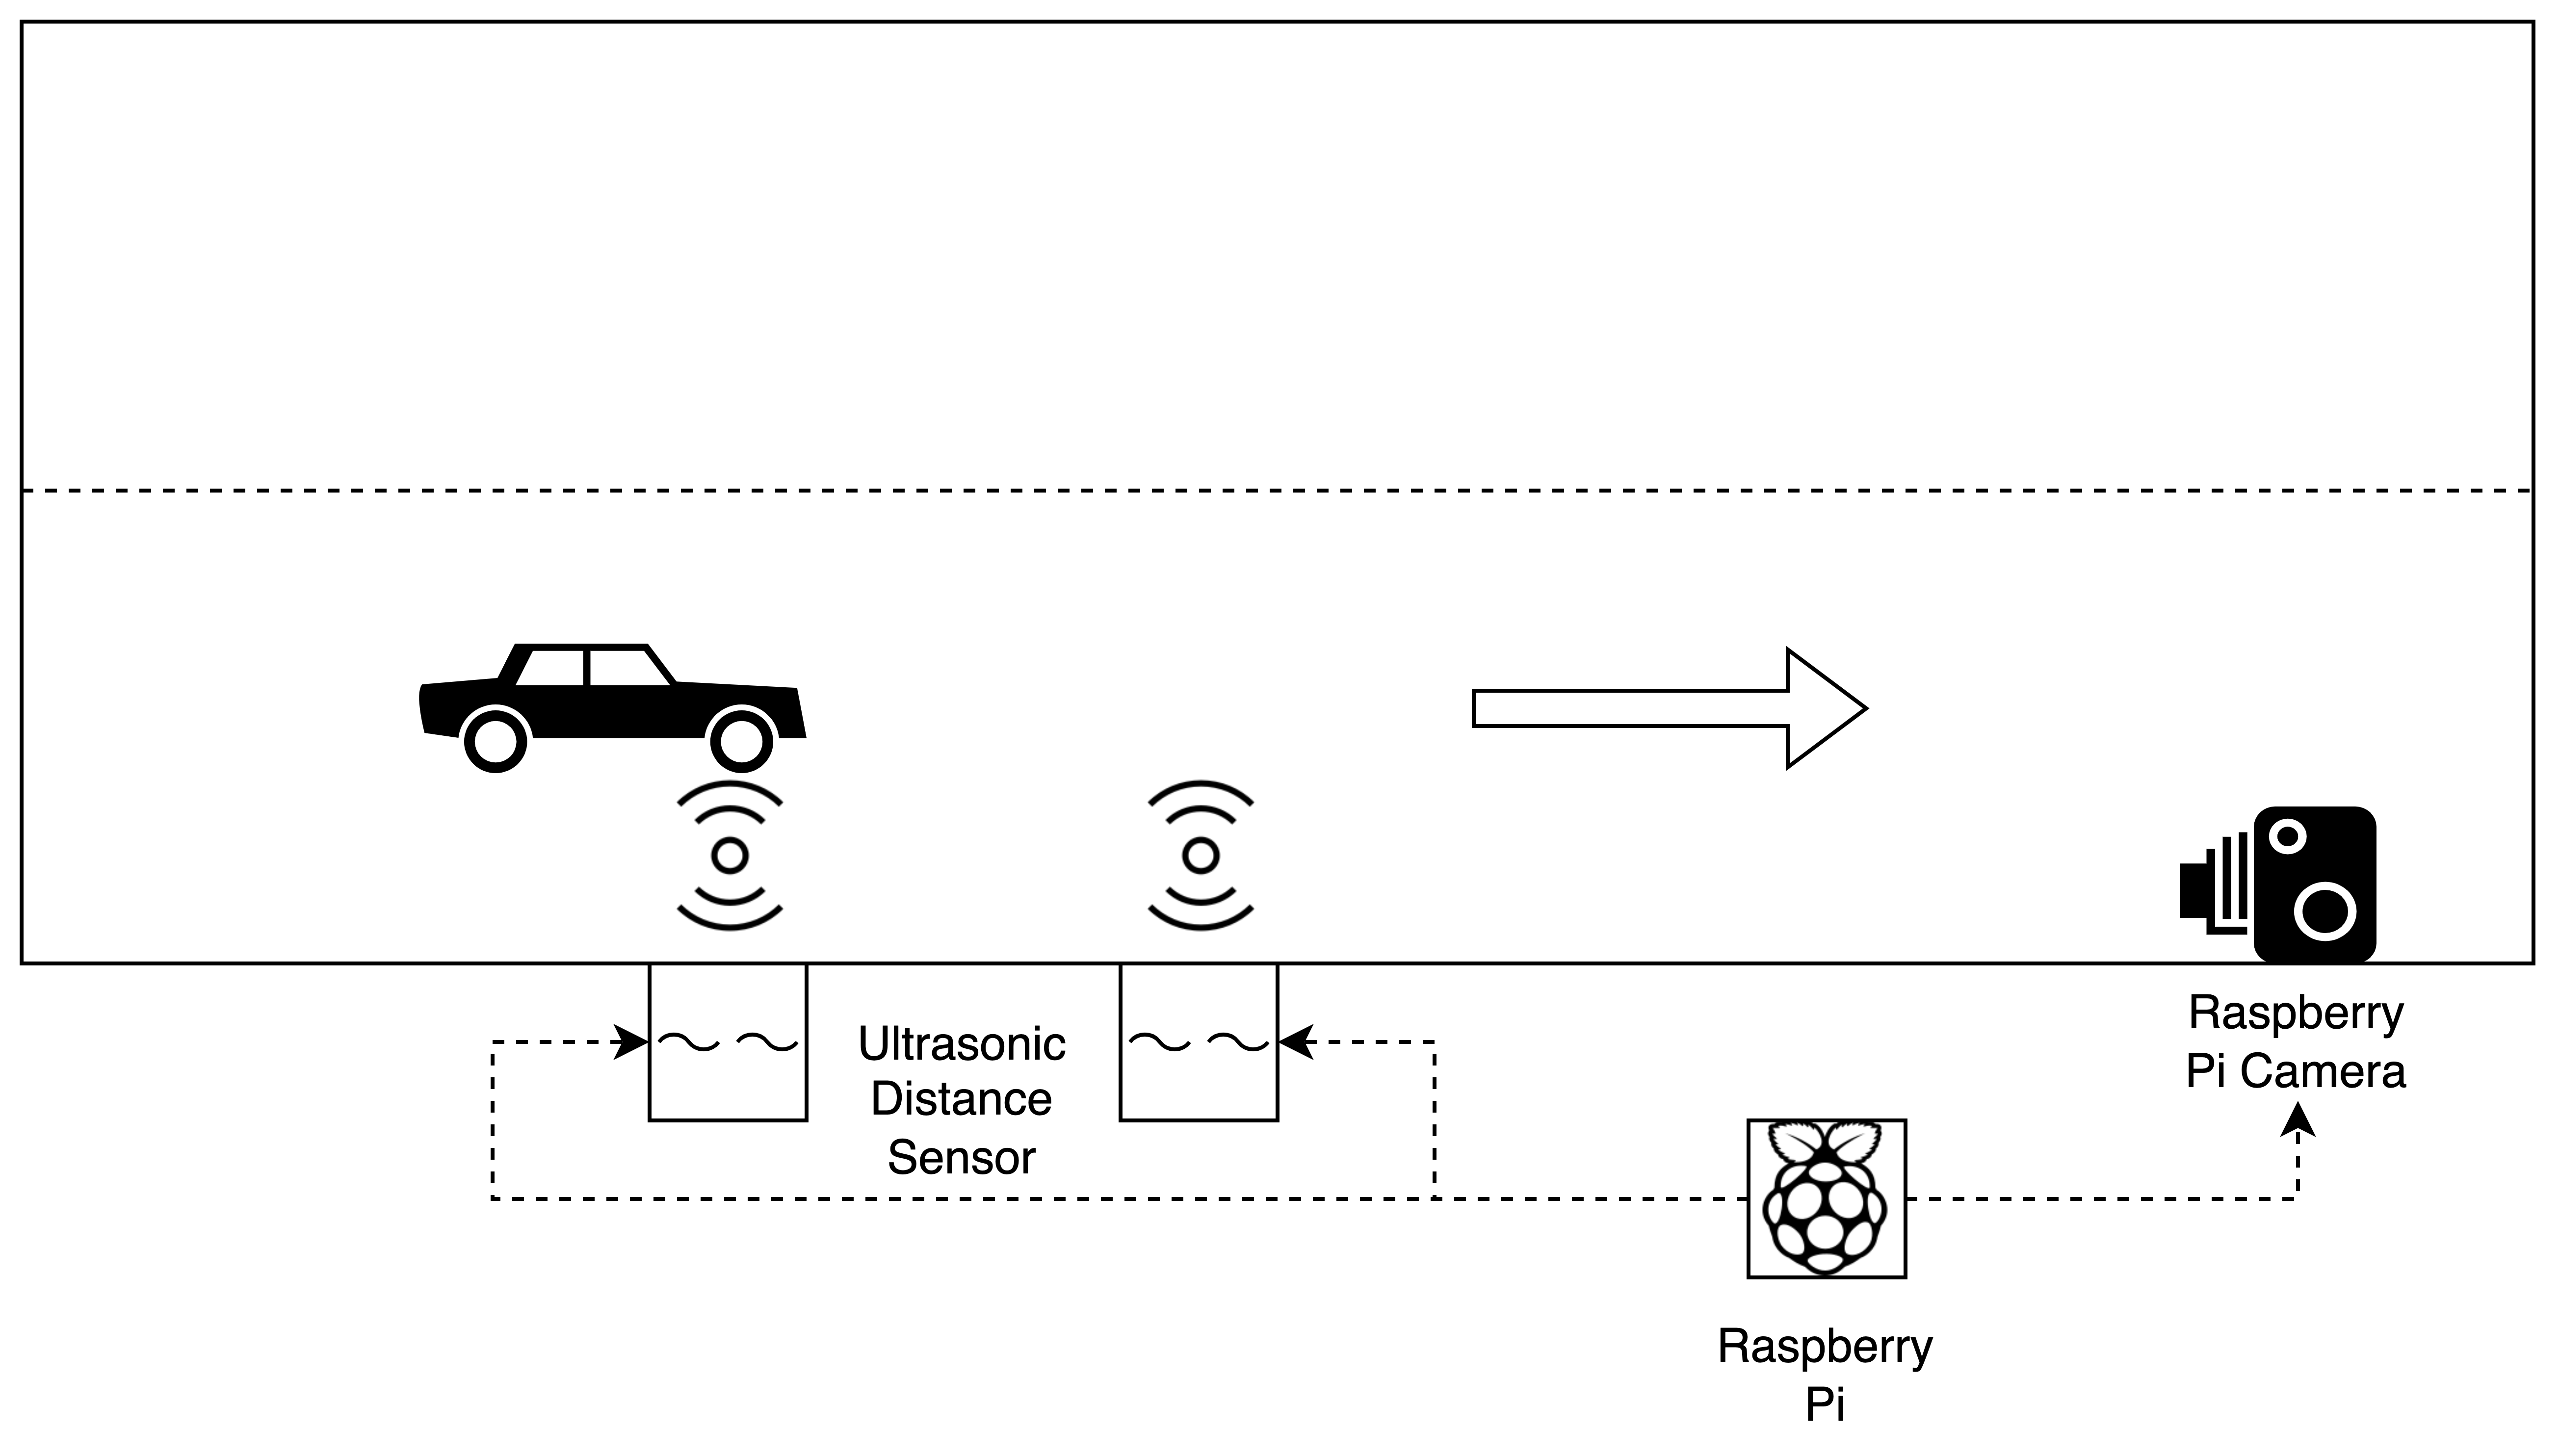
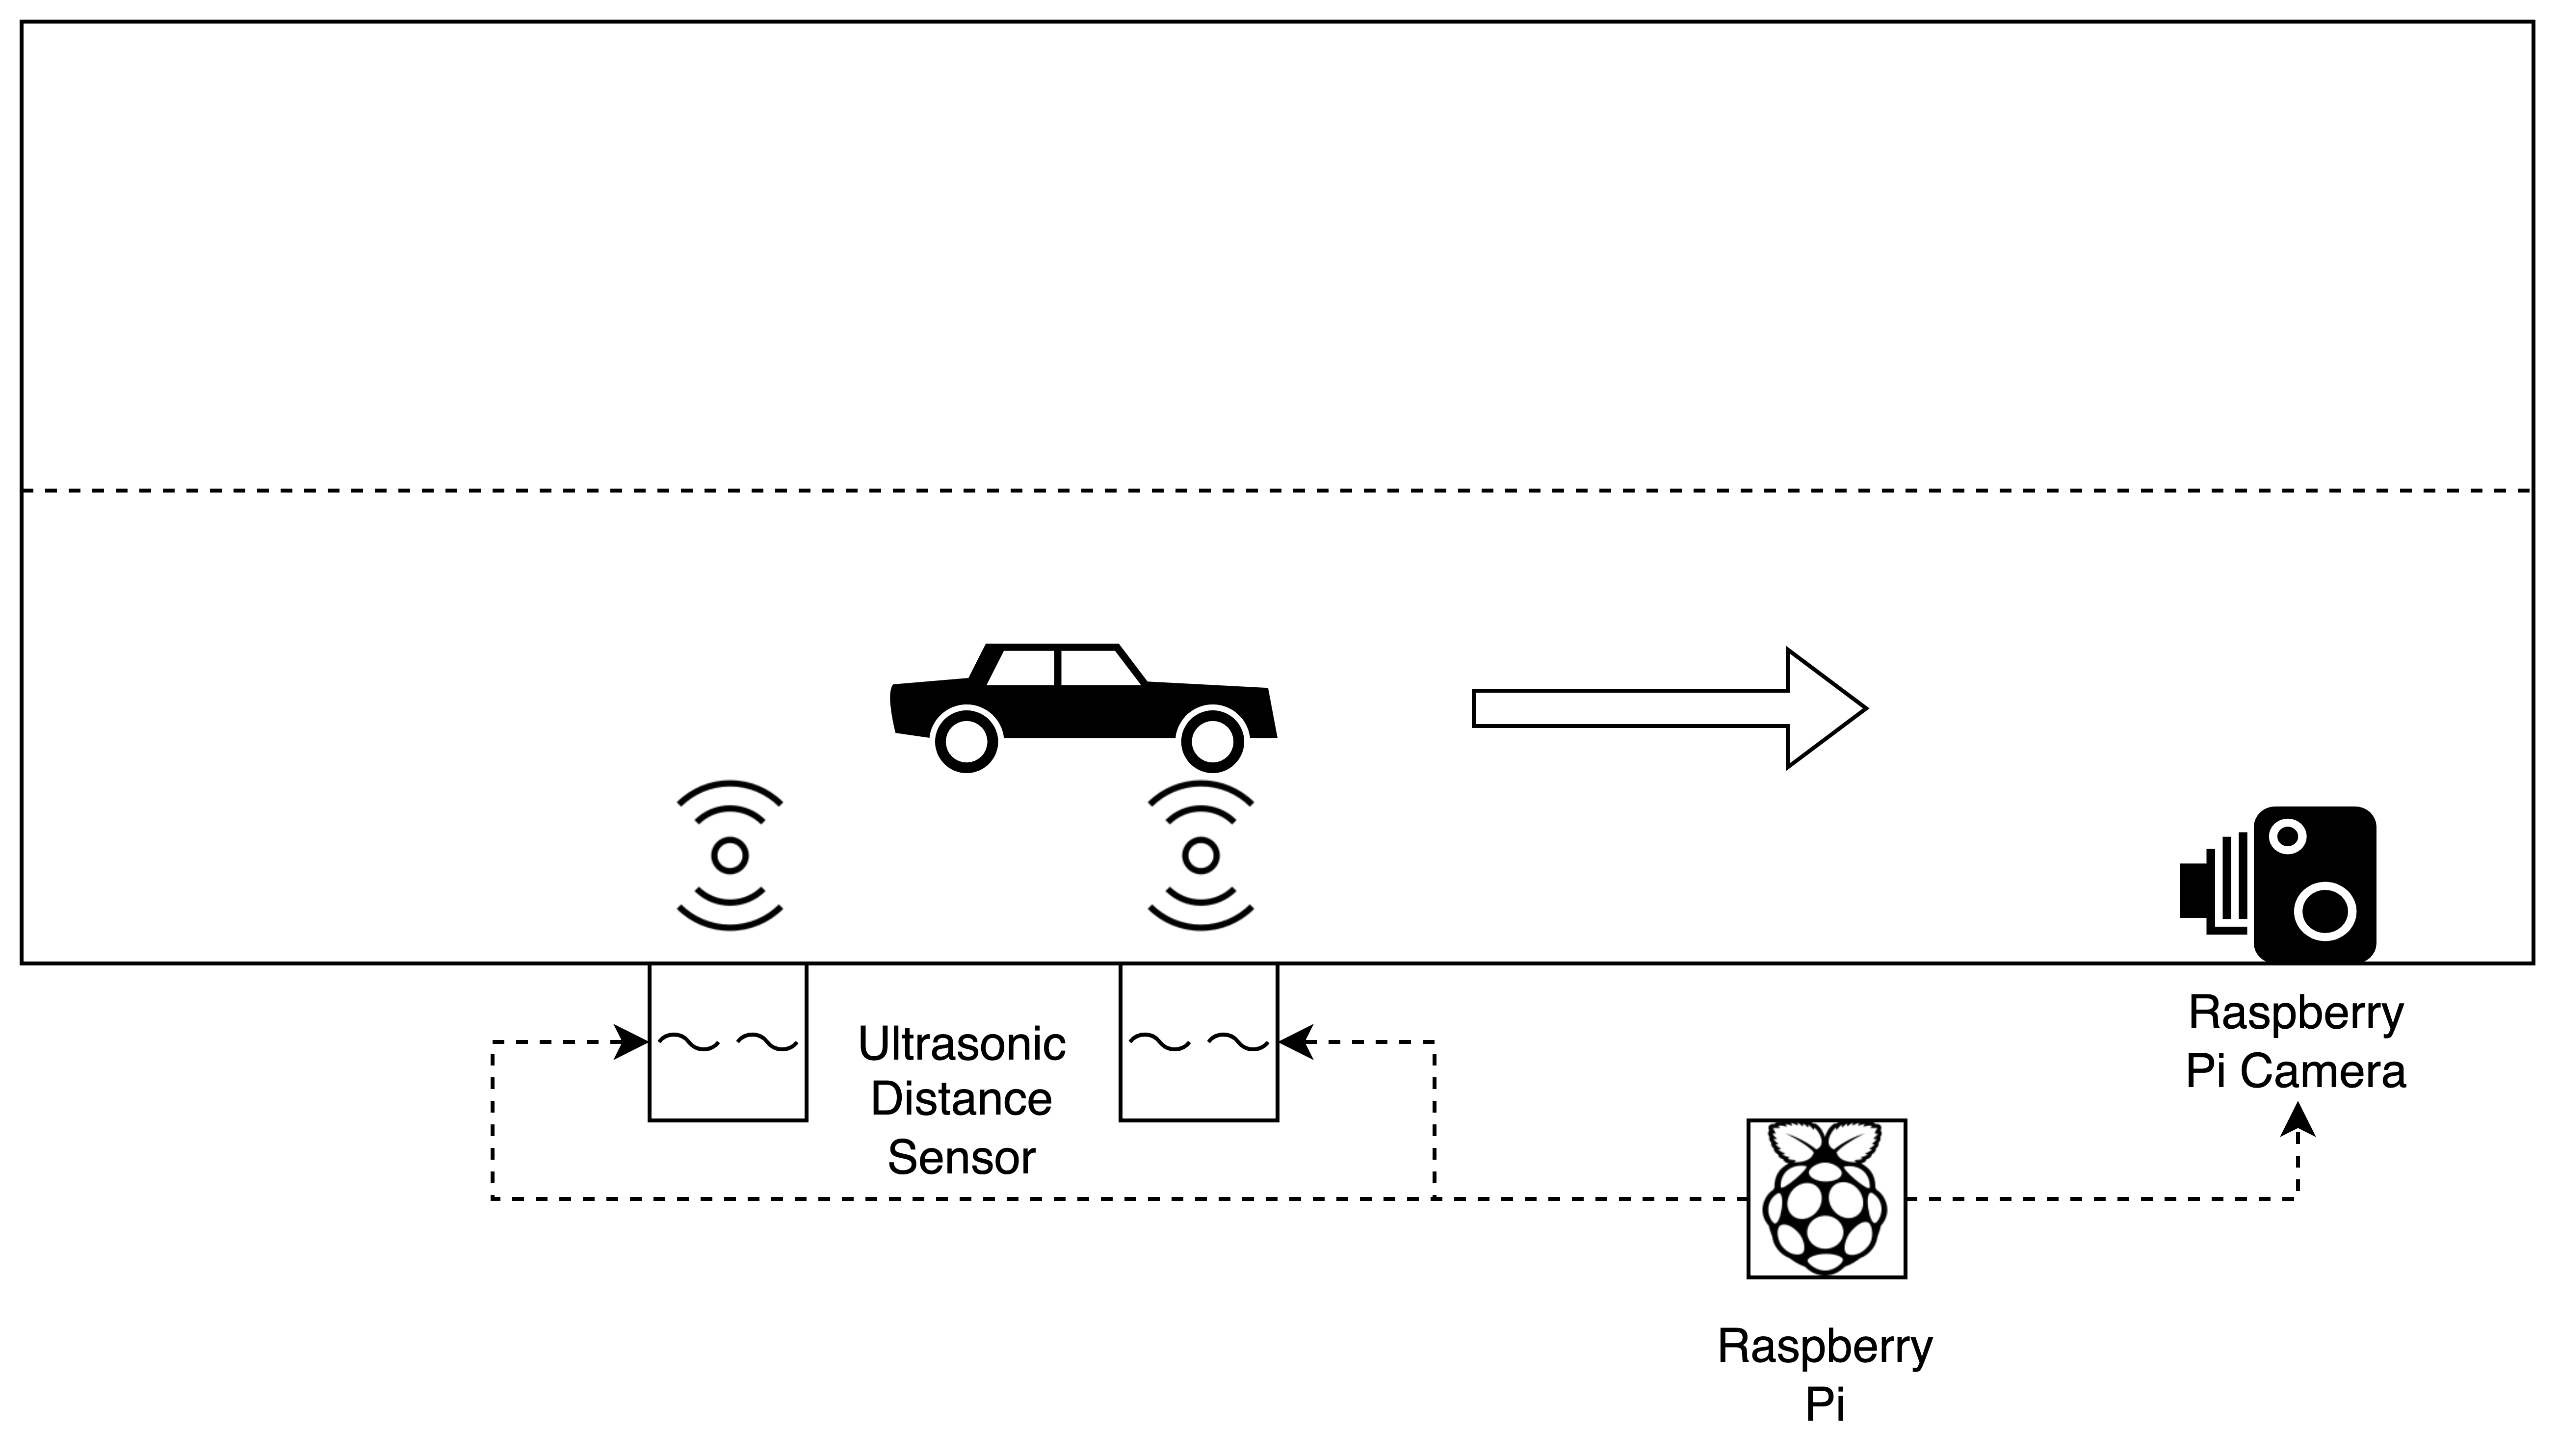
Figure 1: Big Picture of PiSpeed Camera
- Hardware Design
Fig. 1 shows the big picture of our PiSpeed Camera project. It also shows the hardware design part of this project. Fig. 2 shows the pin connection of the Ultrasonic Sensors. Fig. 3 shows the actual connection of our project.
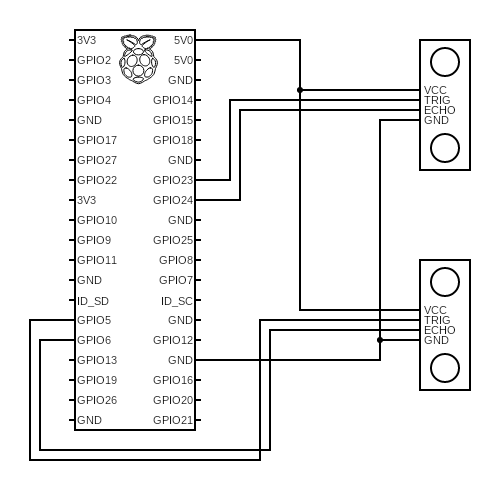
Figure 2: Pin Connection
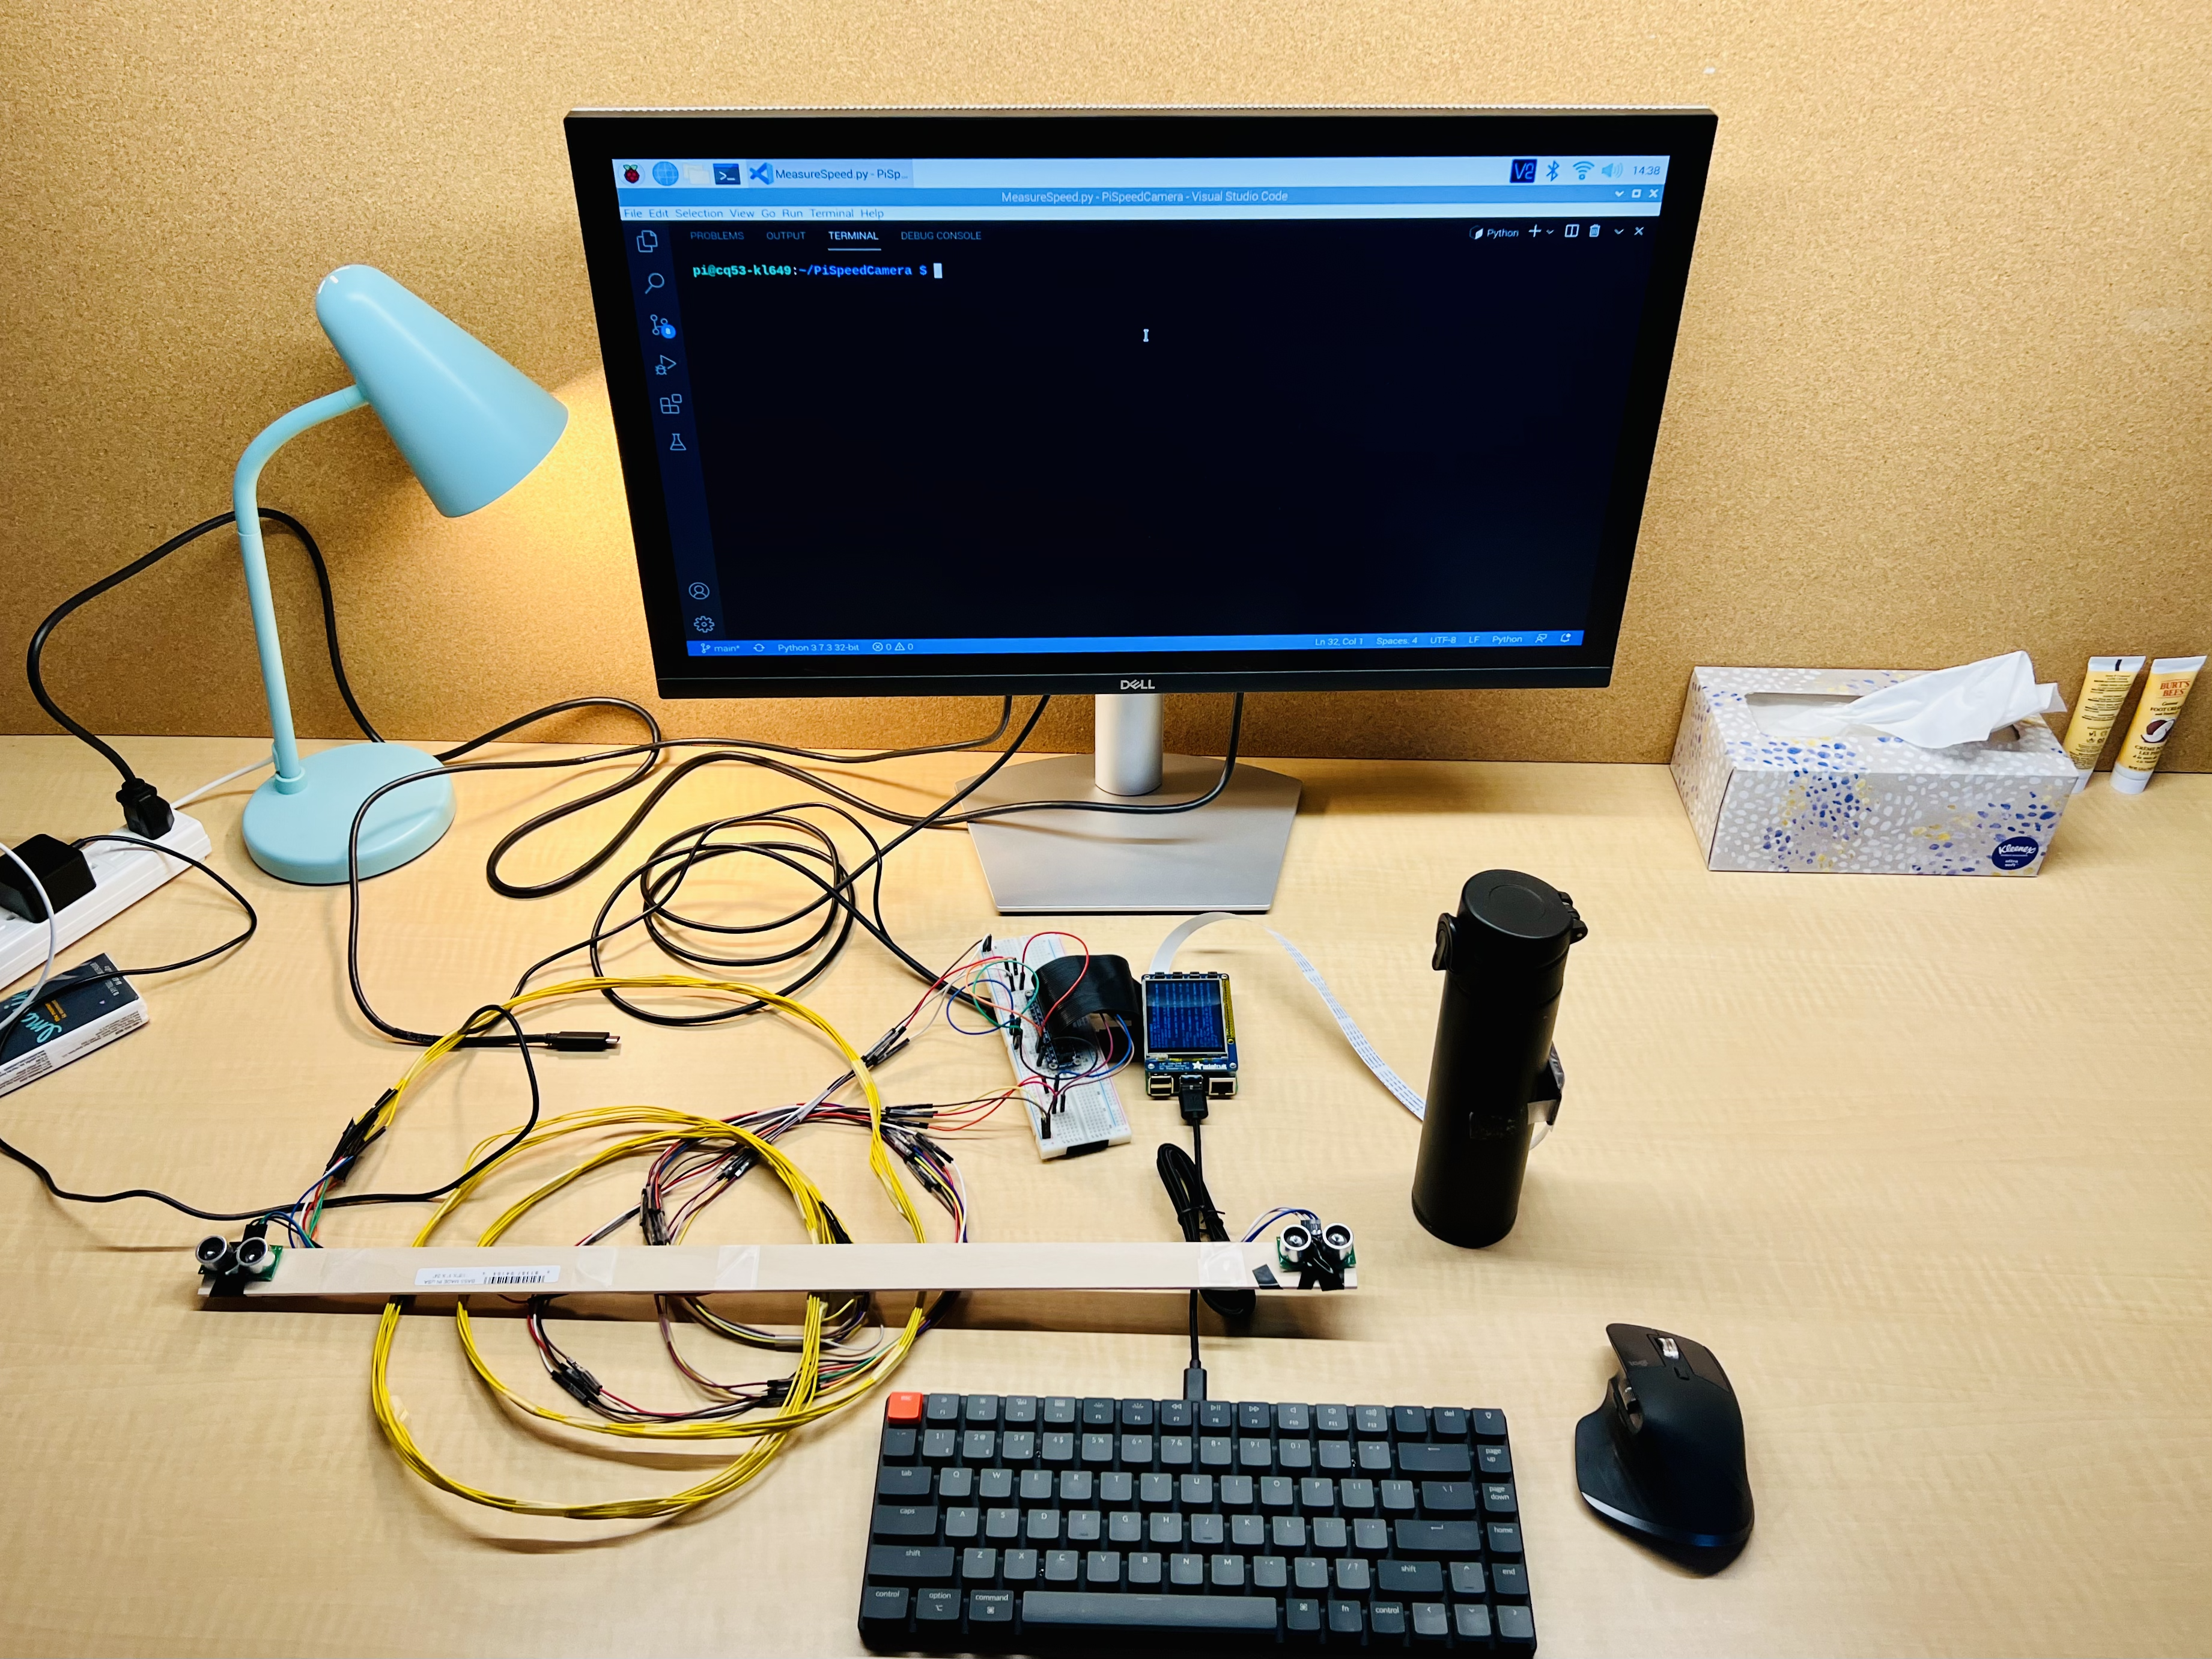
Figure 3: PiSpeed Camera System
Two HC-SR04 Ultrasonic Ranging Module are connected to Raspberry Pi using GPIO pins. They are placed on the two ends of a stick. The HC-SR04 Ultrasonic Ranging Module provides a non-contact distance measurement function from 2cm to 400cm. It has a 5V power supply pin, a 0V ground pin, a trigger pulse input pin, and an echo pulse output pin. It has a wide measuring angle of 15 degrees. The measured distance can be calculated by (pulse travel time * velocity of sound) / 2.
The camera we used is Raspberry Pi Camera Rev 1.3. It can capture an image of 5MP. It connects to Raspberry Pi with the 15-pin MIPI Camera Serial Interface, which allows us to directly plug into Raspberry Pi Board. The camera is placed in the direction of incoming cars.
The camera and Raspberry Pi are placed on the sideway on the road, with a relatively long distance (3 to 5 meters) between the Ultrasonic Sensors.
- Sofeware Design
Appendix Code A shows the code for measuring the distance using one Ultrasonic Sensor. We first set up GPIO pins for TRIG and ECHO. Then, a pulse is generated to the TRIG pin while a timer is set at the same time. The timer ends when the ECHO pin receives the rebounded signal, and we get the pulse duration time. Then we can calculate the distance detected in centimeters.
Appendix Code B shows the code for calculating the speed of the car. We first set the GPIO pins for two Ultrasonic Sensors. We noticed from our pre-conducted test that the first few measurements are not stable, so we discard those values. Then the initially measured distance would be recorded for both left and right sensors. At this point, the left sensor would be continuously detecting distance until a car passed in front of it and causing a shorter detected distance. A timer would be set at this time. Then the left sensor would stop detecting and the right sensor would start working. When the car passed the right sensor, the timer would be stopped. We can now use this interval time to calculate the average speed of the car passing through two ultrasonic sensors.
Once we measure the speed of the car, we then compare it to the preset speed limit. Once the car is speeding, the Raspberry Pi Camera would take an image of the front side of the car. Appendix Code C shows the code for capturing the image of a car. The captured image would be saved in the /ProcessImage directory for later image processing. We used the following convention to set the image file names during image processing. Images (including the original and intermediate) filename of one car would have the same prefix which is the time and date of that image being captured. The name would also contain a postfix indicating this image is produced after which procedure.
We used the OpenCV library to process the captured image. The final output image only contains the area of the license plate. Appendix Code D shows the code to process the captured image. The captured image has a resolution of 1280*1024. Since our camera location and the angle pointing to the car are fixed, the license plate would be located at the bottom of the captured image. Thus, we first crop out the top 400 pixels of the captured image. The benefit of this step is to reduce the computation stress of the program. Fig. 4 shows this original cropped image. Then we convert the image color from RGB to grayscale. We also applied a bilateral filter to reduce the noise in the image. Fig. 5 shows the image after this step. Then we apply the canny edge detector to find out all the edges in the image. Fig. 6 shows the image after this step. The next step is to find a rectangle from the edged image, which could indicate a license plate. Now, if we directly crop out the license plate, as shown in Fig. 7, we may notice that the license plate is titled due to the angle of the camera, which would cause a problem with OCR accuracy. Therefore, we performed a transformation to map this titled rectangle to a vertical-horizontal rectangle. We also did the histogram equalization to avoid the effect of different plate colors. Finally, we crop the rectangle so that only the plate number is preserved. Fig. 8 shows the final output of the detected license plate.
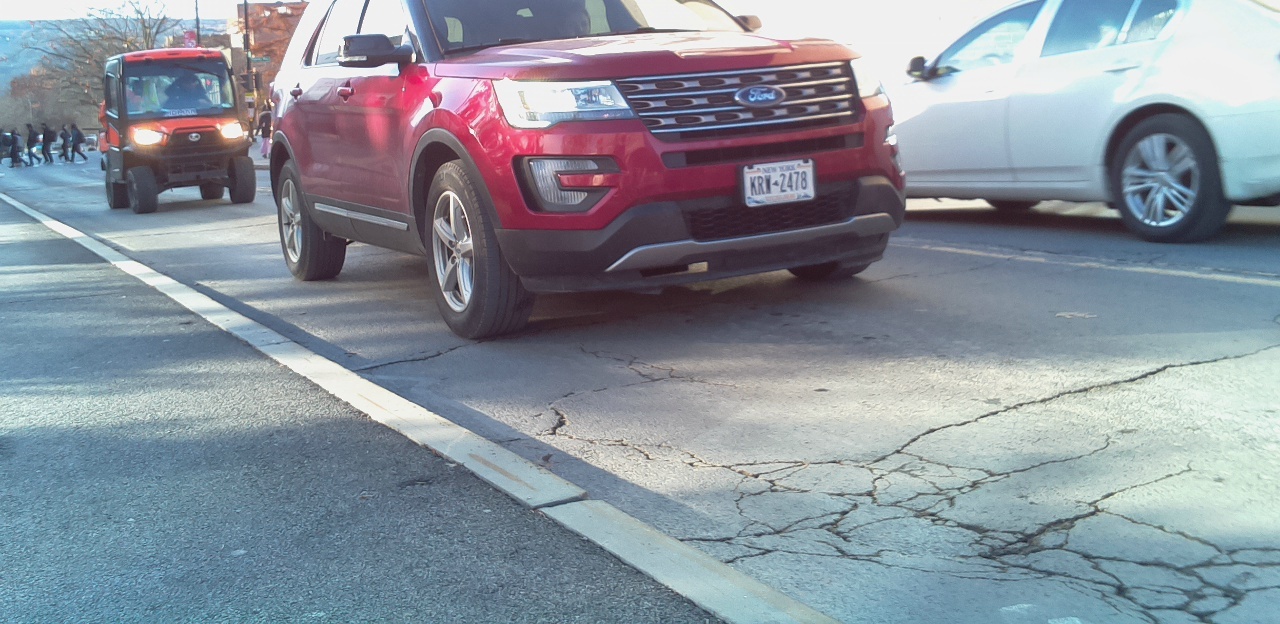
Figure 4: Original Image
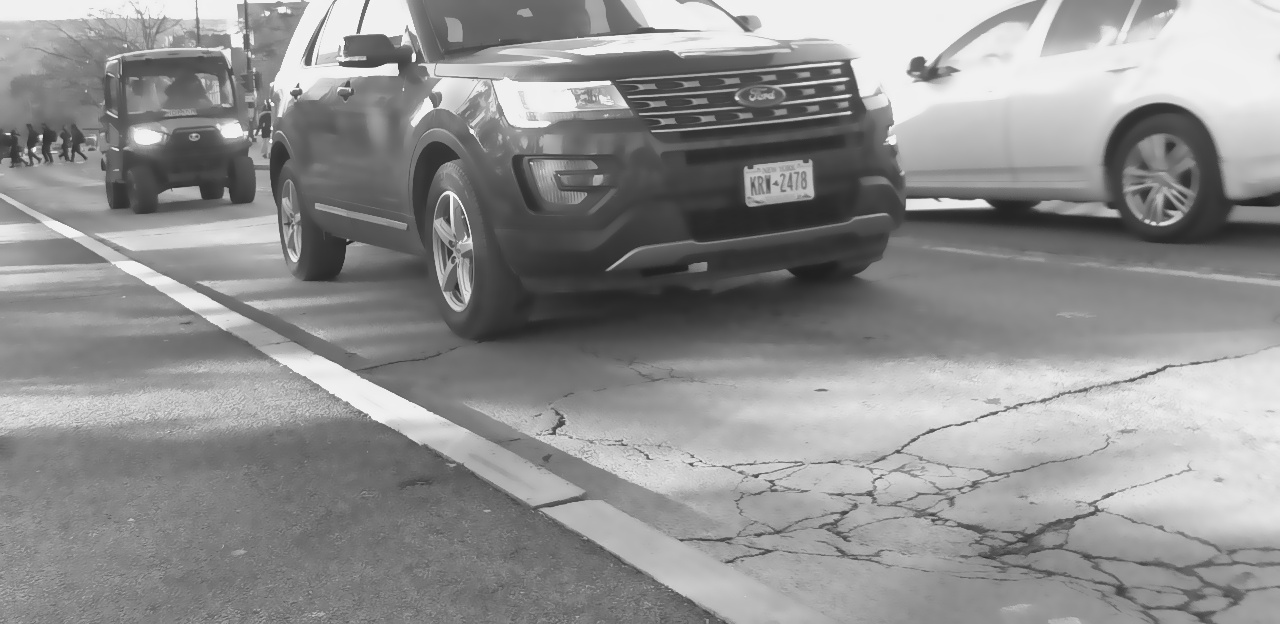
Figure 5: Image After Noise Reduction
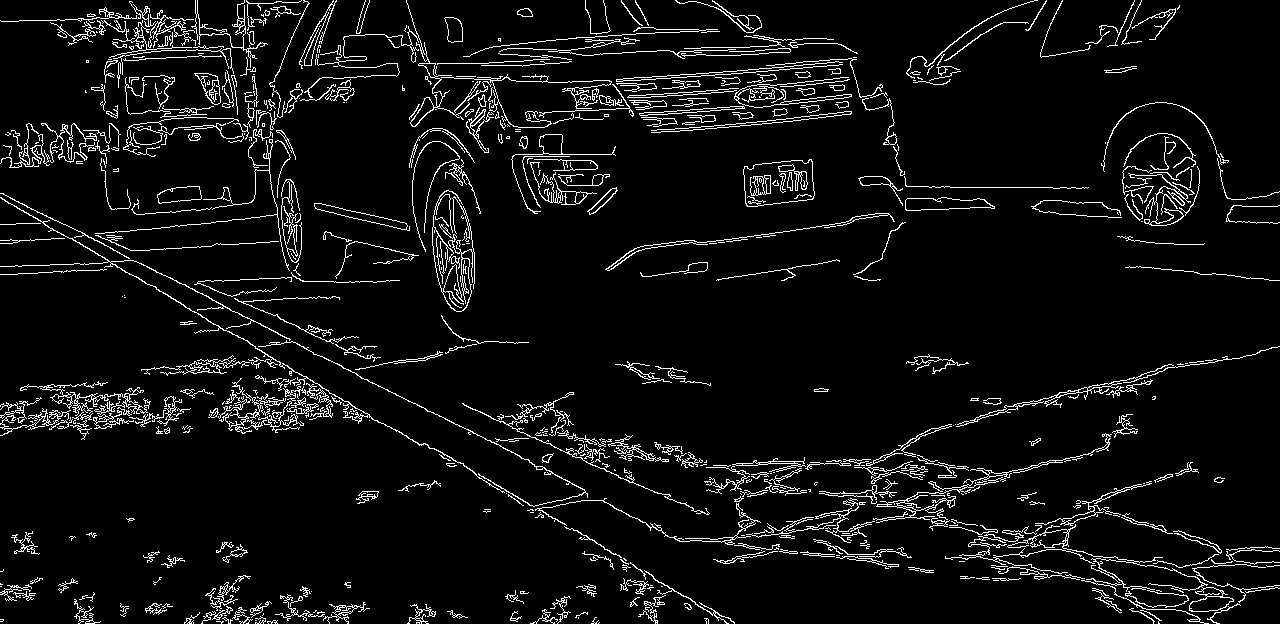
Figure 6: Image After Edge Detection
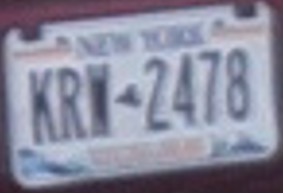
Figure 7: Direct Crop of Detected Rectangle
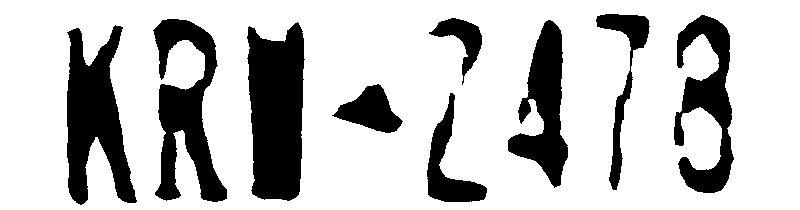
Figure 8: Final Detected License Plate
After we get the image containing the license plate, the Tesseract OCR engine was used to detect the license plate into text. Appendix Code E shows the OCR process. The result of the Tesseract OCR is saved in a text file. We read the content in the text file and only preserve capital letters and digits as our detected license plate. The OCR result with the speed of the car is then added to the website database, as shown in Appendix Code F.
All the steps above are encapsulated as functions and are called in the main program. Appendix Code G shows our main program.
- Server and Website Design
We built a web to automatically upload the information of speeding cars to the internet. We used SQLite to build a database as the back end of the web. The database has three columns, including the speeding time, the number of the license plate, and the speed. We wrote a script, and once a car is speeding, the script will automatically upload the information of speeding cars to the database. Then, we wrote an HTML file to build the fore-end of the web. To upload the data in the database to HTML, we built a server with Flask. The server can capture the data in the database and upload them to HTML. We set a refresh button on the web, and we can get the latest data in the database when we click the button. Fig. 9 shows the screenshot of the website.
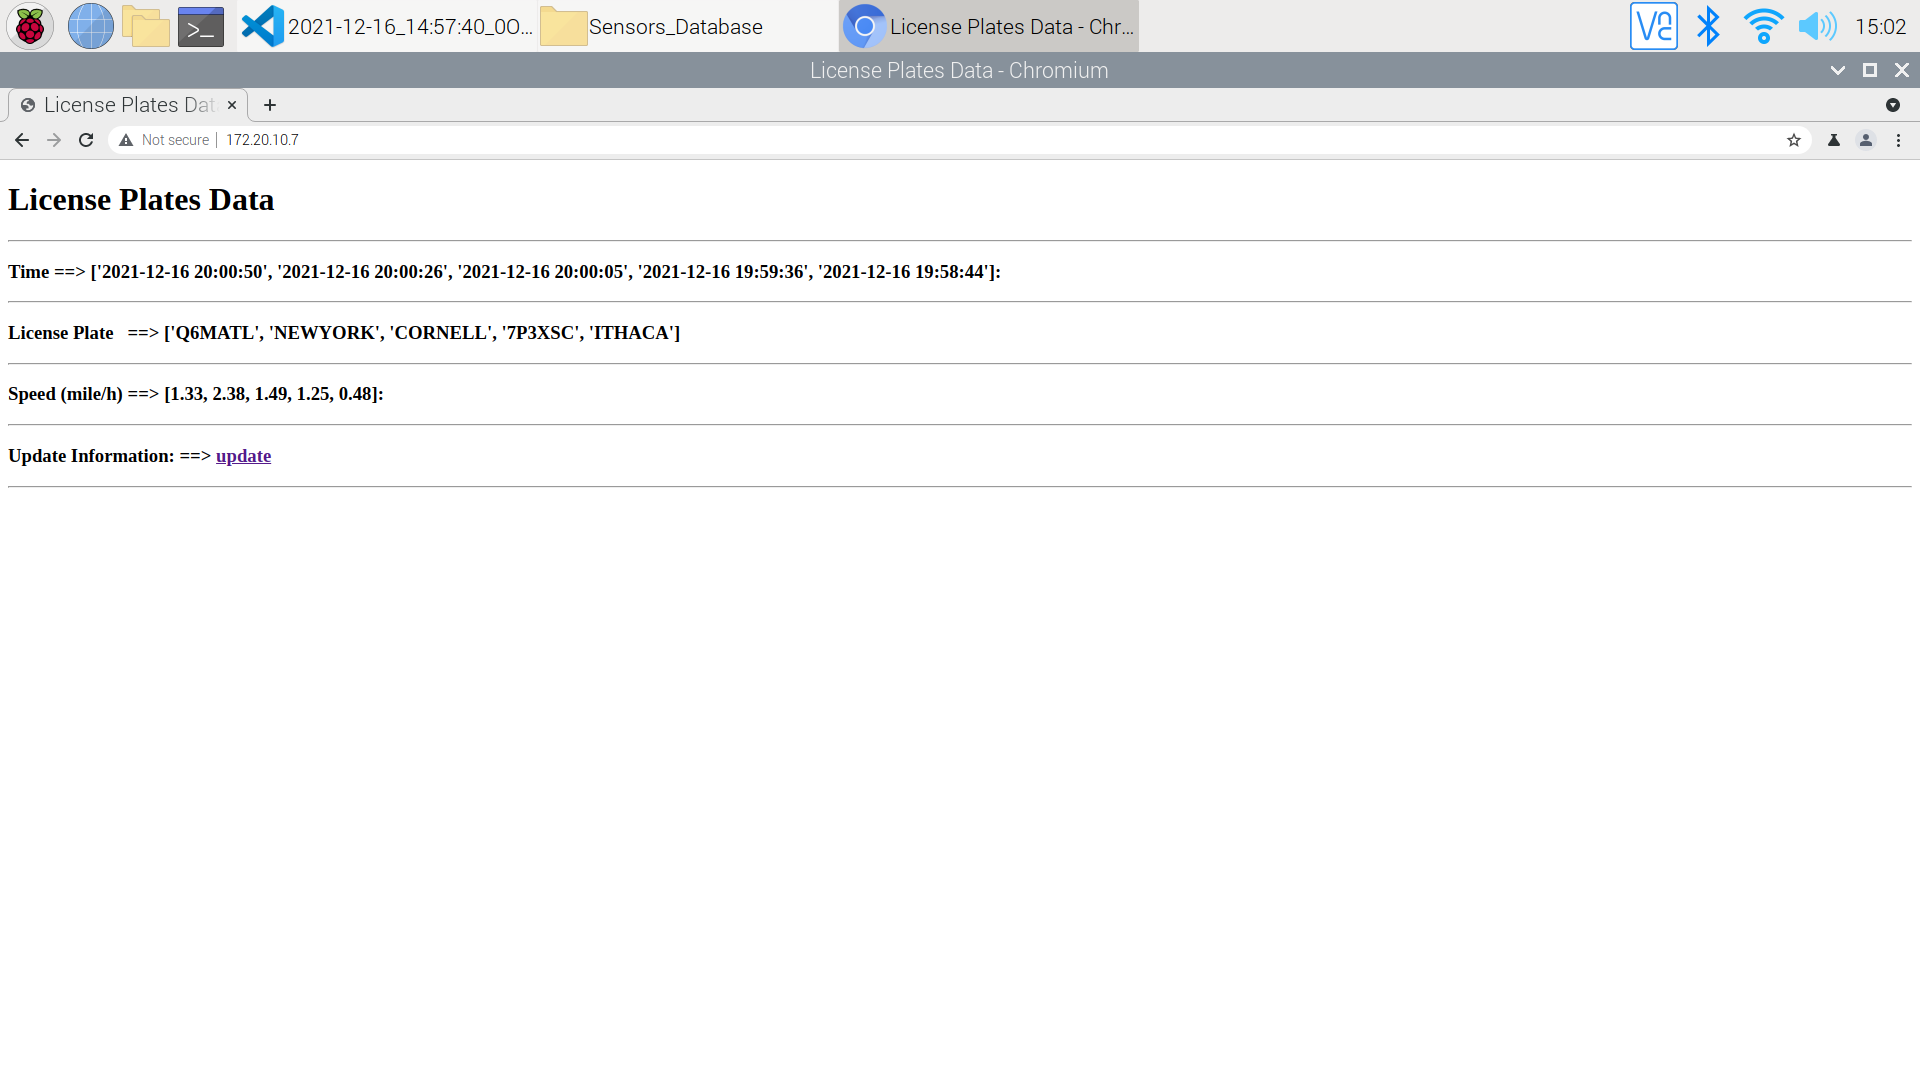
Figure 9: Screenshot of Website
Issues and Solutions
At the beginning of this project, we faced issues with installing the latest version of OpenCV on Raspbian Buster. Traditional installation procedure kept failing on Raspbian, continuously indicating several dependencies missing. Appendix H shows the modified step-by-step installation sequence from Canvas which allows us to install the latest version of OpenCV on Raspbian Buster with Python 3.
Before we perform the rectangle transformation in the license detect program, the OCR accuracy is very low. This is because the OCR engine takes the input image as one line of text. Any extra noise, shapes, and patterns would affect OCR recognition. As stated in the previous section, performing a transformation of the rectangle can resolve this issue.
Results
Our prototype works great with test license plates. We generated several fake license plates for initial tests. Fig. 10 shows one of the examples. Our program successfully detected and cropped out the region of the plate and the OCR engine successfully recognized it as “7P3XSC”. Indeed, the OCR engine we used can be confused by some similar-shaped letters and digits. Fig. 11 is one of the examples. The correct plate is “Q6METL”. The license detects part still works great, cropping the correct area. However, the OCR engine recognized the digit “6” as the letter “G”, making the final detected as “QGMETL”. Similar cases are the digit “2” and letter “Z”.
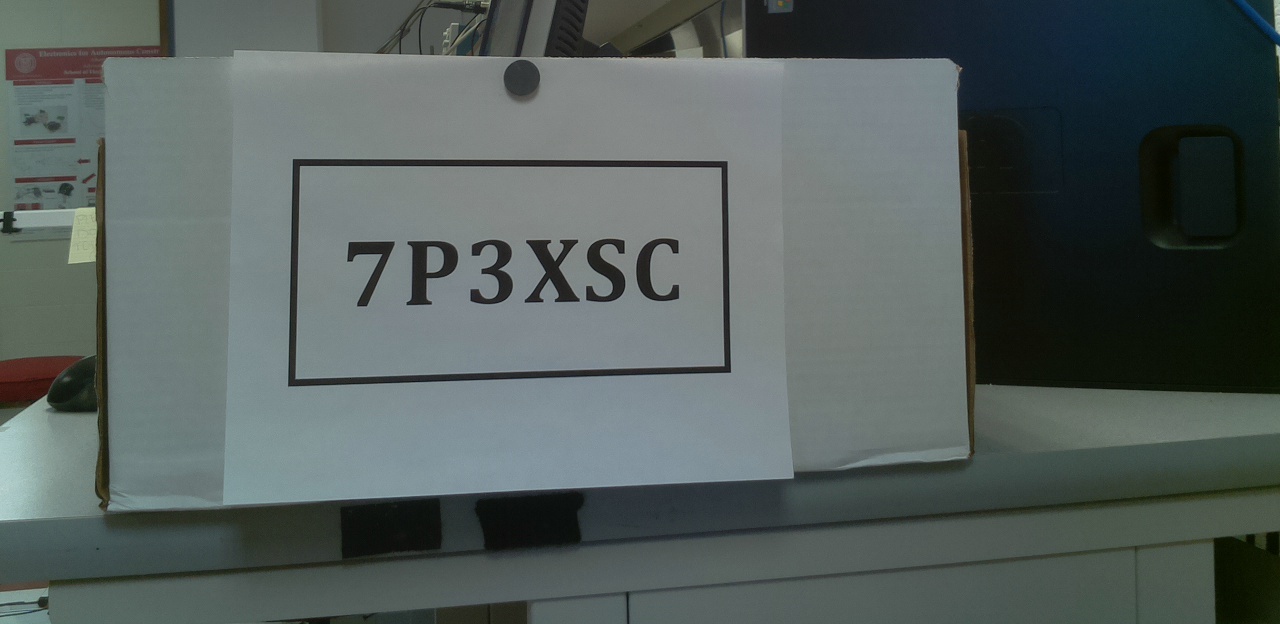
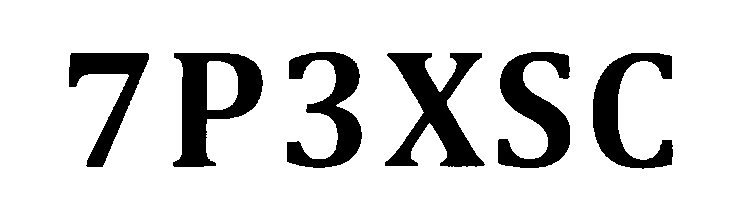
Figure 10: Example of Initial Test
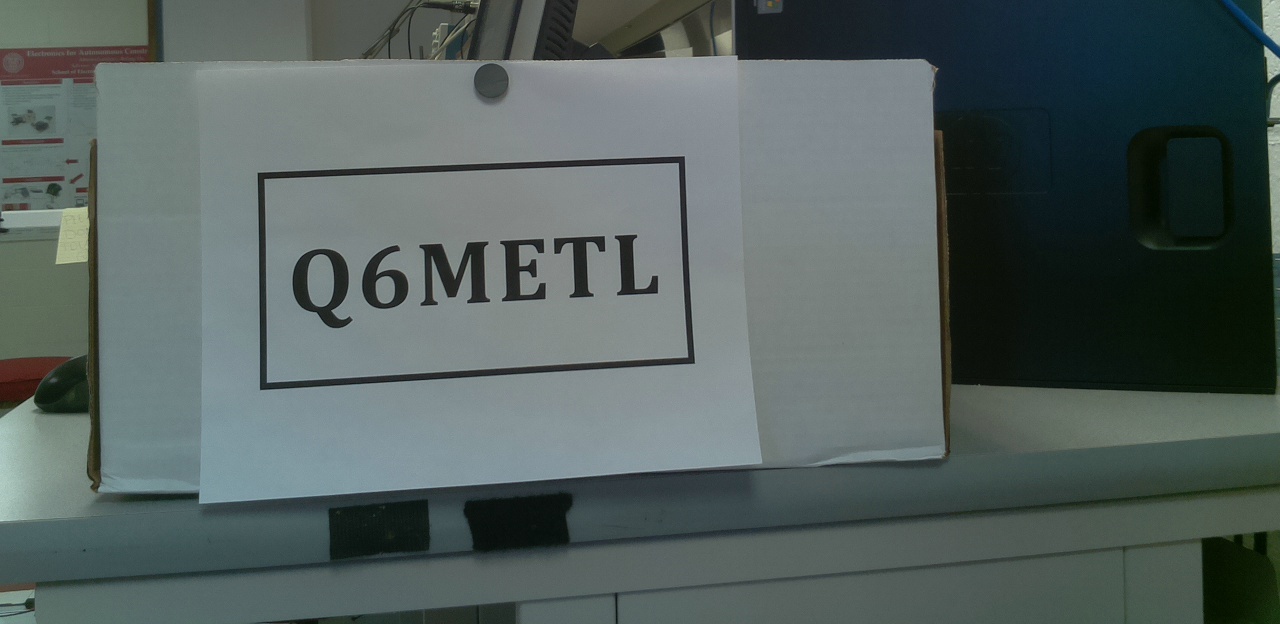

Figure 11: Challenging Test for OCR (“6” and “G”)
We also tested our prototype in a real road environment and still achieved a relatively fair accuracy in detection. Fig. 12 shows an example. The detected license plate is clear, and the OCR result is accurate. However, when the license plate has a similar color to the car itself, our program may have trouble detecting the plate area. Fig. 13 shows an example where our program reported that no rectangle was founded. If we look carefully at the edged image, we can notice that the upper edge of the rectangle of the plate is missing due to the dark blue color of this New York plate style being similar to the black of its car itself. The difference is even smaller when the edge algorithm is taking a grayscale image as its input.
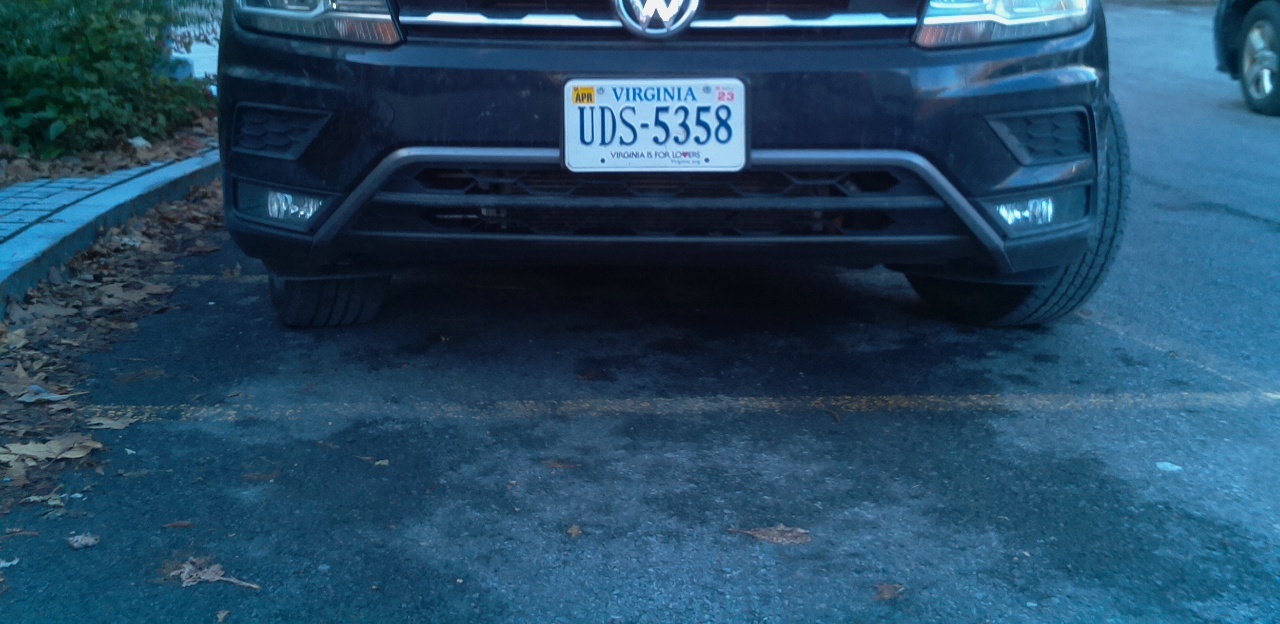
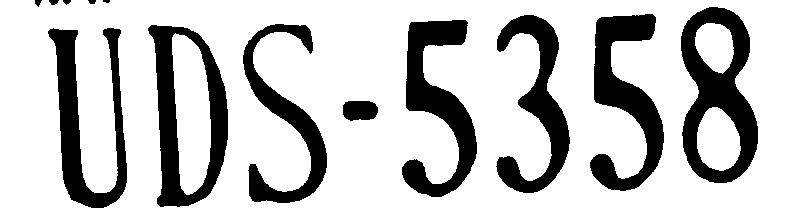
Figure 12: Real Road Environment Test
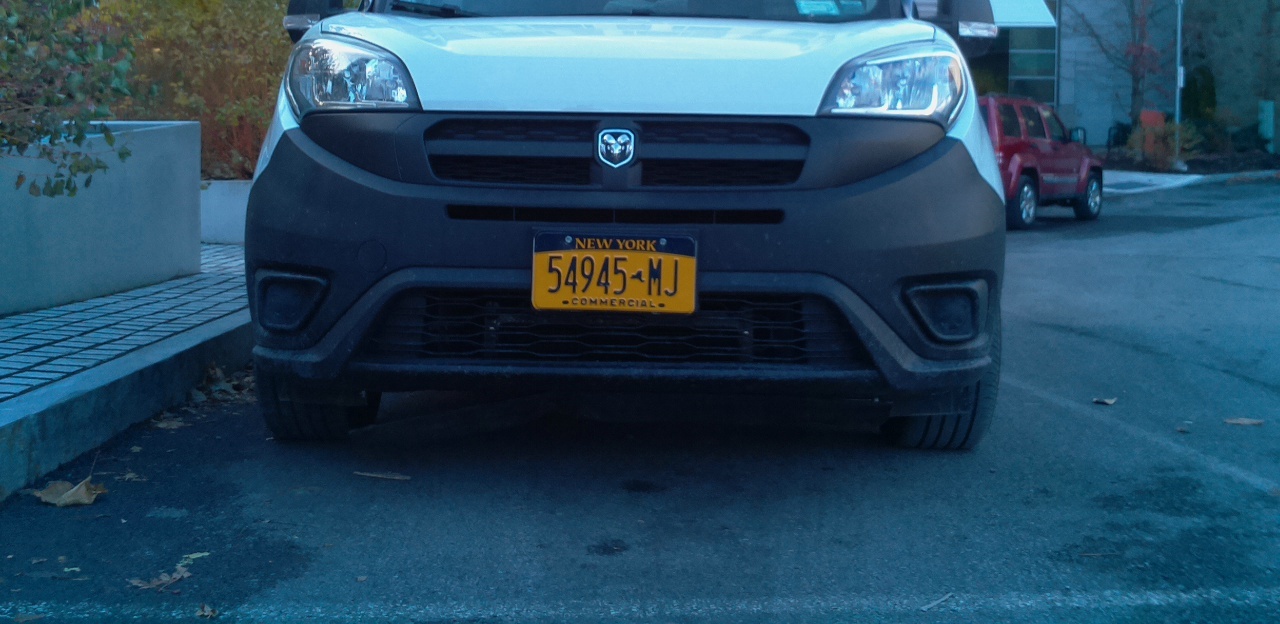
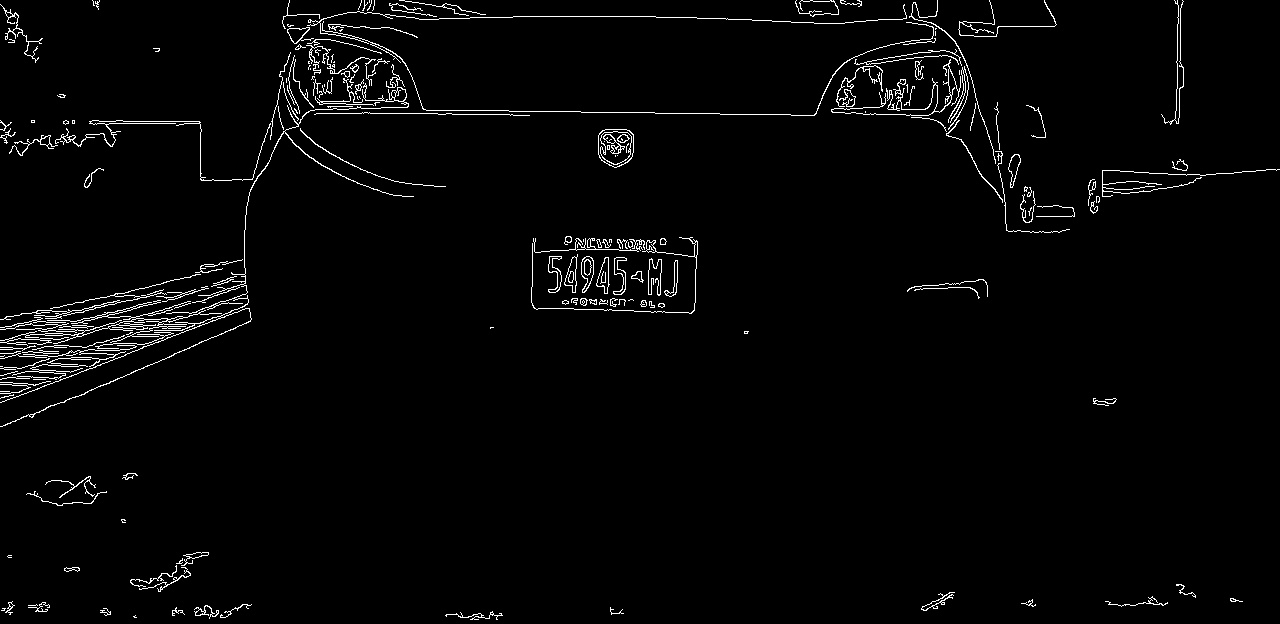
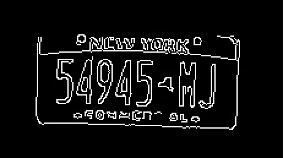
Figure 13: Challenging Plate on Real Road Environment
For successful license detection, the whole process is instant and only takes 2.5 seconds to finish (from capturing the image to printing out the OCR result). It could even be faster if we decide not to save the intermediate files (grayscale, edged, transformed, cropped image). Writing an image to the filesystem is time-consuming, but we still decided to do this process because it can help us speed the debug process. Once our program is stable and works for most of the cars, we can remove those images with written commands.
Future Work
Currently, our Raspberry Pi Camera Rev 1.3 can only take images at a resolution of 1280*1024. The low quality of images restricted the distance of the camera between cars. With a closer distance, it further restricted the highest speed of a car can be for our captured image still be clear. We can see from Fig. 4 and Fig. 8 in the design section that the detected license quality is poor due to the far distance between the camera and the car. The correct plate is “KRW 2478”, but our program recognizes it as “KRP Z478”. If we upgrade our camera to Raspberry Pi Camera V2, which can capture images at the resolution of 3280*2464, the image quality would still be good after cropping. We then may achieve better performance at OCR. Indeed, a higher resolution may result in slower computation. So, we also need to find an optimized solution to this issue.
We can now realize the detection and OCR of the license plate of speeding cars. However, the accuracy of license plate detection and OCR is not 100%. We can add both the original image and the cropped image to our website and allow the maintainer to double-check the final result and modify the incorrect ones. We could also add other characters to verify the speeding cars. We can detect the color of the car and the state in the license plate. Adding all the information to our website can help us identify the detected license with its corresponding captured image faster.
Work Distribution
Chenxi Qian
cq53@cornell.edu
Circuit and Hardware Design
Ultrasonic Speed Testing Design
License Detection and OCR
System Testing
Kuan Lu
kl649@cornell.edu
Computer Vision Design
Database and Website Design
Flask Server Design
System Testing
Parts List
- Raspberry Pi 4 - $35.00
- Raspberry Pi Camera Rev 1.3 - $14.99
- HC-SR04 Ultrasonic Sensors - $4.99 * 2
- Resistors and Wires - Provided by Lab
Total: $59.97
References
Ultrasonic Ranging ModuleRaspberry Pi Camera Rev 1.3
License Plate Detection using OpenCV
Tesseract OCR Engine
Build Website with Flask and SQLite
Install OpenCV on Raspbian Buster with Python 3
Appendix
Code A
"""
    MeasureDistance.py
    Created by Chenxi Qian

    measure the distance using HC-SR04 Ultrasonic Ranging Module
"""

import RPi.GPIO as GPIO
import time

def measureDistance(trig, echo):
    # set up GPIO pins for TRIG and ECHO
    TRIG_PIN = trig
    ECHO_PIN = echo

    GPIO.setmode(GPIO.BCM)
    GPIO.setup(TRIG_PIN, GPIO.OUT)
    GPIO.setup(ECHO_PIN, GPIO.IN)

    # generate a pulse using TRIG pin
    GPIO.output(TRIG_PIN, False)
    GPIO.output(TRIG_PIN, True)
    time.sleep(0.00001)
    GPIO.output(TRIG_PIN, False)

    pulse_start = 0
    pulse_end = 0

    # set up timer and wait for ECHO response
    while GPIO.input(ECHO_PIN) == 0:
        pulse_start = time.time()
    while GPIO.input(ECHO_PIN) == 1:
        pulse_end = time.time()

    # calculate distance
    pulse_duration = pulse_end - pulse_start
    distance = int(pulse_duration * 17150)

    GPIO.cleanup()

    return time.time(), distance
Code B
"""
    MeasureSpeed.py
    Created by Chenxi Qian

    measure the speed of a moving car using two HC-SR04 Ultrasonic Sensors
"""

import time
from MeasureDistance import measureDistance

def measureSpeed():
    # distance between two Ultrasonic Sensors in cm
    SENSOR_DIS = 57

    # define GPIO pins
    LEFT_TRIG_PIN = 23
    LEFT_ECHO_PIN = 24
    RIGHT_TRIG_PIN = 5
    RIGHT_ECHO_PIN = 6

    # initiate ultrasonic sensors
    # first few measurements would be unstable
    # discard these values
    for _ in range(5):
        measureDistance(LEFT_TRIG_PIN, LEFT_ECHO_PIN)
        time.sleep(0.001)
        measureDistance(RIGHT_TRIG_PIN, RIGHT_ECHO_PIN)

    # calibrate and get initial distance
    _, initDistanceLeft = measureDistance(LEFT_TRIG_PIN, LEFT_ECHO_PIN)
    _, initDistanceRight = measureDistance(RIGHT_TRIG_PIN, RIGHT_ECHO_PIN)

    print("#################### Start Program ####################")
    print("############### Measure Initial Distance ##############")
    print("Left Initial:  ", initDistanceLeft)
    print("Right Initial: ", initDistanceRight)
    print("#######################################################")

    # start timer when the car reached the left sensor
    leftDetected = False
    leftDetectedTime = 0
    while not leftDetected:
        currentTimeLeft, measuredDistanceLeft = measureDistance(LEFT_TRIG_PIN, LEFT_ECHO_PIN)
        time.sleep(0.05)
        if measuredDistanceLeft < initDistanceLeft - 5:
            leftDetected = True
            leftDetectedTime = currentTimeLeft

    print("Left Detected! Time:", leftDetectedTime, "Distance:", measuredDistanceLeft)

    # stop timer when the car reached the right sensor
    rightDetected = False
    rightDetectedTime = 0
    while not rightDetected:
        currentTimeRight, measuredDistanceRight = measureDistance(RIGHT_TRIG_PIN, RIGHT_ECHO_PIN)
        time.sleep(0.05)
        if measuredDistanceRight < initDistanceRight - 5:
            rightDetected = True
            rightDetectedTime = currentTimeRight

    print("Right Detected! Time:", rightDetectedTime, "Distance:", measuredDistanceRight)
    print("#######################################################")
    print("################## Calculating Speed ##################")

    # calculate the speed of the car
    speedCM = round(SENSOR_DIS / (rightDetectedTime - leftDetectedTime), 2)
    speedKM = round(speedCM * 0.036, 2)
    speedMI = round(speedCM * 0.022369, 2)
    print("Measured Speed:", speedCM, "cm/s")
    print("Measured Speed:", speedKM, "km/h")
    print("Measured Speed:", speedMI, "mile/h")
    print("#######################################################")
    return speedMI
Code C
"""
    CaptureLiscense.py
    Created by Chenxi Qian

    capture the car image using Raspberry Pi Camera Rev 1.3
"""

from picamera.array import PiRGBArray
from picamera import PiCamera
import time
import cv2

def captureLicense():
    # capture an image using Raspberry Pi Camera
    camera = PiCamera()
    rawCapture = PiRGBArray(camera)

    time.sleep(0.1)

    camera.capture(rawCapture, format="bgr")
    capturedImage = rawCapture.array

    # prepare image file name
    # all the image would be saved in the /ProcessImage directory
    style = "%Y-%m-%d_%H:%M:%S"
    captureTime = str(time.strftime(style, time.localtime(time.time())))
    imagePath = "/home/pi/PiSpeedCamera/ProcessImage/" + captureTime + "_0Original.jpg"

    # save the image
    cv2.imwrite(imagePath, capturedImage)

    return captureTime, imagePath
Code D
"""
    LicenseDetect.py
    Created by Chenxi Qian and Kuan Lu

    detect the license plate and crop corresponding area as output
"""

import cv2
import numpy as np
import imutils

### import used for test code ###
import glob
from LicenseOCR import licenseOCR
#################################

# helper sort function
# given four (x, y) coordinate points
# sort four points in the following order
# A -> B -> C -> D
# ------------------
# ----A--------C----
# ----|        |----
# ----|        |----
# ----B--------D----
# ------------------
def sort(location):
    ySorted = sorted(location, key=(lambda x: x[1]))
    xSorted0 = sorted(ySorted[0:2], key=(lambda x: x[0]))
    xSorted1 = sorted(ySorted[2:4], key=(lambda x: x[0]))
    return xSorted0 + xSorted1

def licenseDetect(captureTime, imagePath):
    # prepare intermediate image file name and path
    originalPath = "/home/pi/PiSpeedCamera/ProcessImage/" + captureTime + "_0Original.jpg"
    noiseReducedImagePath = "/home/pi/PiSpeedCamera/ProcessImage/" + captureTime + "_1NoiseReduced.jpg"
    edgedImagePath = "/home/pi/PiSpeedCamera/ProcessImage/" + captureTime + "_2Edged.jpg"
    transformedPath = "/home/pi/PiSpeedCamera/ProcessImage/" + captureTime + "_3Transformed.jpg"
    croppedImagePath = "/home/pi/PiSpeedCamera/ProcessImage/" + captureTime + "_4Cropped.jpg"

    # crop the captured image to reduce computation
    img = cv2.imread(imagePath)[400:1024, :]
    cv2.imwrite(originalPath, img)

    # convert color to grayscale and perform noise reduction
    gray = cv2.cvtColor(img, cv2.COLOR_BGR2GRAY) # convert color
    bfilter = cv2.bilateralFilter(gray, 11, 17, 17) # Noise reduction
    cv2.imwrite(noiseReducedImagePath, bfilter)

    # edge detection using canny filter
    edged = cv2.Canny(bfilter, 30, 200)
    cv2.imwrite(edgedImagePath, edged)

    # find rectangles from the image
    # trying to match the area of a license plate
    keypoints = cv2.findContours(edged.copy(), cv2.RETR_TREE, cv2.CHAIN_APPROX_SIMPLE)
    contours = imutils.grab_contours(keypoints)
    contours = sorted(contours, key=cv2.contourArea, reverse=True)[:10]

    location = None
    try:
        for contour in contours:
            approx = cv2.approxPolyDP(contour, 10, True)
            if len(approx) == 4:
                location = approx
                break

        # transform the titled rectangle to a vertical horizontal rectangle
        originalPoints = np.float32(sort([location[0][0], location[1][0], location[2][0], location[3][0]]))
        mappedPoints = np.float32([[0, 0], [800, 0], [0, 400], [800, 400]])
        transformMatrix = cv2.getPerspectiveTransform(originalPoints, mappedPoints)
        # transformed = cv2.warpPerspective(img, transformMatrix, (800, 400))[95:305, 0:800]  # parameter used for real road test
        transformed = cv2.warpPerspective(img, transformMatrix, (800, 400))[95:305, 30:770]  # parameter used for lab test environment
        cv2.imwrite(transformedPath, transformed)
        transformedGray = cv2.cvtColor(transformed, cv2.COLOR_BGR2GRAY)

        # histogram equalization and final color convert
        equalized = cv2.equalizeHist(transformedGray)
        # _, cropped = cv2.threshold(equalized, 60, 255, cv2.THRESH_BINARY)  # parameter used for real road test
        _, cropped = cv2.threshold(equalized, 40, 255, cv2.THRESH_BINARY)  # parameter used for lab test environment
        cv2.imwrite(croppedImagePath, cropped)
        return captureTime, croppedImagePath

    except:
        return

################################# TEST CODE #################################

# for img in glob.glob(r"/home/pi/PiSpeedCamera/PiCameraImage/*.jpg"):
#     capturedTime, croppedImagePath = licenseDetect(img[37:-4], img)
#     licenseOCR(capturedTime, croppedImagePath)

#############################################################################
Code E
"""
    LicenseOCR.py
    Created by Chenxi Qian

    detecting license plate content using Tesseract OCR engine
"""

import os
import re

def licenseOCR(captureTime, imagePath):
    # execute tesseract command
    print("OCR Image", imagePath)
    cmd = "tesseract " + imagePath + " /home/pi/PiSpeedCamera/ProcessImage/" + captureTime + "_5OCRResult" + " -l eng -psm 7 >> /dev/null"
    os.system(cmd)

    OCRPath = "/home/pi/PiSpeedCamera/ProcessImage/" + captureTime + "_5OCRResult.txt"
    with open(OCRPath) as f:
        # read the OCR result into one line and remove spaces
        OCRMsg = f.read().replace(" ", "").replace("\n", "").upper()

        # only preserve capital letters and digits
        detectedPlate = re.sub(u"([^\u0030-\u0039\u0041-\u005a])", "", OCRMsg)

    print("OCR Result:", detectedPlate)
    return detectedPlate
Code F
"""
    AddOCRToDatabase.py
    Created by Chenxi Qian and Kuan Lu

    add speed and plate information into website database
"""

import sqlite3

def addOCRToDatabase(speed, plate):
    def add_data(license, num):
        curs.execute("INSERT INTO DHT_data values(datetime('now'), (?), (?))", (license, num))
        conn.commit()

    conn = sqlite3.connect("/home/pi/PiWeb/Sensors_Database/test.db")
    curs = conn.cursor()
    add_data(plate, speed)
    conn.close()
Code G
"""
    main.py
    Created by Chenxi Qian and Kuan Lu

    main function to start the program
    currently needs one start for each speed test
    loop version in future work
"""

from MeasureSpeed import measureSpeed
from CaptureLicense import captureLicense
from LicenseDetect import licenseDetect
from LicenseOCR import licenseOCR
from AddOCRToDatabase import addOCRToDatabase

# SPEED_LIMIT = 20  # speed limit 20 mile/h
SPEED_LIMIT = 0  # debug mode, assuming all cars over speeding

# measure the speed of car
detectedSpeed = measureSpeed()

# if the car is over speeding
# capture the license plate and add to the website database
if detectedSpeed > SPEED_LIMIT:
    captureTime, originalImagePath = captureLicense()
    captureTime, croppedImagePath = licenseDetect(captureTime, originalImagePath)
    detectedPlate = licenseOCR(captureTime, croppedImagePath)
    addOCRToDatabase(detectedSpeed, detectedPlate)
H Install Latest Version of OpenCV on Raspbian Buster with Python 3
# install the latest version of opencv
# should be done within 1 min

$ pip3 install opencv-contrib-python==4.5.3.56 -i https://www.piwheels.org/simple

# install dependencies
# remember to add the "-t buster"

$ sudo apt-get update
$ sudo apt-get install libhdf5-dev -t buster
$ sudo apt-get install libatlas-base-dev -t buster
$ sudo apt-get install libjasper-dev -t buster
$ sudo apt-get install libqt4-test -t buster
$ sudo apt-get install libqtgui4 -t buster
$ sudo apt-get update

# you may need to upgrade the numpy to the latest version

$ pip3 install numpy --upgrade

# to test the installation of the opencv
# import it and use "cv2.__version__" to see the installed version

pi@5725:~ $ python3
Python 3.7.3 (default, Jan 22 2021, 20:04:44)
[GCC 8.3.0] on linux
Type "help", "copyright", "credits" or "license" for more information.
>>> import cv2
>>> cv2.__version__
'4.5.3'
>>> quit()
pi@5725:~ $
I Database of Website
'''
  database.py
  Created by Kuan Lu
  Creat database with SQLite.
'''

import sqlite3 as lite
import sys
con = lite.connect('test.db')
with con:
  cur = con.cursor()
  cur.execute("DROP TABLE IF EXISTS data")
  cur.execute("CREATE TABLE DHT_data(timestamp DATETIME, license TEXT, speed NUMERIC)")
J Flask Server
'''
  webServer.py

  Created by Kuan Lu
  Build the server with Flask.
'''

from flask import Flask, render_template, request
app = Flask(__name__)

import sqlite3

# Retrieve data from database
def getData():
  conn=sqlite3.connect('/home/pi/PiWeb/Sensors_Database/test.db')
  curs=conn.cursor()
  time = []
  licensePlate = []
  speed = []
  for row in curs.execute("SELECT * FROM DHT_data ORDER BY timestamp DESC LIMIT 5"):
    time.append(str(row[0]))
    licensePlate.append(row[1])
    speed.append(row[2])
  conn.close()
  return time, licensePlate, speed

# Upload the data to html
@app.route("/")
def index():

  time, licensePlate, speed = getData()
  templateData = {
    'time'    : time,
    'license' : licensePlate,
    'speed'   : speed
  }
  return render_template('index.html', **templateData)


if __name__ == "__main__":
   app.run(host='0.0.0.0', port=80, debug=False)