Fruit Ninja is a classic and famous screen-touch game which caught people's love over several years.
Inspired by this fascinating game, we want to develop a motion controlled fruit ninja game.
Players can hold a "sword" in their hands and use it to "cut" the fruits in front of camera to get scores.
A short demo video for our project is shown as below.
Introduction
The project consists of two main components: the Fruit Ninja game and the motion detection system.
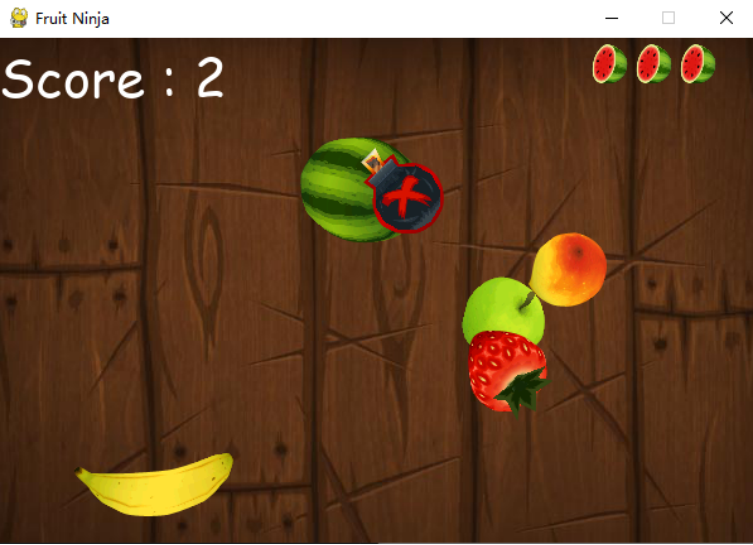
The game is developed in pygame. Similar with Fruit Ninja, players need to cut fruits to get scores and avoid bomb to survive. In addition, players can choose either easy mode or hard mode to play.
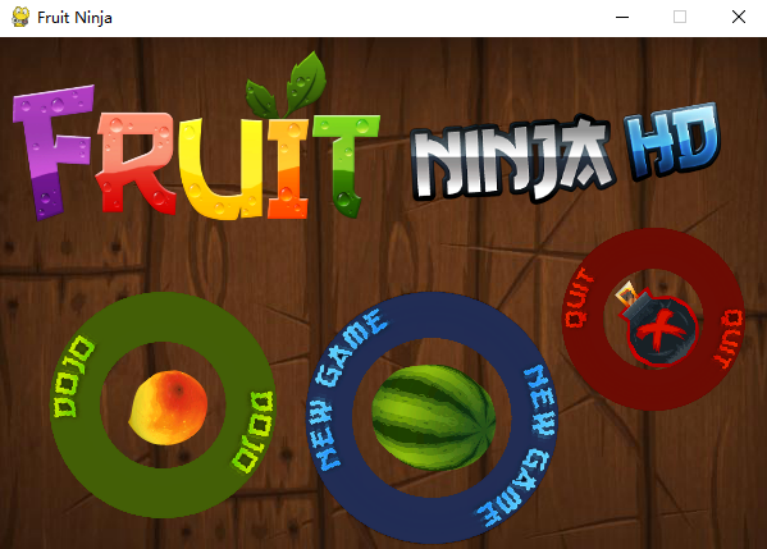
Player can choose to play the game on the piTFT touch-screen or use motion control. The game can be seen in fig. 1.
The motion detection system is based on OpenCV. With pictures captured by Picamera, the motion detection algorithm will find the contour of red object in a frame, calculate the area of red object, find the biggest red object, and calcuate the center.
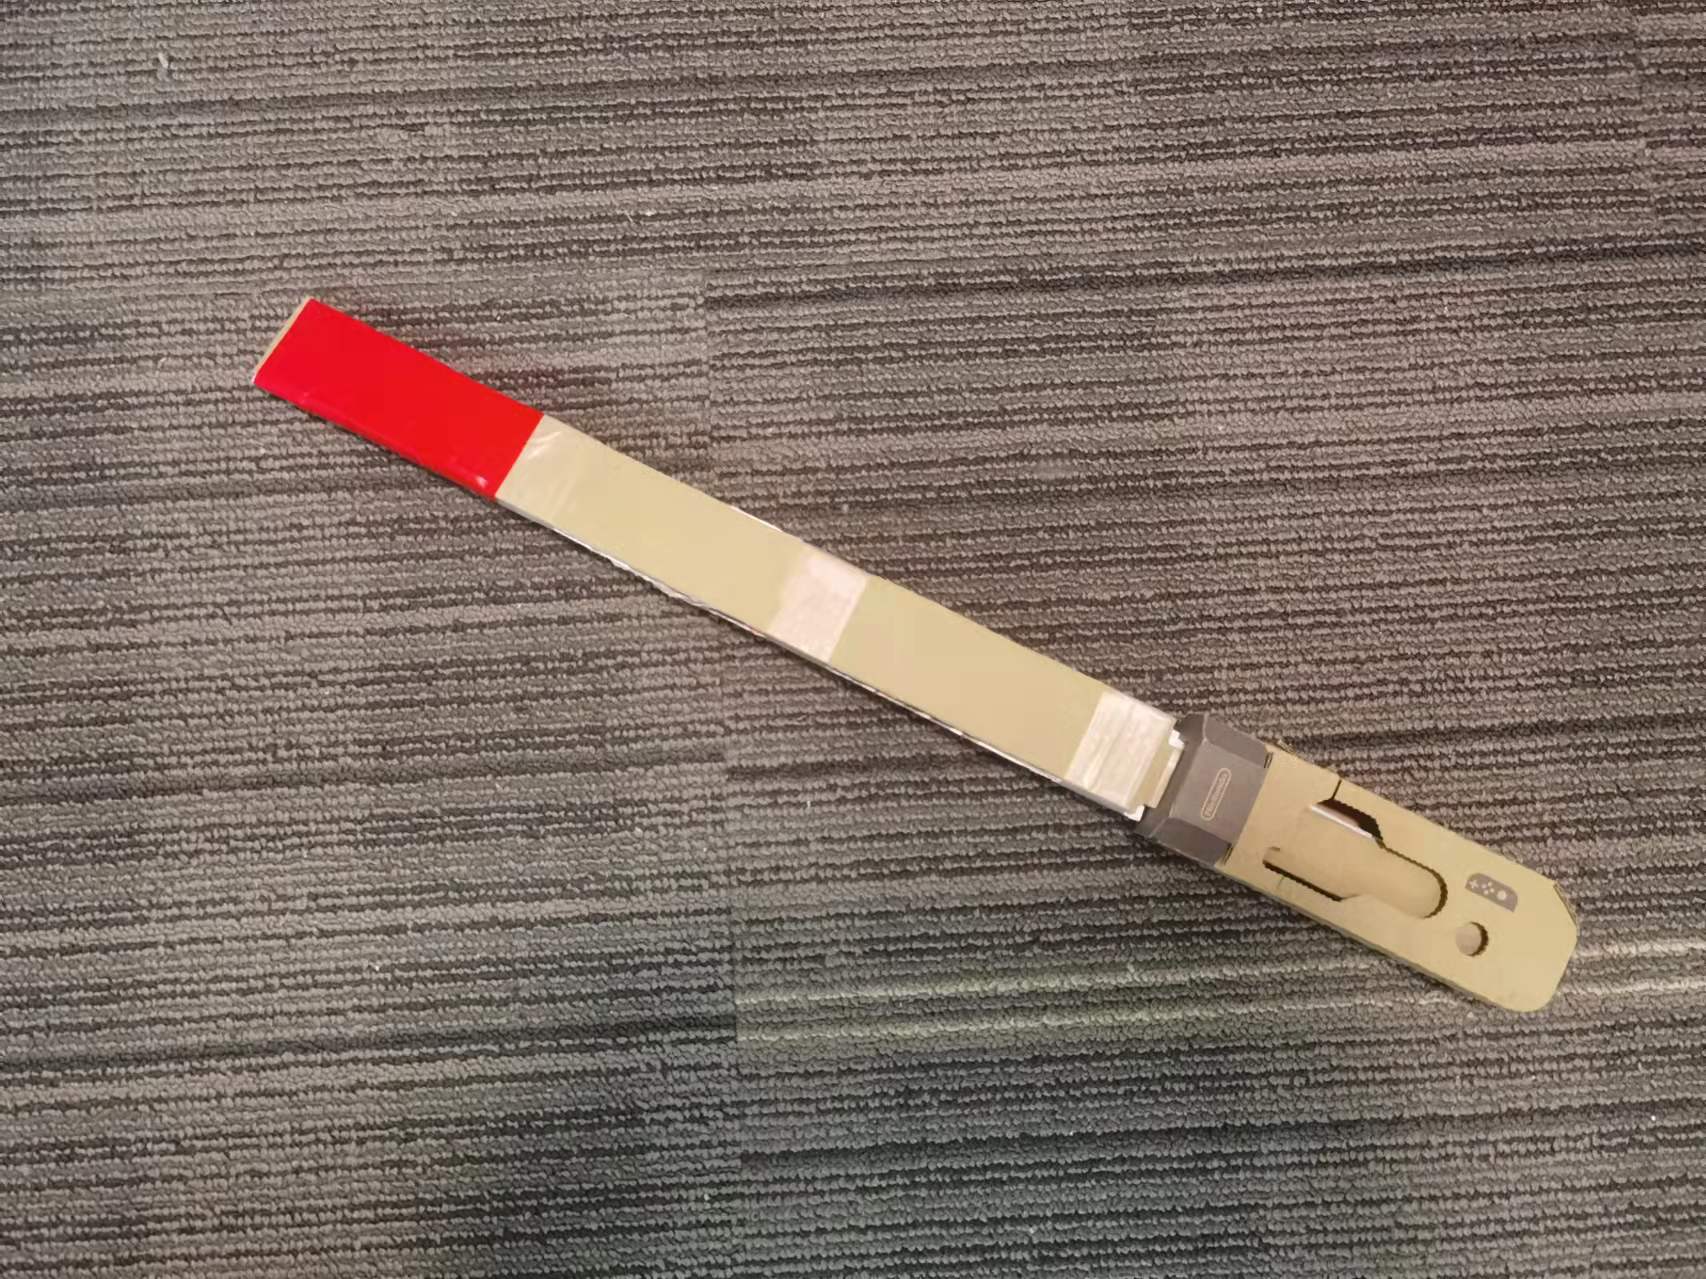
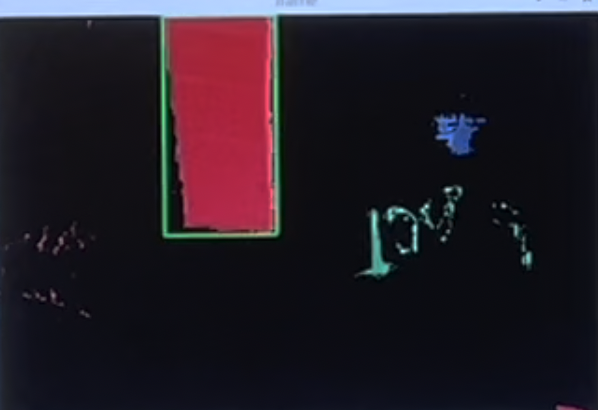
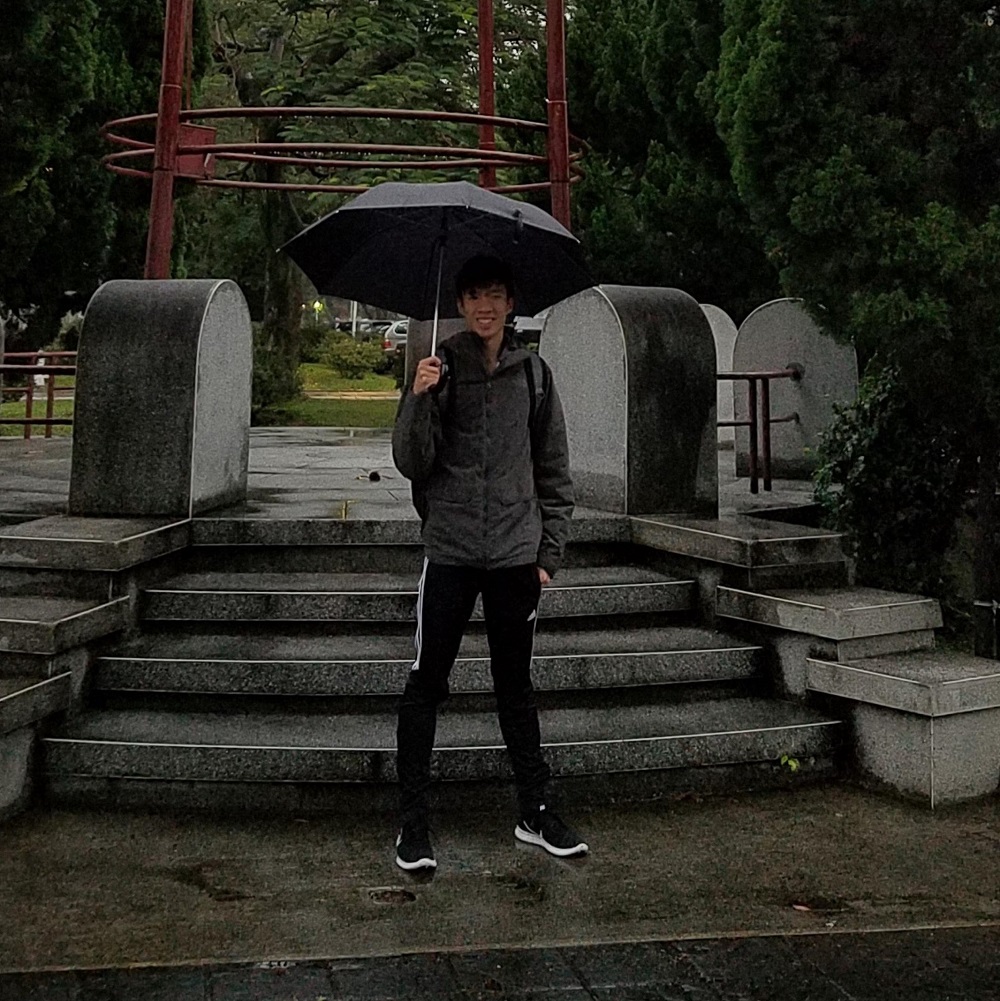
Player use a red "sword" shown in Fig. 3 and the algorithm continuously tracks the center of red "sword" to track the motion of players. The motion detection window can be seen in fig. 4.
Game displayGame displayred swordCV display
Overall, the two components are connected through multiprocessing.Manager.list().
Using multiprocessing, the game and motion detection system run in parallel.
The motion detection system detect the position of "sword" and write the shared multiprocessing.Manager.list. By reading the shared list, the game set the position of mouse in pygame to control the game play.
The project is set up with the Raspberry Pi 3B (Pi), picamera, and a monitor. The Raspberry Pi is connected to the picamera and the monitor is connected through the HDMI port.
To run the system, you would type python main.py in the terminal.
Then you can move the "sword" in front of the camera to "cut" the game mode you want(easy or hard), or to "cut" the quit button to quit the game.
To run the touch-screen game on piTFT, you would type python game_piTFT.py on the RPi.
Design & Testing: Fruit Ninja Game
This section discusses the development of the Fruit Ninja Game of the project.
The design went through multiple iterations before reaching the finalized design.
All the features on the game were tested without the motion detection system at first to ensure that
they function properly. After integrating both the motion detection system and the Game,
we ensured that the motion detection system can properly control the game play.
First Iteration
In the first iteration, we use pygame to develop the Fruit Ninja game.
We initialize the screen using draw_gamestart_screen function, initialize the player's lives using draw_lives function and initialize the fruits
using generate_random_fruits function. We store the fruit data in the data map, which include the speed, position and
other information about the specific fruit. In the main loop, we check the information about the existing fruits in data and judge
whether this fruit will be thrown out or should be generated, then check whether the fruit is cut by the "sword" according to their positions and draw
the updated health points and scores. When the player's health point is less than zero, the game will be over and using draw_gameover_screen function will show the final scores.
The player can either choose start a new game or quit. The display of the first iteration can be seen in fig. 5 and fig. 6.
Second Iteration
After we finished the main part of game, we tried to add more features to the game.
Therefore, in the second iteration, we add a hard mode for this game, which will generate more bombs and harder to get scores.
What's more, we polish the start screen, add three virtual buttons in the start screen, which are easy mode(New Game), hard mode(Dojo) and quit.
In addition, we use GPIO on RPi to enable player to quit the game using physical button, which will be more
convenient.
Final Iteration
In the final iteration, we optimize the parameter of game. We carefully optimize the number, size and speed of fruits and bombs. We choose to run the game in 30 FPS, which makes the game run more smoothly and ensure better user experience.
We also polish the whole game including using high resolution picture and improving the UI interface. We download high resolution icon and fruit pictures from Internet. In the start screen, we add three rotated rings to each of the three virtual buttons, which makes it more visually fascinating.
Game displayGame display
Issues
The first challenge we met is the logic in the main loop. We need to update the speed and position of each fruit
and judge whether the fruit is cut by the "sword" from time to time. Whenever a bomb is cut, the player's health point should be decreased and whenever a fruit is cut the scores
should be increased. The different cases should match different treatments, which require careful thinking and programming.
The second issue we met is the problem of video initialization. When we tried to run the game on piTFT, it showed
the error "video system can not be initialized". Later we found we need to connect the RPi with the monitor first, and the
video system can be initialized successfully.
Design & Testing: motion detection system
This section discusses the development of the motion detection system of the project.
Because we want to develop a motion controled game. We need to find a accurate and fast method to detect the motion of players.
Our design went through 3 versions before reaching the finalized design.
The first version uses OpenPose to detect the hand from the video stream and
segment it from the background. However, the inference in neural network is highly CPU-intensed.
It takes RPi 5 seconds to process one frame which is too slow for a game.
The second version uses OpenCV to detect hands.
The first step is to detect hands from the video stream and segment it from the background.
After detecting the hand, the contours of the hand are extracted using OpenCV.
With this information, the fingers as well as the location of the tip of the pointer finger can be calculated.
Therefore, we can get the location of the hand.
However, the hand detection system can only reach 10 FPS, while The game is running in 30 FPS. It is still too slow.
The final verison uses OpenCV to detect the red "sword".
We made a red "sword" shown in fig. 3. Players need to hold it when playing games. The first step is to detect the red object from the video stream.
After detecting the red object, the contours of the object are extracted and the area of the object are calculated using OpenCV.
We assume there are no big red object in the background, therefore, the largest red object will be the sword.
With this information, we can get the location of sword.
It turns out the simplest is the best. It can reach 30 FPS and can find the position accurately.
First Version - OpenPose
In the first verison, we use a pre-existing neural network model to detect hand. After much searching, we found a model called OpenPose which was developed by
the Perceptual Computing Lab at Carnegie Mellon University.
OpenPose is a real-time multi-person estimation system, which was later
extended to work with hands and other body parts. Setting it up was
very simple and the results of the OpenPose model running on input
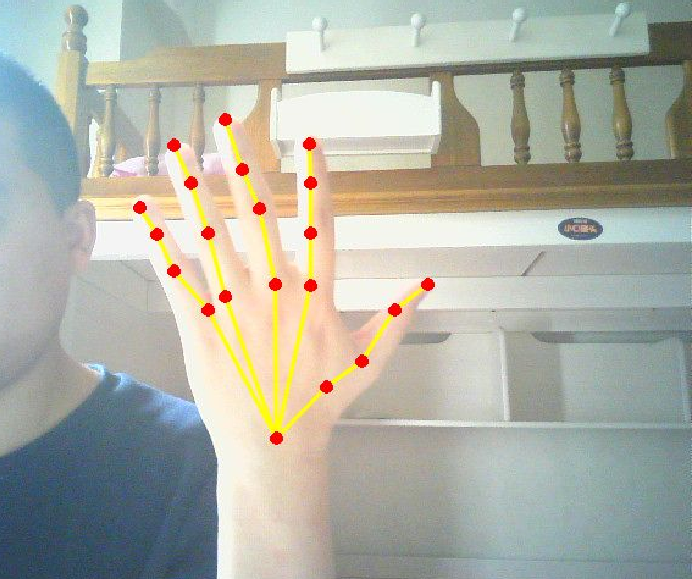
from the camera is shown below in fig. 6.
Classification Results
with OpenPose Model
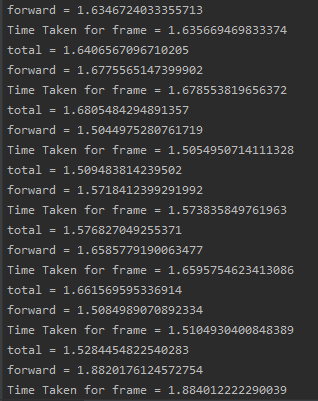
OpenPose Times
As shown in fig.6, the model worked extremely well and is able
to detect all the key points on the hand. Key points in this context refer to the joints on the hand. While the model worked well, there was one critical
downside: the runtime. The model works
by taking an image as input and runs the image through the model
to get the outputs. For pictures or videos, this model works well but
for our real-time application, it was simply too slow. For 720p images,
running the image through the model took over 3 seconds. Even after we
reduced the resolution to 90p, we were still
unable to get the model to classify the camera data fast enough.
Running the model on a desktop with an AMD Ryzen 7 5800H CPU and NVIDIA RTX 3060 GPU running at an
overclocked 4.6 GHz, it took ~1.6 seconds to
run a frame through the forward pass. The times are shown in fig. 7. This meant that if we used this
model, we would have a throughput of less than 1 frame per second.
To increase the throughput, we would need to use CUDA acceleration. Considering that
the Raspberry Pi's CPU is much less powerful than an R7-5800H and that it
does not have a GPU, there was no possible way for us to
use OpenPose on the Pi. Thus, we scrapped this idea and moved
onto an implementations using OpenCV.
Second Version - OpenCV: hands detetcion
In the second version, we moved towards an OpenCV implementation. We used OpenCV to isolate the hand in the image, detected the contour of hands, and finally found the position.
Background Segmentation
we first needed to find a way to isolate the hand in the image.
We used OpenCV's built in background subtraction operators such as cv2.BackgroundSubtractorMOG2.
We ran into an issue quickly with these background segmentation operators.
By default, they take a running average of the images seen so far in the video to create the background.
The background detector was able to detect a moving hand, but once the hand stopped moving, the hand slowly became a part of the background and disappeared.
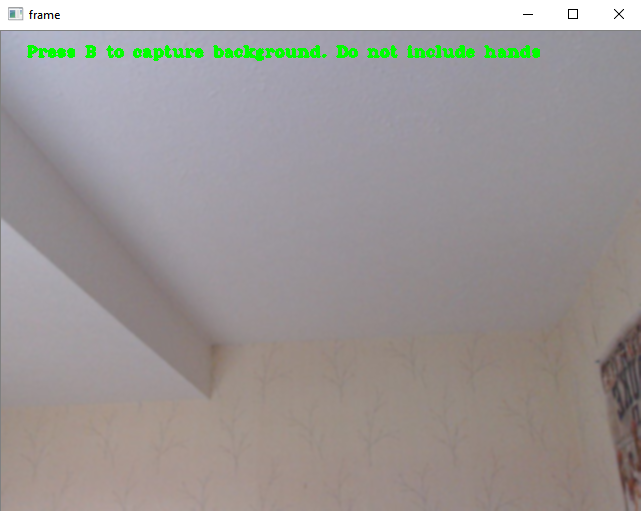
After searching the Internet, We set the learning rate to 0 and the background
subtractor would not update. This allows us to easily detect the
hand, even when still, after setting up the background with a frame that does not include the hand.
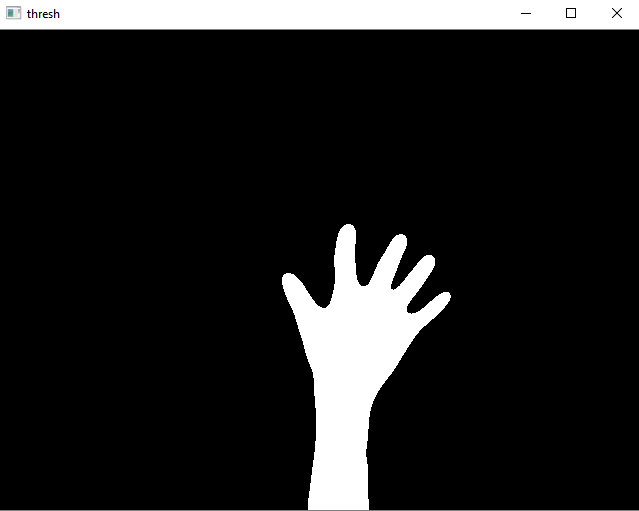
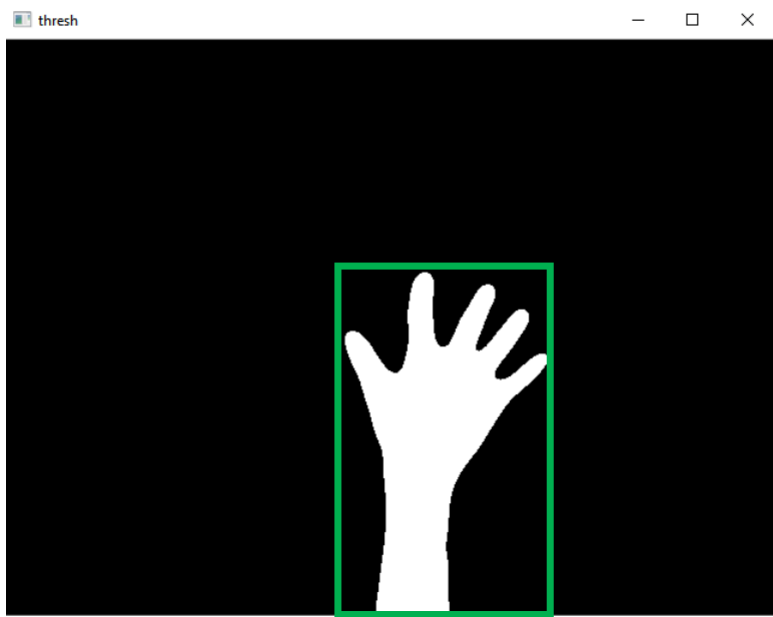
After applying the background subtractor as well as some filtering and thresholding, the binarized image can be seen in fig. 10.
As seen in the figure, there is no noise in the image which makes detecting contours extremely easy.
Contour Detection
The next step is to find the contour of the hand and the arm if they are in
the image. The contour is simply the curve joining the set of points
making up the boundary of the object of interest. To find the contours of
any objects in the image, the OpenCV function cv2.findContours is used. Given a binary image as well as some other
parameters, it returns a list of contours as well as a list representing
the hierarchy of the contours (in case some contours are contained inside
others). Assuming the background is set correctly, the hand corresponds to
the contour with the largest area which was easy to find in the list.
Prompt to Set Background
Binary Image
Adding a Bounding Box
After finding the contour of the hand, we can get coordinate of the hands and use cv2.rectangle to add the bounding box to the hands.
Bounding Box
Final Version - OpenCV: red object detection
The detection of hand is not fast and accuate enough. It can only reach 10 FPS. And it may be affected by the lighting and get the wrong position of hands.
So we decided to use colour detection. The player need to use a "sword" and the top of "sword" is in red as fig. 12. By detecting the red region, we can get the position of the sword.
Because this method is pretty simple, it can reach 30 FPS and detect the position accurately.
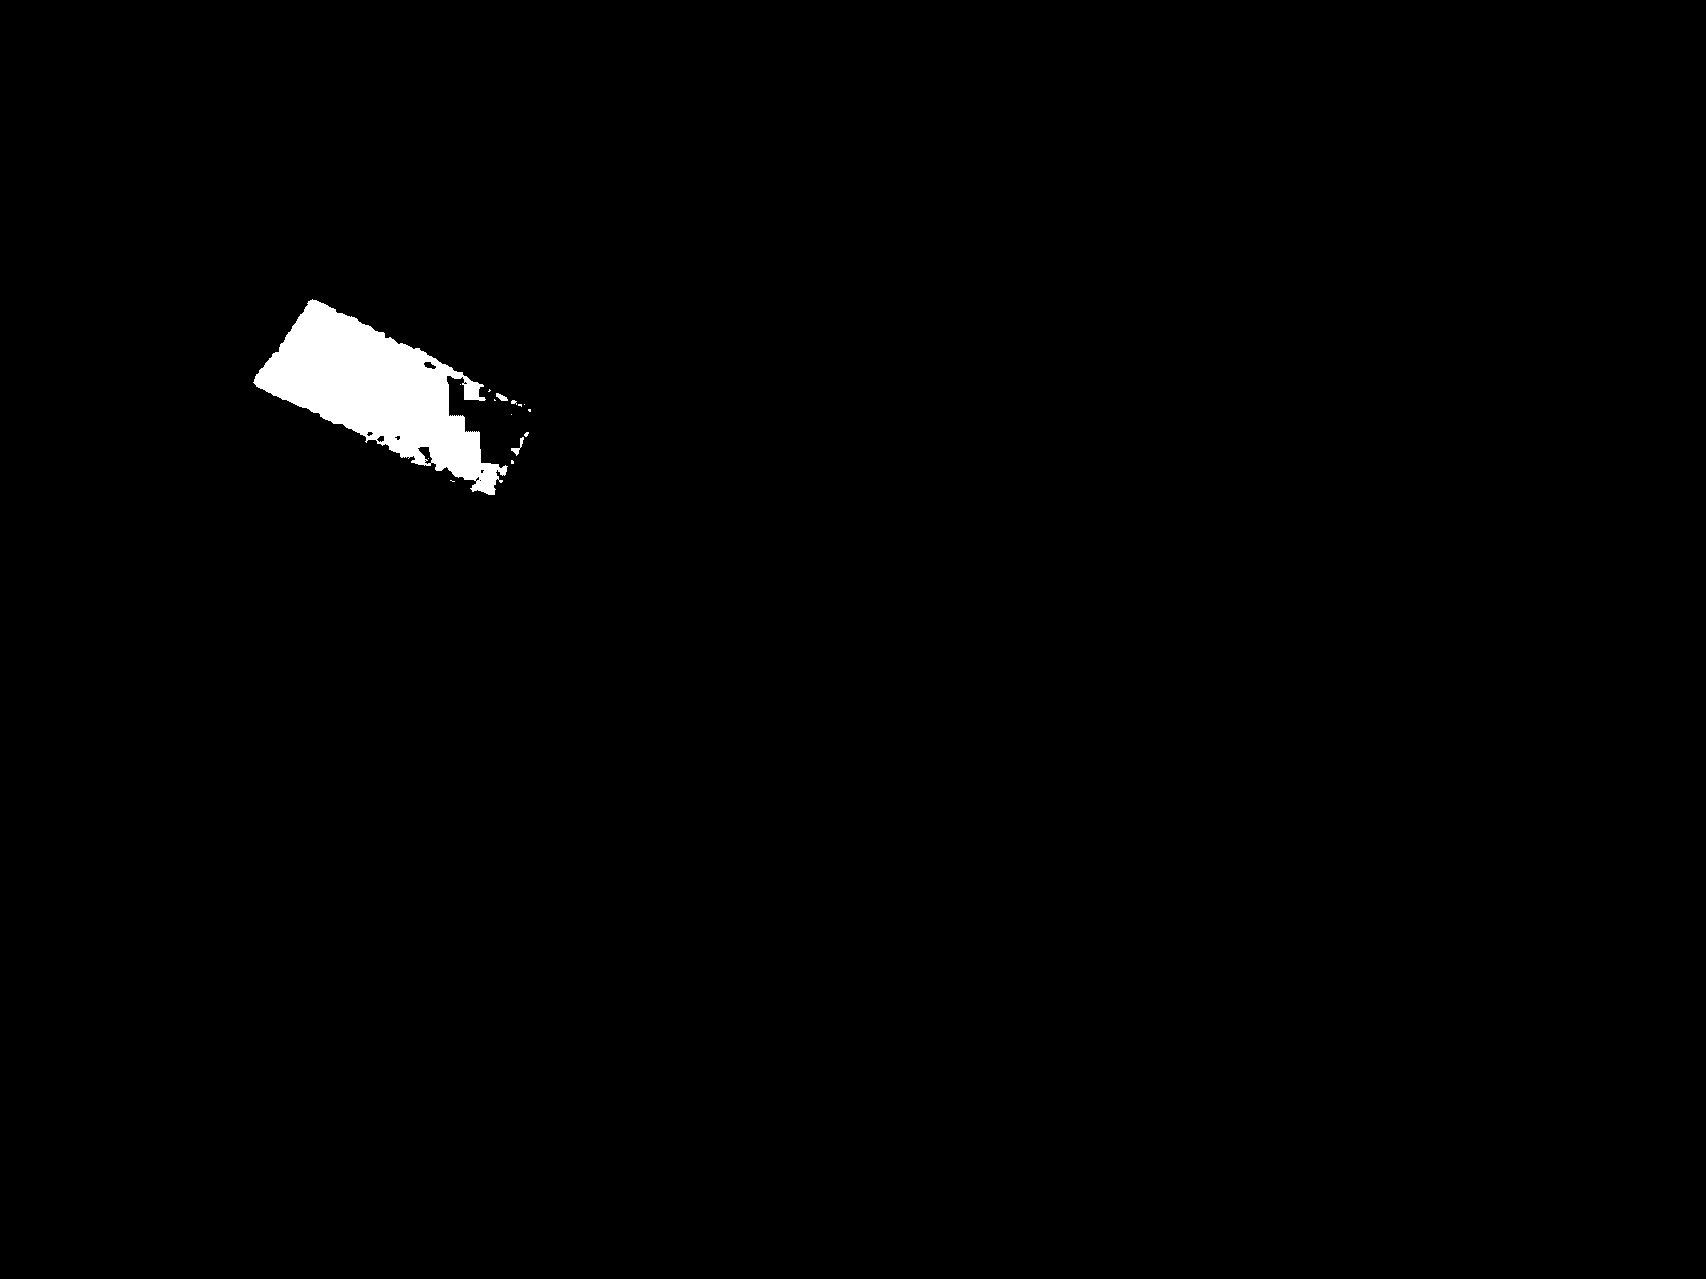
Segment Out the Red Region
We need to segment out a particular region or color from an image using cv2.inRange.
This method is naively equivalent to multiple thresholding where we assign a particular value to the region falling in between the two thresholds.
Remaining region is assigned a different value.
After that we can Then we use cv2.bitwise_and to combine the mask and original frame with bit wise operation and return a merging image like Fig. 14.
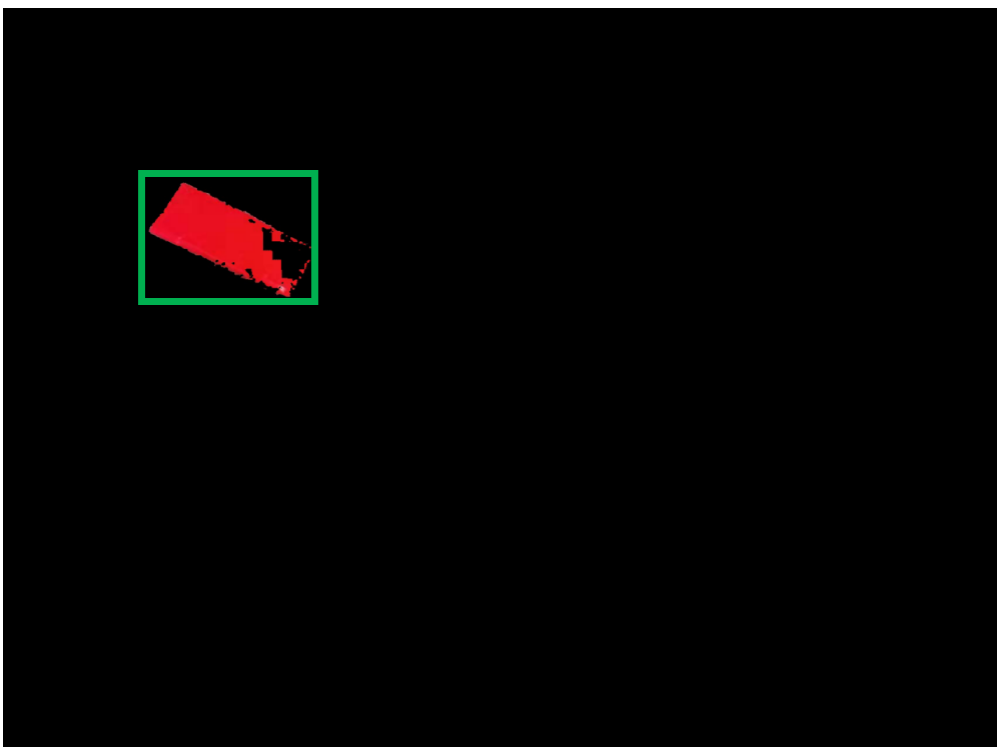
Next, we can use cv2.findContours, cv2.contourArea, and cv2.boundingRect to get the largest red object in the frame. Finally, we successfully get the position
of the largest object.
original picturecv2.inRange resultcv2.bitwise_and resultcv2.boundingRect result
Optimizations the Boundary
The defination of cv2.inRange is as below:
cv2.inRange(src, lowerb, upperb)
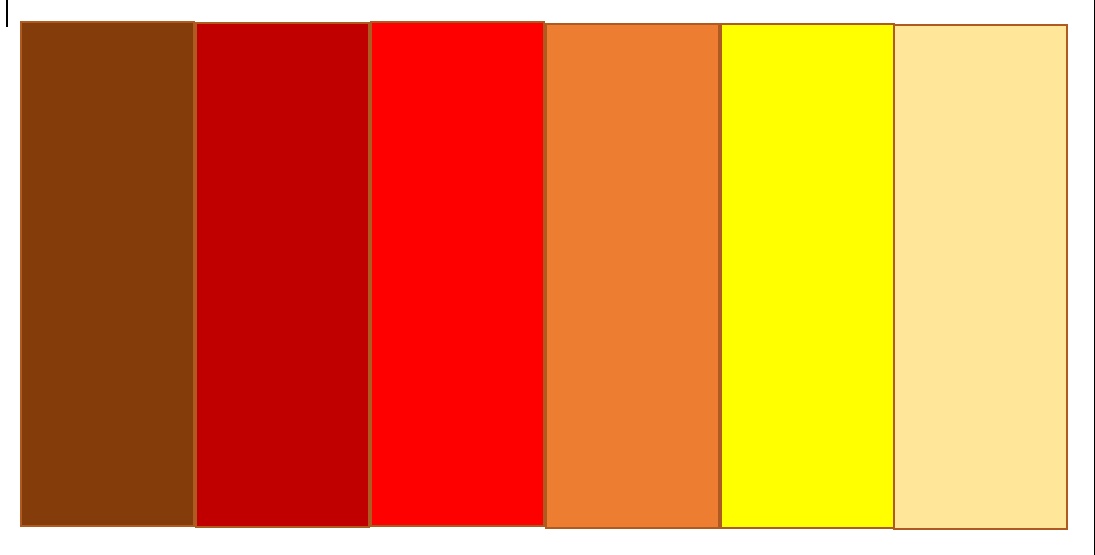
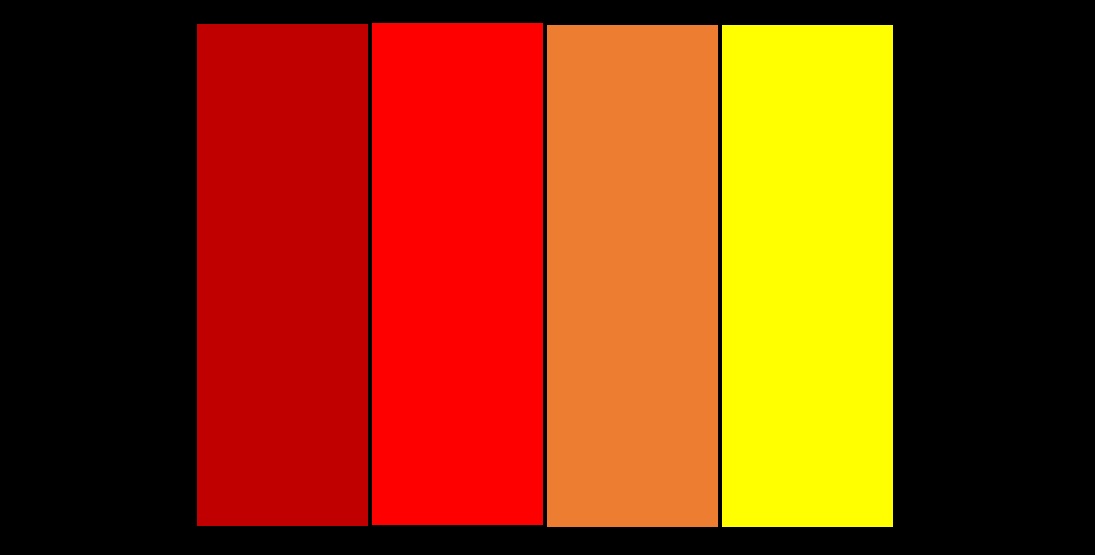
If we change the lower boundary and upper boundary of cv2.inRange, the result will change. We use six colours to get the boundary that can only detect red object like Fig. 16.
original picture
We first set the lower_boundary=np.array([0,180,180]), upper_boundary=np.array([50,255,255]). The result is shown in Fig. 17, Fig. 18. From the result we can find the
red, orange, and yellow region are segmented out. Therefore, the boundary is not good enough.
cv2.inRange resultcv2.bitwise_and result
After the careful experiment, we find if we set lower_boundary=np.array([0,180,180]),upper_boundary=np.array([5,255,255]). We can only segment out the red region which satisfy our requirement.
cv2.inRange resultcv2.bitwise_and result
Testing Details
Given the nature of the program, most of the testing could be done
visually. By running the program and looking at the OpenCV output, it
was easy to test whether certain methods worked properly. When
implementing new features, testing was mostly done on the desktop. This
was done only for convenience as the program runs much faster on the
desktop, allowing us to test features much faster. We used the
OpenCV output frame for most of the testing. For example, we drew
lines on the output frame to test how well the system was
detecting the red object. This also allowed us to test how environment
conditions such as external lighting would affect detection. Testing the speed of the pipeline was done on the Pi since we had to optimize for
performance on the Pi.
Design & Testing: Integration
After the game and motion detection system were developed to a stable state, we combined the two components to create the final system. In this section, we will discuss the final system as well as issues we ran into while finalizing the system.
Final System
The final system has both the game window and motion detection window running concurrently. The CV window allows users to know where the sword are relative to the camera frame and
makes it easier for the user to use their hands to manipulate the game. This is necessary since there aren't enough multiple cameras to cover a large field of view,
so users will run into the issue of moving their hands out of frame if they cannot see their hand location in reference to the camera frame.
Fig. 1 and fig. 4 would be what users see when running the main program. As noted in the Introduction,
The multiprocessing library is used to run the two programs as separate processes since both the motion detection window and game run in a infinite loop.
The data from the motion detection is sent from the CV component to the pygame through a multiprocessing.Manager.list().
The CV component would send data in the form of [x,y], where [x,y] represents a coordinatee>.
In order to use motion to control the game, the user needs to hold the sword and use sword to "cut" the fruit.
The location of the sword is detected and used as the mouse position in pygame to control the game.
If the location of the sword is on a fruit, player will gain a point.
If the location of the sword is on a bomb, player will lose health points.
Results
The project performed mostly as planned.
We were able to implement all the features we planned for. The system functioned properly both on the monitor and the piTFT.
The main objective, to allow players to play a motion controlled Fruit Ninja game, has been achieved.
Conclusions
Our project was able to successfully read input from a camera, detect the user's motion, and control the Fruit Ninja game play based on player's motion.
We also added a hard mode to provide user more challanging but rewarding experience.
Thus, we met all our project objectives. During this process, we discovered certain things that didn't work.
On the motion detection system, we have tried several methods. First we tried to use a pre-existing neural network model - OpenPose to detect hand. However, it took RPi 5 seconds to process a frame which is
too slow for the game. Then we tried OpenCV to detect the hands. However, it can only reach 10 FPS and is not accurate. Finally, we made a red sword and chose to detect the red sword to detect the motion. It can reach 30 FPS and is highly accurate.
During integration, we found that we had to use picamera instead of webcamera to avoid system crash. Also we need to slow down parts of the program, specifically the motion detection system, due to the slower core clock of the Pi's CPU.
Apart from these issues, we are both happy with the outcome with our project and learned a lot about working with the Pi
Future Work
Given more time for the project, we would like to add more feature to the game. For example, we can add the sound
effect to the game and make more rendering to the interface, like the cutting effects.
What's more, we can also optimize the speed and the improve fluency of the game.
Also, we can improve the performance of motion detection system by improving the detection speed and accuracy.
Budget
The overall budget for the project is $0.
The Raspberry Pi and the picamera amount to a cost of $0 as they were provided in lab.
Qingfan mainly worked on the game programming.
Hanzhong worked on the motion detection system, polishing the game, and integrating and optimizing the two components.
We both worked on completing the website report together.
References
We referenced the pygame tutorials
to design the game using the pygame library.
For motion detection system, we researched various methods. We looked into a
neural network model called OpenPose created by CMU.
For the idea of using a skin histogram, we referenced a tutorial called
Skin Detection Using OpenCV.
When attempting manual thresholding for background segmentation, we
referenced a software written using OpenCV in C++ called
Handy, hand detection with OpenCV.
For help with contour and defect detection, we referenced both the
previous tutorial and a tutorial called
Real-time Finger Detection.
For improving performance of the CV pipeline on the Pi, we
referenced the tutorial
Increasing Raspberry Pi FPS with Python and OpenCV.
Lastly, we would like to thank Professor Joseph Skovira and the ECE 5725 Fall 2021 course staff for
their feedback throughout the project development.
Code Appendix
The code is located at the public Github repository.