Soundpad
♪An Intelligent Musical Instrument♪
By Xiameng Chen, Weiyi Sun
Demonstration Video
Introduction
Soundpad is an intelligent musical instrument, which let musicians create their own tracks by making combinations of multiple sound samples. Soundpad provides three modes for users, namely preset mode, AI mode and record mode. With preset mode, each button is loaded with a pre-processed sound clip of the song “Harder, Better, Stronger, Faster” by Daft Punk. While AI mode leverages voice recognition to identify a user-specified instrument to be loaded in buttons. For record mode, it offers more flexibility allowing users to record any sound and then uses it for composition.

Project Objective:
- Play music through a external speaker when pressing buttons
- Recognize voice and load specific sound samples
- Record sound using microphone
Design
Neotrellis Setup
The Neotrellis 4x4 button pad boards are fully tile-able and communicate over I2C. With both Arduino/C++ and CircuitPython/Python library support, we can use the pad with any and all microcontroller like Raspberry Pi. First we wired up a NeoTrellis to our board exactly as shown in the Fig 1. We soldered the VIN to 5V, GND to GND, SDA to I2C data SDA, and SCL to I2C clock SCL.
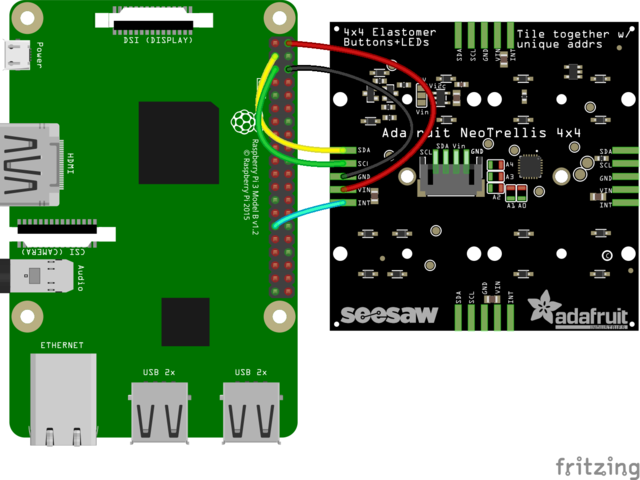
Fig.1 Wiring of Raspberry Pi with I2C created by Adafruit
Then we needed to install the Adafruit CircuitPython Neotrellis library on the CircuitPython board. This library allowed us to easily write Python code that read the button presses, and then lit up the LEDs. We ran the standard updates sudo apt-get update and sudo pip3 install --upgrade setuptools to update our Pi and Python. Since a vast number of the CircuitPython drivers used I2C and SPI for interfacing, we would get those enabled. I2C was a very commonly used standard designed to allow one chip to talk to another. We ran sudo raspi-config, went to interfacing options, and enabled I2C and SPI to install support for the ARM core and linux kernel. We typed the commands sudo i2cdetect -y 1 and ls -l /dev/spidev* to test our configuration. Once we were done with both and had rebooed, we verified the I2C and SPI devices with the command ls /dev/i2c* /dev/spi* and the response was /dev/i2c-1 /dev/spidev0.0 /dev/spidev0.1.
We have encountered a problem when setting the I2C address. At first, running the test program always gives an error saying that there is no I2C device on address 0x2e. However, according to Adafruit documentation, the default address is set to 0x2F, which made us confused. As expected, the I2C address should be 0x30. 0x2E is one smaller than 0x2F, hence we figured out the problem. It should be noted that the default address for Neotrellis is 0x2E rather than 0x2F as specified in Adafruit documentation. Solder jumper A0 sets the lowest bit with a value of 1. By soldering A0, the I2C address is now 0x2E + 1 = 0x2F.

Fig.2 Neotrellis Soldering
User Interface Design
Soundpad contains a home screen and three subscreens. The home screen will direct users to three modes. All three subscreens contain a back button to direct you back to the home screen. The background images are both picked and downloaded from Google. In AI mode, if a user hits the confirm button before the start button, a warning will be displayed at the center of the touchscreen. After saying a word, the context of voice will be displayed on the screen. In record mode, there will be a line of text above four buttons indicating the status update to users. If the start button is pressed, it will show "Recording..."". If the play button is selected, the text will be changed to "Playing...".
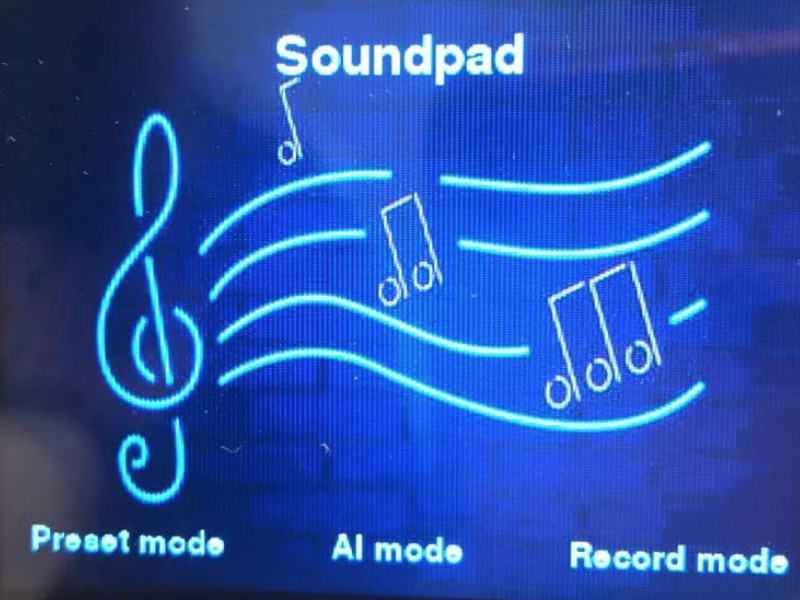
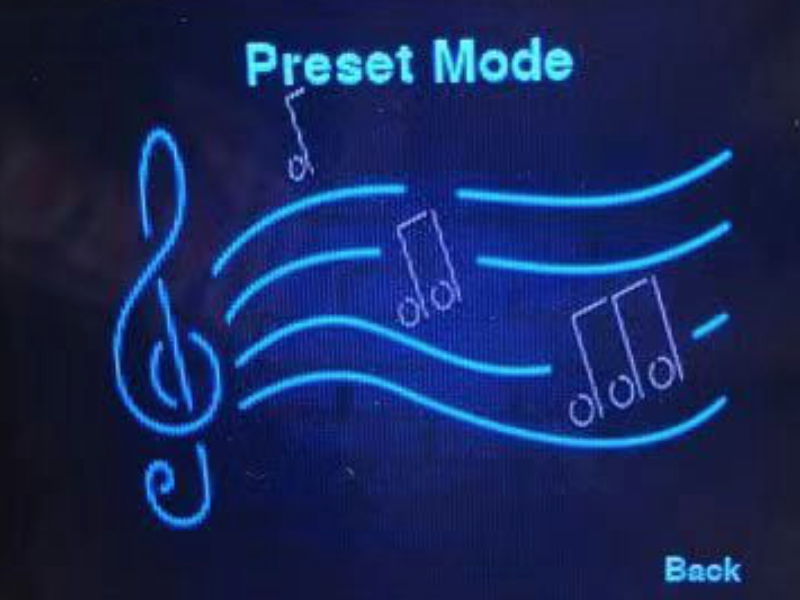
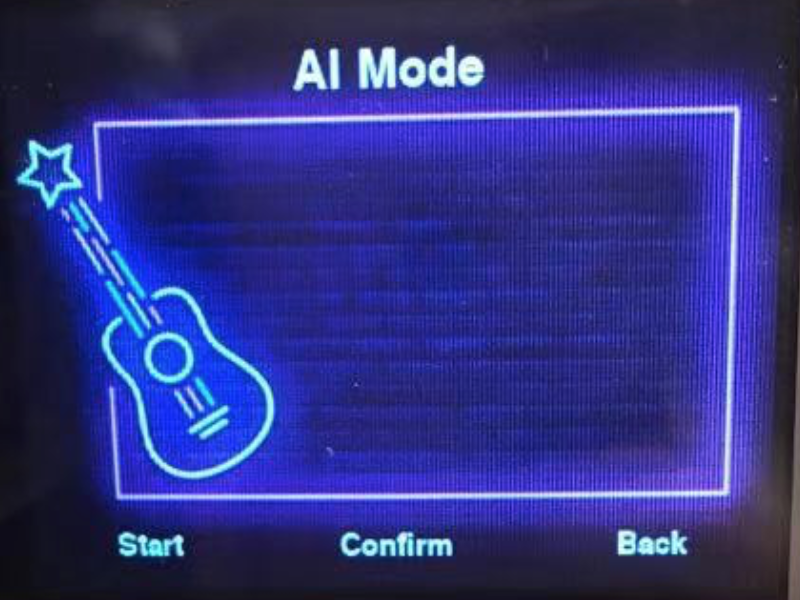
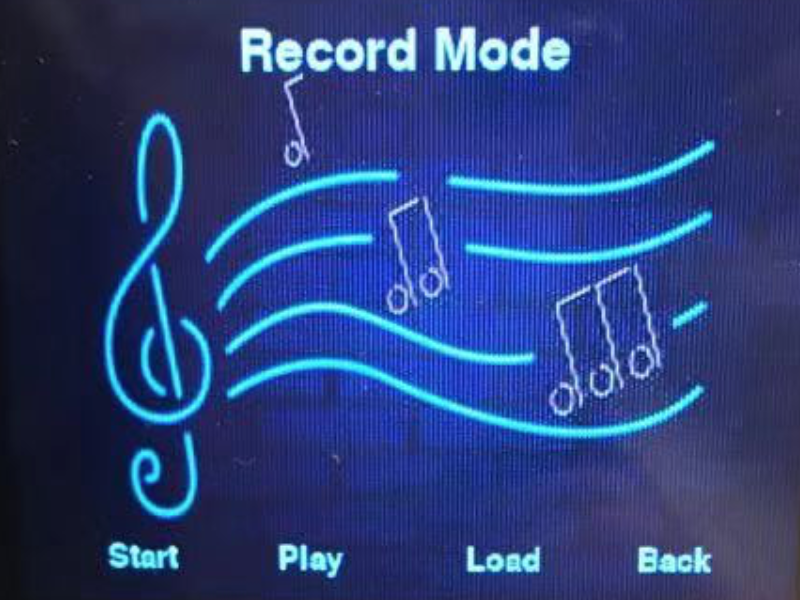
Fig.3 GUI design
Sound Preprocessing
Since Raspberry Pi can only play very specific types of audio files, audio preprocessing is needed before loading to the Soundpad. In Preset Mode, each button is loaded with a clip from the song Harder, Better, Faster, Stronger from Daft Punk, which is one of the most popular songs in electronic music. However, we cannot just cut the whole piece of song into clips. Audio files conversion into PCM 16-bit Mono WAV files at 22KHz sample rate, which is the best for microcontrollers to play WAV files, is also necessary.
In our project, the open-source software program Audacity is utilized for sound preprocessing task. It provides all functions we need, such as audio volume adjustment, trimming audio files into several clips as well as sound effects, and audio format modifications.
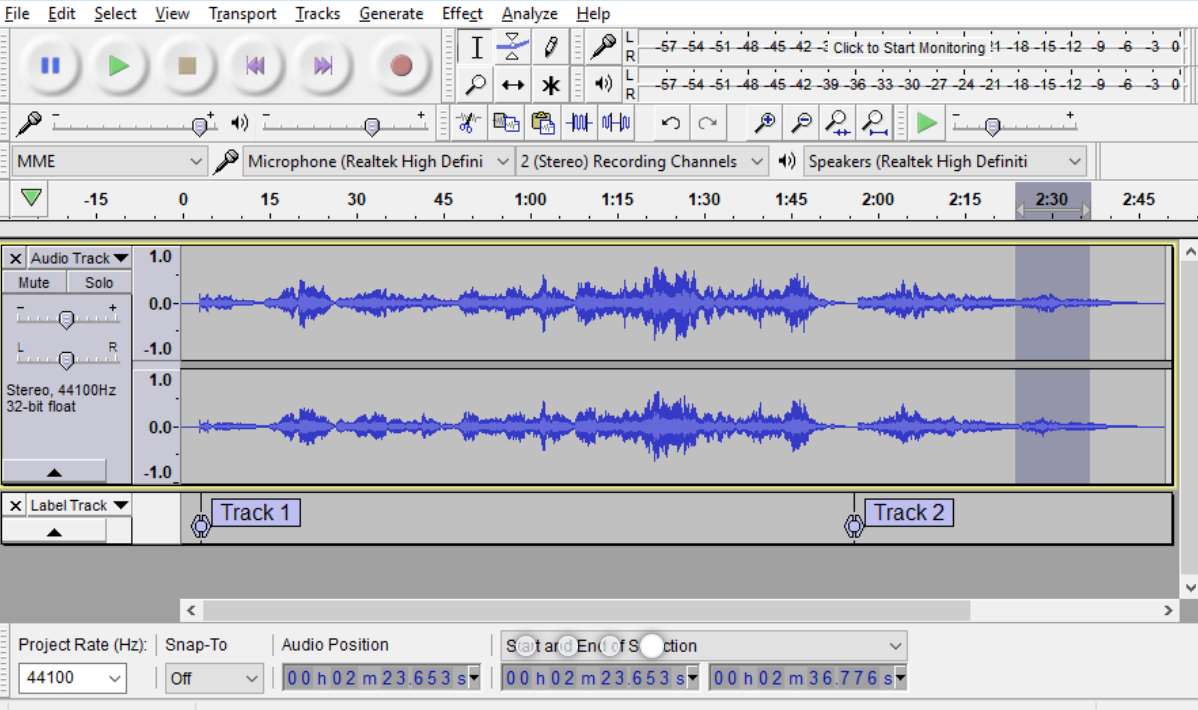
Fig.4 Audacity control screen
In AI mode, all sound samples were downloaded from freesound.org. The samples we used are already in the desired format.
Voice Recognition
Voice recognition in AI mode is implemented by sending HTTP request to and retrieving HTTP response from API. The API used in our project is wit.ai. This API is simple and easy to use. For implementation, we need to contruct HTTP request as the specified format in the documentation specifying access token and content type in the header. Then, the meaning of an audio should be the extracted value of the "_text" field in HTTP response.
Buttons Function
As in Lab2, detection of button presses on Neotrellis is also implemented using callback function. When it detects an edge falling event on the button, it will execute the callback function. In callback function, color of the button will be changed to white when a rising edge is detected and back to its original color when a falling edge is detected. This is used to indicate the press. In addition, it will also play the audio file.
The audio files are stored in directories. Sound samples for preset mode are stored in sounds directory, while for AI mode, they are placed under directory of the instrument name. Each audio file should be named using the format as "nn-color-audioname.wav", where the first two digits nn(number 00-15) represent position of the button to be loaded, color can be either lower case or upper case and audio name can be anything. These three values must be separated by a '-'. For example, "04-red-do.wav" means the button on row two and coloumn one will have red light and be loaded with audio file do.wav. Based on this format, we can extract those values from the file names.
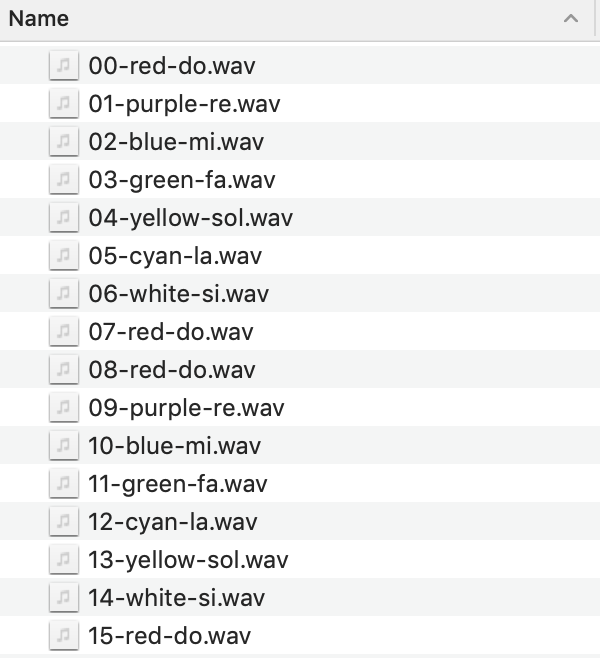
Fig.5 piano Directory
We use omxplayer audiofilename.wav &. It should be noticed that & here is included to ensure the generation of chord.
Recording
The record mode allows users to record their inspiration and composition with a microphone. The users can tap the start button to begin recording. They can either clap their hands or stomp their feet to make a beat via the microphone, and the soundpad will save it down. To playback the record, users can tap the play button and listen to their composition. Users are allowed to record multiple times before loading it into the button. After pressing load button, users can make music with their unique samples.
Testing
After implementation of the desired functions, we encountered a piTFT issue when testing the GUI on piTFT. GUI worked well on Linux desktop, however, when switching the screen back to piTFT, it did not respond to the touch as expected. Then, we ran the screen_coordinates.py program in Lab2 to check the function of piTFT. It turned out that piTFT displayed multiple screen coordinates in response to a single touch and those coordinates were incorrect. After consulting professor Skovira, the problem was located to the command ‘sudo apt-get upgrade’ that ran in Neotrellis setup. This command wiped out the previous piTFT touch control setup in Lab2 Week2. To solve this problem, we need to downgrade the control of touch screen to wheezy.
Steps to fix this problem are listed as follows.
sudo apt-get update
sudo apt-get –y –-allow-downgrades install libsdl1.2debian/wheezy
Result
Three modes work well with the touchscreen control. When the preset mode is selected, all sixteen buttons are activitated and light up sequentially. Each button is assigned with a unique clip. The upper two rows are loaded with single sound effect, while the lower two rows are loaded with preprocessed clips of the song. In AI mode, by hitting the start button, a user begin to say a word, then the context will be displayed on the touchscreen. If the result is correct, you can press the confirm button to load the sound of that instrument into all buttons. If not, you are allowed to say a word again by hitting the start button. You can also make a chord by pressing several buttons simultaneously. The buttons are very sensitive to the time of presses. If you want to generate a chord, please ensure you hit them at the same time, otherwise, there will be delays. Besides, fault tolerance is also considered in interface design. If a user hits the confirm button before saying a word, a warning will be shown on the touchscreen. For record mode, if a user hits the start button, Soundpad will record for three seconds. Hitting the play button will playback this recording. Again, you are allowed to record multiple times until you satisfy. The load button will activate the buttons. The lighting button is the one that loaded with the recording.

Future Work
So far, AI mode supports two instruments which are piano and guitar. Lots of online sound samples we found were either not free for downloading or not suitable for our project. If we want to expand this function to contain more instrument options, we have to find a more powerful website. Besides, up to now, Record mode can load one recording file. Future work may include allowing users to record multiple files and specify which button to load.
Work Distribution

Project group picture
Xiameng Chen
xc437@cornell.edu
Neotrellis assembly and Installation
PyGame Interface Design
Preset mode
AI mode
Loading samples to Neotrellis in Record mode
Weiyi Sun
ws442@cornell.edu
Neotrellis setup and modules installation
Record mode
Sound processing and modifying in Preset mode
Acknowledgement
We would like to thank Professor Skovira for generously providing parts for us. Also thank Professor Skovira and TAs for encouraging us and giving guidance when we encountered problems.
Parts List
- Raspberry Pi 3B+ - Provided by lab
- Adafruit NeoTrellis RGB Driver PCB for 4x4 Keypad - $12.50
- Silicone Elastomer 4x4 Button Keypad - for 3mm LEDs - $4.95
- Mini USB Microphone - Provided by lab
- JBL portable speaker - Provided by lab
Total: $17.45
References
Adafruit NeotrellisMicrocontroller Compatible Audio File Conversion
Neotrellis Sound Board
Piano and guitar sample
Code Appendix
For the complete code, see this Github repository.# main.py # # Date: 12/04/2019 # Description: This is the main function of the program # It creates the GUI and calls function as user selects import pygame from pygame.locals import* #for event MOUSE variables import os import RPi.GPIO as GPIO import time import play_sound import voice_recognition import recordandplay GPIO.setmode(GPIO.BCM) GPIO.setup(27,GPIO.IN,pull_up_down=GPIO.PUD_UP) os.putenv('SDL_VIDEODRIVER','fbcon') #Display on piTFT os.putenv('SDL_FBDEV','/dev/fb1') os.putenv('SDL_MOUSEDRV','TSLIB') #Track mouse clicks on piTFT os.putenv('SDL_MOUSEDEV','/dev/input/touchscreen') def GPIO27_callback(channel): global code_running print ("falling edge detected on 27") code_running = False GPIO.add_event_detect(27,GPIO.FALLING,callback=GPIO27_callback) # Pygame initialization pygame.init() pygame.mouse.set_visible(False) # Set to False when display on piTFT WHITE=255,255,255 BLACK=0,0,0 size=width,height=320,240 screen=pygame.display.set_mode((width,height)) background=pygame.image.load("/home/pi/soundpad/background.jpg") ai_background=pygame.image.load("/home/pi/soundpad/voice_background.jpg") backrect=background.get_rect() backrect2=ai_background.get_rect() title_font=pygame.font.Font(None,30) button_font=pygame.font.Font(None,20) flag_main = True flag_preset = False flag_ai = False flag_record = False context = "" # Initialize main menu def main_menu(): screen.fill(BLACK) screen.blit(background,backrect) title_text={'Soundpad':(160,25)} button_text={'Preset mode':(50,220),'AI mode':(160,220),'Record mode':(270,220)} for my_text,text_pos in title_text.items(): text_surface=title_font.render(my_text,True,WHITE) rect=text_surface.get_rect(center=text_pos) screen.blit(text_surface,rect) for my_text,text_pos in button_text.items(): text_surface=button_font.render(my_text,True,WHITE) rect=text_surface.get_rect(center=text_pos) screen.blit(text_surface,rect) pygame.display.flip() # Initialize preset mode screen def preset_menu(): screen.fill(BLACK) screen.blit(background,backrect) title_text={'Preset Mode':(160,25)} button_text={'Back':(270,220)} for my_text,text_pos in title_text.items(): text_surface=title_font.render(my_text,True,WHITE) rect=text_surface.get_rect(center=text_pos) screen.blit(text_surface,rect) for my_text,text_pos in button_text.items(): text_surface=button_font.render(my_text,True,WHITE) rect=text_surface.get_rect(center=text_pos) screen.blit(text_surface,rect) pygame.display.flip() # Initialize preset mode screen def ai_menu(string): screen.fill(BLACK) screen.blit(ai_background,backrect2) title_text={'AI Mode':(160,25)} button_text={'Start':(50,220),'Confirm':(160,220),'Back':(270,220)} for my_text,text_pos in title_text.items(): text_surface=title_font.render(my_text,True,WHITE) rect=text_surface.get_rect(center=text_pos) screen.blit(text_surface,rect) for my_text,text_pos in button_text.items(): text_surface=button_font.render(my_text,True,WHITE) rect=text_surface.get_rect(center=text_pos) screen.blit(text_surface,rect) text=button_font.render(string,True,WHITE) textRect=text.get_rect() textRect.center=(160,120) #screen.blit(text_surface,rect) screen.blit(text,textRect) pygame.display.flip() # Initialize record mode screen def record_menu(string): screen.fill(BLACK) screen.blit(background,backrect) title_text={'Record Mode':(160,25)} button_text={'Start':(50,220),'Play':(120,220),'Load':(200,220),'Back':(270,220)} for my_text,text_pos in title_text.items(): text_surface=title_font.render(my_text,True,WHITE) rect=text_surface.get_rect(center=text_pos) screen.blit(text_surface,rect) for my_text,text_pos in button_text.items(): text_surface=button_font.render(my_text,True,WHITE) rect=text_surface.get_rect(center=text_pos) screen.blit(text_surface,rect) text=button_font.render(string,True,WHITE) textRect=text.get_rect() textRect.center=(160,180) #screen.blit(text_surface,rect) screen.blit(text,textRect) pygame.display.flip() code_running = True main_menu() while code_running: if flag_main: for event in pygame.event.get(): if(event.type is MOUSEBUTTONUP): pos=pygame.mouse.get_pos() x,y=pos if y>200: if x<80: # preset mode is selected flag_main = False flag_preset = True preset_menu() # Actions to initializaing preset menu status = play_sound.run("sounds") if status==0: flag_main = True flag_preset = False main_menu() elif x>140 and x<180: # ai mode is selected flag_main = False flag_ai = True ai_menu("") elif x>240: # record mode is selected flag_main = False flag_record = True record_menu("") if flag_preset: for event in pygame.event.get(): if(event.type is MOUSEBUTTONUP): pos=pygame.mouse.get_pos() x,y=pos if y>200: if x>240: # back to main menu flag_main = True flag_preset = False main_menu() if flag_ai: for event in pygame.event.get(): if(event.type is MOUSEBUTTONUP): pos=pygame.mouse.get_pos() x,y=pos if y>200: if x<80: # start recognizing human voice ai_menu("Start to speak") context = voice_recognition.run() # call voice recognition print("Requesting "+context) ai_menu(context) elif x>140 and x<180: # confirm the result if context=="": ai_menu("Please specify instrument first:)") else: ai_menu("Now playing " + context + "...") status = play_sound.run(context) # loading specific sound packs if status==0: context = "" flag_main = True flag_ai = False main_menu() elif status==1: ai_menu("Start to speak") elif x>240: # back to main menu flag_main = True flag_ai = False main_menu() if flag_record: for event in pygame.event.get(): if(event.type is MOUSEBUTTONUP): pos=pygame.mouse.get_pos() x,y=pos if y>200: if x<80: # start recording print("Start recording...") record_menu("Recording...") # add recording code recordandplay.record() time.sleep(3.0) record_menu("Finish") elif x>100 and x<140: # playback print("Playback...") record_menu("Playing...") # add playback code recordandplay.play() record_menu("Finish") elif x>180 and x<220: # load print("Loading to Neotrellis...") record_menu("Loaded^_^") # add playback code status = play_sound.run("record") elif x>240: # back to main menu flag_main = True flag_record = False main_menu() GPIO.cleanup()