Portable Game Console
A CHIP8 emulator
A Project By Yixin Cui (yc2494) and Zhongling Liu (zl682)
Demonstration Video
Introduction
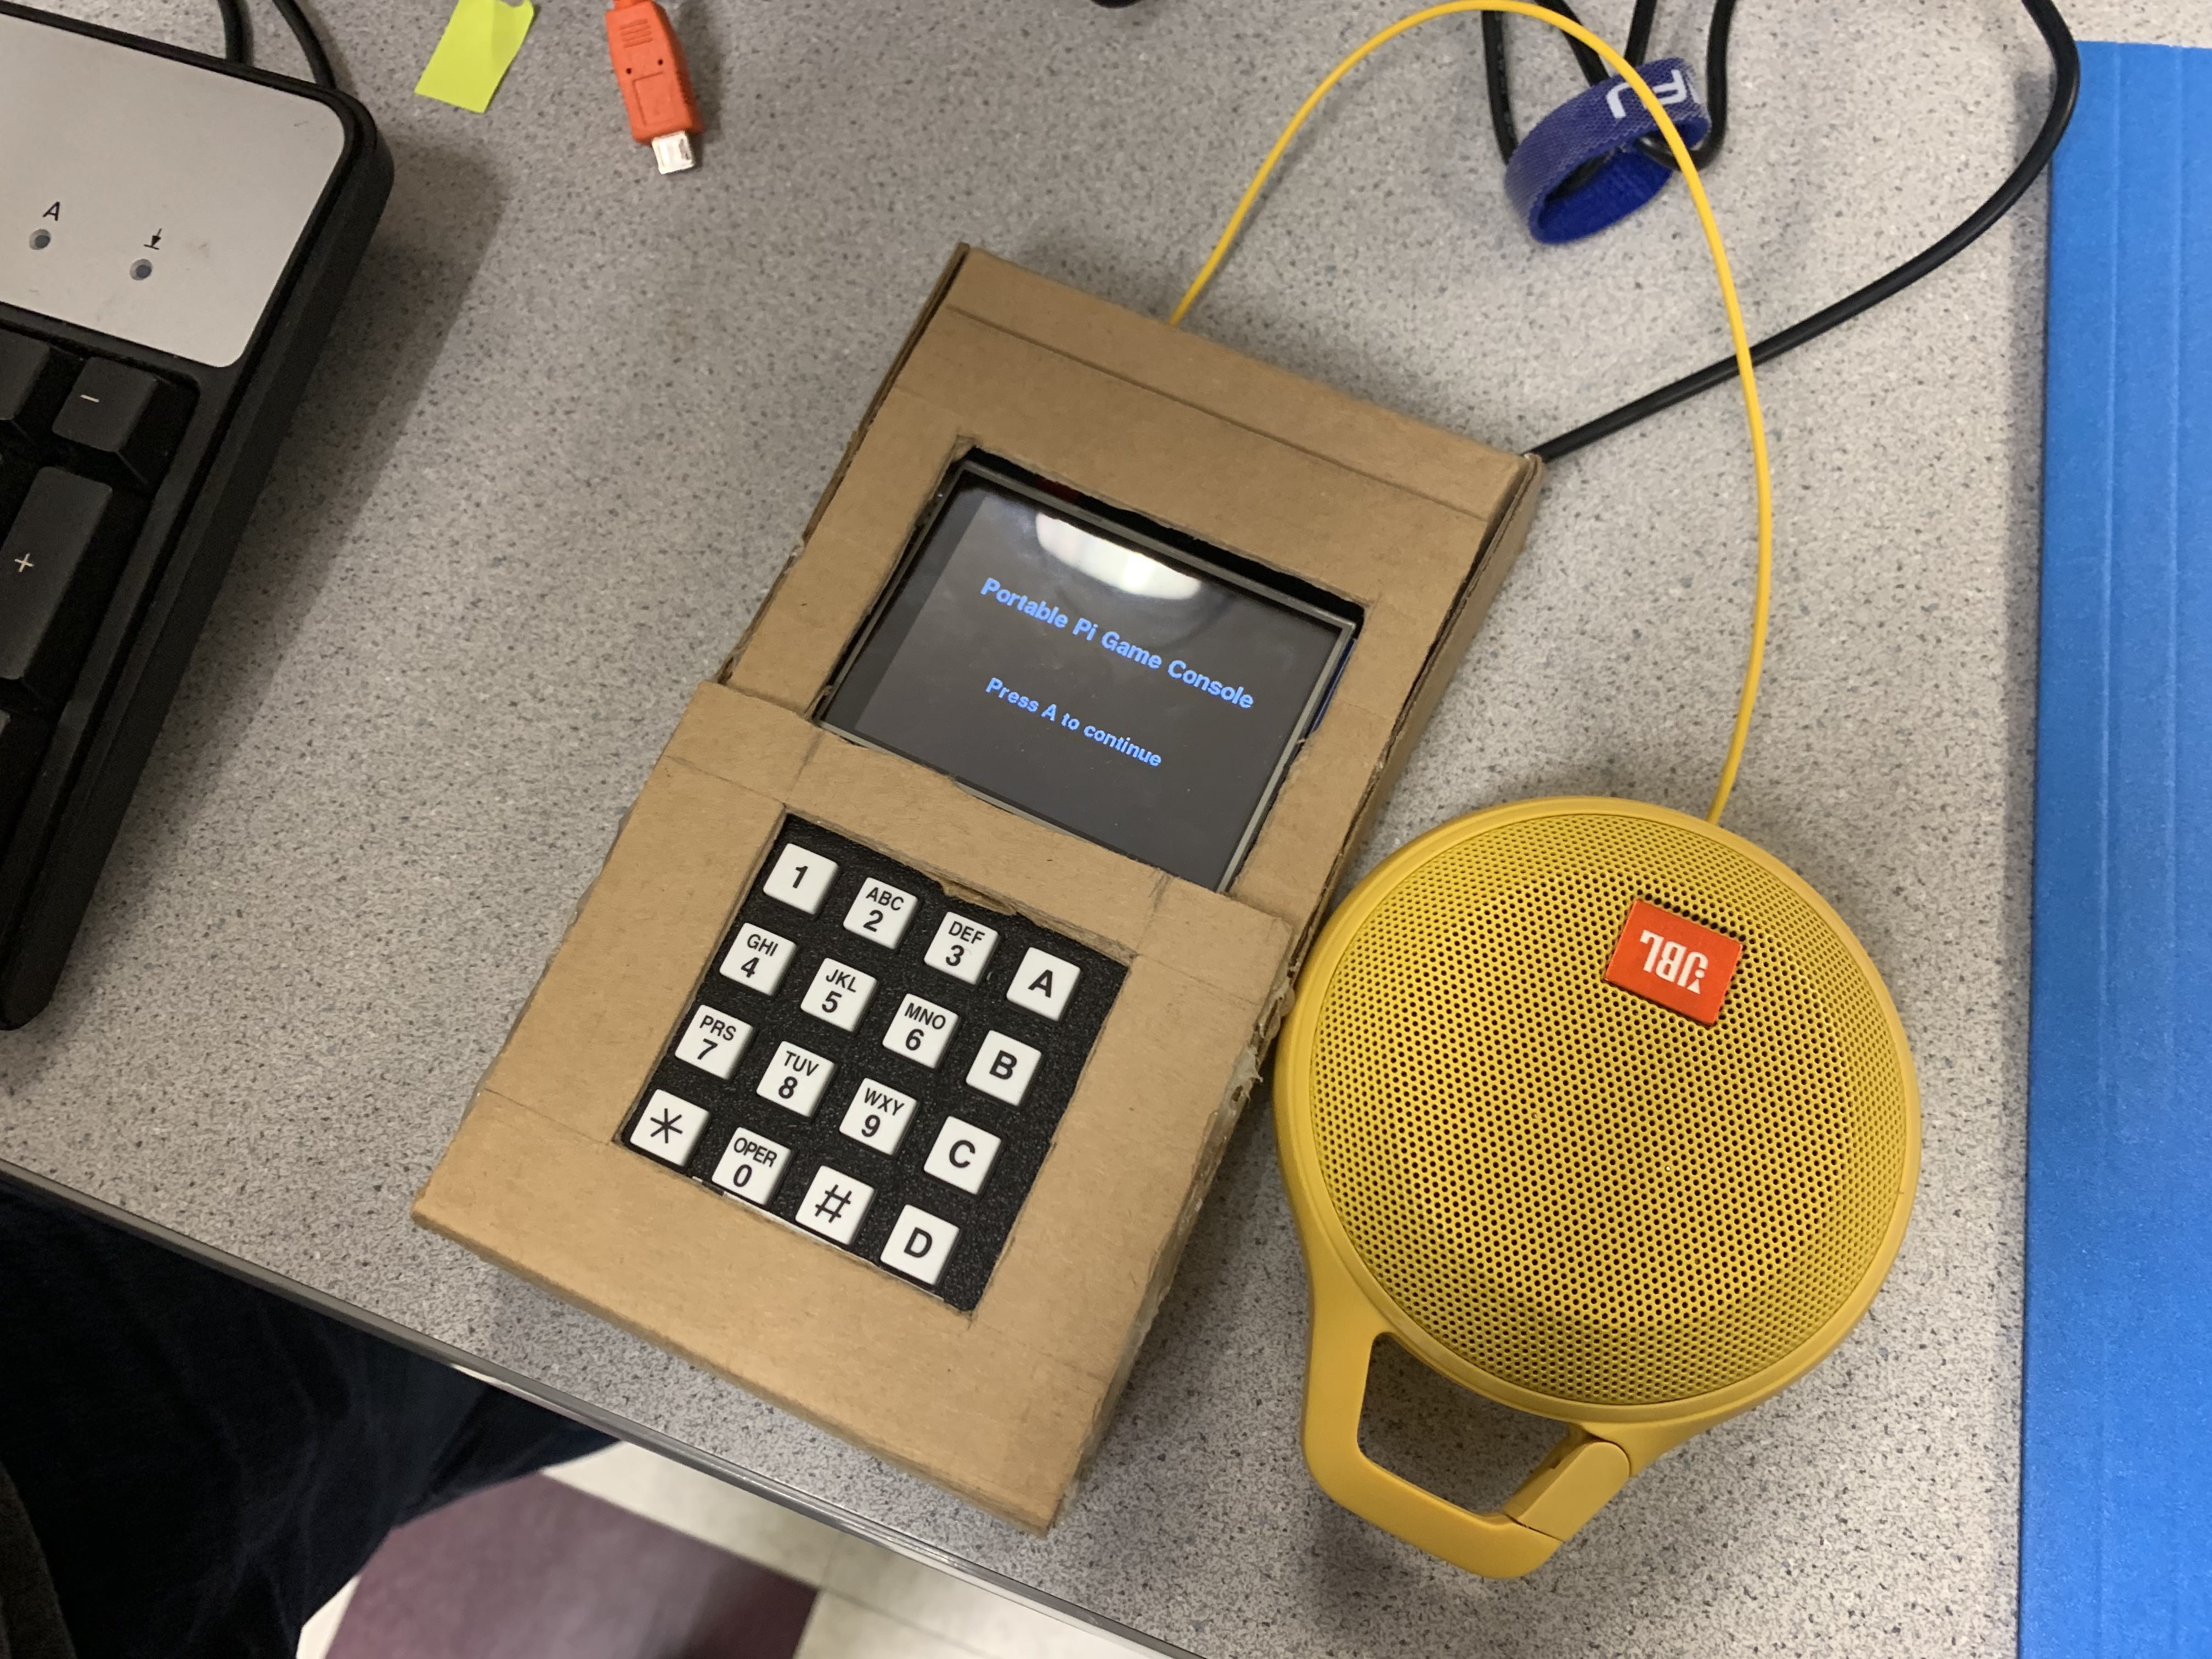
Our ECE5725 project is a portable game console. The core part of the system is a CHIP8 emulator written in Python. Users use the numeric keypad to interact with the console, and PiTFT displays the menu and game. The external speaker is used to play sound. The whole system resides in a handmade box created in cardboard, which is environmental friendly. The Pygame module is the top level of our implementation and is used to display the user interface and coordinate all the other parts such as keypad input, sound output and game display.
Project Objective:
- Be able to run chip8 games on our emulator
- Be able to display the game console on the PiTFT
- Be able to use external buttons to play game
- Be able to play sound when playing games
Design
Hardware Design
Our portable game console consists of four parts: Raspberry Pi, 2.8 inch piTFT, keypad and speaker. Raspberry Pi is the controller of the system. The 2.8 inch piTFT displays the user interface and game, which is connected with Raspberry Pi by GPIO. Keypad is the input module and is connected with Raspberry Pi by GPIO as well. User can use the buttons on the keypad to choose game and control in the game. Speaker plays the sound in the process of game.

Fig. 1 Hardware design of Portable Game Console
Chip8 Emulation
The main goal of this project is to run chip8 game on the Raspberry Pi. Since they have a totally different CPU architectures, we have to emulate the CPU so that it allows RPi to emulate a Chip8 video game console's hardware and play its games on Raspberry Pi. It requires us to emulate the Chip8 in the following four modules.
Instruction Set Implementation
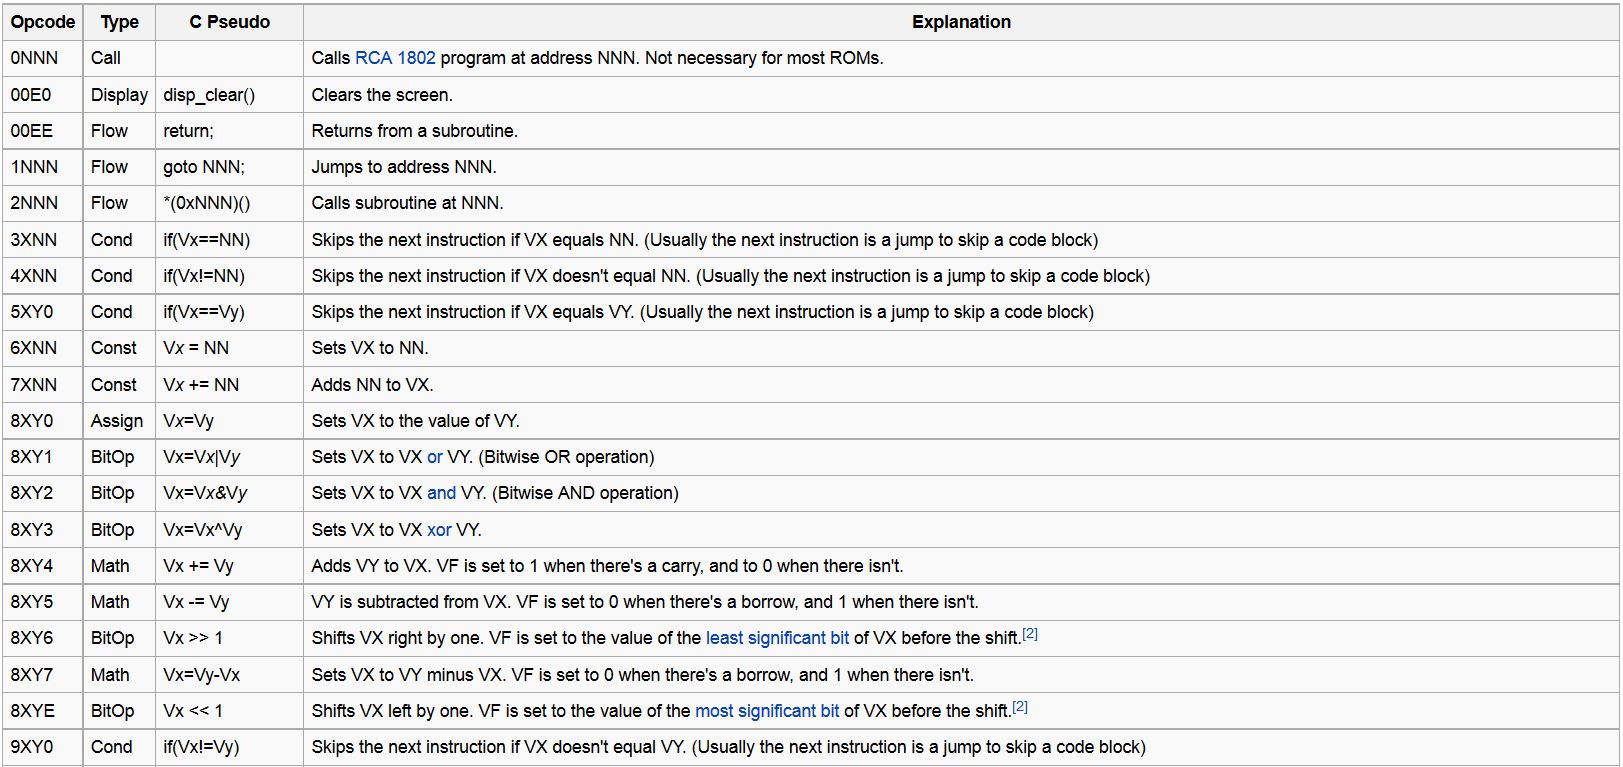
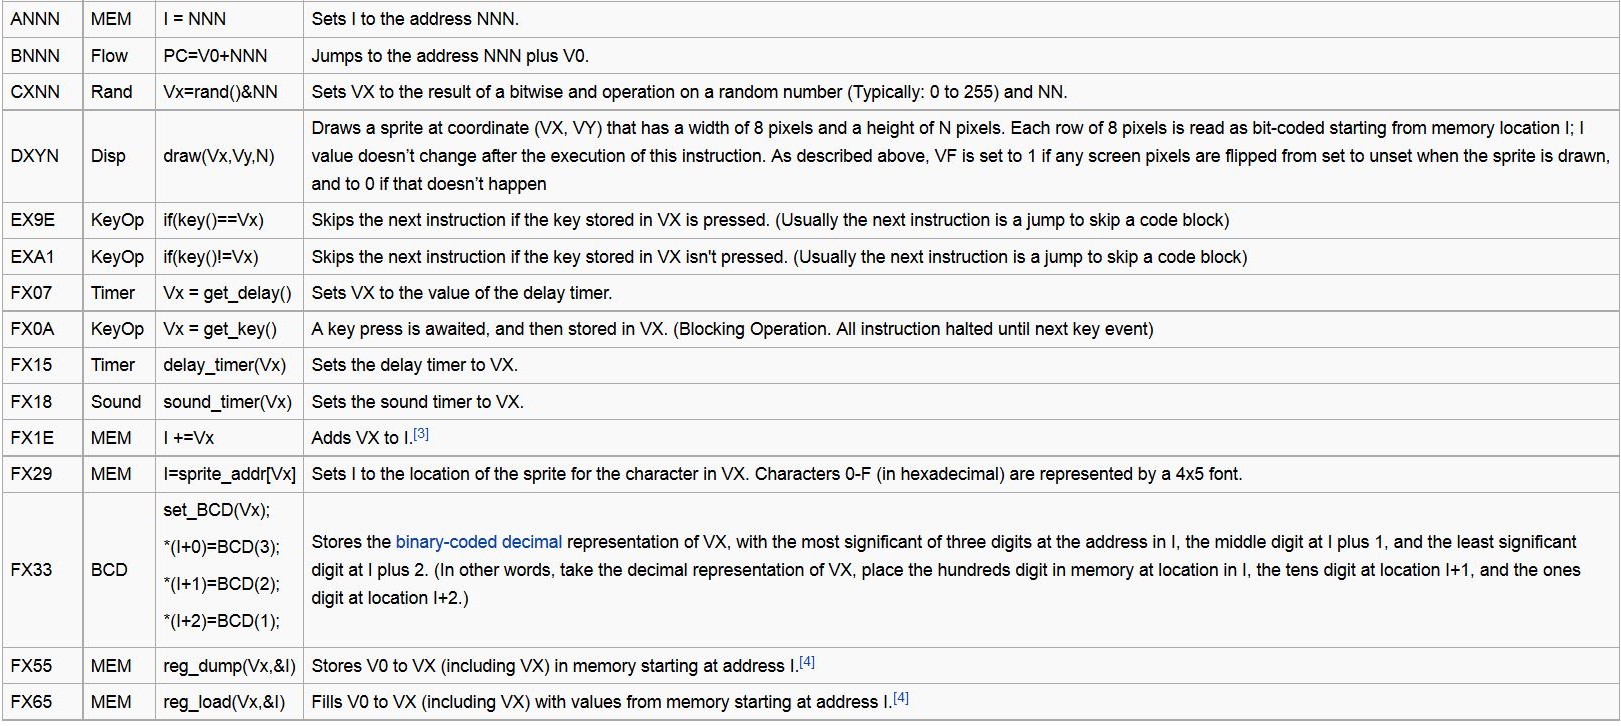
Fig. 2 Chip8 Instruction Set (Source: https://en.wikipedia.org/wiki/CHIP-8)
According to the image above, the Chip8 consists of 35 different instructions, the first step is to emulate all the instructions using Python. Each opcode is 16 bits long. The most significant 4 bits determines the type of the operation and rest bits usually represent the register number or the absolute address. The following figure shows how we implemented one of these .
# Instruction 3XNN
    def cpu_3xnn(self):
        x = (self.op_code & 0x0F00) >> 8
        if self.v_reg[x] == (self.op_code & 0x00FF):
            self.reg['PC'] += 4
        else:
            self.reg['PC'] += 2
Fig. 3 The implementation example of instruction 3XNN
The instruction is 3XNN, 3 is the type of the instruction, in this case, it means the condition opcode, we use bitwise shift operator and bitwise & operator to get the X, which is the register number of one of the register in Chip8. NN is also obtained in a similar way. If the value in the specified register equals to the given NN, the program counter will increment by 4 which is two operations, so the emulator will skip the next instruction which usually is a jump operation to skip a code block. If the value in the register doesn't meet the condition, the counter will only increment by 2 and goes to the next instruction. We implemeted all the instructions in CPU.py and the code is shown in the Appendix section.
Memory Subsystem
Besides the CPU itself, we also have to emulate the memory using software implementation. The Chip8 system has a total 4KB memory. We used the bytearray in Python with size 4096 to store all the bytes. Chip8 games are usually stored in the address from 0x200 to 0xFFF and other space is reserved for built-in font or other use. When initialzing the memory, the machine code of the game and the font data we defined in an array are loaed to the byte array. We also created two functions for the CPU to access the memory, the first is load_byte, which return a byte from a specific address. The other is the store_byte, which stores the given byte value in the specified address.
Chip8 Output
The Chip8 system has two output devices, the display and the speaker. For the display, the screen size of the original Chip8 system is 64x32. All the graphic information is stored in an array with length 2048. Only one opcode is used to change the value in that array. Opecode DXYN reads coordinate from the register X and register Y and draw a sprite that has a width of 8 and height of N. All the bit-coded pixels are stored in the memory locations whose starting address is defined in the register I, which is a special register in the CPU. The Pygame will have access to that array, process the graphic information and display it. There is also a draw flag defined in the CPU, the Pygame only refresh the PiTFT when the flag is true.
Chip8 Input
The Chip8 system uses a numeric keypad to generate input. The keypad has 16 keys in total. In the CPU, there is an array with length 16 that stores the keypress information. When a key is pressed, the value in the specific slot of the array is set to 1. Some opcodes, such as EX9E, performs corresponding operation according to the keypress status.
CPU initialization and CPU cycle
When the system is started, the CPU will first start the inilialization process, create the memory object and load the game rom into the memory. Then it will set all the registers to 0 and program counter to the starting address. The CPU cycle has three steps. The first is the fetching opcode, basically CPU load two bytes from the memory address defined in program counter. Multiple if-else statements read the opcode and branch the program to the specific operation and execute the instruction. Two timers in the CPU, delay timer and sound timer decrement by 1 every CPU cycle.
Front-end Design
KeyPad
There are 8 pins on the keypad, where 4 pins are used as input and 4 pins are used as output. Each button acts as a switch. Whenever a button is pressed, one input pin and one output pin are connected. On the Raspberry Pi, 4 GPIO ports are used as output and connected with the 4 input pins on the keypad, and 4 GPIO ports are used as input and connected with the 4 output pins on the keypad. In the front-end program, if one input GPIO port detects high voltage when one specific output GPIO port outputs high voltage, the related button can be considered as pressed.
Speaker
We use pygame.mixer to play the sound. In the CPU module, there is a timer related to sound. When the timer countdowns to 1, the front-end program plays the sound.
Display module
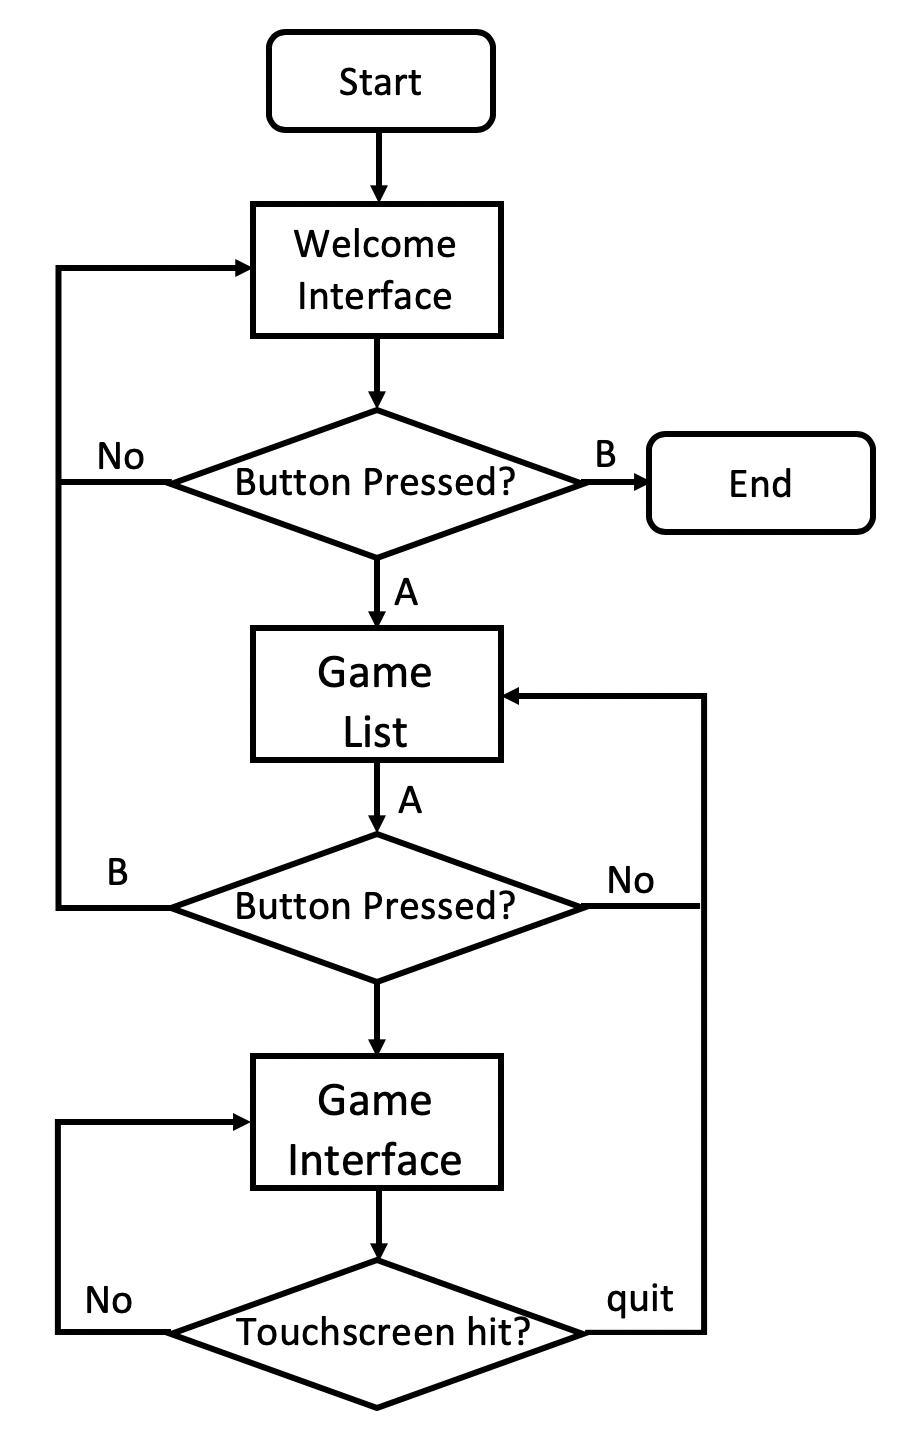
Fig. 4 Hardware design of Portable Game Console
In the front-end program, there are three levels totally and pygame is used to draw the screen. The first level is the welcome interface, where the name of our project is displayed. At the first level, if button B is pressed, the program will quit. If button A is pressed, the program will turn to the second level.
The second level is the game list. Our portable game console provides six games: "PONG2", "UFO", "TETRIS", "TANK", "BLINKY", "INVADERS". User can use button 2 and button 8 to switch the game. Then, button A can be used to start the game, and button B can be used to return to the first level.
The third level is the game interface. In this level, the CPU module will be applied. The CPU module has a 16-size array which is related to the 16 buttons. In addition, the CPU module has a 2048-size array to represent the value of each pixel, where the original resolution is 64x32. Because the 2.8 inch piTFT's resolution is 320x240, only the middle 320x160 part of the piTFT screen is used to display the game, and each pixel in the CPU module is extended to a 5x5 square on the piFTF screen. In CPU module, there is a bool-type variable named as draw_flag. When draw_flag is true, the front-end program updates the game interface. In order to make the program faster, only the region related to the modified pixels are drawn based on current pixel value. Furthermore, on the bottom lines of the piTFT screen, two buttons (restart and quit) are deployed to restart the game or return to the second level. If the other part of the touchscreen is hit, the game will be paused or resumed.
Result
By the end of the semester, we successfully implemented the emulator and are able to run Chip8 games on the Raspberry Pi. The keypad is fully functional and we can use it to interact with the emulator and play the game. The speaker also playes sound when it detect the specific game event happens. Most of the ROMs work fine on our emulator but there are still some problems. For example, the Raspberry Pi doesn't have a super fast CPU and Python is not an efficient language, so some of the game don't have a good perfomance. The following images shows the demo of our Pygame UI and game examples.

Fig. 5 Picture of whole system and welcome interface
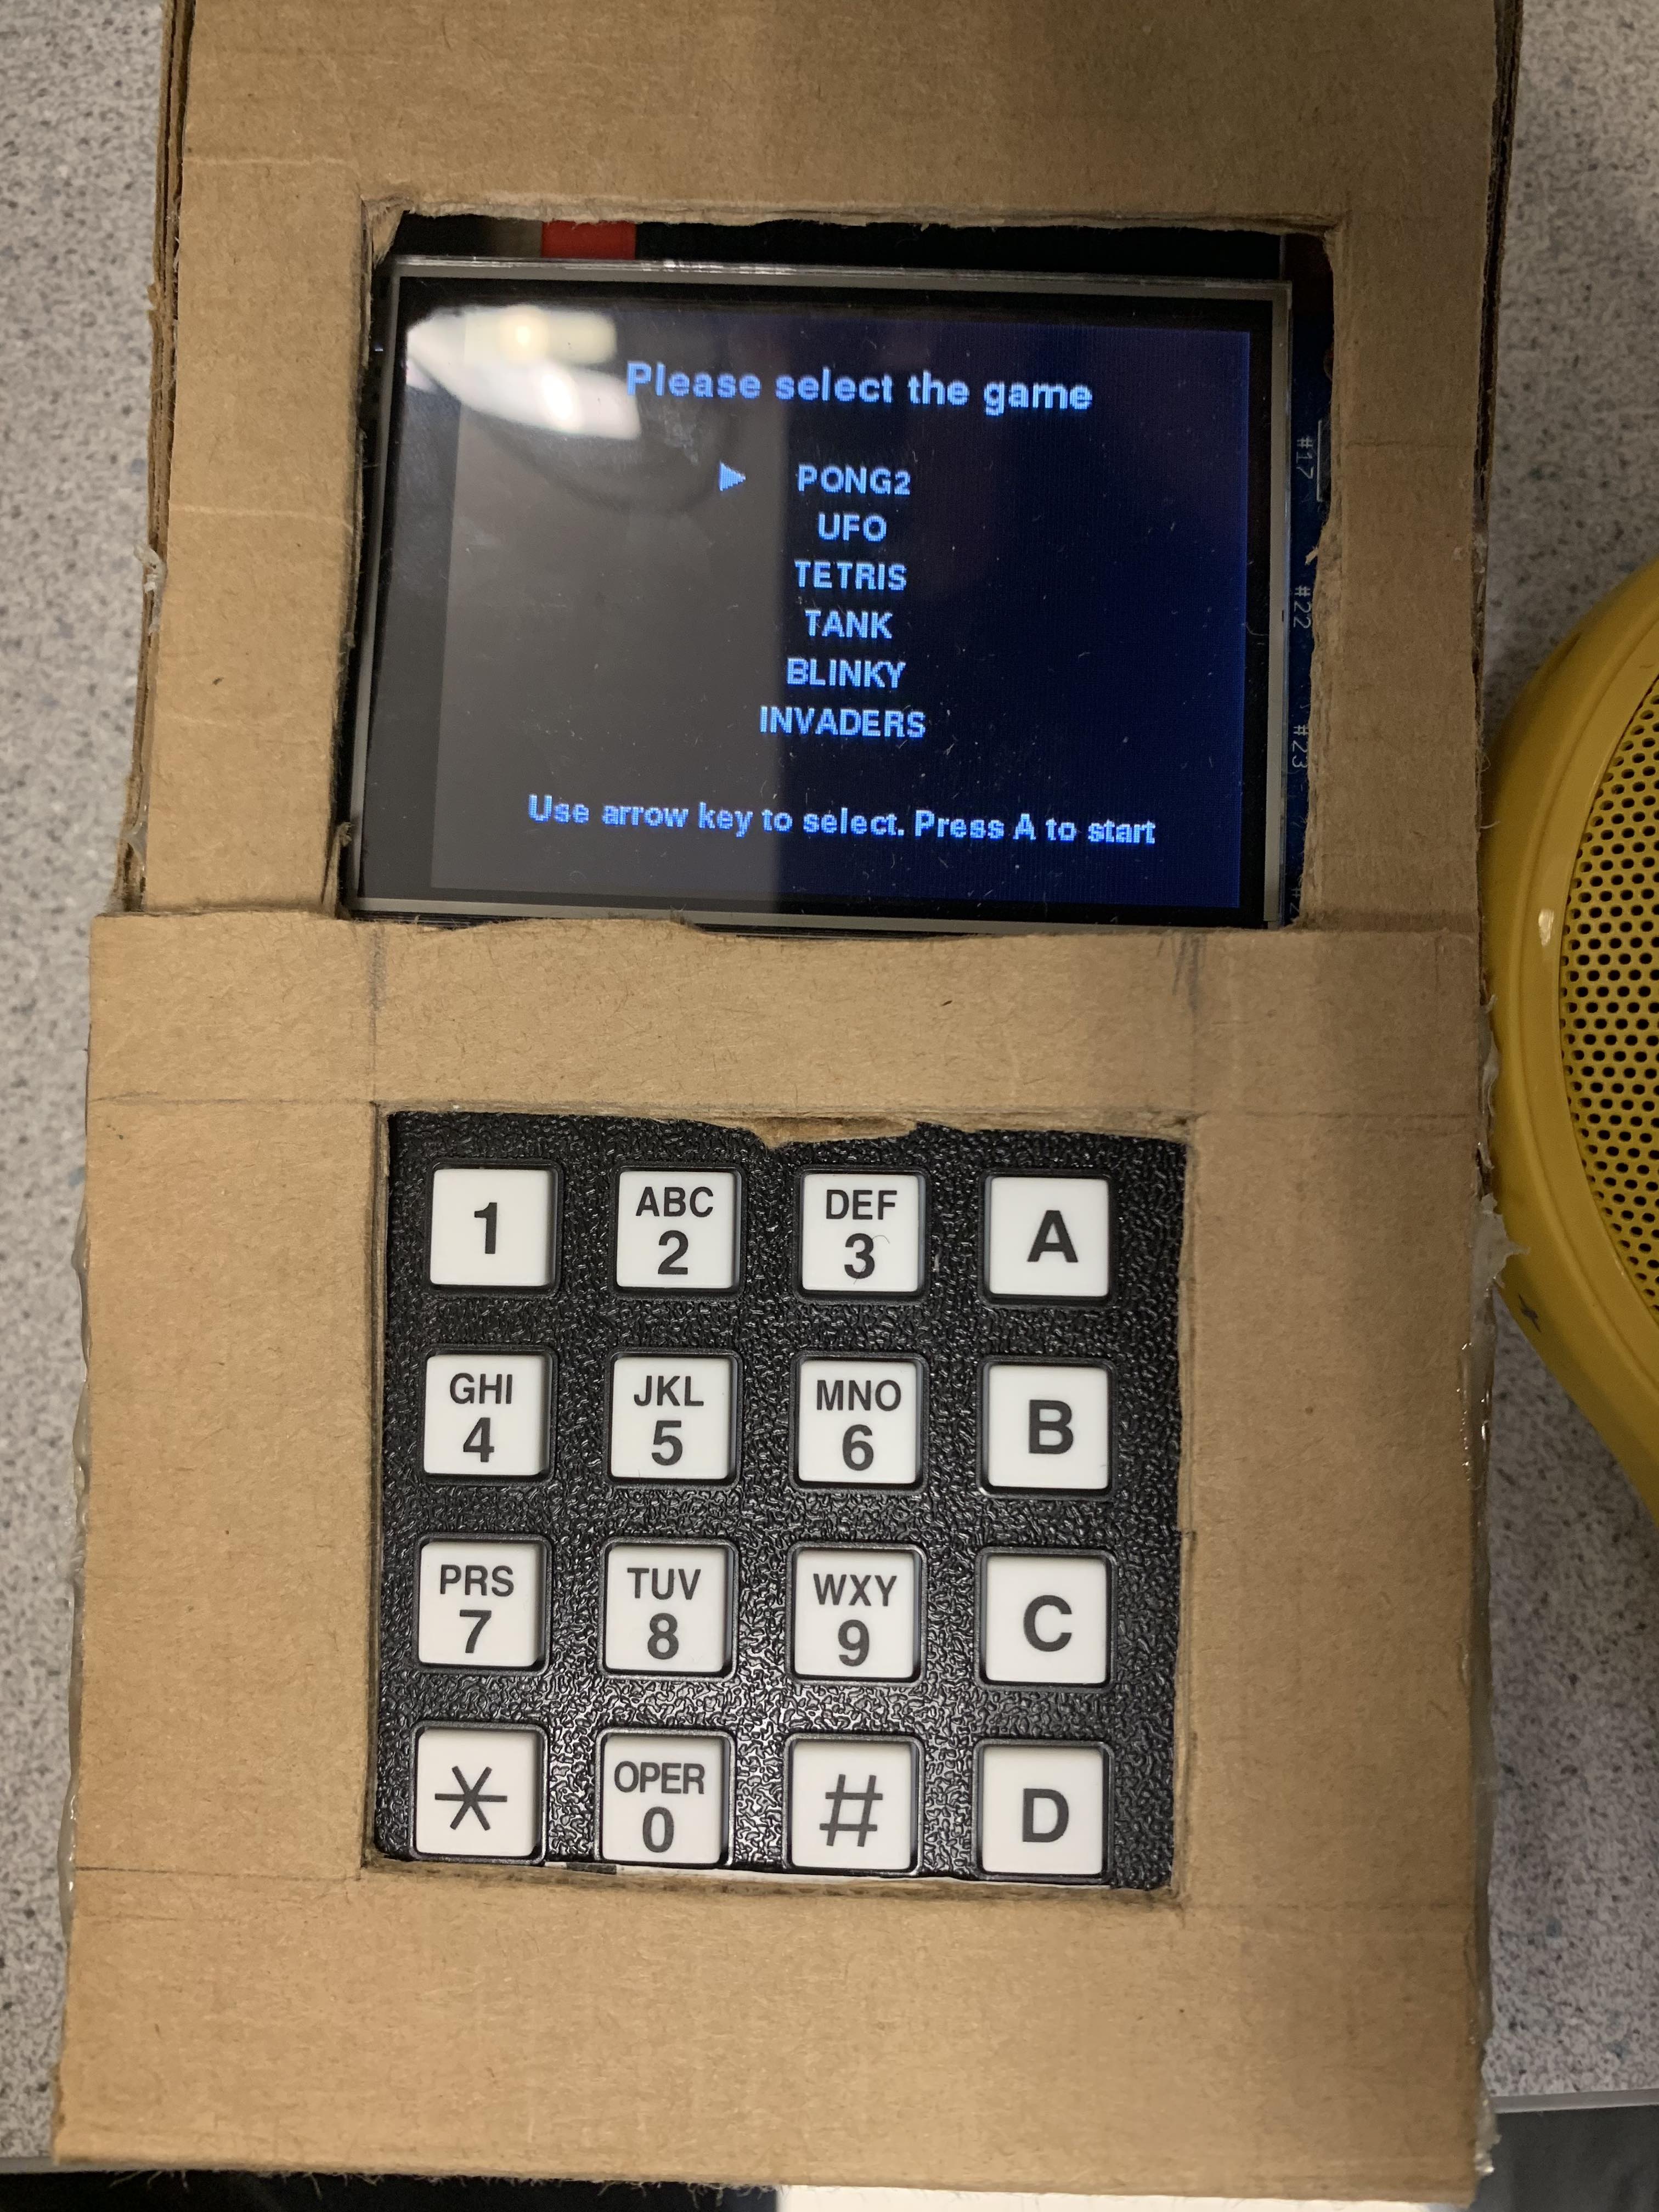
Fig. 6 Picture of game list
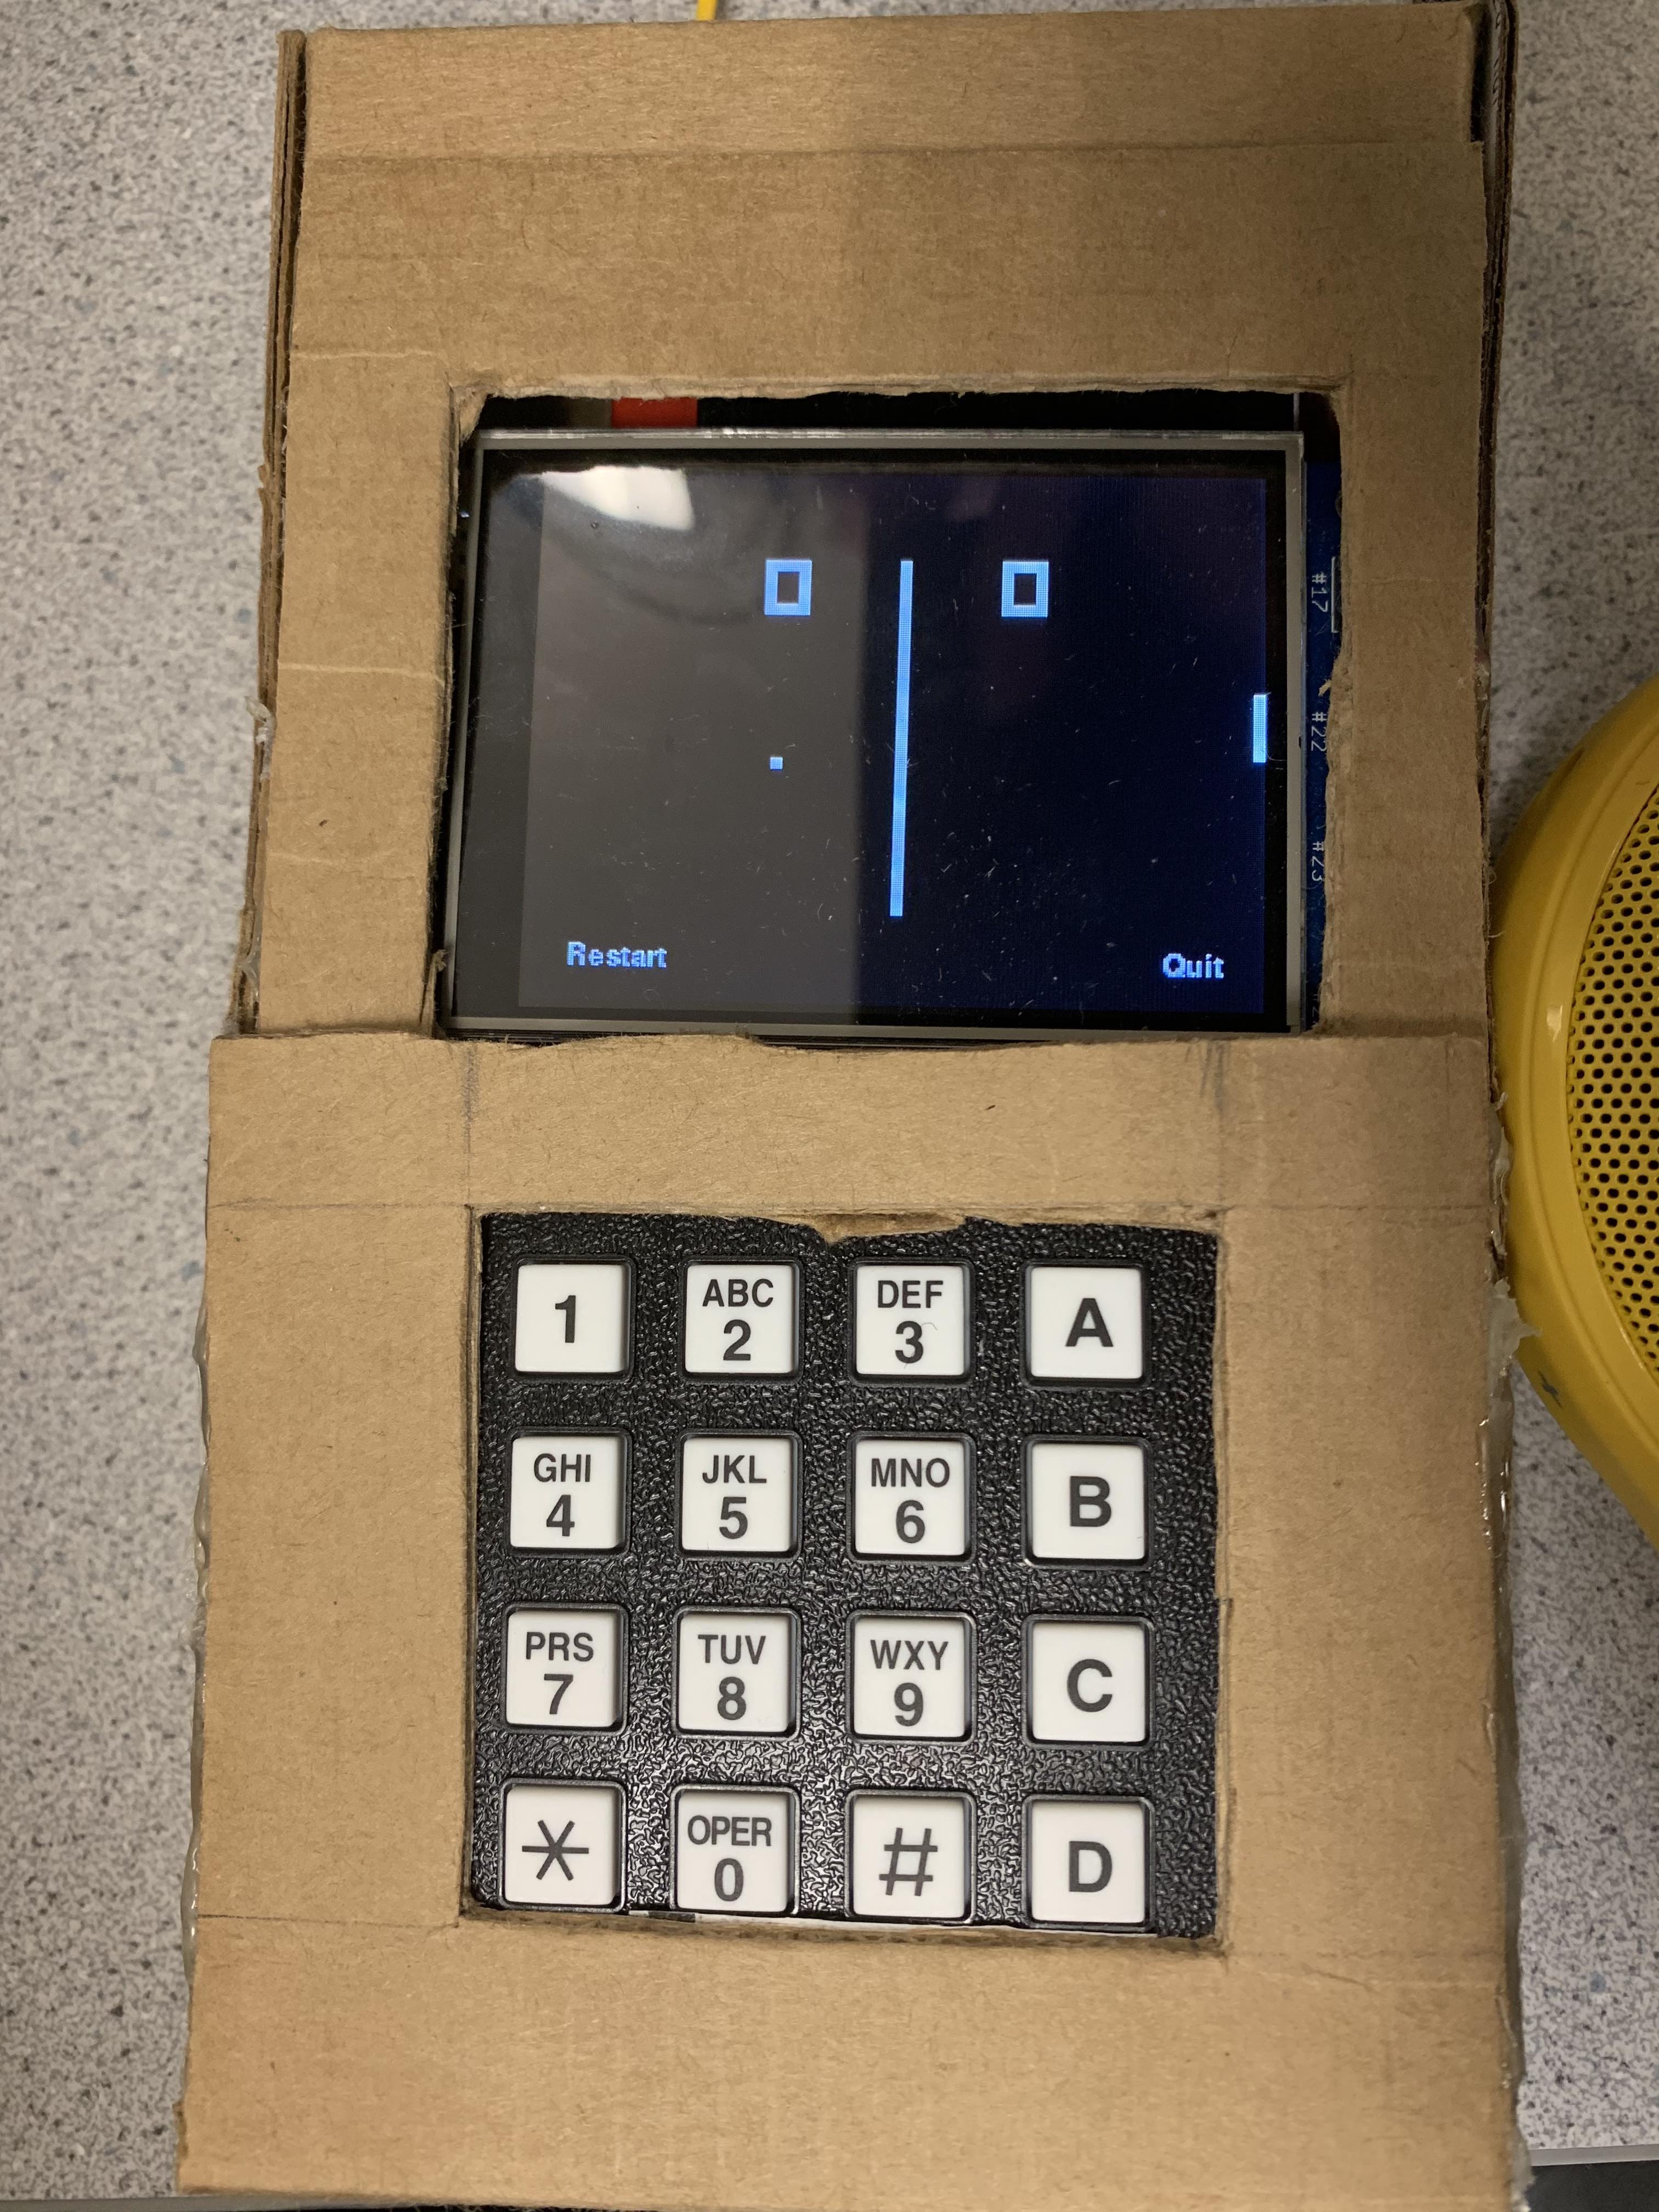
Fig. 7 Picture of game "PONG2"
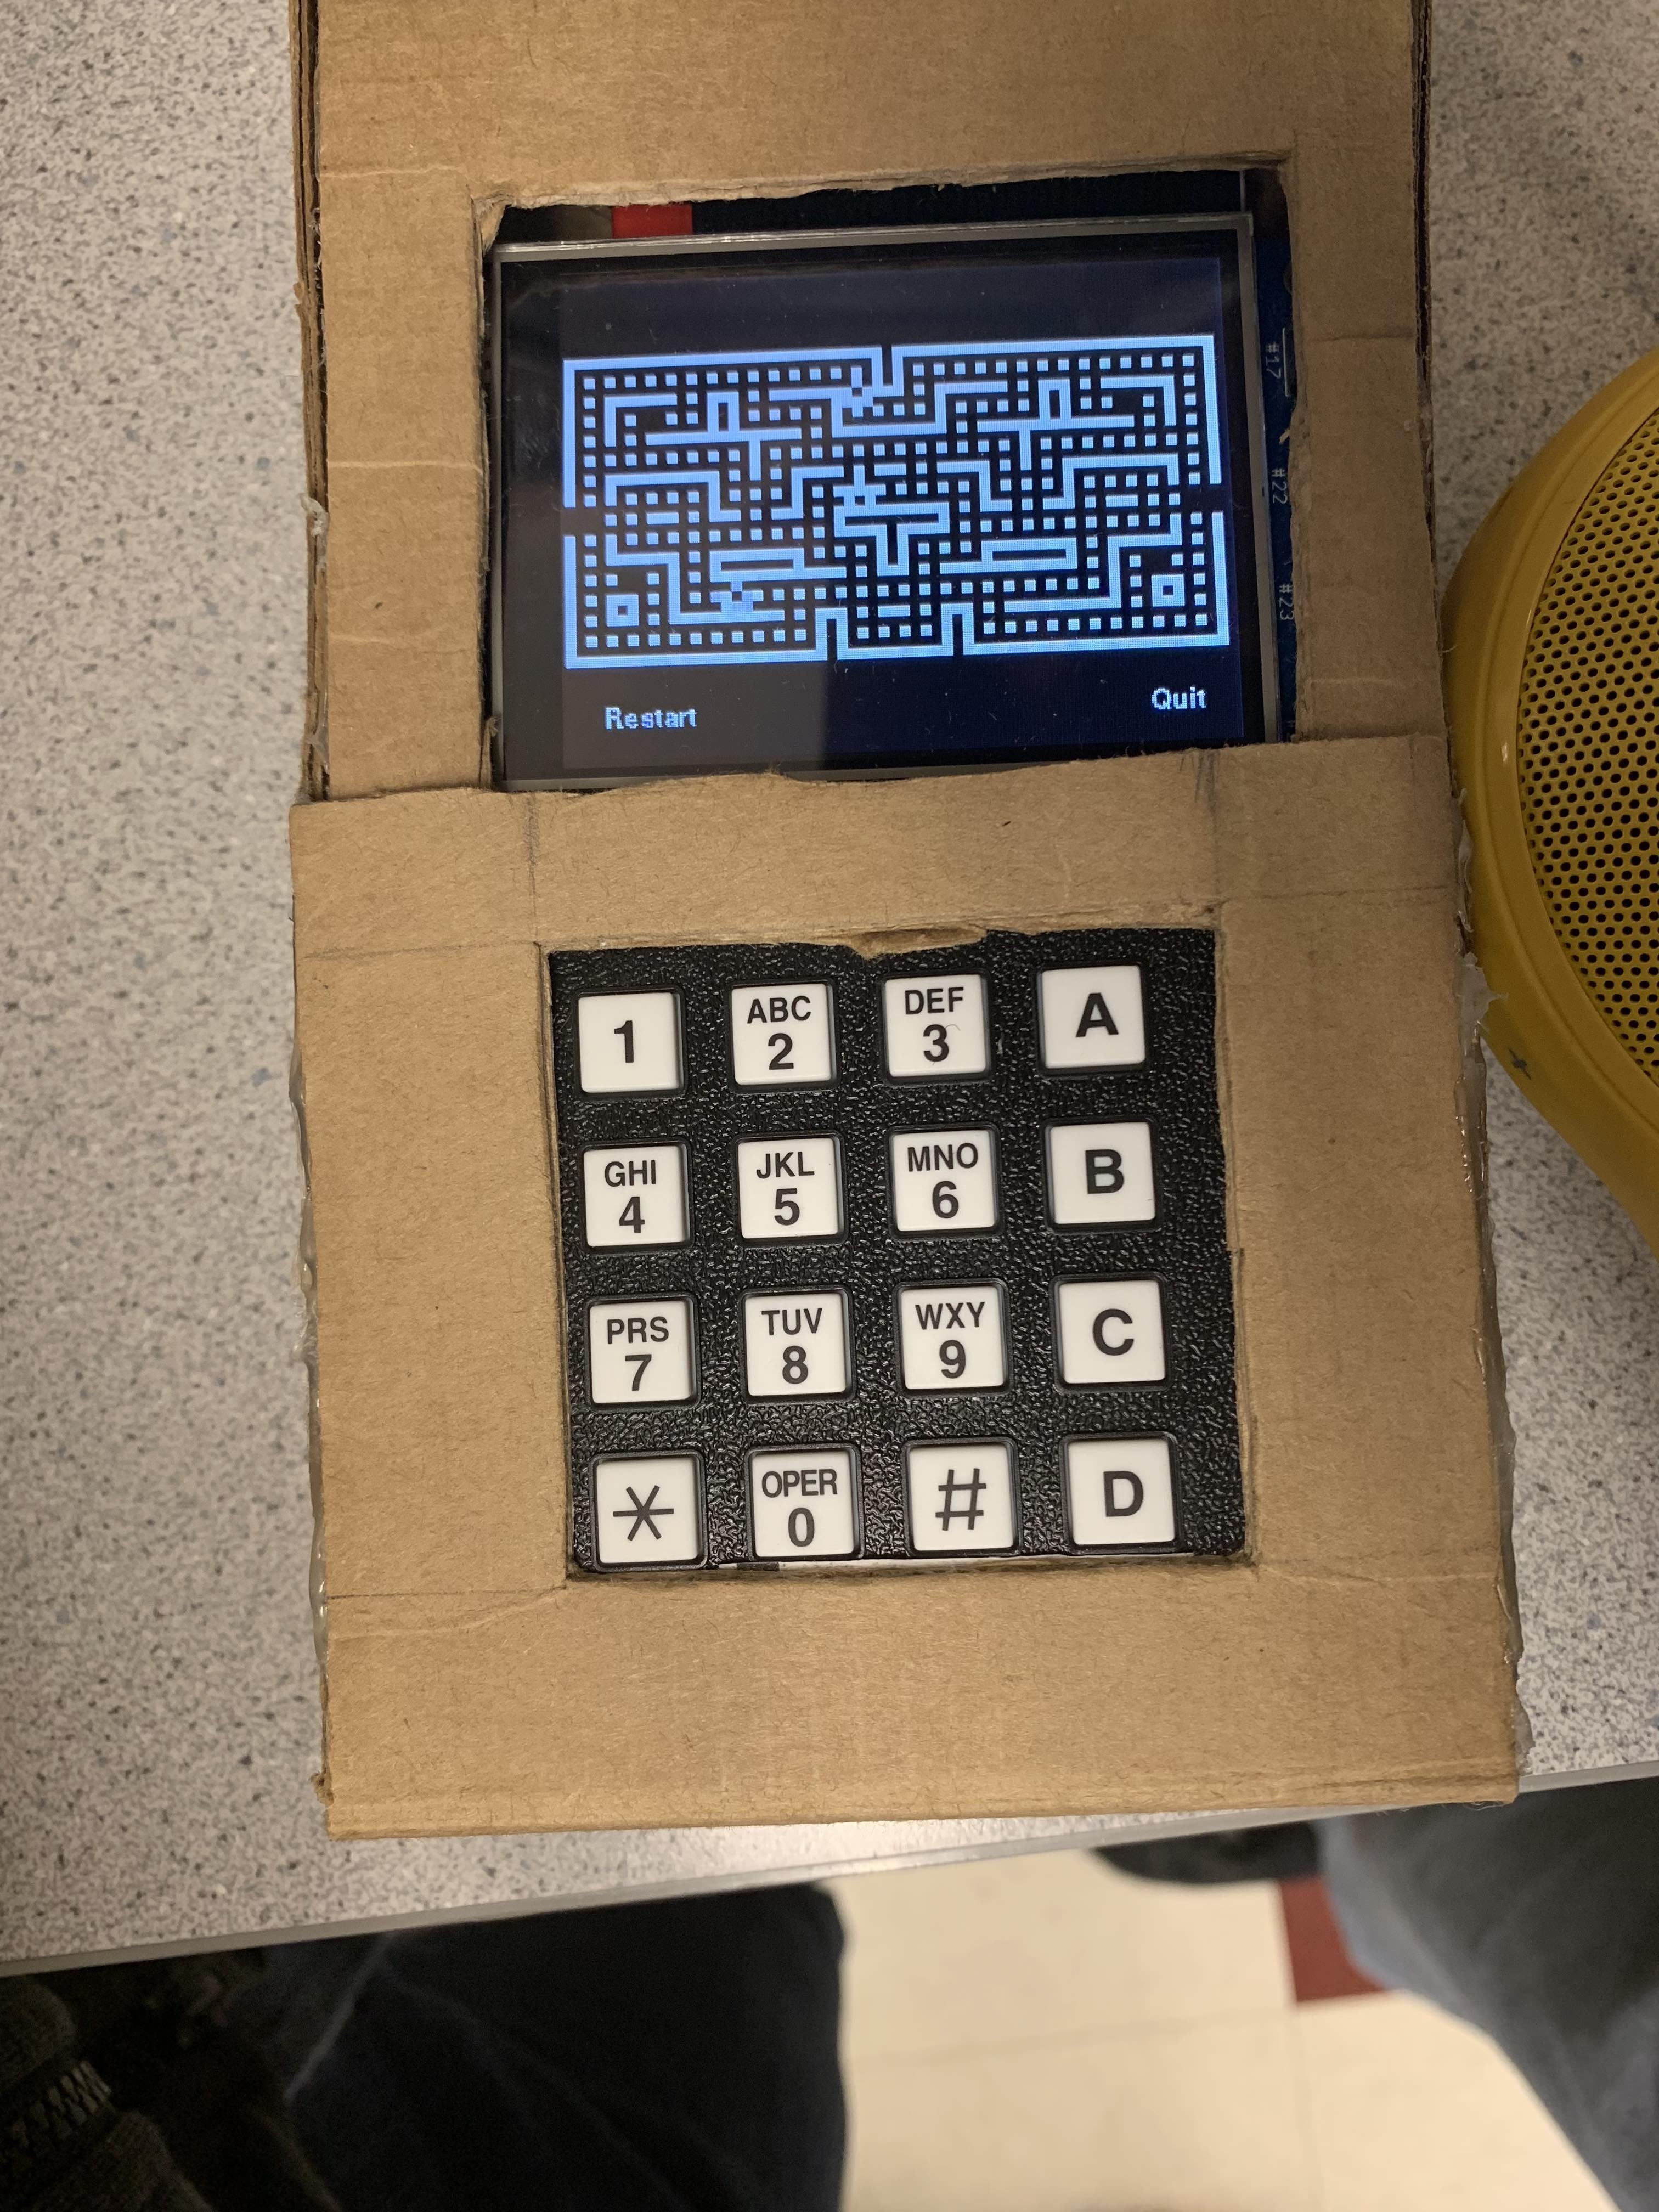
Fig. 8 Picture of "BLINKY"
Work Distribution

Project group picture

Yixin Cui
yc2494@cornell.edu
Designed the Chip8 emulation and made the case.

Zhongling Liu
zl682@cornell.edu
Designed the frontend UI and keypad mapping.
Parts List
- Raspberry Pi $35.00
- Numeric Keypad $10.00
- Cardboard Case - Discarded Cardboard
- Resistors and Wires - Provided in lab
Total: $45.00
References
Multigesture Chip 8 TutorialWikipedia Chip 8 Instruction Set
Downloadable Chip 8 Games
R-Pi GPIO Document
KeyPad Datasheet
Code Appendix
CPU.py
import random


class CPU:
    def __init__(self, start_address, mem):
        # Operation Code
        self.op_code = 0
        # Stack pointer
        self.sp = 0
        # Program stack
        self.stack = [0] * 24
        # Graphics pixel array
        self.gfx = [0] * 2048
        # Key array
        self.key = [0] * 16
        # Program counter and Index register
        self.reg = {
            'I': 0,
            'PC': start_address
        }
        # V register
        self.v_reg = [0, 0, 0, 0, 0, 0, 0, 0, 0, 0, 0, 0, 0, 0, 0, 0]
        # CPU clock
        self.timer = {
            'delay': 0,
            'sound': 0
        }
        # Initialize memory
        self.mem = mem
        # Draw flag
        self.draw_flag = False

    def emulate_cycle(self):
        # Fetch instruction
        self.op_code = self.mem.fetch_opcode(self.reg['PC'])
        # Decode ope_code
        opc = (self.op_code & 0xF000) >> 12
        # Execute ope_code
        if opc == 0:
            self.cpu_0nnn()
        elif opc == 1:
            self.cpu_1nnn()
        elif opc == 2:
            self.cpu_2nnn()
        elif opc == 3:
            self.cpu_3xnn()
        elif opc == 4:
            self.cpu_4xnn()
        elif opc == 5:
            self.cpu_5xy0()
        elif opc == 6:
            self.cpu_6xnn()
        elif opc == 7:
            self.cpu_7xnn()
        elif opc == 8:
            self.cpu_8xy()
        elif opc == 9:
            self.cpu_9xy0()
        elif opc == 0xA:
            self.cpu_annn()
        elif opc == 0xB:
            self.cpu_bnnn()
        elif opc == 0xC:
            self.cpu_cxnn()
        elif opc == 0xD:
            self.cpu_dxyn()
        elif opc == 0xE:
            self.cpu_ex()
        elif opc == 0xF:
            self.cpu_fx()
        else:
            print "Unknown OpCode: " + str(self.op_code)
        # Update timers
        if self.timer['delay'] > 0:
            self.timer['delay'] -= 1
        if self.timer['sound'] > 0:
            if self.timer['sound'] == 1:
                print 'Play sound!'
            self.timer['sound'] -= 1

    # Instruction 0NNN
    def cpu_0nnn(self):
        if self.op_code == 0x00E0:
            self.gfx = [0] * 2048
            self.draw_flag = True
            self.reg['PC'] += 2
        elif self.op_code == 0x00EE:
            self.sp -= 1
            self.reg['PC'] = self.stack[self.sp] + 2
        else:
            self.reg['PC'] = self.op_code & 0x0FFF

    # Instruction 1NNN
    def cpu_1nnn(self):
        self.reg['PC'] = self.op_code & 0x0FFF

    # Instruction 2NNN
    def cpu_2nnn(self):
        self.stack[self.sp] = self.reg['PC']
        self.sp += 1
        self.reg['PC'] = self.op_code & 0x0FFF

    # Instruction 3XNN
    def cpu_3xnn(self):
        x = (self.op_code & 0x0F00) >> 8
        if self.v_reg[x] == (self.op_code & 0x00FF):
            self.reg['PC'] += 4
        else:
            self.reg['PC'] += 2

    # Instruction 4XNN
    def cpu_4xnn(self):
        x = (self.op_code & 0x0F00) >> 8
        if self.v_reg[x] != (self.op_code & 0x00FF):
            self.reg['PC'] += 4
        else:
            self.reg['PC'] += 2

    # Instruction 5XY0
    def cpu_5xy0(self):
        x = (self.op_code & 0x0F00) >> 8
        y = (self.op_code & 0x00F0) >> 4
        if self.v_reg[x] == self.v_reg[y]:
            self.reg['PC'] += 4
        else:
            self.reg['PC'] += 2

    # Instruction 6XNN
    def cpu_6xnn(self):
        x = (self.op_code & 0x0F00) >> 8
        self.v_reg[x] = (self.op_code & 0x00FF)
        self.reg['PC'] += 2

    # Instruction 7XNN
    def cpu_7xnn(self):
        x = (self.op_code & 0x0F00) >> 8
        self.v_reg[x] = ((self.op_code & 0x00FF) + self.v_reg[x]) & 0x00FF
        self.reg['PC'] += 2

    # Instruction 8XY0 ~ 8XYE
    def cpu_8xy(self):
        sec_opcode = self.op_code & 0x000F
        x = (self.op_code & 0x0F00) >> 8
        y = (self.op_code & 0x00F0) >> 4
        if sec_opcode == 0:
            self.v_reg[x] = self.v_reg[y]
        elif sec_opcode == 1:
            self.v_reg[x] = self.v_reg[x] | self.v_reg[y]
        elif sec_opcode == 2:
            self.v_reg[x] = self.v_reg[x] & self.v_reg[y]
        elif sec_opcode == 3:
            self.v_reg[x] = self.v_reg[x] ^ self.v_reg[y]
        elif sec_opcode == 4:
            self.v_reg[x] += self.v_reg[y]
            carry = self.v_reg[x] & 0xFF00
            if carry == 0:
                self.v_reg[0xF] = 0
            else:
                self.v_reg[0xF] = 1
                self.v_reg[x] &= 0x00FF
        elif sec_opcode == 5:
            self.v_reg[x] -= self.v_reg[y]
            borrow = self.v_reg[x] & 0xFF00
            if borrow == 0:
                self.v_reg[0xF] = 1
            else:
                self.v_reg[0xF] = 0
                self.v_reg[x] &= 0x00FF
        elif sec_opcode == 6:
            self.v_reg[0xF] = self.v_reg[x] & 0x01
            self.v_reg[x] >>= 1
        elif sec_opcode == 7:
            self.v_reg[x] = self.v_reg[y] - self.v_reg[x]
            borrow = self.v_reg[x] & 0xFF00
            if borrow == 0:
                self.v_reg[0xF] = 1
            else:
                self.v_reg[0xF] = 0
                self.v_reg[x] &= 0x00FF
        elif sec_opcode == 0xE:
            self.v_reg[0xF] = self.v_reg[x] & 0x80
            self.v_reg[x] <<= 1
        else:
            print "Unknown OpCode: " + str(self.op_code)

        self.reg['PC'] += 2

    # Instruction 9XY0
    def cpu_9xy0(self):
        x = (self.op_code & 0x0F00) >> 8
        y = (self.op_code & 0x00F0) >> 4
        if self.v_reg[x] != self.v_reg[y]:
            self.reg['PC'] += 4
        else:
            self.reg['PC'] += 2

    # Instruction ANNN
    def cpu_annn(self):
        self.reg['I'] = self.op_code & 0x0FFF
        self.reg['PC'] += 2

    # Instruction BNNN
    def cpu_bnnn(self):
        self.reg['PC'] = self.op_code & 0x0FFF + self.v_reg[0x0]

    # Instruction CXNN
    def cpu_cxnn(self):
        x = (self.op_code & 0x0F00) >> 8
        val_nn = self.op_code & 0x00FF
        self.v_reg[x] = random.randint(0, 255) & val_nn
        self.reg['PC'] += 2

    # Instruction DXYN
    def cpu_dxyn(self):
        x = (self.op_code & 0x0F00) >> 8
        y = (self.op_code & 0x00F0) >> 4
        x_val = self.v_reg[x]
        y_val = self.v_reg[y]
        height = self.op_code & 0x000F
        self.v_reg[0xF] = 0
        for yline in range(0, height):
            pixel = self.mem.load_byte(self.reg['I'] + yline)
            for xline in range(0, 8):
                if pixel & (0x80 >> xline) != 0:
                    if self.gfx[x_val + xline + (y_val + yline) * 64] == 1:
                        self.v_reg[0xF] = 1
                    self.gfx[x_val + xline + (y_val + yline) * 64] ^= 1
        self.draw_flag = True
        self.reg['PC'] += 2

    # Instruction EX9E~EXA1
    def cpu_ex(self):
        x = (self.op_code & 0x0F00) >> 8
        sec_opcode = self.op_code & 0x00FF
        if sec_opcode == 0x9E:
            if self.key[self.v_reg[x]] != 0:
                self.reg['PC'] += 2
        elif sec_opcode == 0xA1:
            if self.key[self.v_reg[x]] == 0:
                self.reg['PC'] += 2
        else:
            print "Unknown OpCode: " + str(self.op_code)
        self.reg['PC'] += 2

    # Instruction FX07~FX65
    def cpu_fx(self):
        x = (self.op_code & 0x0F00) >> 8
        sec_opcode = self.op_code & 0x00FF
        if sec_opcode == 0x07:
            self.v_reg[x] = self.timer['delay']
        elif sec_opcode == 0x0A:
            self.v_reg[x] = self.timer['sound']
        elif sec_opcode == 0x15:
            self.timer['delay'] = self.v_reg[x]
        elif sec_opcode == 0x18:
            self.timer['sound'] = self.v_reg[x]
        elif sec_opcode == 0x1E:
            self.reg['I'] += self.v_reg[x]
            if self.reg['I'] > 0xFFF:
                self.v_reg[0xF] = 1
                self.reg['I'] &= 0xFFF
            else:
                self.v_reg[0xF] = 0
        elif sec_opcode == 0x29:
            self.reg['I'] = self.v_reg[x] * 5
        elif sec_opcode == 0x33:
            self.mem.store_byte(self.v_reg[x] / 100, self.reg['I'])
            self.mem.store_byte(self.v_reg[x] / 10 % 10, self.reg['I'] + 1)
            self.mem.store_byte(self.v_reg[x] % 100 % 10, self.reg['I'] + 2)
        elif sec_opcode == 0x55:
            for i in range(x + 1):
                self.mem.store_byte(self.v_reg[i], self.reg['I'] + i)
        elif sec_opcode == 0x65:
            for i in range(x + 1):
                self.v_reg[i] = self.mem.load_byte(self.reg['I'] + i)
        else:
            print "Unknown OpCode: " + str(self.op_code)
        self.reg['PC'] += 2

    def __str__(self):
        ret = 'Current Instruction: ' + str(hex(self.op_code)).upper()\
              + '\nPC: ' + str(hex(self.reg['PC'])).upper() + '\nI Register: '\
              + str(hex(self.reg['I'])).upper() + '\nStack: '\
              + str(hex(self.stack[self.sp])).upper() + '\nV Register: '
        regs = ''
        for i in range(len(self.v_reg)):
            regs += ' V' + str(i) + ': ' + str(hex(self.v_reg[i])).upper()
        ret += regs + '\n'
        return ret

    def display_screen(self):
        for i in range(0, 31):
            print str(self.gfx[i * 64:(i + 1) * 64]) + '\n'
        print '\n'
Memory.py
from Config import (
    MAX_MEMORY, CHIP8_FONTS
)


class Mem:
    def __init__(self):
        self.memory = bytearray(MAX_MEMORY)
        for i in range(0, 80):
            self.memory[i] = CHIP8_FONTS[i]

    def load_rom(self, rom_file):
        with open(rom_file, 'rb') as f:
            byte = f.read(1)
            addr = 0x200
            while byte != "":
                self.memory[addr] = byte
                addr += 1
                byte = f.read(1)
        f.close()

    def fetch_opcode(self, addr):
        return self.memory[addr] << 8 | self.memory[addr + 1]

    def store_byte(self, byte, addr):
        self.memory[addr] = byte

    def load_byte(self, addr):
        return self.memory[addr]
Chip8.py
from CPU import CPU
from Memory import Mem
from Config import START_ADDRESS, CPU_CLOCK
from Display import Display
import time


class Chip8:
    def __init__(self, rom_file):
        self.mem = Mem()
        self.mem.load_rom(rom_file)
        self.cpu = CPU(START_ADDRESS, self.mem)
        self.display = Display()

    def run(self):
        while True:
            time.sleep(1 / (CPU_CLOCK * 10000))
            self.cpu.emulate_cycle()
            if self.cpu.draw_flag:
                self.display.draw_game(self.cpu.gfx)
                self.cpu.draw_flag = False
Config.py
MAX_MEMORY = 4096
START_ADDRESS = 0x200
CHIP8_FONTS = [0xF0, 0x90, 0x90, 0x90, 0xF0,
               0x20, 0x60, 0x20, 0x20, 0x70,
               0xF0, 0x10, 0xF0, 0x80, 0xF0,
               0xF0, 0x10, 0xF0, 0x10, 0xF0,
               0x90, 0x90, 0xF0, 0x10, 0x10,
               0xF0, 0x80, 0xF0, 0x10, 0xF0,
               0xF0, 0x80, 0xF0, 0x90, 0xF0,
               0xF0, 0x10, 0x20, 0x40, 0x40,
               0xF0, 0x90, 0xF0, 0x90, 0xF0,
               0xF0, 0x90, 0xF0, 0x10, 0xF0,
               0xF0, 0x90, 0xF0, 0x90, 0x90,
               0xE0, 0x90, 0xE0, 0x90, 0xE0,
               0xF0, 0x80, 0x80, 0x80, 0xF0,
               0xE0, 0x90, 0x90, 0x90, 0xE0,
               0xF0, 0x80, 0xF0, 0x80, 0xF0,
               0xF0, 0x80, 0xF0, 0x80, 0x80
               ]
CPU_CLOCK = 1.8
Frontend.py
import pygame
from pygame.locals import * # for event MOUSE variables
from Chip8 import Chip8
import time
import os
import RPi.GPIO as GPIO

os.putenv('SDL_VIDEODRIVER', 'fbcon') # Display on piTFT
os.putenv('SDL_FBDEV', '/dev/fb1')
os.putenv('SDL_MOUSEDRV', 'TSLIB') # Track mouse clicks on piTFT
os.putenv('SDL_MOUSEDEV', '/dev/input/touchscreen')

# Initialization
pygame.init()
pygame.mouse.set_visible(False)

WHITE = 255, 255, 255
BLACK = 0,0,0

size = width, height = 320, 240
screen = pygame.display.set_mode(size)
my_font1 = pygame.font.Font(None, 30)
my_font2 = pygame.font.Font(None, 25)
my_font3 = pygame.font.Font(None, 20)

# Setup GPIO
GPIO.setmode(GPIO.BCM)

GPIO.setup(27, GPIO.IN, pull_up_down=GPIO.PUD_UP)
GPIO.setup(5, GPIO.OUT) #1
GPIO.setup(6, GPIO.OUT) #2
GPIO.setup(13, GPIO.OUT) #3
GPIO.setup(19, GPIO.OUT) #4
GPIO.setup(26, GPIO.IN, pull_up_down=GPIO.PUD_DOWN) #5
GPIO.setup(16, GPIO.IN, pull_up_down=GPIO.PUD_DOWN) #6
GPIO.setup(20, GPIO.IN, pull_up_down=GPIO.PUD_DOWN) #7
GPIO.setup(21, GPIO.IN, pull_up_down=GPIO.PUD_DOWN) #8

GPIO.output(5, GPIO.LOW)
GPIO.output(6, GPIO.LOW)
GPIO.output(13, GPIO.LOW)
GPIO.output(19, GPIO.LOW)

arrow_center = [110, 70]
level = 0
game_stop = 0
last_game_stop = 0

pixel = [0] * 2048

file_path = '/home/pi/Documents/final_project/c8games/'

# Game list
game_name = ['PONG2','UFO','TETRIS', 'TANK','BLINKY','INVADERS']
game_index = 0

r_file = file_path + game_name[game_index]
chip = Chip8(r_file)

# Main while loop
while True:
    if (not GPIO.input(27)):
        break

    # Welcome screen
    if level == 0:
        time.sleep(0.2)
        # Check button A
        GPIO.output(5, GPIO.HIGH)
        if GPIO.input(21):
            level = 1
            continue
        # Check button B
        GPIO.output(5, GPIO.LOW)
        GPIO.output(6, GPIO.HIGH)
        if GPIO.input(21):
            print "Quit"
            break
        GPIO.output(6, GPIO.LOW)
        # Erase the Work space
        screen.fill(BLACK)
        # Print sentences
        text_surface = my_font1.render('Portable Pi Game Console', True, WHITE)
        rect = text_surface.get_rect(center=(160, 80))
        screen.blit(text_surface, rect)

        text_surface = my_font2.render('Press A to continue', True, WHITE)
        rect = text_surface.get_rect(center=(160, 160))
        screen.blit(text_surface, rect)

        # display workspace on screen
        pygame.display.flip()
    # Game list
    elif level == 1:
        time.sleep(0.2)
        GPIO.output(5, GPIO.HIGH)
        # Check button 2
        if GPIO.input(16):
            arrow_center[1] = (arrow_center[1] + 30) % 120 + 70
            game_index = (game_index - 1) % 6
        # Check button A
        if GPIO.input(21):
            r_file = file_path + game_name[game_index]
            chip = Chip8(r_file)
            # Erase the Work space
            screen.fill(BLACK)
            level = 2
            # Deploy buttons
            text_surface = my_font3.render('Quit', True, WHITE)
            rect = text_surface.get_rect(center=(290, 220))
            screen.blit(text_surface, rect)

            text_surface = my_font3.render('Restart', True, WHITE)
            rect = text_surface.get_rect(center=(40, 220))
            screen.blit(text_surface, rect)

            pygame.display.flip()
            continue
        GPIO.output(5, GPIO.LOW)
        GPIO.output(6, GPIO.HIGH)
        # Check button B
        if GPIO.input(21):
            GPIO.output(13, GPIO.LOW)
            GPIO.output(19, GPIO.LOW)
            level = 0
            continue
        GPIO.output(6, GPIO.LOW)
        GPIO.output(13, GPIO.HIGH)
        # Check button 8
        if GPIO.input(16):
            arrow_center[1] = (arrow_center[1] - 50) % 120 + 70
            game_index = (game_index + 1) % 6
        GPIO.output(13, GPIO.LOW)
        GPIO.output(19, GPIO.HIGH)
        if GPIO.input(21):
            print "Quit"
        GPIO.output(19, GPIO.LOW)
        # Erase the Work space
        screen.fill(BLACK)
        text_surface = my_font2.render('Please select the game', True, WHITE)
        rect = text_surface.get_rect(center=(160, 30))
        screen.blit(text_surface, rect)
        # Print game list
        text_surface = my_font3.render(game_name[0], True, WHITE)
        rect = text_surface.get_rect(center=(160, 70))
        screen.blit(text_surface, rect)

        text_surface = my_font3.render(game_name[1], True, WHITE)
        rect = text_surface.get_rect(center=(160, 90))
        screen.blit(text_surface, rect)

        text_surface = my_font3.render(game_name[2], True, WHITE)
        rect = text_surface.get_rect(center=(160, 110))
        screen.blit(text_surface, rect)

        text_surface = my_font3.render(game_name[3], True, WHITE)
        rect = text_surface.get_rect(center=(160, 130))
        screen.blit(text_surface, rect)

        text_surface = my_font3.render(game_name[4], True, WHITE)
        rect = text_surface.get_rect(center=(160, 150))
        screen.blit(text_surface, rect)

        text_surface = my_font3.render(game_name[5], True, WHITE)
        rect = text_surface.get_rect(center=(160, 170))
        screen.blit(text_surface, rect)

        text_surface = my_font3.render('Use arrow key to select. Press A to start', True, WHITE)
        rect = text_surface.get_rect(center=(160, 210))
        screen.blit(text_surface, rect)

        pygame.draw.polygon(screen, WHITE, [[arrow_center[0] - 4, arrow_center[1] - 5], [arrow_center[0] - 4, arrow_center[1] + 5],[arrow_center[0] + 5, arrow_center[1]]], 0)

        # display workspace on screen
        pygame.display.flip()
    # Game interface
    elif level == 2:
        if game_index == 2:
            time.sleep(0.002)
        for event in pygame.event.get():
            if(event.type is MOUSEBUTTONDOWN):
                pos = pygame.mouse.get_pos()
                x,y = pos
                if y > 200 and x > 260:
                    level = 1
                elif y > 200 and x < 80:
                    r_file = file_path + game_name[game_index]
                    chip = Chip8(r_file)
                else:
                    if game_stop:
                        game_stop = False
                    else:
                        game_stop = True
        if level == 1:
            continue
        chip.cpu.key = [0] * 16
        # Detect buttons and modify buttons according to game
        GPIO.output(5, GPIO.HIGH)
        if GPIO.input(26):
            if game_index == 0:
                chip.cpu.key[1] = 1
            else:
                chip.cpu.key[0] = 1
        if GPIO.input(16):
            if game_index == 0:
                chip.cpu.key[0] = 1
            elif game_index == 3:
                chip.cpu.key[8] = 1
            elif game_index == 4:
                chip.cpu.key[3] = 1
            else:
                chip.cpu.key[1] = 1
        if GPIO.input(20):
            if game_index == 0:
                chip.cpu.key[12] = 1
            elif game_index == 3:
                chip.cpu.key[9] = 1
            else:
                chip.cpu.key[2] = 1
        if GPIO.input(21):
            if game_index == 4:
                chip.cpu.key[1] = 1
            else:
                chip.cpu.key[3] = 1
        GPIO.output(5, GPIO.LOW)
        GPIO.output(6, GPIO.HIGH)
        if GPIO.input(26):
            if game_index == 0:
                chip.cpu.key[8] = 1
            elif game_index == 2:
                chip.cpu.key[5] = 1
            elif game_index == 4:
                chip.cpu.key[7] = 1
            else:
                chip.cpu.key[4] = 1
        if GPIO.input(16):
            if game_index == 2:
                chip.cpu.key[4] = 1
            else:
                chip.cpu.key[5] = 1
        if GPIO.input(20):
            if game_index == 4:
                chip.cpu.key[8] = 1
            else:
                chip.cpu.key[6] = 1
        if GPIO.input(21):
            if game_index == 4:
                chip.cpu.key[4] = 1
            else:
                chip.cpu.key[7] = 1
        GPIO.output(6, GPIO.LOW)
        GPIO.output(13, GPIO.HIGH)
        if GPIO.input(26):
            if game_index == 0:
                chip.cpu.key[4] = 1
            elif game_index == 3:
                chip.cpu.key[1] = 1
            elif game_index == 4:
                chip.cpu.key[9] = 1
            else:
                chip.cpu.key[8] = 1
        if GPIO.input(16):
            if game_index == 3:
                chip.cpu.key[2] = 1
            elif game_index == 4:
                chip.cpu.key[6] = 1
            else:
                chip.cpu.key[9] = 1
        if GPIO.input(20):
            if game_index == 0:
                chip.cpu.key[13] = 1
            else:
                chip.cpu.key[10] = 1
        if GPIO.input(21):
            chip.cpu.key[11] = 1
        GPIO.output(13, GPIO.LOW)
        GPIO.output(19, GPIO.HIGH)
        if GPIO.input(26):
            if game_index == 0:
                chip.cpu.key[2] = 1
            else:
                chip.cpu.key[12] = 1
        if GPIO.input(16):
            if game_index == 0:
                chip.cpu.key[10] = 1
            else:
                chip.cpu.key[13] = 1
        if GPIO.input(20):
            chip.cpu.key[14] = 1
        if GPIO.input(21):
            chip.cpu.key[15] = 1
        GPIO.output(19, GPIO.LOW)
        # If not paused, call CPU module
        if not game_stop:
            chip.cpu.emulate_cycle()
        # Draw
        if chip.cpu.draw_flag:
            for i in range(0, 2048):
                x = (i % 64) * 5
                y = (i / 64) * 5 + 40
                if chip.cpu.gfx[i] != pixel[i]:
                    pixel[i] = chip.cpu.gfx[i]
                    if pixel[i] == 1:
                        pygame.draw.rect(screen, WHITE, [x, y, 5, 5], 0)
                    else:
                        pygame.draw.rect(screen, BLACK, [x, y, 5, 5], 0)
            chip.cpu.draw_flag = False

            # display workspace on screen
            pygame.display.flip()

GPIO.cleanup()