Light Gun Game Arcade: Space Protector

Designed by
Shuhua Li (sl2737), Yangyang Peng (yp373)


Demonstration Video


Introduction

Most people had played the various arcades while the video game machines were not that popular at that time. One of the most popular arcades would be the light gun game. We use the light gun connected to the arcade to shoot the flights, UFOs and zombies on the screen to get higher scores. We decide to make this light gun game machine to pursue an arcade-like system realizing the basic functions for our teenage memories.


Generic placeholder image

Project Objective

The goal of the project is to design a light gun UFOs shooting game using OpenCV, PyGame.This light gun game includes two parts of the work.


Hardware

The hardware components of the system include the button for the trigger, laser point and the Pi camera. The button acts like a real light gun trigger, when we pull the trigger, we will press the button at the same time which let a beam appear on the screen shooting the aiming object. The laser pointer will flash of a reasonable time period when we pull the trigger for us to see the aiming point clearly. The Pi camera will work for realizing the targeting function which supports the main purpose of the project.

The button

The button connects to the GPIO OUTPUT pin. Every time when we press the trigger, the program will create a beam object, it will add a new beam in the beam object group and project a new beam on the screen with the update of the PyGame event. The external button is connected to the GPIO pin 17. First, we refer to the pin map below.

Fig.1 GPIO pin map

Next, we connect the circuit on the protoboard refer to the theoretical circuits as on the left and test the functions with some testing programs:

• Connect the 5v pin to the bottom of the protoboard in order to supply power to the circuits.
• Connect the GND pin to another row at the bottom of the protoboard to make sure the circuits are loops and can work correctly.
• Consider that the Pi-cobbler have the 10k omega resist inside, choose the circuit which voltage is high when not pressed, is low when pressed for making the circuit looks easier.
• Connect the pin 17 to the circuits, use it as the external button.

Fig.2 Theory circuit

The laser pointer

The laser pointer connects to the GPIO OUTPUT pin, which can easily be controlled by the PWM signal. We set the PWM signal as LOW for default. When we press the button, the program will set the PWM signal as HIGH. Besides, a timer will start to count time at the same time. After the beam update on the screen. There will be an if-statement to check whether the time surpasses 0.6s, if so, it will set the PWM signal as LOW again. Through the process above, we realize the laser pointer flash function when we pull the trigger.

The laser pointer is called KY-008 type, it can be directly power through an RPi output pin as it only draws 30 mA from the processor that has outputs rated for 40 mA.

The output pin shows as below. We only need to connect the ground pin and the 5Vdc supply pin to the GPIO output pin on the RPi. The laser pointer basically works as a LED light. We first run a blink program tested its function, then assemble it to the RPi.

Fig.3 Lasor Pointer

Fig.4 Pointer datasheet

Fig.5 Pointer info table

The Pi camera

The Pi camera works as the eye of the light gun. It can capture the screen and take a big number of pictures for the OpenCV to utilize sequentially. The CV program will use these pictures to make corresponding analysis by our designed program at real time in order to give a vivid shooting experience.
The Raspberry Pi Camera V2 features an 8 megapixel Sony IMX219 image sensor with fixed focus lens, it is capable of 3280×2464 pixel static images and supports 1080p30, 720p60, and 640×480p90 video. For the configuration of the Pi camera:
First, we install the OpenCV and enable the Pi camera connection to the RPi.
sudo raspi-config -> 5 Interfacing Options -> P1 Camera -> select yes to enable camera interface
Second, each time when we open the RPi, we should load the device for OpenCV video capture using the code below:
sudo modprobe bcm2835-v4l2
Then, in the program, we can create a video capture class to use the Pi camera for the further utilities.

Fig.6 Pi Camera

Fig.7 Pi Camera Configuration


Software

It includes the Opencv targeting function, beam design, UFO motion design, background animation design and the game music design

How does our program work?

We use pygame library to draw a blue border for the game window. This blue border is easy to be detected in the camera capture, therefore we can use its position in the camera coordinate to determine the position where the light gun is aiming at.

OpenCV capture/targeting function

We first create a video capture class, set the size of the captured picture. Read the pictures from the class.
            
cap = cv2.VideoCapture(0)
cap.set(3, cameraw)
cap.set(4, camerad)
Convert them into HSV image which will benefit us to analyze.

hsv = cv2.cvtColor(image, cv2.COLOR_BGR2HSV)
Set a range of the pixel color or say a threshold, make parts of this blue color range show as white in the picture. The other parts show as black.

mask = cv2.inRange(hsv, lower_blue, upper_blue)
Use the morphologyEx function to adjust the edges/shape of the picture we detect.

mask = cv2.morphologyEx(mask,cv2.MORPH_OPEN,kernelOpen)
Use the cvFindCountours function to calculate the edges in the picture. We put parameter cv_retr_tree which detect all the edges in the picture establishing only two layers of edges.
We also set the parameter cv_chain_approx_simple which can only save the edge point coordinates information as for return. Through this operation we can get the edge coordinate for the further function realize.

(cnts, _) = cv2.findContours(mask.copy(), cv2.RETR_TREE, cv2.CHAIN_APPROX_SIMPLE)
cnts = sorted(cnts, key = cv2.contourArea, reverse = True)[:10]
If we place the light gun too far, the contour area will be small, when it reaches a threshold 5000, we will not draw the standard game frame by setting the edge array as none. This can also avoid detecting some small blue objects that are not the pygame window. If it is in a proper distance, we will get the frame which has been optimized by the approxPolyDP function.

    for c in cnts:
        peri = cv2.arcLength(c, True)
        approx = cv2.approxPolyDP(c, 0.12 * peri, True) 
        if cv2.contourArea(c) < 5000:
            break
        if (cv2.isContourConvex(approx)) and len(approx) == 4:
            screenCnt = approx
            break

    cv2.imshow("mask", cv2.resize(mask, (320,240)))
    cv2.drawContours(image, [screenCnt], -1, (0, 255, 0), 3)
    cv2.imshow("image", cv2.resize(image, (320,240)))
    if cv2.waitKey(1) & 0xFF == ord('q'):
        break
Calculate the central coordinate of the camera and get the corresponding edge point coordinates through the edge array we get above. We then utilize a perspective transform to convert the coordinate system and get the coordinate of the camera central point on the screen. Finally, we set an if statement to limit the shooting area of the aiming coordinate and project it on the screen with picture we preset.
  
pts = screenCnt.reshape(4,2)
s = pts.sum(axis = 1)
rect[0] = (rect[0] * 2 + pts[np.argmin(s)]) / 3
rect[2] = (rect[2] * 2 + pts[np.argmax(s)]) / 3
diff = np.diff(pts, axis = 1)
rect[1] = (rect[1] * 2 + pts[np.argmin(diff)]) / 3
rect[3] = (rect[3] * 2 + pts[np.argmax(diff)]) / 3
pcenter = np.float32([cameraw / 2,camerad / 2]) #camera center
dst = np.float32([[30,30],[width-60,30],[width-60,height-60],[30,height-60]]) 
M = cv2.getPerspectiveTransform(rect, dst) 
ptarget = cv2.perspectiveTransform(pcenter.reshape(-1, 1, 2), M)
ptarget = ptarget.reshape(2)
if (ptarget[0] > 150)and(ptarget[0] < width-150)and(ptarget[1] > 150)and(ptarget[1] < height-150): 
    brect.center = np.rint(ptarget)
    insight = True
else:
    insight = False
The code above realize the aiming/targeting function.
The blue margin and the contour detected is showed in the picture below. Note that the red scope we display in pygame window is at the center of the camera capture image, which verifies that our algorithm is performing accurately.

Fig.2 Blue object detection and the contour of window

Gameplay design

We use pygame library to write the main functionality of our game.

The pygame library provides great features for game design. We use the predefined class pygame.sprite to create our own sprite class. The sprites are the movable objects on the screen. After we implement the update method of our sprite class, we can use sprite group to easily control the movement of multiple sprites. In our game, we use sprite class to describe UFOs, light beams, stars in background, explosion animations, and blinking texts, almost everything movable in the game!

The flowchart of main loop in game is showed below.

Fig.2 Flowchart of main game loop

Beam animation

We create a beam class for the beam animation update. This class is inherited from pygame sprite class, which make it easy to implement the beam movement. It initializes with the origin position coordinate and the target coordinate which is the coordinate we calculated from above. Considering the beam should looks as if in the perspective space. We make two function for the two head points of beam.
Head = (1.0 / t) * origin_pos + (1.0 - 1.0 / self.t) * target_pos
Tail= (0.6 / self.t) * origin_pos + (1.0 - 0.6 / self.t) * target_pos
t is a parameter which will increase will a specific amount. When t surpasses a value, the beam will disappear. With the increase of t, the beam will be shorter as it goes further and closer to the target which is very vivid.

Fig.2 Beam Animation

UFO animation

In an active game, the program will generate new UFOs and display them on the screen. The maximum limit of number of UFO increases when the player crashes more UFOs.

These UFO are moving on the screen in 3 states.

The UFO will change its color in every 10 frames, which makes the game more colorful!

Fig.2 UFO movement

Background animation

We also want to add some effects to simulate a scene in the space. We display 500 stars on the screen which can move as if player is approaching them. These stars will appear randomly in the window with a accelerating speed towards the border. Once it disappears after it hits border, the game will initialize them again so that there are always 500 stars displayed on screen in every frame.

Explosion animation

Once a UFO is destroyed, we immediately create an explosion sprite object at the position where the UFO is killed. The explosion will update its appearance every several frames so that player can see the explosion animation.


Result

Ultimately, we made an arcade-like light gun game machine. It perfectly realized the functions that a light gun arcade may have performed. Through this process, we learned a great deal about how to assemble of the hardware to the RPi for making a great working light gun. Besides, we gained the software coding skills on using OpenCV and Pygame which did not only just stay on the software design level, but also demonstrate the combination of the hardware and the software and brought this to our game program. The ideas for the optimization to the movement of the beam and the target coordinate converting showed our comprehension to our designing purpose, it taught us a lot the way we struggled to achieve the perfect result. We would say this project was a big success.


Future work

Case Assemble:

The case for the arcade and the monitor assembly: We expect to make a monitor for the game machine, which will not need to connect it to the external monitor every time. This will need us to do the further CAD design in the future and modify the parameter for targeting on the new monitor.

Fig.8 Arcade module

Fig.9 Light gun case

The two-player mode

As we accomplished above, our light gun game machine can realize a single player mode. It is easy to add the two-player mode which only need to add a same hardware configuration and code adjustment. This will increase the game’s playability a lot.

Extend the game content

We would add more detail and mode for the game itself. Basically, the various game mode depends on the light gun targeting function. We only need to create more targets with different movement track making it more alike the traditional arcade game we had a lot fun with when we were young.

Multi-thread processing

We are only using one CPU for the game runing and the OpenCV detecting. If we assign the task on other CPU it will be faster to run our program by using the threads control in our code. This will reduce the delay on the OpenCV detection which will give a better effect on the game performance.

Wireless Light gun

In the initial goal of this project, we decide to use two Raspberry Pi communicating with each other using bluetooth or WiFi. We can run the main game function on a Raspberry Pi 3 connected to Screen Monitor, and combine the Raspberry Zero and the model gun together along with the button and the piCamera. If so, the light will become completely wire-free. However, we found that the latency of transmitting data between Raspberry Pis is so high such that may reduce the performance of the game. In future, we can try to solve the latency problem.

Work Distribution

Generic placeholder image

Project group picture

Generic placeholder image

Shuhua Li

sl2737@cornell.edu

Game design, main program development, testing.

Generic placeholder image

Yangyang Peng

yp373@cornell.edu

Hardware design and assemble, human-machine interaction, testing, web page design.


Parts List

  • Raspberry Pi $35.00
  • Raspberry Pi Camera V2 $25.00
  • LEDs, Resistors and Wires - Provided in lab

Total: $60.00


References

GPIO pin map
Lasor Pointer Fig 3,4,5
Pi Camera
Pi Camera Assembly
Arcade module

Code Appendix


# 5725 Final Project
# Space Protector - Light Gun Game Arcade
# Author: Shuhua Li (sl2737), Yangyang Peng (yp373)
# Release date: Dec 7, 2018

import numpy as np
import random
import time
import math
import pygame
import cv2
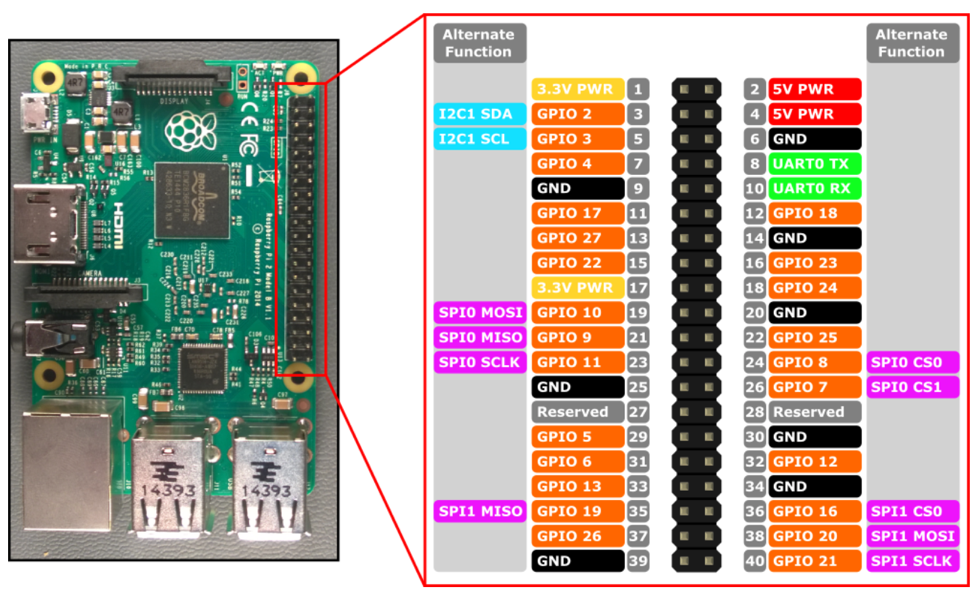
import RPi.GPIO as GPIO

# GPIO setup
GPIO.setmode(GPIO.BCM)
GPIO.setup(17, GPIO.IN, pull_up_down = GPIO.PUD_UP)
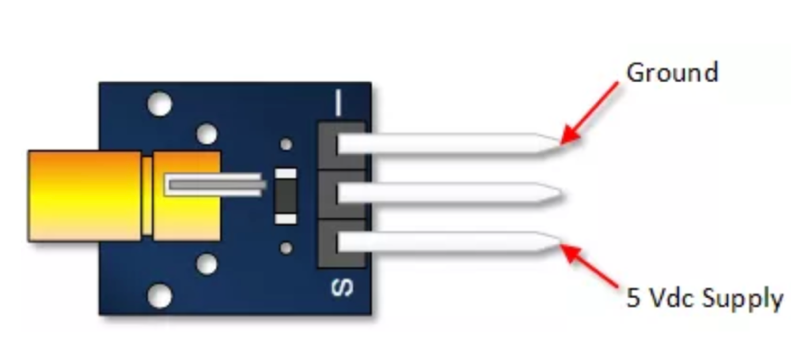
GPIO.setup(27, GPIO.OUT)
GPIO.output(27, GPIO.LOW)

WHITE = 255, 255, 255
BLACK = 0, 0, 0
BLUE = 0, 0, 255
GREEN = 0, 255, 0
RED = 255, 0, 0

ALIEN_RELOAD   = 12

# Sprite class for beams
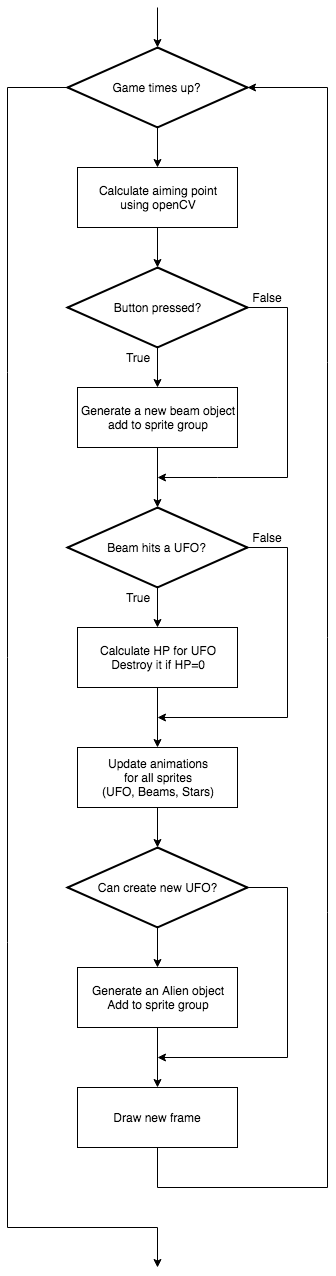
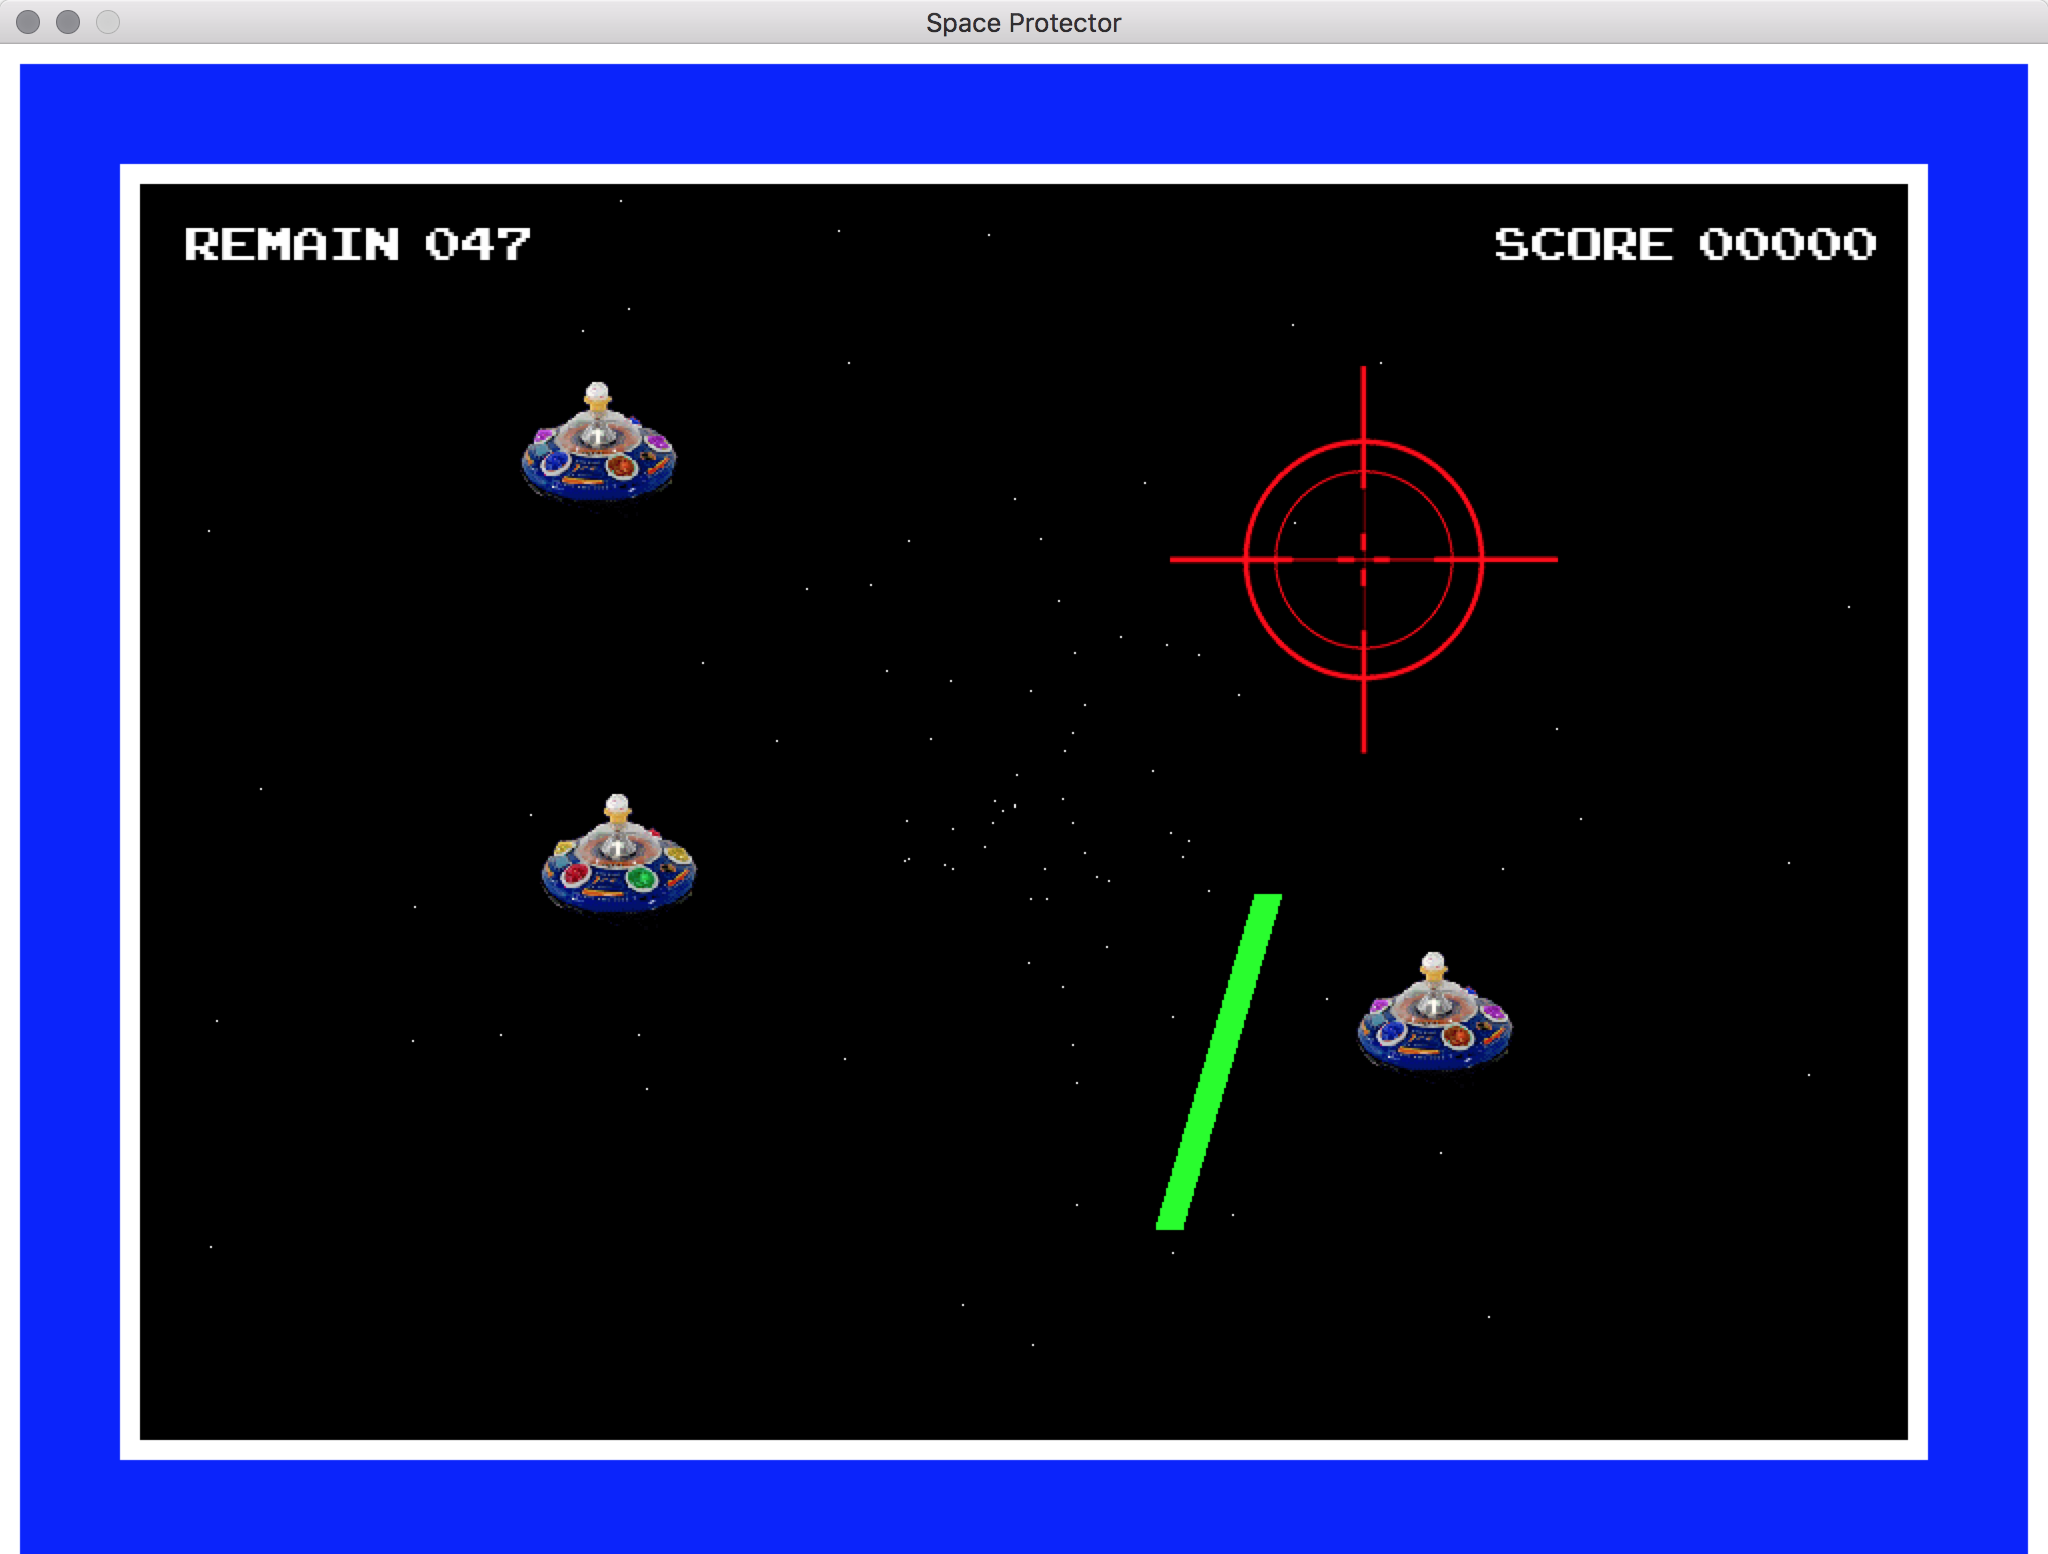
class Beam(pygame.sprite.Sprite):

    def __init__(self, beam_origin_pos, beam_target_pos):
        pygame.sprite.Sprite.__init__(self)
        self.origin_pos = np.array(beam_origin_pos)
        self.target_pos = np.array(beam_target_pos)
        self.rect = pygame.Rect(0,0,1,1)
        self.v = 6.0
        self.a = 1.0
    
    def update(self):
        self.pos0 = np.rint((6.0 / self.v) * self.origin_pos + (1.0 - 6.0 / self.v) * self.target_pos)
        self.pos1 = np.rint((3.0 / self.v) * self.origin_pos + (1.0 - 3.0 / self.v) * self.target_pos)
        self.width = int(100.0 / self.v)
        self.v += self.a
        self.a += 2.0
        if self.v > 50:
            self.rect = pygame.Rect(self.target_pos, (1,1))
        if self.v > 300:
            self.kill()

# Sprite class for Aliens
class Alien(pygame.sprite.Sprite):

    animcycle = 6
    images = []

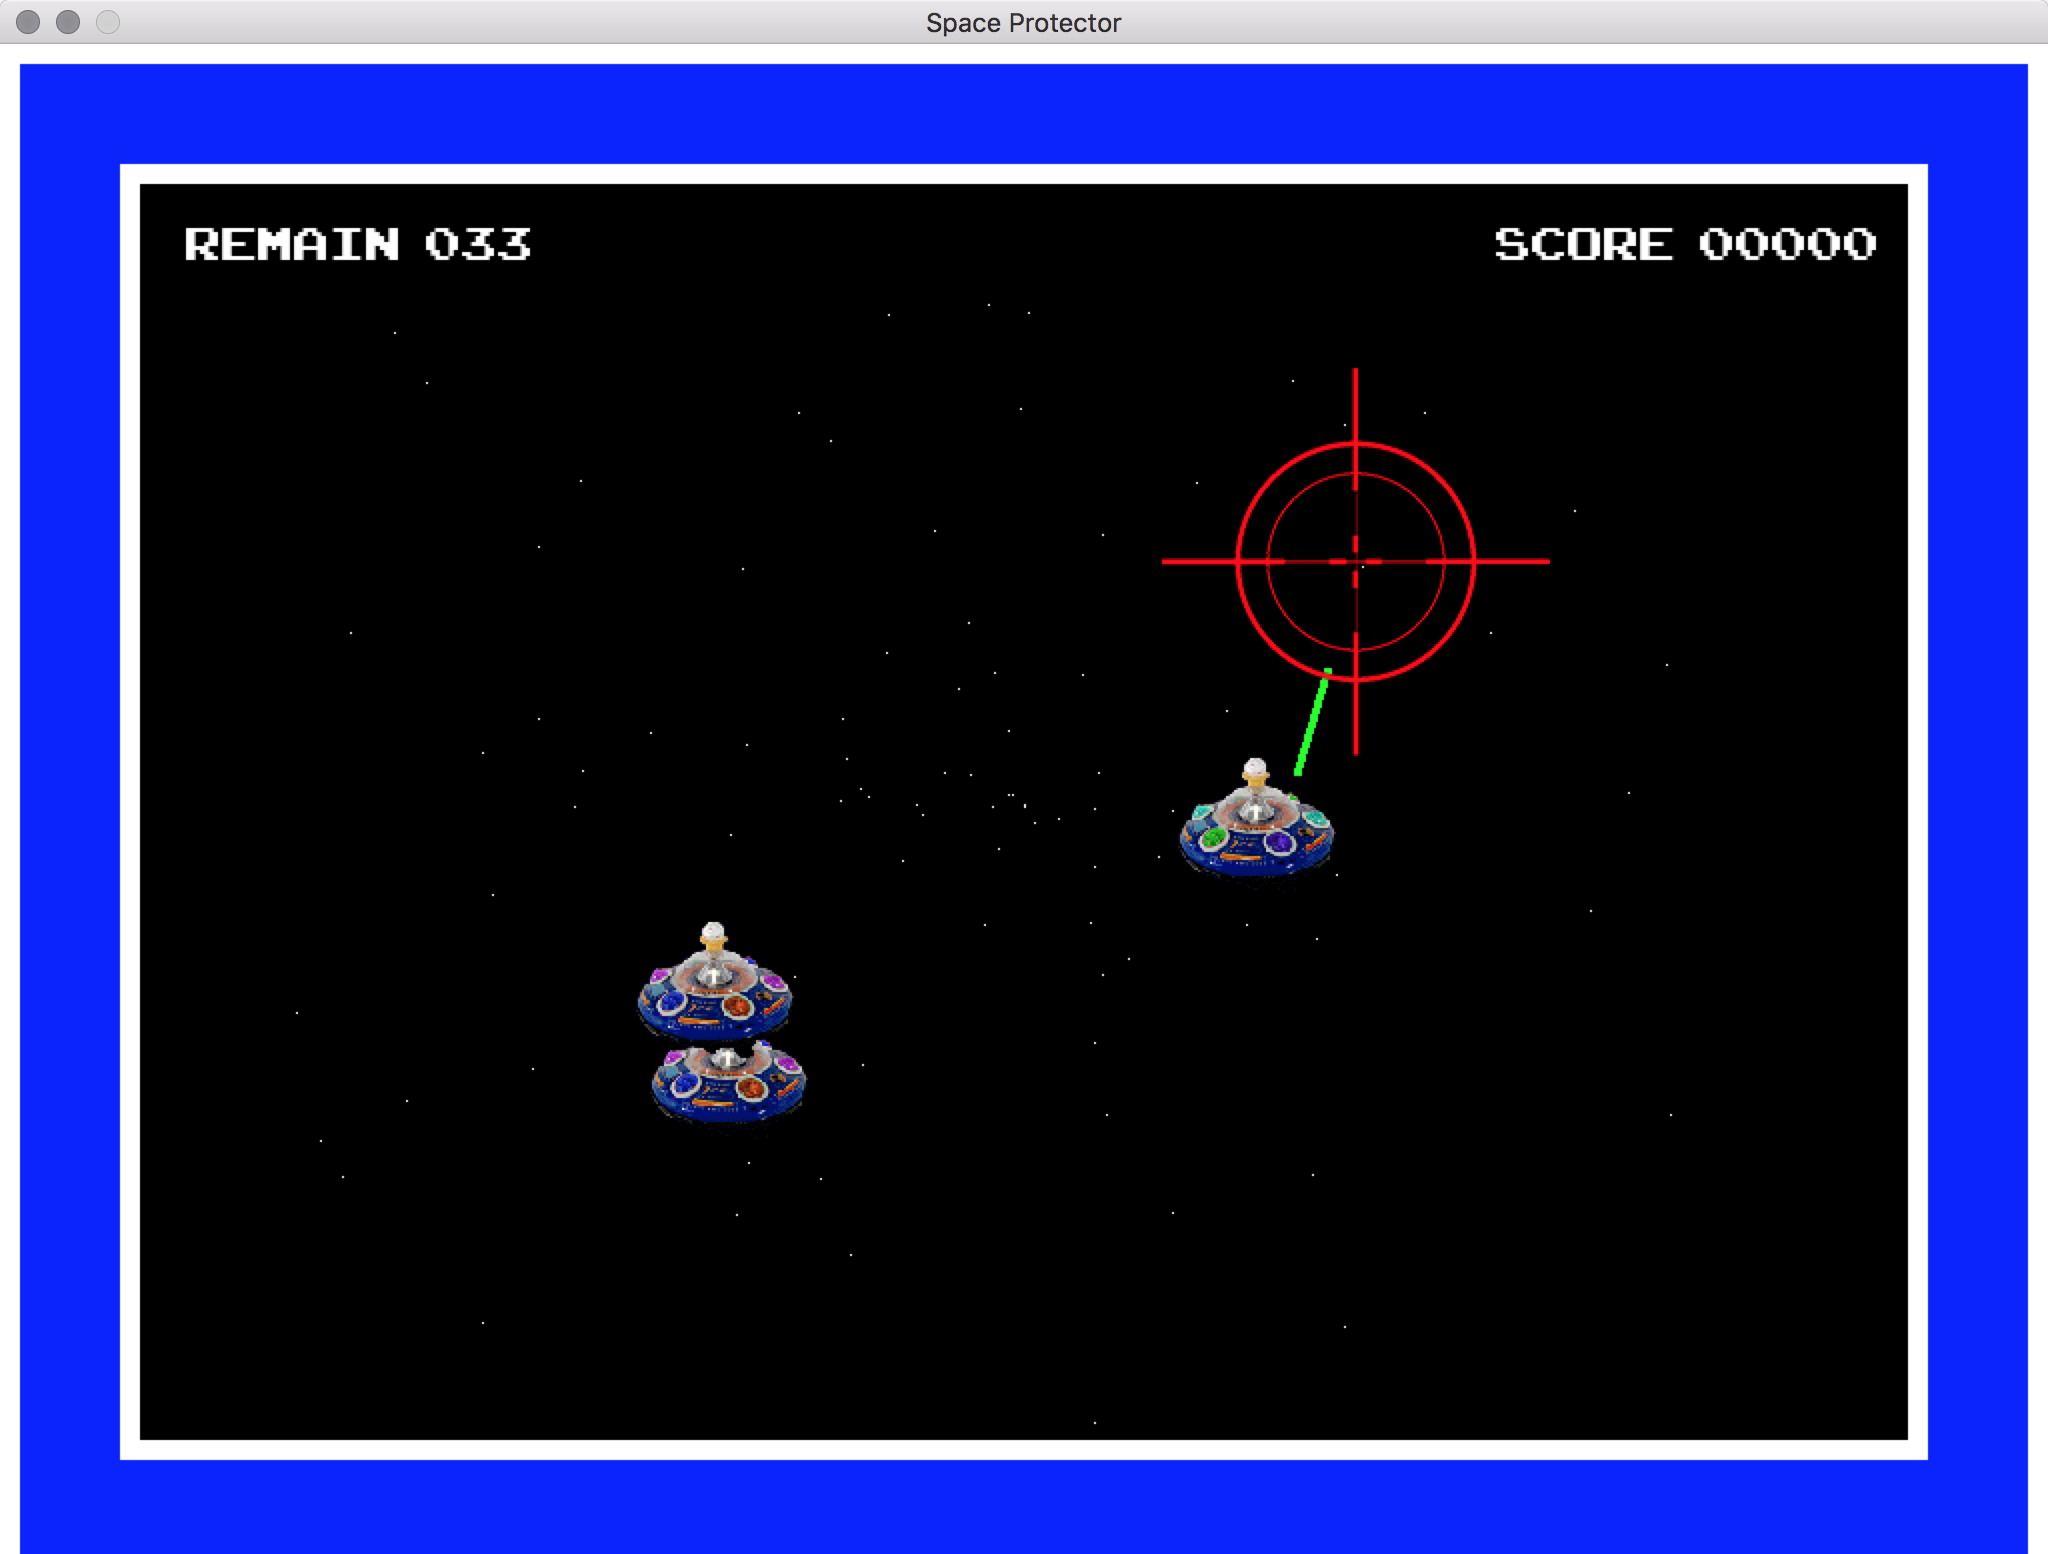
    def __init__(self, ufo_origin_pos, ufo_target_pos, ufo_stay_pos):
        pygame.sprite.Sprite.__init__(self)
        self.origin_pos = np.array(ufo_origin_pos)
        self.target_pos = np.array(ufo_target_pos)
        self.stay_pos = np.array(ufo_stay_pos)
        self.state = 0
        self.frame = 0
        self.image = self.images[0]
        self.rect = self.image.get_rect()
        self.rect.center = self.origin_pos
        self.v = np.zeros(2)
        self.v[0] = random.random() * 10 + 10
        self.v[1] = random.random() * 20 - 10
        self.hp = 100
        
    def update(self):
        global width
        self.frame += 1
        self.image = self.images[self.frame//self.animcycle%3]
        # Move the UFO according to its state
        if self.state == 0:
            self.v = (self.v + (self.stay_pos - self.rect.center) / 100) * 0.95
            #self.v = self.v / np.linalg.norm(self.v) * 20
            if self.frame > 15:
                self.state = 1
        if self.state == 1:
            self.v = self.v * 0.92 + (self.stay_pos - self.rect.center) / 20
            if self.frame > 80:
                self.state = 2
        if self.state == 2:
            self.v = self.v + (self.target_pos - self.rect.center) / 500
        
        #print(self.rect.center)
        self.rect.center = self.rect.center + self.v
        
        if self.rect.center[0] > width + 100:
            self.kill()

# Sprite class for explosion effects
class Explosion(pygame.sprite.Sprite):

    defaultlife = 12
    animcycle = 3
    images = []

    def __init__(self, actor):
        pygame.sprite.Sprite.__init__(self)
        self.image = self.images[0]
        self.rect = self.image.get_rect(center=actor.rect.center)
        self.life = self.defaultlife

    def update(self):
        self.life = self.life - 1
        self.image = self.images[self.life//self.animcycle%2]
        if self.life <= 0: self.kill()

# Sprite class for background stars
class Star(pygame.sprite.Sprite):

    def __init__(self, origin_pos):
        pygame.sprite.Sprite.__init__(self)
        self.pos = np.array(origin_pos).astype(float)
        direction = random.randrange(1000)
        vm = random.random()*.6+.4
        self.v = np.array([math.sin(direction) * vm, math.cos(direction) * vm])
        for i in range(int(random.randint(0, 100))):
            self.v *= 1.03
            self.pos += self.v

    def update(self):
        global width, height
        self.v *= 1.03
        self.pos += self.v
        if self.pos[0] < 0 or self.pos[0] > width or self.pos[1] < 0 or self.pos[1] > height:
            self.__init__((width / 2, height / 2))

# Sprite class for blinking texts
class BlinkText(pygame.sprite.Sprite):
    INTERVAL = 10
    def __init__(self, display_text):
        pygame.sprite.Sprite.__init__(self)
        self.surface = font1.render(display_text, True, WHITE)
        self.rect = self.surface.get_rect(center = (width / 2, height / 2 + 200))
        self.blink = False
        self.frame = self.INTERVAL

    def update(self):
        self.frame -= 1
        if self.frame < 0:
            self.blink = not self.blink
            self.frame = self.INTERVAL

# Function to draw the blue border for openCV recognization
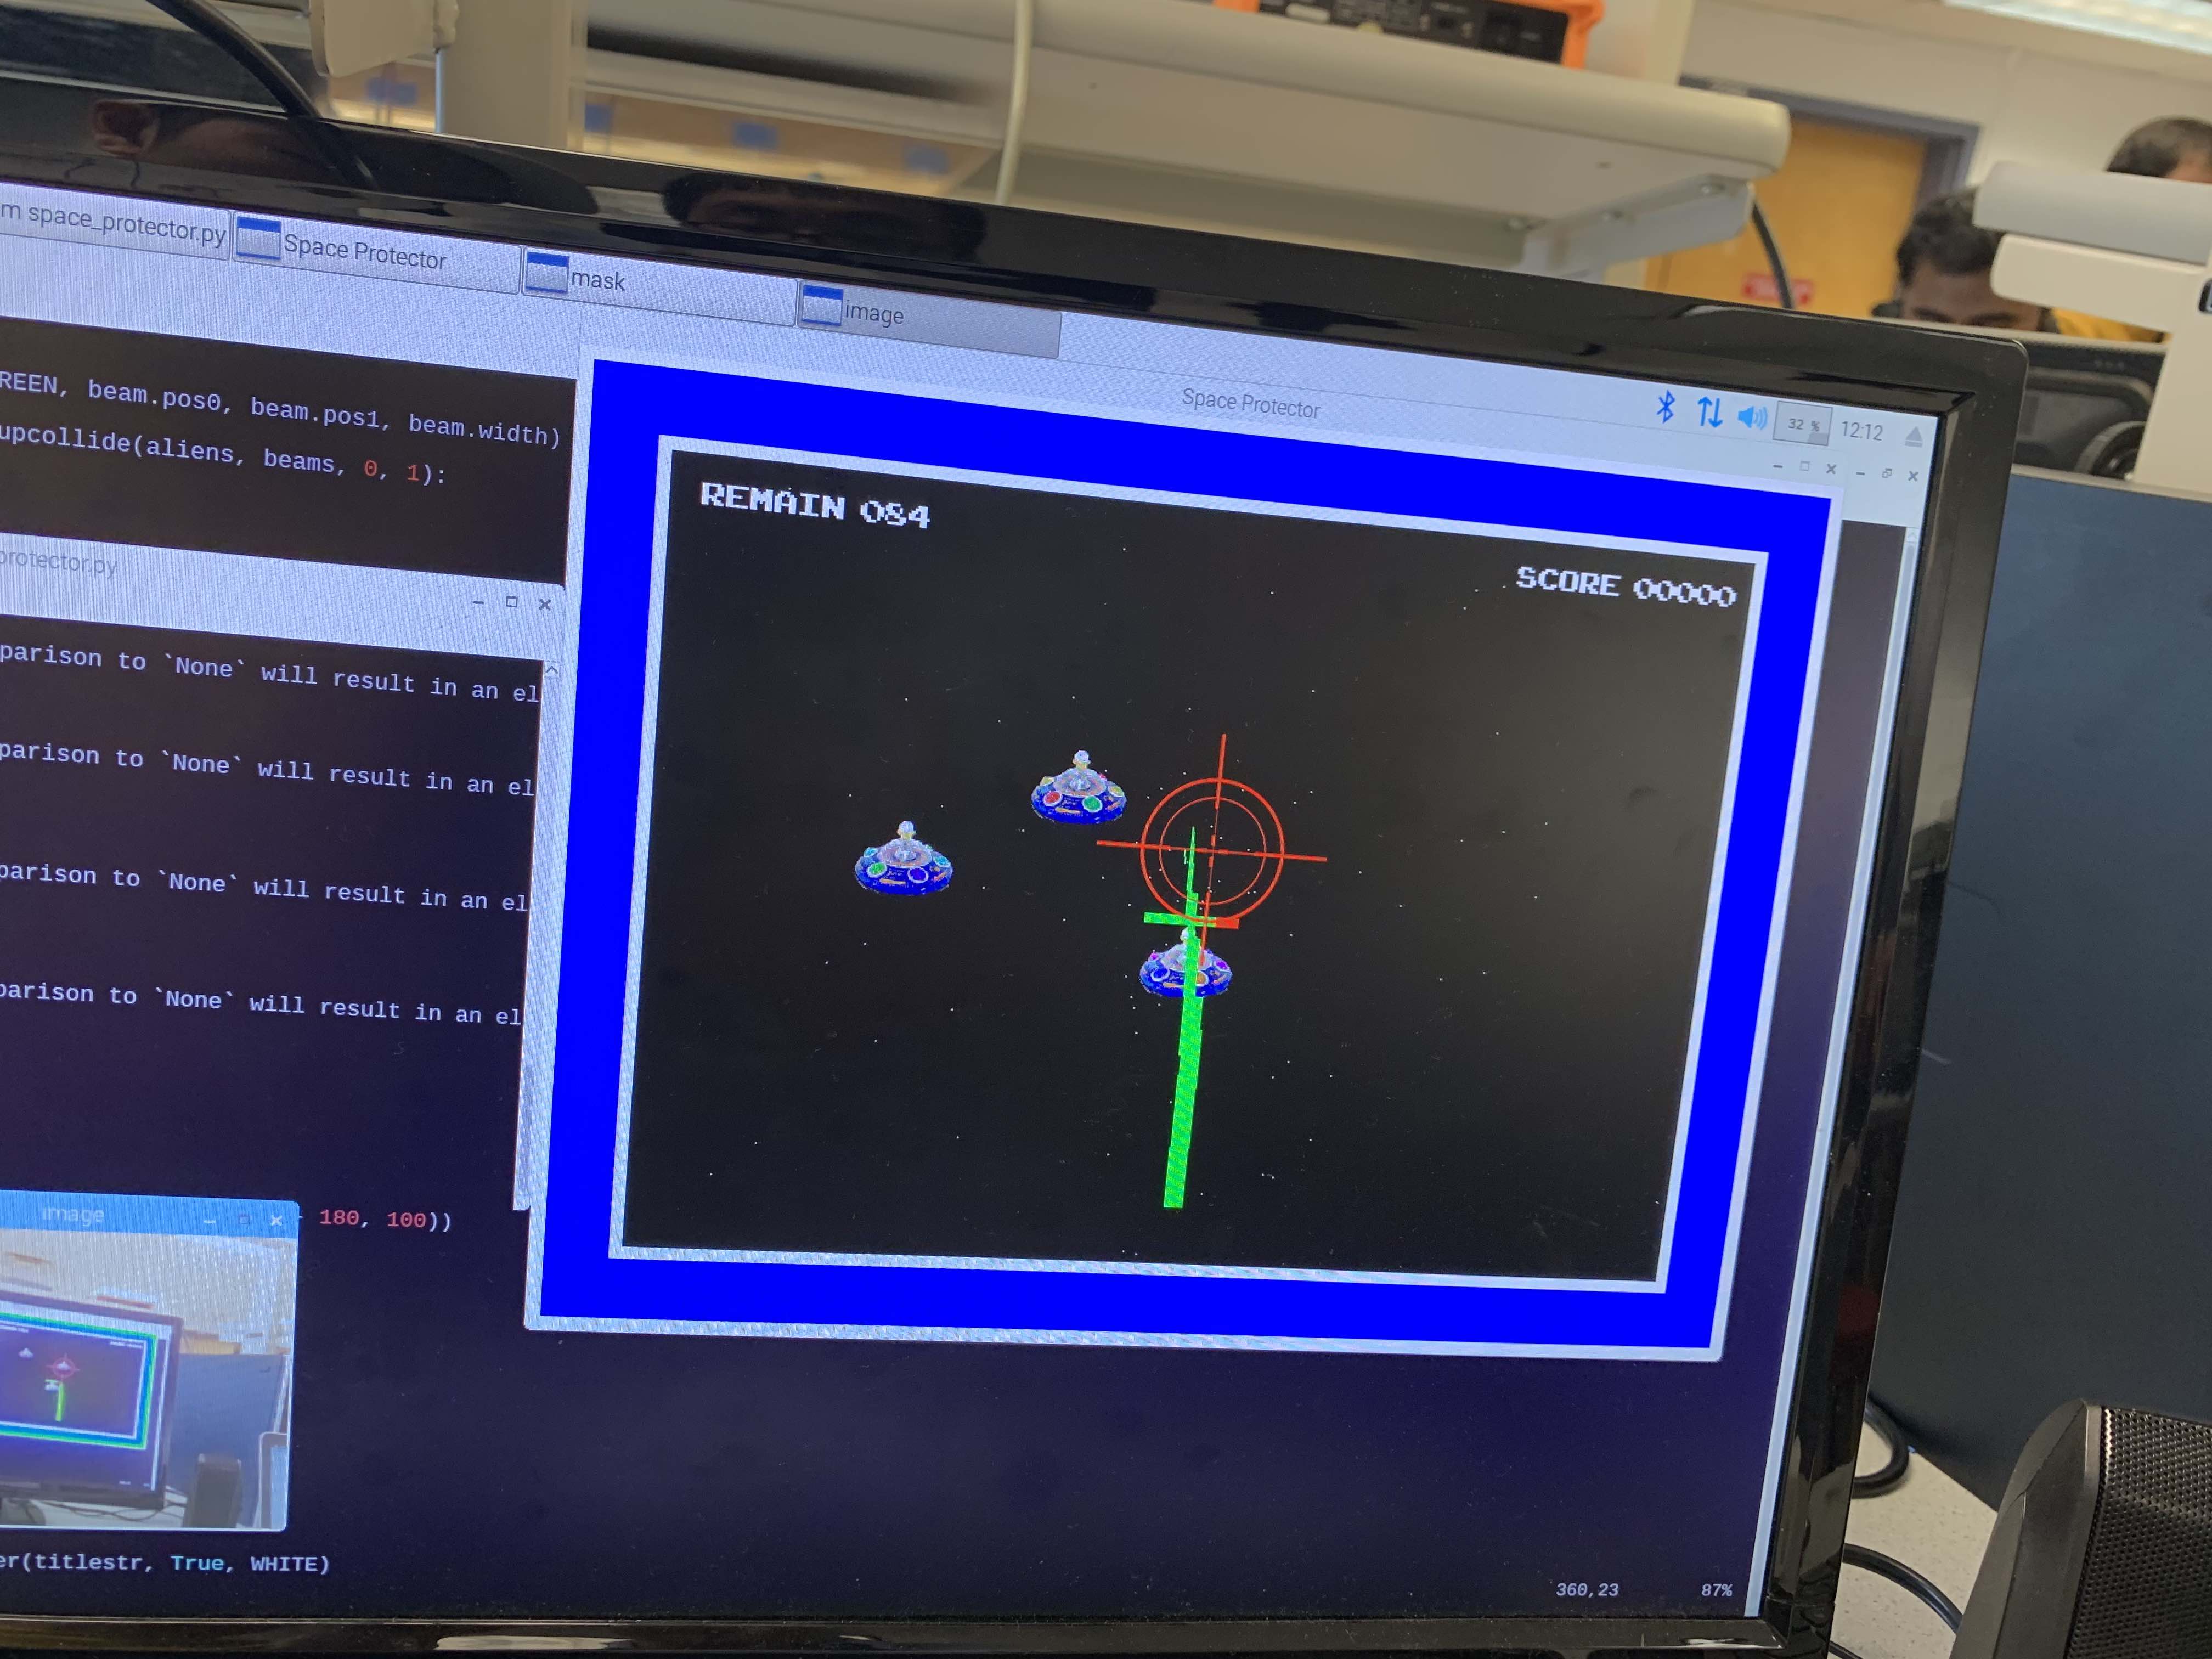
def drawBorder(screen):
    pygame.draw.rect(screen, WHITE, pygame.Rect(0, 0, width, 70))
    pygame.draw.rect(screen, WHITE, pygame.Rect(0, 0, 70, height))
    pygame.draw.rect(screen, WHITE, pygame.Rect(width-70, 0, 70, height))
    pygame.draw.rect(screen, WHITE, pygame.Rect(0, height-70, width, 70))
    pygame.draw.rect(screen, BLUE, pygame.Rect(10, 10, width - 20, 50))
    pygame.draw.rect(screen, BLUE, pygame.Rect(10, 10, 50, height - 20))
    pygame.draw.rect(screen, BLUE, pygame.Rect(width-60, 10, 50, height - 20))
    pygame.draw.rect(screen, BLUE, pygame.Rect(10, height-60, width - 20, 50))

# Initialize openCV parameters

rect = np.zeros((4, 2), dtype = "float32")
cameraw,camerad = 640, 480
cap = cv2.VideoCapture(0)
cap.set(3, cameraw)
cap.set(4, camerad)
lower_blue = np.array([90,80,160])
upper_blue = np.array([130,255,255])
kernelOpen=np.ones((3,3))

# Initialize pygame
pygame.init()
pygame.mouse.set_visible(False)

# Window mode
size = width, height = 1024, 768
screen = pygame.display.set_mode(size)

# Fullscreen mode
#size = width, height = 1920, 1080
#screen = pygame.display.set_mode(size, pygame.FULLSCREEN)

# Load images, fonts and sound effects

scope = pygame.image.load("sniper.png")
brect = scope.get_rect()

Alien.images.append(pygame.image.load("alien1.png"))
Alien.images.append(pygame.image.load("alien2.png"))
Alien.images.append(pygame.image.load("alien3.png"))
aliens = pygame.sprite.Group()
alienreload = ALIEN_RELOAD

icon = pygame.transform.scale(Alien.images[0], (32, 32))
pygame.display.set_icon(icon)
pygame.display.set_caption('Space Protector')

img = pygame.image.load('explosion1.gif')
Explosion.images = [img, pygame.transform.flip(img, 1, 1)]

font1 = pygame.font.Font("ARCADECLASSIC.TTF", 32)
font2 = pygame.font.Font("ARCADECLASSIC.TTF", 48)
font_title = pygame.font.Font("ARCADECLASSIC.TTF", 96)

if pygame.mixer and not pygame.mixer.get_init():
    print ('Warning, no sound')
    pygame.mixer = None

boom_sound = pygame.mixer.Sound('boom.wav')
hit_sound = pygame.mixer.Sound('hit.wav')
laser_sound = pygame.mixer.Sound('laser.wav')
laser_sound.set_volume(0.2)

if pygame.mixer:
    pygame.mixer.music.load('house_lo.wav')
    pygame.mixer.music.play(-1)

# Initialize global parameters used in game

ptarget = np.float32([width / 2, height / 2])
maxalien = 3
score = 0
starttime = time.time()
timestamp = 0
insight = False
game_running = True
ingame = 0
clock = pygame.time.Clock()

# Initialize sprite groups
beams = pygame.sprite.Group()
stars = pygame.sprite.Group()
explosions = pygame.sprite.Group()

hintstr = "PRESS   BUTTON   TO   START"
hinttxt = BlinkText(hintstr)

# Initialize the background stars
for i in range(100):
    stars.add(Star((width / 2, height / 2)))

# Main loop
while game_running:

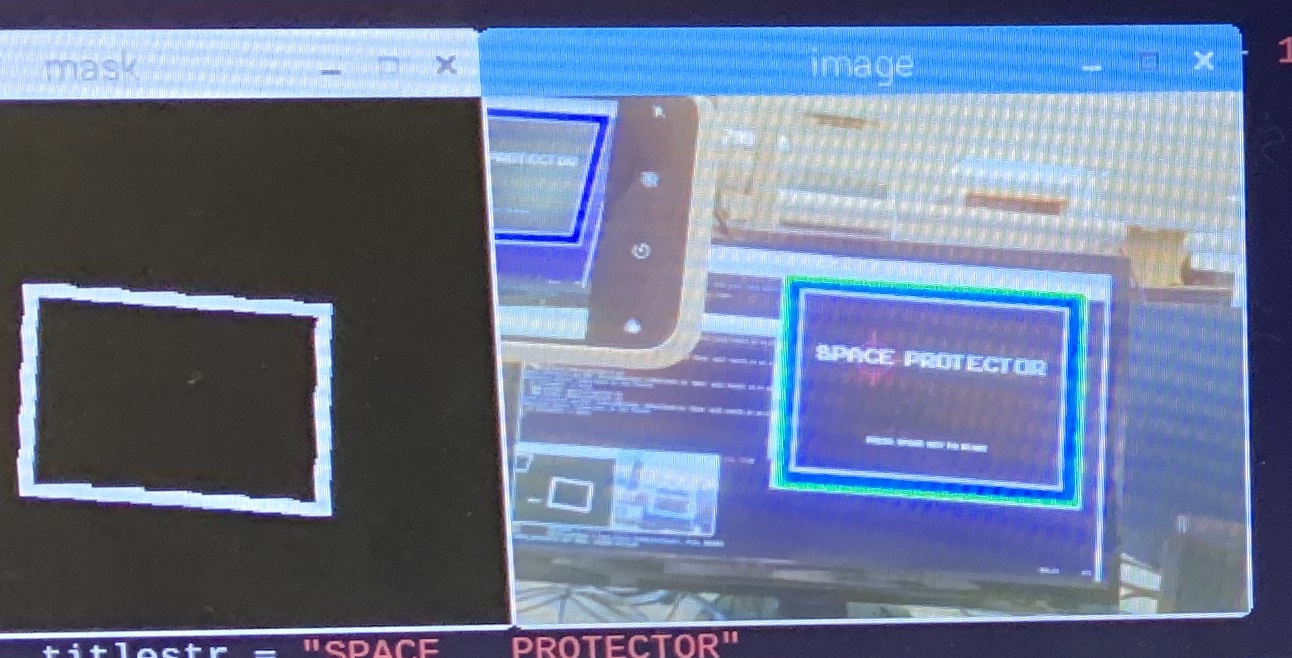
    # Use openCV to find the aiming position

    ret, image = cap.read()
    hsv = cv2.cvtColor(image, cv2.COLOR_BGR2HSV)
    mask = cv2.inRange(hsv, lower_blue, upper_blue)
    mask = cv2.morphologyEx(mask,cv2.MORPH_OPEN,kernelOpen)
    (cnts, _) = cv2.findContours(mask.copy(), cv2.RETR_TREE, cv2.CHAIN_APPROX_SIMPLE)
    cnts = sorted(cnts, key = cv2.contourArea, reverse = True)[:10]
    screenCnt = None

    for c in cnts:
        peri = cv2.arcLength(c, True)
        approx = cv2.approxPolyDP(c, 0.12 * peri, True)
        if cv2.contourArea(c) < 5000:
            break
        if (cv2.isContourConvex(approx)) and len(approx) == 4:
            screenCnt = approx
            break

    cv2.imshow("mask", cv2.resize(mask, (320,240)))
    cv2.drawContours(image, [screenCnt], -1, (0, 255, 0), 3)
    cv2.imshow("image", cv2.resize(image, (320,240)))
    if cv2.waitKey(1) & 0xFF == ord('q'):
        break

    if screenCnt != None:
        pts = screenCnt.reshape(4,2)
        s = pts.sum(axis = 1)
        rect[0] = (rect[0] * 2 + pts[np.argmin(s)]) / 3
        rect[2] = (rect[2] * 2 + pts[np.argmax(s)]) / 3
        diff = np.diff(pts, axis = 1)
        rect[1] = (rect[1] * 2 + pts[np.argmin(diff)]) / 3
        rect[3] = (rect[3] * 2 + pts[np.argmax(diff)]) / 3
        pcenter = np.float32([cameraw / 2,camerad / 2])
        dst = np.float32([[30,30],[width-60,30],[width-60,height-60],[30,height-60]])
        M = cv2.getPerspectiveTransform(rect, dst)
        ptarget = cv2.perspectiveTransform(pcenter.reshape(-1, 1, 2), M)
        ptarget = ptarget.reshape(2)

        if (ptarget[0] > 150)and(ptarget[0] < width-150)and(ptarget[1] > 150)and(ptarget[1] < height-150):
            brect.center = np.rint(ptarget)
            insight = True
        else:
            insight = False
    else:
        insight = False

    clock.tick(20)

    # Processing the inputs (keyboard, mouse and external buttons)

    if time.time()-timestamp > 0.6:
        GPIO.output(27, GPIO.LOW)

    for event in pygame.event.get():
        if (event.type is pygame.KEYDOWN):
            presskey = pygame.key.get_pressed()
            if presskey[pygame.K_ESCAPE]:
                game_running = False
            if presskey[pygame.K_SPACE]:
                if ingame == 0:
                    ingame = 1
                    maxalien = 3
                    score = 0
                    hinttxt.kill()
                    starttime = time.time()
                elif ingame == 1:
                    laser_sound.play()
                    beam = Beam([(width + brect.center[0]) / 3, height - 120],brect.center)
                    beams.add(beam)
                else:
                    if time.time() - starttime > 3:
                        ingame = 0
                        hinttxt.kill()
                        hintstr = "PRESS   BUTTON   TO   START"
                        hinttxt = BlinkText(hintstr)

        elif (event.type is pygame.MOUSEMOTION):
            pos = pygame.mouse.get_pos()
            insight = True
            brect.center = pos

    screen.fill(BLACK)
    stars.update()
    for star in stars.sprites():
        screen.set_at(star.pos.astype(int), WHITE)

    # If game is playing
    if ingame == 1:

        if(not GPIO.input(17)):
            laser_sound.play()
            beam = Beam([width/2, height -120],brect.center)
            beams.add(beam)
            GPIO.output(27, GPIO.HIGH)
            timestamp = time.time()
        # Create new alien
        if alienreload:
            alienreload = alienreload - 1
        elif len(aliens) < maxalien and random.random() < 0.5:
            origin_y = int(random.random() * 400) + 200
            target_y = int(random.random() * 400) + 200
            stay_x = int(random.random() * 400) + 200
            stay_y = int(random.random() * 400) + 200
            
            alien = Alien([-100, origin_y], [width + 100, target_y], [stay_x, stay_y])
            aliens.add(alien)
            alienreload = ALIEN_RELOAD

        aliens.update()
        beams.update()
        explosions.update()
        
        aliens.draw(screen)
        explosions.draw(screen)

        for beam in beams.sprites():
            pygame.draw.line(screen, GREEN, beam.pos0, beam.pos1, beam.width)

        for alien in pygame.sprite.groupcollide(aliens, beams, 0, 1):
            alien.hp -= 25
            if alien.hp <= 0:
                score += 100
                if score % 500 == 0:
                    maxalien += 1
                alien.kill()
                boom_sound.play()
                explosions.add(Explosion(alien))
            else:
                hit_sound.play()

        for alien in aliens.sprites():
            if alien.hp < 100 and alien.hp > 0:
                hpbar = pygame.Rect(alien.rect)
                hpbar.top = hpbar.top - 10
                hpbar.height = 8
                hpremain = pygame.Rect(hpbar)
                hpremain.width = hpbar.width * alien.hp / 100
                pygame.draw.rect(screen, RED, hpbar)
                pygame.draw.rect(screen, GREEN, hpremain)
        
        remaintime = 60 - (time.time() - starttime)

        remaintimestr = "REMAIN   " + str(int(remaintime)).zfill(3)
        scorestr = "SCORE   " + str(score).zfill(5)

        remaintime_surface = font1.render(remaintimestr, True, WHITE)
        remaintime_rect = remaintime_surface.get_rect(center = (180, 100))
        screen.blit(remaintime_surface, remaintime_rect)

        score_surface = font1.render(scorestr, True, WHITE)
        score_rect = score_surface.get_rect(center = (width - 180, 100))
        screen.blit(score_surface, score_rect)

        if remaintime <= 0:
            ingame = 2
            starttime = time.time()
            beams.empty()
            aliens.empty()
            explosions.empty()
            hinttxt.kill()
            hintstr = "PRESS   BUTTON   TO   RETURN"
            hinttxt = BlinkText(hintstr)


    elif ingame == 0:
        titlestr = "SPACE   PROTECTOR"
        title_surface = font_title.render(titlestr, True, WHITE)
        title_rect = title_surface.get_rect(center = (width / 2, height / 2 - 100))
        screen.blit(title_surface, title_rect)

        hinttxt.update()
        if(not GPIO.input(17)):
            ingame = 1
            maxalien = 3
            score = 0
            hinttxt.kill()
            starttime = time.time()

        
        if hinttxt.blink:
            screen.blit(hinttxt.surface, hinttxt.rect)

    elif ingame == 2:
        titlestr = "GAME   OVER"
        title_surface = font_title.render(titlestr, True, WHITE)
        title_rect = title_surface.get_rect(center = (width / 2, height / 2 - 100))
        screen.blit(title_surface, title_rect)

        score_surface = font2.render(scorestr, True, WHITE)
        score_rect = score_surface.get_rect(center = (width / 2, height / 2 + 100))
        screen.blit(score_surface, score_rect)

        hinttxt.update()
        if(not GPIO.input(17)):
            if time.time() - starttime > 3:
                ingame = 0
                hinttxt.kill()
                hintstr = "PRESS   BUTTON   TO   START"
                hinttxt = BlinkText(hintstr)
        
        if time.time() - starttime > 3 and hinttxt.blink:
            screen.blit(hinttxt.surface, hinttxt.rect)

    if insight:
        screen.blit(scope, brect)

    # Finally, draw the blue border on the window
    drawBorder(screen)
    
    # Display the new frame onto the Screen
    pygame.display.update()

# Release gpio pins and camera before exit
GPIO.cleanup()
cap.release()
cv2.destroyAllWindows()