Raspberry Pi Virtual Vibes Music Device
ECE5725 Final Project
Designed By Jie Huang & Runqiu Zhu
Virtue Vibes Demonstration Video
Introduction
Our final project is to create an incredible music device called “Virtual Vibes”. The device consists of two parts: the main part is a Raspberry Pi base connected with 12 pairs of infrared emitter and sensor. For the second part, it is a specially designed stick with an add-on absolute orientation sensor. This is an intelligent and dynamic device which can detect how hard you hit the infrared beams and respond with the corresponding volume of sound. With these two parts cooperating with each other, users can have the opportunity to create music with multiple layers of sound and make their music smooth and rhythmic. What’s more, to implement the higher and more complex design we need to add more components, we will implement two buttons, when we press one of the buttons it will switch to another octave. And we try to implement a different type of the timbre based on the external speaker.
Project Objective:
- Design hardware and the structure of the music device, including the keyboard and the stick.
- Manage to use WiFi communication to connect the Raspberry Pi and the stick.
- Use Raspberry Pi and speaker to play sound when hitting the IR beam.
- Display corresponding notes on the PiTFT.
Design & Drawings
Hardware Part
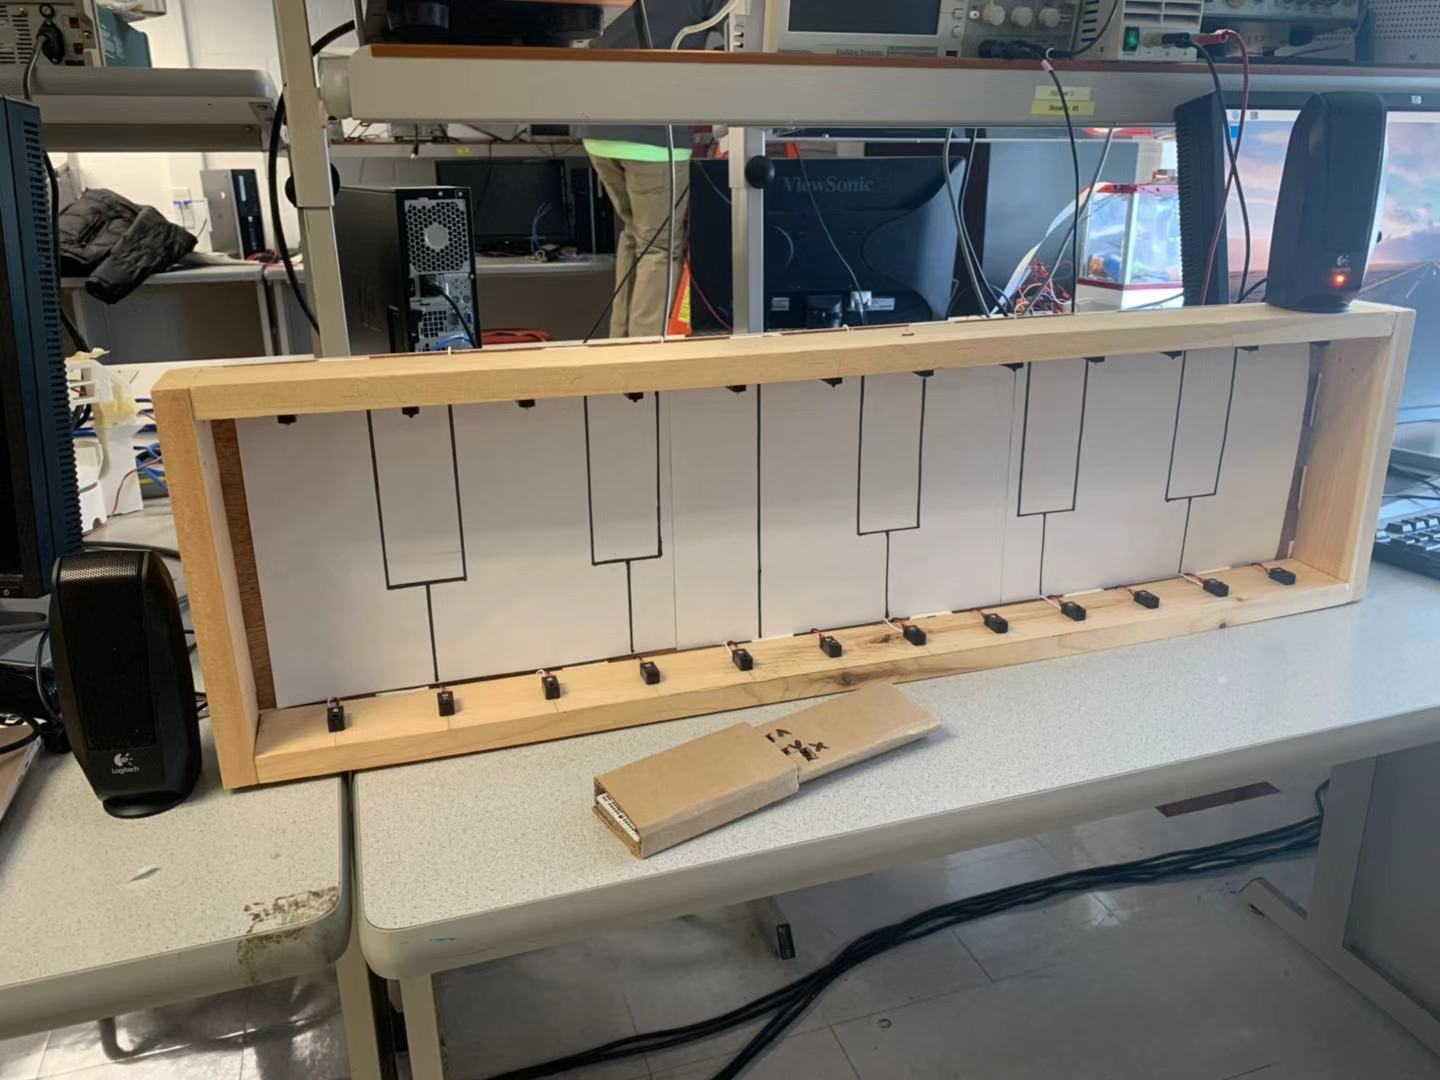
For the hardware part, it basically consists of three part. One is the keyboard, one is the stick and the last one is Raspberry Pi. To build the keyboard, we need several wooden boards, 12 pairs of IR beam breakers and some resistors as well as Wires. As for the stick, we used teensy 3.2, BNO055 Absolute Orientation Sensor and ESP-12E WiFi module and assembled them together. The figures below show the components of hardware and how each part connected to each other.
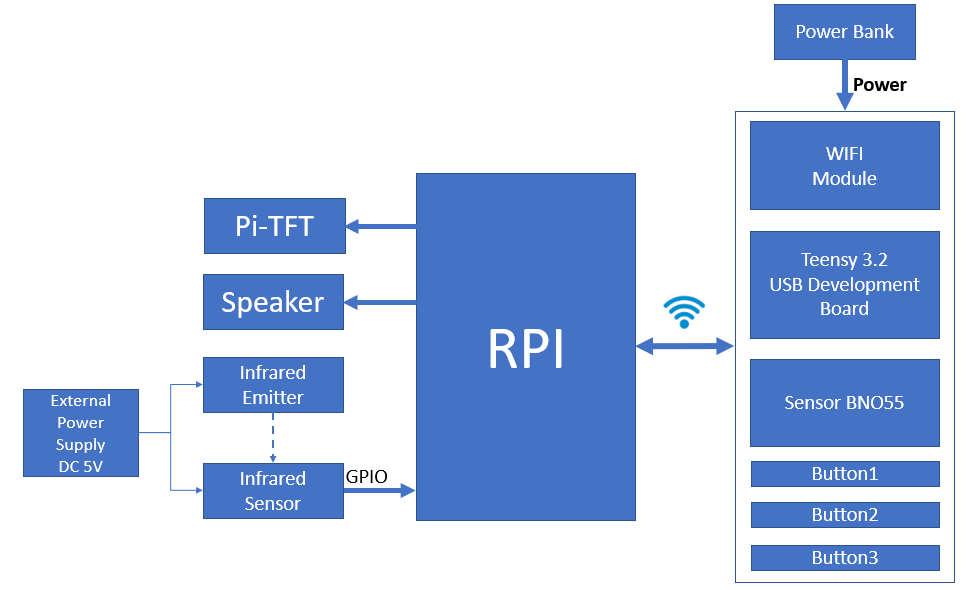
Figure 1 System Structure
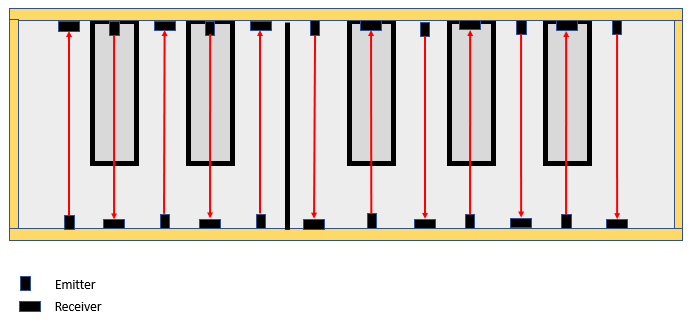
Figure 2 Keyboard Frame Architecture
Software Part
Music Note Play
The first function for programming is getting the sound waves from sample files, we need to build a note library which can make the Rpi display different notes and compose them together as a whole composition based on our program. In physics, we can know that sound is an oscillation of a mechanical medium that makes the surrounding air also oscillate and transport the sound as a compression wave. In Maths, a different type of note oscillation has different oscillating frequency and usually has 440hz as an octave. So we can just generate one note and using iFFT and FFT transform to convert it into a different type of note.

Figure 3 Octave Schematic Diagram
where t is the time and f the frequency of the oscillation. Each musical note vibrates at a particular frequency and to generate a tone we have to generate an oscillation with the appropriate frequency. We just have the notation ‘C4’ as basic frequency 440Hz, we can first use FFT to transfer it to the frequency domain and add an interval frequency and then transfer it into the time domain.
GPIO-Python
We design the GPIO callback functions in Python file, let it waiting for players’ input. When a player makes an input in our Virtual Vibes Music Device, the corresponding callback function will generate a global GPIO detection list contains elements [pull_down/pull_up, GPIO port] to indicate the GPIO status, command to terminal and the main function loop will receive the list and deal some function to handle the GPIO input, like playing a single sound out, generating a note, displaying the note, displaying the keyboard.
Pygame Note Generate
-Note Detection and Sound Producing
# Detect Virtual Press
In each loop we will detect the note based on the GPIO detection list and process and split the list data to generate the sound based on a dictionary key, if the detected GPIO indicates the key corresponding to the keys in the dictionary we will mark the note as playing and play the dictionary value of that note.
# Use UDP Signal to Change Volume
We first generate the UDP signal and use subprocess to execute bash script and than change the volume in the bash script.
# Generate Note Sound
We use scipy to generate note sound.
-Note List
To display the note on the screen we should first generate a note-list contains notes elements and append a new generated note/rest to the note list.
Notes elements: globalname.notelist.append([math.ceil(note_length), location, 320 - note_start_point, rise, line_number, pngpos])
Notelist elements contains:
- #Note_length
- #Note_start_point on piTFT screen
- #Rise or not
- #Line outside of staff
- #Picture direction
- #Global variable location
-Calculate Rest/Note Duration
Each time we detected that there is a GPIO has been pulled_up or pulled_down. We will record the time and use the time interval between two notes as a time calculation result of a note or a rest. When the GPIO has been pull_down which means the vibre has been touched, we should calculate the former rest_duration. When the GPIO has been pull_up which means the vibre has been removed, we should calculate the former rest_duration.
-Start Point of Note
Since each different note has a different note duration. At present, we use some algorithm to handle the note. There exists a problem which hard to is solved is if we want to display the note instantly on the score seems impossible. When we have enough information about what type of the note is and we can display it on the score screen, the note has already finished and should be passed on the score. So we cannot just display every note on the screen without any preprocessing. We should have an algorithm to change the position where should the note be displayed.
-Rise or not/Line outside of staff/Picture direction
To display the note with accuracy we need to focus on the special situation of the note rise and note line and note direction.
-Global Variable Location
We use the location to indicate different note position, different octave, different staff.
Pygame Display
There are several sub-program included about the functions we need to display on the PiTFT screen:
- # display.displaykey(screen): Display the init-keyboard on the screen
- # display.displaykeyboard(key,keys,screen): Display the touched-keyboard on the screen
- # display.displaybase(screen): Display the staff on the screen
- # display.displaynote(screen): Display the notes on the screen. In each loop we display the notes the notes location will be pushed left based on the music tempo and staff moving speed.
Arduino Function
The program is designed to implement ESP8266 WiFi Module and BNO055 Absolute Orientation Sensor on the Teensy 3.2. The goal is to collect data from the sensor and transmit it through UPD when receiving a signal from the Raspberry Pi. Here, we have already setup a hotspot on Raspberry Pi. What we have to do is to connect the device to the Raspberry Pi, wait for the device to receive signal 'w' from RPI and send the maxima sensor from the buffer. By modifying the program we add a FIFO data structure to detect the maxima sensor data.
UDP Port Setting
-Arduino Setting
#define WIFI_Serial Serial2 // WIFI Port
#define WIFI_SSID "jh2674_rz373_AP" // Network Name
#define WIFI_PASS "31415926" // Network Password
#define HOST "192.168.4.1" // Host Address
#define PORT 8080 // Host Port
#define myPORT 9008 // Device Port
-Rpi Setting
UDP_IP = "192.168.4.9"
UDP_PORT = 9008
sock.bind(("192.168.4.1",8080))
Testing
Examinating Hardware
In order to have a workable and reliable device after assembly, it is necessary to test the hardware part before implementing the software to the device. In general, hardware examination consists of two parts. The first examination part is to test the keyboard. In the first place, it is essential to check all the infrared emitter and sensor pairs whether they can function correctly before connected to the GPIO of Raspberry Pi. In this step, we used the oscilloscope to check the output signal from the sensor and also examined the voltage values of different points with digital voltmeter.
After finishing the first step, the next thing to do is to examine whether the IR beam breakers can function correctly or not when connected to the Raspberry Pi. So we basically write a simple python code to detect the breaking and give corresponding actions. With those two steps mentioned above, we now complete the keyboard examination.
As for the stick, we need to make sure that the stick can operate in the right way. So we are required to test with WiFi communication with the Raspberry Pi, buttons implement and also the sensor data collection. At this point, we can make sure that the whole music device can work cooperatively.
Testing Software
The program is designed to display different types of notes with a different tempo. A whole note with rest on PiTFT display screen. You can see a whole note F4 and a rest in the PiTFT screen.
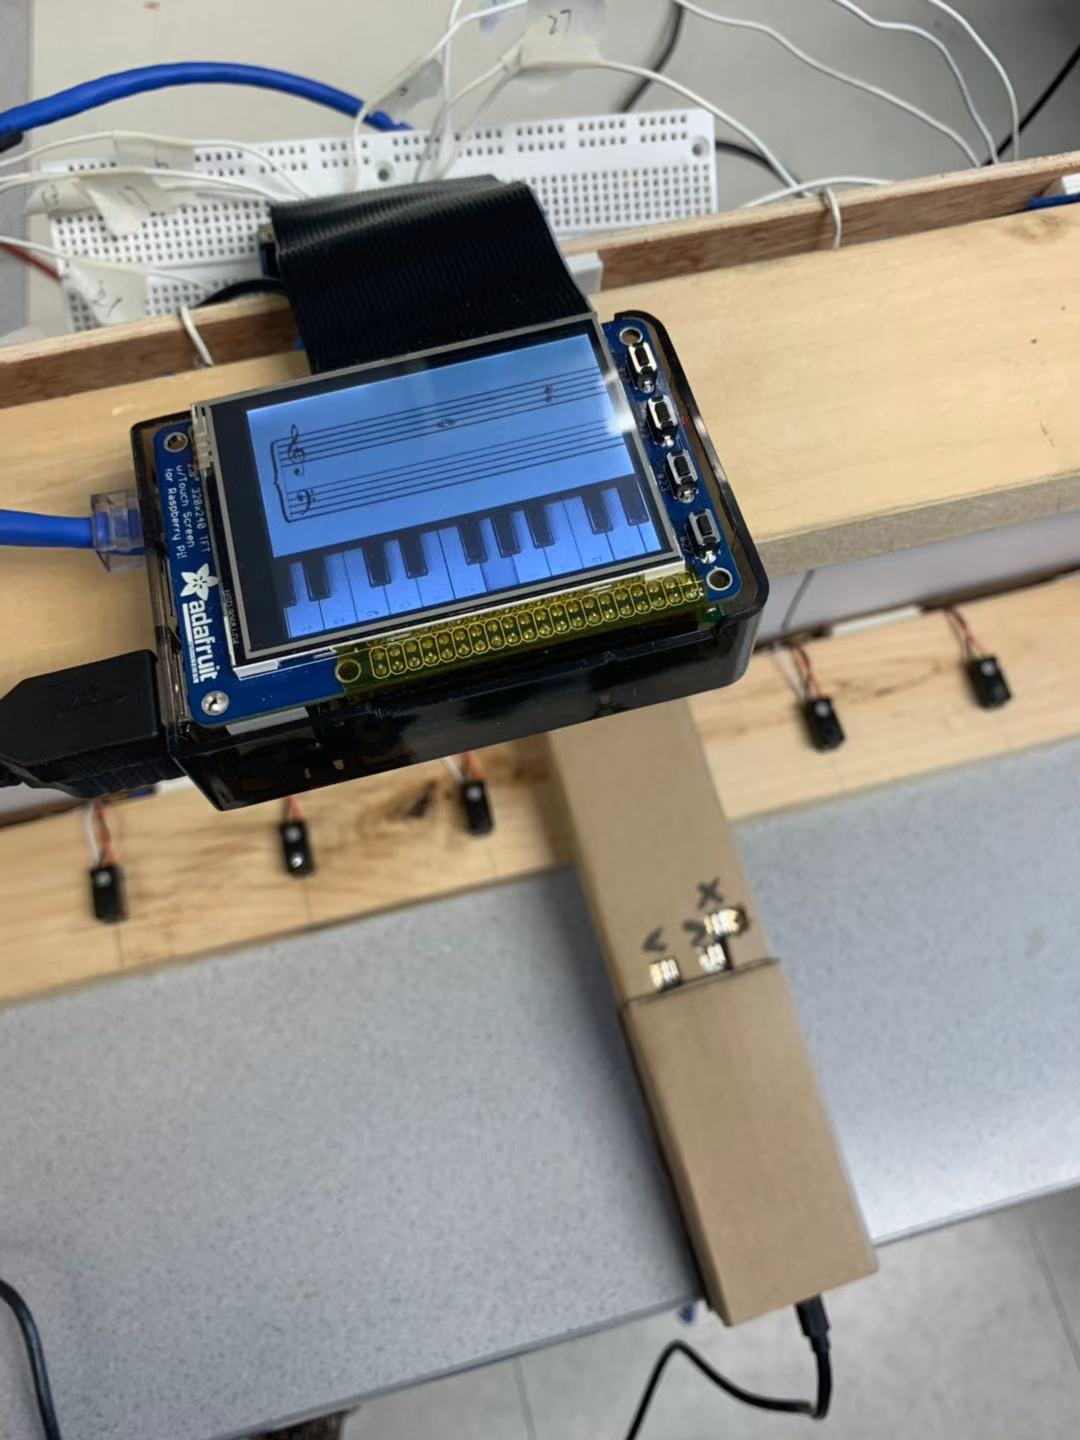
Figure 4 Display a Note F4
A #G3 forth_note and a #E3 half_note and a #E3 forth_note
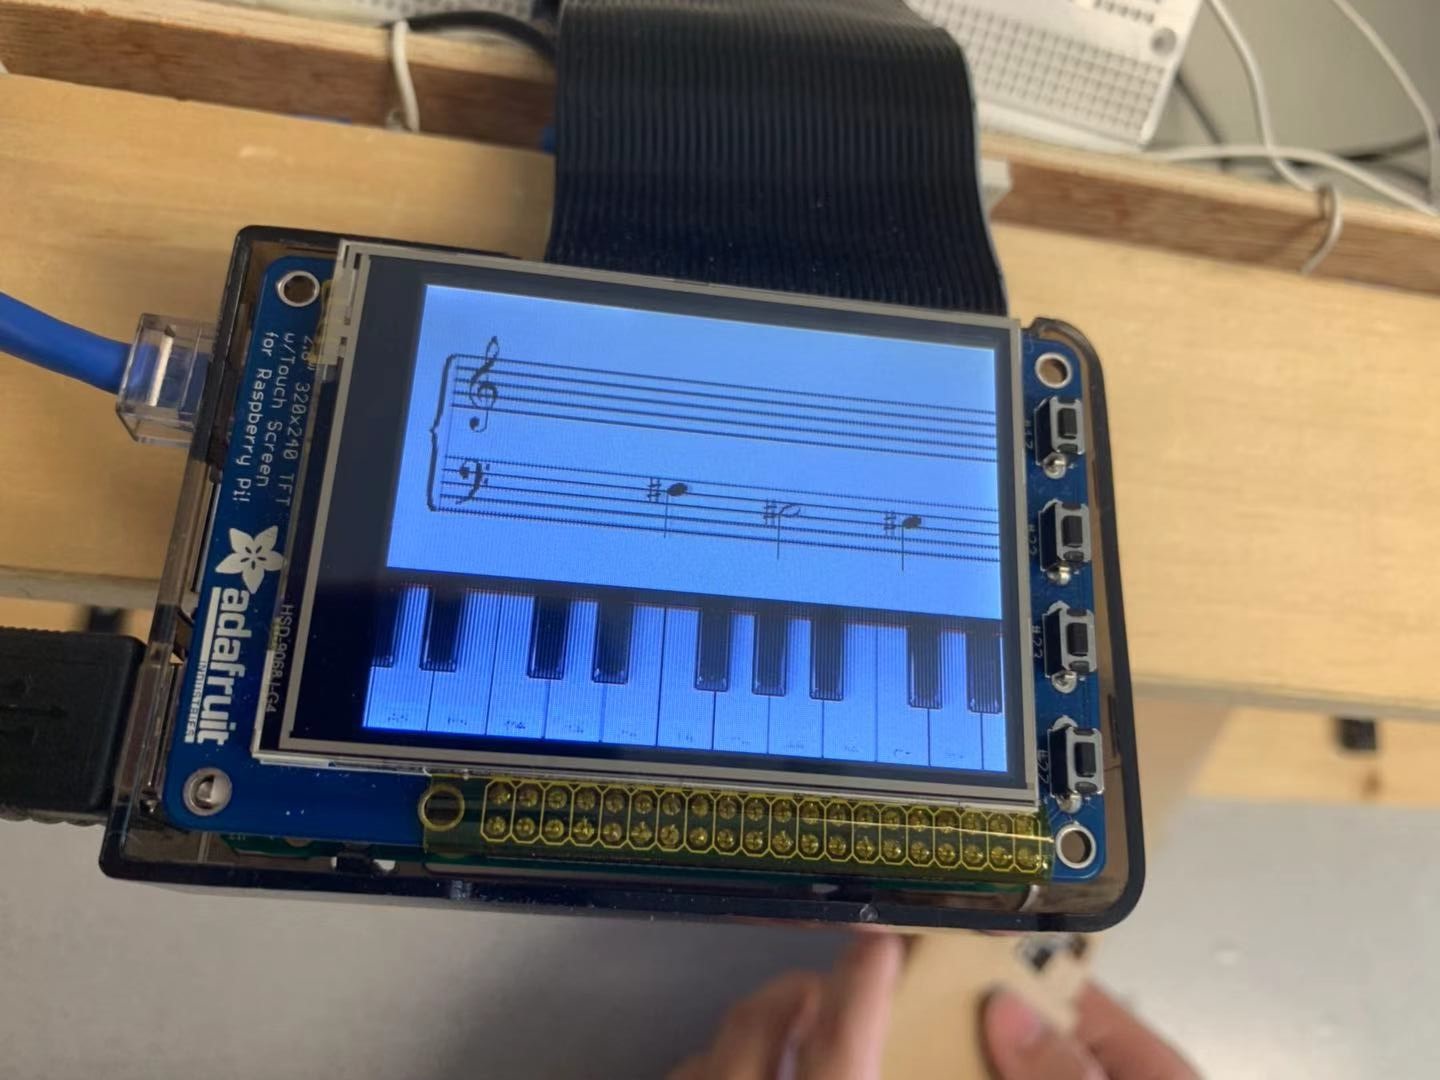
Figure 5 Display Several Notes
Multi-notes with a small line. You can see a C4 half_note and multi C4 sixteenth_note and a rest.
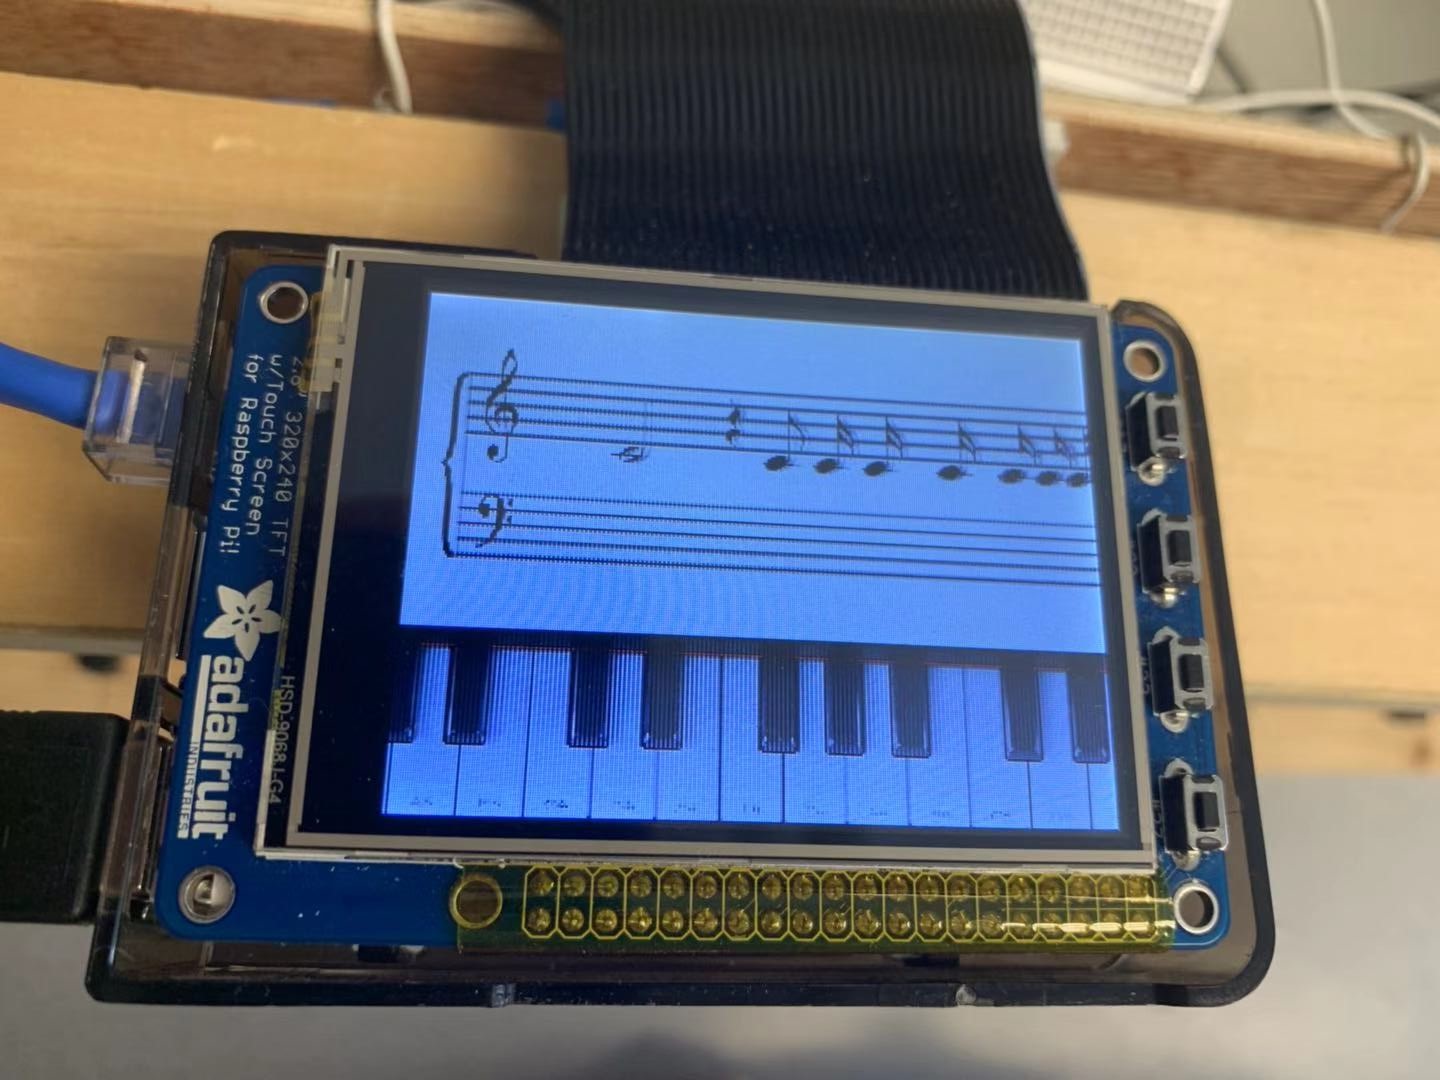
Figure 6 Display A Series of Notes
Conclusions
Our final project is to create an incredible musical device called “Virtual Vibes”. The ultimate goal of the project is to design and realize an electronic musical instrument which allows people to play music they want. By using the specially designed stick to hit the beams, we are able to create different kinds of sounds that we desired. If we hit the beams harder, we can create a louder sound and vice versa.
The device consists of two parts: the main part is a Raspberry Pi base connected with 12 pairs of infrared emitter and sensor. For the second part, it is a specially designed stick with an add-on sensor. This is an intelligent and dynamic device which can detect how hard you hit the infrared beams and respond with the corresponding volume of sound. What’s more, we can display the note on the staff on the PiTFT screen to create a well-performed music sheet. With these two parts cooperating with each other, users can successfully have the opportunity to create music with multiple layers of sound and make their music smooth and rhythmic. What’s more, we finally successfully implement the function of our Virtual Vibes.
Future Work
If we have more time, then we will try our best to improve the responding delay problem and make Virtual Vibes to realize the truly real time. Besides, another thing to work on is the sensitivity of the IR break detection, making it much easier to use. What's more, we probably will change the appearance of the music device and make it look better.
Work Distribution
Jie Huang(jh2674@cornell.edu):
Designed the overall hardware device including the keyboard and the stick, assembled all parts together and managed to implement the WiFi communication.
Runqiu Zhu(rz373@cornell.edu):
Designed the software structure of the whole device, realized the sound playing and the note display.
Parts List
- Raspberry Pi 3 - $35.00 * 1 = $35.00
- Adafruit IR Break Beam Sensor - $1.95 * 12 = $23.40
- Teensy USB Board Version 3.2 - $19.80 * 1 = $19.80
- Adafruit BNO055 Absolute Orientation Sensor - $34.95 * 1 = $34.95
- ESP-12E Serial Wifi Wireless - $5.00 * 1 = $5.00
- Resistors, Wires and Wooden Frame - Provided in lab
Total: $69.95
References
R-Pi GPIO DocumentTeensy 3.2 Document
Adafruit BNO055 Absolute Orientation Sensor Document
ESP-12E Datasheet
Music and Mathematics
Setting up a Raspberry Pi as an access point in a standalone network (NAT)
Code Appendix
Github: https://github.com/zrqohbug/virtualpiano