# Final Project: homepageupdate.py
# Updated date: 12/05/2018
# Authors: Han Yu (hy532), Yingjie Li (yl2988)
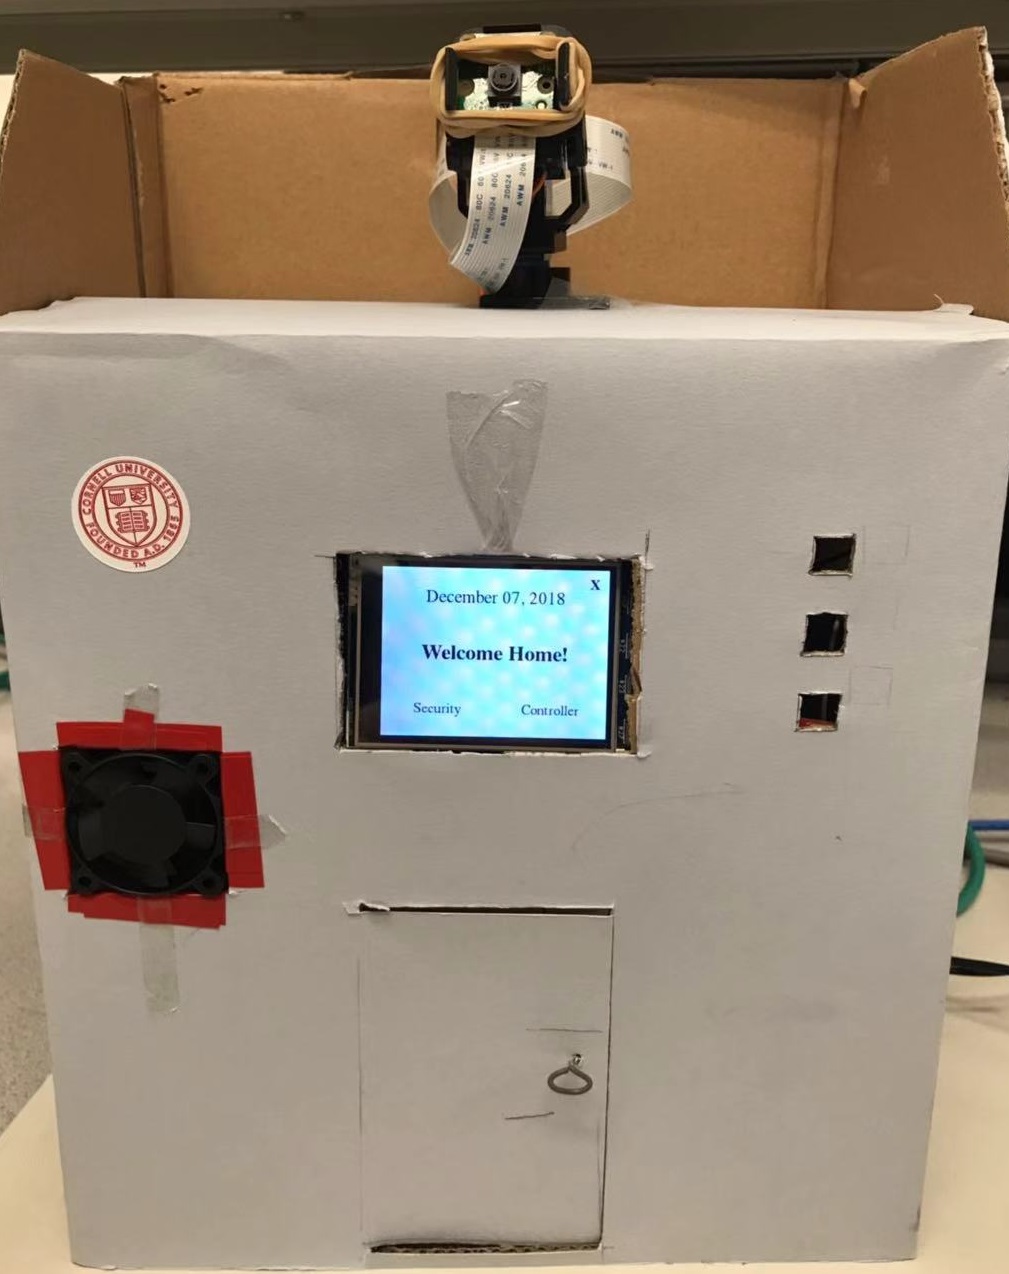
# Description: Display welcome home page, controller page, and security page
# Controller page is used for controlling household eletrical appliances, including
# lights, air conditioner and temperature and humidity sensor.
# Security page is used for home security. Owner can set the pin for home security
# system, and arm or disarm their house by entering the pin number. When house is
# armed, magnetic door sensor will work. Once it detetcts someone break in the house,
# camera will start to work, tracking the person and sending email to the owner of the house.
import pygame
from pygame.locals import *
import os
import time
from time import sleep
import math
import RPi.GPIO as GPIO
import thread
import threading
import Adafruit_DHT
import smtplib
from email.MIMEMultipart import MIMEMultipart
from email.MIMEText import MIMEText
from email.MIMEBase import MIMEBase
from email import encoders
import cv2
import numpy as np
import pigpio
# colors
black= 0, 0, 0
white= 255, 255, 255
# size
size= width, height= 320, 240
os.putenv('SDL_VIDEODRIVER', 'fbcon') # Display on piTFT
os.putenv('SDL_FBDEV', '/dev/fb1')
os.putenv('SDL_MOUSEDRV', 'TSLIB') #Track mouse clicks on piTFT
os.putenv('SDL_MOUSEDEV', '/dev/input/touchscreen')
pygame.init()
pygame.mouse.set_visible(False)
# set the screen size and color
screen = pygame.display.set_mode(size)
screen.fill(white)
pygame.display.update()
global flag_home
global flag_controller
global flag_security
global pin
global pin_enter
global status
global isArm
global isEnter
global isSetting
global isCorrect
global isOn1
global isOn2
global isOn3
global currentposv
global currentposh
global pi
global flag_door
global temp
global hu
flag_home= True
flag_controller= False
flag_security= False
pin= []
pin_enter= []
status= 'Disarm'
isArm= False
isEnter= False
isSetting= False
isCorrect= False
isOn1= False
isOn2= False
isOn3= False
currentposv= 85000
currentposh= 75000
flag_door= False
temp= 24.5
hu= 22.3
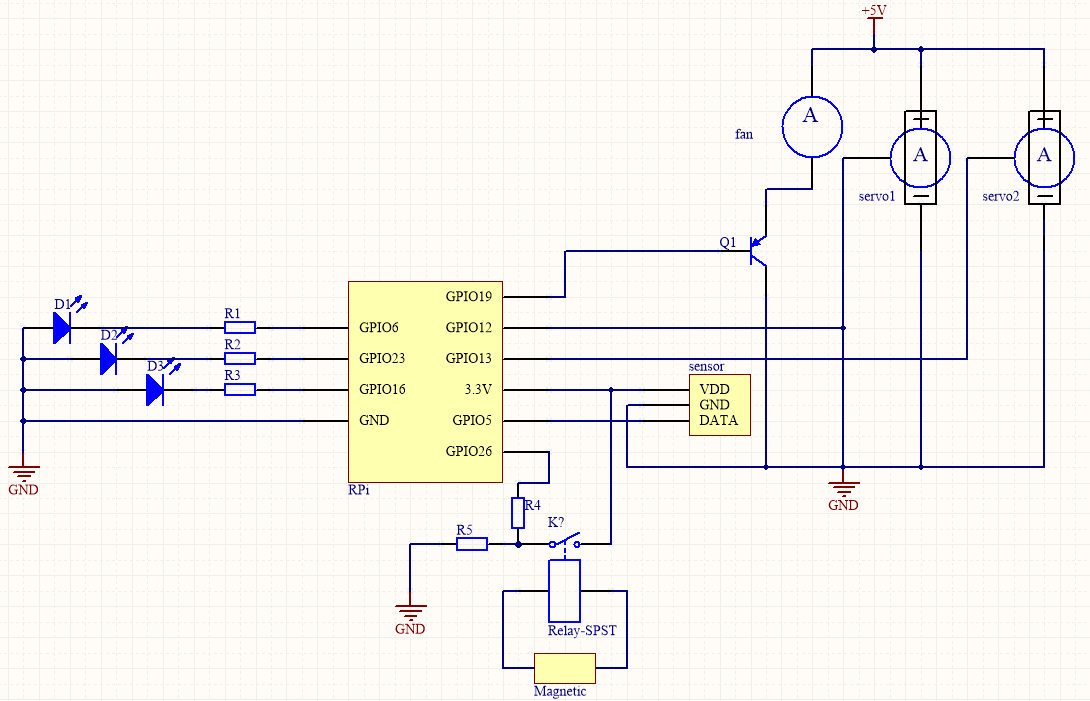
GPIO.setmode(GPIO.BCM)
# fan
GPIO.setup(19, GPIO.OUT)
GPIO.output(19, GPIO.HIGH)
# lights
GPIO.setup(16, GPIO.OUT)
GPIO.output(16, GPIO.LOW)
GPIO.setup(6, GPIO.OUT)
GPIO.output(6, GPIO.LOW)
GPIO.setup(23, GPIO.OUT)
GPIO.output(23, GPIO.LOW)
# door switch
GPIO.setup(26, GPIO.IN, pull_up_down=GPIO.PUD_UP)
# physical bail-out button
GPIO.setup(27, GPIO.IN, pull_up_down=GPIO.PUD_UP)
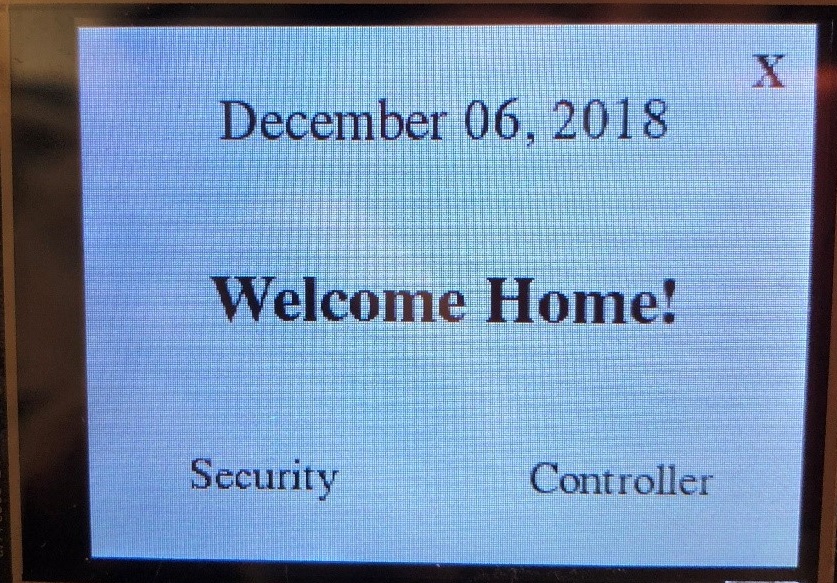
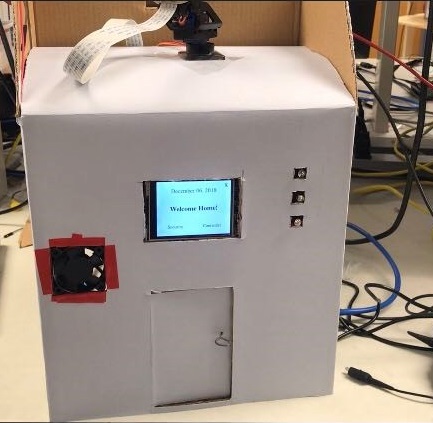
# create welcome home page
def homepage():
screen.fill(white)
# create 'welcome home!' text
font= pygame.font.SysFont('Times New Roman', 30, True)
wel_surface= font.render('Welcome Home!', True, black)
wel_rect= wel_surface.get_rect(center=(160, 120))
screen.blit(wel_surface, wel_rect)
# create 'security' and 'controller' buttons
font= pygame.font.SysFont('Times New Roman', 20)
two_buttons = {'Security':(80,200), 'Controller':(240,200)}
for my_text, text_pos in two_buttons.items():
button_surface = font.render('%s'%my_text, True, black)
button_rect = button_surface.get_rect(center=text_pos)
screen.blit(button_surface, button_rect)
# create date
font= pygame.font.SysFont('Times New Roman', 25)
date= time.strftime("%B %d, %Y")
date_surface= font.render(date, True,black)
date_rect= date_surface.get_rect(center=(160, 40))
screen.blit(date_surface, date_rect)
# quit button
font= pygame.font.SysFont('Times New Roman', 20, True)
quit_surface= font.render('X', True, black)
quit_rect= quit_surface.get_rect(center=(300, 20))
screen.blit(quit_surface, quit_rect)
#update display
pygame.display.flip()
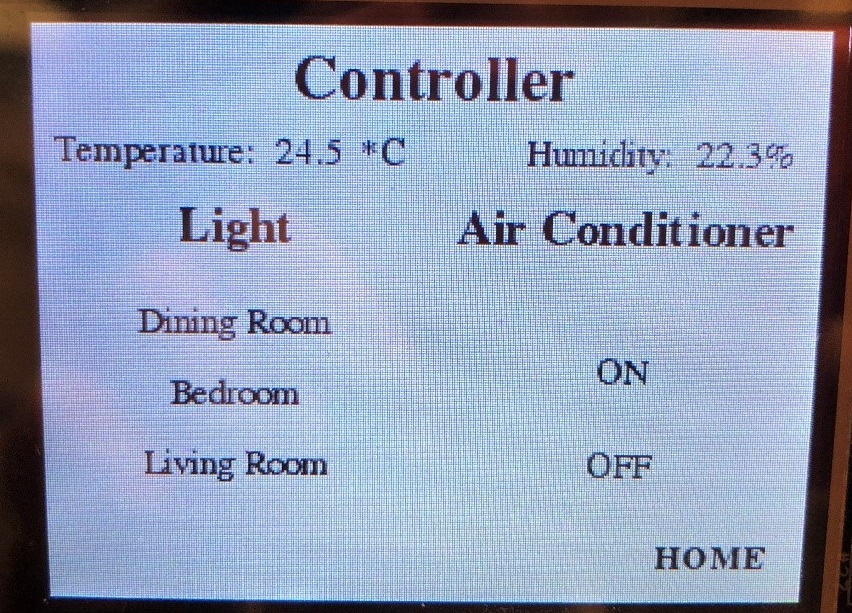
# create controller page
def controllerpage():
global temp
global hu
screen.fill(white)
# create 'Controller' title
font= pygame.font.SysFont('Times New Roman', 25, True)
contr_surface= font.render('Controller', True, black)
contr_rect= contr_surface.get_rect(center=(160, 20))
screen.blit(contr_surface, contr_rect)
# create display of temperature and humidity
font= pygame.font.SysFont('Times New Roman', 15)
Temp_Humi= {'Temperature: ':(50, 50), '*C':(140, 50), 'Humidity: ':(230, 50), '%':(300, 50)}
for mytext, textpos in Temp_Humi.items():
TempHumi_surface= font.render('%s'%mytext, True, black)
TempHumi_rect= TempHumi_surface.get_rect(center=textpos)
screen.blit(TempHumi_surface, TempHumi_rect)
temp_surf= font.render(str(temp), True, black)
temp_rect= temp_surf.get_rect(center=(110, 50))
hu_surf= font.render(str(hu), True, black)
hu_rect= hu_surf.get_rect(center=(280, 50))
screen.blit(temp_surf, temp_rect)
screen.blit(hu_surf, hu_rect)
# create 'Light' text
font= pygame.font.SysFont('Times New Roman', 20, True)
light_surface= font.render('Light', True, black)
light_rect= light_surface.get_rect(center=(80, 80))
screen.blit(light_surface, light_rect)
# create 'Air Conditioner' text
font= pygame.font.SysFont('Times New Roman', 20, True)
air_surface= font.render('Air Conditioner', True, black)
air_rect= air_surface.get_rect(center=(240, 80))
screen.blit(air_surface, air_rect)
# create light buttons
font= pygame.font.SysFont('Times New Roman', 15)
lightbuttons= {'Dining Room':(80, 120), 'Bedroom':(80, 150), 'Living Room':(80, 180)}
for mytext, textpos in lightbuttons.items():
lb_surface= font.render('%s'%mytext, True, black)
lb_rect= lb_surface.get_rect(center=textpos)
screen.blit(lb_surface, lb_rect)
# create air conditioner buttons
font= pygame.font.SysFont('Times New Roman', 15)
fanbuttons= {'ON':(240, 140), 'OFF':(240, 180)}
for mytext, textpos in fanbuttons.items():
fan_surface= font.render('%s'%mytext, True, black)
fan_rect= fan_surface.get_rect(center=textpos)
screen.blit(fan_surface, fan_rect)
# create 'home' button
font= pygame.font.SysFont('Times New Roman', 15, True)
home_surface= font.render('HOME', True, black)
home_rect= home_surface.get_rect(center=(280, 220))
screen.blit(home_surface, home_rect)
pygame.display.flip()
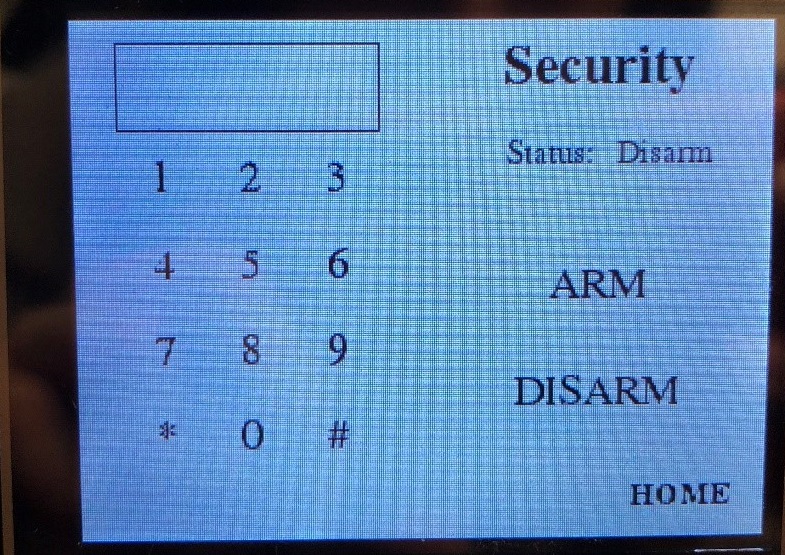
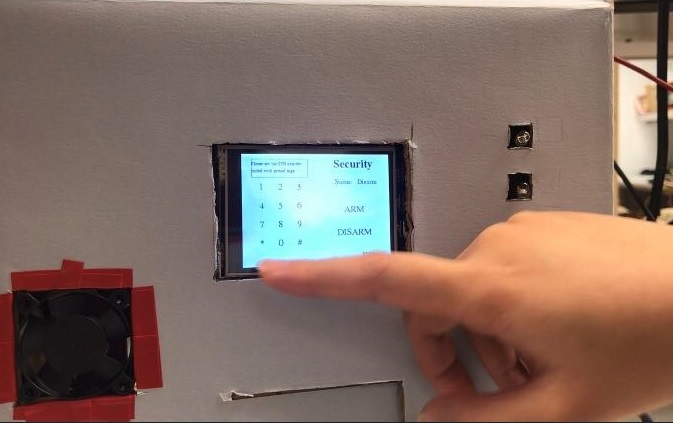
# create security page
def securitypage(sta, text, length):
screen.fill(white)
# create 'Security' title
font= pygame.font.SysFont('Times New Roman', 25, True)
sec_surface= font.render('Security', True, black)
sec_rect= sec_surface.get_rect(center=(240, 20))
screen.blit(sec_surface, sec_rect)
# create 'home' button
font= pygame.font.SysFont('Times New Roman', 15, True)
home_surface= font.render('HOME', True, black)
home_rect= home_surface.get_rect(center=(280, 220))
screen.blit(home_surface, home_rect)
# create status
font= pygame.font.SysFont('Times New Roman', 15)
status= {'Status: ': (220, 60), sta: (270, 60) }
for mytext, textpos in status.items():
sta_surface= font.render('%s'%mytext, True, black)
sta_rect= sta_surface.get_rect(center=textpos)
screen.blit(sta_surface, sta_rect)
# create 'ARM' and 'DISARM' buttons
font= pygame.font.SysFont('Times New Roman', 20)
buttons= {'ARM': (240, 120), 'DISARM': (240, 170) }
for mytext, textpos in buttons.items():
button_surface= font.render('%s'%mytext, True, black)
button_rect= button_surface.get_rect(center=textpos)
screen.blit(button_surface, button_rect)
# create number buttons
font= pygame.font.SysFont('Times New Roman', 20)
numpad= {'1': (40, 70), '2': (80, 70), '3': (120, 70),
'4': (40, 110), '5': (80, 110), '6': (120, 110),
'7': (40, 150), '8': (80, 150), '9': (120, 150),
'*': (40, 190), '0': (80, 190), '#': (120, 190)}
for mytext, textpos in numpad.items():
numpad_surface= font.render('%s'%mytext, True, black)
numpad_rect= numpad_surface.get_rect(center=textpos)
screen.blit(numpad_surface, numpad_rect)
# create display bar
pygame.draw.rect(screen, black, (20, 10, 120, 40), 1)
# create text in display bar
font= pygame.font.SysFont('Times New Roman', 10)
if len(text) != 0:
for index in range(len(text)):
bar_surface= font.render('%s'%text[index], True, black)
bar_rect= bar_surface.get_rect(topleft=(20, 15+index*15))
screen.blit(bar_surface, bar_rect)
# display the entering pin number in a security way
font= pygame.font.SysFont('Times New Roman', 15)
if length != 0:
for i in range(length):
pin_surface= font.render('*', True, black)
pin_rect= pin_surface.get_rect(topleft=(20+i*5, 20))
screen.blit(pin_surface, pin_rect)
pygame.display.flip()
# response to entering pin number
def pin_res(num):
global pin
global pin_enter
global status
global isArm
global isEnter
global isSetting
global isCorrect
# set the pin number
if (num == '*'):
isEnter= True
if (len(pin) != 0):
text= ['Please enter the PIN number', 'ended with pound sign']
securitypage(status, text, 0)
if (num == '#'):
isEnter= False
if (pin != pin_enter):
text= ['PIN number is wrong' 'please enter again']
securitypage(status, text, 0)
pin_enter= []
else:
text= ['Please enter the', 'new PIN number']
securitypage(status, text, 0)
isCorrect= True
pin_enter= []
else:
if (num != '*' and num != '#' and isEnter):
pin_enter.append(num)
securitypage(status, [], len(pin_enter))
if (isCorrect or len(pin) == 0):
text= ['Please set the PIN number', 'ended with pound sign']
securitypage(status, text, 0)
pin= []
isSetting= True # user is setting the pin number
# enter pin number
if (not isSetting):
if (num == '#'):
if (pin != pin_enter):
text= ['PIN number is wrong', 'please enter again']
securitypage(status, text, 0)
pin_enter= []
else:
isEnter= False
isCorrect= True
text= ['Success!']
securitypage(status, text, 0)
pin_enter= []
else:
if (num != '*' and num != '#' and isEnter):
pin_enter.append(num)
securitypage(status, [], len(pin_enter))
# set pin number
else:
if (num == '#'):
isEnter= False
isSetting= False
text= ['PIN number has been set!']
securitypage(status, text, 0)
else:
if (num != '*' and num != '#' and isEnter):
pin.append(num)
securitypage(status, [], len(pin))
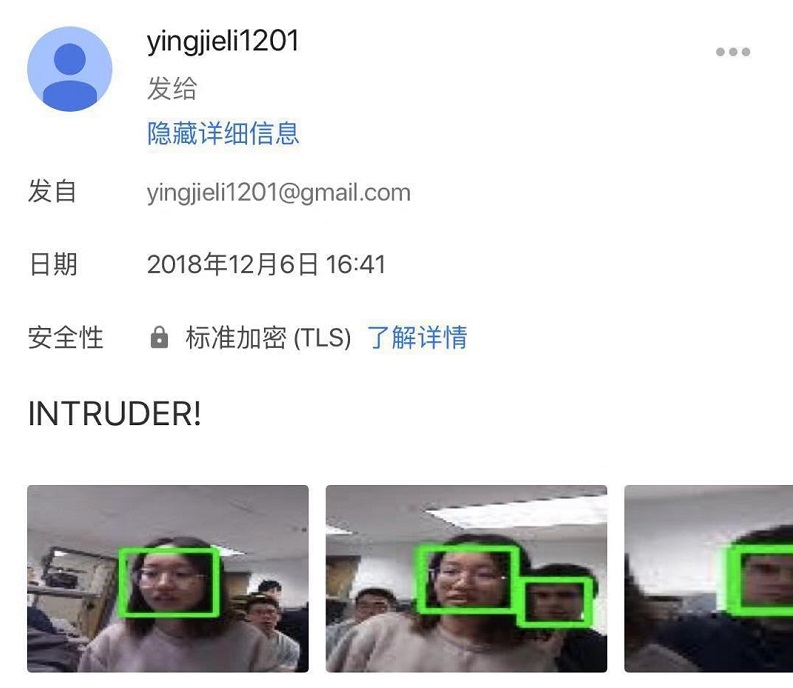
def sendemail(filepath, n):
msg= MIMEMultipart()
# subject
msg['Subject']= 'Alert'
# body
body= 'INTRUDER!'
msg.attach(MIMEText(body, 'plain'))
#attachment
if (filepath != ''):
while n != 0:
filename= filepath + "/img" + str(n) + ".jpg"
attachment= open(filename, 'rb')
part = MIMEBase('application', 'octest-stream')
part.set_payload((attachment).read())
encoders.encode_base64(part)
part.add_header('Content-Disposition', 'attachment', filename=filename)
msg.attach(part)
n -= 1
# set SMTP
server = smtplib.SMTP('smtp.gmail.com', 587)
server.starttls()
server.set_debuglevel(1)
server.login("yingjieli1201@gmail.com","lyj961201")
text = msg.as_string()
server.sendmail("yingjieli1201@gmail.com","yhan96967@gmail.com", text)
server.quit()
time.sleep(1)
print ("text sent")
# door open
def GPIO26_callback(channel):
global flag_door
if isArm:
flag_door= True
# num_step is the distance that servo supposed to move
# direction: -1 for moving right, 1 for moving left
def move_horizontal(num_step, direction):
global currentposh
fullRight= 120000 # duty cycle is 12%, servo turns full right
fullLeft= 30000 # duty cycle is 3%, servo turns full left
step= (fullRight- fullLeft) / 480
currentposh= currentposh + step * num_step * direction
if currentposh > fullRight:
currentposh= fullRight
if currentposh < fullLeft:
currentposh= fullLeft
pi.hardware_PWM(13, 50, currentposh)
# num_step is the distance that servo supposed to move
# direction: -1 for moving up, 1 for moving down
def move_vertical(num_step, direction):
global currentposv
fullUp= 60000 # duty cycle is 6%, servo turns full up
fullDown= 110000 # duty cycle is 11%, servo turns full down
step= (fullDown- fullUp) / 360
currentposv= currentposv + step * num_step * direction
if currentposv < fullUp:
currentposv= fullUp
if currentposv > fullDown:
currentposv= fullDown
pi.hardware_PWM(12, 50, currentposv)
# tracking face
def tracking(frameShow):
# create a VideoCapture calss object to stream video from pi camera
vcap= cv2.VideoCapture(0)
# create classifier to recognize human face
hf= cv2.CascadeClassifier('haarcascade_frontalface_alt.xml')
# check if VideoCapture class object is created successfully
if (not vcap.isOpened()):
print ("Error: Can't find Pi Camera")
quit()
else:
print("Success: Pi Camera is open")
videoWidth= vcap.get(cv2.cv.CV_CAP_PROP_FRAME_WIDTH)
videoHeight= vcap.get(cv2.cv.CV_CAP_PROP_FRAME_HEIGHT)
print("Default vedio resolution: " + str(int(videoWidth)) + "*" + str(int(videoHeight)))
global pi
global currentposh
global currentposv
pi= pigpio.pi()
pi.hardware_PWM(12, 50, 85000)
pi.hardware_PWM(13, 50, 75000)
currentposh= 75000
currentposv= 85000
flag_quit= False
try:
time= 1
n= 1
while (vcap.isOpened() and not flag_quit):
# read video by frame
# isRead is boolean, return true when frame is read correctly
# frame is the image of every frame
isRead, frame= vcap.read()
# if the video cannot be read, we break the while loop
if (not isRead):
break;
# resize the frame
frame= cv2.resize(frame, (160, 120), interpolation= cv2.INTER_CUBIC)
# convert image to grayscale
gray= cv2.cvtColor(frame, cv2.COLOR_BGR2GRAY)
# detect human face
faces= hf.detectMultiScale(gray, 1.3, 5)
filepath= "/home/pi/final_project/monitor"
# the center coordinate of frame
frameCenter= [80, 60]
for x, y, w, h in faces:
cv2.rectangle(frame, (x, y), (x+w, y+h), (0, 255, 0), 2)
# record the picture of face every 10 times detecting faces
if time%50 == 0 and n<6:
img= frame[y-h:y+2*h, x-w:x+2*w]
cv2.imwrite(filepath + "/img" + str(n) + ".jpg", img)
n += 1
print("n= %d" %n)
if n == 6:
flag_quit= True
sendemail(filepath, n-1)
time= 1
while n != 1:
n -= 1
os.remove(filepath + "/img" + str(n) + ".jpg")
break
time += 1
# the center of the face detected
faceCenter= [x+w/2, y+h/2]
moveRL= threading.Thread()
moveUD= threading.Thread()
# move right or left
# face is on the right side of the screen, camera moves right
if faceCenter[0] > frameCenter[0]:
direction= -1
# face is on the left side of the screen, camera moves left
else:
direction= 1
num_step= abs((int)(faceCenter[0] - frameCenter[0])/10)
if num_step > 0:
moveRL= threading.Thread(target= move_horizontal, args= (num_step, direction))
# move up or down
# face is on the lower side of the screen, camera moves down
if faceCenter[1] > frameCenter[1]:
direction= 1
# face is on the upper side of the screen, camera moves up
else:
direction= -1
num_step= abs((int)(faceCenter[1] - frameCenter[1])/10)
if num_step > 0:
moveUD= threading.Thread(target= move_vertical, args= (num_step, direction))
moveRL.start()
moveUD.start()
moveRL.join()
moveUD.join()
if frameShow:
cv2.imshow('Security', frame)
key= cv2.waitKey(1) & 0xFF
# if 'q' on the keyboard pressed or if touch 'DISARM', quit
if (key == ord("q")):
break
# cleanup and close all the windows
vcap.release()
cv2.destroyAllWindows()
except KeyboardInterrupt:
# cleanup and close all the windows
vcap.release()
cv2.destroyAllWindows()
# cleanup and close all the windows
vcap.release()
cv2.destroyAllWindows()
try:
homepage()
while flag_home:
# physical button to bail out
if not GPIO.input(27):
break
for event in pygame.event.get():
if (event.type == MOUSEBUTTONUP):
pos= pygame.mouse.get_pos()
x, y= pos
print pos
# quit button
if y<40 and y>0:
if x<320 and x>280:
flag_home= False
if y<220 and y>180:
# when touch 'Controller'
if x<280 and x>200:
controllerpage()
flag_controller= True
while flag_controller:
# if we need to update temp and humidity every loop, uncomment this
#controllerpage()
for event in pygame.event.get():
if (event.type == MOUSEBUTTONUP):
pos= pygame.mouse.get_pos()
x, y= pos
# when touch light buttons
if x<120 and x>40:
# Dining room
if y<130 and y>110:
if (not isOn1):
GPIO.output(16, GPIO.HIGH)
print("Light in dining room turns on")
isOn1= True
else:
GPIO.output(16, GPIO.LOW)
print("Light in dining room turns off")
isOn1= False
# Bedroom
if y<160 and y>140:
if (not isOn2):
GPIO.output(6, GPIO.HIGH)
print("Light in bedroom turns on")
isOn2= True
else:
GPIO.output(6, GPIO.LOW)
print("Light in bedroom turns off")
isOn2= False
# Living room
if y<190 and y>170:
if (not isOn3):
GPIO.output(23, GPIO.HIGH)
print("Light in living room turns on")
isOn3= True
else:
GPIO.output(23, GPIO.LOW)
print("Light in living room turns off")
isOn3= False
# when touch air conditioner button
if x<260 and x>220:
# when touch 'ON'
if y<160 and y>120:
GPIO.output(19, GPIO.LOW)
print("Fan turns on")
# when touch 'OFF'
if y<200 and y>160:
GPIO.output(19, GPIO.HIGH)
print("Fan turns off")
# when touch Temp & humidity part
if y<60 and y>40:
if x<320 and x>30:
# temperature and humidity sensor connects GPIO5
hu, temp= Adafruit_DHT.read_retry(Adafruit_DHT.AM2302, 5)
temp= round(temp, 2)
hu= round(hu, 2)
controllerpage()
# when touch 'HOME' button, return to home page
if y<240 and y>200:
if x<300 and x>260:
flag_controller= False
homepage()
# when touch 'Security'
if x<120 and x>40:
flag_security= True
securitypage(status, [], 0)
# when door sensor detects someone breaks in, start tracking
while flag_security:
if flag_door:
tracking(False)
flag_door= False
for event in pygame.event.get():
if (event.type == MOUSEBUTTONUP):
pos= pygame.mouse.get_pos()
x, y= pos
securitypage(status, [], 0)
# when touch number pad
if y<80 and y>60:
if x<50 and x>30:
pin_res('1')
elif x<90 and x>70:
pin_res('2')
elif x<130 and x>110:
pin_res('3')
if y<120 and y>100:
if x<50 and x>30:
pin_res('4')
elif x<90 and x>70:
pin_res('5')
elif x<130 and x>110:
pin_res('6')
if y<160 and y>140:
if x<50 and x>30:
pin_res('7')
elif x<90 and x>70:
pin_res('8')
elif x<130 and x>110:
pin_res('9')
if y<200 and y>180:
if x<50 and x>30:
pin_res('*')
elif x<90 and x>70:
pin_res('0')
elif x<130 and x>110:
pin_res('#')
# when touch 'ARM' or 'DISARM' button
# 'ARM'
if y<140 and y>100:
if x<280 and x>220:
if (isCorrect):
status= 'Arm'
isCorrect= False
isArm= True
securitypage(status, [], 0)
GPIO.add_event_detect(26, GPIO.FALLING, callback=GPIO26_callback, bouncetime=300)
else:
isEnter= True
text= ['Please enter thr PIN number!', 'Then press the button again']
securitypage(status, text, 0)
# 'DISARM'
if y<190 and y>150:
if x<280 and x>220:
if (isCorrect):
status= 'Disarm'
isCorrect= False
isArm= False
securitypage(status, [], 0)
else:
isEnter= True
text= ['Please enter thr PIN number!', 'Then press the button again']
securitypage(status, text, 0)
# when touch 'HOME' button
if y<240 and y>200:
if x<300 and x>260:
flag_security= False
homepage()
except KeyboardInterrupt:
GPIO.cleanup()
GPIO.cleanup()