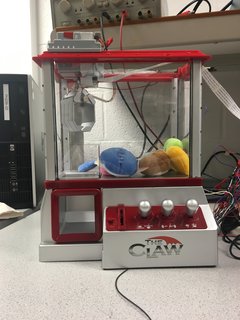
The Claw Pi Machine
A Project By Minze Mo, Ramita Pinsuwannakub, and Wenjie Cao
Demonstration Video
Introduction
Our claw machine, which can catch dolls inside, has three mode. The first mode is the hand mode. In this mode, a user controls lever switches to move the claw. Control signal sends to Raspberry Pi and Raspberry Pi performs movement accordingly. The second mode is the voice mode. In this mode, a user controls the claw by voice. Raspberry records the input voice, performs speed-to-text, and moves the claw in specific direction and duration accordingly. The last mode is auto mode. In this mode, a user selects a doll on the piTFT touchscreen. Raspberry Pi performs real-time object detection to locate the selected doll. A close-loop control is performed to move the claw to that location and captures the doll.
Project Objective:
The goal of this project is to build a claw machine and extend the functions of it. The claw machine has three mode, hand mode, voice mode and auto mode. In hand mode, the claw machine is controlled by lever switches. In voice mode, the claw machine is controlled by voice. In auto mode, the claw machine can capture the doll specified by a user.
Hardware Design
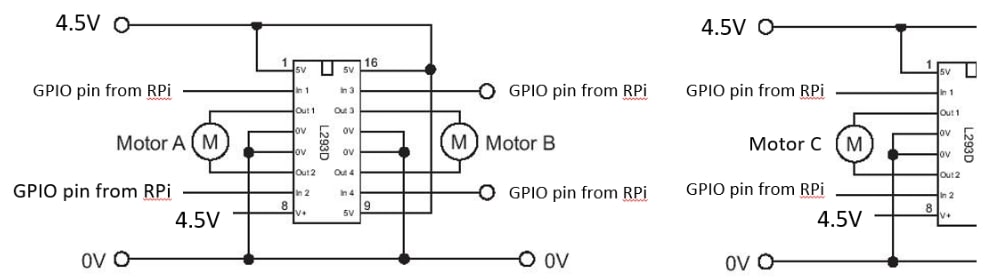
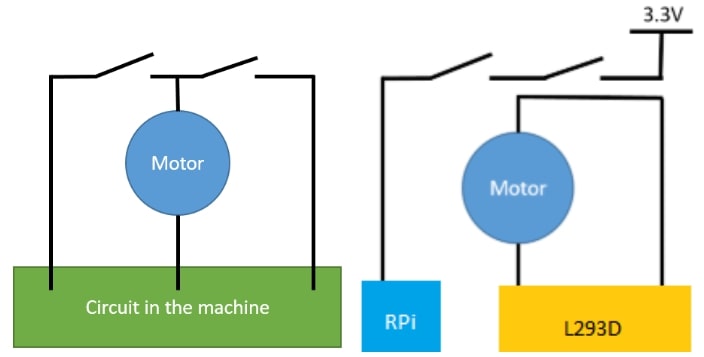
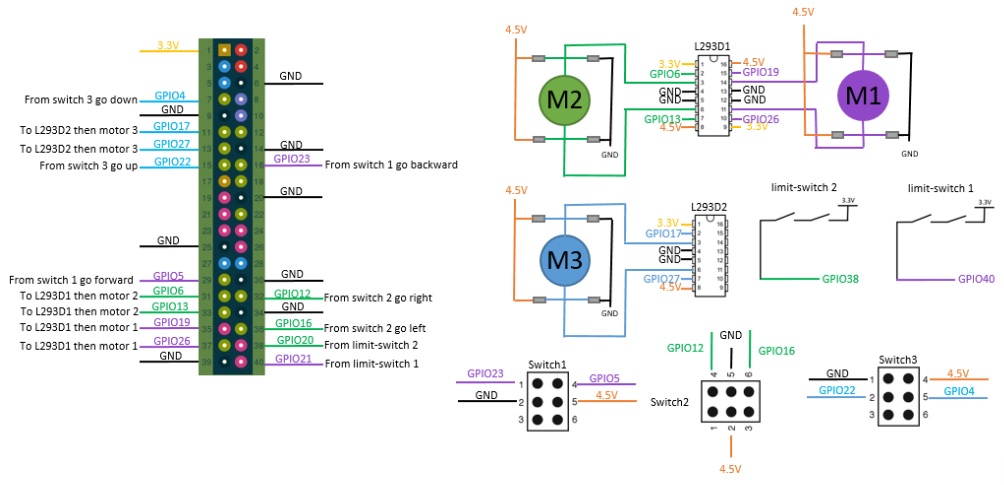
The main hardware part is the machine which conststs of 3 lever switches, 3 DC motors, and 2 limit-switches. Since the DC motor use 4.5V to move, the Raspberry Pi can't run the motor with 3.3V. We used L293D (motor driver IC) to run these motors and received the signal from Raspberry Pi. Moreover, we connected diodes between the DC motor and 4.5V or Ground.
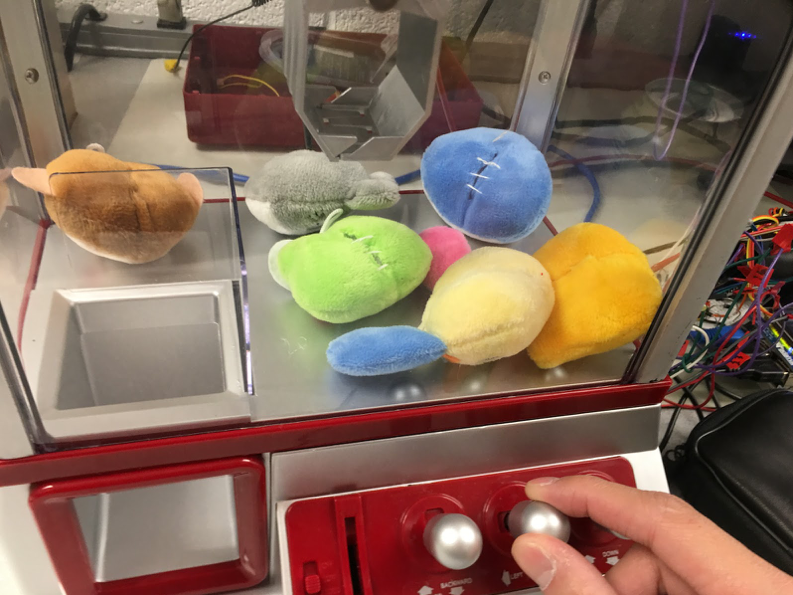
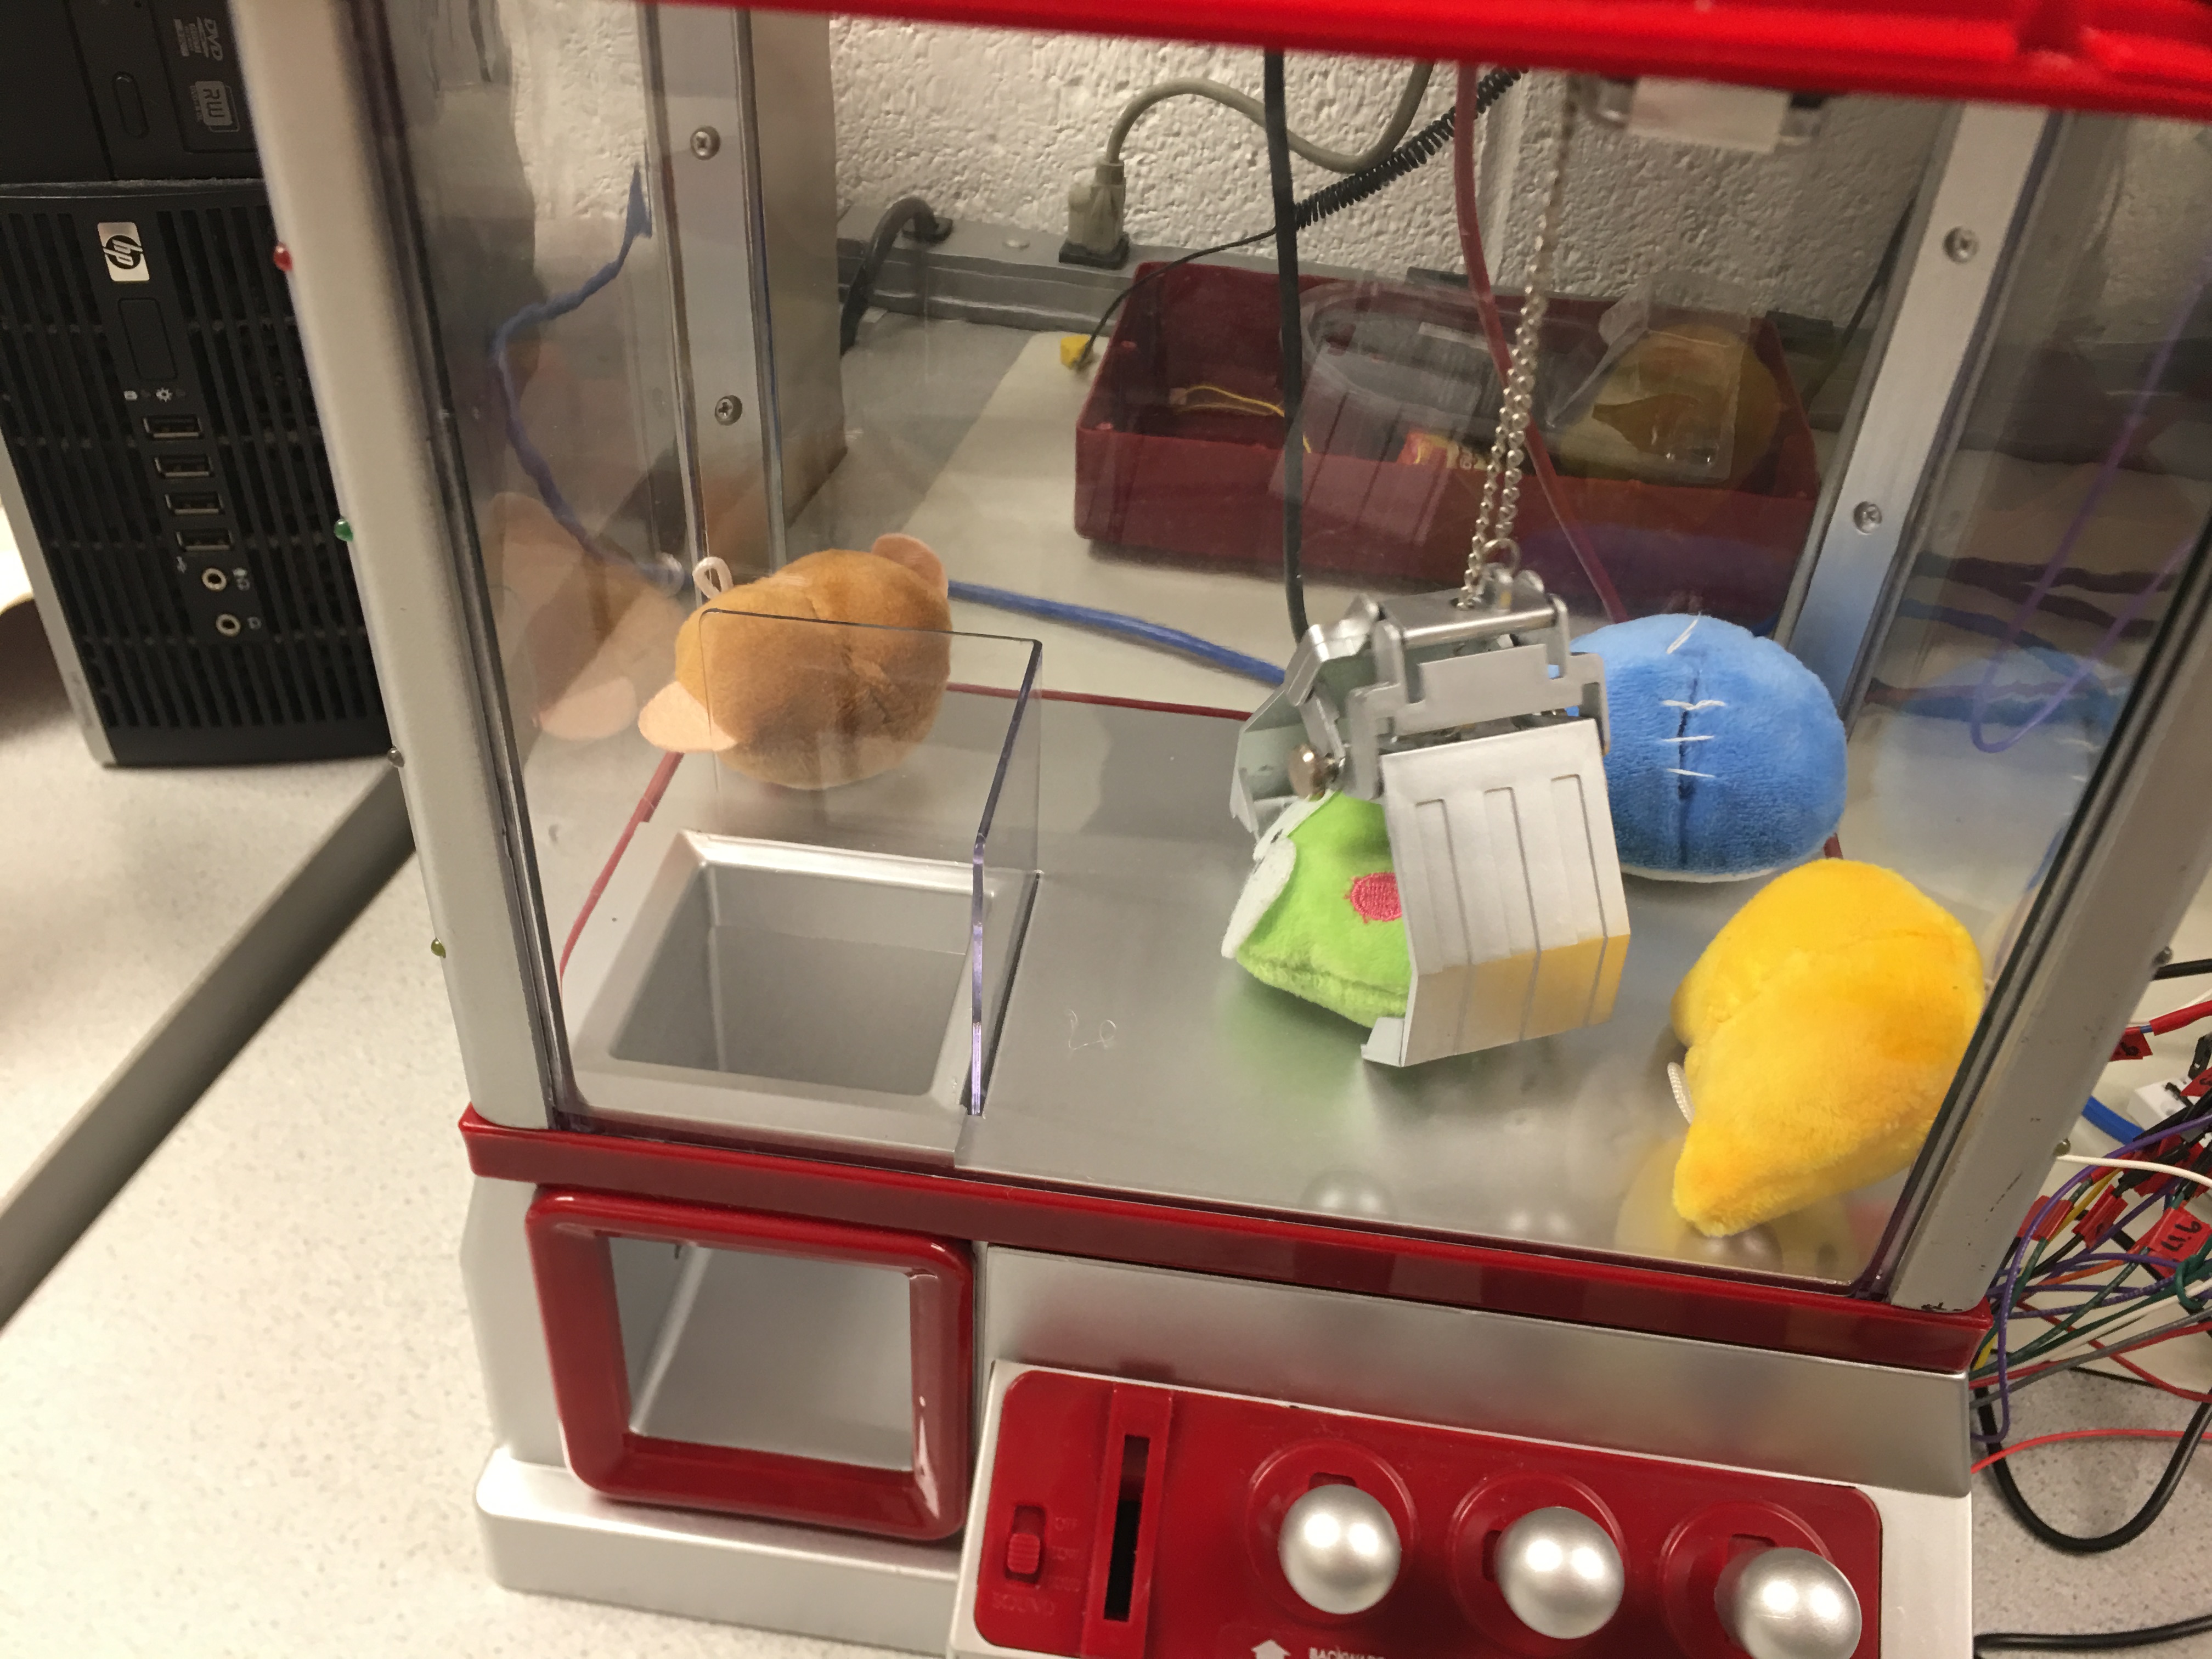
The claw Machine
From the top view point, there are 4 limit switches, left-end, right-end, front-end, and back-end. These small black switches will stop the moving motor in that direction. Two of them limit left and right and another two limit forward and backward.Each of the pairs connected to one motor. From the original machine connection, there are two limit switches connected to a motor. We also reconnected them because we can't control the movement of the motor box from earlier connection. We connect limit switches to high voltage and DC motors to L293D.
piTFT and GPIO pins
There are two pins which we used affect the performance of piTFT. There are GPIO 24 and GPIO 25. We have reached the limit of GPIO pins from Raspberry Pi. There are 14 pins we can use as GPIO pins. Because it is limit, we don't have bail-out button for quit the piTFT touchscreen and the enable pin for L293D. We set this pin as always enable.
Whole Connection
By hand mode
This mode require all hareware parts and run on the codes in software part. A user can catch a doll the same action as in the arcade.
By voice mode
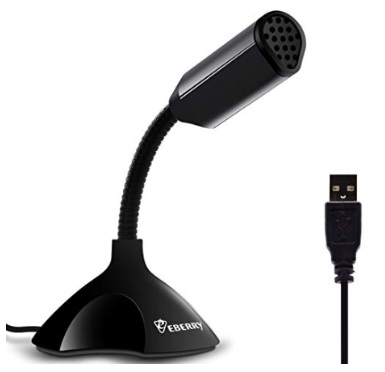
We use usb microphone and plug with the Raspberry Pi.
AUTO mode
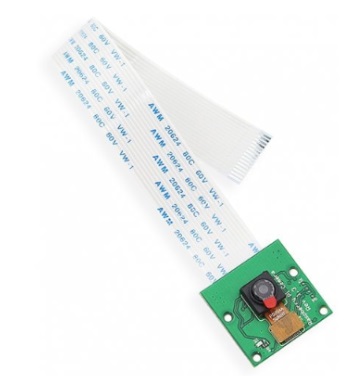
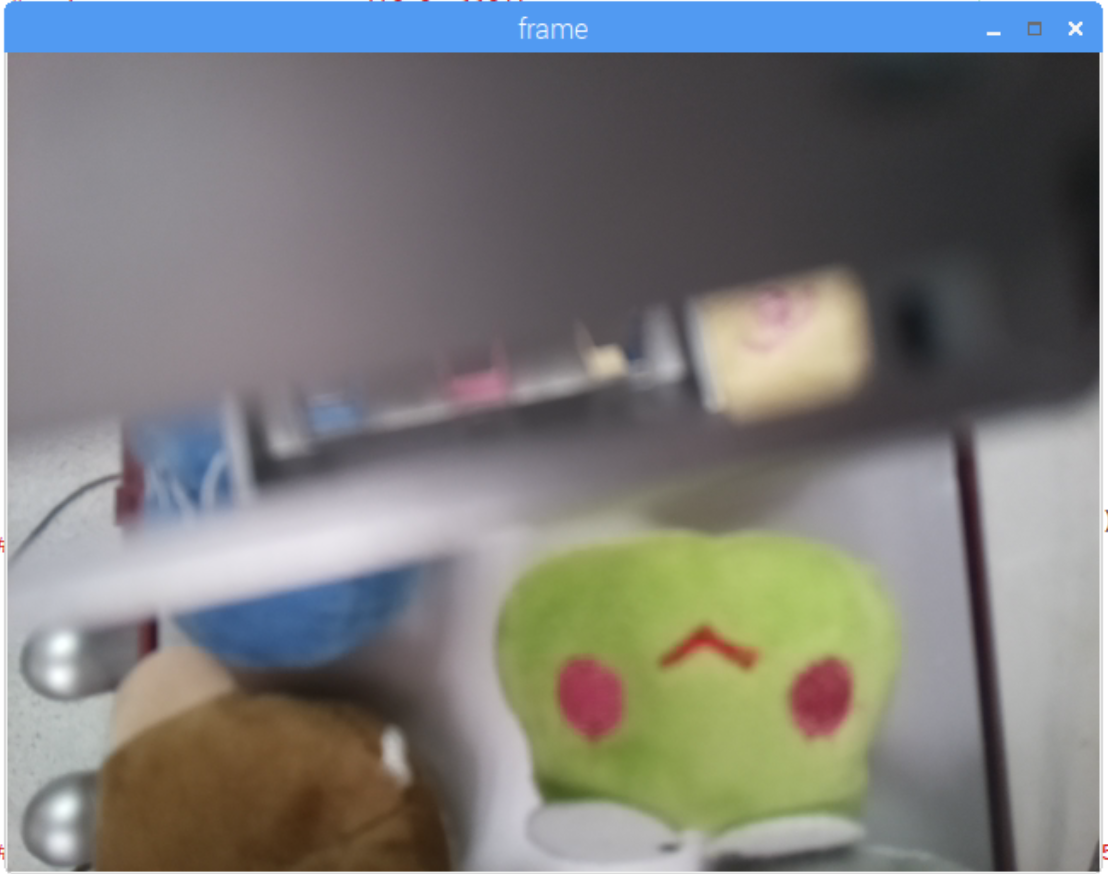
We use Pi Camera to capture the video inside the machine. The location of the camera is beneath the motor box and face toward the ground. This is the chosen spot. From this view, we can see half of the frame because the claw block another half. But it is enough to search a doll.
Software Design
There are three main functions in our project: control the claw machine manually, voice control and auto control. There is a mode selection menu and users can select the desired mode. trol
Hand mode
The hand mode allows a user to play the claw machine using three lever switches. Each lever switch corresponds to two directions, left/right, forward/backward, up/down.
When the claw machine touches the limit switches on each directions, it will stop. Three lever switches connect the Raspberry Pi. As the Raspberry Pi receives input signal from a lever switch,
it outputs signal to corresponding GPIO pins and perform a corresponding movement.
The challenge in this part is that the left side and right side shares a limit switch and so do it for the front end and back end. When the claw machine touches the limit switch for left/right and it stops,
we cannot know it reaches which end and we don't know which direction to move at the next iteration. We design a state machine to fix this issue. Taking direction left /right as example.
There are three states, left limit, intermediate and right limit. When the machine in the left limit state, which means it already reaches the left end and it will ignore the 'moving left' signals; If the 'moving right' signals come in, it will change to intermediate state and moving to the right;
When the machine is in the intermediate state, it can either goes to left or right; If the current state is right limit, which means the machine already reach the right end and it will ignore the 'moving right' signals and only can go to left and change the state to intermediate when 'left' signals in.
Following picture shows the state transition between the left and right.
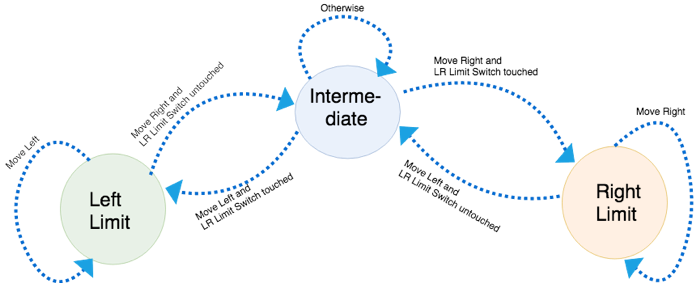
Similarly, there are three states in the forward and backward directions and they work in the same state machine as what we define on left and right. Following is the state diagram for backward and forward.
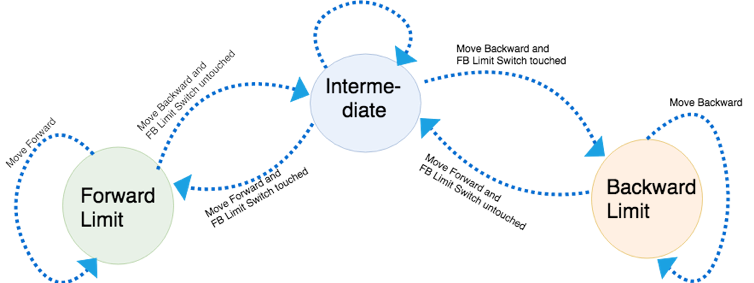
In general, the Raspberry Pi receives signals from lever switches, recognize the direction, and then output the corresponding movement by output signals to specific GPIO pins. The claw is initialized at left and backward side, which is at state left limit and backward limit. As a user move the claw, the state transit according to state transition graphs. Any unpermitted movements would not be performed in this case and the claw machine keeps stopping.
Voice Control Mode
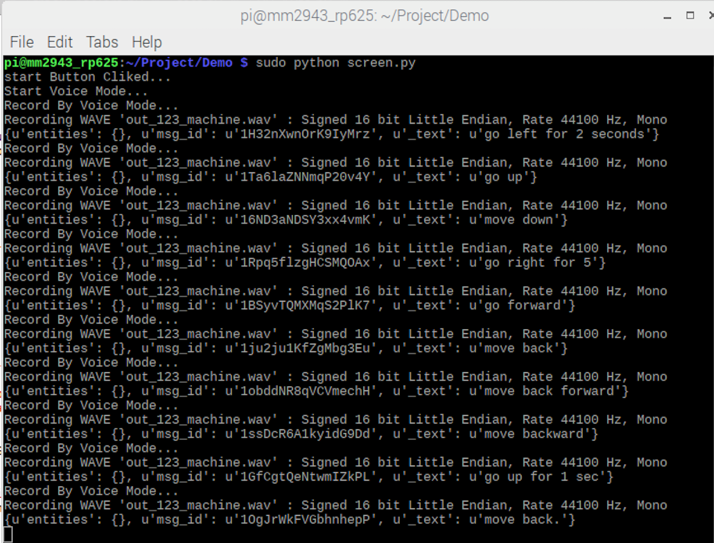
The claw Pi allows users to use voice command to control its movement. We use USB microphone to record the speech. Users need to press the 'record' button to start recording. When the button is pressed, the program will send a "arecord -D plughw:1,0 -d 3 --rate 44100 --format S16_LE -c1 out_123_machine.wav" command, which is a Linux command and is to record the voice from the microphone by the terminal and save it as a 'wav' audio file.
Users can say anything they want. Even though there is no requested format for the voice command, for a valid one, it must contain a direction word, like left, right, back/backward, forward, up and down. Besides, users can specify the moving duration. This is optional because for each valid voice command, it has a default moving duration which is 2 seconds. The customize moving duration should range from 1 second to 7 seconds, which is inclusively.Examples of valid voice commands: "go right for 5 seconds", "go back", "go left for 1 second".
We use the wit.ai library for the speech recognition. We already get a valid audio file from the previous step. We use function post() to send a speech recognition request to the website https://api.wit.ai/speech and use another function json.load() to get the transformed result. Here are some examples of the returning results, the u'_text' field is the recognition result. We extract the direction word and specific moving time (if there is) and pass them to the relevant Ge claw machine.
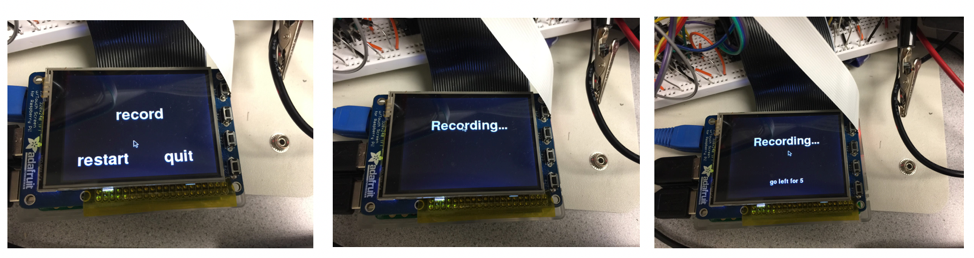
Following are the steps in voice control part: Pressing 'record' button to start recording; recording; show what users said on the piTFT and the claw machine does the correspondinthe same time.
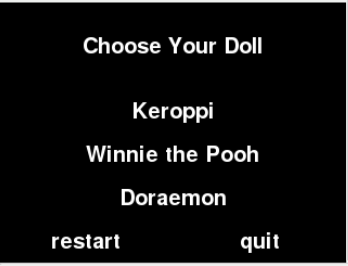
Auto Mode
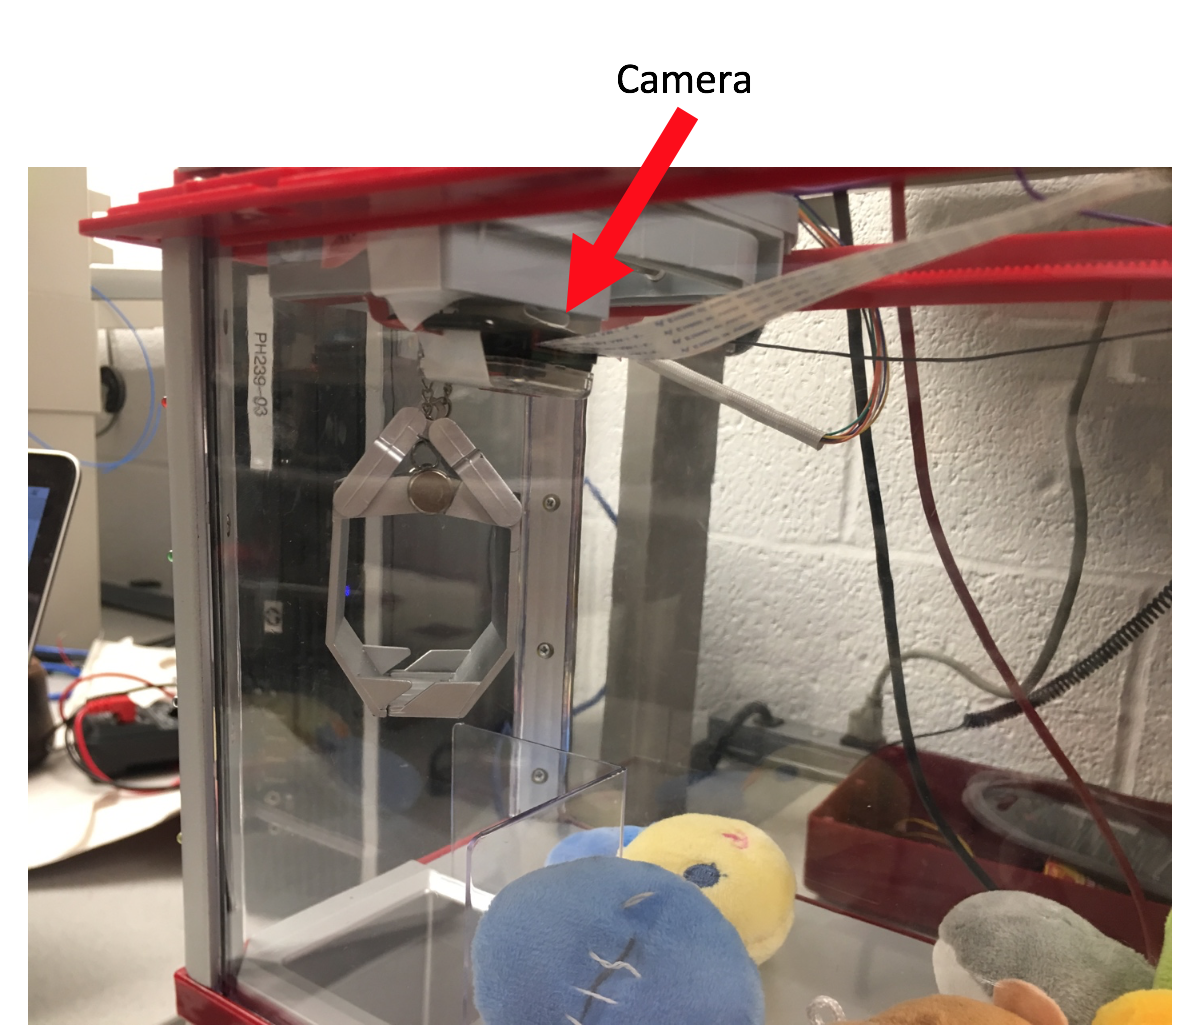
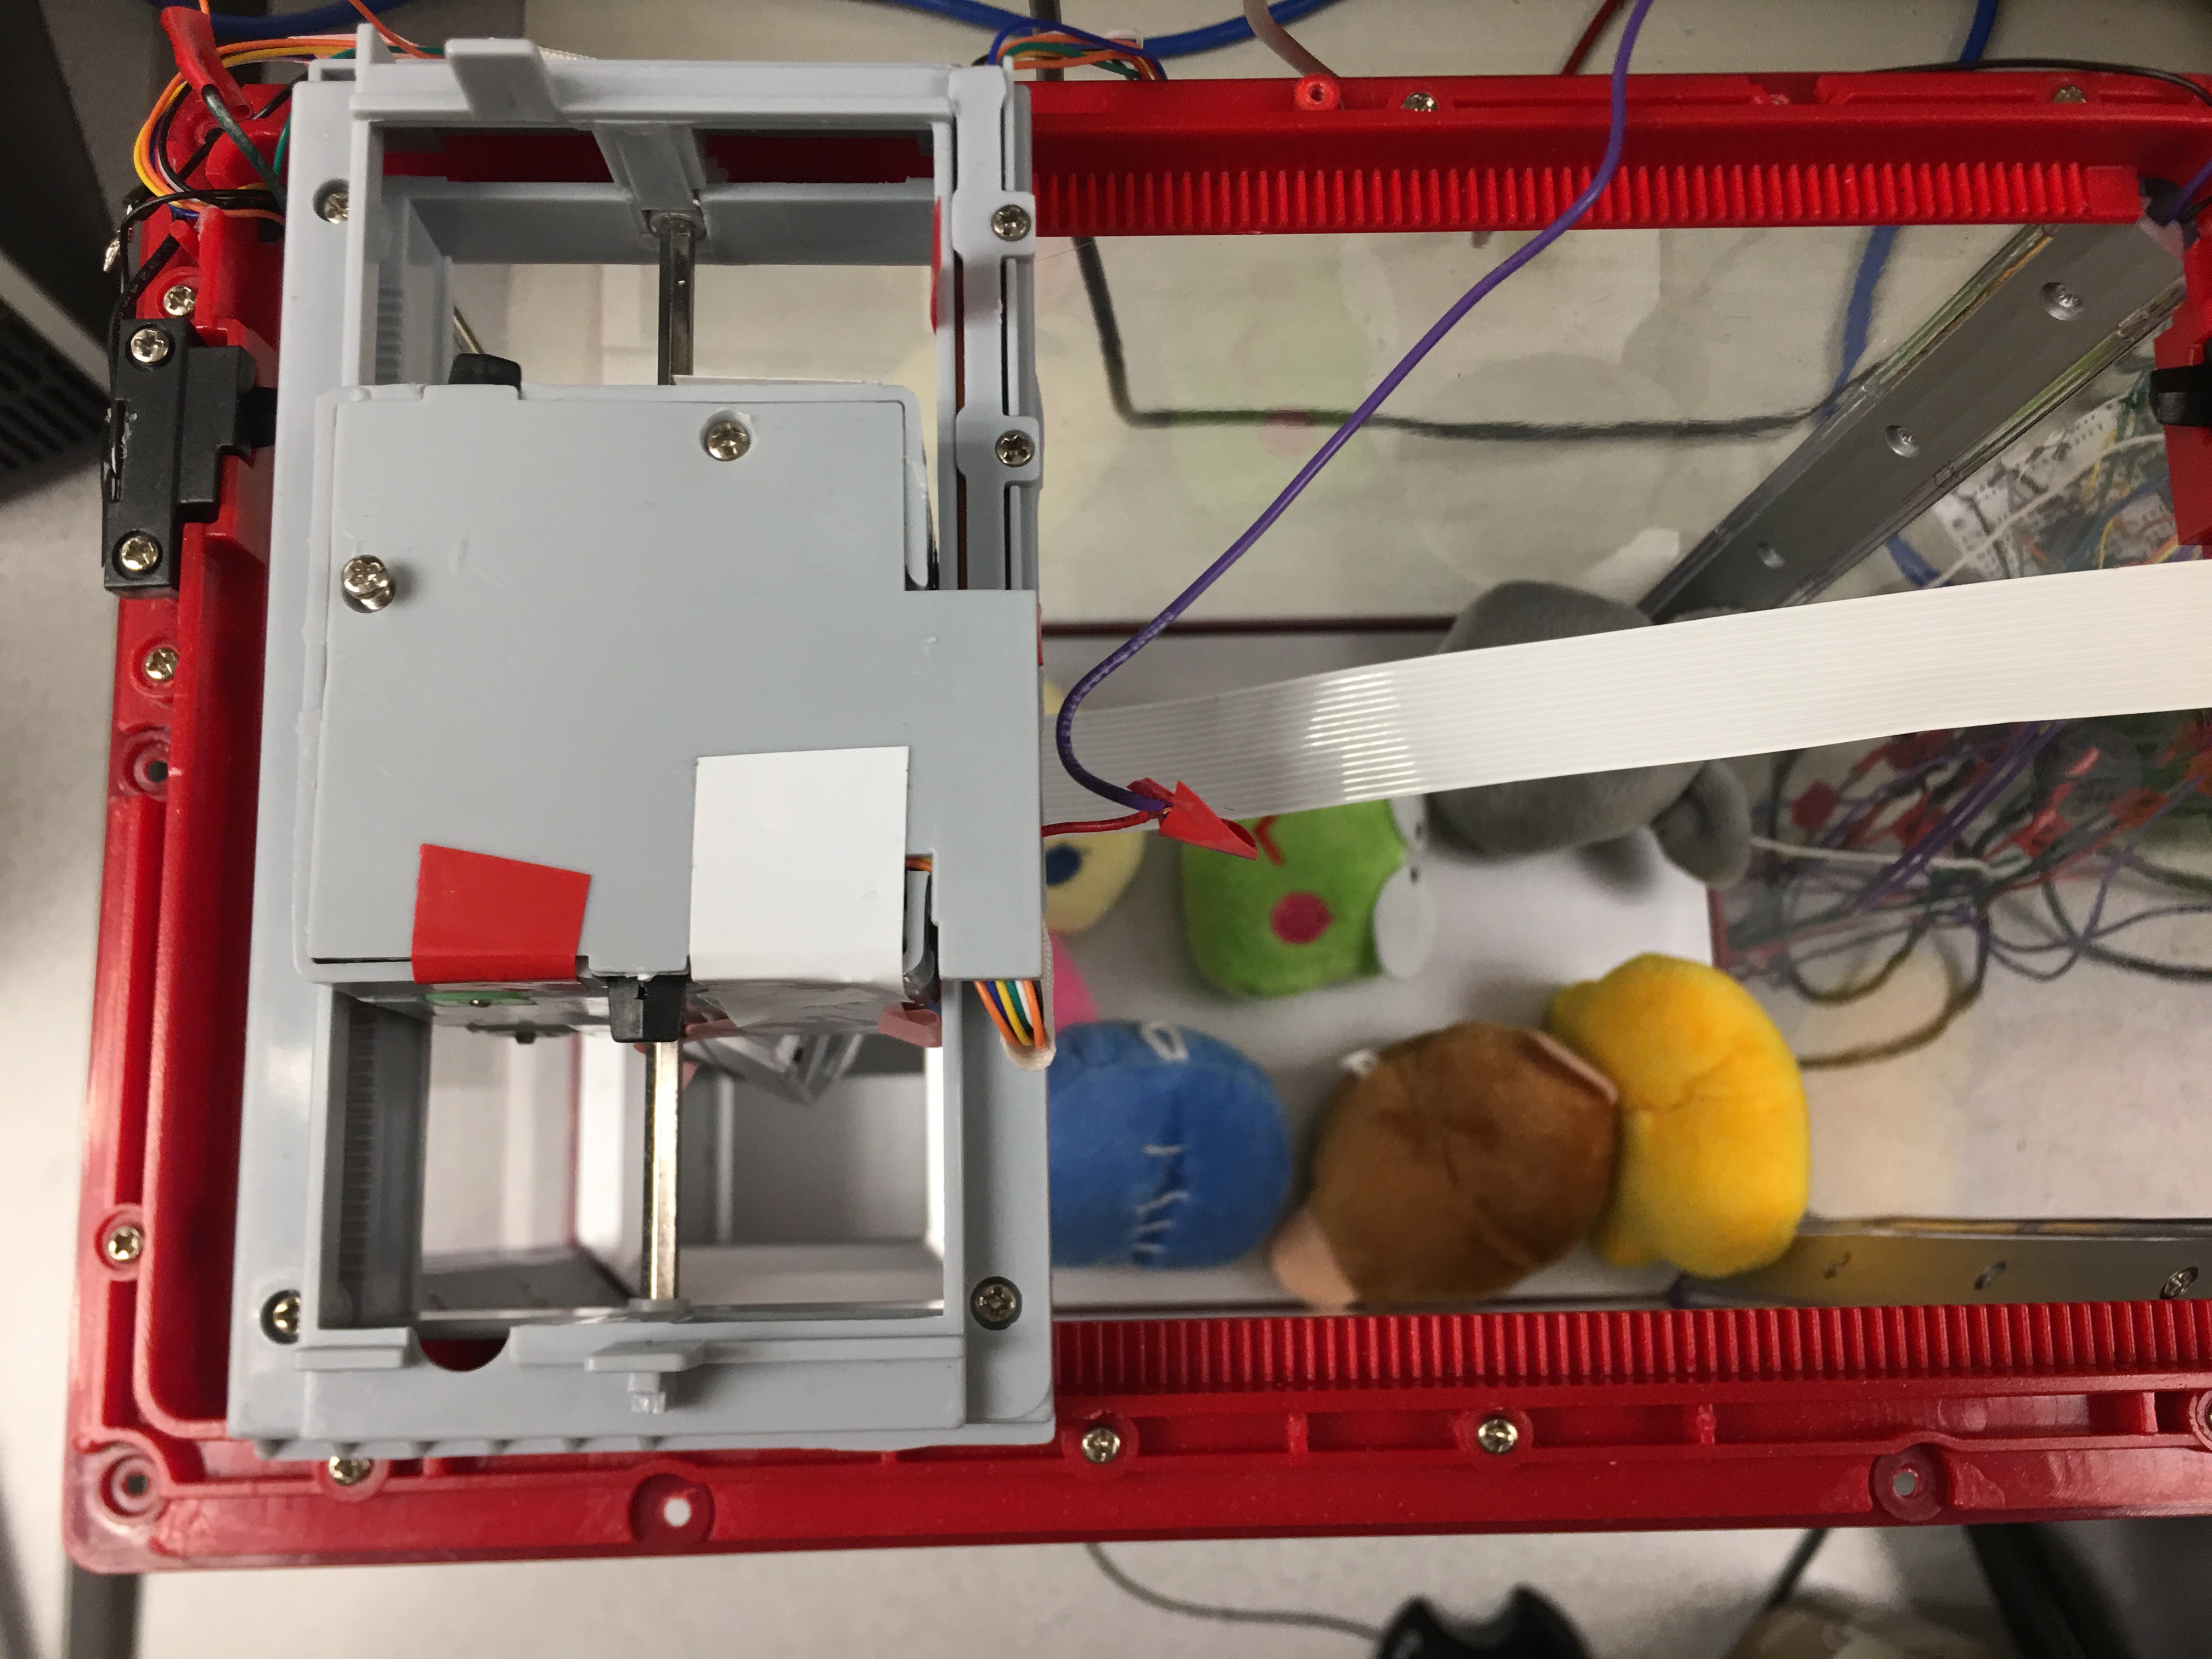
The last mode is auto mode. In this mode, a user choose a doll, and the claw machine capture the specific doll automatically. In order to detect and locate the position of an object, a Pi camera is used to capture real time image and opencv is used to perform image processing.We try to set up the Pi camera in different location, top-left corner of the claw machine or top of the claw or outside the claw machine. We decided to attach the Pi camera at the top of the claw base on three reasons. Although the camera fixed at the corner can capture the whole box of the claw machine, it still has some blind spot covered by the claw. Moreover, the camera cannot move with the claw. If the camera is attached at the top of the claw, the camera can move with the claw, which give us some feedback of the location of t he doll, and allows us to do a closed-loop control. But in this case, due to the position of the claw, the camera can only detect half of the image and it cannot detect the whole box of the claw machine in one image.Figure 24 shows the position of the camera.The camera is attached with the claw, whichmove with the law.
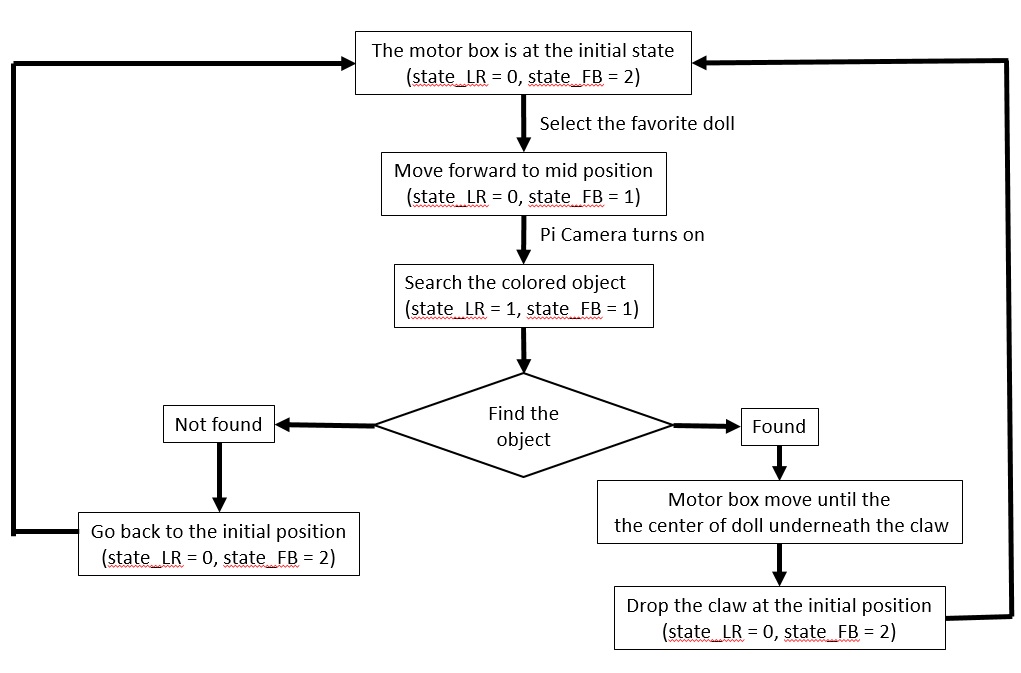
There are four The claw is initially at the left and backward position of the machine, which has the state left limit and backward limit as we mentioned before. The first step is to move the claw to the middle of forward and backward axis. The reason for this is that mid point of forward and backward axis makes the image captured by the camera symmetric, which avoid any unnecessary pixel transforma tion and some extreme situation such that the object located at the edge of the image, which potentially increase the detection failure.It is import to note that the orientation of the camera attached to the claw is different from the frame of the claw machine. The camera is 90 degree clockwise different from the claw frame. All the frame stated below has already transformed rame.
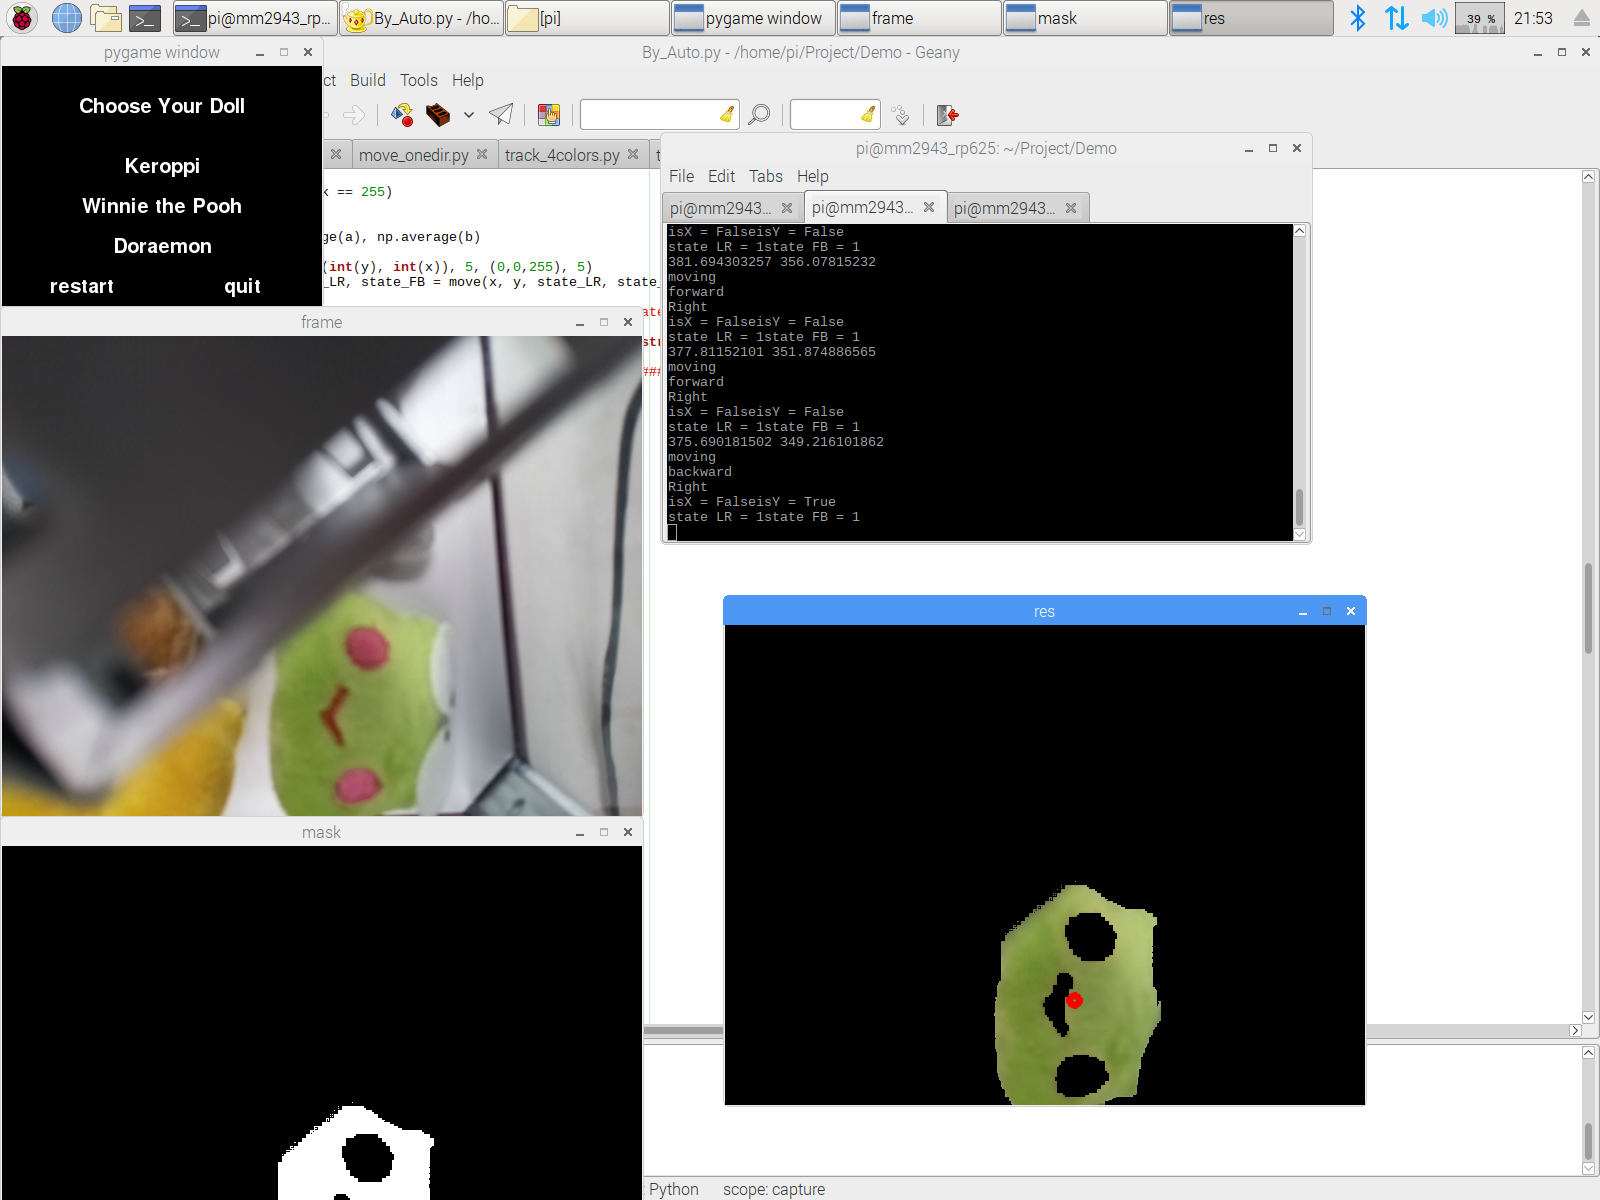
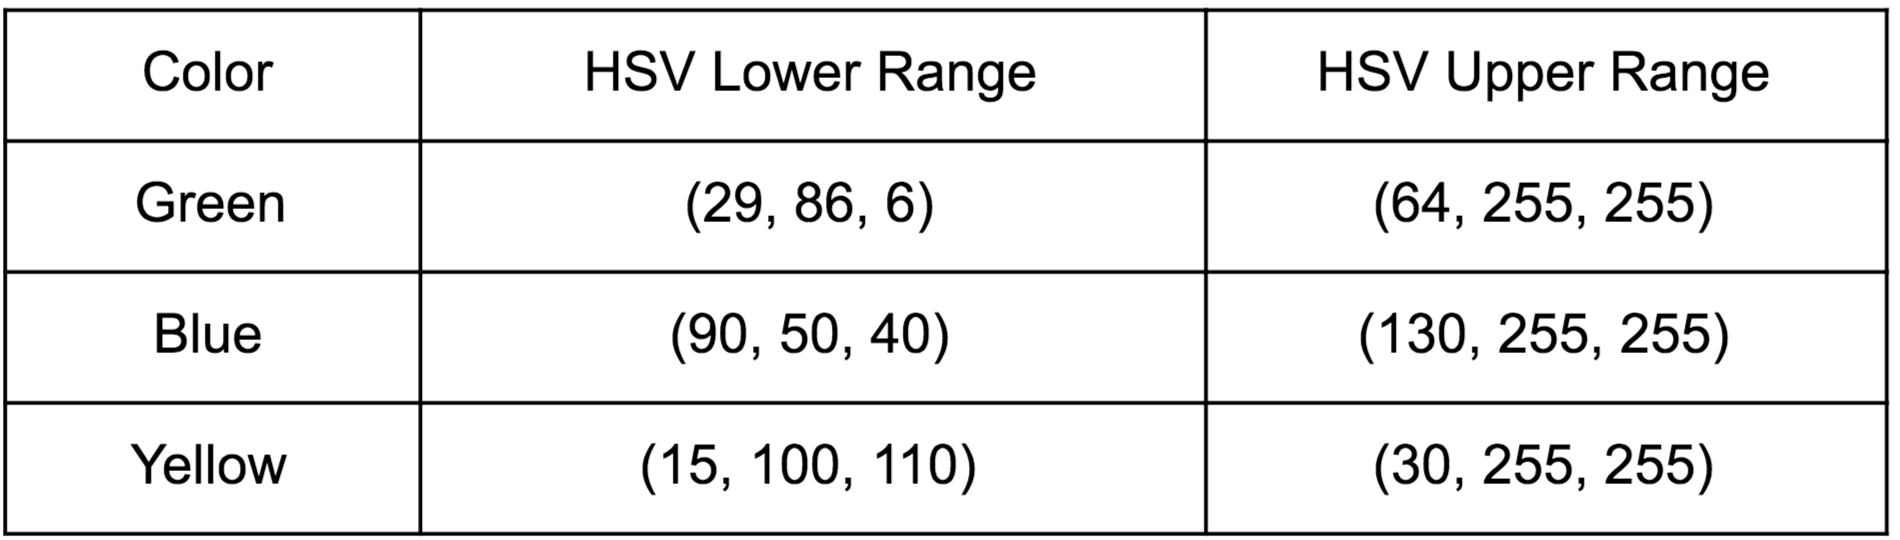
The second step is to search the specifil doll. The claw moves to the right and perform a real time object detection. Our initial plan is to use SIFT to do template matching. SIFT stands for scale-invariant feature transform. Given a reference image, it transform the image into feature vector, which is invariant to scale, orientation and partially invariant to illumination changes. To do template matching, we perform the same procedure for a query image to extract feature. Then, we detect an object that match the reference image by comparing the feature vectors of two images based on euclidean distance. If an object in query image matches the reference image, then features vector at certain location must match features of reference image. Using this method we can locate the doll in an image. We use opencv2 to do image processing. However, the SIFT function we used is only allowed in opencv3. We try to follow the given instruction to install opencv3 and compile opencv3 into our Raspberry Pi. It fails due to some issues such as memory and some files missing. The compilation process even change the configuration of our Raspberry Pi, which makes the Raspberry Pi fails to show on the monitor. We have to use the backup SD card due to this issue.We, then use color detection to find the object in the query image. We first assign a unique color to each doll. Each color have a color range [4], [5]. We first filter out all the pixels that are out of the range by setting them to be zero. We set all the pixels to 255 if they are in the color range. In order to filter out disturbance, we say an object is being detected if more than 5000 pixels are in the range. Figure below shows the color detection of an object. The red point shows the centct.
If an object is detected, the claw then stop and proceed step 3. However, if the claw reach the right limit and no object is found, the claw is then go back its initial position.
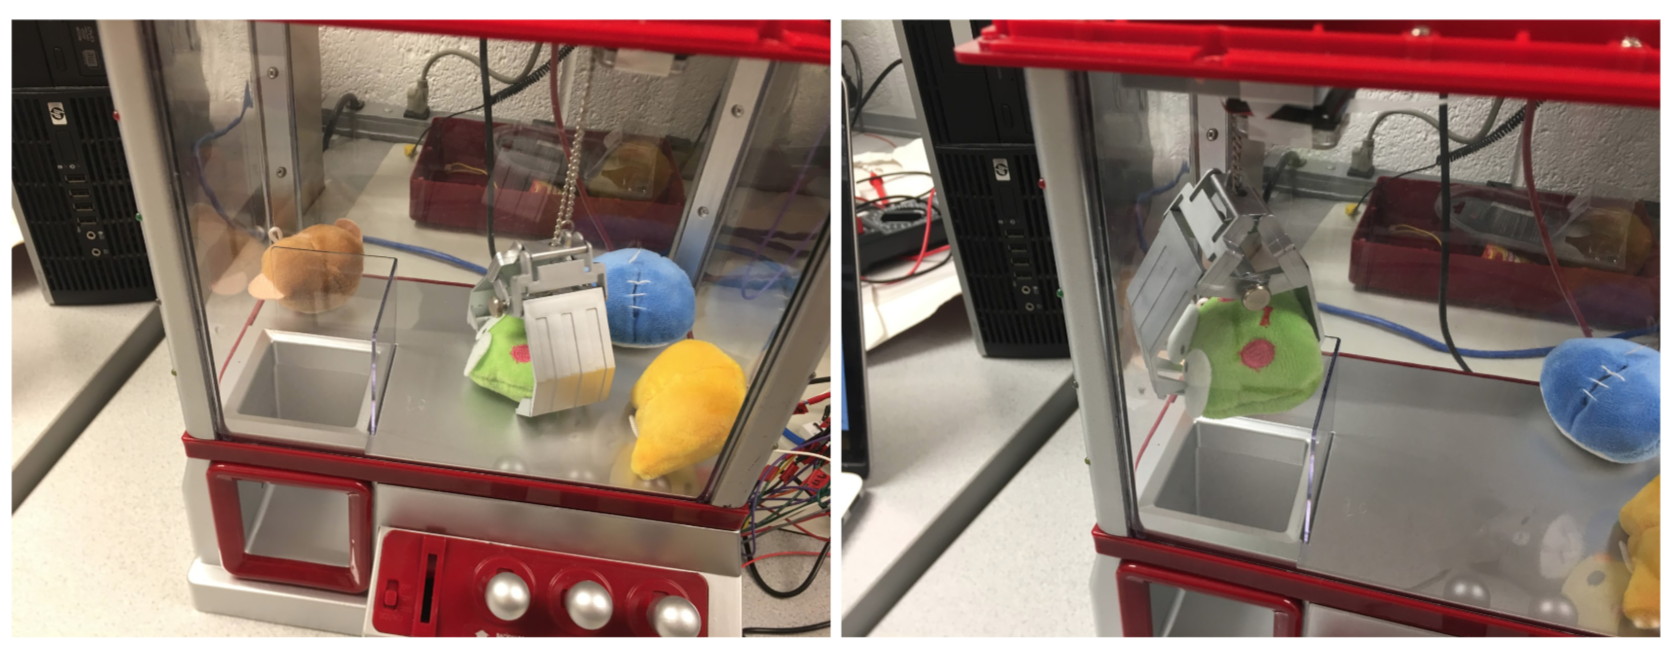
If an object is found at step 2, step 3 then move the claw to the location of the found object. Using object detection, we can get pixels of the object that match the reference image. Center of the found object can be computed as the mean of x axis and mean of y axis of those pixels. We know that the position of the camera in the captured image must locate in the center. Then, the claw can move according to the relative position of the found object from the center. The camera keeps tracking the relative position of the object as the claw move toward the object. Ideally, the claw stops until the object is underneath the claw. In other words, the center of the object is at the center of an image. However, the object disappear as the claw is close to the object. This is because the camera is set at the top of the claw, the claw will cover the object if it is underneath the claw. Therefore, we say an object is underneath the claw if one of the condition meet. First, the object disappear from the image. Second, relative distance of x axis and y axis of the object from the center are small enough. The last condition is for an extreme case. For example, if the object located at the edge of the box. Before the claw move close to the object, a limit switch could be touched. To solve this problem, we set the third condition to be that left/right limit switch is touch and forward-backward distance is close enough, or forward/backward limit switch is touched and left-right distance is close enough, or two limit switches are touched.
As soon as the claw move to the location of the found object, step 4 is processed. Step 4 is to grab the doll and return the doll to the exit. Since the height
of doll from the claw is fix. The claw is moved down and then move up for a fix time. The exit is in the same position of the initial location of the claw. In order to move back initial position, it is necessary
to the current position. To do that, we use state machines which is the same as the hand mode, and voice control part. Therefore, we keep track of the states of the claw in all steps stated above. When the claw
move back initial position, it moves left and backward until it reaches state left limit and backward limit.
One thing to point out is that, it is harder to identify two color if they have overlapped color range. We use HSV color space to help use better identify two color instead of RGB. However, even that there still exist some color have overlapped color range, such as brown and yellow. We performs a large amounts of experiment to determine a color range that can be identified betwlow.
Result
As the result of our project, we have a fully working claw machine with a user interface on piTFT. There are three mode of the claw machine.Hand Mode. As a user select the hand mode on piTFT. He or she can freely control the claw with three lever switches, left/right, forward/backward and up/down.
Voice Mode. In this mode, as a user presses the record button on piTFT, his or her voice would be recorded. The voice is then parsed to a command. The claw machine would move accordingly. In this mode, the user can not only specify the direction but also the duration the claw move. For example, if the user speak to the microphone ‘go right for three seconds’, then the claw move to the right for three seconds.
Auto Mode. In this mode, a user specify the doll he or she want. The claw machine then perform a real time object detection to locate the doll. As the claw move to the location of the doll, it capture the doll, move to the drop down zoon and drop it.
A user interface is built on the piTFT. A user freely selects the mode they want. In each mode, the user is allows to restart if he or she press the restart button on piTFT. If the restart button is pressed, the claw moves back original position. The user can also quit the current mode by pressing the quit button. Doing that, the claw also move back initial position, and the user interface go back previous level. In voice mode, piTFT would show the command that is re cognized after recording. It helps the user to know how the machine recognize and correct the voice command.
Conclusion
The result of our project meets most of the goal we proposed. Three mode of the claw machine, hand mode, voice mode and auto mode, are all successfully built. H owever, some goals did not work due to the configuration of the claw machine and Raspberry Pi. According to our initial plan, user can either choose the area he or she want the claw to capture or the specific doll to capture. Due to the configuration of the claw machine, there is no place for the camera to set up such that the camera can capture an image covered all the area without concealed by the claw. Another issue is because of the Raspberry. Opencv 3 cannot be compiled into Raspberry Pi since Opencv do not support the architecture the Raspberry Pi use. Therefore, some latest functions such as SIFT in opencv 3 are not able to use, which makes our object detection algorithm changed.
Work Distribution
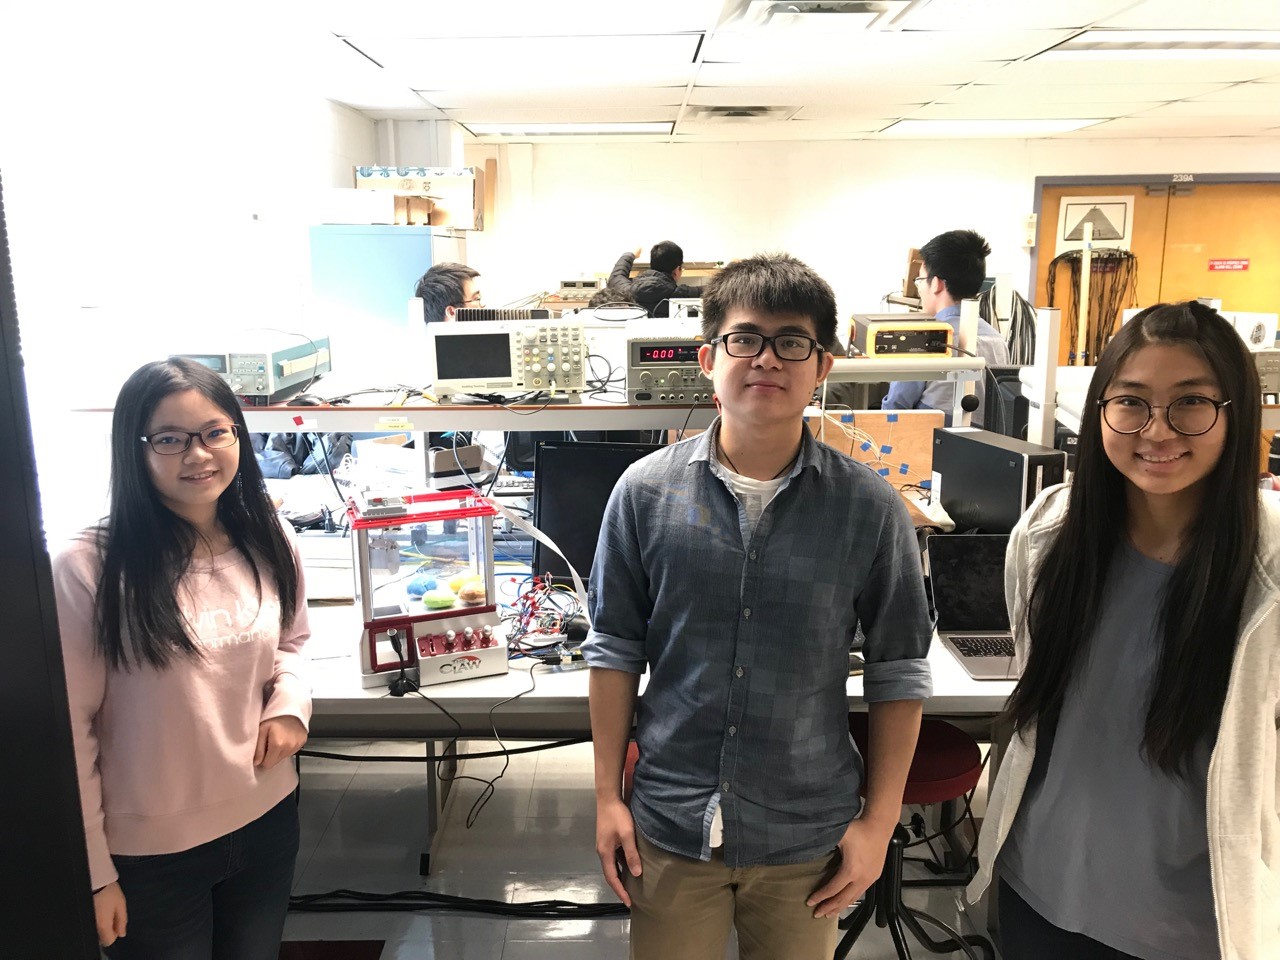
Project group picture
Minze Mo
mm2943@cornell.edu
voice control
Wenjie Cao
wc585@cornell.edu
hand mode, auto mode, piTFT
Ramita Pinsuwannakub
rp625@cornell.edu
Hardware modification, piTFT
Parts List
- Raspberry Pi (not inclusded) $35.00
- PiTFT screen (not included) $34.95
- The Claw Toy Grabber Machine $44.99
- D-batteries $5.90
- Picamera $24.90
- Microphone $7.99
- Schottky Diodes $3.192
- L293D $7.34
- Wires - Provided in lab
Total: $94.312
Code Appendix
screen.py
###############################################################################
# screen.py
#
# Authors: Wenjie Cao (wc585)
#          Ramita Pinsuwannakub (rp625)
#          Minze Mo (mm2943)
#
# Date:    December 8st 2018
#
# Description:
# This scirpt is the main function of the program
# Create a user interface on piTFT, call the mode specific by the user
###############################################################################

import pygame
from pygame.locals import *
import os
import RPi.GPIO as GPIO
import time
from threading import Timer
import sys
import By_Hand
import By_Voice
import By_Auto


def Level2():

#	os.putenv('SDL_VIDEODRIVER', 'fbcon') # Display on piTFT
#	os.putenv('SDL_FBDEV', '/dev/fb1')

	WHITE = 255, 255, 255
	BLACK = 0,0,0
	screen_size = [320, 240]
	screen = pygame.display.set_mode(screen_size)
	screen.fill(BLACK)

	# initialize font
	# draw 2 buttons: start and quit
	my_font = pygame.font.Font(None, 50)
	my_buttons = {'Mode selection':(160,50), 'By hand':(160,100), 'By voice': (160,150), 'AUTO': (160,200)}
	quit_font = pygame.font.Font(None,25)
	quit_button = {'quit':(280,220)}

	for my_text, text_pos in my_buttons.items():
		text_surface = my_font.render(my_text, True, WHITE)
		rect = text_surface.get_rect(center=text_pos)
		screen.blit(text_surface, rect)

	for my_text, text_pos in quit_button.items():
		text_surface = quit_font.render(my_text, True, WHITE)
		rect = text_surface.get_rect(center=text_pos)
		screen.blit(text_surface, rect)

	pygame.display.flip()

	while True:
		time.sleep(0.2)

		for event in pygame.event.get():

			# Check if there is a mouse-click event
			if (event.type is MOUSEBUTTONDOWN):
				pos = pygame.mouse.get_pos()
			elif (event.type is MOUSEBUTTONUP):
				pos = pygame.mouse.get_pos()
				x, y = pos

				# Size and position of each button
				hand_size = my_font.size('By hand')
				hand_center = my_buttons['By hand']
				voice_size = my_font.size('By voice')
				voice_center = my_buttons['By voice']
				auto_size = my_font.size('AUTO')
				auto_center = my_buttons['AUTO']
				quit_size = quit_font.size('quit')
				quit_center = quit_button['quit']

				# Check if quit button clicked
				# If yes, exit the program
				if (quit_center[1] - quit_size[1]/2.) <= y <= (quit_center[1] + quit_size[1]/2.):
					if (quit_center[0] - quit_size[0]/2.) <= x <= (quit_center[0] + quit_size[0]/2.):
						print 'Quit the program...'
						sys.exit(0)

				if (hand_center[1] - hand_size[1]/2.) <= y <= (hand_center[1] + hand_size[1]/2.):
					if (hand_center[0] - hand_size[0]/2.) <= x <= (hand_center[0] + hand_size[0]/2.):
						print 'Start By Hand Mode...'
						By_Hand.run()

						GPIO.setmode(GPIO.BCM) # BCM mode needs GPIO pin

						screen.fill(BLACK)
						for my_text, text_pos in my_buttons.items():
							text_surface = my_font.render(my_text, True, WHITE)
							rect = text_surface.get_rect(center=text_pos)
							screen.blit(text_surface, rect)

						for my_text, text_pos in quit_button.items():
							text_surface = quit_font.render(my_text, True, WHITE)
							rect = text_surface.get_rect(center=text_pos)
							screen.blit(text_surface, rect)

						pygame.display.flip()

				if (auto_center[1] - auto_size[1]/2.) <= y <= (auto_center[1] + auto_size[1]/2.):
					if (auto_center[0] - auto_size[0]/2.) <= x <= (auto_center[0] + auto_size[0]/2.):
						print 'Start Auto Mode...'
						By_Auto.run()
						GPIO.setmode(GPIO.BCM) # BCM mode needs GPIO pin

						screen.fill(BLACK)
						for my_text, text_pos in my_buttons.items():
							text_surface = my_font.render(my_text, True, WHITE)
							rect = text_surface.get_rect(center=text_pos)
							screen.blit(text_surface, rect)

						for my_text, text_pos in quit_button.items():
							text_surface = quit_font.render(my_text, True, WHITE)
							rect = text_surface.get_rect(center=text_pos)
							screen.blit(text_surface, rect)

						pygame.display.flip()

				if (voice_center[1] - voice_size[1]/2.) <= y <= (voice_center[1] + voice_size[1]/2.):
					if (voice_center[0] - voice_size[0]/2.) <= x <= (voice_center[0] + voice_size[0]/2.):
						print 'Start Voice Mode...'
						By_Voice.run()
						GPIO.setmode(GPIO.BCM) # BCM mode needs GPIO pin

						screen.fill(BLACK)
						for my_text, text_pos in my_buttons.items():
							text_surface = my_font.render(my_text, True, WHITE)
							rect = text_surface.get_rect(center=text_pos)
							screen.blit(text_surface, rect)

						for my_text, text_pos in quit_button.items():
							text_surface = quit_font.render(my_text, True, WHITE)
							rect = text_surface.get_rect(center=text_pos)
							screen.blit(text_surface, rect)

						pygame.display.flip()

def Level1():

	#commend these foue lines
	os.putenv('SDL_VIDEODRIVER', 'fbcon') # Display on piTFT
	os.putenv('SDL_FBDEV', '/dev/fb1')
	os.putenv('SDL_MOUSEDRV', 'TSLIB') # Track mouse clicks on piTFT
	os.putenv('SDL_MOUSEDEV', '/dev/input/touchscreen')

	# Configure GPIO25
	GPIO.setmode(GPIO.BCM) # BCM mode needs GPIO pin

	# Initial pygame
	# Set the screen size to 320x240
	pygame.init()

	pygame.mouse.set_visible(False)

	WHITE = 255, 255, 255
	BLACK = 0,0,0
	screen_size = [320, 240]
	screen = pygame.display.set_mode(screen_size)
	screen.fill(BLACK)

	# initialize font
	# draw 2 buttons: start and quit
	my_font = pygame.font.Font(None, 100)
	my_buttons = {'start':(80,200), 'quit':(240,200)}

	for my_text, text_pos in my_buttons.items():
		text_surface = my_font.render(my_text, True, WHITE)
		rect = text_surface.get_rect(center=text_pos)
		screen.blit(text_surface, rect)

	pygame.display.flip()

	# the first level
	while True:
		time.sleep(0.2)

		for event in pygame.event.get():
			# Check if there is a mouse-click event
			if (event.type is MOUSEBUTTONDOWN):
				pos = pygame.mouse.get_pos()
			elif (event.type is MOUSEBUTTONUP):
				pos = pygame.mouse.get_pos()
				x, y = pos

				# Size and position of each button
				start_size = my_font.size('start')
				start_center = my_buttons['start']
				quit_size = my_font.size('quit')
				quit_center = my_buttons['quit']

				# Check if quit button clicked
				# If yes, exit the program
				if (quit_center[1] - quit_size[1]/2.) <= y <= (quit_center[1] + quit_size[1]/2.):
					if (quit_center[0] - quit_size[0]/2.) <= x <= (quit_center[0] + quit_size[0]/2.):
						print 'Quit Button Cliked...'
						sys.exit(0)

				# Check if start buttom clicked
				# If yes, go to level 2
				if (start_center[1] - start_size[1]/2.) <= y <= (start_center[1] + start_size[1]/2.):
					if (start_center[0] - start_size[0]/2.) <= x <= (start_center[0] + start_size[0]/2.):
						print 'start Button Cliked...'
						Level2()

						screen.fill(BLACK)
						for my_text, text_pos in my_buttons.items():
							text_surface = my_font.render(my_text, True, WHITE)
							rect = text_surface.get_rect(center=text_pos)
							screen.blit(text_surface, rect)

						pygame.display.flip()
				else:
					msg = 'Hit at (%d, %d)' %(x, y)
					print msg

					# Erase the screen
					screen.fill(BLACK)

					# Draw button and coordinate
					text_surface = my_font.render(msg, True, WHITE)
					rect = text_surface.get_rect(center=(screen_size[0]/2, screen_size[1]/2))
					screen.blit(text_surface, rect)

					for my_text, text_pos in my_buttons.items():
						text_surface = my_font.render(my_text, True, WHITE)
						rect = text_surface.get_rect(center=text_pos)
						screen.blit(text_surface, rect)

					pygame.display.flip()

if __name__=='__main__':
	Level1()
By_Hand.py
###############################################################################
# By_Hand.py
#
# Authors: Wenjie Cao (wc585)
#          Ramita Pinsuwannakub (rp625)
#          Minze Mo (mm2943)
#
# Date:    December 8st 2018
#
# Description:
# This scirpt is used for hand mode
# Move the claw machine according to the input signal
# State machine is used for movement
###############################################################################

import time
import RPi.GPIO as GPIO
import pygame
from pygame.locals import *
import os
import sys

def go_back(state_LR, state_FB):
	left_stop, backward_stop = False, False
	while True:
		if state_FB == 0:
			GPIO.output(19, 0)
			GPIO.output(26, 1)
			time.sleep(1)
			state_FB = 1
		elif state_FB == 1:
			GPIO.output(19, 0)
			GPIO.output(26, 1)
			if not GPIO.input(21):
				state_FB = 2
		elif state_FB == 2:
			GPIO.output(19, 0)
			GPIO.output(26, 0)
			backward_stop = True
		else:
			print 'State_FB Invalid'

		if state_LR == 2:
			GPIO.output(6, 0)
			GPIO.output(13, 1)
			time.sleep(1)
			state_LR = 1
		elif state_LR == 1:
			GPIO.output(6, 0)
			GPIO.output(13, 1)
			if not GPIO.input(20):
				state_LR = 0
		elif state_LR == 0:
			GPIO.output(6, 0)
			GPIO.output(13, 0)
			left_stop = True
		else:
			print 'State_LR Invalid'
		if backward_stop and left_stop:
			break

def run():

#	os.putenv('SDL_VIDEODRIVER', 'fbcon') # Display on piTFT
#	os.putenv('SDL_FBDEV', '/dev/fb1')

	GPIO.setmode(GPIO.BCM)

	#from switch FW-BW (motor1)
	GPIO.setup(5, GPIO.IN, pull_up_down=GPIO.PUD_DOWN)
	GPIO.setup(23, GPIO.IN, pull_up_down=GPIO.PUD_DOWN)
	#to L293D to FW-BW (motor1)
	GPIO.setup(19, GPIO.OUT)
	GPIO.setup(26, GPIO.OUT)

	#from switch L-R (motor2)
	GPIO.setup(16, GPIO.IN, pull_up_down=GPIO.PUD_DOWN)
	GPIO.setup(12, GPIO.IN, pull_up_down=GPIO.PUD_DOWN)
	#to L293D to L-R (motor2)
	GPIO.setup(6, GPIO.OUT)
	GPIO.setup(13, GPIO.OUT)

	#from switch U-D (motor3)
	GPIO.setup(22, GPIO.IN, pull_up_down=GPIO.PUD_DOWN)
	GPIO.setup(4, GPIO.IN, pull_up_down=GPIO.PUD_DOWN)
	#to L293D to U-D (motor3)
	GPIO.setup(17, GPIO.OUT)
	GPIO.setup(27, GPIO.OUT)

	#limit switch
	GPIO.setup(20, GPIO.IN, pull_up_down=GPIO.PUD_DOWN) # motor 2 L-R
	GPIO.setup(21, GPIO.IN, pull_up_down=GPIO.PUD_DOWN) # motor 1 FW-BW

	#state_FB == 1: unpressed the limit swutch
	#state_FB == 0: press FW limit switch
	#state_FB == 2: press BW limit switch
	state_FB = 2
	state_LR = 0

	WHITE = 255, 255, 255
	BLACK = 0,0,0
	screen_size = [320, 240]
	screen = pygame.display.set_mode(screen_size)
	screen.fill(BLACK)

	# initialize font
	# draw 2 buttons: start and quit
	my_font = pygame.font.Font(None, 50)
	my_buttons = {'restart':(80,200), 'quit':(240, 200)}

	for my_text, text_pos in my_buttons.items():
		text_surface = my_font.render(my_text, True, WHITE)
		rect = text_surface.get_rect(center=text_pos)
		screen.blit(text_surface, rect)

	# Size and position of each button
	quit_size = my_font.size('quit')
	quit_center = my_buttons['quit']
	restart_size = my_font.size('restart')
	restart_center = my_buttons['restart']

	pygame.display.flip()

	isQuit = False
	while(True):

		for event in pygame.event.get():

			# Check if there is a mouse-click event
			if (event.type is MOUSEBUTTONDOWN):
				pos = pygame.mouse.get_pos()
			elif (event.type is MOUSEBUTTONUP):
				pos = pygame.mouse.get_pos()
				x, y = pos

				# Check if quit button clicked
				# If yes, exit the program
				if (quit_center[1] - quit_size[1]/2.) <= y <= (quit_center[1] + quit_size[1]/2.):
					if (quit_center[0] - quit_size[0]/2.) <= x <= (quit_center[0] + quit_size[0]/2.):
						print 'Quit By Hand Mode...'
						go_back(state_LR, state_FB)
						isQuit = True

				if (restart_center[1] - restart_size[1]/2.) <= y <= (restart_center[1] + restart_size[1]/2.):
					if (restart_center[0] - restart_size[0]/2.) <= x <= (restart_center[0] + restart_size[0]/2.):
						print 'Restart By Hand Mode...'
						go_back(state_LR, state_FB)
						state_LR, state_FB = 0, 2
		if isQuit:
			break

		# Forward and Backward
		# motor 1
		if state_FB == 0:
			if GPIO.input(21):
				state_FB = 1
		if state_FB == 1:
			if GPIO.input(5) and not GPIO.input(21):
				state_FB = 0
			if GPIO.input(23) and not GPIO.input(21):
				state_FB = 2
		if state_FB == 2:
			if GPIO.input(21):
				state_FB = 1
		if GPIO.input(5) and state_FB != 0: # forward
			GPIO.output(19, 1)
			GPIO.output(26, 0)
			print 'Forward'
		elif GPIO.input(23) and state_FB != 2: # Backward
			GPIO.output(19, 0)
			GPIO.output(26, 1)
			print 'Backward'

		else:
			GPIO.output(19, 0)
			GPIO.output(26, 0)

		# Left and Right
		#motor 2
		if state_LR == 0:
			if GPIO.input(20):
				state_LR = 1
		if state_LR == 1:
			if GPIO.input(16) and not GPIO.input(20):
				state_LR = 0
			if GPIO.input(12) and not GPIO.input(20):
				state_LR = 2
		if state_LR == 2:
			if GPIO.input(20):
				state_LR = 1
		if GPIO.input(16) and state_LR != 0:	# Left
			GPIO.output(6, 0)
			GPIO.output(13, 1)
			print 'Left'

		elif GPIO.input(12) and state_LR != 2:	# Right
			GPIO.output(6, 1)
			GPIO.output(13, 0)
			print 'Right'
		else:
			GPIO.output(6, 0)
			GPIO.output(13, 0)

		#motor3
		if (GPIO.input(22)):	# UP
			GPIO.output(17, 0)
			GPIO.output(27, 1)
			print 'up'
		elif (GPIO.input(4)):	# DOWN
			GPIO.output(17, 1)
			GPIO.output(27, 0)
			print 'down'
		else:
			GPIO.output(17, 0)
			GPIO.output(27, 0)
	GPIO.cleanup()
By_Voice.py
###############################################################################
# By_Voice.py
#
# Authors: Wenjie Cao (wc585)
#          Ramita Pinsuwannakub (rp625)
#          Minze Mo (mm2943)
#
# Date:    December 8st 2018
#
# Description:
# This scirpt is used for voice mode
# Record the voice, perform speech-to-text, and parse the command
# Move the claw according to the command
###############################################################################

#!/usr/bin/env python3
# NOTE: this example requires PyAudio because it uses the Microphone class
import random
import threading
import time
import RPi.GPIO as GPIO
from datetime import datetime
import sys
import pyaudio
import wave
import requests
import json
import subprocess
import pygame
from pygame.locals import *
import os

def move(state_LR, state_FB, d, t):

	# Forward and Backward
	# motor 1
	start = time.time()
	while (time.time() - start < t):
		if state_FB == 0:
			if GPIO.input(21):
				state_FB = 1
		if state_FB == 1:
			if d == 'forward' and not GPIO.input(21):
				state_FB = 0
			if d == 'backward' and not GPIO.input(21):
				state_FB = 2
		if state_FB == 2:
			if GPIO.input(21):
				state_FB = 1

		if d == 'forward' and state_FB != 0: # forward
			GPIO.output(19, 1)
			GPIO.output(26, 0)

		elif d == 'backward' and state_FB != 2: # Backward
			GPIO.output(19, 0)
			GPIO.output(26, 1)

		else:
			GPIO.output(19, 0)
			GPIO.output(26, 0)

		# Left and Right
		#motor 2
		if state_LR == 0:
			if GPIO.input(20):
				state_LR = 1
		if state_LR == 1:
			if d == 'left' and not GPIO.input(20):
				state_LR = 0
			if d == 'right' and not GPIO.input(20):
				state_LR = 2
		if state_LR == 2:
			if GPIO.input(20):
				state_LR = 1
		if d == 'left' and state_LR != 0:	# Left
			GPIO.output(6, 0)
			GPIO.output(13, 1)

		elif d == 'right' and state_LR != 2:	# Right
			GPIO.output(6, 1)
			GPIO.output(13, 0)

		else:
			GPIO.output(6, 0)
			GPIO.output(13, 0)

	GPIO.output(19, 0)
	GPIO.output(26, 0)
	GPIO.output(6, 0)
	GPIO.output(13, 0)
	return state_LR, state_FB

def go_back(state_LR, state_FB):
	left_stop, backward_stop = False, False
	while True:
		if state_FB == 0:
			GPIO.output(19, 0)
			GPIO.output(26, 1)
			time.sleep(1)
			state_FB = 1
		elif state_FB == 1:
			GPIO.output(19, 0)
			GPIO.output(26, 1)
			if not GPIO.input(21):
				state_FB = 2
		elif state_FB == 2:
			GPIO.output(19, 0)
			GPIO.output(26, 0)
			backward_stop = True
		else:
			print 'State_FB Invalid'

		if state_LR == 2:
			GPIO.output(6, 0)
			GPIO.output(13, 1)
			time.sleep(1)
			state_LR = 1
		elif state_LR == 1:
			GPIO.output(6, 0)
			GPIO.output(13, 1)
			if not GPIO.input(20):
				state_LR = 0
		elif state_LR == 0:
			GPIO.output(6, 0)
			GPIO.output(13, 0)
			left_stop = True
		else:
			print 'State_LR Invalid'
		if backward_stop and left_stop:
			break

def left_right_stop():
    GPIO.output(6, 0)
    GPIO.output(13, 0)

def forward_backward_stop():
    GPIO.output(19, 0)
    GPIO.output(26, 0)

def down_up_stop():
    GPIO.output(17, 0)
    GPIO.output(27, 0)


def record_audio(RECORD_SECONDS, WAVE_OUTPUT_FILENAME):
    #--------- SETTING PARAMS FOR OUR AUDIO FILE ------------#
    FORMAT = pyaudio.paInt16    # format of wave
    CHANNELS = 1                # no. of audio channels
    RATE = 44100                # frame rate
    CHUNK = 1024                # frames per audio sample
    #--------------------------------------------------------#

    # creating PyAudio object
    audio = pyaudio.PyAudio()

    # open a new stream for microphone
    # It creates a PortAudio Stream Wrapper class object
    stream = audio.open(format=FORMAT,channels=CHANNELS,
                        rate=RATE, input=True,
                        frames_per_buffer=CHUNK)

    #----------------- start of recording -------------------#
    print("Listening...")

    # list to save all audio frames
    frames = []

    for i in range(int(RATE / CHUNK * RECORD_SECONDS)):
        # read audio stream from microphone
        data = stream.read(CHUNK,exception_on_overflow=False)
        # append audio data to frames list
        frames.append(data)

    #------------------ end of recording --------------------#
    print("Finished recording.")

    stream.stop_stream()    # stop the stream object
    stream.close()          # close the stream object
    audio.terminate()       # terminate PortAudio

    #------------------ saving audio ------------------------#

    # create wave file object
    waveFile = wave.open(WAVE_OUTPUT_FILENAME, 'wb')

    # settings for wave file object
    waveFile.setnchannels(CHANNELS)
    waveFile.setsampwidth(audio.get_sample_size(FORMAT))
    waveFile.setframerate(RATE)
    waveFile.writeframes(b''.join(frames))

    # closing the wave file object
    waveFile.close()

def read_audio(WAVE_FILENAME):
    # function to read audio(wav) file
    with open(WAVE_FILENAME, 'rb') as f:
        audio = f.read()
    return audio

def find_duration(str):
	if str.find('1')!=-1:
		return 1
	elif str.find('2')!=-1:
		return 2
	elif str.find('3')!=-1:
		return 3
	elif str.find('4')!=-1:
		return 4
	elif str.find('5')!=-1:
		return 5
	elif str.find('6')!=-1:
		return 6
	elif str.find('7')!=-1:
		return 7
	else:
		return -1

def run():

#	os.putenv('SDL_VIDEODRIVER', 'fbcon') # Display on piTFT
#	os.putenv('SDL_FBDEV', '/dev/fb1')

	GPIO.setmode(GPIO.BCM)

	#to L293D to FW-BW (motor1)
	GPIO.setup(19, GPIO.OUT)
	GPIO.setup(26, GPIO.OUT)

	#to L293D to L-R (motor2)
	GPIO.setup(6, GPIO.OUT)
	GPIO.setup(13, GPIO.OUT)

	#to L293D to U-D (motor3)
	GPIO.setup(17, GPIO.OUT)
	GPIO.setup(27, GPIO.OUT)

	#limit switch
	GPIO.setup(20, GPIO.IN, pull_up_down=GPIO.PUD_DOWN) # motor 2 L-R
	GPIO.setup(21, GPIO.IN, pull_up_down=GPIO.PUD_DOWN) # motor 1 FW-BW

	WHITE = 255, 255, 255
	BLACK = 0,0,0
	screen_size = [320, 240]
	screen = pygame.display.set_mode(screen_size)
	screen.fill(BLACK)

	# initialize font
	# draw 2 buttons: start and quit
	my_font = pygame.font.Font(None, 50)
	my_buttons = {'restart':(80,200), 'quit':(240, 200), 'record': (160, 100)}

	for my_text, text_pos in my_buttons.items():
		text_surface = my_font.render(my_text, True, WHITE)
		rect = text_surface.get_rect(center=text_pos)
		screen.blit(text_surface, rect)

	# Size and position of each button
	quit_size = my_font.size('quit')
	quit_center = my_buttons['quit']
	restart_size = my_font.size('restart')
	restart_center = my_buttons['restart']
	record_size = my_font.size('record')
	record_center = my_buttons['record']

	pygame.display.flip()

	state_LR, state_FB = 0, 2
	isQuit = False
	while(True):

		for event in pygame.event.get():

			# Check if there is a mouse-click event
			if (event.type is MOUSEBUTTONDOWN):
				pos = pygame.mouse.get_pos()
			elif (event.type is MOUSEBUTTONUP):
				pos = pygame.mouse.get_pos()
				x, y = pos

				# Check if quit button clicked
				# If yes, exit the program
				if (quit_center[1] - quit_size[1]/2.) <= y <= (quit_center[1] + quit_size[1]/2.):
					if (quit_center[0] - quit_size[0]/2.) <= x <= (quit_center[0] + quit_size[0]/2.):
						print 'Quit By Voice Mode...'
						go_back(state_LR, state_FB)
						isQuit = True

				if (restart_center[1] - restart_size[1]/2.) <= y <= (restart_center[1] + restart_size[1]/2.):
					if (restart_center[0] - restart_size[0]/2.) <= x <= (restart_center[0] + restart_size[0]/2.):
						print 'Restart By Voice Mode...'
						go_back(state_LR, state_FB)
						state_LR, state_FB = 0, 2

				if (record_center[1] - record_size[1]/2.) <= y <= (record_center[1] + record_size[1]/2.):
					if (record_center[0] - record_size[0]/2.) <= x <= (record_center[0] + record_size[0]/2.):
						print 'Record By Voice Mode...'
						state_LR, state_FB = voice_control(state_LR, state_FB)
						screen.fill(BLACK)
						for my_text, text_pos in my_buttons.items():
							text_surface = my_font.render(my_text, True, WHITE)
							rect = text_surface.get_rect(center=text_pos)
							screen.blit(text_surface, rect)
							pygame.display.flip()

		if isQuit:
			break

	GPIO.cleanup()

def voice_control(state_LR, state_FB):

	WHITE = 255, 255, 255
	BLACK = 0,0,0
	screen_size = [320, 240]
	screen = pygame.display.set_mode(screen_size)
	screen.fill(BLACK)

	my_font = pygame.font.Font(None, 50)
	my_buttons = {'Recording...':(160,80)}

	# Draw button and coordinate
	for my_text, text_pos in my_buttons.items():
		text_surface = my_font.render(my_text, True, WHITE)
		rect = text_surface.get_rect(center=text_pos)
		screen.blit(text_surface, rect)

	pygame.display.flip()


	API_ENDPOINT = 'https://api.wit.ai/speech'
	ACCESS_TOKEN = 'HJM6RWOTOSNDFQ4HQXAY26STRROKGT7Q'

	cmd='arecord -D plughw:1,0 -d 3 --rate 44100 --format S16_LE -c1 out_123_machine.wav'
	subprocess.check_output(cmd, shell=True)
	# get a sample of the audio that we recorded before.
	audio = read_audio('out_123_machine.wav')#Yamaha-V50-Synbass-1-C2

	# defining headers for HTTP request
	headers = {'authorization': 'Bearer ' + ACCESS_TOKEN,
				'Content-Type': 'audio/wav'}

	#Send the request as post request and the audio as data
	resp = requests.post(API_ENDPOINT, headers = headers,data = audio)

	#Get the text
	data = json.loads(resp.content)

	str="hello"
	str =data['_text']
	print str

	my_font = pygame.font.Font(None, 25)
	my_buttons = {str:(160, 200)}

	# Draw button and coordinate
	for my_text, text_pos in my_buttons.items():
		text_surface = my_font.render(my_text, True, WHITE)
		rect = text_surface.get_rect(center=text_pos)
		screen.blit(text_surface, rect)

	pygame.display.flip()

	duration=2
	if find_duration(str)!=-1:
		duration=find_duration(str)

	start=0

	if str.find('left')!=-1:#left
		state_LR, state_FB = move(state_LR, state_FB, 'left', duration)
		print 'go left for %d seconds' % (duration)


	elif str.find('right')!=-1 or str.find('ride')!=-1:#right
		state_LR, state_FB = move(state_LR, state_FB, 'right', duration)
		if str.find('ride')!=-1:
			str=str.replace('ride','right')
		print 'go right for %d seconds' % (duration)

	elif str.find('head')!=-1 or str.find('forward')!=-1:#forward
		state_LR, state_FB = move(state_LR, state_FB, 'forward', duration)
		print 'go ahead for %d seconds' % (duration)

	elif str.find('back')!=-1:#backward
		state_LR, state_FB = move(state_LR, state_FB, 'backward', duration)
		print 'go back for %d seconds' % (duration)

	elif str.find('down')!=-1:#down
		GPIO.output(17, 1)
		GPIO.output(27, 0)
		time.sleep(duration)
		GPIO.output(17, 0)
		GPIO.output(27, 0)
		print 'go down for %d seconds' % (duration)

	elif str.find('up')!=-1:#up
		GPIO.output(17, 0)
		GPIO.output(27, 1)
		time.sleep(duration)
		GPIO.output(17, 0)
		GPIO.output(27, 0)
		print 'go up for %d seconds' % (duration)

	return state_LR, state_FB
By_Auto.py
###############################################################################
# By_Auto.py
#
# Authors: Wenjie Cao (wc585)
#          Ramita Pinsuwannakub (rp625)
#          Minze Mo (mm2943)
#
# Date:    December 8st 2018
#
# Description:
# This scirpt is used for auto mode
# The claw perform object detection and capture the doll
###############################################################################

import cv2
import numpy as np
import RPi.GPIO as GPIO
import time
import pygame
from pygame.locals import *
import os

CLAW_P = (220 ,320)
e = 30

def go_back(state_LR, state_FB):
	left_stop, backward_stop = False, False
	while True:
		if state_FB == 0:
			GPIO.output(19, 0)
			GPIO.output(26, 1)
			time.sleep(1)
			state_FB = 1
		elif state_FB == 1:
			GPIO.output(19, 0)
			GPIO.output(26, 1)
			if not GPIO.input(21):
				state_FB = 2
		elif state_FB == 2:
			GPIO.output(19, 0)
			GPIO.output(26, 0)
			backward_stop = True
		else:
			print 'State_FB Invalid'

		if state_LR == 2:
			GPIO.output(6, 0)
			GPIO.output(13, 1)
			time.sleep(1)
			state_LR = 1
		elif state_LR == 1:
			GPIO.output(6, 0)
			GPIO.output(13, 1)
			if not GPIO.input(20):
				state_LR = 0
		elif state_LR == 0:
			GPIO.output(6, 0)
			GPIO.output(13, 0)
			left_stop = True
		else:
			print 'State_LR Invalid'
		if backward_stop and left_stop:
			break

def move(x, y, state_LR, state_FB):
	print 'moving'
	isX, isY = False, False


	if x < CLAW_P[0]-e:
		# left
		dlr = 'left'

	elif x > CLAW_P[0]+e:
		# right
		dlr = 'right'
	else:
		dlr = 'stop'
		isX = True

	if y < CLAW_P[1]-e:
		# backward
		dfb = 'backward'

	elif y > CLAW_P[1]+e:
		# forward
		dfb = 'forward'
	else:
		dfb = 'stop'
		isY = True

	state_LR, state_FB = state_transition(state_LR, state_FB, dlr, dfb)

	return isX, isY, state_LR, state_FB

def state_transition(state_LR, state_FB, dlr, dfb):

	# Forward and Backward
	# motor 1
	if state_FB == 0:
		if GPIO.input(21):
			state_FB = 1
	if state_FB == 1:
		if dfb == 'forward' and not GPIO.input(21):
			state_FB = 0
		if dfb == 'backward' and not GPIO.input(21):
			state_FB = 2
	if state_FB == 2:
		if GPIO.input(21):
			state_FB = 1

	if dfb == 'forward' and state_FB != 0: # forward
		GPIO.output(19, 1)
		GPIO.output(26, 0)
		print 'forward'
	elif 'backward' and state_FB != 2: # Backward
		GPIO.output(19, 0)
		GPIO.output(26, 1)
		print 'backward'

	else:
		GPIO.output(19, 0)
		GPIO.output(26, 0)

	# Left and Right
	#motor 2
	if state_LR == 0:
		if GPIO.input(20):
			state_LR = 1
	if state_LR == 1:
		if dlr == 'left' and not GPIO.input(20):
			state_LR = 0
		if dlr == 'right' and not GPIO.input(20):
			state_LR = 2
	if state_LR == 2:
		if GPIO.input(20):
			state_LR = 1
	if dlr == 'left' and state_LR != 0:	# Left
		GPIO.output(6, 0)
		GPIO.output(13, 1)
		print 'Left'
	elif dlr == 'right' and state_LR != 2:	# Right
		GPIO.output(6, 1)
		GPIO.output(13, 0)
		print 'Right'
	else:
		GPIO.output(6, 0)
		GPIO.output(13, 0)
	return state_LR, state_FB

def drop(state_LR, state_FB):
	left_stop, backward_stop = False, False
	while True:

		if state_FB == 0:
			GPIO.output(19, 0)
			GPIO.output(26, 1)
			time.sleep(1)
			state_FB = 1
		elif state_FB == 1:
			GPIO.output(19, 0)
			GPIO.output(26, 1)
			if not GPIO.input(21):
				state_FB = 2
		elif state_FB == 2:
			GPIO.output(19, 0)
			GPIO.output(26, 0)
			backward_stop = True
		else:
			print 'State_FB Invalid'

		if state_LR == 2:
			GPIO.output(6, 0)
			GPIO.output(13, 1)
			time.sleep(1)
			state_LR = 1
		elif state_LR == 1:
			GPIO.output(6, 0)
			GPIO.output(13, 1)
			if not GPIO.input(20):
				state_LR = 0
		elif state_LR == 0:
			GPIO.output(6, 0)
			GPIO.output(13, 0)
			left_stop = True
		else:
			print 'State_LR Invalid'
		if backward_stop and left_stop:
			break
	GPIO.output(17, 1)
	GPIO.output(27, 0)
	time.sleep(1.5)
	GPIO.output(17, 0)
	GPIO.output(27, 1)
	time.sleep(2)
	GPIO.output(17, 0)
	GPIO.output(27, 0)

def capture(color, state_LR, state_FB):

	cap = cv2.VideoCapture(0)
	if color == 'green':
		lower = np.array([29,86,6])
		upper = np.array([64,255,255])

	elif color == 'yellow':
		lower = np.array([15,100,110])
		upper = np.array([30,255,255])

	elif color == 'blue':
		lower = np.array([90,50,40])
		upper = np.array([130,255,255])


	try:
		while(True):

			# Take each frame
			_, frame = cap.read()

			# Convert BGR to HSV
			hsv = cv2.cvtColor(frame, cv2.COLOR_BGR2HSV)

			mask = cv2.inRange(hsv, lower, upper)

			# Bitwise-AND mask and original image
			res = cv2.bitwise_and(frame,frame, mask = mask)

			a, b = np.where(mask == 255)

			if len(a) > 5000:
				x, y = np.average(a), np.average(b)
				cv2.circle(res,(int(y), int(x)), 5, (0,0,255), 5)
				isX, isY, state_LR, state_FB = move(x, y, state_LR, state_FB)

				if (isX or state_LR != 1) and (isY or state_FB != 1):
					print 'Capturing....'

					GPIO.output(6, 0)
					GPIO.output(13, 0)
					GPIO.output(19, 0)
					GPIO.output(26, 0)
					break
			else:
				print 'No detection'
				GPIO.output(6, 0)
				GPIO.output(13, 0)
				GPIO.output(19, 0)
				GPIO.output(26, 0)
				break


#			cv2.imshow('frame',frame)
#			cv2.imshow('mask',mask)
#			cv2.imshow('res',res)

#			k = cv2.waitKey(5) & 0xFF
#			if k == 27:
#				return state_LR, state_FB
#				break
	except KeyboardInterrupt:
		GPIO.cleanup()

	GPIO.output(17, 1)
	GPIO.output(27, 0)
	time.sleep(3.75)
	GPIO.output(17, 0)
	GPIO.output(27, 1)
	time.sleep(3.75)
	GPIO.output(17, 0)
	GPIO.output(27, 0)

	cv2.destroyAllWindows()
	return state_LR, state_FB

def first_move():
	GPIO.output(19, 1)
	GPIO.output(26, 0)
	time.sleep(3.5)
	GPIO.output(19, 0)
	GPIO.output(26, 0)

def search(color):
	state_LR = 0
	cap = cv2.VideoCapture(0)
	if color == 'green':
		lower = np.array([29,86,6])
		upper = np.array([64,255,255])

	elif color == 'yellow':
		lower = np.array([15,100,110])
		upper = np.array([30,255,255])

	elif color == 'blue':
		lower = np.array([90,50,40])
		upper = np.array([130,255,255])

	GPIO.output(6, 1)
	GPIO.output(13, 0)

	try:
		while(True):
			if state_LR == 0 and GPIO.input(20):
				state_LR = 1
			if state_LR == 1 and not GPIO.input(20):
				state_LR = 2

			_, frame = cap.read()
			# Convert BGR to HSV
			hsv = cv2.cvtColor(frame, cv2.COLOR_BGR2HSV)

			mask = cv2.inRange(hsv, lower, upper)

			# Bitwise-AND mask and original image
			res = cv2.bitwise_and(frame,frame, mask = mask)

			a, b = np.where(mask == 255)
			if len(a) > 5000:
				time.sleep(0.2)
				GPIO.output(6, 0)
				GPIO.output(13, 0)
				return True, state_LR
			if state_LR == 2:
				GPIO.output(6, 0)
				GPIO.output(13, 0)
				return False, state_LR
#			cv2.imshow('frame',frame)
#			cv2.imshow('mask',mask)
#			cv2.imshow('res',res)

#			k = cv2.waitKey(5) & 0xFF
#			if k == 27:
#				break

	except KeyboardInterrupt:
		GPIO.cleanup()

def run():

	GPIO.setmode(GPIO.BCM)

	#to L293D to FW-BW (motor1)
	GPIO.setup(19, GPIO.OUT)
	GPIO.setup(26, GPIO.OUT)

	#to L293D to L-R (motor2)
	GPIO.setup(6, GPIO.OUT)
	GPIO.setup(13, GPIO.OUT)

	#to L293D to U-D (motor3)
	GPIO.setup(17, GPIO.OUT)
	GPIO.setup(27, GPIO.OUT)

	#limit switch
	GPIO.setup(20, GPIO.IN, pull_up_down=GPIO.PUD_DOWN) # motor 2 L-R
	GPIO.setup(21, GPIO.IN, pull_up_down=GPIO.PUD_DOWN) # motor 1 FW-BW

	WHITE = 255, 255, 255
	BLACK = 0,0,0
	screen_size = [320, 240]
	screen = pygame.display.set_mode(screen_size)
	screen.fill(BLACK)

	my_font = pygame.font.Font(None, 30)
	my_buttons = {'restart':(80,220), 'quit':(240, 220), 'Keroppi': (160, 100), 'Winnie the Pooh': (160, 140), 'Doraemon': (160, 180), 'Choose Your Doll': (160, 40)}

	for my_text, text_pos in my_buttons.items():
		text_surface = my_font.render(my_text, True, WHITE)
		rect = text_surface.get_rect(center=text_pos)
		screen.blit(text_surface, rect)

	# Size and position of each button
	quit_size = my_font.size('quit')
	quit_center = my_buttons['quit']
	restart_size = my_font.size('restart')
	restart_center = my_buttons['restart']
	keroppi_size = my_font.size('Keroppi')
	keroppi_center = my_buttons['Keroppi']
	winnie_size = my_font.size('Winnie the Pooh')
	winnie_center = my_buttons['Winnie the Pooh']
	doraemon_size = my_font.size('Doraemon')
	doraemon_center = my_buttons['Doraemon']

	pygame.display.flip()

	isQuit = False
	while(True):

		for event in pygame.event.get():

			# Check if there is a mouse-click event
			if (event.type is MOUSEBUTTONDOWN):
				pos = pygame.mouse.get_pos()
			elif (event.type is MOUSEBUTTONUP):
				pos = pygame.mouse.get_pos()
				x, y = pos

				# Check if quit button clicked
				# If yes, exit the program
				if (quit_center[1] - quit_size[1]/2.) <= y <= (quit_center[1] + quit_size[1]/2.):
					if (quit_center[0] - quit_size[0]/2.) <= x <= (quit_center[0] + quit_size[0]/2.):
						print 'Quit By Hand Mode...'
						go_back(state_LR, state_FB)
						isQuit = True

				if (restart_center[1] - restart_size[1]/2.) <= y <= (restart_center[1] + restart_size[1]/2.):
					if (restart_center[0] - restart_size[0]/2.) <= x <= (restart_center[0] + restart_size[0]/2.):
						print 'Restart By Hand Mode...'
						go_back(state_LR, state_FB)
						state_LR, state_FB = 0, 2

				if (keroppi_center[1] - keroppi_size[1]/2.) <= y <= (keroppi_center[1] + keroppi_size[1]/2.):
					if (keroppi_center[0] - keroppi_size[0]/2.) <= x <= (keroppi_center[0] + keroppi_size[0]/2.):
						print 'Start capture Keroppi'
						first_move()
						isfound, state_LR = search('green')
						if isfound:
							state_LR, state_FB = capture('green', state_LR, 1)
							drop(state_LR, state_FB)
						else:
							print 'The object cannot be found'
							go_back(state_LR, 1)

				if (winnie_center[1] - winnie_size[1]/2.) <= y <= (winnie_center[1] + winnie_size[1]/2.):
					if (winnie_center[0] - winnie_size[0]/2.) <= x <= (winnie_center[0] + winnie_size[0]/2.):
						print 'Start capture Winnie the Pooh'
						first_move()
						isfound, state_LR = search('yellow')
						if isfound:
							state_LR, state_FB = capture('yellow', state_LR, 1)
							drop(state_LR, state_FB)
						else:
							print 'The object cannot be found'
							go_back(state_LR, 1)

				if (doraemon_center[1] - doraemon_size[1]/2.) <= y <= (doraemon_center[1] + doraemon_size[1]/2.):
					if (doraemon_center[0] - doraemon_size[0]/2.) <= x <= (doraemon_center[0] + doraemon_size[0]/2.):
						print 'Start capture Doraemon'
						first_move()
						isfound, state_LR = search('blue')
						if isfound:
							state_LR, state_FB = capture('blue', state_LR, 1)
							drop(state_LR, state_FB)
						else:
							print 'The object cannot be found'
							go_back(state_LR, 1)
		if isQuit:
			break
	GPIO.cleanup()