A Smart Door System
ECE 5725 course project
By Han Shi(hs978) & Xinghui Hu(xh344)
12/06/2018
Demonstration Video
Introduction
Nowadays, every part in our home becomes “smart”. Home security plays a crucial role in our daily lives. Meanwhile, people become “lazy” and always try to make their lives easier. So we design a smart door system based on RPI. It allows people access the door using their passwords, voices and faces. When someone ‘knocks’ the door, our system will automatically send a email with a link of a website to owner’s email address. The door sends high resolution and low delay live security monitor video to that specific website. Owner can access the video streaming by login to a website. Owner also can control the door remotely on the website. What's more, our smart door system can connect with a mobile phone app called wechat. Owner can use the wechat to remote control the smart door system. And in each steps, our door can give user an audio instruction.
Project Objective:
- User friendly GUI with 11 interfaces with real time local weather, place and time information.
- Audio output instruction.
- Facial registration and facial recognition system.
- Voice recognition and control system.
- Password setting changing and login system.
- Remotely controlling door system through a web interface.
- Sending a high resolution and low delay real-time security video into a specific web.
- Connecting the door system with wechat. Owner can use wechat to control the system remotely.
Design Overview
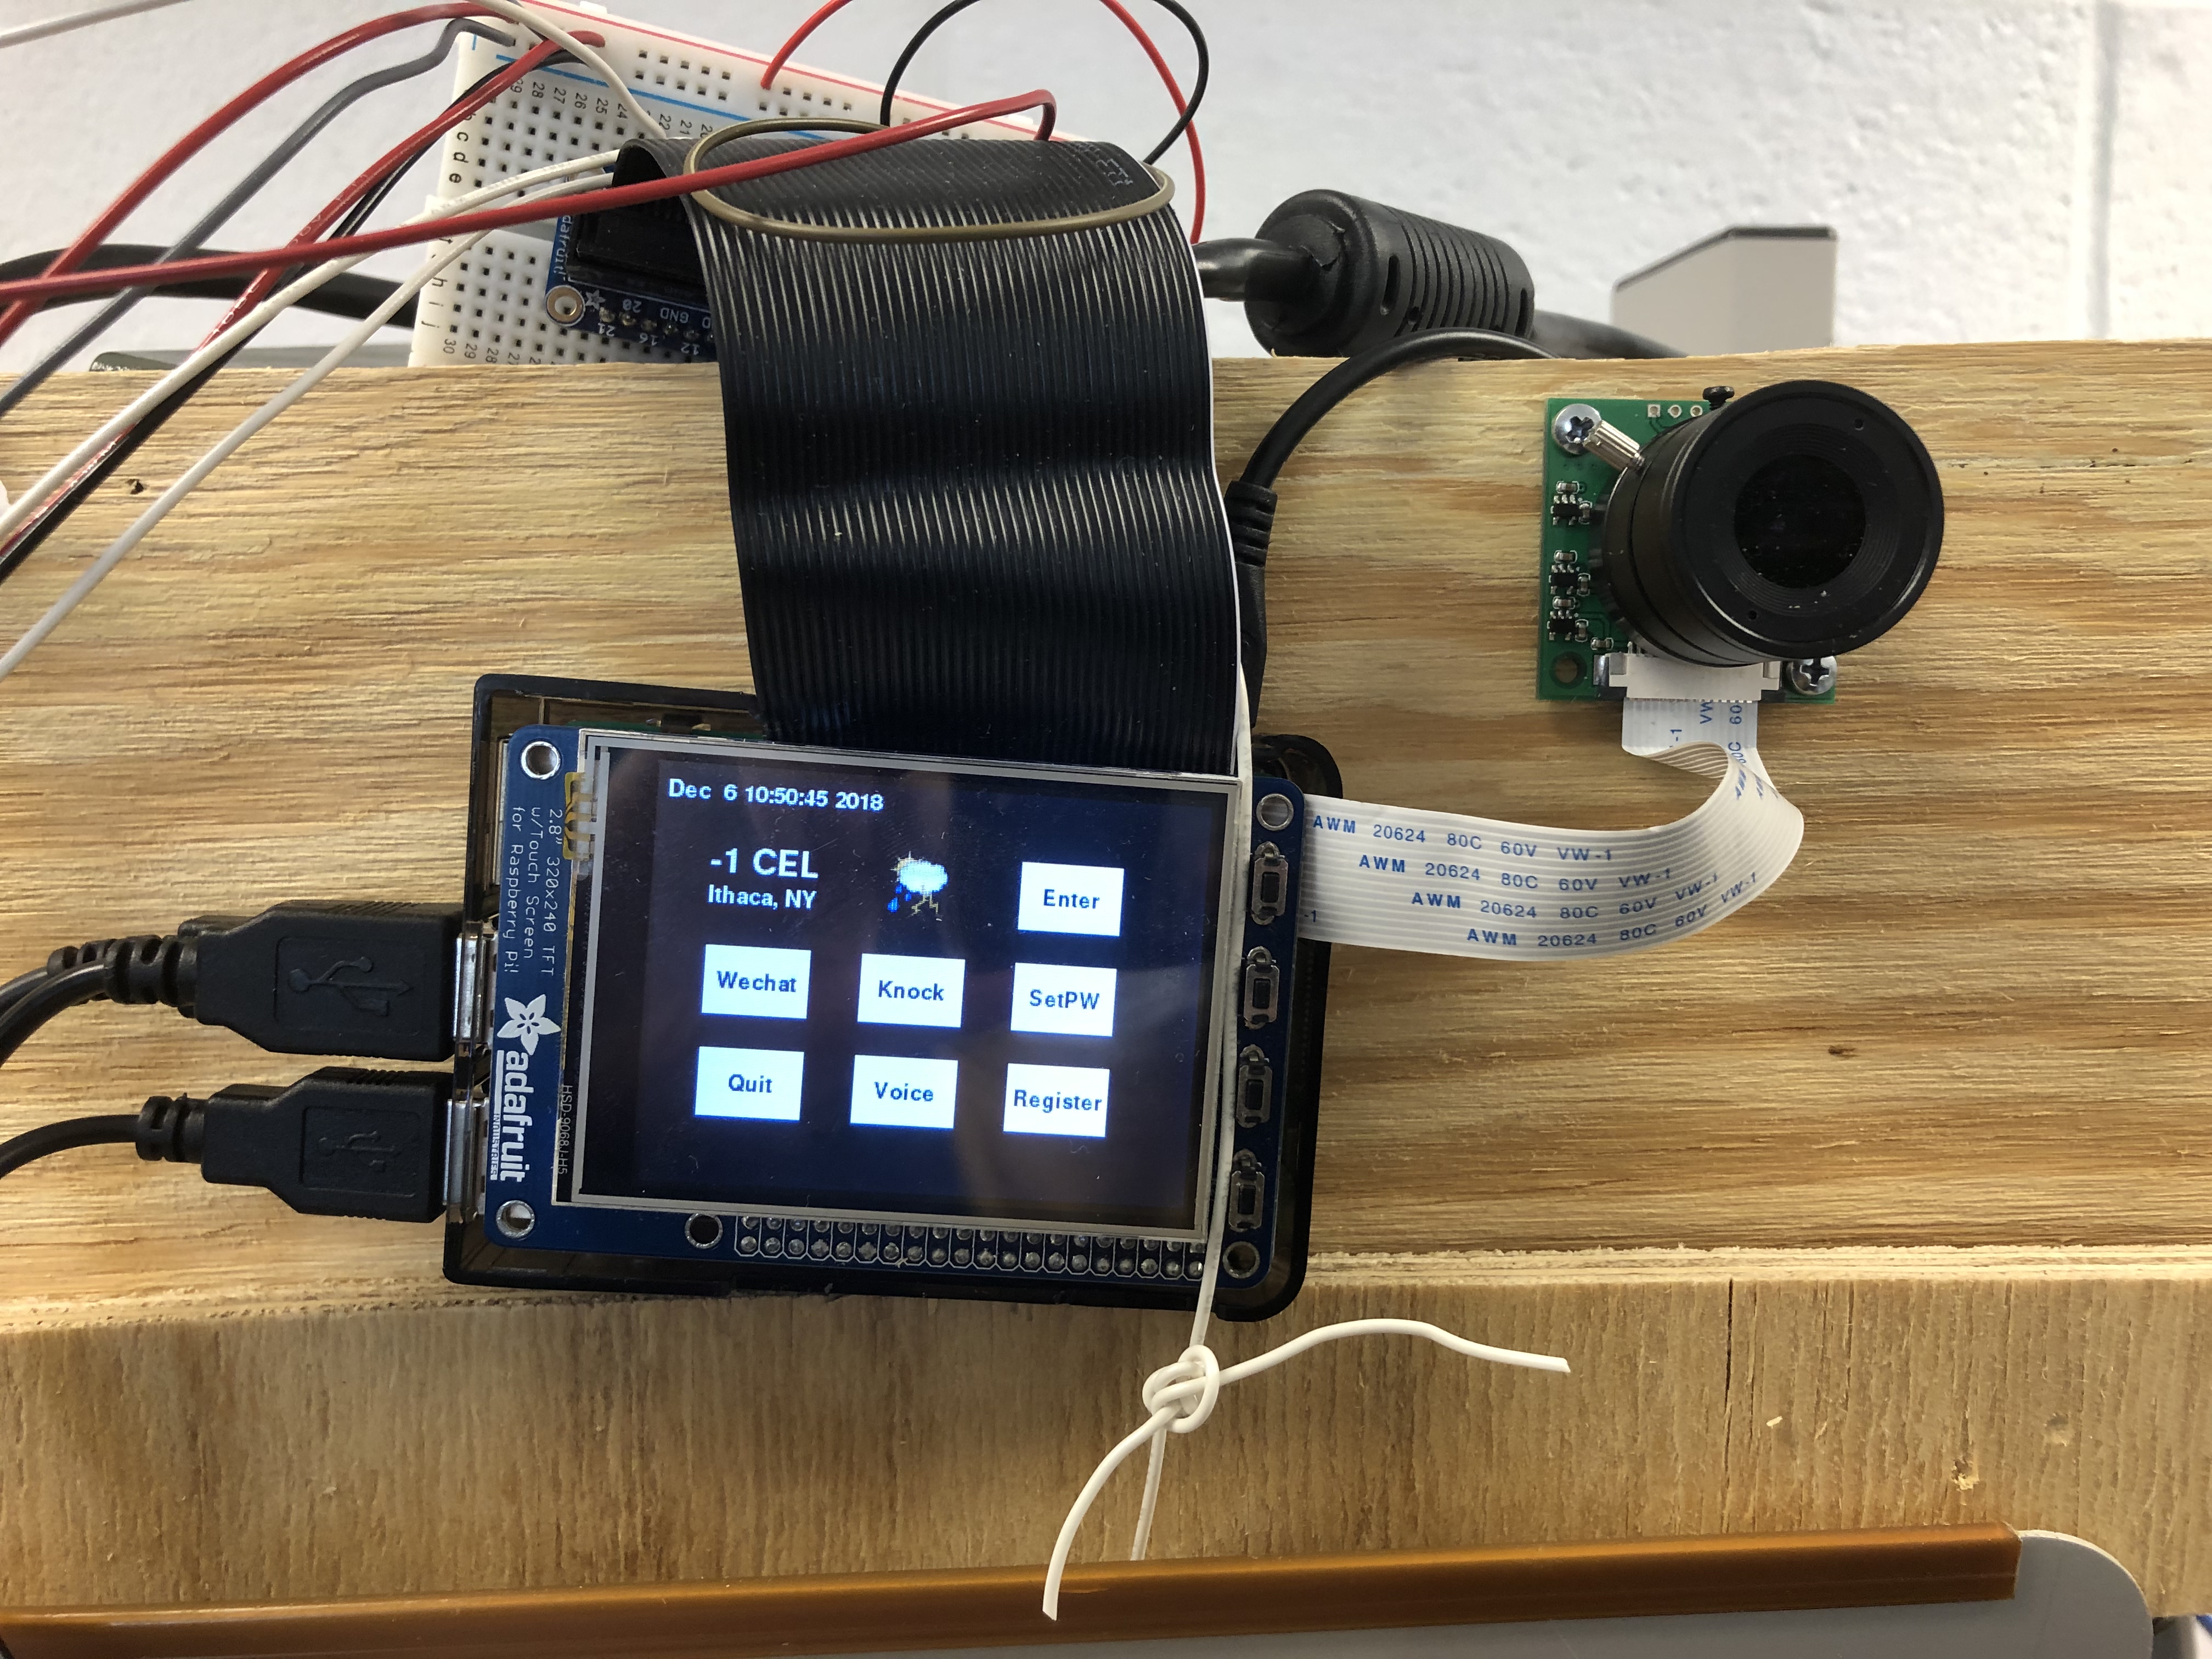
Figure 1: GUI & menu design
System starts at our main menu, figure1(left) shows. The time, weather and degree are all acquired from the internet in real time. Then as is shown on the Pi-TFT screen, user has multiple ways to open the door: facial recognition, voice recognition, Web('Knock' button on the screen) and Wechat, in which Web and Wechat needs the internet and the permission of the owner while ficial and voice recognition are both offline. If facial recognition doesn't succeed, user can type password. If the password is correct, then the user can also get the door open. User can also set a new password by clicking 'SetPW' button.Then he needs to type the old password first to set the new password. Also, if the user knows the password but is not registered(face can't be recognized), he can register by clicking 'register' button, then the system will automatically take 80 pictures of the user and retrain the recignition model to 'remember' the person. What's more, the system works with audio output which can give users audio instructions and is transferred from text by text->voice engine.
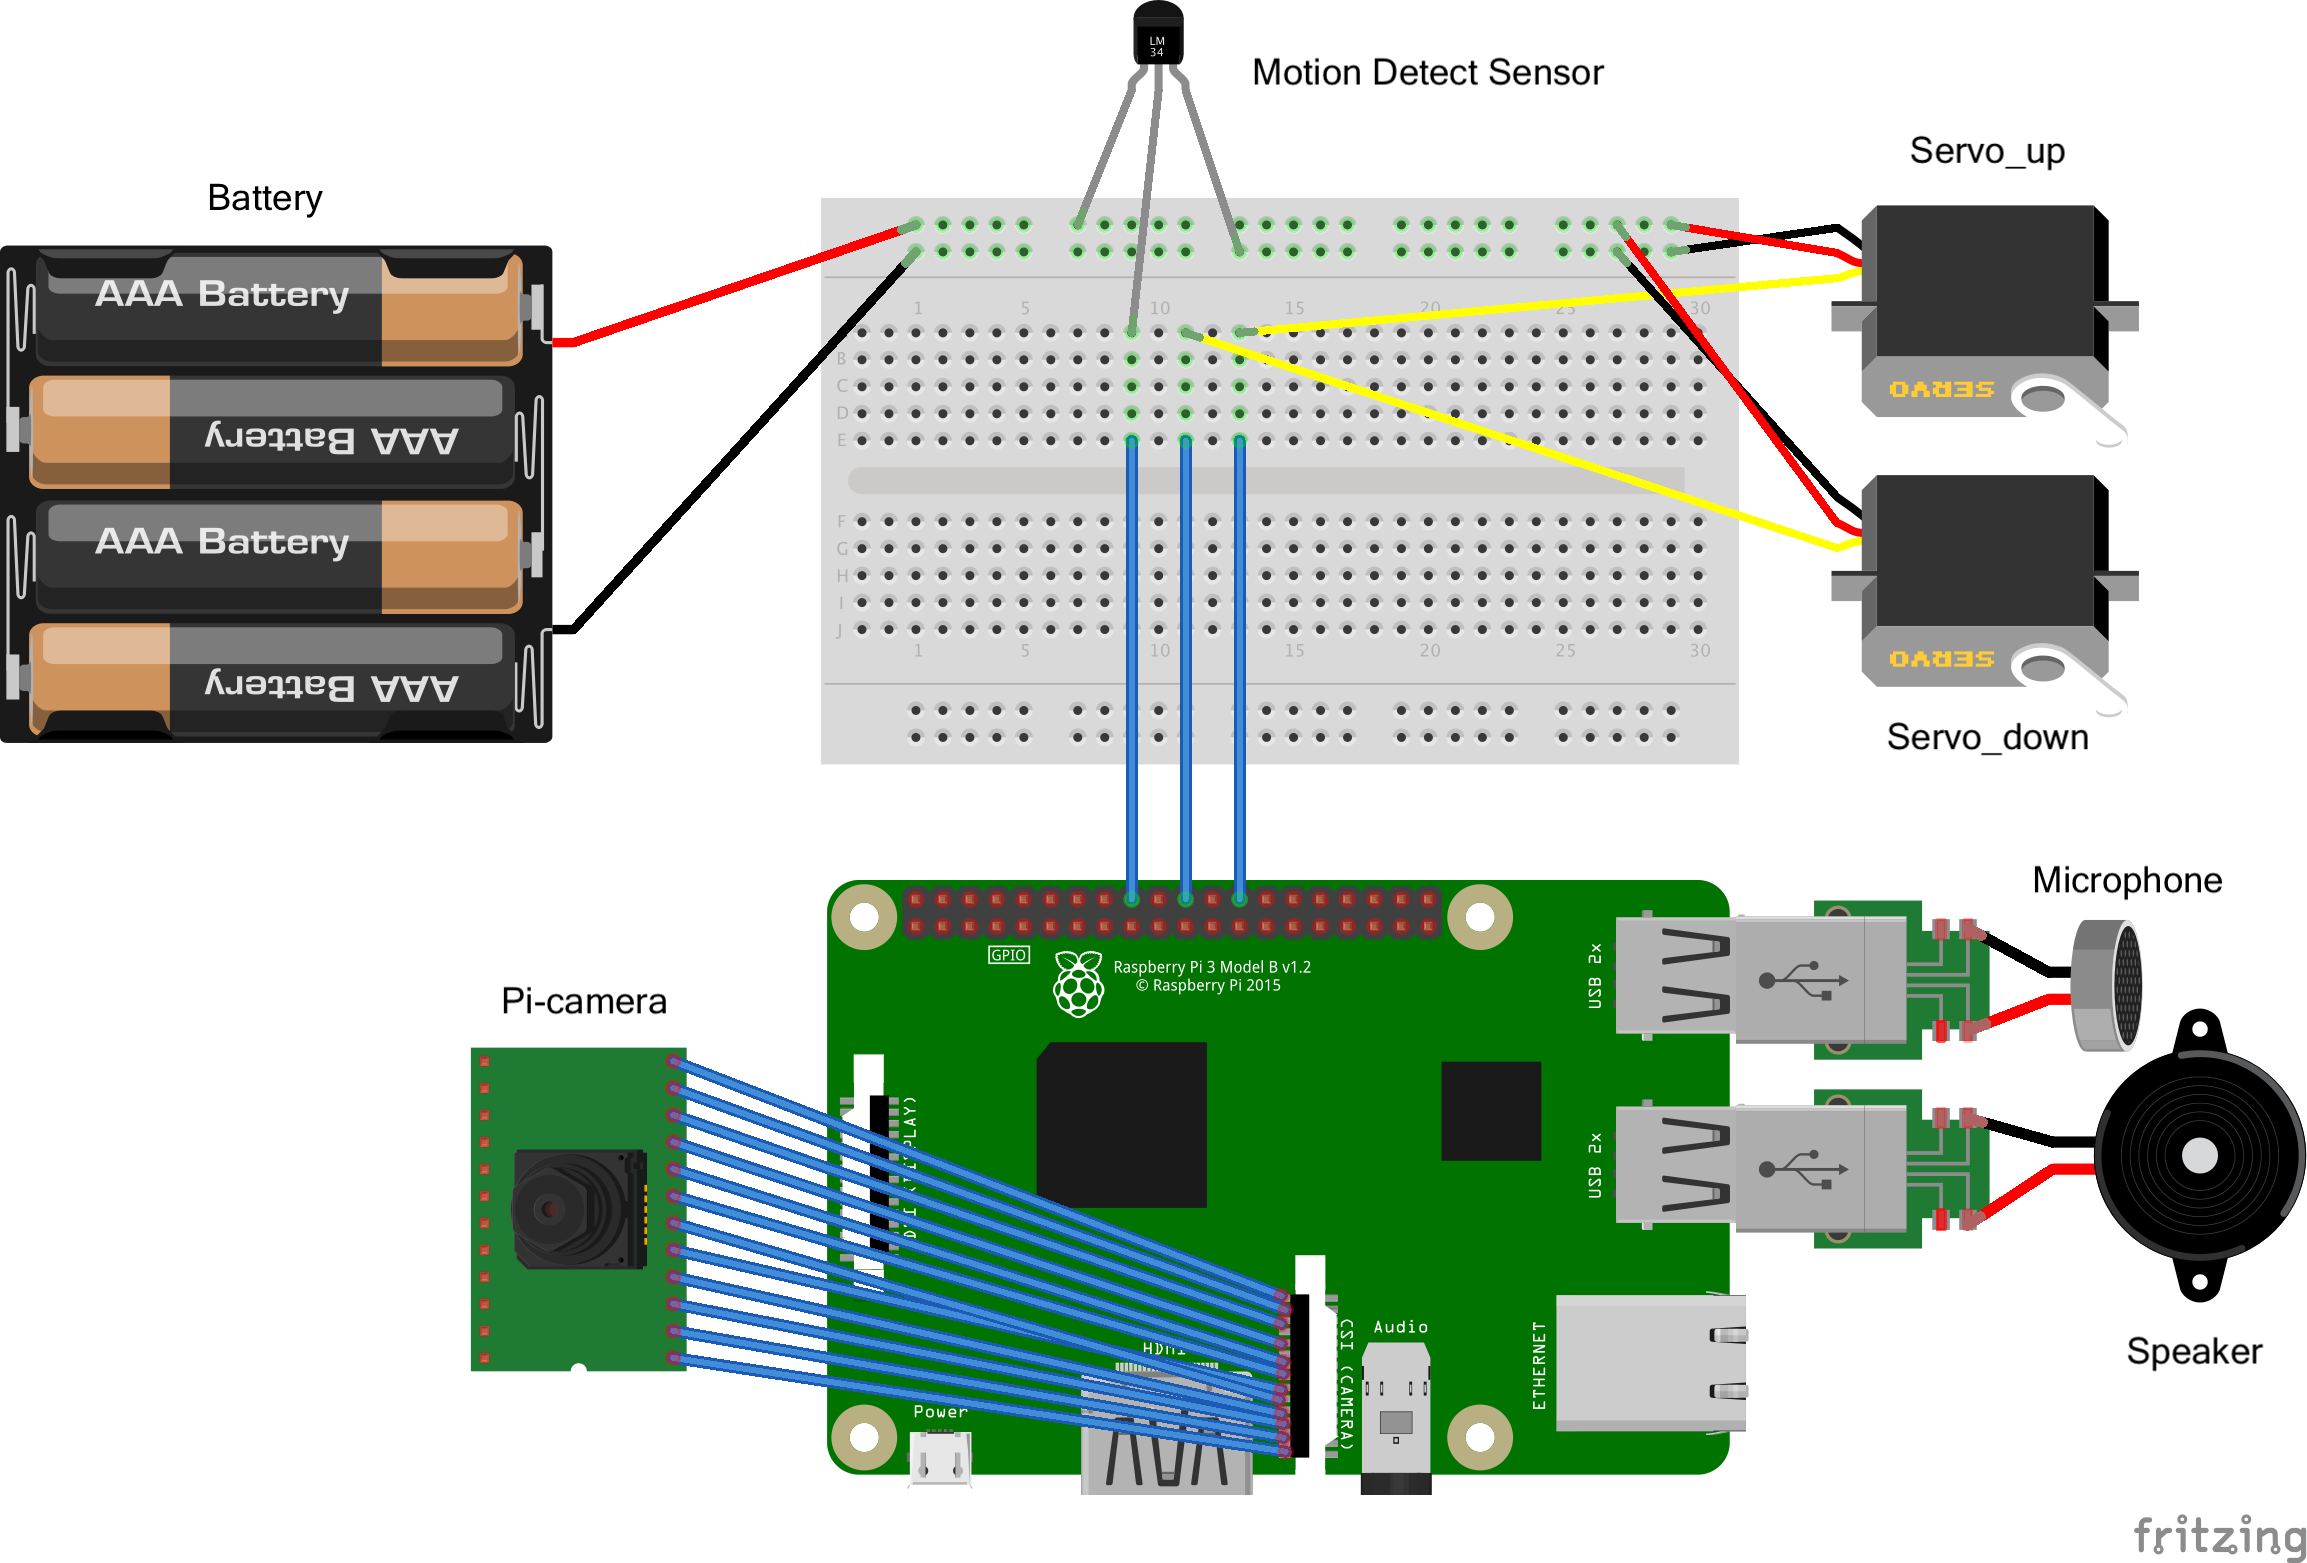
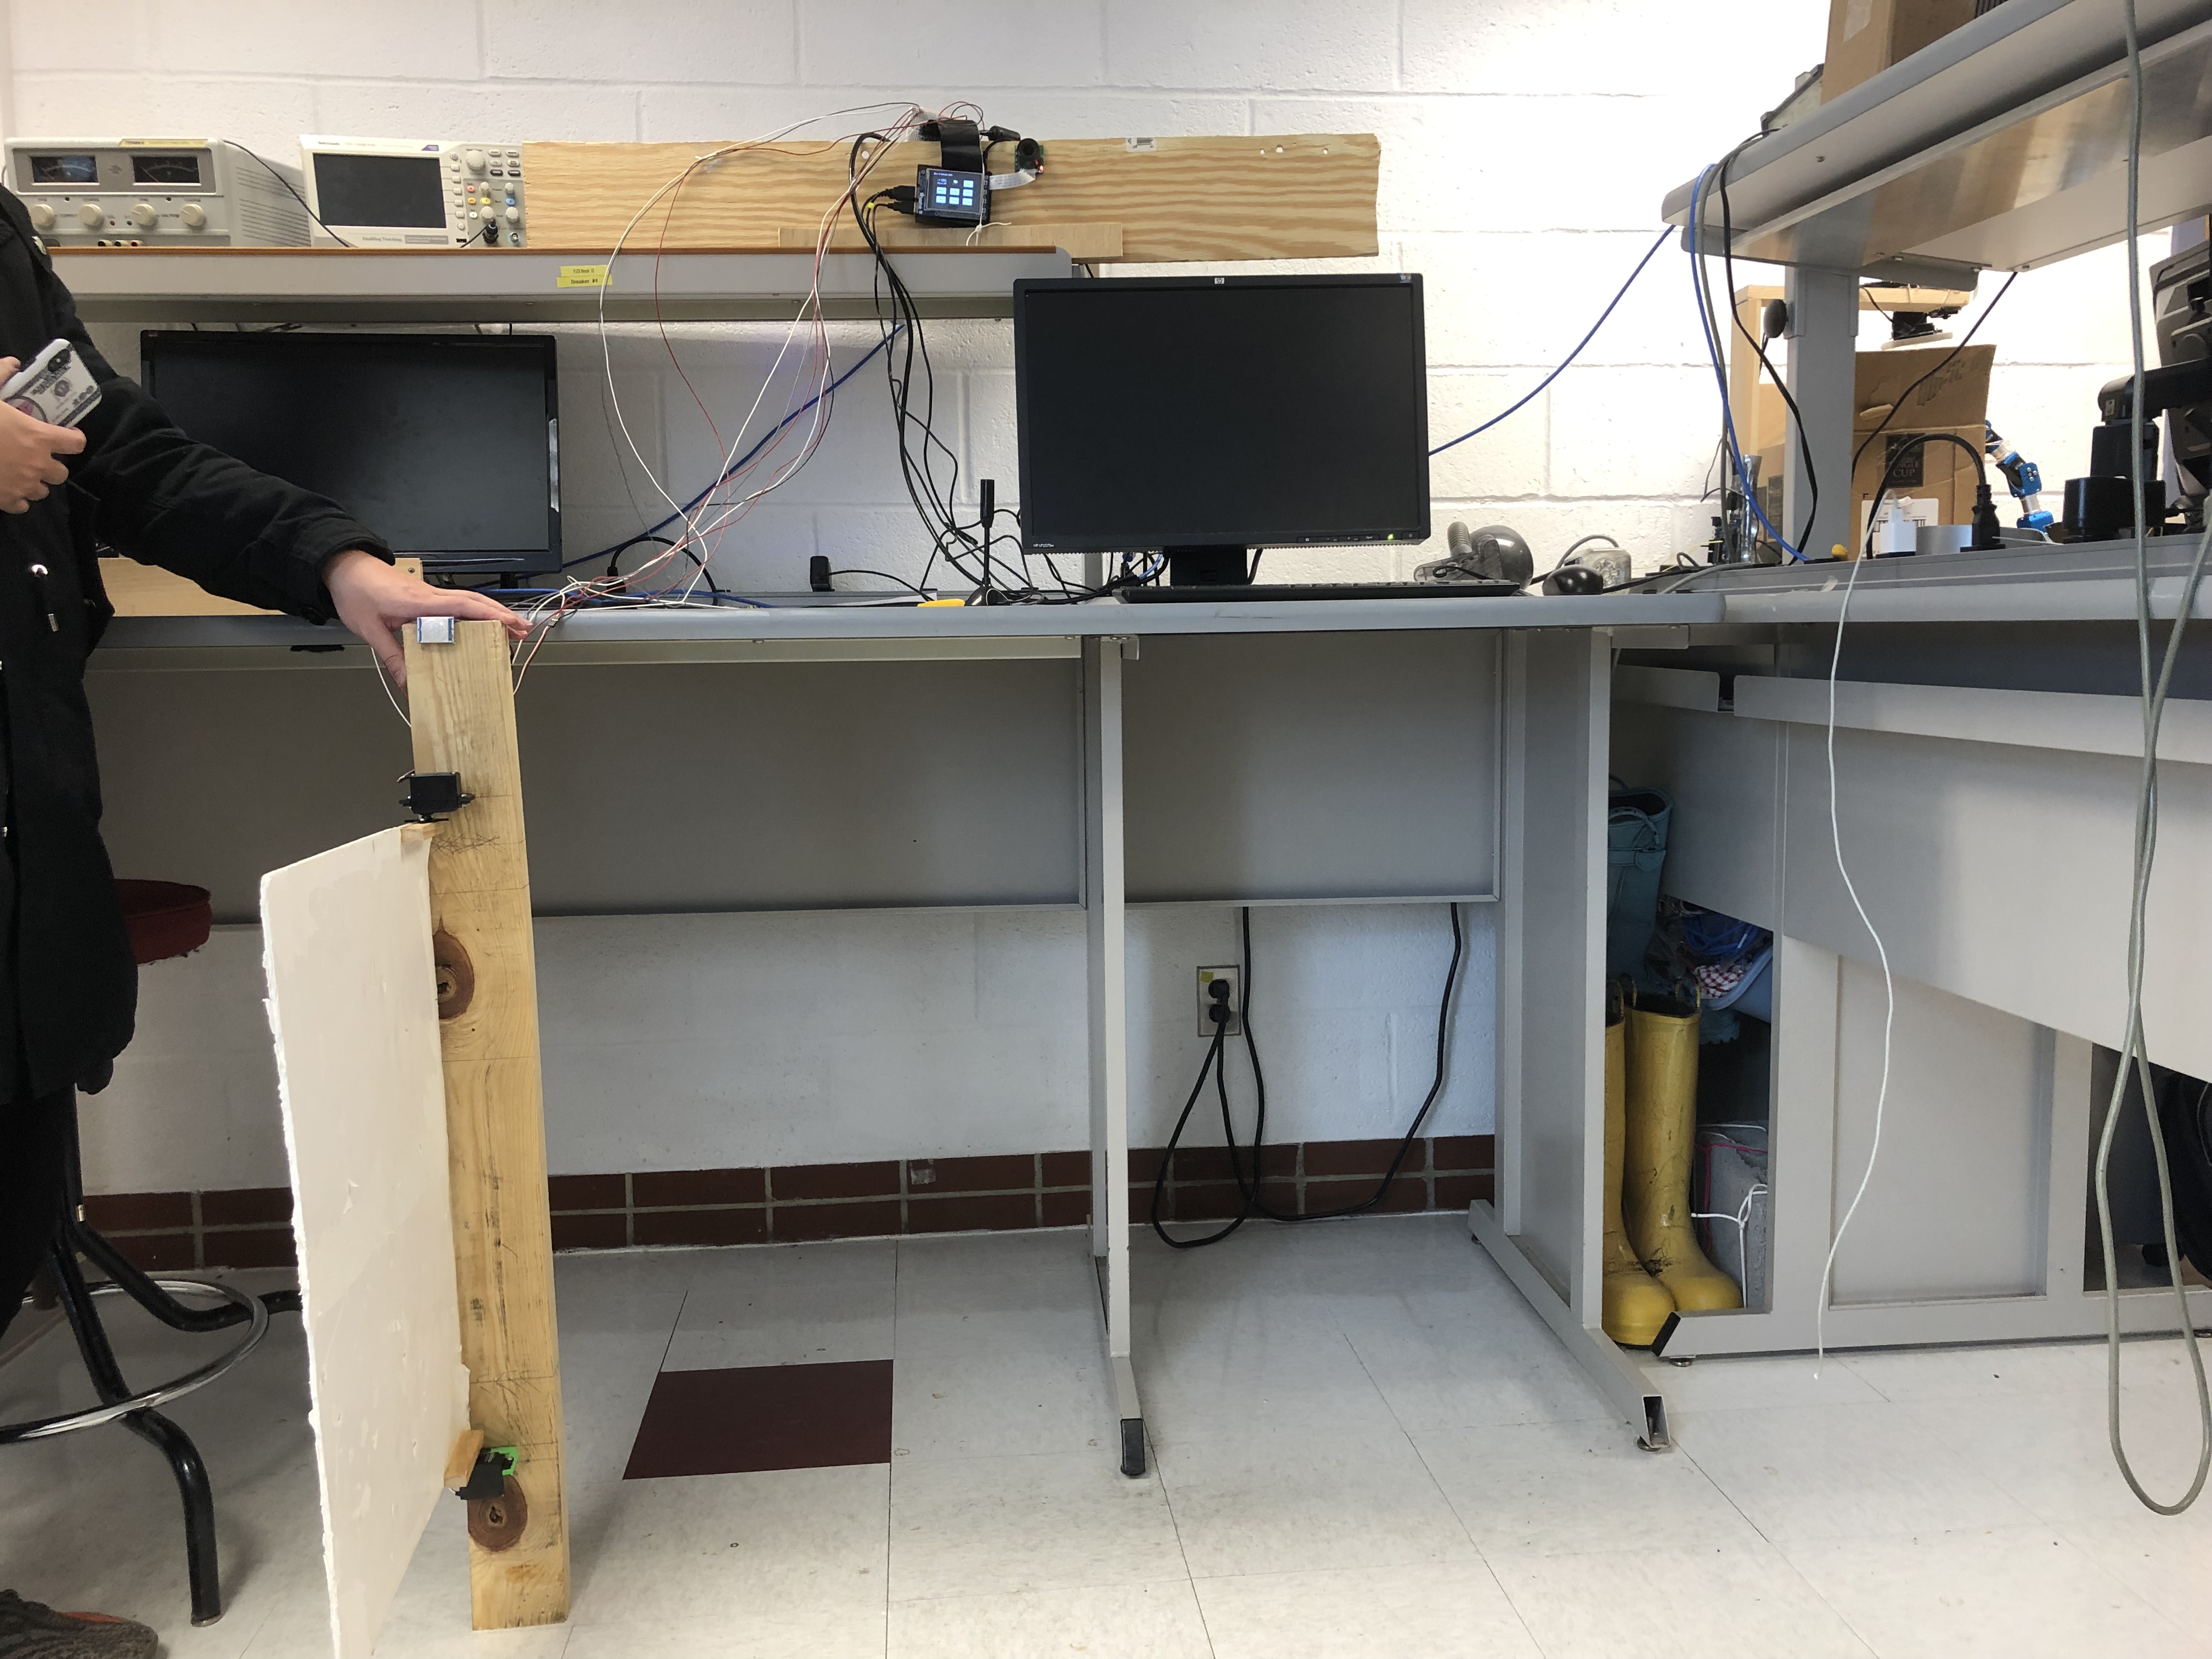
Figure 2: mechanical&wiring design
The wiring and connection of all the parts are shown in the figure2. Two servos are used to control the door. Pi-camera is fixed on a board which is used for simulating the wall with the door. Microphone and speaker are connect with the Pi. A motion detect sensor is fixed above the door. We use it to prevent the door from hitting people. Four batteries are hidden behind the board powering servos.
In the followwing a few sections, we will discuss in detail about the design of each functions of our system.
Design 1: Enter - Face recognition
Face recognition is one of the core parts in our system. Therefore, the performance must be guaranteed. Actually, face recognition can be divided into two parts which are face detection and face recognition.In the detection part, we need to let the computer recognize what is the human faces look like. Face detection is a process of finding out the face area in the image. We use Haar Cascade to detect faces. Haar-like features such as edge features, line features and center-surround features are used and they are inputs of classifiers. Next, our program crops the face images and stores them into specific folder. Those cropped face image are used for training in recognition step.
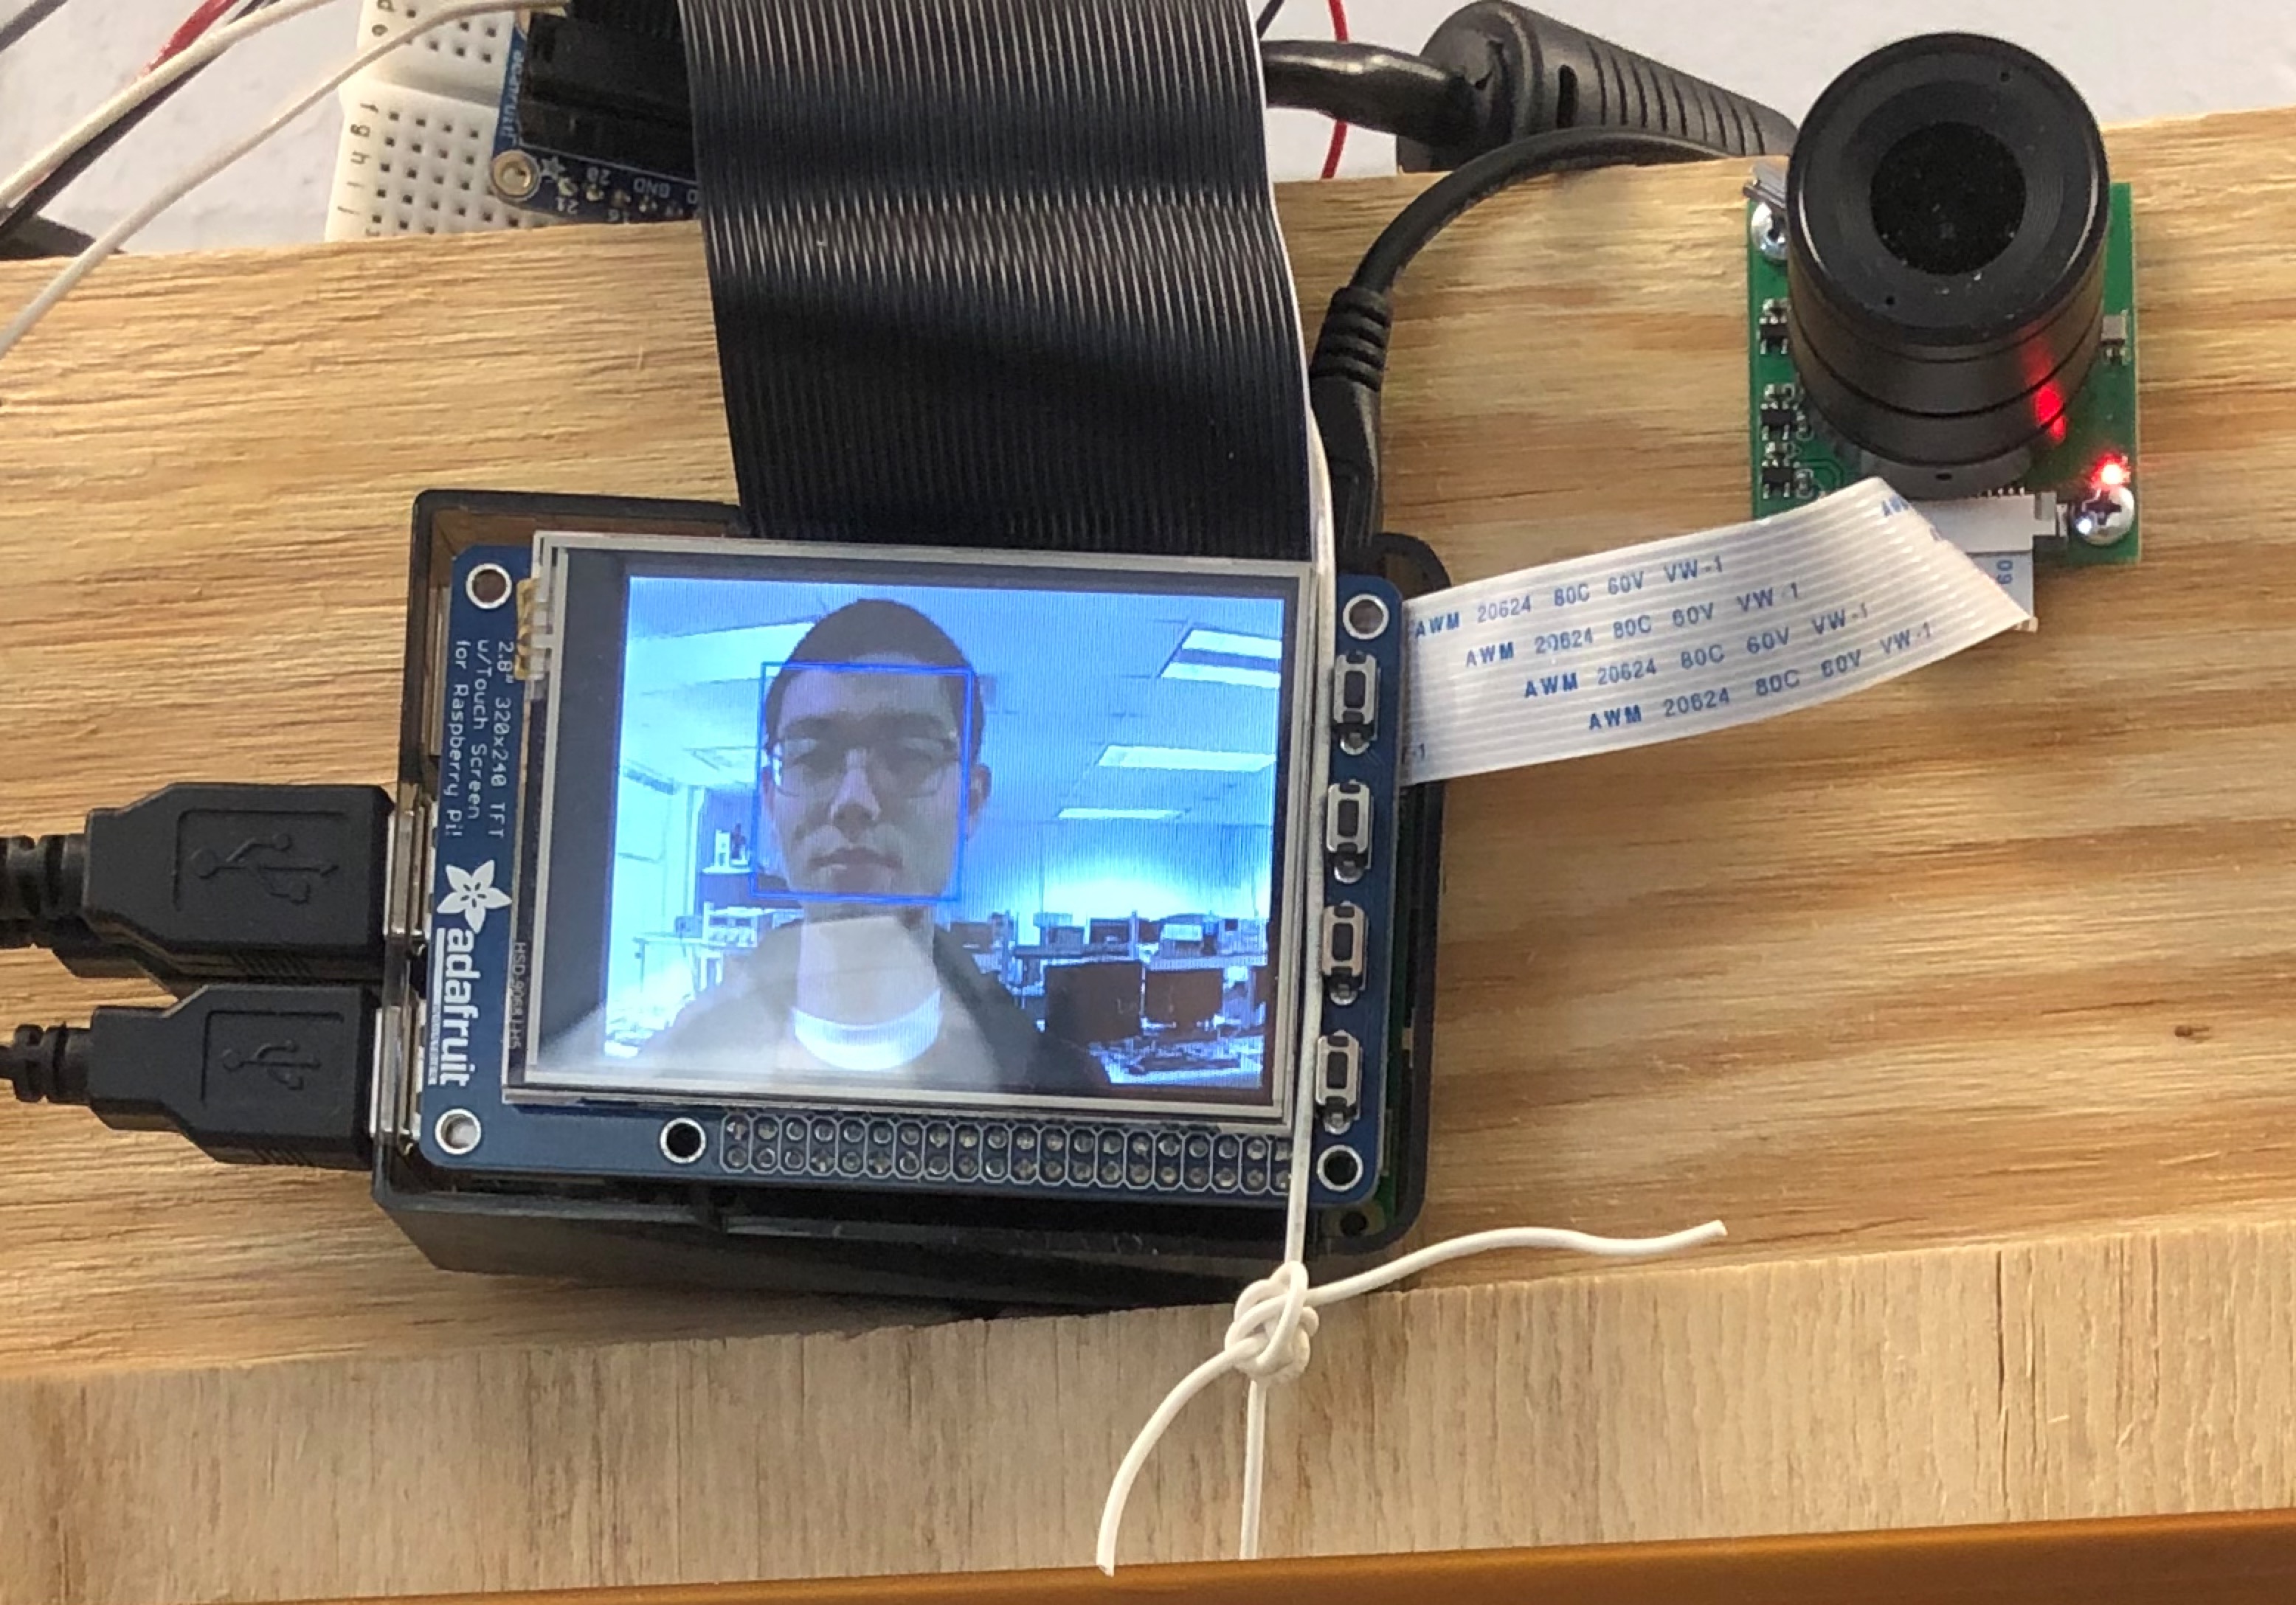
Figure 3: Facial recognition scenario
In recognition part, we use a powerful tool---opencv. It includes a number of libraries which can help us do the facial recognition. There are three major algorithms in the opencv:
1. Eigenfaces
2. Fisherfaces
3. Local Binary Patterns Histograms
After a lot of testings, we find the third algorithm performances best. We first need to train our own model. Our door should only recognize the owners and unable to recognize anyone else. We have 200 cropped face photos of ourselves and we pass them into our model. We use a function called face_rec funciton to recognize faces. In practice, we set the pygame screen variable global in the function and 'blit/flip' each photo in the recognize phase onto the screen.
If face recognition is successful, the door will open. The corresponding GUI is show in figure 4(left). We use the opend() and closed()funcitons to make the door open by running servos in opposite directions. Also, we used a motion detect sensor to avoid the door from hitting people. If there are motion input when the door is closing. the door would freeze. On the other hand, if the facial recignition part fails, system would enter a password-input interface which requires the user to enter password, as is shown in figure 4(right). Only if the person enters the correct password will the door open.

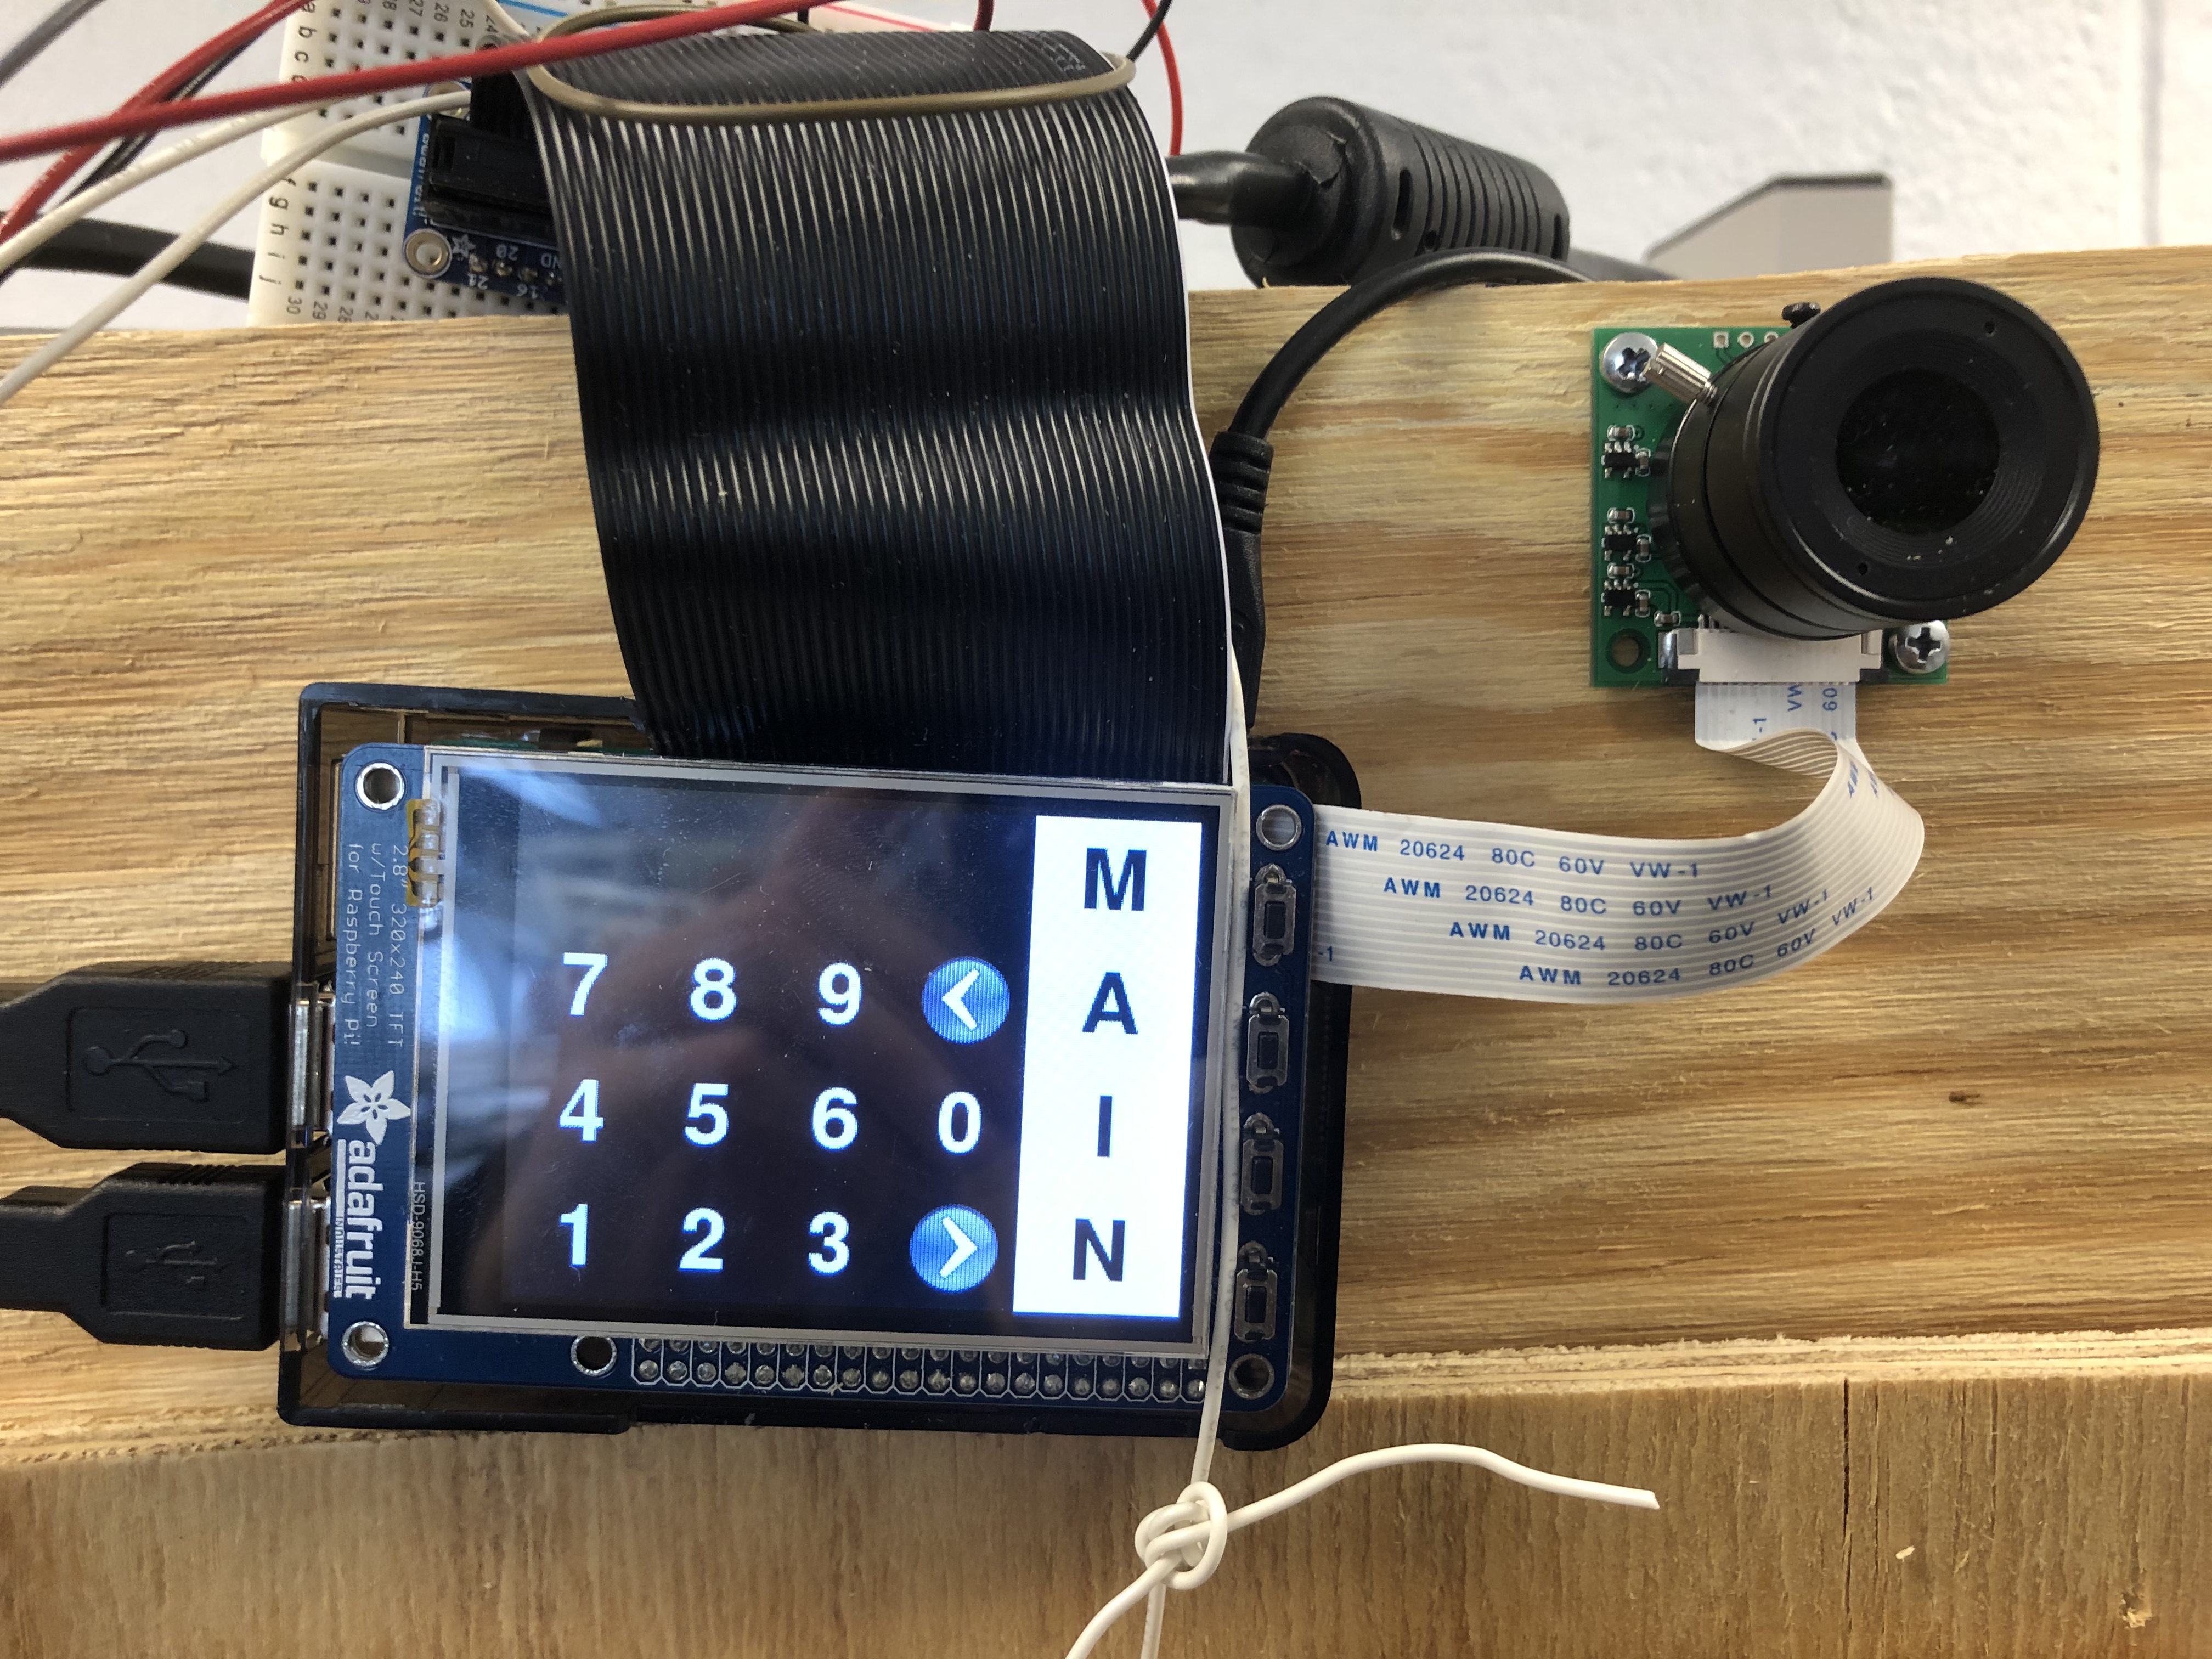
Figure 4: GUI after face recognition successed(left) or fail(right)
Design 2: Register - Model Training
If the house has a new master, we need to make the door remember the person's face so that next time he comes, he can use facial recognition funciton to get into the house. So we set a 'register' funciton in the main menu. After clicking the register button, the system would enter into the GUI in figure 5. It will automatically identify the person face, take pictures of the face and retrain the model.
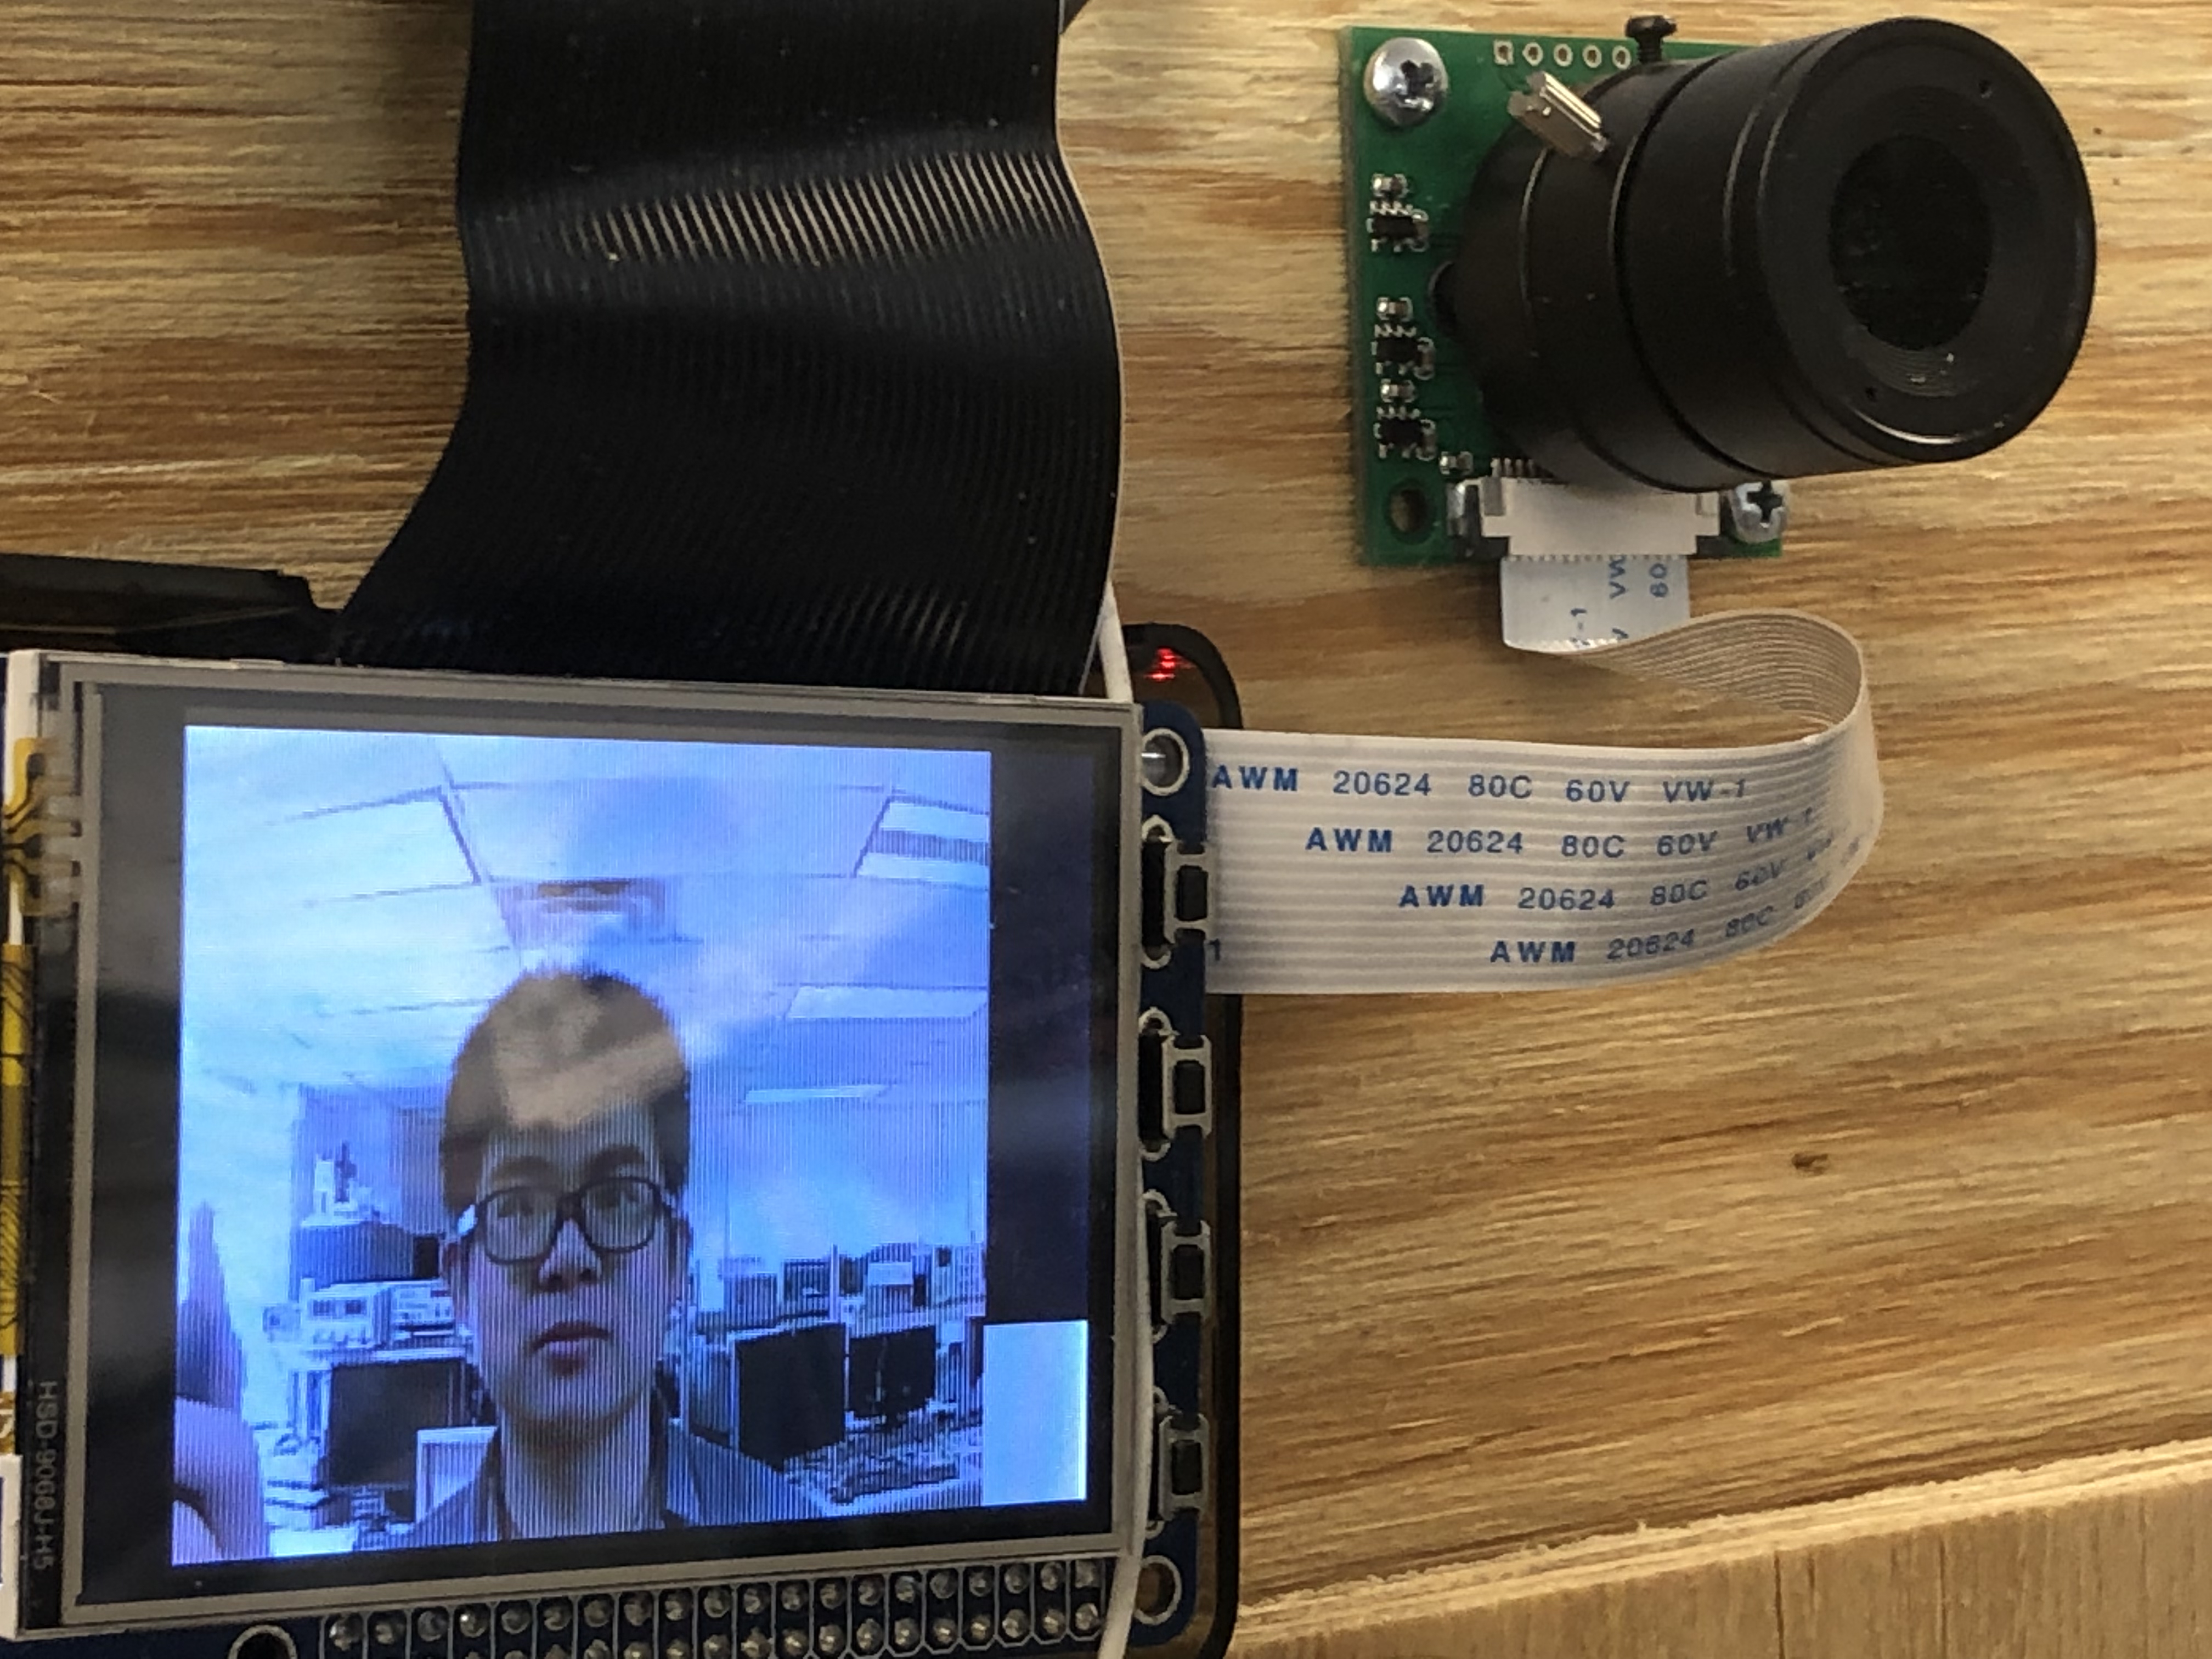
Figure 5: Register scenario
The whole training process needs to take a while. As is shown in figure 4, we have a progress bar on the screen to remind the user of the information gathering process.(Need 80 photos in total) After training, the system can recognize the developers of this project perfectly and open the door for the developers while keep anyone else out. It's achieved by keeping adjusting the identification confidence number. The best confidence number ranges for us is between 45 and 90.
Design 3: Knock - Web Login
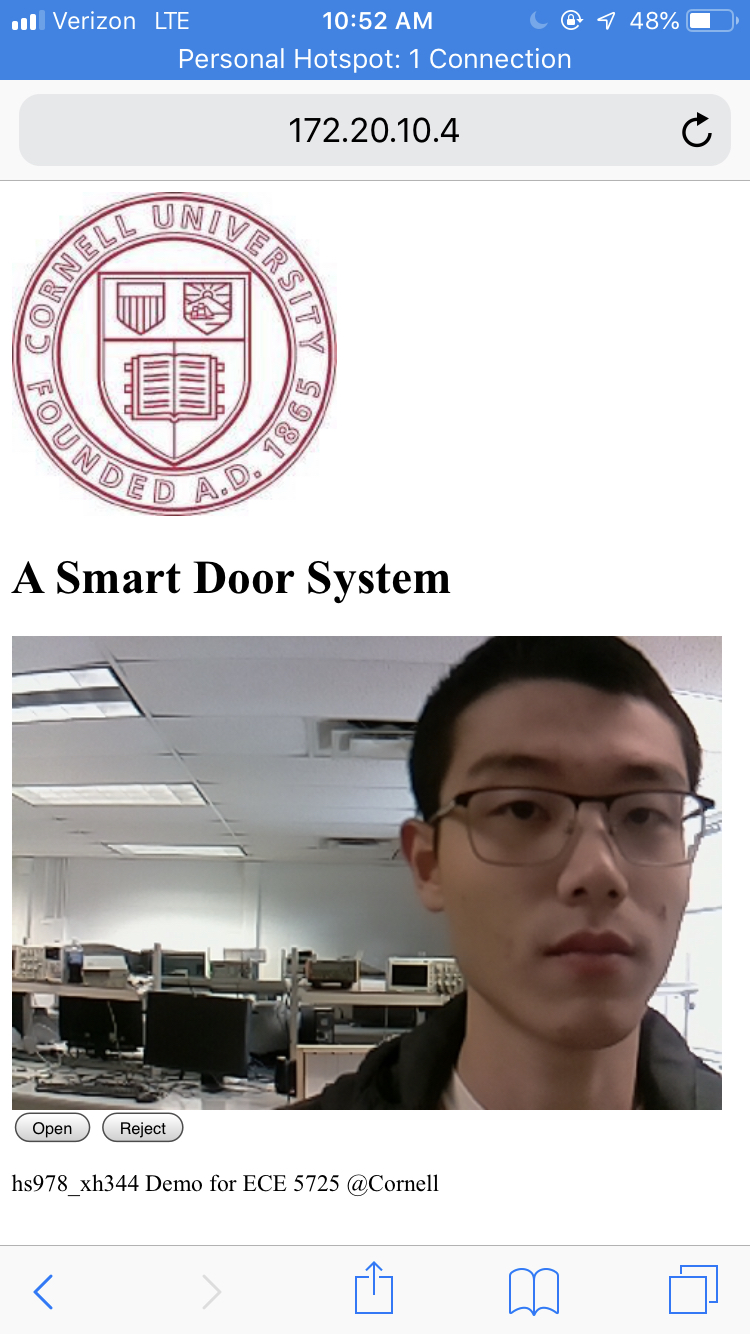
Figure 6: Webpage on phone
We used Flask framework to creat a web server so that the owner who's in the same network with Pi can visit the websit through a web address sent through emial to the owner. The web frontend is written in html and backend is in python. Two main functions of the web are generating video streams from frames acquired from Pi-camera and accepting the owner's response(open/reject) to do corresponding reactions on the Pi.
Generate Video Stream
A basecamera class was built based on Pi-camera to use threads to get frames. An iterator in the class would keep acquiring frames from Pi-camera. Another thread would keep counting time since the web was last accessed. If the time interval exceeds 10 seconds, the thread using Pi-camera would give up its control of the Pi-camera. The flask backend response function was defined to keep asking for response from frontend Web page, thus we defined a video_feed() function putting streaming route to the src attribute of an image tag. On the other hand, the html frontend uses a corresponding url to acquire frames in real time.
Accept response from Web page
To make responses to buttons on the Web page, we redifined the index funciton with method 'GET' and 'POST'. Whenever there's a response from the webpage, the index function would do cooresponding actions(set the status to decide where to go in the GUI and jump out of the Web backend recall funciton).
Send E-mail - sub-function of Knock,Knock
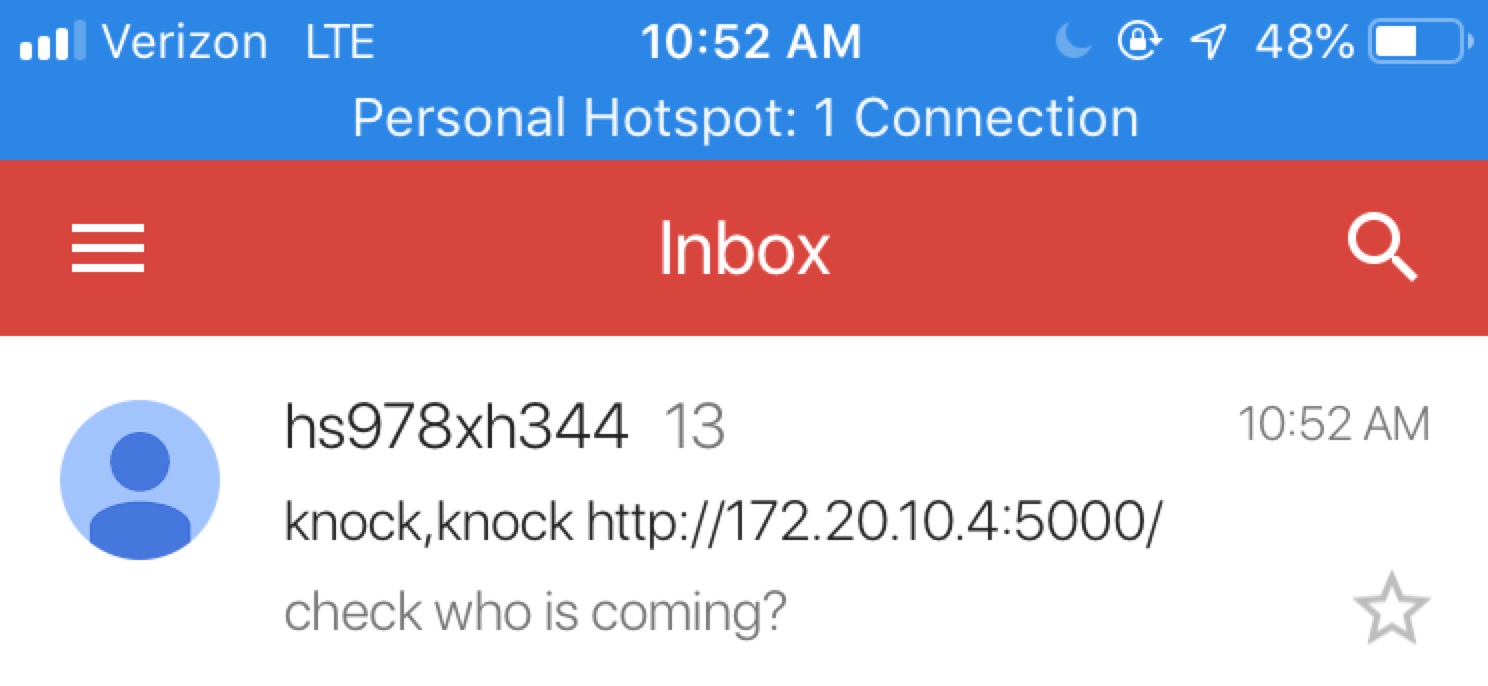
After the web server is working, our door system also can notify the owner that a visitor is ‘knocking’ the door by sending a email with a link to the owner. In this part, we use “smtplib” which is the build in library in the Rpi system. We can login our default emails through the functions in this library. And sending the email to the owner’s email with a website link. We find that gmail system automatic blocks all the link in the message body, even though you transfer the link to string format. Therefore, we include the link in the header which works perfectly.
Design 4: Wechat - 'knocking' the door with Wechat
Wechat is now the most popular chatting APP in China. Using Wechat, a user can ask the owner to open the door remotely. How do we make it? We Let the user scan a QR code on PiTFT screen, as is shown in figure 7(right). Then, the owner would receive a message from the user as is shownin figure 7(left) and he can decide whether to allow the guy get in by typing yes or no.
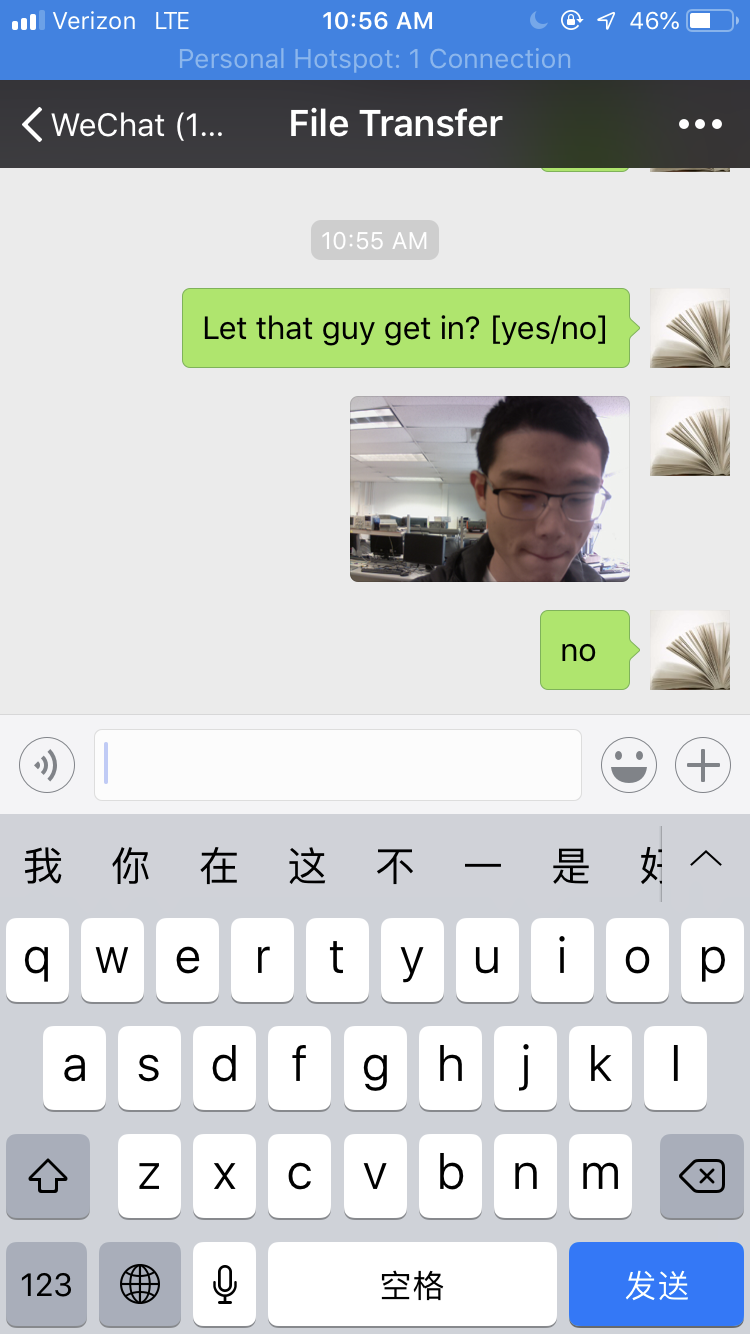
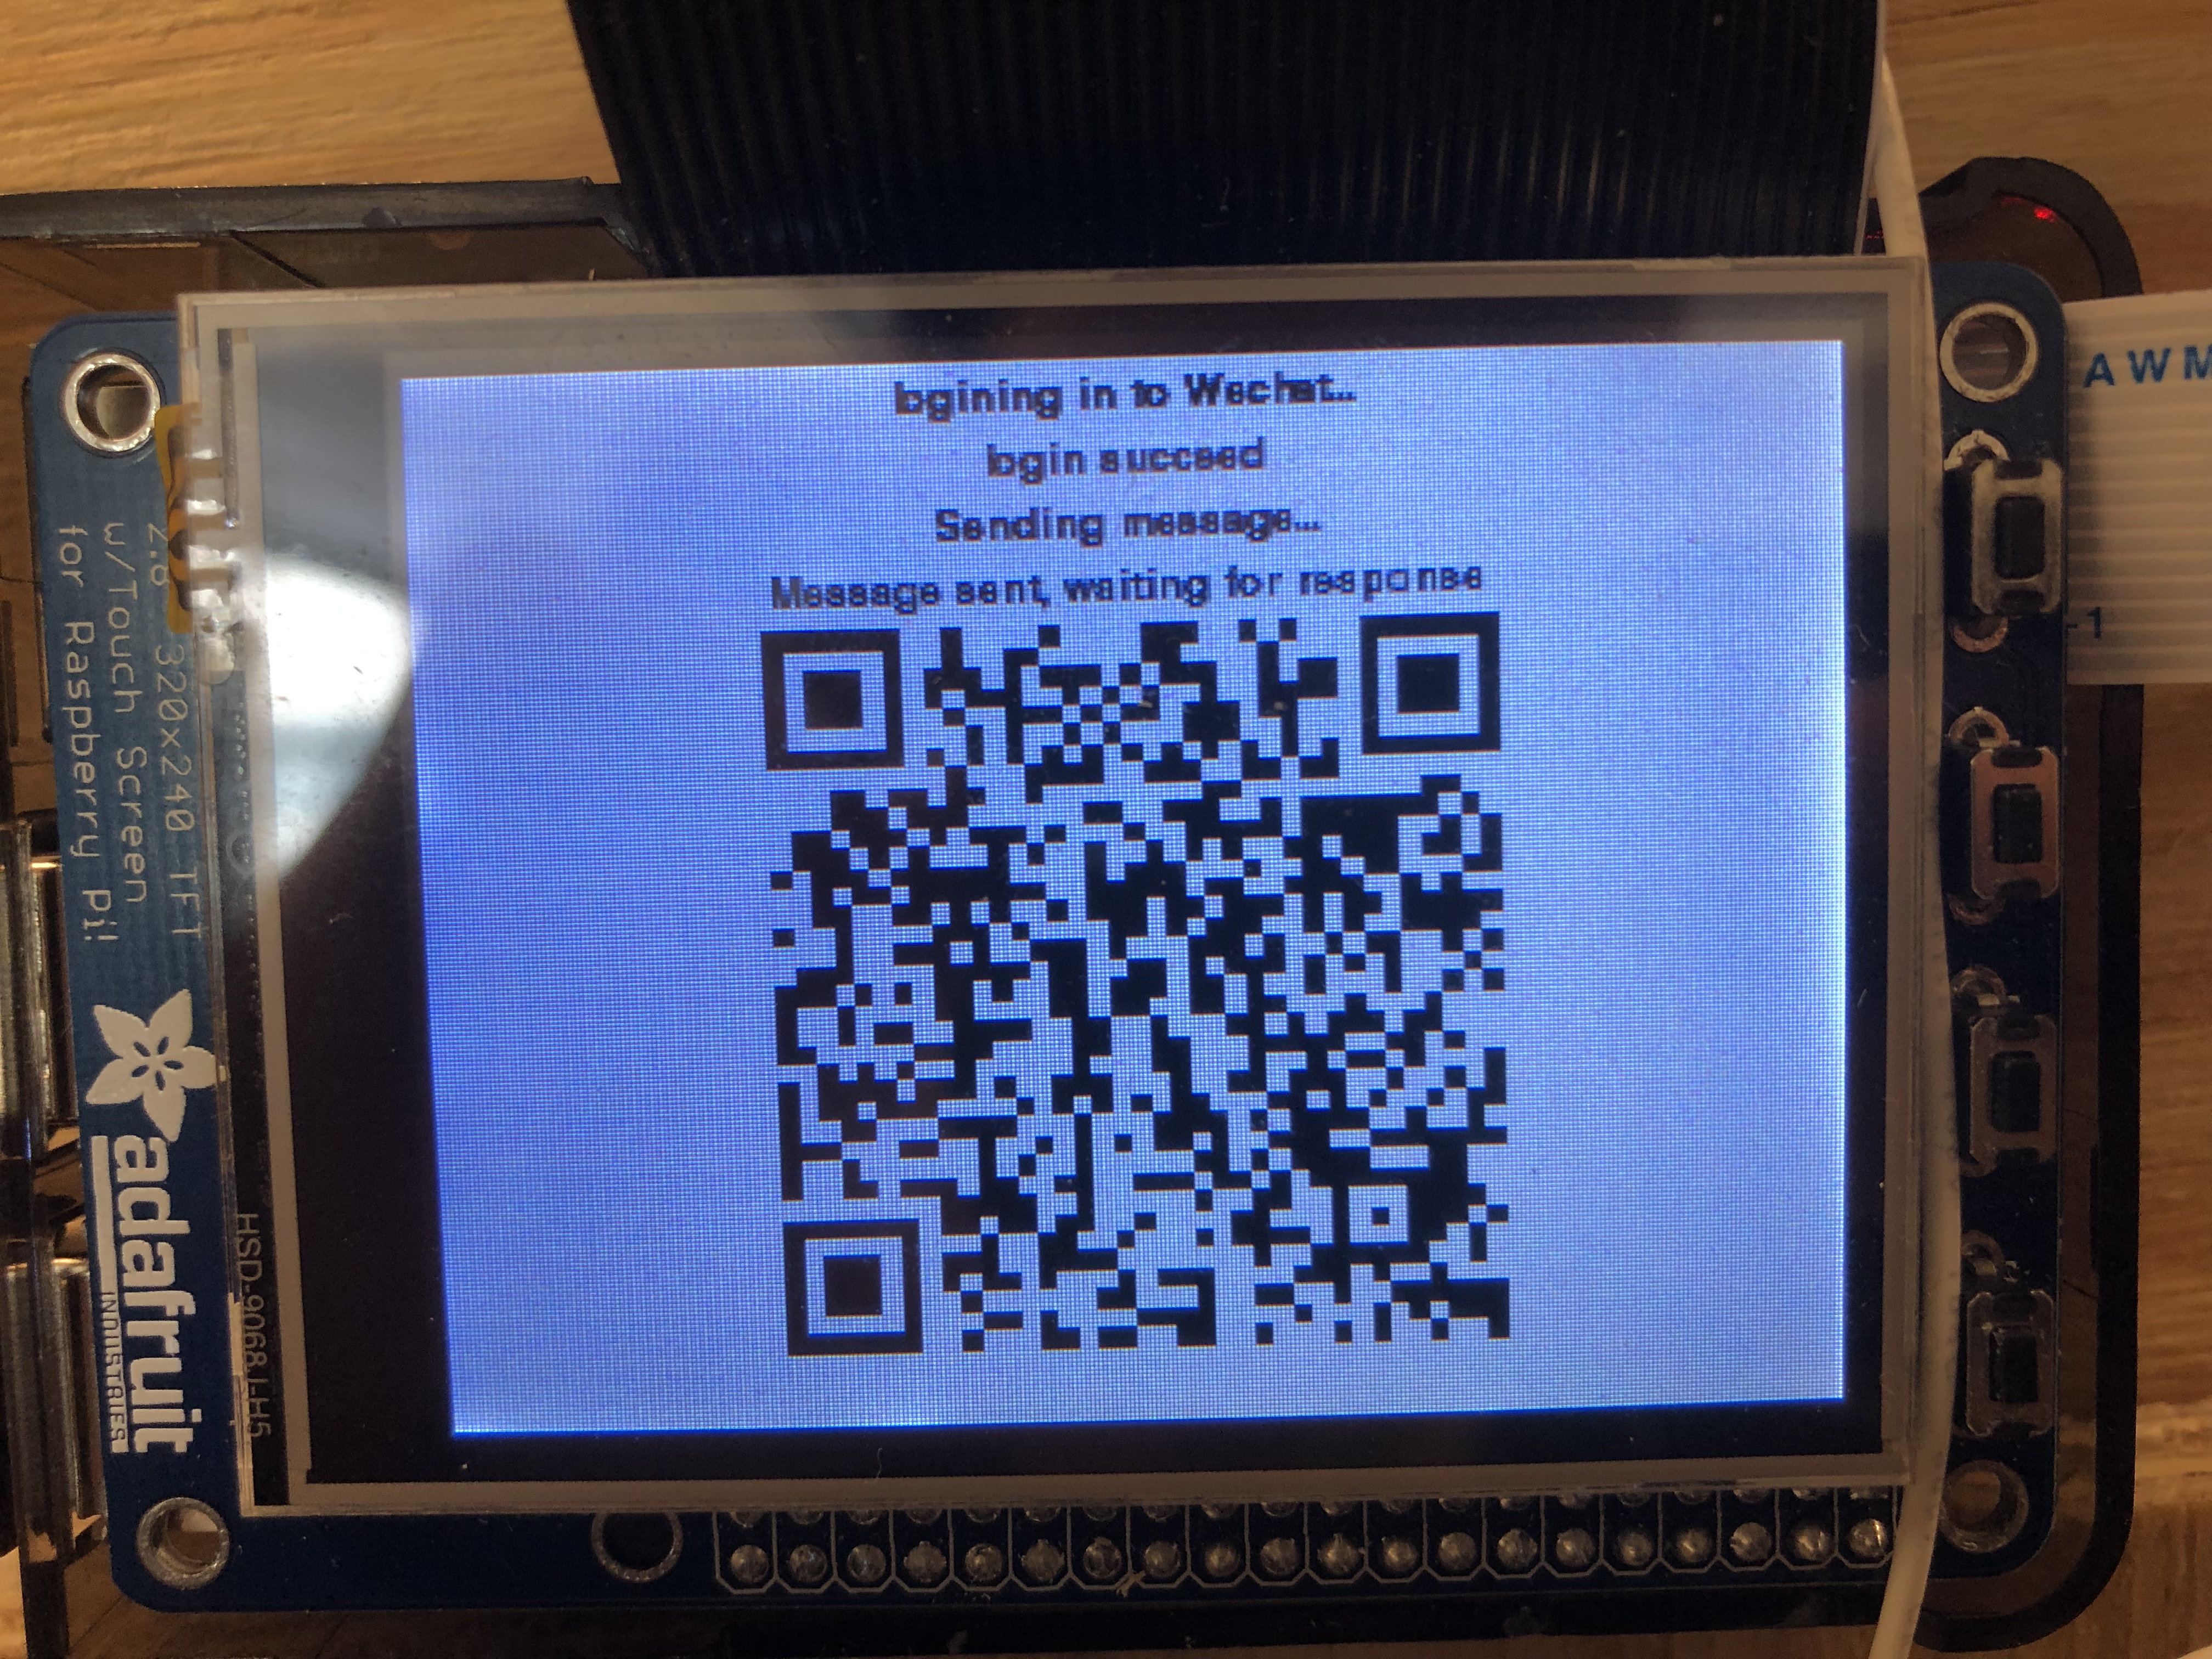
Figure 7: Owner(left) and user(right) interfaces of Wechat funciton
We thought the function would be useful since scaning QR code to pay or get messages from Ads is so popular in China now. To realize this function, we first looked at a Wechat API called 'itchat' which can be installed via pip and provides login and message sending funcitons. However, the interfaces doen't provides us with the functions we need. Therefore, after learning the logic of the API, we wrote our own function of requesting an QR code from the Wechat Website and we used the Pi as a Wechat logger. On the other hand, we set a message receiving function which can continuesly check messages received from the other users. We set the owner as that particular user so that the whole Wechat sub-system will jump out as loog as certain messages have been received('yes' or 'no' in this case). Then either the door will open or the system will go back to the main menu.
Design 5: Voice - Voice recognition to enter
At first, we want to use the “Jasper” which is an open source platform for developing always-on, voice-controlled applications. However, it needs to keep connect with the internet and runs at the background. Since we have other different program that we need to process at the same time, the performance doesn’t meet the requirement. Thus, we change to another software named “Sopare”. Sopare is a Raspberry Pi offline voice recognition tool. You can train your own program based on Sopare. After training, you will create a dict file which will include your information and training result. After testing, we find that normally we need to train five times per word. Apart from that, since we need combine this tool with our program, we made a lot of modification in the plug in file. One of the things we did is that we transfer all the output of voice recognition into String. And then we write those results into a file which can be read by our main program. Detailed step by step instruction is included in the reference.
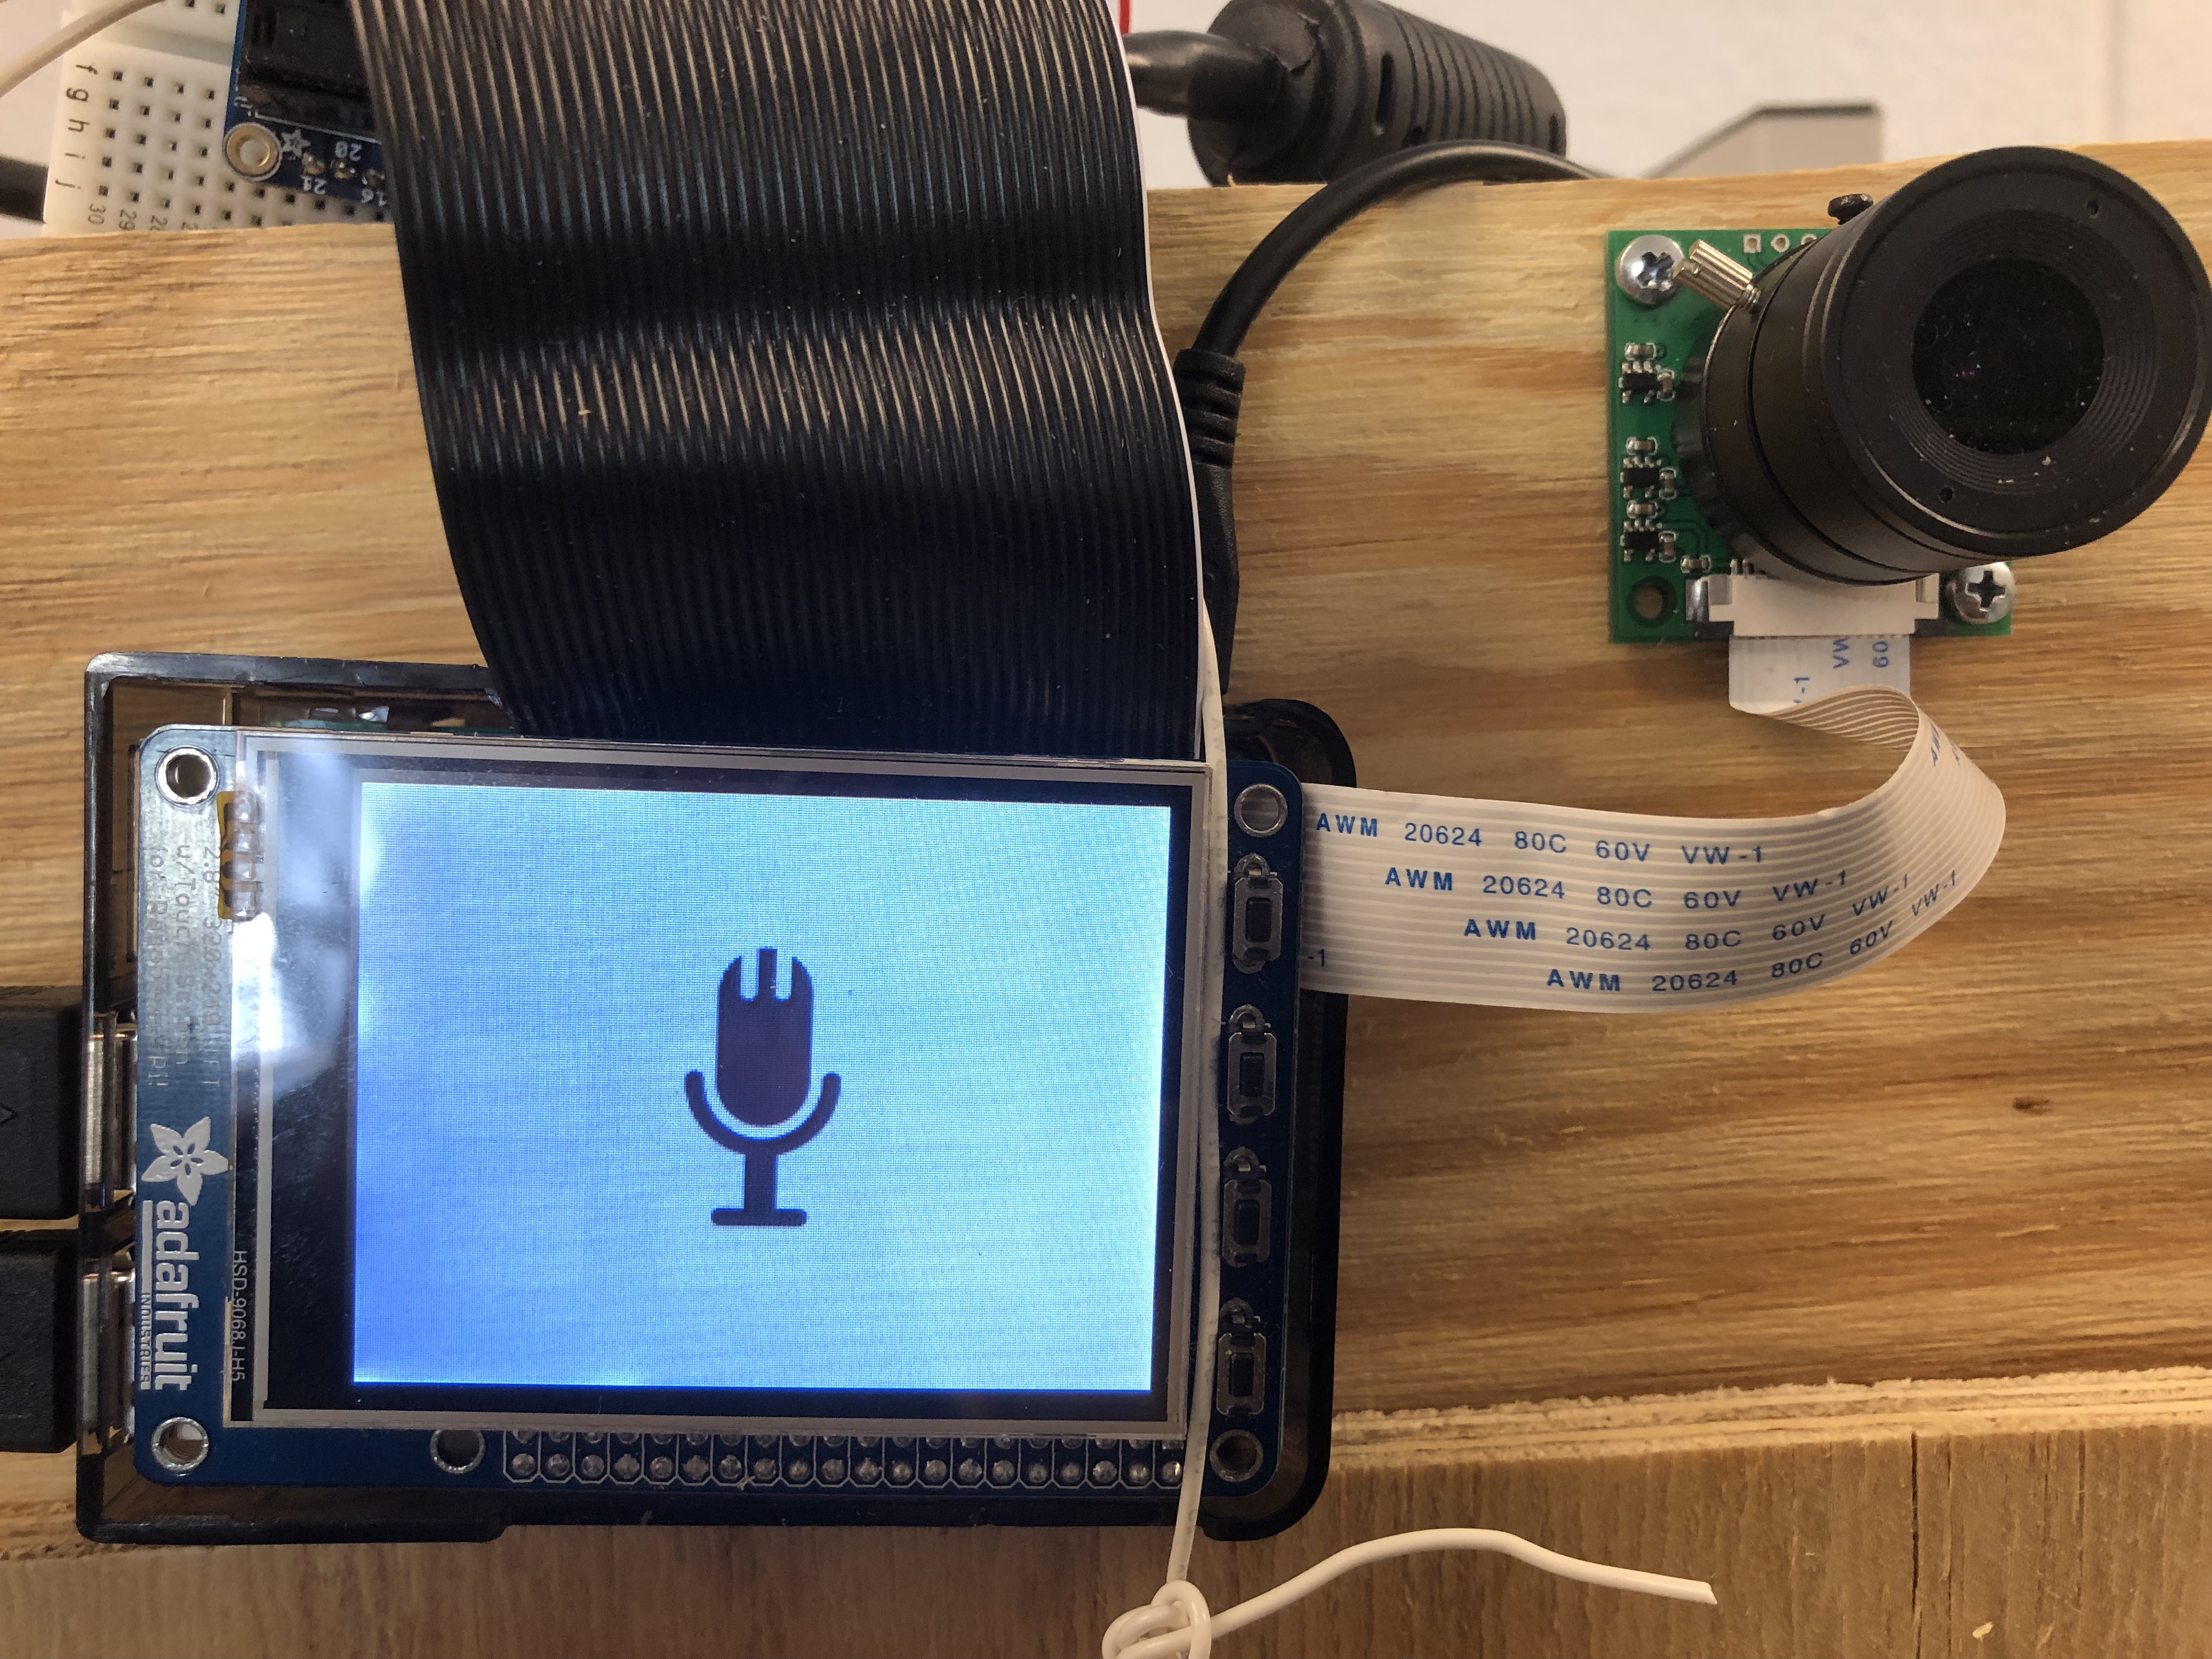
Figure 8: Voice Recognition GUI
Design 6: SetPW - Reset password
In this part, the system would require the user to enter the old password first then he can set the new password. The password is stored in hard disk by a file so that it will be permanent even if there is a sudden power loss. In memory, the status of the password typing progress is store in a dictionary with a number to indicate which number the user is currently typing. There are in total 4 tuples in the dictionary so the number can't exceed 4. There are also a delete funciton by which user can delete a number. We realized it simply by setting the coorespoding entry in the dictionary as ''. When we want to 'blit' something onto the screen, '' will show as nothing.
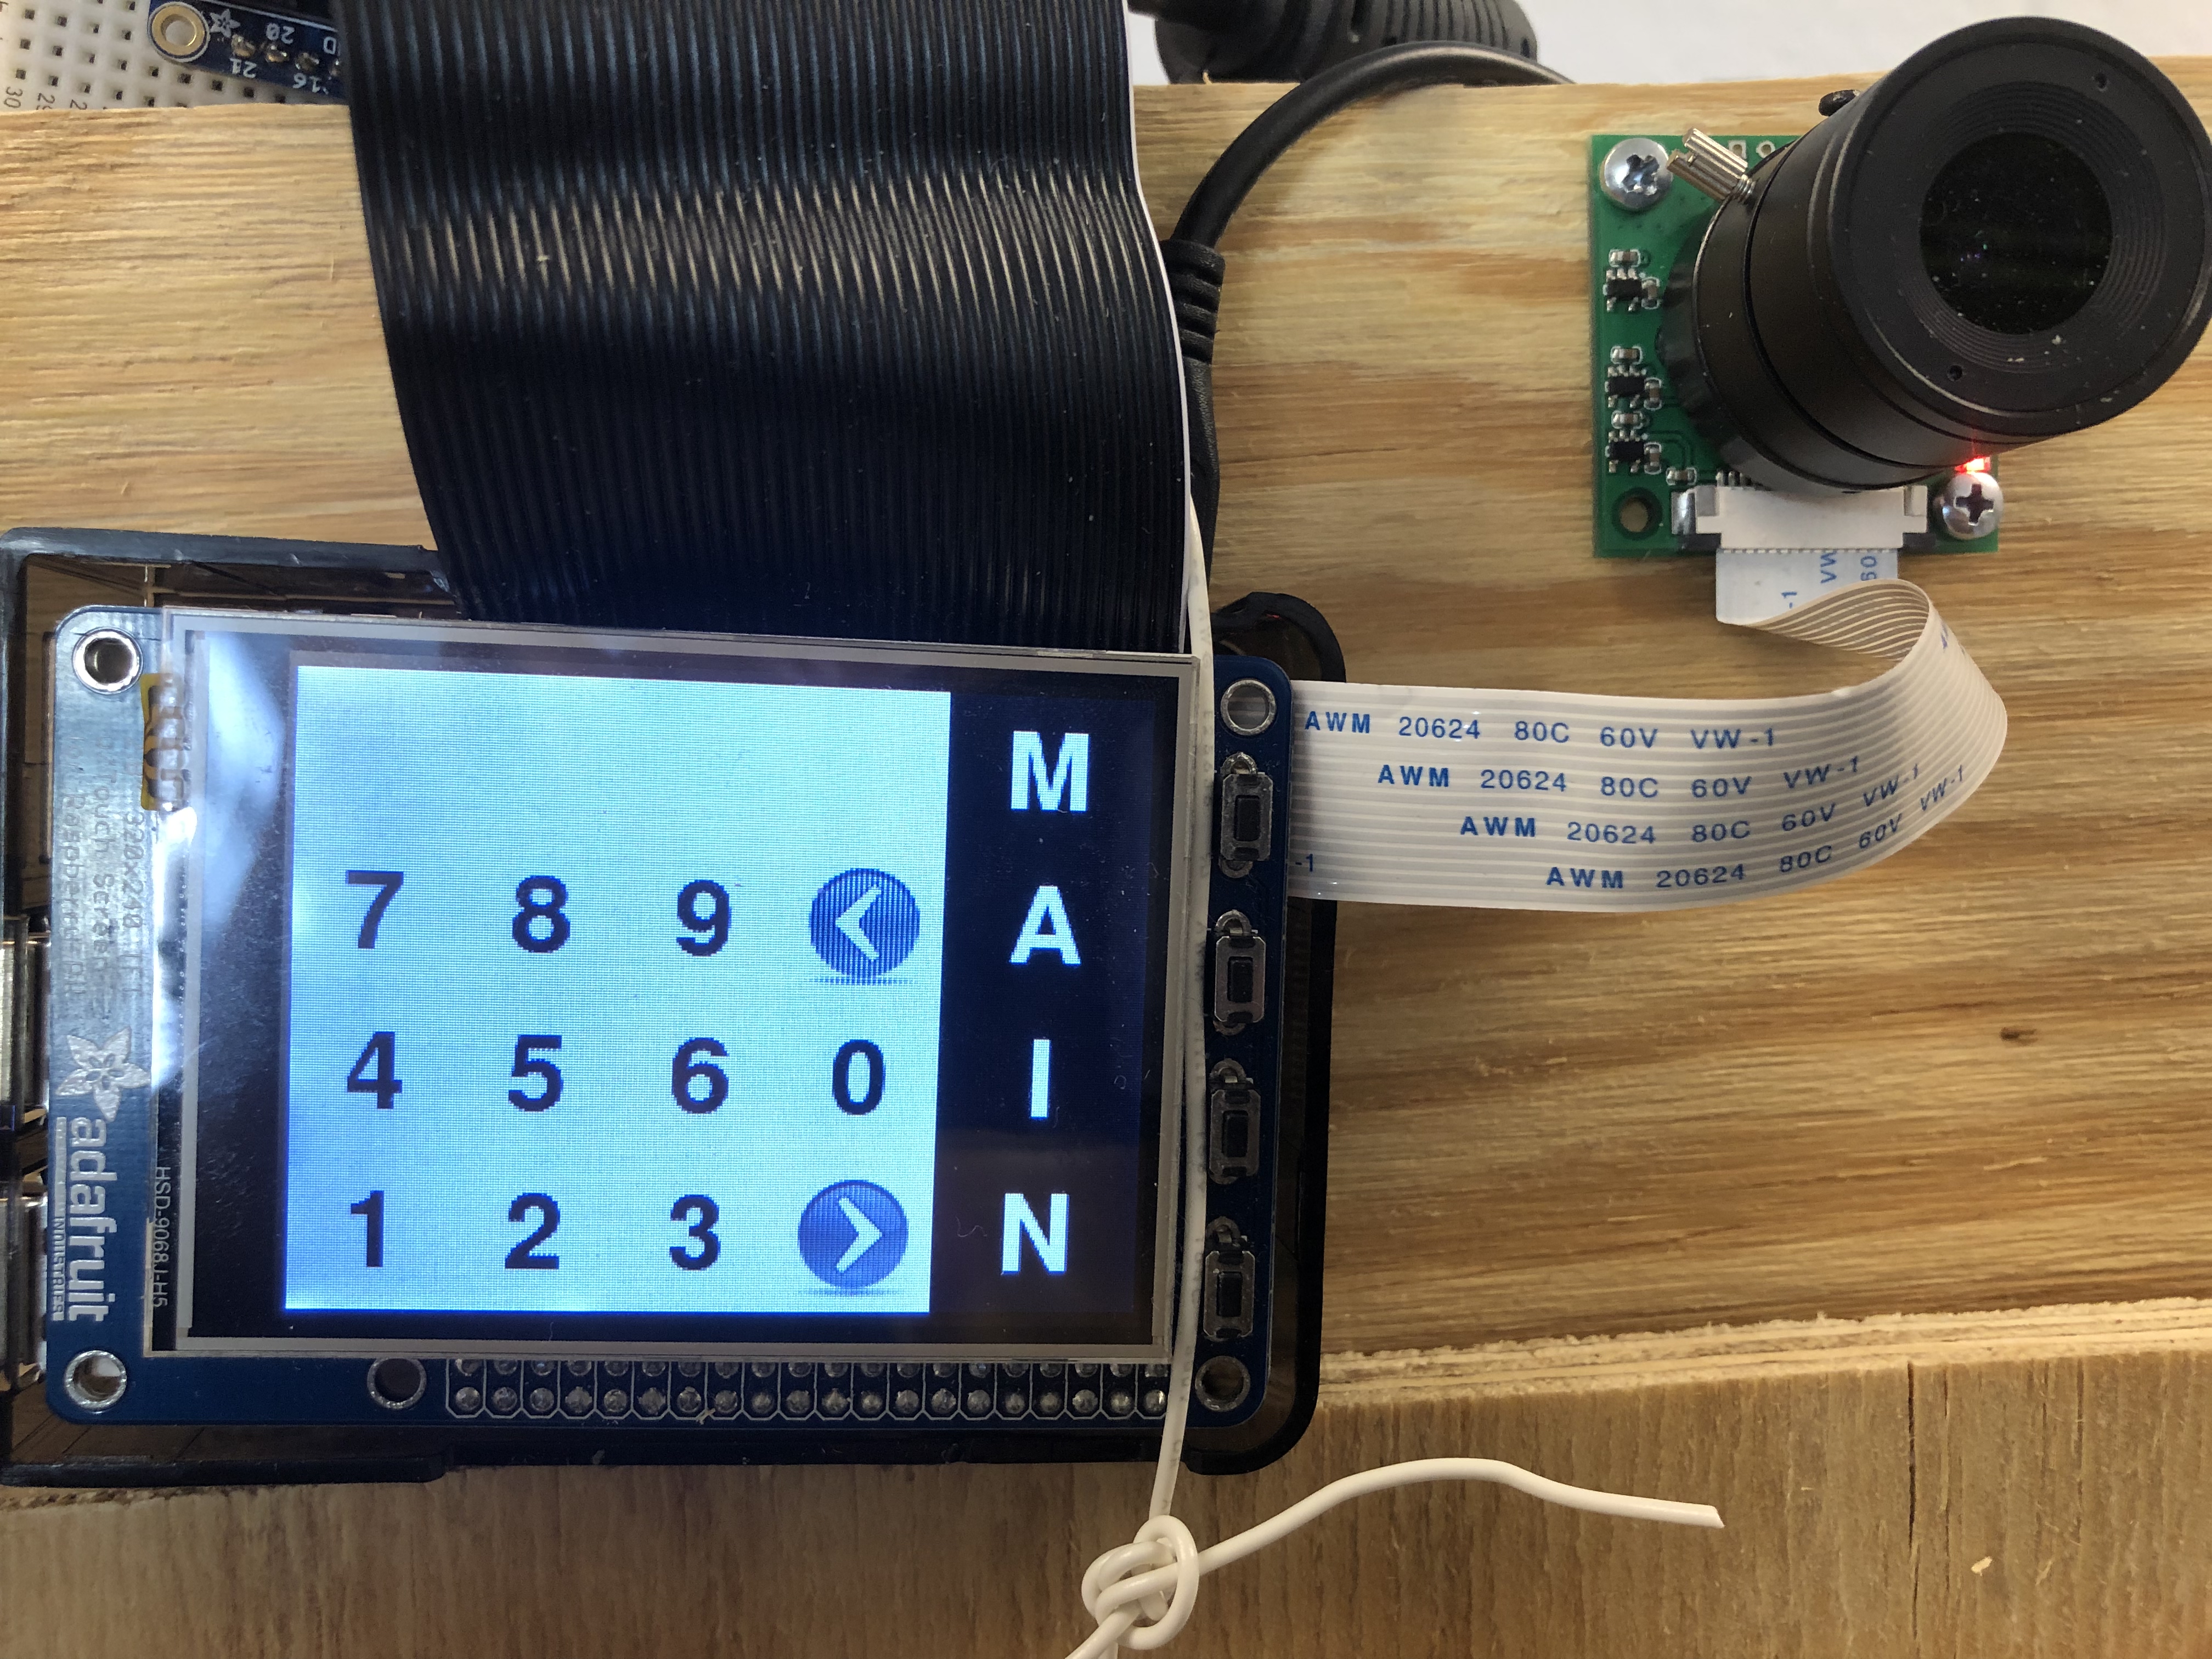

Figure 9: SetPW GUI
Testing - problems & drawbacks
Facial recognition Module
Our facial recognition module should identify registered user and allow unregistered user register their faces. When we were working on registration part, we found that more than 100 pictures for each person can provides our facial recognition model with the best accuracy. Therefore, if we need this accuracy, we need to take more than 100 pictures of the user in the registering process. However, the user must be unhappy if he needs to wait for so much time out of the door. Thus, we made a compromise for both. We finally decided to take 80 picture of the person while registering. This is the minimum number to allow the system recognize the users successfully. Also, we adjusted our confidence number multiple times to achieve the best performance. After those tests and modification, our face recognition module worked as expected.
Web video transmission
When we test our web video transmission part, we found that the delay between our video on the RPi and website is really high. Thus, we tried different frame rate and found the lowest one that won't cause delay and decrease the resolution. Meanwhile, we used the built-in function in html language to expand the frame(it should have some interpolation algorithms). Also, we tried different encoding methods and finally found jpeg format was the fastest. After adjustment, our video transmission performanced as planned.
Wechat Module
When we build our wechat module, we met with the problem that the API interface does not provide QR code. Neither do we have solutions to 'blit' the QR code onto our Pi-TFT screen.Therefore, we had to look at the source code of Wechat API and rewrote it. We wrote a login function which request an QR code from Wechat website and took the screen variable as a parameter and 'blit' the QR code inside the function. Please see the code appendix part for the modified file. After we modified the necessary source code, it performanced as planned.
Voice recognition
At first, we used Jasper to do voice recognition. However, it needs to keep connect with the internet and run at the background. Since we have other different program need to process at the same time, the performance didn’t meet the requirement. Thus, we changed to another software named “Sopare”. After changing to Sopare, our voice recognition part worked as planned.
GUI and Password
Those two modules worked as our planned. We did not make some big change. They all worked as planned. Please look at the figures in the design section.
Results
All the functions work as expected. Enter function won't respond to unknown people and will correctly identify the registered person. For the facial recognition part, test has been done on three persons at most.(There would be a limit of person number for the model to keep accuracy, but we didn't reach the limit in the test). Wechat connection is stable but the process of acquiring QR code have some delay due to the response delay of Wechat Website. Web stream has no delay after our optimization. Audio output and microphone has some conflicts due to sound card conflict so we showed the audio output and voice recognition functions seperately. Please refer to the design section for more detailed information.
Conclusions
In this lab, we really learn a lot. The start point of our project is face recognition. From this part, we learn a lot from opencv like different face recognition model. Our facial recognition part perform very well. The correct rate is over 90%. The next part is password login system. Each owner have their own log file which includes their name, training label, and password. And then, we try multiple different tools for voice recognition. Sopare is really a good Rpi offline voice recognition tool and it works very well. After that, we make a website and optimize our video stream. Owner can watch high resolution and low delay security video on real time. Finally, we combine wechat with our smart door system. User can remote control our door through wechat. The problem we haven’t resolved is sound card confliction. The sound cards in speaker and mic cannot work together. We believe this is the hardware issue. If we can change to another microphone without build in sound card , the problem might be solved. Last but not least, the most important lesson we learn is backing up and documentation. Backing up really saves our work and documentation really help to organize our work. We will never forget again.
Future work
Many further improvements can be done to perfect our smart door system.At first, our audio output system cannot work with voice recognition system due the sound card confliction. We believe it is a hardware problem. If we have a speaker or mic without build in sound card, the problem should be resolve. Secondly, we can optimize our UI design like add some icons to the buttons which can make the whole system more user friendly. Thirdly, right now we can send low delay live video stream into a web without audio. In the future we should optimize this function and send audio file with video file at the same time. Last but not least, we can add security checking function into our door system. Actually, we already finish implementing this function but we cannot get a good training data so that the performance is not good. Therefore, we have to give up demoing this function. In the future, we will train more target images and get better training data which can improve our system performance.
Work Distribution
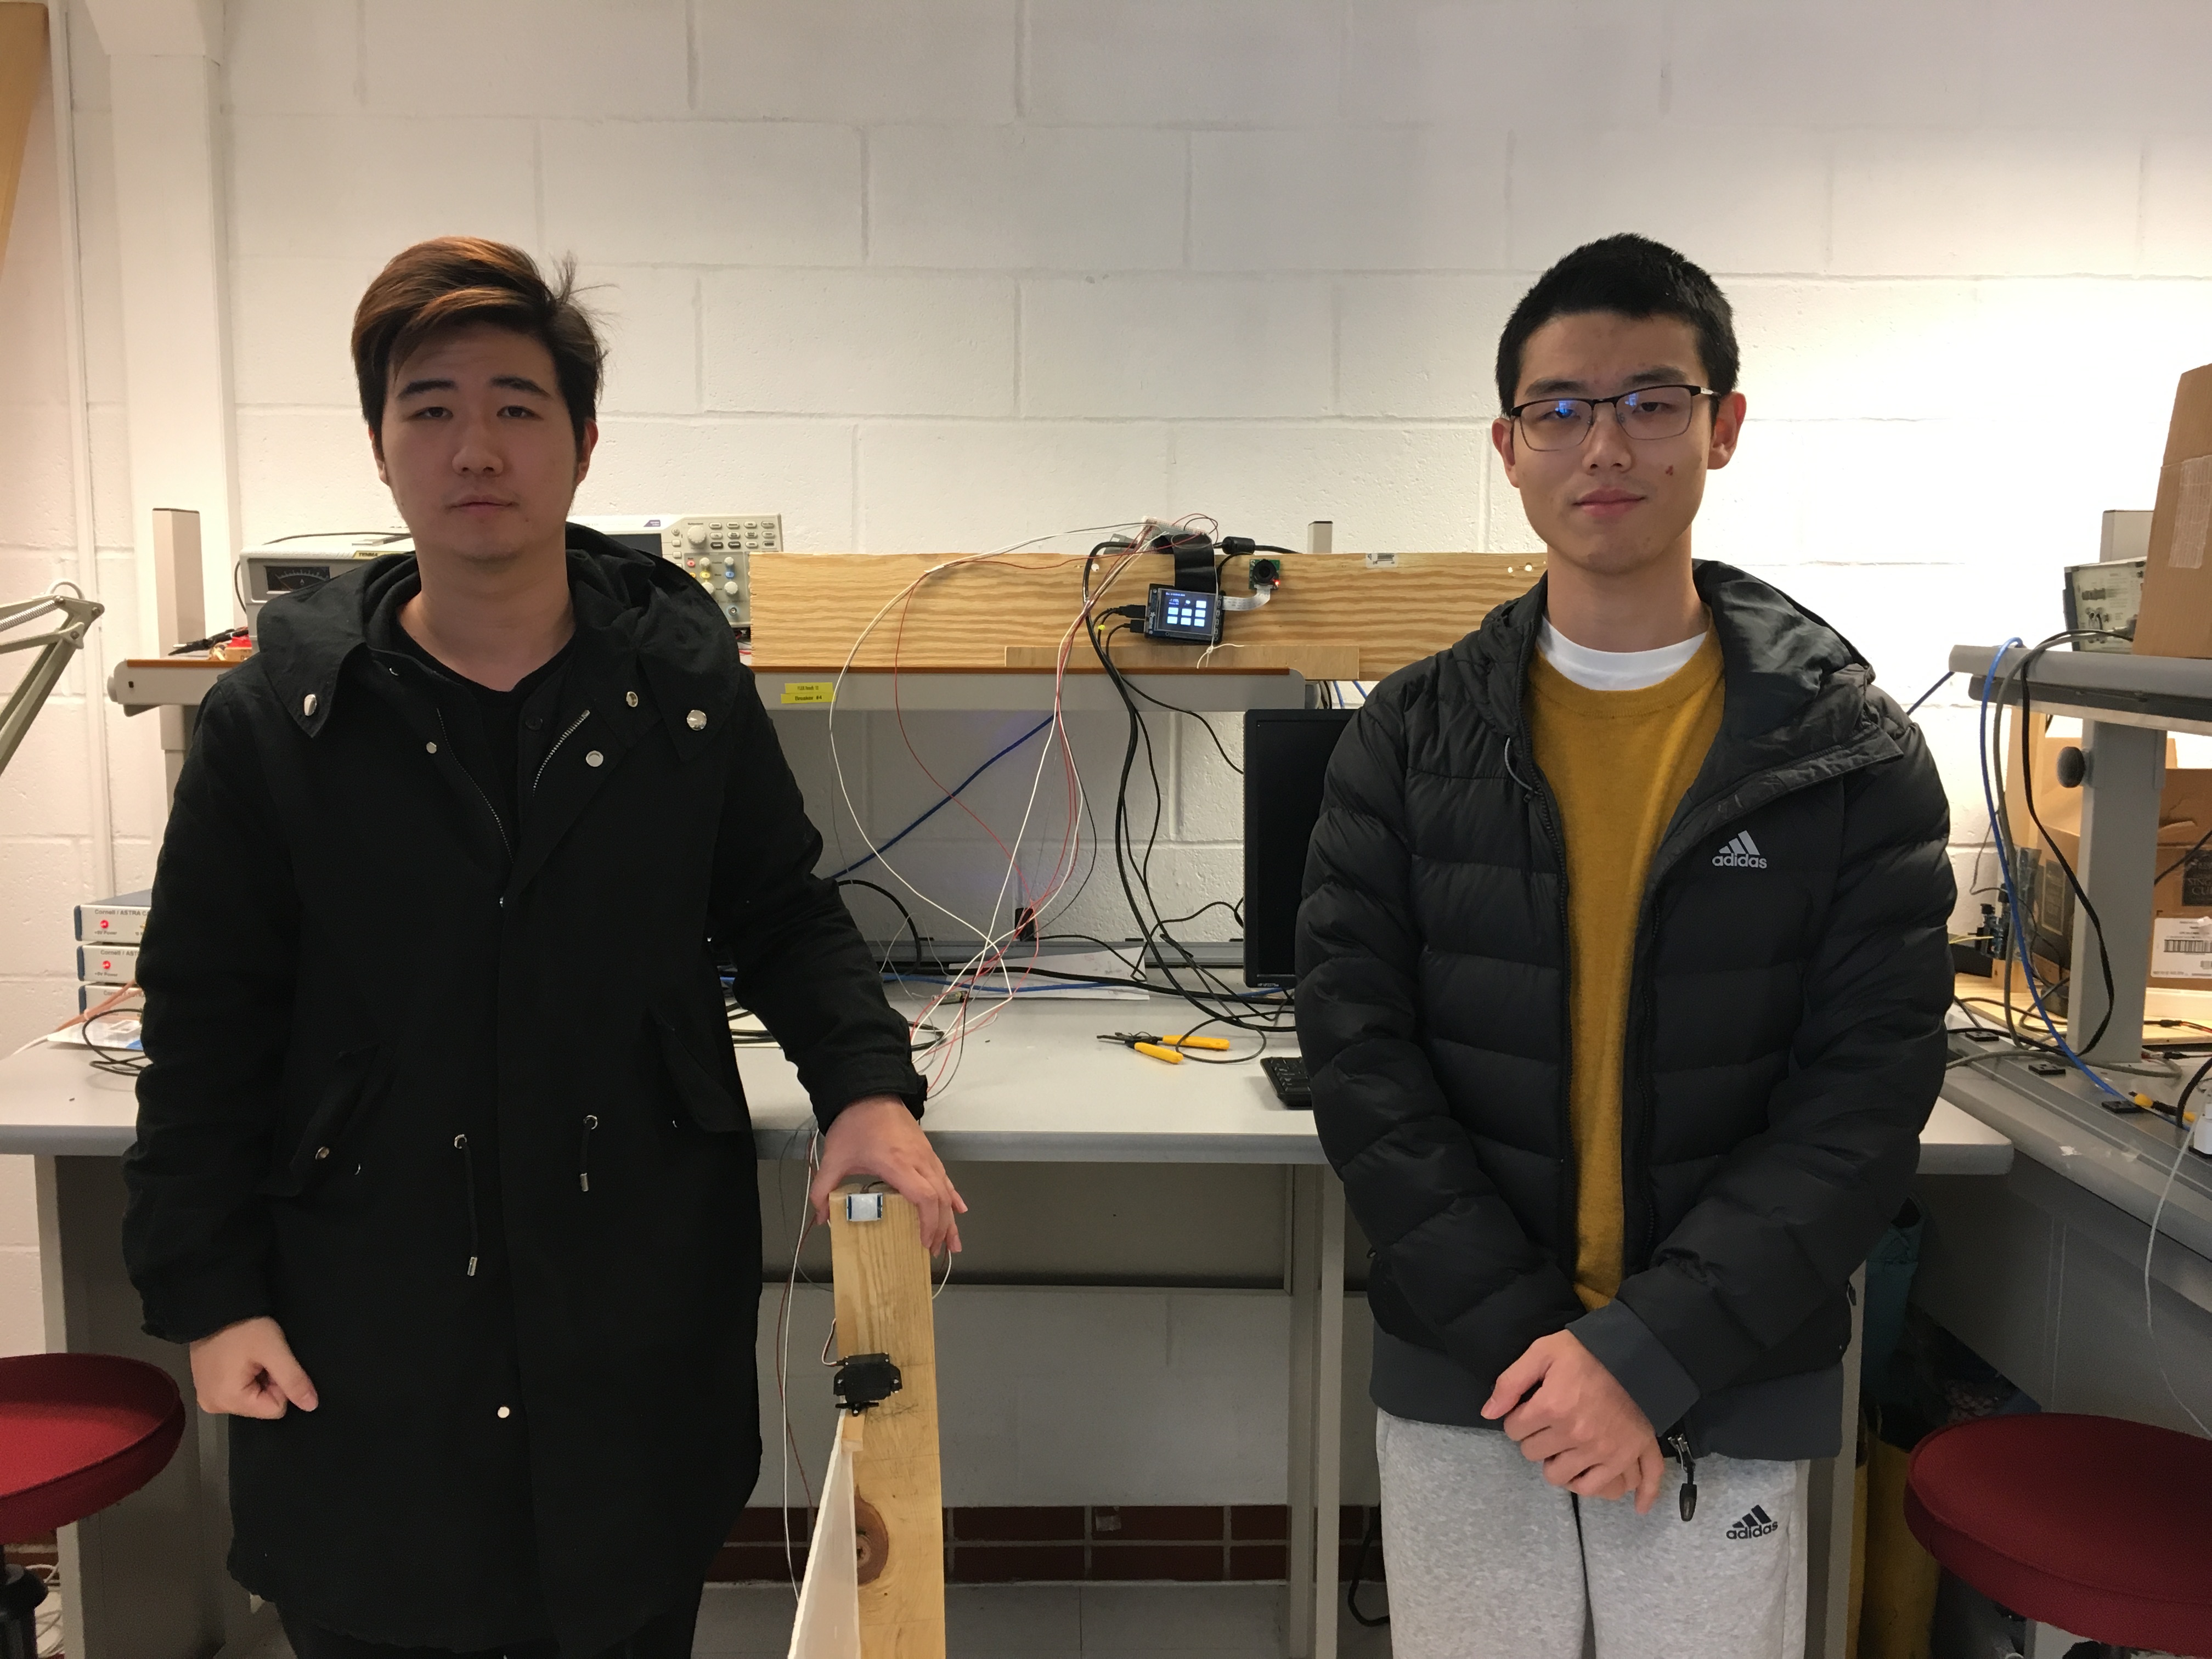
Project group picture
Xinghui Hu
xh344@cornell.edu
Designed voice,face recognition and email functions.

Han Shi
hs978@cornell.edu
Designed R-Pi GUI, Wechat and Web functions.
Parts List
- Raspberry Pi $35.00
- Raspberry Pi Camera OV5647 $29.99
- NeoPixel Ring - $9.95
- Kinobo USB Microphone - $18.99
- HONKYOB USB Mini Speaker - $11.99
- Sensors, Boards and Wires - Provided in lab
Total: $70.92
References
PiCamera DocumentTower Pro Servo Datasheet
Sopare Voice Recognition System
OpenCV Document
Flask Document
Motion Detect Sensor Document
itchat API Document
Pigpio Library
R-Pi GPIO Document
Code Appendix
Github LinkMain code of GUI
- GUI.py
##################################################################
# Main starts here
#
# Overall preview:
# |set Pi TFT -> set GPIOs -> open camera |
# 1.init |-> set espeak -> set pygame -> set font |
# |-> set warning messages -> load image |
# |-> set axis, flag, time -> request weather |
#
# 2.loop |status 0: main menu |
# |status 1: face recognition |
# |status 2: password input |
# |status 3: welcome GUI - door open |
# |status 4: register GUI1 - enter password |
# |status 5: register GUI2 - registering |
# |status 6: change password GUI1 - old PW |
# |status 7: change password GUI2 - new PW |
# |status 8: Web GUI |
# |status 9: test page |
# |status 10: Wechat Gui |
# |status 11: Voice recognition GUI |
#
##################################################################
##################################################################
#lib import
##################################################################
from picamera.array import PiRGBArray
from picamera import PiCamera
import time
import cv2
import os
import numpy as np
from PIL import Image
import pickle
import pygame
from pygame.locals import *
import RPi.GPIO as GPIO
import subprocess
import sys
import pygame.mixer
import smtplib
from weather import Weather, Unit
from importlib import import_module
import os
from flask import Flask, render_template, Response, request
import io
import picamera
from base_camera import BaseCamera
import itchat
##################################################################
#PiTFT setup
##################################################################
os.putenv('SDL_VIDEODRIVER', 'fbcon') # Display on piTFT
os.putenv('SDL_FBDEV', '/dev/fb1')
os.putenv('SDL_MOUSEDRV', 'TSLIB') # Track mouse clicks on piTFT
os.putenv('SDL_MOUSEDEV', '/dev/input/touchscreen')
##################################################################
#GPIO(servo) setup
##################################################################
GPIO.setmode(GPIO.BCM)
GPIO.setup(26, GPIO.IN)
GPIO.setup(5, GPIO.OUT)
GPIO.setup(13, GPIO.OUT)
vdd= 0
dc = 100 * vdd / (vdd + 20)
f = 1000 / (vdd + 20)
vdd2= 0
dc2 = 100 * vdd2 / (vdd2 + 20)
f2 = 1000 / (vdd2 + 20)
#vdd3 = 0
#dc3 = 100 * vdd3 / (vdd3 + 20)
#f3 = 1000 / (vdd3 + 20)
p_left = GPIO.PWM(5,f)
p_left.start(dc2)
p_right = GPIO.PWM(13,f2)
p_right.start(dc2)
##################################################################
#camera setup
##################################################################
camera= PiCamera()
#camera = pygame.camera.Camera()
camera.resolution=(480,320)
camera.framerate=64
#camera_flag = 1
#register("hxh",str(1111))
#register("hs",str(1111))
##################################################################
#espeak setup
##################################################################
s1 = "espeak '"
s = "hello"
s3 = "' --stdout | aplay -D plughw:1,0"
str_out = s1 + s + s3
os.system("espeak 'system starts' --stdout | aplay -D plughw:1,0")
##################################################################
#pygame setup
##################################################################
pygame.init()
#pygame.camera.init()
pygame.mouse.set_visible(False)
WHITE = 255, 255, 255
BLACK = 0,0,0
size = width, height =320,240
screen = pygame.display.set_mode(size)
sleep_time=0.003
##################################################################
#font setup
##################################################################
my_font_big = pygame.font.Font(None, 30)
my_font_key = pygame.font.Font(None, 20)
my_font_info = pygame.font.Font(None, 14)
my_font_num = pygame.font.Font(None, 60)
##################################################################
#warning messages(for pygame) setup
##################################################################
my_button_s1 = {(240,60):'Enter',(240,180):'Register',(60,180):'Quit',(150,180):'Voice',(240,120):'SetPW',(60,120):'Wechat',(150,120):'Knock'}
my_inform = {(80,180):'Press Button to enter'}
my_warning = {(160,120):'Facial Rec...'}
my_warning1 = {(160,120):'Processing...'}
my_warning2 = {(160,120):'^_^ Welcome ^_^'}
my_warning3 = {(160,120):'Waiting for web control'}
my_warning4 = {(160,100):'E-mail has been sent',(160,140):'Waiting for response throught port 5000'}
my_warning5 = {(160,120):'Please speak'}
my_number = {(30,90):'7',(30,150):'4',(30,210):'1',(90,90):'8',(90,150):'5',(90,210):'2',(150,90):'9',(150,150):'6',(150,210):'3',(210,150):'0'}
my_main_button = {(280,30):'M',(280,90):'A',(280,150):'I',(280,210):'N'}
my_code = {(30,30):'',(90,30):'',(150,30):'',(210,30):''}
my_message1 = {(160,7):'logining in to Wechat...'}
my_message2 = {(160,7):'logining in to Wechat...',(160,21):'login succeed',(160,35):'Sending message...'}
my_message3 = {(160,7):'logining in to Wechat...',(160,21):'login succeed',(160,35):'Sending message...',(160,49):'Message sent, waiting for response'}
##################################################################
#laod images
##################################################################
mic = pygame.image.load("mic.png")
mic_rect = mic.get_rect()
mic_rect.center = [160,120]
snow = pygame.image.load("snow.png")
snow_rect = snow.get_rect()
snow_rect.center = [150,60]
thunder = pygame.image.load("thunder.png")
thunder_rect = thunder.get_rect()
thunder_rect.center = [150,60]
fog = pygame.image.load("fog.png")
fog_rect = fog.get_rect()
fog_rect.center = [150,60]
cloud = pygame.image.load("cloudy.png")
cloud_rect = cloud.get_rect()
cloud_rect.center = [150,60]
sun = pygame.image.load("sun.png")
sun_rect = sun.get_rect()
sun_rect.center = [150,60]
arrow = pygame.image.load("arrow.png")
arrow_rect = arrow.get_rect()
arrow_rect.center = [210,210]
deletea = pygame.image.load("delete.png")
deletea_rect = arrow.get_rect()
deletea_rect.center = [210,90]
#Degree = {(40,60):'2 CEL'}
##################################################################
#axis, flag, time init
##################################################################
x = 0
y = 0
flag_sys = 1
time_start=time.time()
weather_flag = 1
status_flag = 0
ID = 1
camera_flag = 0
speak_flag = 0
open_flag = 0
enter_num = 0
##################################################################
#get weather/degree froom web(Yahoo Weather)
##################################################################
weather = Weather(unit = Unit.CELSIUS)
location = weather.lookup_by_location('Ithaca')
code = location.condition.code
if code < 5:#thunder
weather_flag = 0
if code > 4 and code < 13:#snow
weather_flag = 1
if code > 12 and code < 19:#rain
weather_flag = 2
if code > 18 and code < 23:#foggy
weather_flag = 3
if code > 22 and code < 31:#cloudy
weather_flag = 4
if code > 30 and code < 37:#sunny
weather_flag = 5
if code > 36:#thunder
weather_flag = 0
#weather_flag = 5
temp = str(location.condition.temp) + ' CEL'
Degree = {(60,50):temp}
my_loc = {(60,70):'Ithaca, NY'}
try:
while flag_sys:
while status_flag == 0:
##################################################################
#main screen: buttons, weather, time, audio output
##################################################################
##################################################################
#darw buttons on the screen
##################################################################
screen.fill(BLACK)
time_now = time.time()
pygame.draw.rect(screen,WHITE,[210,40,60,40],0)
pygame.draw.rect(screen,WHITE,[210,160,60,40],0)
pygame.draw.rect(screen,WHITE,[210,100,60,40],0)
pygame.draw.rect(screen,WHITE,[30,100,60,40],0)
pygame.draw.rect(screen,WHITE,[120,100,60,40],0)
pygame.draw.rect(screen,WHITE,[30,160,60,40],0)
pygame.draw.rect(screen,WHITE,[120,160,60,40],0)
localtime = time.asctime(time.localtime(time.time()))
#time display
text_surface = my_font_key.render(localtime, True, WHITE)
rect = text_surface.get_rect(center=(50,10))
screen.blit(text_surface, rect)
#print(type(localtime))
for text_pos, my_text in Degree.items():
text_surface = my_font_big.render(my_text, True, WHITE)
rect = text_surface.get_rect(center=text_pos)
screen.blit(text_surface, rect)
for text_pos, my_text in my_button_s1.items():
text_surface = my_font_key.render(my_text, True, BLACK)
rect = text_surface.get_rect(center=text_pos)
screen.blit(text_surface, rect)
for text_pos, my_text in my_loc.items():
text_surface = my_font_key.render(my_text, True, WHITE)
rect = text_surface.get_rect(center=text_pos)
screen.blit(text_surface, rect)
#for text_pos, my_text in my_inform.items():
# text_surface = my_font_key.render(my_text, True, WHITE)
# rect = text_surface.get_rect(center=text_pos)
# screen.blit(text_surface, rect)
if(weather_flag == 0):
#screen.fill(BLACK)
screen.blit(thunder, thunder_rect)
if(weather_flag == 1):
#screen.fill(BLACK)
screen.blit(rain, rain_rect)
if(weather_flag == 2):
#screen.fill(BLACK)
screen.blit(snow, snow_rect)
if(weather_flag == 3):
#screen.fill(BLACK)
screen.blit(fog, fog_rect)
if(weather_flag == 4):
#screen.fill(BLACK)
screen.blit(cloudy, cloudy_rect)
if(weather_flag == 5):
#screen.fill(BLACK)
screen.blit(sun, sun_rect)
pygame.display.flip()
##################################################################
#decide which sub-menu to go
##################################################################
for event in pygame.event.get():
if(event.type is MOUSEBUTTONDOWN):
pos = pygame.mouse.get_pos()
elif(event.type is MOUSEBUTTONUP):
pos = pygame.mouse.get_pos()
x,y = pos
if x > 210 and x < 270 and y > 40 and y < 80:
status_flag = 1
x = 0
y = 0
if x > 210 and x < 270 and y > 160 and y < 200:
status_flag = 4
x = 0
y = 0
if x > 210 and x < 270 and y > 100 and y < 140:
status_flag = 6
x = 0
y = 0
if x > 120 and x < 180 and y > 100 and y < 140:
status_flag = 8
x = 0
y = 0
if x > 210 and x < 270 and y > 100 and y < 140:
status_flag = 9
x = 0
y = 0
if x > 30 and x < 90 and y > 100 and y < 140:
status_flag = 10
x = 0
y = 0
if x > 120 and x < 180 and y > 160 and y < 200:
status_flag = 11
x = 0
y = 0
if x > 30 and x < 90 and y > 160 and y < 200:
status_flag = 12
flag_sys = 0
x = 0
y = 0
while status_flag == 1:
##################################################################
#sub menu 1: face recognition -use face-rec function to do face recognition
##################################################################
s = "Hi, please look at the camera!"
str_out = s1 + s + s3
os.system(str_out)
screen.fill(BLACK)
for text_pos, my_text in my_warning.items():
text_surface = my_font_big.render(my_text, True, WHITE)
rect = text_surface.get_rect(center=text_pos)
screen.blit(text_surface, rect)
pygame.display.flip()
ID = face_rec()
print("out")
speak_flag == 0
while status_flag == 2:
##################################################################
#sub menu 2: password input - if face recognition part fail
##################################################################
##################################################################
#audio output first
##################################################################
if speak_flag == 0:
s = "Sorry, can't recognize your face, please enter password to get in"
speak_flag = 1
str_out = s1 + s + s3
os.system(str_out)
##################################################################
#draw key board
##################################################################
screen.fill(BLACK)
pygame.draw.rect(screen,WHITE,[240,0,80,240],0)
for text_pos, my_text in my_number.items():
text_surface = my_font_num.render(my_text, True, WHITE)
rect = text_surface.get_rect(center=text_pos)
screen.blit(text_surface, rect)
for text_pos, my_text in my_main_button.items():
text_surface = my_font_num.render(my_text, True, BLACK)
rect = text_surface.get_rect(center=text_pos)
screen.blit(text_surface, rect)
for text_pos, my_text in my_code.items():
text_surface = my_font_num.render(my_text, True, WHITE)
rect = text_surface.get_rect(center=text_pos)
screen.blit(text_surface, rect)
screen.blit(arrow, arrow_rect)
screen.blit(deletea, deletea_rect)
pygame.display.flip()
##################################################################
#get password input
##################################################################
for event in pygame.event.get():
if(event.type is MOUSEBUTTONDOWN):
pos = pygame.mouse.get_pos()
elif(event.type is MOUSEBUTTONUP):
pos = pygame.mouse.get_pos()
x,y = pos
if x < 180 and y > 60 and enter_num < 4:
if y > 180:
if x < 60:
my_code[(30 + enter_num * 60,30)] = "1"
if x > 60 and x < 120:
my_code[(30 + enter_num * 60,30)] = "2"
if x > 120:
my_code[(30 + enter_num * 60,30)] = "3"
if y > 120 and y < 180:
if x < 60:
my_code[(30 + enter_num * 60,30)] = "4"
if x > 60 and x < 120:
my_code[(30 + enter_num * 60,30)] = "5"
if x > 120:
my_code[(30 + enter_num * 60,30)] = "6"
if y > 60 and y < 120:
if x < 60:
my_code[(30 + enter_num * 60,30)] = "7"
if x > 60 and x < 120:
my_code[(30 + enter_num * 60,30)] = "8"
if x > 120:
my_code[(30 + enter_num * 60,30)] = "9"
enter_num = enter_num + 1
x = 0
y = 0
if x > 180 and x < 240 and y > 120 and y < 180 and enter_num < 4:
my_code[(30 + enter_num * 60,30)] = "0"
enter_num = enter_num + 1
x = 0
y = 0
if x > 180 and x < 240 and y > 60 and y < 120 and enter_num > 0:
enter_num = enter_num - 1
my_code[(30 + enter_num * 60,30)] = ""
x = 0
y = 0
##################################################################
#check password
##################################################################
if x > 180 and x < 240 and y > 180:
str_code = my_code[(30,30)] + my_code[(90,30)] + my_code[(150,30)] + my_code[(210,30)]
print(ID)
check_result = checkpw(ID, str_code)
print(check_result)
if check_result == 1:
my_code[(30,30)] = ''
my_code[(90,30)] = ''
my_code[(150,30)] = ''
my_code[(210,30)] = ''
enter_num = 0
status_flag = 3
x = 0
y = 0
##################################################################
#back to main menu
##################################################################
if x > 240:
my_code[(30,30)] = ''
my_code[(90,30)] = ''
my_code[(150,30)] = ''
my_code[(210,30)] = ''
enter_num = 0
status_flag = 0
x = 0
y = 0
time_start=time.time()
while status_flag == 3:
##################################################################
#sub menu 3: Welcome GUI - use opend() and closed() functions to open the door
##################################################################
s = "Welcome"
str_out = s1 + s + s3
os.system(str_out)
#sendm()
screen.fill(BLACK)
for text_pos, my_text in my_warning2.items():
text_surface = my_font_big.render(my_text, True, WHITE)
rect = text_surface.get_rect(center=text_pos)
screen.blit(text_surface, rect)
pygame.display.flip()
opend()
time.sleep(3)
iii = 0
while GPIO.input(26):
iii = iii + 1
print(iii)
closed()
status_flag = 0
#time_now = time.time()
#time_interval = time_now - time_start
#if time_interval > 10:
# status_flag = 0
speak_flag = 0
while status_flag == 4:
##################################################################
#sub menu 4: register GUI - enter password first, go to sub menu 5 if
# password is correct
##################################################################
if speak_flag == 0:
s = "Hello, please enter password to register"
speak_flag = 1
str_out = s1 + s + s3
os.system(str_out)
screen.fill(BLACK)
pygame.draw.rect(screen,WHITE,[240,0,80,240],0)
for text_pos, my_text in my_number.items():
text_surface = my_font_num.render(my_text, True, WHITE)
rect = text_surface.get_rect(center=text_pos)
screen.blit(text_surface, rect)
for text_pos, my_text in my_main_button.items():
text_surface = my_font_num.render(my_text, True, BLACK)
rect = text_surface.get_rect(center=text_pos)
screen.blit(text_surface, rect)
for text_pos, my_text in my_code.items():
text_surface = my_font_num.render(my_text, True, WHITE)
rect = text_surface.get_rect(center=text_pos)
screen.blit(text_surface, rect)
screen.blit(arrow, arrow_rect)
screen.blit(deletea, deletea_rect)
pygame.display.flip()
for event in pygame.event.get():
if(event.type is MOUSEBUTTONDOWN):
pos = pygame.mouse.get_pos()
elif(event.type is MOUSEBUTTONUP):
pos = pygame.mouse.get_pos()
x,y = pos
if x < 180 and y > 60 and enter_num < 4:
if y > 180:
if x < 60:
my_code[(30 + enter_num * 60,30)] = "1"
if x > 60 and x < 120:
my_code[(30 + enter_num * 60,30)] = "2"
if x > 120:
my_code[(30 + enter_num * 60,30)] = "3"
if y > 120 and y < 180:
if x < 60:
my_code[(30 + enter_num * 60,30)] = "4"
if x > 60 and x < 120:
my_code[(30 + enter_num * 60,30)] = "5"
if x > 120:
my_code[(30 + enter_num * 60,30)] = "6"
if y > 60 and y < 120:
if x < 60:
my_code[(30 + enter_num * 60,30)] = "7"
if x > 60 and x < 120:
my_code[(30 + enter_num * 60,30)] = "8"
if x > 120:
my_code[(30 + enter_num * 60,30)] = "9"
enter_num = enter_num + 1
x = 0
y = 0
if x > 180 and x < 240 and y > 120 and y < 180 and enter_num < 4:
my_code[(30 + enter_num * 60,30)] = "0"
enter_num = enter_num + 1
x = 0
y = 0
if x > 180 and x < 240 and y > 60 and y < 120 and enter_num > 0:
enter_num = enter_num - 1
my_code[(30 + enter_num * 60,30)] = ""
x = 0
y = 0
if x > 180 and x < 240 and y > 180:
str_code = my_code[(30,30)] + my_code[(90,30)] + my_code[(150,30)] + my_code[(210,30)]
print(ID)
check_result = checkpw(ID, str_code)
print(check_result)
if check_result == 1:
my_code[(30,30)] = ''
my_code[(90,30)] = ''
my_code[(150,30)] = ''
my_code[(210,30)] = ''
enter_num = 0
status_flag = 5
x = 0
y = 0
if x > 240:
my_code[(30,30)] = ''
my_code[(90,30)] = ''
my_code[(150,30)] = ''
my_code[(210,30)] = ''
enter_num = 0
status_flag = 0
x = 0
y = 0
speak_flag = 0
while status_flag == 5:
##################################################################
#sub menu 5: register GUI2 - retrain the model to
# make the system remember the person
##################################################################
if speak_flag == 0:
s = "please look at the camera to help me gather information about you"
speak_flag = 1
str_out = s1 + s + s3
os.system(str_out)
screen.fill(BLACK)
#showing : strating collecting info here
pygame.display.flip()
gather_info_success_flag = 0
gather_info_success_flag = gather_info()
if gather_info_success_flag:
s = "information gathered successfully, please wait"
str_out = s1 + s + s3
os.system(str_out)
screen.fill(BLACK)
#showing : training now, please wait
for text_pos, my_text in my_warning1.items():
text_surface = my_font_num.render(my_text, True, WHITE)
rect = text_surface.get_rect(center=text_pos)
screen.blit(text_surface, rect)
pygame.display.flip()
train()
print("train out")
gather_info_success_flag = 0
status_flag = 0
speak_flag = 0
while status_flag == 6:
##################################################################
#sub menu 6: change password GUI - enter old password first, if correct
# go to sub menu 7
##################################################################
if speak_flag == 0:
s = "please enter your old password"
speak_flag = 1
str_out = s1 + s + s3
os.system(str_out)
screen.fill(WHITE)
pygame.draw.rect(screen,BLACK,[240,0,80,240],0)
for text_pos, my_text in my_number.items():
text_surface = my_font_num.render(my_text, True, BLACK)
rect = text_surface.get_rect(center=text_pos)
screen.blit(text_surface, rect)
for text_pos, my_text in my_main_button.items():
text_surface = my_font_num.render(my_text, True, WHITE)
rect = text_surface.get_rect(center=text_pos)
screen.blit(text_surface, rect)
for text_pos, my_text in my_code.items():
text_surface = my_font_num.render(my_text, True, BLACK)
rect = text_surface.get_rect(center=text_pos)
screen.blit(text_surface, rect)
screen.blit(arrow, arrow_rect)
screen.blit(deletea, deletea_rect)
pygame.display.flip()
for event in pygame.event.get():
if(event.type is MOUSEBUTTONDOWN):
pos = pygame.mouse.get_pos()
elif(event.type is MOUSEBUTTONUP):
pos = pygame.mouse.get_pos()
x,y = pos
if x < 180 and y > 60 and enter_num < 4:
if y > 180:
if x < 60:
my_code[(30 + enter_num * 60,30)] = "1"
if x > 60 and x < 120:
my_code[(30 + enter_num * 60,30)] = "2"
if x > 120:
my_code[(30 + enter_num * 60,30)] = "3"
if y > 120 and y < 180:
if x < 60:
my_code[(30 + enter_num * 60,30)] = "4"
if x > 60 and x < 120:
my_code[(30 + enter_num * 60,30)] = "5"
if x > 120:
my_code[(30 + enter_num * 60,30)] = "6"
if y > 60 and y < 120:
if x < 60:
my_code[(30 + enter_num * 60,30)] = "7"
if x > 60 and x < 120:
my_code[(30 + enter_num * 60,30)] = "8"
if x > 120:
my_code[(30 + enter_num * 60,30)] = "9"
enter_num = enter_num + 1
x = 0
y = 0
if x > 180 and x < 240 and y > 120 and y < 180 and enter_num < 4:
my_code[(30 + enter_num * 60,30)] = "0"
enter_num = enter_num + 1
x = 0
y = 0
if x > 180 and x < 240 and y > 60 and y < 120 and enter_num > 0:
enter_num = enter_num - 1
my_code[(30 + enter_num * 60,30)] = ""
x = 0
y = 0
if x > 180 and x < 240 and y > 180:
str_code = my_code[(30,30)] + my_code[(90,30)] + my_code[(150,30)] + my_code[(210,30)]
print(ID)
check_result = checkpw(ID, str_code)
print(check_result)
if check_result == 1:
s = "correct password"
str_out = s1 + s + s3
os.system(str_out)
my_code[(30,30)] = ''
my_code[(90,30)] = ''
my_code[(150,30)] = ''
my_code[(210,30)] = ''
enter_num = 0
status_flag = 7
x = 0
y = 0
if x > 240:
my_code[(30,30)] = ''
my_code[(90,30)] = ''
my_code[(150,30)] = ''
my_code[(210,30)] = ''
enter_num = 0
status_flag = 0
x = 0
y = 0
speak_flag = 0
while status_flag == 7:
##################################################################
#sub menu 7: change password GUI 2- enter the new password
##################################################################
if speak_flag == 0:
s = "please enter your new password"
speak_flag = 1
str_out = s1 + s + s3
os.system(str_out)
screen.fill(WHITE)
pygame.draw.rect(screen,BLACK,[240,0,80,240],0)
for text_pos, my_text in my_number.items():
text_surface = my_font_num.render(my_text, True, BLACK)
rect = text_surface.get_rect(center=text_pos)
screen.blit(text_surface, rect)
for text_pos, my_text in my_main_button.items():
text_surface = my_font_num.render(my_text, True, WHITE)
rect = text_surface.get_rect(center=text_pos)
screen.blit(text_surface, rect)
for text_pos, my_text in my_code.items():
text_surface = my_font_num.render(my_text, True, BLACK)
rect = text_surface.get_rect(center=text_pos)
screen.blit(text_surface, rect)
screen.blit(arrow, arrow_rect)
screen.blit(deletea, deletea_rect)
pygame.display.flip()
for event in pygame.event.get():
if(event.type is MOUSEBUTTONDOWN):
pos = pygame.mouse.get_pos()
elif(event.type is MOUSEBUTTONUP):
pos = pygame.mouse.get_pos()
x,y = pos
if x < 180 and y > 60 and enter_num < 4:
if y > 180:
if x < 60:
my_code[(30 + enter_num * 60,30)] = "1"
if x > 60 and x < 120:
my_code[(30 + enter_num * 60,30)] = "2"
if x > 120:
my_code[(30 + enter_num * 60,30)] = "3"
if y > 120 and y < 180:
if x < 60:
my_code[(30 + enter_num * 60,30)] = "4"
if x > 60 and x < 120:
my_code[(30 + enter_num * 60,30)] = "5"
if x > 120:
my_code[(30 + enter_num * 60,30)] = "6"
if y > 60 and y < 120:
if x < 60:
my_code[(30 + enter_num * 60,30)] = "7"
if x > 60 and x < 120:
my_code[(30 + enter_num * 60,30)] = "8"
if x > 120:
my_code[(30 + enter_num * 60,30)] = "9"
enter_num = enter_num + 1
x = 0
y = 0
if x > 180 and x < 240 and y > 120 and y < 180 and enter_num < 4:
my_code[(30 + enter_num * 60,30)] = "0"
enter_num = enter_num + 1
x = 0
y = 0
if x > 180 and x < 240 and y > 60 and y < 120 and enter_num > 0:
enter_num = enter_num - 1
my_code[(30 + enter_num * 60,30)] = ""
x = 0
y = 0
if x > 180 and x < 240 and y > 180:
str_code = my_code[(30,30)] + my_code[(90,30)] + my_code[(150,30)] + my_code[(210,30)]
if my_code[(30,30)] != "" and my_code[(90,30)] != "" and my_code[(150,30)] != "" and my_code[(210,30)] != "":
#print(ID)
#check_result = checkpw(ID, str_code)
#print(check_result)
#if check_result == 1:
my_code[(30,30)] = ''
my_code[(90,30)] = ''
my_code[(150,30)] = ''
my_code[(210,30)] = ''
changepw(str_code)
s = "password reset succeed"
str_out = s1 + s + s3
os.system(str_out)
enter_num = 0
status_flag = 0
x = 0
y = 0
if x > 240:
my_code[(30,30)] = ''
my_code[(90,30)] = ''
my_code[(150,30)] = ''
my_code[(210,30)] = ''
enter_num = 0
status_flag = 0
x = 0
y = 0
speak_flag == 0
while status_flag == 8:
##################################################################
#sub menu 8: Web GUI: use function app.run to fun the web server,
# show message on the R-Pi screen
##################################################################
if speak_flag == 0:
s = "E-mail has been sent to the owner, waiting for response now"
speak_flag = 1
str_out = s1 + s + s3
os.system(str_out)
screen.fill(BLACK)
for text_pos, my_text in my_warning4.items():
text_surface = my_font_info.render(my_text, True, WHITE)
rect = text_surface.get_rect(center=text_pos)
screen.blit(text_surface, rect)
pygame.display.flip()
#$start_web = time.time()
sendm()
camera_flag = 3
app.run(host="0.0.0.0", threaded=True)
while status_flag == 9:
##################################################################
#sub menu 9: test page, canceled finally
##################################################################
sub_flag = 1
while sub_flag:
screen.fill(BLACK)
for text_pos, my_text in my_warning4.items():
text_surface = my_font_info.render(my_text, True, WHITE)
rect = text_surface.get_rect(center=text_pos)
screen.blit(text_surface, rect)
pygame.display.flip()
speak_flag == 0
while status_flag == 10:
##################################################################
#sub menu 10: Wechat GUI - showing messages and QR code on GUI while using
# the rewritten itchat.login funciton to acquire QR code from
# Wechat website, than use itchat.send function to send message
# and image to the user. While itchat.run is ongoing, terminate
# as loog as the corresponding message was receiveed
##################################################################
if speak_flag == 0:
s = "Use wechat to login"
speak_flag = 1
str_out = s1 + s + s3
os.system(str_out)
screen.fill(WHITE)
ii = 0
for text_pos, my_text in my_message1.items():
text_surface = my_font_info.render(my_text, True, BLACK)
rect = text_surface.get_rect(center=text_pos)
screen.blit(text_surface, rect)
pygame.display.flip()
#itchat.get_QR(picDir='./qr.png')
itchat.login(screen = screen, picDir = './qr.png')
#qr = pygame.image.load('./qr.png')
#qr = pygame.transform.scale(qr,(200,200))
#screen.blit(qr,(120,40))
#itchat.login(picDir = './qr.png')
for text_pos, my_text in my_message2.items():
text_surface = my_font_info.render(my_text, True, BLACK)
rect = text_surface.get_rect(center=text_pos)
screen.blit(text_surface, rect)
pygame.display.flip()
camera.capture('./realtime.jpg')
itchat.send('Let that guy get in? [yes/no]', toUserName = 'filehelper')
itchat.send_image('./realtime.jpg',toUserName = 'filehelper')
for text_pos, my_text in my_message3.items():
text_surface = my_font_info.render(my_text, True, BLACK)
rect = text_surface.get_rect(center=text_pos)
screen.blit(text_surface, rect)
#ii = ii + 1
pygame.display.flip()
itchat.start_receiving()
itchat.run()
speak_flag = 0
if status_flag == 11:
##################################################################
#sub menu 11: Voice recognition GUI - audio output if conflicts happen
# check the right voice comparing the contents in
# voice recorder. Record and change contents in another bash
##################################################################
timea = time.time()
while status_flag == 11:
if speak_flag == 0:
s = "Voice recognition part porbiddened due to sound card conflict, sorry"
speak_flag = 1
str_out = s1 + s + s3
os.system(str_out)
screen.fill(WHITE)
screen.blit(mic, mic_rect)
pygame.display.flip()
with open("/home/pi/final_project/voiceorder.txt") as file:
data1=file.read()
file.close()
ti = time.time()-timea
if ti >10:
status_flag = 0
break
#print (data1)
if data1 == 'open':
print('^_^')
status_flag = 3
break
#i=i+1
except KeyboardInterrupt:
pass
p_left.stop()
p_right.stop()
GPIO.cleanup()
get_msg function
GUI.py
##################################################################
#   Function name: get_msg
#
#   Description: used for Wechat (Web backend)
#                callback function for wechat response
#
#   Made by: hs978
#
#   Date: 2018.12.4
##################################################################
@itchat.msg_register(itchat.content.TEXT)
def get_msg(msg):
    global status_flag
    if msg.text == 'no':
        status_flag = 0
        itchat.logout()
    if msg.text == 'yes':
        status_flag = 3
        itchat.logout()
    print msg.text
Camera class
GUI.py
##################################################################
#   Class name: Camera
#
#   Description: used for knock (Web backend)
#                self-defined camera class for acquiring frames
#
#   Made by: hs978
#
#   Date: 2018.12.4
##################################################################
class Camera(BaseCamera):
    global camera
    global camera_flag
    global x
    global y
    @staticmethod
    def frames():
        #with picamera.PiCamera() as camera:
            # let camera warm up

        while camera_flag:
            time.sleep(2)

            stream = io.BytesIO()
            for _ in camera.capture_continuous(stream, 'jpeg',
                                                 use_video_port=True):
                if camera_flag < 1:
                    break
                # return current frame
                stream.seek(0)
                yield stream.read()

                # reset stream for next frame
                stream.seek(0)
                stream.truncate()

app = Flask(__name__)
index function
GUI.py
##################################################################
#   Function name: index
#
#   Description: used for knock (Web backend)
#                main function of web backend
#
#   Made by: hs978
#
#   Date: 2018.12.4
##################################################################
@app.route("/", methods=['GET', 'POST'])
def index():
    global camera_flag
    global status_flag
    global start_web
    #if (time.time() - start_web) > 10:
    #    func = request.environ.get('werkzeug.server.shutdown')
    #    func()
        #shutdown_server()
    #    return

    """Video streaming home page."""
    print(request.method)
    if request.method == 'POST':
        if request.form.get('Open') == 'Open':
                # pass
            print("Open")
            #camera_flag = 0
            status_flag = 3
            #open_flag
            func = request.environ.get('werkzeug.server.shutdown')
            func()
            #shutdown_server()
            return render_template("success.html")
        elif  request.form.get('Reject') == 'Reject':
                # pass # do something else
            status_flag = 0
            print("Reject")
            func = request.environ.get('werkzeug.server.shutdown')
            func()
            return render_template("fail.html")
        else:
                # pass # unknown
            return render_template("index.html")
    elif request.method == 'GET':
            # return render_template("index.html")
            print("No Post Back Call")
    return render_template("index.html")
gen(camera) function
GUI.py
##################################################################
#   Function name: gen(camera)
#
#   Description: used for knock (Web backend)
#                sub-function for function contact()
#
#   Made by: hs978
#
#   Date: 2018.12.4
##################################################################
def gen(camera):
    """Video streaming generator function."""
    while True:
        frame = camera.get_frame()
        yield (b'--frame\r\n'
               b'Content-Type: image/jpeg\r\n\r\n' + frame + b'\r\n')
video_feed function
GUI.py
##################################################################
#   Function name: video_feed
#
#   Description: used for knock (Web backend)
#                video stream contact
#
#   Made by: hs978
#
#   Date: 2018.12.4
##################################################################
@app.route('/video_feed')
def video_feed():
    """Video streaming route. Put this in the src attribute of an img tag."""
    return Response(gen(Camera()),
                    mimetype='multipart/x-mixed-replace; boundary=frame')
contact function
GUI.py
##################################################################
#   Function name: contact
#
#   Description: used for knock (Web backend)
#                unit test case(not used in the final work)
#
#   Made by: hs978
#
#   Date: 2018.12.4
##################################################################
@app.route('/contact',methods=['GET', 'POST'])
def contact():
    if request.method == 'POST':
        if request.form['submit_button'] == 'Do Something':
            print("a")
            pass # do something
        elif request.form['submit_button'] == 'Do Something Else':
            print("b")
            pass # do something else
        else:
            pass # unknown
    elif request.method == 'GET':
        return render_template('contact.html', form=form)
sendm function
GUI.py
##################################################################
#   Function name: sendm
#
#   Description: used for knock(before starting web)
#                send a remind email to the owner
#
#   Made by: xh344
#
#   Date: 2018.12.3
##################################################################
def sendm():
    smtpUser = 'hs978xh344@gmail.com'
    smtpPass = 'ece5725!'

    toAdd='hs978@cornell.edu'#'xh344@cornell.edu'
    fromAdd = smtpUser

    subject = 'knock,knock http://172.20.10.4:5000/'#http://128.253.17.23:5000/'
    header = 'To: ' + toAdd + '\n' + 'From: ' + fromAdd + '\n' + 'Subject: ' + subject
    link='128,253,17,23:5000'
    body = 'check who is coming? '

    print header + '\n' + body

    s = smtplib.SMTP('smtp.gmail.com',587)
    s.ehlo()
    s.starttls()
    s.ehlo()

    s.login(smtpUser,smtpPass)
    s.sendmail(fromAdd, toAdd, header + '\n' + body)
    s.quit()
#white = 255,255,255
#black = 0,0,0
register function
GUI.py
##################################################################
#   Function name: register
#
#   Description: add a new password to the file
#
#   Made by: xh344
#
#   Date: 2018.11.28
##################################################################

def register(name, str):
    file=open('/home/pi/final_project/password/'+name+'.txt',"w")
    file.write(str)
contact function
GUI.py
##################################################################
#   Function name: changepw
#
#   Description: change the password in the file
#
#   Made by: xh344
#
#   Date: 2018.11.28
##################################################################

def changepw(str):
    file=open('/home/pi/final_project/password/hs.txt',"w")
    file.write(str)
checkpw function
GUI.py
##################################################################
#   Function name: checkpw
#
#   Description: used for changePW
#                check is the input password is right compared to the
#                file saved copy
#
#   Made by: xh344
#
#   Date: 2018.11.28
##################################################################

def checkpw(id_, str):
    #str is the user input in GUI
    #if(id_==0):
        with open("/home/pi/final_project/password/hs.txt") as file:
            data1=file.read()

                #unlock the door call servo function

    #if(id_==1):
        with open("/home/pi/final_project/password/hxh.txt") as file:
            data2=file.read()

        return data1==str or data2==str

    #unlock the door call servo function
model training function
GUI.py
##################################################################
#   Function name: train
#
#   Description: used for register
#                train the face recognition model using images
#                in the library
#
#   Made by: xh344
#
#   Date: 2018.11.27
##################################################################
def train():
    recognizer = cv2.createLBPHFaceRecognizer()
    cascadePath= "/home/pi/final_project/opencv-master/data/haarcascades/haarcascade_frontalface_alt2.xml"
    face_cascade =cv2.CascadeClassifier(cascadePath)
# find the image directory
    BASE_DIR =os.path.dirname("/home/pi/final_project")
    image_dir =os.path.join(BASE_DIR, "final_project/images")
#print(image_dir)

#initialize the the trauning variable
    curr_id=0
    label_ids ={}
    y_labels=[]
    x_train=[]

    for root,dirs,files in os.walk(image_dir):

        for file in files :

           if file.endswith("jpg"):
                path = os.path.join(root,file)
                label =os.path.basename(root)
            #print(label)

                if not label in label_ids:
                    label_ids[label] = curr_id
                    curr_id=curr_id+1
                id_= label_ids[label]
            #print(label_ids)
                pil_image=Image.open(path).convert("L")# grayscale
                image_array = np.array(pil_image,"uint8")
            #print(image_array)
                faces=face_cascade.detectMultiScale(image_array, scaleFactor=1.5, minNeighbors=5,minSize=(5,5), flags= cv2.cv.CV_HAAR_SCALE_IMAGE)

                for(x,y,w,h) in faces:
                    roi= image_array[y:y+h,x:x+w]
                    x_train.append(roi)
                    y_labels.append(id_)

#print(x_train) just for check
    print(y_labels)
# store the label
    with open("labels.pickle",'wb') as f:
        pickle.dump(label_ids,f)

#start to train
    recognizer.train(x_train,np.array(y_labels))
    recognizer.save("trainer.yml")
gather_info function(take pictures)
GUI.py
##################################################################
#   Function name: gather_info
#
#   Description: used for register
#                continuesly take 80 pictures using picamera
#
#   Made by: hs978
#
#   Date: 2018.11.28
##################################################################

def gather_info():
    i=0
    im_num = 80

    rawCapture = PiRGBArray(camera,size=(480,320))
    face_cascade=cv2.CascadeClassifier('/home/pi/final_project/opencv-master/data/haarcascades/haarcascade_frontalface_alt2.xml')
    #time_start_l = time.time()
    for frame in camera.capture_continuous(rawCapture, format="bgr", use_video_port =True):
  #time_interval_l = time_now_l - time_start_l
  #if time_interval_l > 60:
        #    status_flag = 2

        #    return 0

  frame= frame.array
  gray =cv2.cvtColor(frame,cv2.COLOR_BGR2GRAY)
  faces=face_cascade.detectMultiScale(gray, scaleFactor=1.5, minNeighbors=5,minSize=(5,5), flags= cv2.cv.CV_HAAR_SCALE_IMAGE)
  for(x,y,w,h) in faces:
    print(x,y,w,h)
    rog= gray[y:y+h,x:x+w]# region of interets in gray scale

      # recognizer

    color1= (255,0,0)
    color2= (0,255,0)
    color3= (0,0,255)
    im=frame

    if(i<=im_num ):
                    cv2.imwrite('/home/pi/final_project/images/user2/'+str(i)+'.jpg', frame)#[y:y+h,x:x+h])
                    i=i+1
                else:
                    return 1
                cv2.rectangle(im,(x,y),(x+w,y+w),color1,2)
                    #cv2.imwrite('/home/pi/Desktop/test.jpg', frame[y:y+h,x:x+h])
                    #i = i+1
  #cv2.imshow('frame', frame)
        screen.fill(BLACK)################################
        sf=cv2.resize(frame,(280,240))
        sf= cv2.cvtColor(sf,cv2.COLOR_BGR2RGB)
        sf=np.rot90(sf)
        sf=pygame.surfarray.make_surface(sf)
        screen.blit(sf,(0,0))
        height = (240 * i) / im_num
        #print(height)
        pygame.draw.rect(screen,WHITE,[280,240 - height,40,height],0)
        pygame.display.flip()
  rawCapture.truncate(0)
    return 0
face_rec function
GUI.py
##################################################################
#   Function name: face_rec
#
#   Description: used for face detection in real time
#                will break when a face is successfully detected
#
#   Made by: xh344
#
#   Date: 2018.11.27
##################################################################

def face_rec():
    # enable the picamera
    global status_flag
    global screen#################################
    global camera_flag
    global camera
    #if camera_flag == 0:

    rawCapture = PiRGBArray(camera,size=(480,320))

    record=0
    sum=0
    array=[]
    #input the face_cascade
    face_cascade=cv2.CascadeClassifier('/home/pi/final_project/opencv-master/data/haarcascades/haarcascade_frontalface_alt2.xml')
    #initialize the facerecognizer
    recognizer = cv2.createLBPHFaceRecognizer()
    #load the traning data
    recognizer.load("trainer.yml")
    i = 0
    time_start_l = time.time()
    # capture frame by frame and detect and recognize the face frame by frame
    for frame in camera.capture_continuous(rawCapture, format="bgr", use_video_port =True):


  frame= frame.array
  gray =cv2.cvtColor(frame,cv2.COLOR_BGR2GRAY)
  faces=face_cascade.detectMultiScale(gray, scaleFactor=1.5, minNeighbors=5,minSize=(5,5), flags= cv2.cv.CV_HAAR_SCALE_IMAGE)
  time_now_l = time.time()
  time_interval_l = time_now_l - time_start_l
  if time_interval_l > 15:
            status_flag = 2
#            camera.close()
            return -1
  for(x,y,w,h) in faces:
    print(x,y,w,h)
      # region of interets in gray scale
    rog= gray[y:y+h,x:x+w]

      # recognizer predict he id and the confidence number which associate with
                id_, conf = recognizer.predict(rog)

            # after mutiple adjusting the confidence number, we use this region
                if conf>= 35 and conf=88:
                    print(id_)
                    array.append(id_)
                    if len(array)<=5:
                        sum=sum+id_

                    else:
                        if sum>5:
                            status_flag = 3
                            #camera.close()
                            return 1
                        else:
                            status_flag = 3
                            #camera.close()
                            return 0

                    #status_flag = 3
                    #return -1
                    ###start to call checkpw function conbine with gui
      # for different colors of retangular
    color1= (255,0,0)
    color2= (0,255,0)
    color3= (0,0,255)
    cv2.rectangle(frame,(x,y),(x+w,y+w),color1,2)
    #if(record == 0 ):
                    #cv2.imwrite('/home/pi/Desktop/datah/test'+str(i)+'.jpg', frame)#[y:y+h,x:x+h])
                    #cv2.imwrite('/home/pi/Desktop/test.jpg', frame[y:y+h,x:x+h])
                    #i = i+1
  #cv2.imshow('frame', frame)

  screen.fill(BLACK)################################
        sf=cv2.resize(frame,(320,240))
        sf= cv2.cvtColor(sf,cv2.COLOR_BGR2RGB)
        sf=np.rot90(sf)
        sf=pygame.surfarray.make_surface(sf)
        screen.blit(sf,(0,0))
        pygame.display.flip()


  rawCapture.truncate(0)

  # physical key for quiting
  if cv2.waitKey(20) & 0xFF ==ord('q'):
            break
    status_flag = 2
    #camera.close()
    return -1
opend function(open the door)
GUI.py
##################################################################
#   Function name: opend
#
#   Description: used for door opening
#                use two GPIOs to control the servos to open the door
#
#   Made by: hs978
#
#   Date: 2018.11.27
##################################################################
def opend():
    global p_left
    global p_right

    vdd= 1.53
    dc = 100 * vdd / (vdd + 20)
    f = 1000 / (vdd + 20)

    vdd2= 1.47
    dc2 = 100 * vdd2 / (vdd2 + 20)
    f2 = 1000 / (vdd2 + 20)

    vdd3= 0
    dc3 = 100 * vdd3 / (vdd3 + 20)
    f3 = 1000 / (vdd3 + 20)

    p_left.ChangeFrequency(f)
    p_left.ChangeDutyCycle(dc)

    p_right.ChangeFrequency(f2)
    p_right.ChangeDutyCycle(dc2)

    #p_left.start(dc)
    #p_right.start(dc2)
    time_start=time.time()

    while 1:
        time_now=time.time()
        time_interval=time_now-time_start
        if time_interval > 1.2:
            break

    p_left.ChangeFrequency(f3)
    p_left.ChangeDutyCycle(dc3)

    p_right.ChangeFrequency(f3)
    p_right.ChangeDutyCycle(dc3)
closed function(close the door)
GUI.py
##################################################################
#   Function name: closed
#
#   Description: used for door closing
#                use two GPIOs to control the servos to close the door
#
#   Made by: hs978
#
#   Date: 2018.11.27
##################################################################
def closed():
    global p_left
    global p_right

    vdd= 1.53
    dc = 100 * vdd / (vdd + 20)
    f = 1000 / (vdd + 20)

    vdd2= 1.47
    dc2 = 100 * vdd2 / (vdd2 + 20)
    f2 = 1000 / (vdd2 + 20)

    vdd3= 0
    dc3 = 100 * vdd3 / (vdd3 + 20)
    f3 = 1000 / (vdd3 + 20)

    p_left.ChangeFrequency(f2)
    p_left.ChangeDutyCycle(dc2)

    p_right.ChangeFrequency(f)
    p_right.ChangeDutyCycle(dc)

    #p_left.start(dc2)
    #p_right.start(dc)
    time_start=time.time()

    while 1:
        time_now=time.time()
        time_interval=time_now-time_start
        if time_interval > 1:
            break

    #p_left.stop()
    #p_right.stop()
    p_left.ChangeFrequency(f3)
    p_left.ChangeDutyCycle(dc3)

    p_right.ChangeFrequency(f3)
    p_right.ChangeDutyCycle(dc3)
Flask backend Section
app.py
##################################################################
#   Section name: app.py
#
#   Description: flask backend main functions
#                response to action in the html page
#
#   Made by: hs978
#
#   Date: 2018.12.3
##################################################################
from importlib import import_module
import os
from flask import Flask, render_template, Response, request
import io
import time
import picamera
from base_camera import BaseCamera
from picamera.array import PiRGBArray
from picamera import PiCamera
import pygame

class Camera(BaseCamera):
    global camera
    global camera_flag
    global x
    global y
    @staticmethod
    def frames():
        #with picamera.PiCamera() as camera:
            # let camera warm up

        while camera_flag:
            time.sleep(2)

            stream = io.BytesIO()
            for _ in camera.capture_continuous(stream, 'jpeg',
                                                 use_video_port=True):
                if camera_flag <1:
                    break
                # return current frame
                stream.seek(0)
                yield stream.read()

                # reset stream for next frame
                stream.seek(0)
                stream.truncate()


# import camera driver
#if os.environ.get('CAMERA'):
#    Camera = import_module('camera_' + os.environ['CAMERA']).Camera
#else:
#    from camera import Camera

# Raspberry Pi camera module (requires picamera package)
#from camera_pi import Camera
#from picamera.array import PiRGBArray
#from picamera import PiCamera

app = Flask(__name__)


#@app.route('/')
#def index():
#    """Video streaming home page."""
#    return render_template('index.html')

@app.route("/", methods=['GET', 'POST'])
def index():
    global camera_flag
    """Video streaming home page."""
    print(request.method)
    if request.method == 'POST':
        if request.form.get('Encrypt') == 'Encrypt':
                # pass
            print("Encrypted")
            camera_flag = 0
            func = request.environ.get('werkzeug.server.shutdown')
            func()
            #shutdown_server()
            return
        elif  request.form.get('Decrypt') == 'Decrypt':
                # pass # do something else
            print("Decrypted")
        else:
                # pass # unknown
            return render_template("index.html")
    elif request.method == 'GET':
            # return render_template("index.html")
            print("No Post Back Call")
    return render_template("index.html")

def gen(camera):
    """Video streaming generator function."""
    while True:
        frame = camera.get_frame()
        yield (b'--frame\r\n'
               b'Content-Type: image/jpeg\r\n\r\n' + frame + b'\r\n')


@app.route('/video_feed')
def video_feed():
    """Video streaming route. Put this in the src attribute of an img tag."""
    return Response(gen(Camera()),
                    mimetype='multipart/x-mixed-replace; boundary=frame')

@app.route('/contact',methods=['GET', 'POST'])
def contact():
    if request.method == 'POST':
        if request.form['submit_button'] == 'Do Something':
            print("a")
            pass # do something
        elif request.form['submit_button'] == 'Do Something Else':
            print("b")
            pass # do something else
        else:
            pass # unknown
    elif request.method == 'GET':
        return render_template('contact.html', form=form)

if __name__ == '__main__':
    camera= PiCamera()
    #camera = pygame.camera.Camera()
    camera.resolution=(480,320)
    camera.framerate=64
    camera_flag = 1
    app.run(host="0.0.0.0", threaded=True)


    while True:
        BLACK = 0,0,0
        x = 0
        y = 0
        screen = pygame.display.set_mode((320,240))
        screen.fill(BLACK)
        pygame.display.flip()


    WHITE = 0,0,0
    x = 0
    y = 0
    screen = pygame.display.set_mode((320,240))
    screen.fill(WHITE)
    pygame.display.flip()
basecamera class
basecamera.py
##################################################################
#   Section name: app.py
#
#   Description: flask camera class
#                use thread to acquire frames using picamera in real time
#
#   Made by: hs978
#
#   Date: 2018.12.3
##################################################################
import time
import threading
try:
    from greenlet import getcurrent as get_ident
except ImportError:
    try:
        from thread import get_ident
    except ImportError:
        from _thread import get_ident


class CameraEvent(object):
    """An Event-like class that signals all active clients when a new frame is
    available.
    """
    def __init__(self):
        self.events = {}

    def wait(self):
        """Invoked from each client's thread to wait for the next frame."""
        ident = get_ident()
        if ident not in self.events:
            # this is a new client
            # add an entry for it in the self.events dict
            # each entry has two elements, a threading.Event() and a timestamp
            self.events[ident] = [threading.Event(), time.time()]
        return self.events[ident][0].wait()

    def set(self):
        """Invoked by the camera thread when a new frame is available."""
        now = time.time()
        remove = None
        for ident, event in self.events.items():
            if not event[0].isSet():
                # if this client's event is not set, then set it
                # also update the last set timestamp to now
                event[0].set()
                event[1] = now
            else:
                # if the client's event is already set, it means the client
                # did not process a previous frame
                # if the event stays set for more than 5 seconds, then assume
                # the client is gone and remove it
                if now - event[1] > 5:
                    remove = ident
        if remove:
            del self.events[remove]

    def clear(self):
        """Invoked from each client's thread after a frame was processed."""
        self.events[get_ident()][0].clear()


class BaseCamera(object):
    thread = None  # background thread that reads frames from camera
    frame = None  # current frame is stored here by background thread
    last_access = 0  # time of last client access to the camera
    event = CameraEvent()

    def __init__(self):
        """Start the background camera thread if it isn't running yet."""
        if BaseCamera.thread is None:
            BaseCamera.last_access = time.time()

            # start background frame thread
            BaseCamera.thread = threading.Thread(target=self._thread)
            BaseCamera.thread.start()

            # wait until frames are available
            while self.get_frame() is None:
                time.sleep(0)

    def get_frame(self):
        """Return the current camera frame."""
        BaseCamera.last_access = time.time()

        # wait for a signal from the camera thread
        BaseCamera.event.wait()
        BaseCamera.event.clear()

        return BaseCamera.frame

    @staticmethod
    def frames():
        """"Generator that returns frames from the camera."""
        raise RuntimeError('Must be implemented by subclasses.')

    @classmethod
    def _thread(cls):
        """Camera background thread."""
        print('Starting camera thread.')
        frames_iterator = cls.frames()
        for frame in frames_iterator:
            BaseCamera.frame = frame
            BaseCamera.event.set()  # send signal to clients
            time.sleep(0)

            # if there hasn't been any clients asking for frames in
            # the last 10 seconds then stop the thread
            if time.time() - BaseCamera.last_access > 10:
                frames_iterator.close()
                print('Stopping camera thread due to inactivity.')
                break
        BaseCamera.thread = None