ECE5725 Project Robot Cat
December 5 2018
A Project By Jingyi Wang(jw2527) and Zitao Zheng(zz632)
Demonstration Video
Introduction
In this project, we develop a robot cat based on Raspberry Pi. We implement several functions to the robot cat. Firstly, we attach three ultrasonic sensors to realize the function of avoiding obstacles. It will turn left when the right sensor detects obstacles, turn right when the left sensor detects obstacles, and go backward when the front sensor detects obstacles. Secondly, we install OpenCV and use Haar cascades algorithm to realize the function of face detection. When it detects its owner, it will come towards its owner. Thirdly, we use pygame to realize the function of displaying the output of the Pi Camera, then users can take photos with four different cat patterns with a tap of button.
Project Objective:
In this project, we build a robot cat which has three modes:
- Wander Mode: it can walk on the floor and avoid obstacles on its way.
- Find Owner Mode: it can detect user’s face and move to track user.
- Photo Booth Mode: it can display the output of the Pi Camera and user can take photos with it.
- There also GUI hardware button implementations.
Design and Testing
Robot Move
Since our Robot Cat needs to move around, the robot we built from Lab 3 can be a very good prototype for us. We used the rpi.GPIO library to develop control applications for servos.In this project, we chose GPIO6 and GPIO19 as GPIO output for servos. The servo connection circuit is shown as Fig.1. Also, we changed the duty cycle and frequency to change the speed and direction.
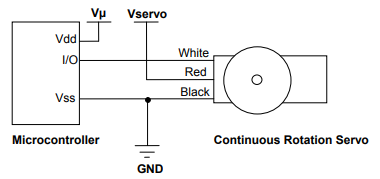
Fig.1 Servo Circuit
We can place Raspberry Pi and breadboard on the robot frame and two continous servos on the robot can drive make the robot move and change speed. Moreover, in order to fulfill the function of Robot Cat, we need to add more parts to it. For the Find Owner Mode, Robot Cat needs to look see our faces, so we added a PiCamera. For Wander mode, Robot Cat needs to sense the distance between obstacles and itself, so we added 3 ultrasonic distance sensors. This distance sensor can return the distance and this can help us programming and finish our function. We also added an amplifier for creating more interaction with people. The robot apperance is shown as Fig.2.
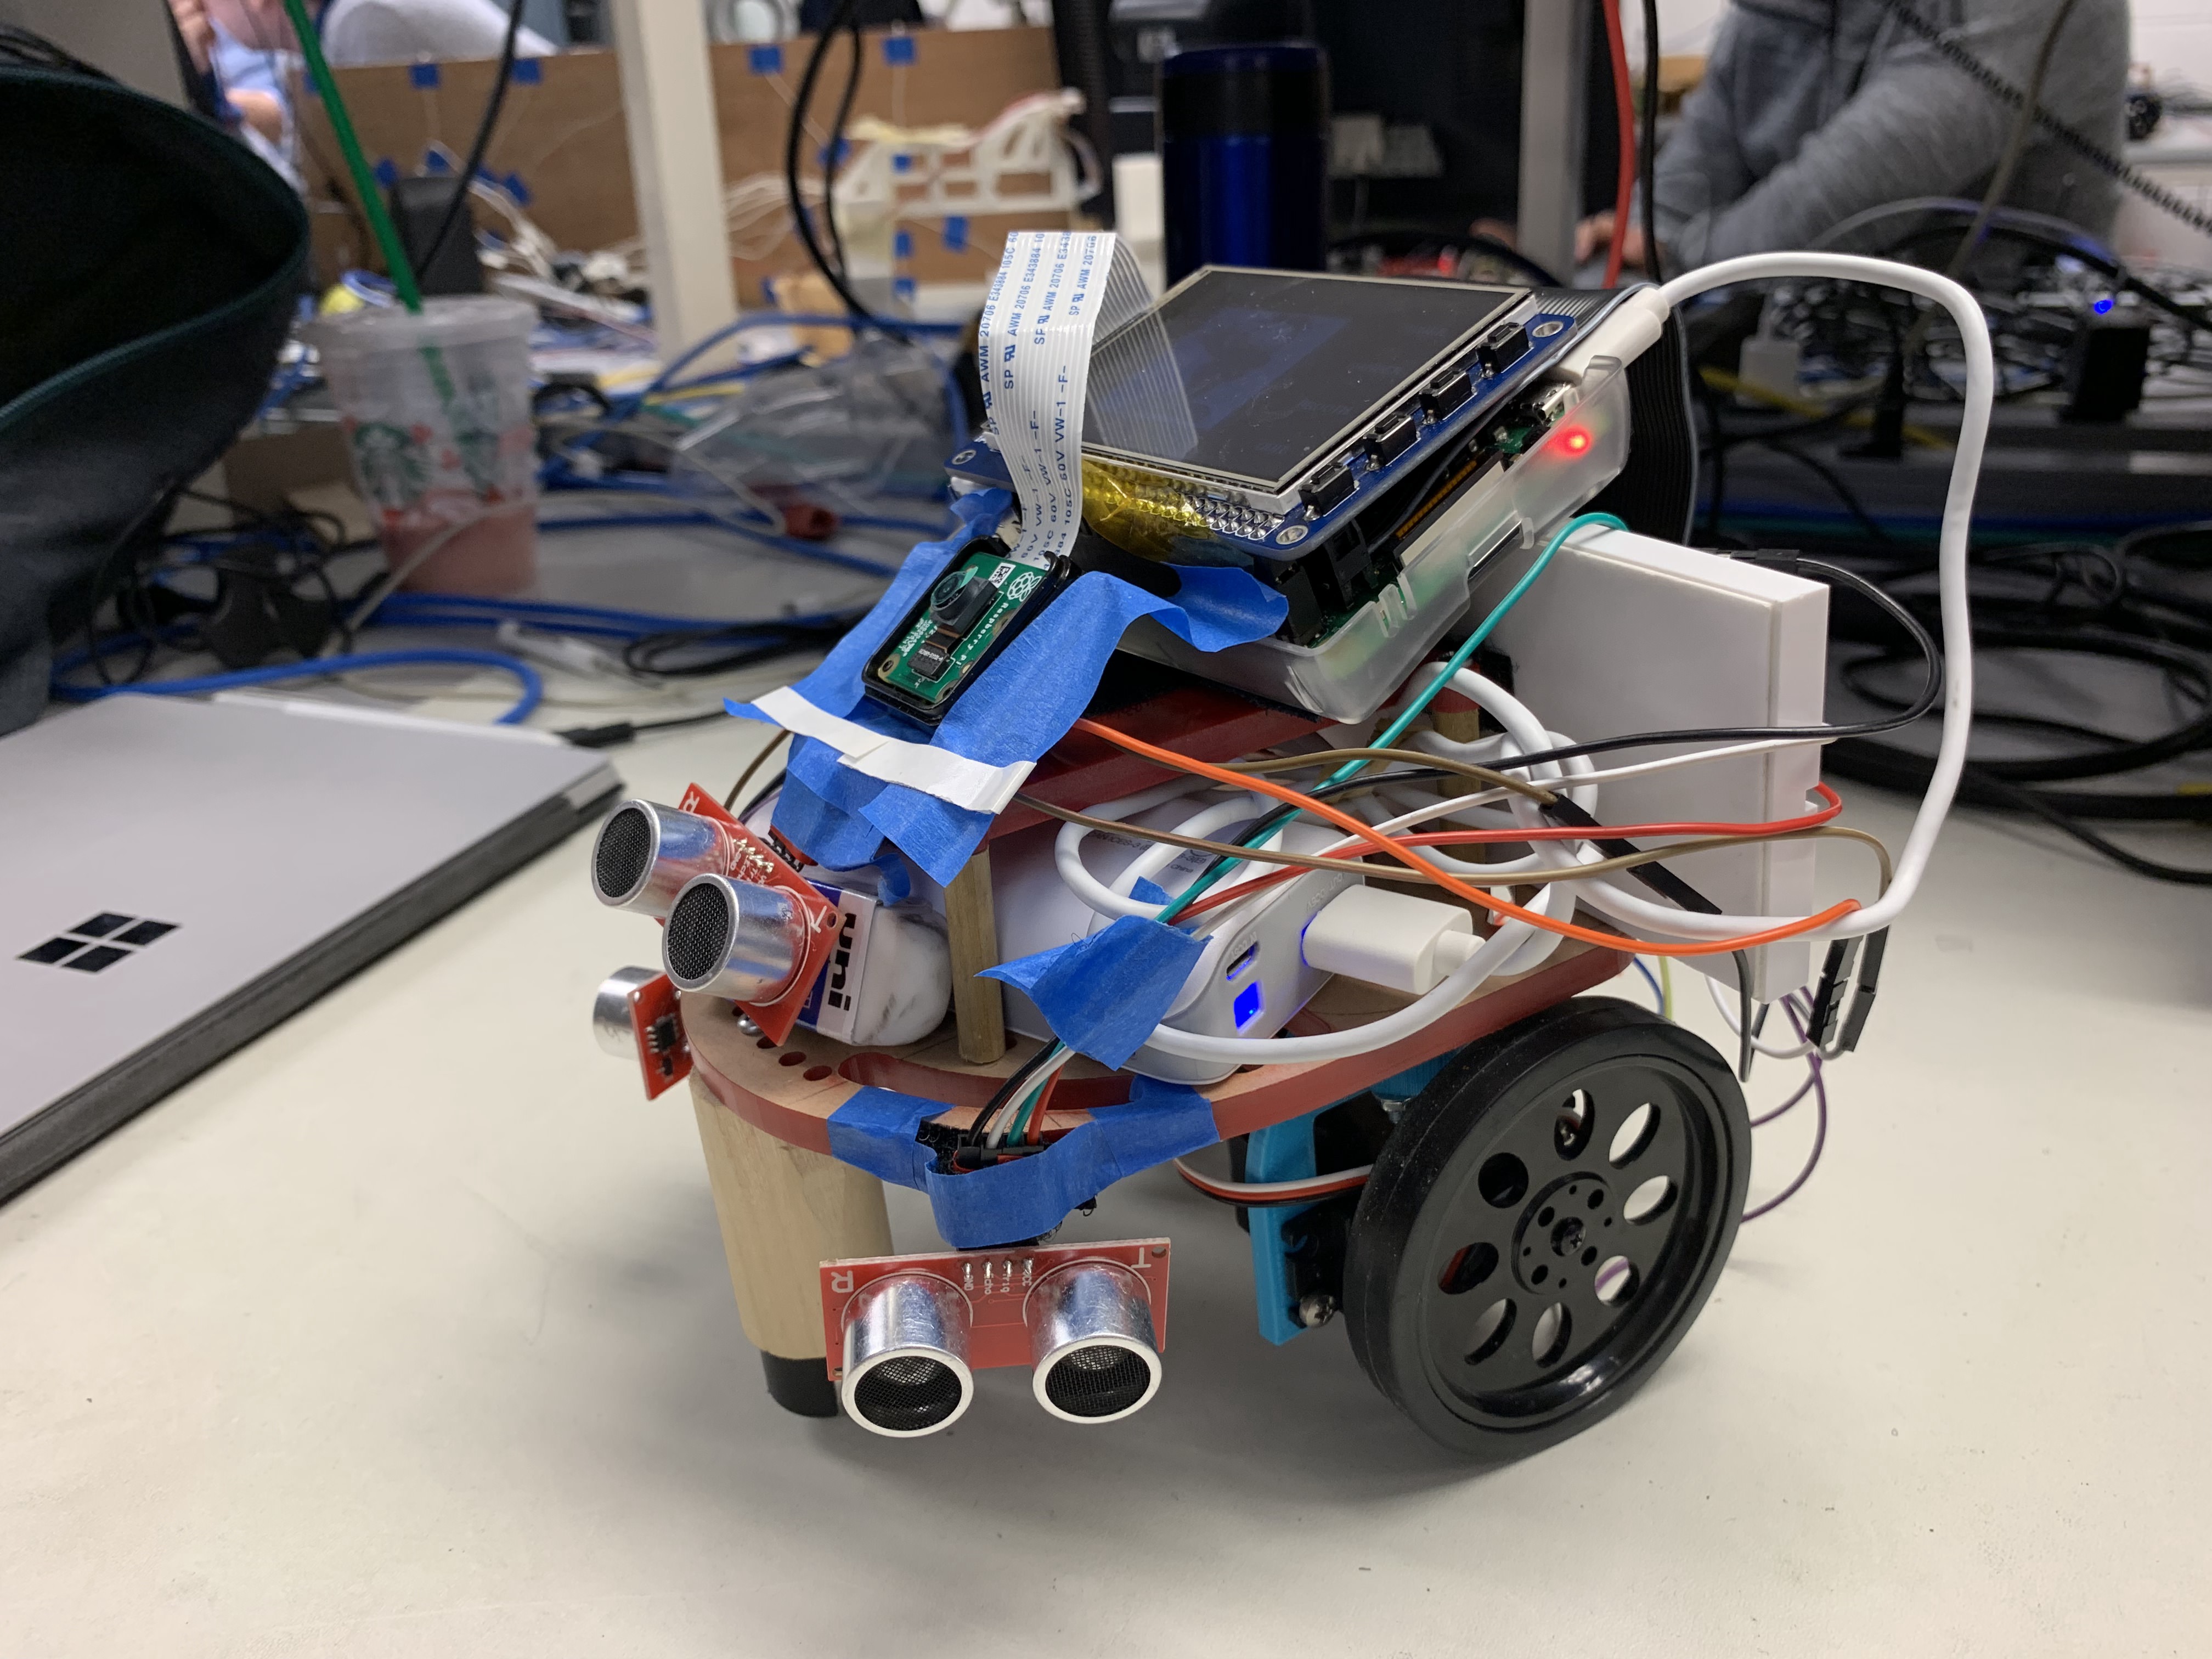
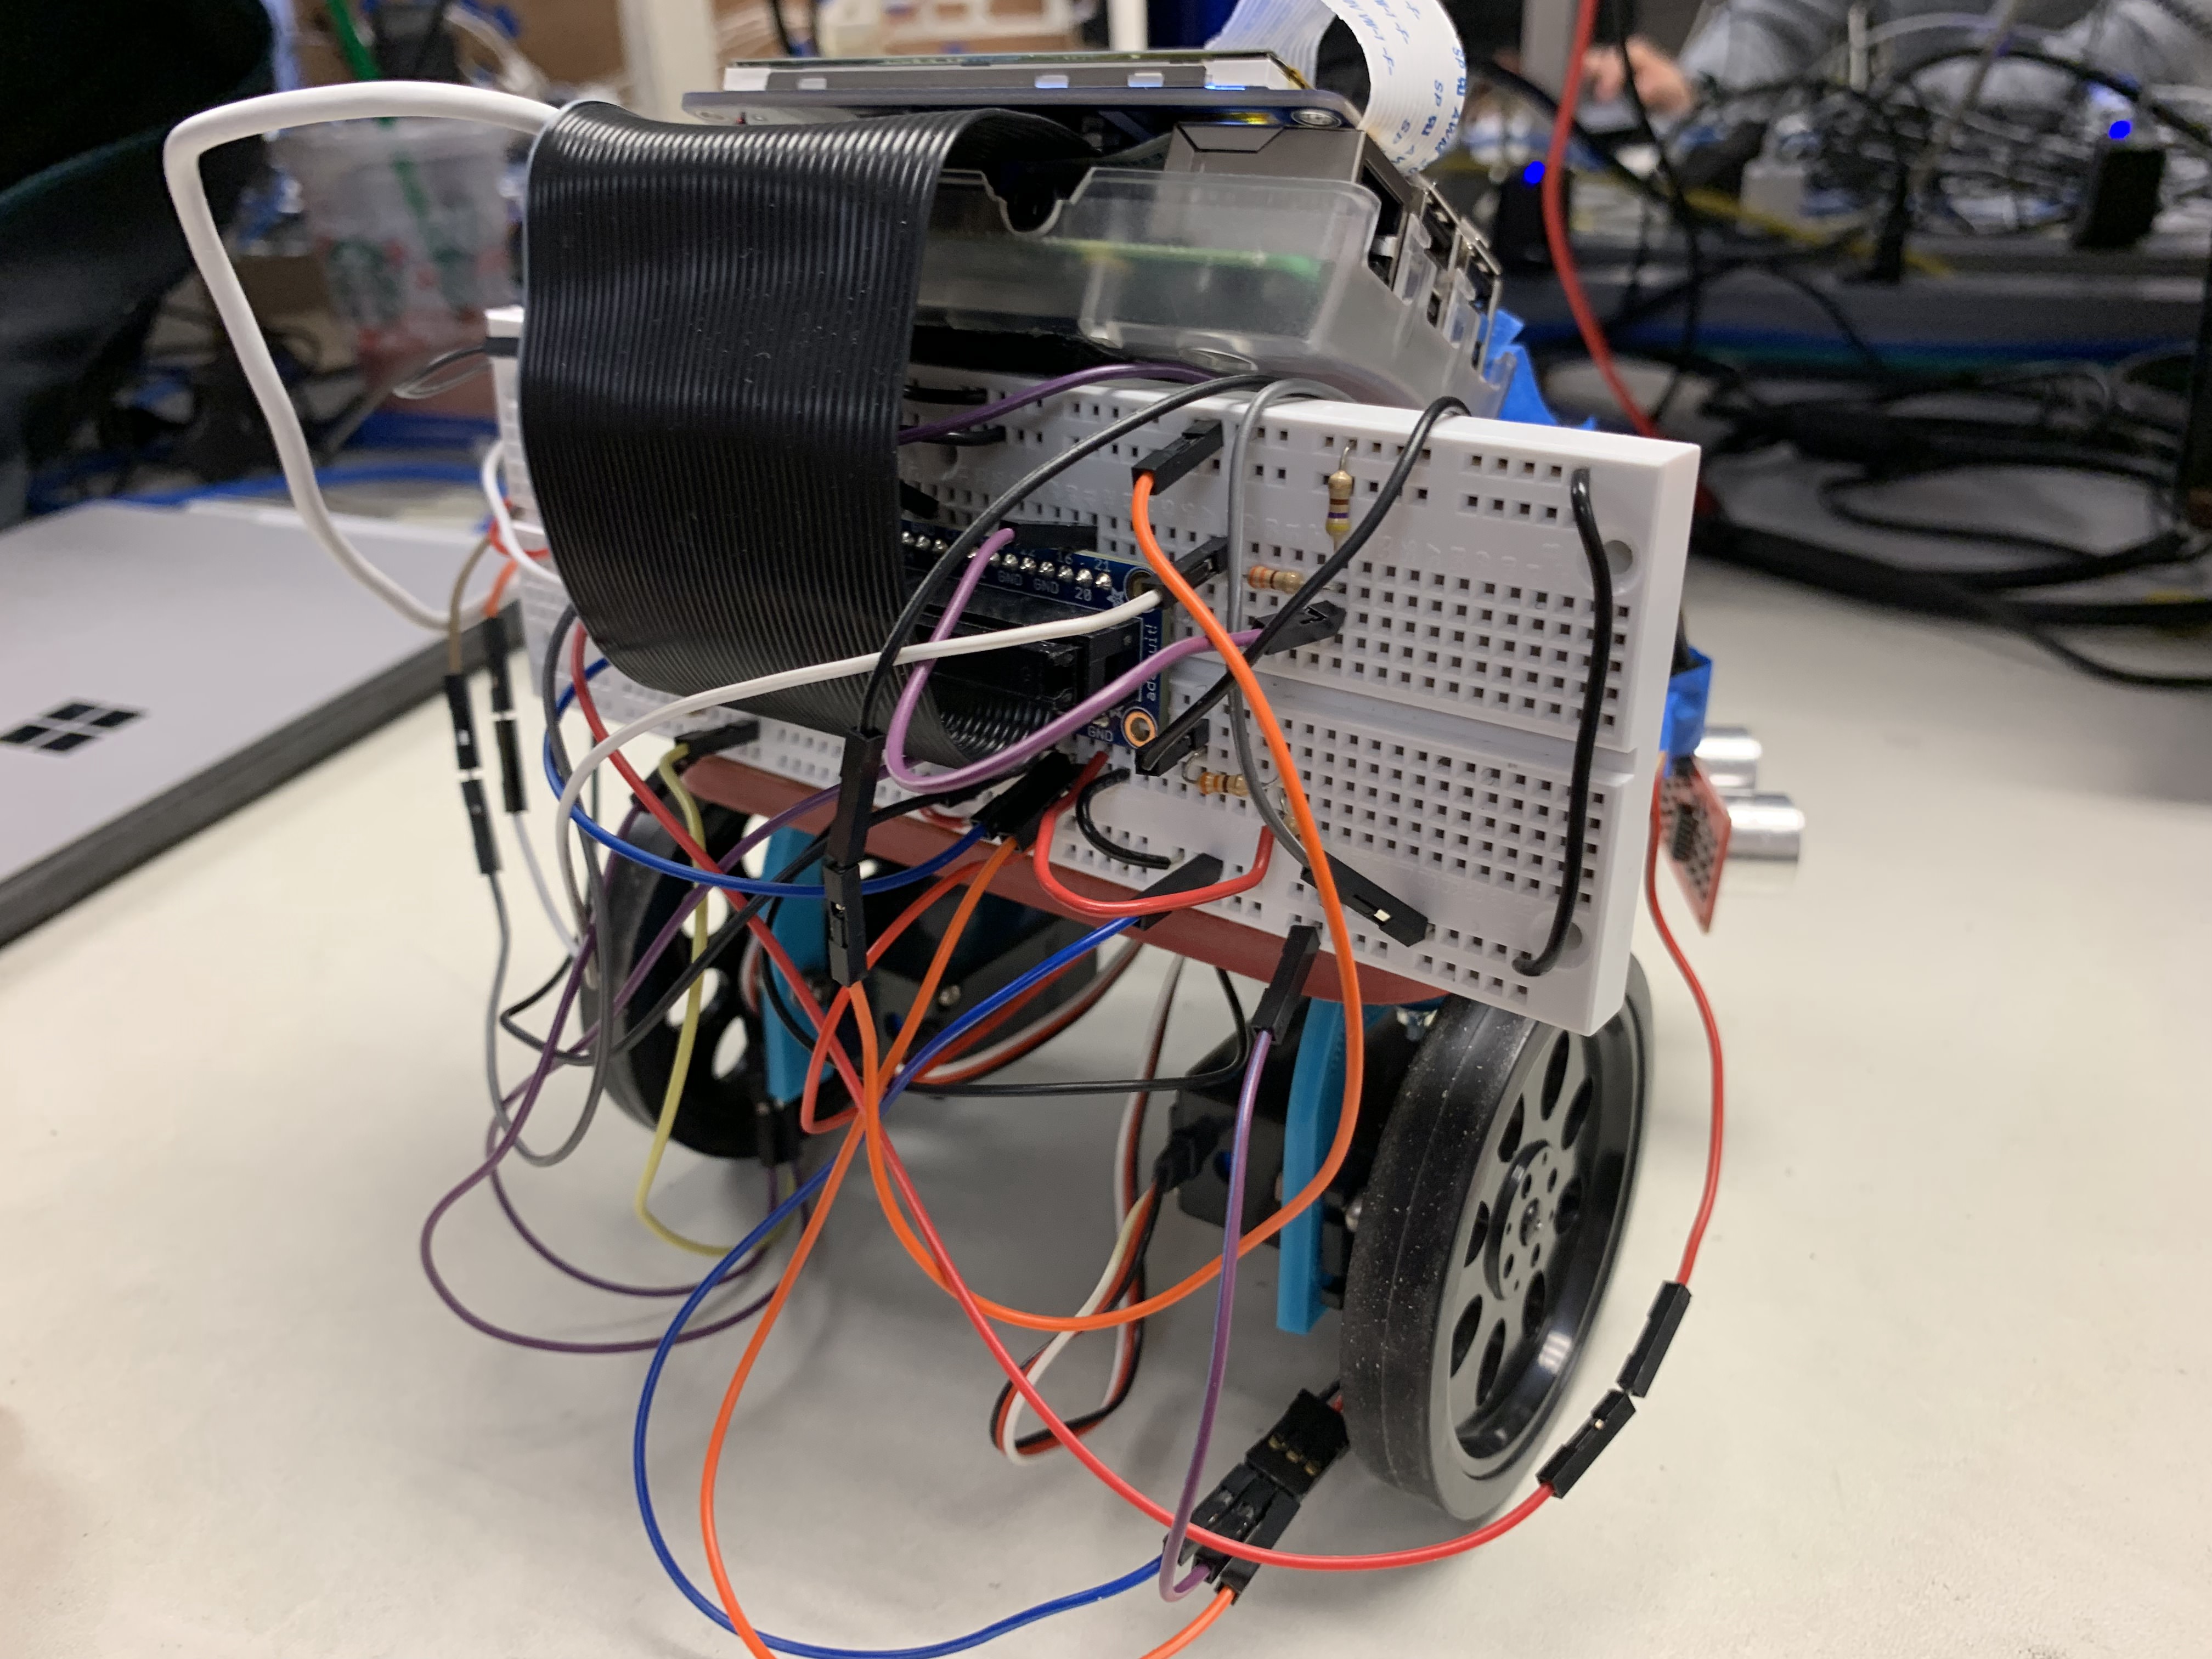
Fig.2 Robot Cat Appearance
Wander Mode
In Lab 3, we learned how to develop a robot car that can go straight and turn around. Based on that, we wanted Robot Cat can detect and avoid obstacles. To begin with, we added to ultrasonic distance sensors to two sides of the robot frame. We finished the hardware circuit connection as Fig.3 shows and we used a test code to test whether they functions well.
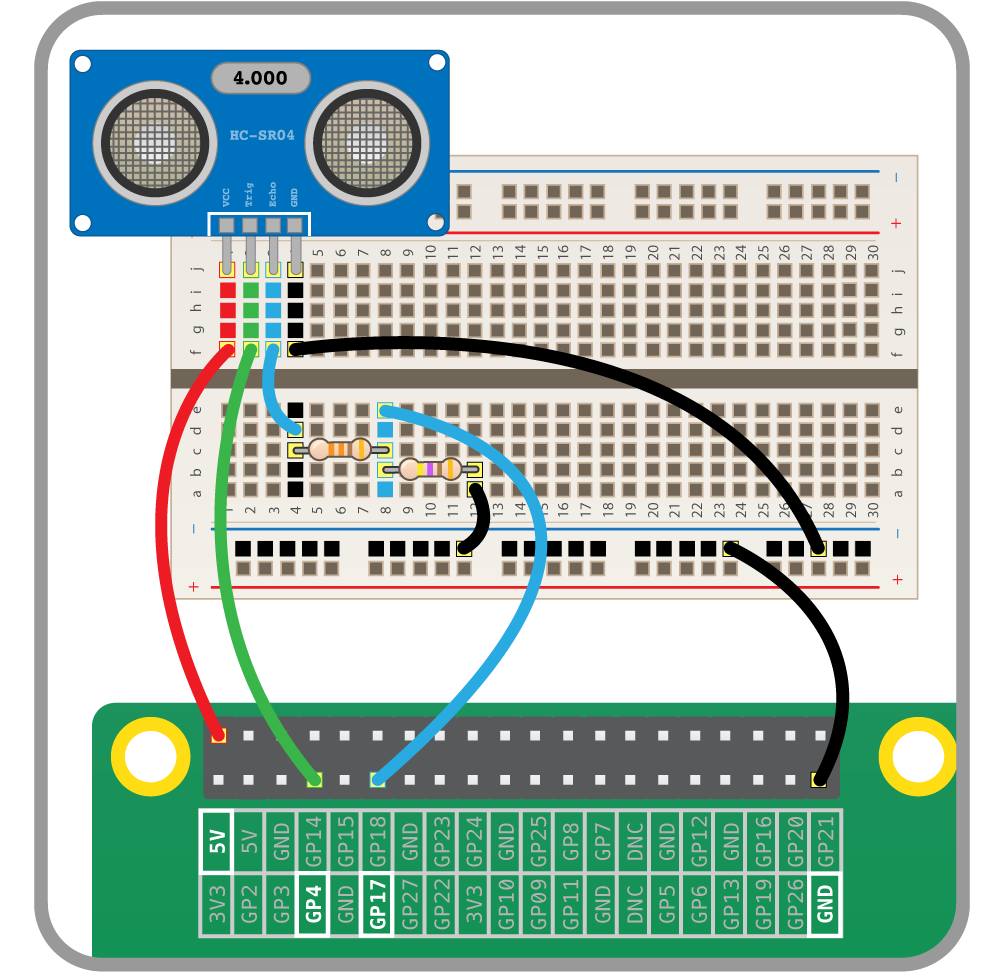
Fig.3 Ultrasonic Distance Sensor Circuit
After checking the sensor, we began working on the software part. Since we want the robot to follow certain patterns when there is no obstacles, we set each period of the whole pattern a number and the time starts to count when first entering this state. For the basic pattern, we had four patterns including Go Straight, Turn Left, Go Straight, Turn Right, and we realize them by changing the duty cycle and frequency.
For the situation with obstacles, we came up with an idea that set this as a state as well. If the distance sensed by sensors are shorter than the setted value, the program would go into this state and avoid hitting them by turn the direction. To be more specific, when the sensor on the left returns a distance less than 20cm, Robot Cat would turn right. Also, Robot Cat would turn left when the sensor on the right returns a distance less than 20cm. If both sensors get short distance, there may be a corner and Robot Cat would go back. The first quesiton we faced is that the state can't change immediately when sensing obstacles. Our first solution is to run all the states in sequence and check the distance in the state for avoiding obstacles. In this situation, the state won't change if the state is not for avoiding obstacles when sensing obstacles. The professor then advised us to check the distance first then change states. We tried that and it really worked.
When we tested this functon, we had two preoblems about it. Firstly, how to place the sensors really matters. In our experience, the direction of the sensors should be upper a little bit instead of just pointing to the front. The latter tended to get wrong distance and return a signal with little distance. This is actually a difficult problem since the back of the sensor has circuits and we can just glue the sensor to the robot. At last, we used Velcro and tapes to attach the sensors to the robot. The second problem is this setting still cannot avoidng hitting. When Robot Cat go straight the the wall or something thin enough that cannot be sensed by the sensors, Robot Cat wouldn't turn and crash happens. To solve that, we decided to add one more sensor on the front and add code for the extra sensor. One thing should be illustrated is that we let Robot Cat go back and turn right a little before it return to a normal pattern when the front sensor get a short distance. If Robot cat go straight, sense a wall, and go back, it would go straight again if there is no turn. Then there would be a infinite loop with go straight and go back. We add turn direction after that go back to avoid that.
Wander Mode Demonstration Video
Find Owner Mode
A cat in our mind should be intimate with his owner, so we want to do a function that make this cat knows his owner and can run towards his owner. The first thing came to our head is face recognition. We searched related tutorial and we tried a library created by Adam Geitgey. However, we can't install this library for some reason. Then, we changed to another tutorial, which is in the reference. Fig.4 shows there are 3 phases for face recognition.
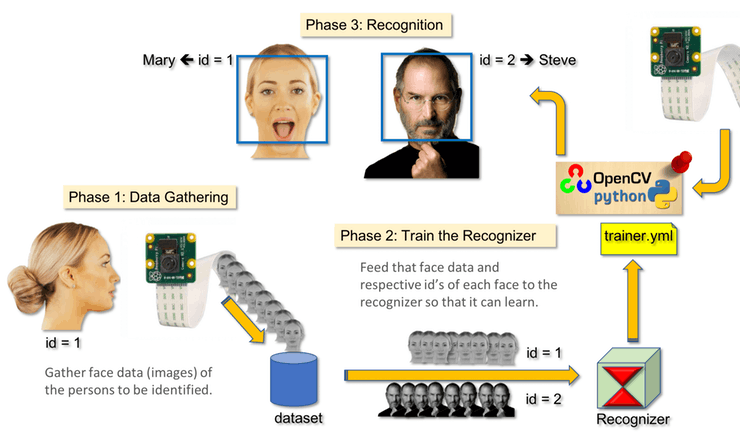
Fig.4 3 Phases of Face Recognition
First thing is face detection. The method that we are going to use in this program is a Haar Cascade classifier, which can be loaded with a pretrained xml file. After finding a face, we need to train the recognizer with dataset with faces. We used the face of Zitao's and we took 120 pictures as dataset. We tried different angles of a face and different face expression in order to make the dataset complete. Fig.5 are some samples of the dataset. Then, we used this dataset to train a face recognizer. Then we can use this recognizer with LBPHFaceRecognizer to find Zitao's face. Although this method was not very accurate, it is enough for distinguish Zitao's face with others.
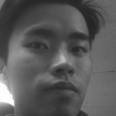
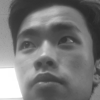
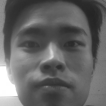

Fig.5 Dataset to Train Face Recognizer
There are some notes we noticed during this process. Firstly, it is important to set a good confidence number. The confidence number showed how confident the recognizer is with the match. If the number in the code are too big, this code can't distinguish people from one to another; if the number is too small, it can't even know the face of the people in the dataset. So we tested the code for a few time to find the perfect number for this project. It is also important to generate a good dataset for training the recognizer. When we take pictures of ours, we should silmulate the situation Robot Cat capture us, including the camera angle and lighting.
Then it comes the part to combine the movement with face recognition. When the program recognizes a face, it draws a rectangle for the face. We can find the center of the face through this rectangle and control the motor according to the postion of this rectangle. Fig.6 shows how we change the motor. The number above is the coordinate of the screen.
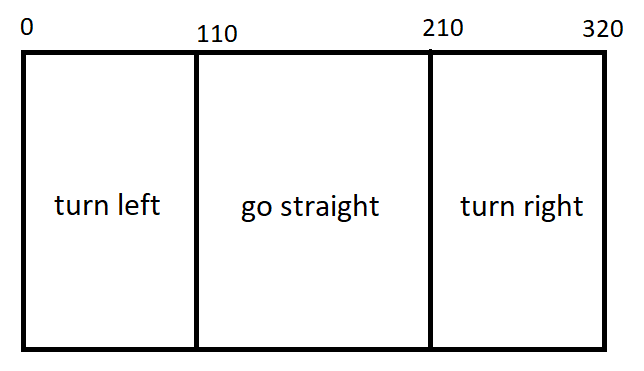
Fig.6 Find Owner Mode Diagram
This mode has three states. When there is no face on the camera, Robot Cat would rurn right constantly trying to find if there are people around him. If it detected a face but it is not a face of its owner, it would keep turning right with a picture saying "I don't know you". When it finds its owner in one direction, it changes to another state to start go straight to the direction of the owner. When the distance got from the sensor on the front is shorter than the setted number, Robot Cat can go back for a little to avoid hitting obstacles. Finally, when camera sees the face of owner and get close to the owner, Robot Cat would stop and show "Found you".
We faced some problems during this part. Firstly, our function for face recognition always has some time delay and it is kind of a trouble to recognize a face. With the time delay, the calculation can't follow the movement of people and it maybe fail to catch a face. We wanted to used multiprocessing to accelerating the speed to detecting a face, we suddenly noticed that the size of video may be the problem. The bigger the video heights and weights, the longer the time we spent on detecting a face. After we changing the size, the processing speeds up and meets our requirement. Moreover, we still need to use some way to let Robot Cat to find its owner accurately. We implemented a very low speed to save time for face recognition function and we adjust the angle of the camera to record our face pefectly. There is also a minor problem about the servos. When we run the code of this function in a single python file, the whole function works perfect. However, when we run it in a big file with other functions together, the servos seldom moves. We asked the professor and he said it is because of the hardware PWM. The large process of code would interfere the signal coming from the software. To avoid this problem, we should change to hardware PWM. However, due to the limited time, we sticked to software and change the speed of motors to get a good speed for this mode.
Find Owner Mode Demonstration Video
Photo Booth Mode
We always love taking photos with our pets and our Robot Cat can do this easily. We have four cat picture in this mode and people can choose the one they like. Then, the camera would show the video on piTFT with the picture on them. People can move the picture to the position they like and pressed a button to take a photo. The photo would be saved in the file.
There are two parts to finish this mode. The first one is to show the real-time video on piTFT, the second is showing a picture that can move on the piTFT. We used pygame to implement this. To change the position on the screen, we get the position of touch event and let the picture show on the new position. Once we can't show picture on the real time video, we solved it after figuring out the sequence and statement we should use. They are shown in Fig.7.
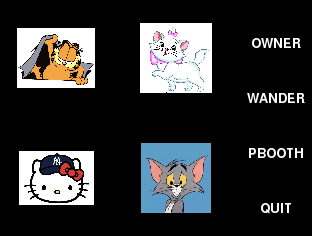
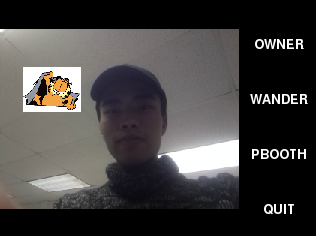
Fig.7 Photo Booth Mode
GUI
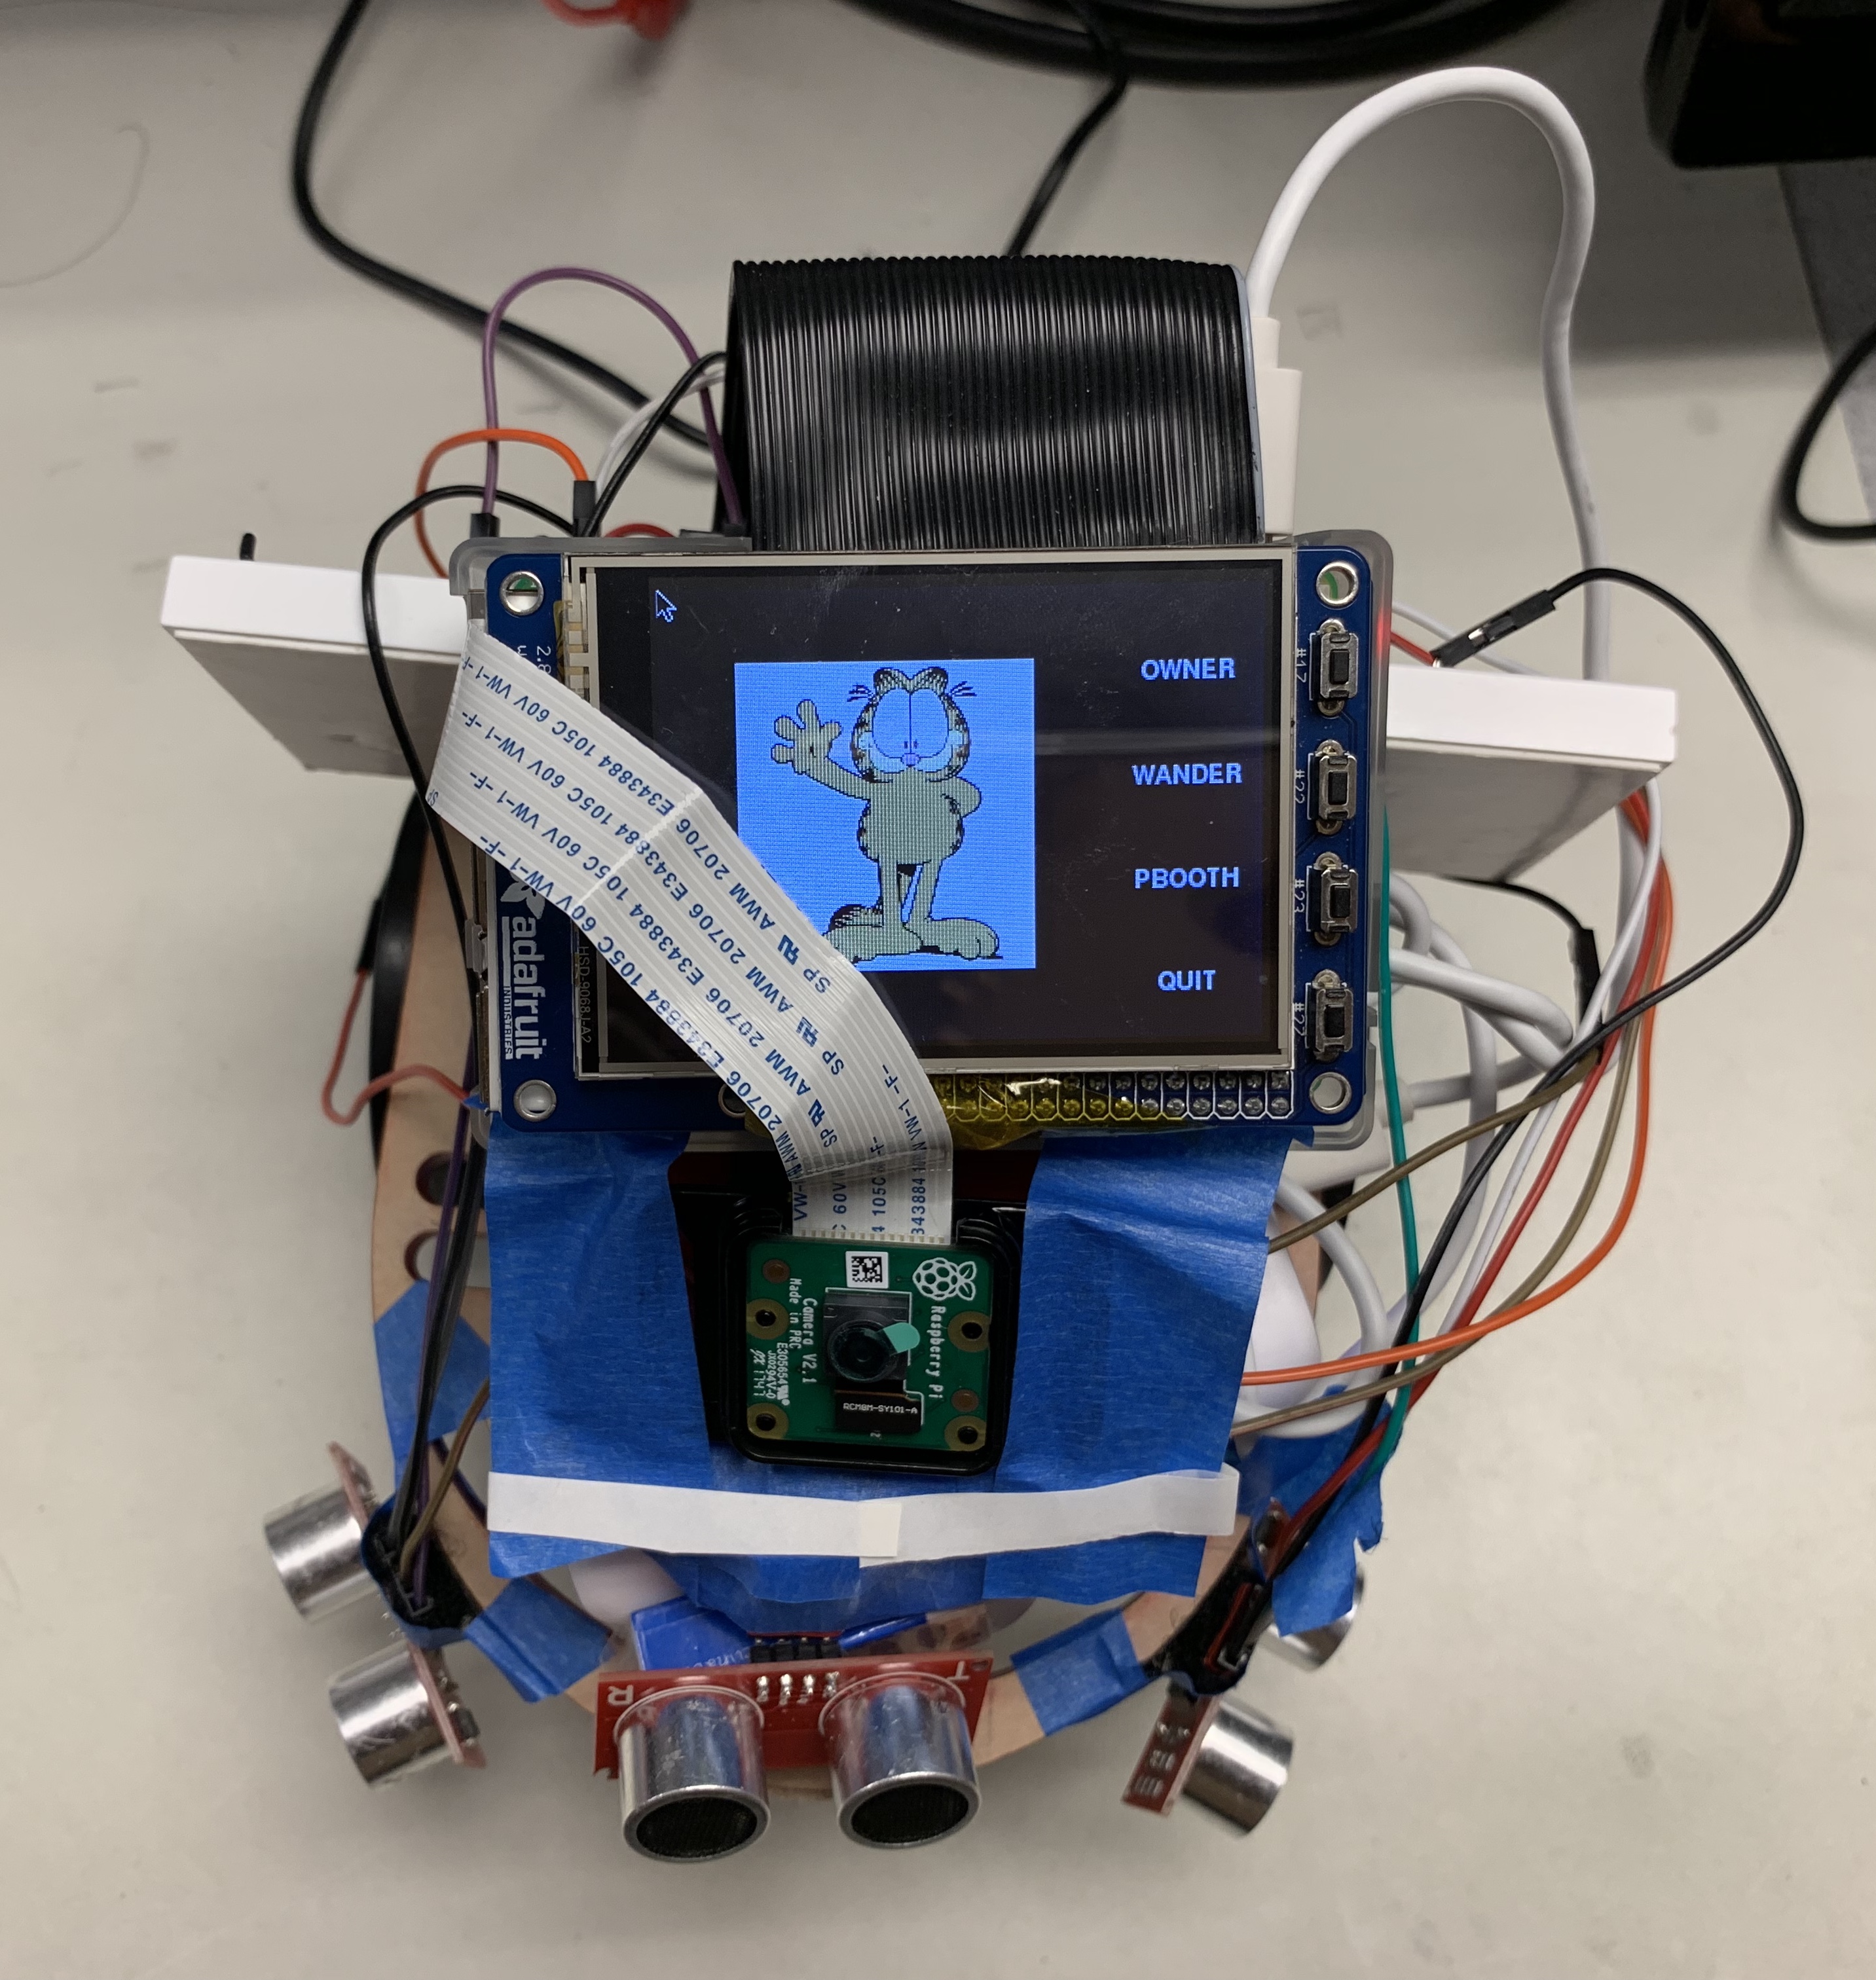
We had menus to control all the functions. Firstly, we had a home page that can choose which function we want to choose.Fig 8 is GUI of main menu. We also have a bail-out button for quiting the program or testing purposes. When we get in some mode, we can use one hardware button to return to main menus on any time. The button function and hardware connection are shown as Fig.9.

Fig.8 Main Menu
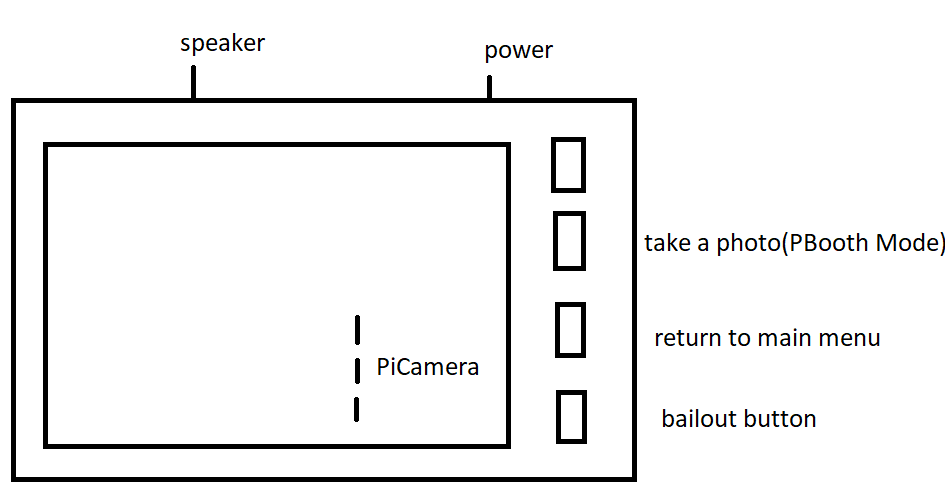
Fig.9 Raspberry Pi Button Function and Hardware Connection
For Wander Mode, we have two pictures to show whether it is sensing obstacles around it. If Robot Cat finds a obstacle the first time, it would make a "meow" sound and turn around. Two screenshot for normal pattern and hitting state are shown as Fig.10.
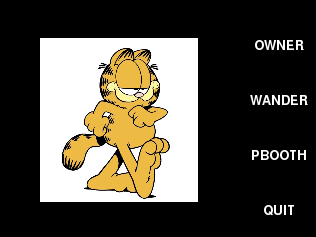
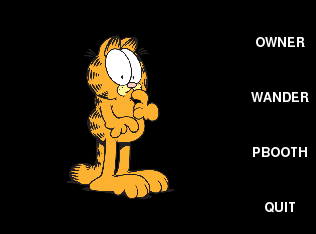
Fig.10 Wander Mode
For Find Owner Mode, each state have its own screen too. Three different screen are shown as Fig.11.


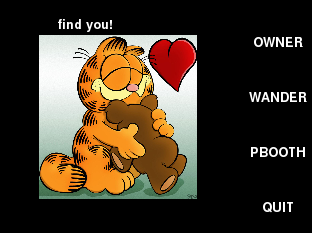
Fig.11 Find Owner Mode
For Photo Booth Mode, we used a hardware button for taking the photo and there is a "click" sound for it.
Results
Our initial goal was to use voice control and we chose to install SOPARE, which could provide offline and real time audio processing for some words that must be trained upfront. However, after we had successfully installed and implemented it, we found that the accuracy was not as high as we expected. As a result, we gave up this function.
To realize the function of face detection, we installed OpenCV and used Haar cascades algorithm. We trained 120 pictures in advance. We found that the accuracy of fact detection was great when the user kept still or moved slowly. However, when the user moved quickly, the accuracy would decrease a little. As a result, our robot cat would sometimes lose track of the user when the user moved quickly.
Conclusions
Our initial goal was to use voice control. However, after we had successfully installed SOPARE and implemented it, we found that the accuracy was not as high as we expected. As a result, we gave up this function and changed to a new function, which it can display the output of the Pi Camera and user can take photos with it by a tap of one button on the piTFT. Besides, we finished all the planned work and realized all the expected functions.
Future Work
In the beginning we wanted to add voice control to our Robot Cat. We tried to use an API but it didn't work well. In the future we can find a good way to implement voice control so we can use our voice to make the cat do functions above. We also can use voice control to make some interesting interaction with Robot Cat to make it more lively. Those interactions can be tell the cat to sleep and the cat can stop and change to another state, or sing with the cat.
We also want to add a function of finding a ball, which are related to object tracking. As we all know, cats love playing with balls.It would be very interesting to implement this function to Robot Cat and we can get in touch with openCV more.
Moreover, there is a problem with our Find Owner Mode. Since we only used tape to settle the camera on the front, it is impossible to change the angle of the camera. However, when Robot Cat runs to the owner, the angle to the face is changing and the cat may not recognize the owner's face anymore. We can add more motor for the camera so the direction of camera can be changed. It can make this mode more accurate. Besides, Robot Cat can't "see" us when we are standing. That's because the camera is low and it is easy to get bad lighting on our face and the algorithm can't recognize us. We can place the camera on a higher place, so it can see people when they are standing.
For the motor problem we described above, we can work on changing from software PWM to hardware PWM. This can make the movement of Robot Cat more accurate and fit more functions which need accuracy,
For the face recognition, we can find better algorithm with more accuracy and efficiency to implement our function. We also can use multiprocessing to accelerate the process of face detection and recognition.
Work Distribution

Project group picture

Jingyi Wang
jw2527@cornell.edu
Design and finish the hardware part.
Contributed to testing.

Zitao Zheng
zz632@cornell.edu
Design and implement the software part.
Contributed to testing.
Parts List
- Raspberry Pi $35.00
- Raspberry Pi Camera $25.00
- Ultrasonic Distance Sensor $5.88 (*3 pieces)
- Speaker $19.99
- Servo Motor - Provided in lab
- Robot Frame - Provided in lab
- LEDs, Resistors and Wires - Provided in lab
Total: $97.63
References
PiCamera TutorialContinuous Servo Datasheet
Using an ultrasonic distance sensor
GPIO pinout diagram
Pygame Documentation
Real-Time Face Recognition
Place Images Over Webcam Video in PyGame
Code Appendix
main.py
#Jingyi Wang(jw2527) Zitao Zheng(zz632) Final Project 2018-12-5
import pygame
import pygame.camera
from pygame.locals import*
import os
import RPi.GPIO as GPIO
import time
from gpiozero import DistanceSensor
import cv2
import numpy as np
#make the screen to show on piTFT
os.putenv('SDL_VIDEORIVER','fbcon')
os.putenv('SDL_FBDEV','/dev/fb1')
os.putenv('SDL_MOUSEDRV','TSLIB')
os.putenv('SDL_MOUSEDEV','/dev/input/touchscreen')
#setup GPIO
GPIO.setmode(GPIO.BCM)
GPIO.setup(17, GPIO.IN, pull_up_down=GPIO.PUD_UP)
GPIO.setup(22, GPIO.IN, pull_up_down=GPIO.PUD_UP)
GPIO.setup(23, GPIO.IN, pull_up_down=GPIO.PUD_UP)
GPIO.setup(27, GPIO.IN, pull_up_down=GPIO.PUD_UP)
GPIO.setup(6, GPIO.OUT)
GPIO.setup(19, GPIO.OUT)
ultrasonic1 = DistanceSensor(echo=26, trigger=5)
ultrasonic2 = DistanceSensor(echo=13, trigger=4)
ultrasonic3 = DistanceSensor(echo=16, trigger=24)
pygame.init()
pygame.camera.init()
pygame.mouse.set_visible(False)
BLACK=0,0,0
WHITE=255,255,255
#set up screen size
screen=pygame.display.set_mode((320, 240))
size=width,height=320,240
my_font=pygame.font.Font(None,20)
#swt up buttons
my_buttons={'OWNER':(280,45),'WANDER':(280,100),'PBOOTH':(280,155),'QUIT':(280,210)}
#software PWM for 2 servos
p=GPIO.PWM(6,1000/21.5)
q=GPIO.PWM(19,1000/21.5)
p.start(0)
q.start(0)
#main menu
global code_running
code_running=True
catini = pygame.image.load("/home/pi/final/cat/CAT4.png")
catini = pygame.transform.scale(catini,(158,164))
#variables and pictures for Wander Mode
ha=False
first=True
state=1
cat_wander1 = pygame.image.load("/home/pi/final/cat/CAT1.png")
cat_wander1 = pygame.transform.scale(cat_wander1,(158,164))
cat_wander2 = pygame.image.load("/home/pi/final/cat/CAT8.png")
cat_wander2 = pygame.transform.scale(cat_wander2,(158,164))
scared=False
#variables and picutres for Find Owner Mode
fo=False
vision=False
find1 = pygame.image.load("/home/pi/final/cat/CAT5.png")
find1 = pygame.transform.scale(find1,(158,164))
find2 = pygame.image.load("/home/pi/final/cat/CAT7.jpg")
find2 = pygame.transform.scale(find2,(158,164))
find3 = pygame.image.load("/home/pi/final/cat/CAT2.png")
find3 = pygame.transform.scale(find3,(158,164))
find4 = pygame.image.load("/home/pi/final/cat/CAT10.jpg")
find4 = pygame.transform.scale(find4,(158,164))
#variables and pictures for Photo Booth Mode
pb=False
DEVICE = '/dev/video0'
SIZE = (320, 240)
FILENAME = 'capture.png'
catphoto1 = pygame.image.load("/home/pi/final/cat/CAT3.png")
catphoto1 = pygame.transform.scale(catphoto1,(78,60))
catphoto2 = pygame.image.load("/home/pi/final/cat/mao.jpg")
catphoto2 = pygame.transform.scale(catphoto2,(72,70))
catphoto3 = pygame.image.load("/home/pi/final/cat/kitty3.jpg")
catphoto3 = pygame.transform.scale(catphoto3,(75,54))
catphoto4 = pygame.image.load("/home/pi/final/cat/tom.jpg")
catphoto4 = pygame.transform.scale(catphoto4,(70,70))
catphoto=catphoto1
sh=False
choose=True
# a function to bail out the program
def bailout(channel):
print(" ")
print"button 27 pressed"
code_running = False
#a function to draw on the piTFT screen
def scrdis():
screen.fill(BLACK)
for my_text, text_pos in my_buttons.items():
text_surface=my_font.render(my_text, True, WHITE)
rect=text_surface.get_rect(center=text_pos)
screen.blit(text_surface, rect)
# a function to make servo stop
def stop():
p.ChangeDutyCycle(0)
q.ChangeDutyCycle(0)
#time.sleep(0.6)
# a function to keep looking for the face of the owner
def find():
p.ChangeFrequency(1000/21.51)
p.ChangeDutyCycle(151/21.51)
q.ChangeDutyCycle(0)
scrdis()
find_rect1 = find1.get_rect(center=(120,120))
screen.blit(find1, find_rect1)
text=my_font.render("looking for my owner", True, WHITE)
screen.blit(text, (60,20))
back()
# a function to avoiding hitting things during Find Owner Mode
def back():
if ultrasonic3.distance<0.15 and ultrasonic3.distance!=0:
q.ChangeFrequency(1000/21.53)
q.ChangeDutyCycle(153/21.53)
p.ChangeFrequency(1000/21.47)
p.ChangeDutyCycle(147/21.47)
scrdis()
catrect_wander2 = cat_wander2.get_rect(center=(120,120))
screen.blit(cat_wander2, catrect_wander2)
# interrupt for bailout button
GPIO.add_event_detect(27, GPIO.FALLING, callback=bailout, bouncetime=300)
scrdis()
while code_running:
time.sleep(0.02)
scrdis()
# when none of the function is activated, the screen shows the main menu
if ha==False and fo==False and pb==False:
catrectini= catini.get_rect(center=(120,120))
screen.blit(catini, catrectini)
pygame.display.flip()
# touchscreen
for event in pygame.event.get():
if(event.type is MOUSEBUTTONDOWN):
pos=pygame.mouse.get_pos()
elif(event.type is MOUSEBUTTONUP):
pos=pygame.mouse.get_pos()
x,y = pos
if x>260 and x<300:
if y>85 and y<115:
print"wander mode started"
start=time.time()
ha=True
elif y>195 and y<220:
print"quit pressed"
code_running=False
elif y>30 and y<60:
print"find owner"
fo=True
vision=True
elif y>140 and y<160:
print"take a picture!"
pb=True
if ha:
time.sleep(0.02)
#go straight for 2 seconds
if state==1:
if first==True:
start=time.time()
first = False
p.ChangeFrequency(1000/21.55)
p.ChangeDutyCycle(155/21.55)
q.ChangeFrequency(1000/21.45)
q.ChangeDutyCycle(145/21.45)
if time.time()-start >= 2:
state=2
first=True
# turn right for 1 second
elif state==2:
if first==True:
start=time.time()
first = False
p.ChangeDutyCycle(0)
q.ChangeFrequency(1000/21.45)
q.ChangeDutyCycle(145/21.45)
if time.time()-start >= 1:
state=3
first=True
# go straight for 2 seconds
elif state==3:
if first==True:
start=time.time()
first = False
p.ChangeFrequency(1000/21.55)
p.ChangeDutyCycle(155/21.55)
q.ChangeFrequency(1000/21.45)
q.ChangeDutyCycle(145/21.45)
if time.time()-start >= 2:
state=4
first=True
# turn left for 1 second
elif state==4:
if first==True:
start=time.time()
first = False
p.ChangeFrequency(1000/21.55)
p.ChangeDutyCycle(155/21.55)
q.ChangeDutyCycle(0)
if time.time()-start >= 1:
state=1
first=True
# turn left to avoid hitting things on the right
if state==5:
p.ChangeDutyCycle(0)
q.ChangeFrequency(1000/21.45)
q.ChangeDutyCycle(145/21.45)
# if the distance is safe enough, it goes back to the normal pattern
if ultrasonic1.distance > 0.25:
state = 1
first = True
# turn left to avoid hitting things on the right
if state==6:
q.ChangeDutyCycle(0)
p.ChangeFrequency(1000/21.55)
p.ChangeDutyCycle(155/21.55)
if ultrasonic2.distance > 0.25:
state = 1
first = True
# go back to avoid hitting the front
if state==7:
q.ChangeFrequency(1000/21.55)
q.ChangeDutyCycle(155/21.55)
p.ChangeFrequency(1000/21.45)
p.ChangeDutyCycle(145/21.45)
if ultrasonic1.distance < 0.25 and ultrasonic2.distance > 0.25:
state = 5
elif ultrasonic2.distance < 0.25 and ultrasonic1.distance > 0.25:
state = 6
elif ultrasonic1.distance > 0.25 and ultrasonic2.distance > 0.25:
state = 1
first = True
if ultrasonic3.distance > 0.25:
q.ChangeDutyCycle(0)
p.ChangeFrequency(1000/21.55)
p.ChangeDutyCycle(155/21.55)
time.sleep(0.5)
state = 1
first = True
if ultrasonic1.distance < 0.25 and ultrasonic2.distance > 0.25:
state = 5
if ultrasonic2.distance < 0.25 and ultrasonic1.distance > 0.25:
state = 6
if ultrasonic1.distance < 0.25 and ultrasonic2.distance < 0.25:
state = 7
if ultrasonic3.distance <0.25:
state=7
#GUI
screen.fill(BLACK)
if ultrasonic1.distance < 0.25 or ultrasonic2.distance < 0.25 or ultrasonic3.distance < 0.25:
if scared == False:
#sound effect for hitting the obstacle for the first time
pygame.mixer.music.load('meow.wav')
pygame.mixer.music.play()
scared=True
# picture indicating sensing something is near
catrect_wander2 = cat_wander2.get_rect(center=(120,120))
screen.blit(cat_wander2, catrect_wander2)
else:
if scared==True:
scared=False
# picture for the normal pattern
catrect_wander1 = cat_wander1.get_rect(center=(120,120))
screen.blit(cat_wander1, catrect_wander1)
for my_text, text_pos in my_buttons.items():
text_surface=my_font.render(my_text, True, WHITE)
rect=text_surface.get_rect(center=text_pos)
screen.blit(text_surface, rect)
pygame.display.flip()
#end this function and return to the main menu
if (not GPIO.input(23)):
p.ChangeDutyCycle(0)
q.ChangeDutyCycle(0)
ha=False
if fo:
#recognizer part reference: https://thecodacus.com/face-recognition-loading-recognizer/
#Haar Cascade for face detection
recognizer = cv2.createLBPHFaceRecognizer()
recognizer.load('trainer/trainer.yml')
cascadePath = "/usr/share/opencv/haarcascades/haarcascade_frontalface_default.xml"
faceCascade = cv2.CascadeClassifier(cascadePath);
#set video size
cam = cv2.VideoCapture(0)
cam.set(cv2.cv.CV_CAP_PROP_FRAME_WIDTH, 320)
cam.set(cv2.cv.CV_CAP_PROP_FRAME_HEIGHT, 240)
font = cv2.cv.InitFont(cv2.cv.CV_FONT_HERSHEY_SIMPLEX, 1, 1, 0, 1, 1)
while vision:
print(ultrasonic3.distance)
ret, frame =cam.read()
# Flip camera vertically
im=cv2.flip(frame, -1)
gray=cv2.cvtColor(im,cv2.COLOR_BGR2GRAY)
faces=faceCascade.detectMultiScale(gray,1.2,5)
f=False
for(x,y,w,h) in faces:
#draw a rectangle for a face
cv2.rectangle(im,(x,y),(x+w,y+h),(225,0,0),2)
Id, conf = recognizer.predict(gray[y:y+h,x:x+w])
scrdis()
# the confidence ahow how the face detects matches the dataset
if(conf<51):
if(Id==1):
Id="Jingyi"
elif(Id==2):
Id="Zitao"
# a flag indicating find owner's face
f=True
#x coordinate of face center
xfacecenter = x+w/2
#when the face is on the center area, go straight
if xfacecenter>110 and xfacecenter<210:
# avoid incorrect distance to intefere the correctness of this mode
if ultrasonic3.distance>0.15 or ultrasonic3.distance==0:
p.ChangeFrequency(1000/21.51)
p.ChangeDutyCycle(151/21.51)
q.ChangeFrequency(1000/21.49)
q.ChangeDutyCycle(149/21.49)
#show picure and test of on my way
find_rect3 = find3.get_rect(center=(120,120))
screen.blit(find3, find_rect3)
text=my_font.render("on my way!", True, WHITE)
screen.blit(text, (60,20))
# reach the owner and stop
if ultrasonic3.distance<=0.15 and ultrasonic3.distance!=0:
p.ChangeDutyCycle(0)
q.ChangeDutyCycle(0)
find_rect4 = find4.get_rect(center=(120,120))
screen.blit(find4, find_rect4)
text=my_font.render("find you!", True, WHITE)
screen.blit(text, (60,20))
time.sleep(2)
vision=False
fo=False
# turn left
if xfacecenter>210:
p.ChangeFrequency(1000/21.51)
p.ChangeDutyCycle(151/21.51)
q.ChangeDutyCycle(0)
find_rect3 = find3.get_rect(center=(120,120))
screen.blit(find3, find_rect3)
text=my_font.render("on my way!", True, WHITE)
screen.blit(text, (60,20))
# turn right
if xfacecenter<110:
p.ChangeDutyCycle(0)
q.ChangeFrequency(1000/21.49)
q.ChangeDutyCycle(149/21.49)
find_rect3 = find3.get_rect(center=(120,120))
screen.blit(find3, find_rect3)
text=my_font.render("on my way!", True, WHITE)
screen.blit(text, (60,20))
# when finding a face which is unknown to Robot Cat
else:
Id="unknown"
find_rect2 = find2.get_rect(center=(120,120))
screen.blit(find2, find_rect2)
text=my_font.render("I don't know you", True, WHITE)
screen.blit(text, (60,20))
cv2.cv.PutText(cv2.cv.fromarray(im),str(Id), (x,y+h),font, 255)
# when Robot Cat can't find a face, keep turning around
if(f==False):
find()
pygame.display.flip()
#return to main menu
if (not GPIO.input(23)):
vision=False
cam.release()
cv2.destroyAllWindows()
p.ChangeDutyCycle(0)
q.ChangeDutyCycle(0)
fo=False
if pb:
#choose a picture to take photo with
while choose==True:
scrdis()
catrectphoto1 = catphoto1.get_rect(center=(60,60))
screen.blit(catphoto1, catrectphoto1)
catrectphoto2 = catphoto2.get_rect(center=(180,60))
screen.blit(catphoto2, catrectphoto2)
catrectphoto3 = catphoto3.get_rect(center=(60,180))
screen.blit(catphoto3, catrectphoto3)
catrectphoto4 = catphoto4.get_rect(center=(180,180))
screen.blit(catphoto4, catrectphoto4)
pygame.display.flip()
# for touchscreen
for event in pygame.event.get():
if(event.type is MOUSEBUTTONDOWN):
pos=pygame.mouse.get_pos()
elif(event.type is MOUSEBUTTONUP):
pos=pygame.mouse.get_pos()
x,y = pos
if y>40 and y<80:
if x>40 and x<80:
catphoto=catphoto1
choose=False
elif x>160 and x<200:
catphoto=catphoto2
choose=False
if y>160 and y<200:
if x>40 and x<80:
catphoto=catphoto3
choose=False
elif x>160 and x<200:
catphoto=catphoto4
choose=False
#if no finished photo are shown on the screen, start showing real-time video
if sh==False:
display = pygame.display.set_mode(SIZE, 0)
camera = pygame.camera.Camera(DEVICE, SIZE)
camera.start()
#default photo position
x=70
y=80
# a flag for showing the picture on screen
capture = True
while capture:
for event in pygame.event.get():
if(event.type is MOUSEBUTTONDOWN):
pos=pygame.mouse.get_pos()
elif(event.type is MOUSEBUTTONUP):
pos=pygame.mouse.get_pos()
x,y = pos
scrdis()
screenn = camera.get_image()
screenn=pygame.transform.rotate(screenn,180)
screen.blit(screenn, (0,0))
catrectphoto = catphoto.get_rect(center=(x,y))
screen.blit(catphoto, catrectphoto)
pygame.display.update()
#sound effect for taking photos
if(not GPIO.input(22)):
pygame.mixer.music.load('ka.wav')
pygame.mixer.music.play()
pygame.image.save(screen, FILENAME)
sh=True
camera.stop()
scrdis()
capture=False
# return to main menu
if(not GPIO.input(23))and sh ==False:
camera.stop()
capture=False
choose=True
pb=False
# show the photo on the screen
if sh == True:
com = pygame.image.load("/home/pi/final/capture.png")
com = pygame.transform.scale(com,(240,180))
comrect = com.get_rect(center=(120,120))
screen.blit(com, comrect)
pygame.display.flip()
time.sleep(3)
choose=True
pb=False
sh=False
GPIO.cleanup()
generator.py
#Jingyi Wang(jw2527) Zitao Zheng(zz632) Final Project 2018-12-5
#generate a dataset for training the recognizer
#reference: https://thecodacus.com/opencv-face-recognition-python-part1/

import cv2
import os

cam = cv2.VideoCapture(0)
cam.set(cv2.cv.CV_CAP_PROP_FRAME_WIDTH, 320)
cam.set(cv2.cv.CV_CAP_PROP_FRAME_HEIGHT, 240)
detector=cv2.CascadeClassifier('/usr/share/opencv/haarcascades/haarcascade_frontalface_default.xml')

Id=raw_input('enter your id:')
sampleNum=0
while(True):
    ret, frame = cam.read()
    img = cv2.flip(frame, -1)
    gray = cv2.cvtColor(img, cv2.COLOR_BGR2GRAY)
    faces = detector.detectMultiScale(gray, 1.3, 5)
    for (x,y,w,h) in faces:
        cv2.rectangle(img,(x,y),(x+w,y+h),(255,0,0),2)

        #incrementing sample number
        sampleNum=sampleNum+1
        #saving the captured face in the dataset folder
        cv2.imwrite("dataset/User."+Id +'.'+ str(sampleNum) + ".png", gray[y:y+h,x:x+w])

        cv2.imshow('frame',img)
    #wait for 100 miliseconds
    if cv2.waitKey(100) & 0xFF == ord('q'):
        break
    # break if the sample number is morethan 120
    elif sampleNum>120:
        break
cam.release()
cv2.destroyAllWindows()
trainer.py
#Jingyi Wang(jw2527) Zitao Zheng(zz632) Final Project 2018-12-5
#train the recognizer
#reference: https://thecodacus.com/face-recognition-opencv-train-recognizer/

import cv2,os
import numpy as np
from PIL import Image

recognizer = cv2.createLBPHFaceRecognizer()
path='dataset'
detector= cv2.CascadeClassifier('/usr/share/opencv/haarcascades/haarcascade_frontalface_default.xml');

def getImagesAndLabels(path):
    #get the path of all the files in the folder
    imagePaths=[os.path.join(path,f) for f in os.listdir(path)]
    #create empth face list
    faceSamples=[]
    #create empty ID list
    Ids=[]
    #now looping through all the image paths and loading the Ids and the images
    for imagePath in imagePaths:
        #loading the image and converting it to gray scale
        pilImage=Image.open(imagePath).convert('L')
        #Now we are converting the PIL image into numpy array
        imageNp=np.array(pilImage,'uint8')
        #getting the Id from the image
        Id=int(os.path.split(imagePath)[-1].split(".")[1])
        # extract the face from the training image sample
        faces=detector.detectMultiScale(imageNp)
        #If a face is there then append that in the list as well as Id of it
        for (x,y,w,h) in faces:
            faceSamples.append(imageNp[y:y+h,x:x+w])
            Ids.append(Id)
    return faceSamples,Ids


faces,Ids = getImagesAndLabels('dataset')
recognizer.train(faces, np.array(Ids))
recognizer.save('trainer/trainer.yml')