Face Recognition Door Lock
Ling Zeng (lz455), Rong Sun(rs2364)
Introduction
House security matters and people always try to make life easier at the same time. That’s why we put up with our project, Face Recognition Door Lock System. We developed this system based on Raspberry-pi 3, to make the house only accessible when your face is recognized by the recognition algorithms from OpenCV library and meanwhile you are allowed in by the house owner, who could monitor entrance remotely. By doing so, the system is less likely to be deceived: since the owner can check each visitor in the remote console, getting recognized by the camera using a photo won’t work. We also added passcode function for entrance in case that face recognition part corrupts.
Objectives
Users could operate on a touchscreen to select entering the house by recognizing face or entering passcode.
For face recognition, an image will be captured by pi camera and preprocessed by Raspberry pi like converting, resizing and cropping. Then face detection and recognition are performed. Once the face is recognized by the classifier based on pre-stored image library, the image will be sent to a remote console waiting for house owner’s decision.
For passcode part, users could enter or reset passcode through a keypad.
System Design & Framework
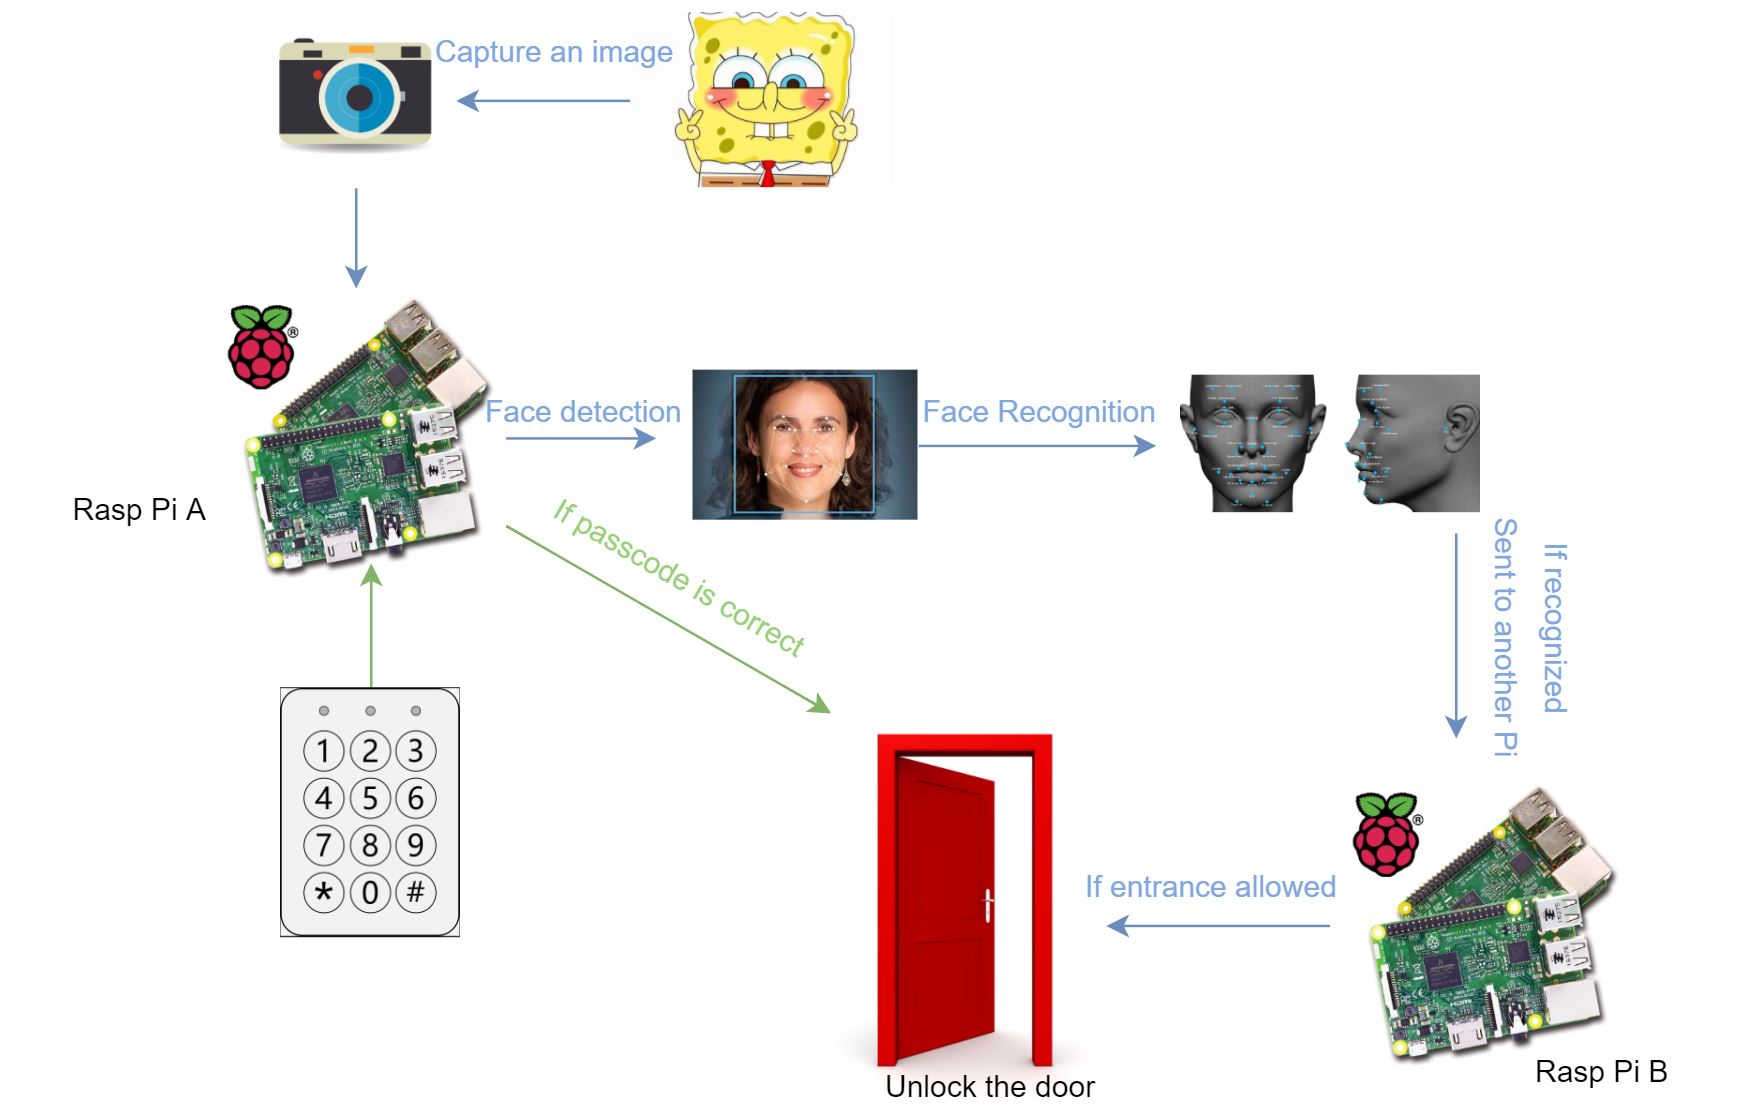
Figure 1: System Design
Image source: Google
Hardware Implementation
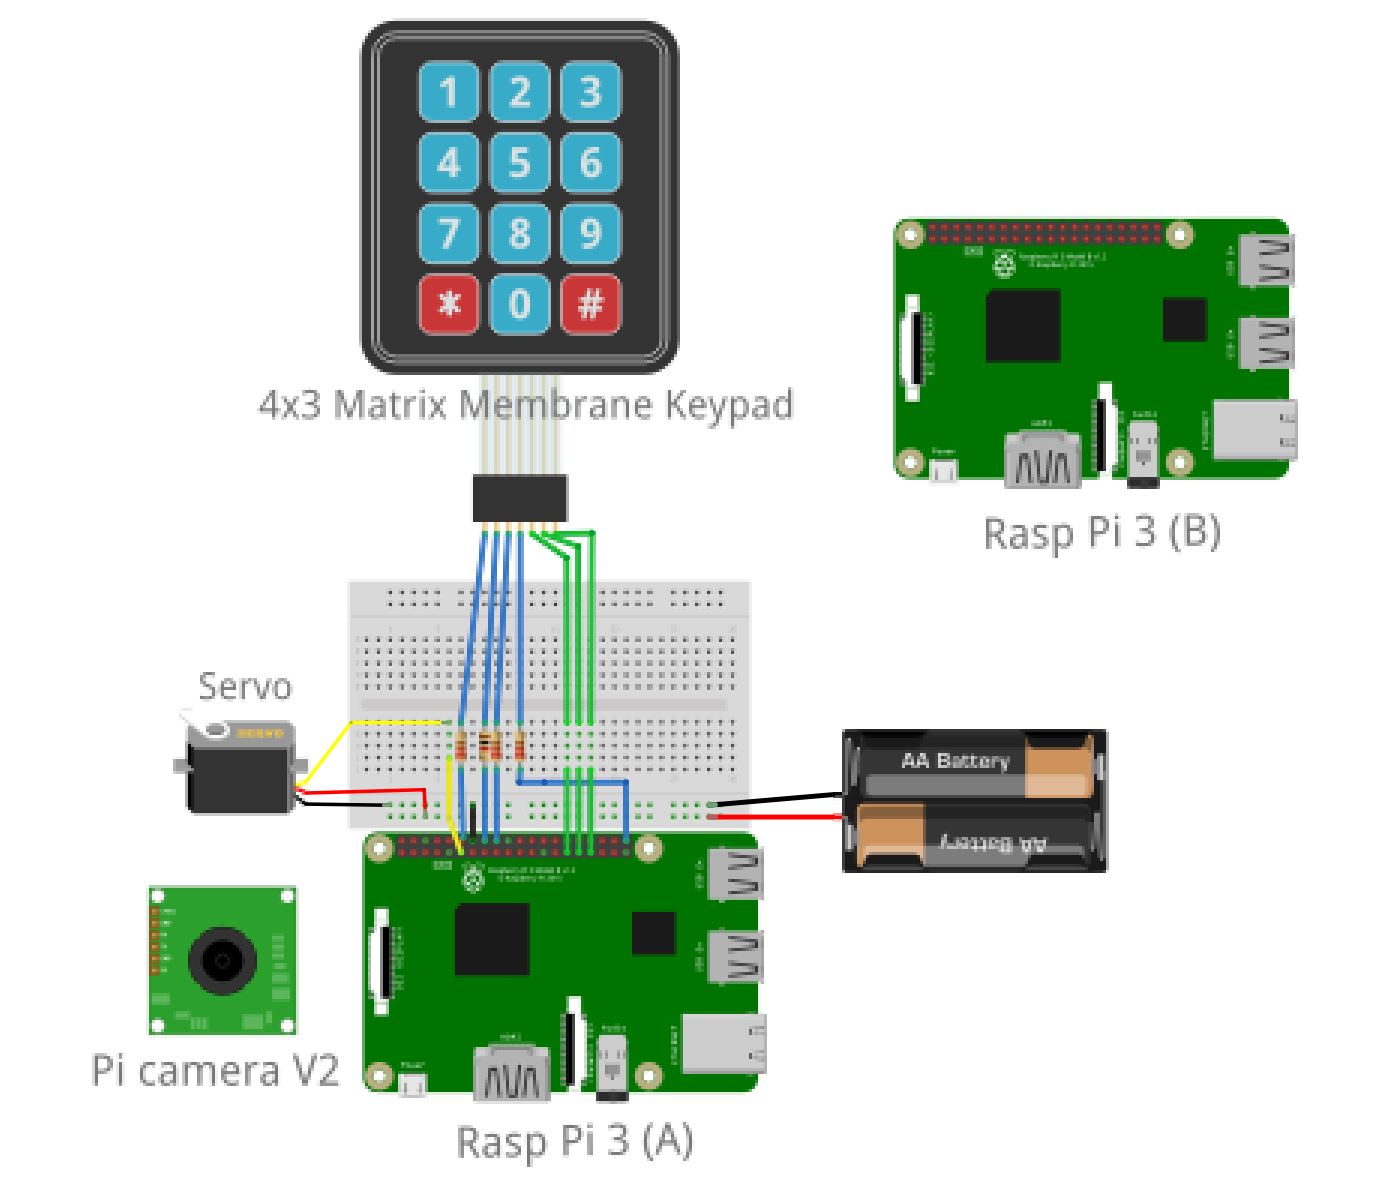
Figure 2: Hardware Modules
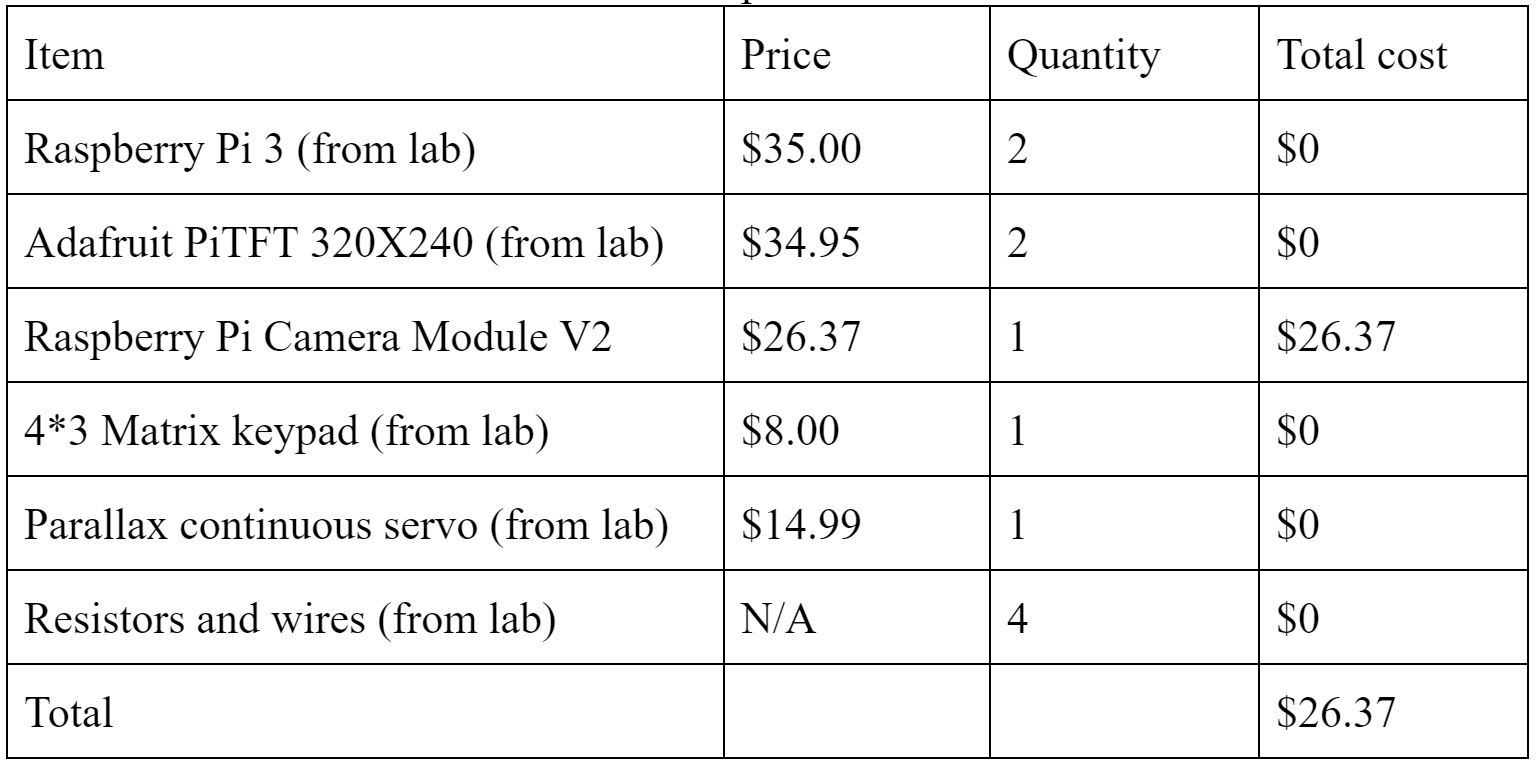
As shown in the above figure, our system involves two Raspberry Pi 3, a Pi Camera V2, a 4X3 Matrix Membrane Keypad, a Parallax Continuous Rotation Servo and 4-AA battery pack to power up the servo. Besides these, we used 2 Adafruit PiTFT touchscreens for user interfaces.
• Raspberry pi
One of the Raspberry pi, called Pi A, provides most services of our door lock system. It is connected with the pi camera, keypad, servo and a touchscreen. The facial image is taken by the pi camera and passcode is entered using the keypad, and we control the position and rotation of the continuous servo to lock/unlock the door. All these functions are triggered by pressing corresponding touch buttons on the PiTFT screen. The other Raspberry pi, Pi B, works as a server which receives images from Pi A and then sends response to Pi A after users operate on its touchscreen.
• Pi camera
The Pi camera is directly connected with Pi A via the camera slot.
• Keypad
Attach matrix 7-pin interfaces to 7 free GPIO pins. 3 column pins are set as output which are directly connected with GPIOs, while 4 row pins are set as input with pull-up resistors.
• Servo
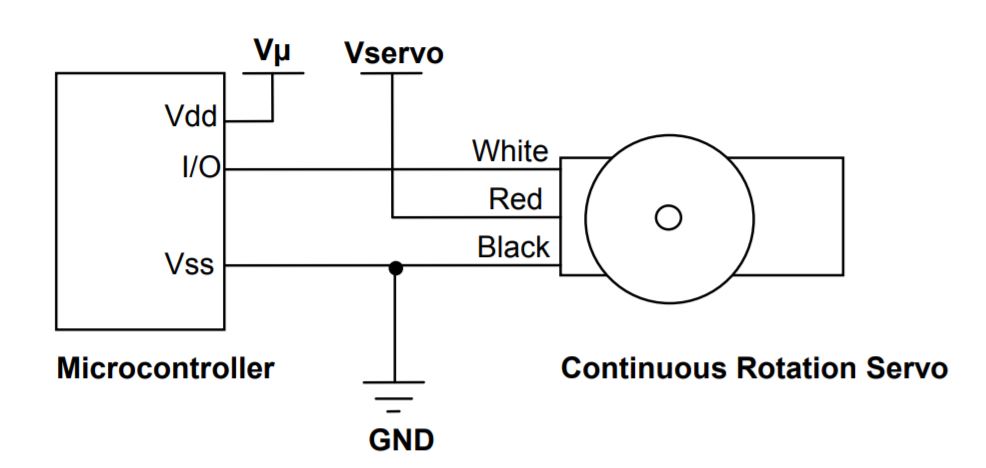
Attach the servo to a GPIO (we selected GPIO 17 here) of the Raspberry pi A and control its rotation utilizing pulse-width modulation. The servo is powered by a 6V-battery pack.
Figure 3: Quick-Start Circuit
Below is the final outlook of our face recognition door lock model.
.jpg)
Figure 4: System Framework
Software Implementation & Test
• User Interfaces
For user interfaces, we utilized python library ‘pygame’ to design aesthetics of PiTFT touchscreen and detect any user input.
Rasp Pi A
The way we linked touchscreen buttons with system functions on Pi A are displayed in Figure 5.
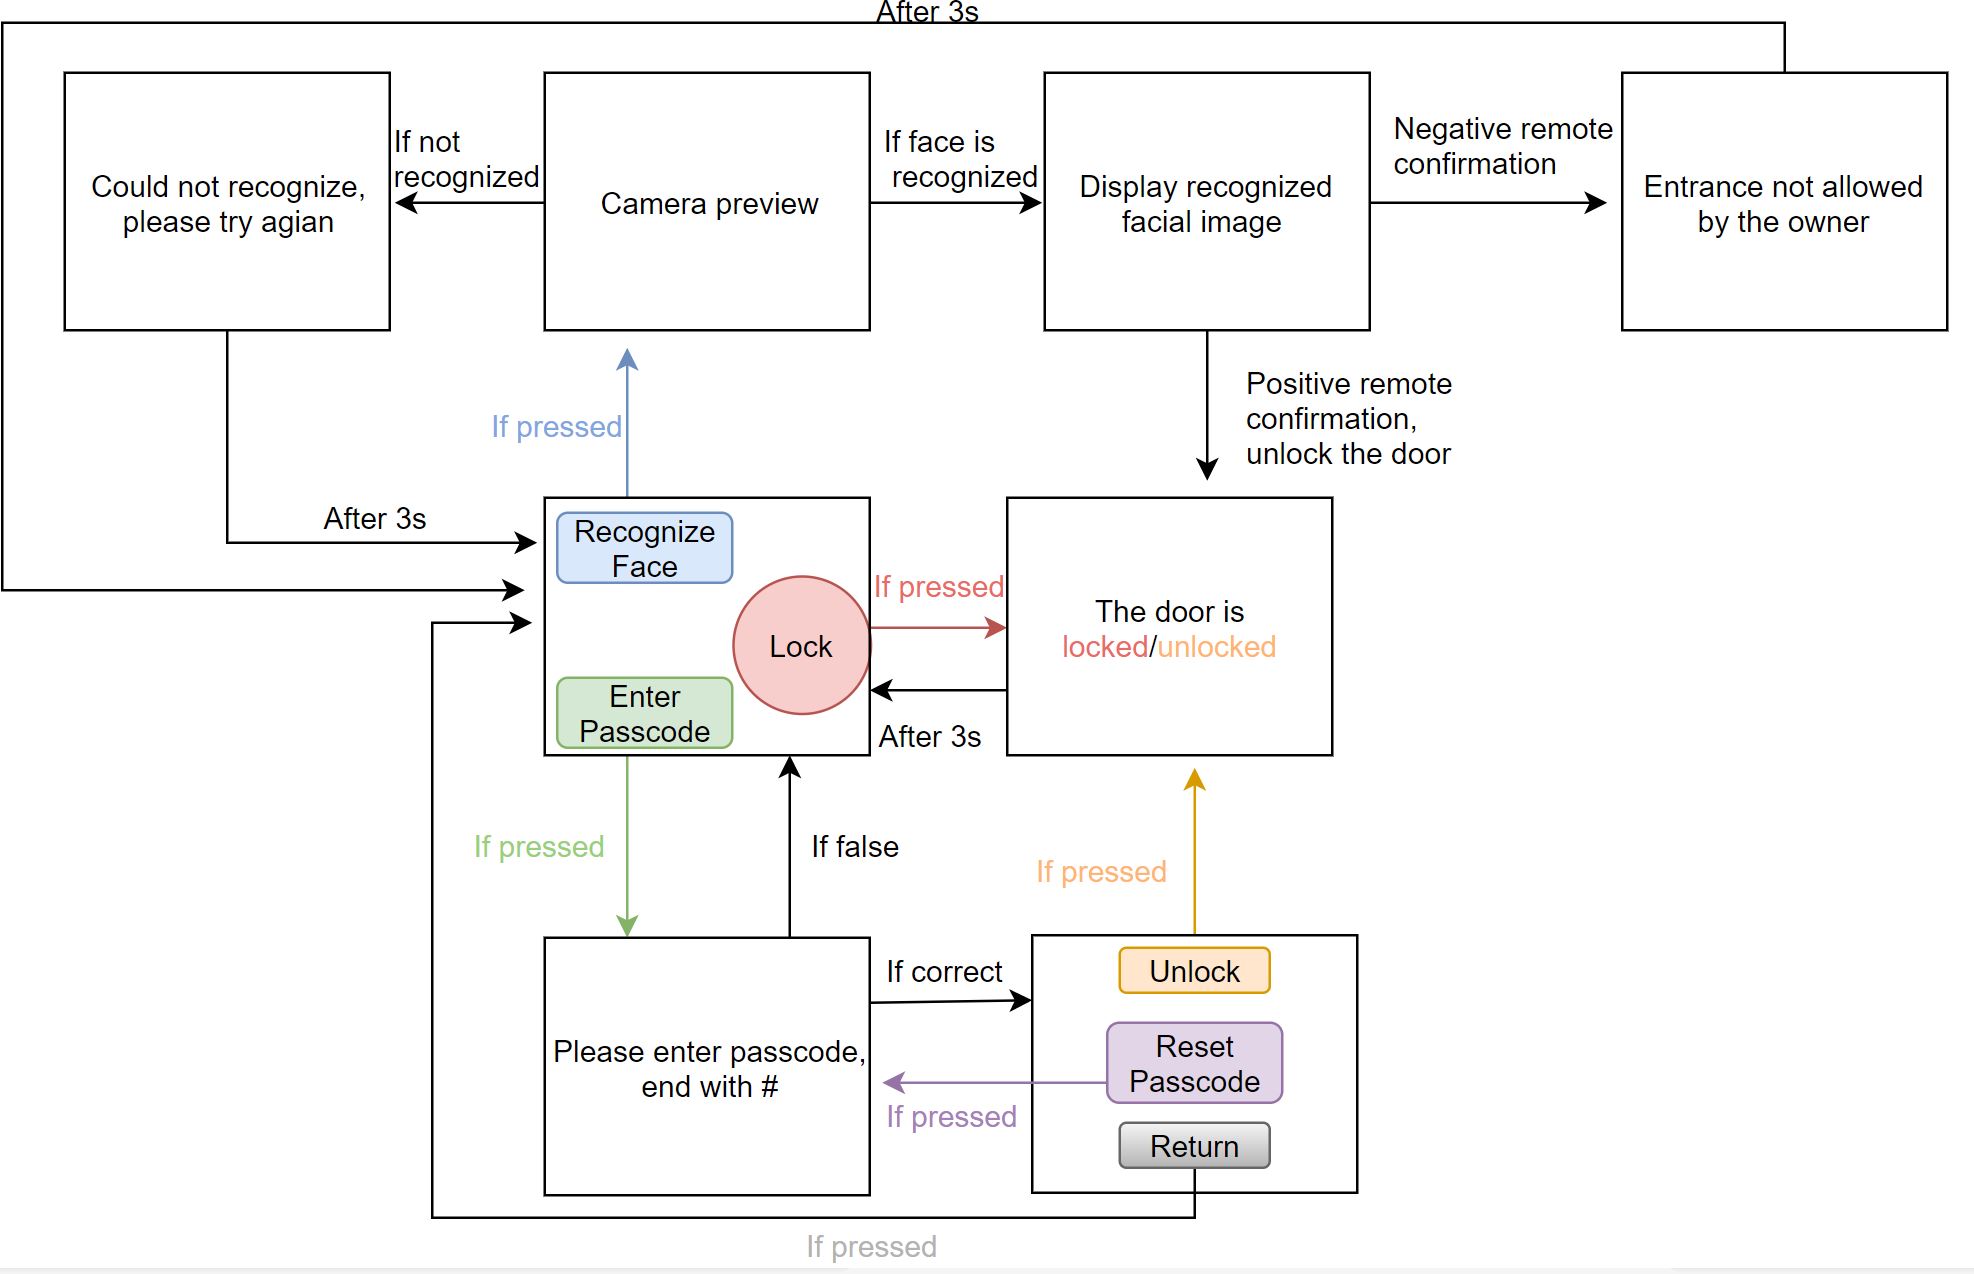
Figure 5: User Interfaces Flowchart of Pi A
Initially, on the PiTFT screen, there are 3 buttons in the ‘main’ level: ‘Lock’, ‘Recognize Face’ and ‘Enter Passcode’. The ‘Lock’ button is designed for house owners to know whether the door is locked and lock the door manually. When the door is unlocked, the house owner could press the ‘Lock’ button to lock the door. If the door is already locked, nothing will happen when the ‘Lock’ button is pressed.
Once the ‘Face Recognize’ button is pressed, you could preview pi camera on the screen and the image will be captured in 5 seconds. After a series of image processing steps, if the face cannot be recognized, a message ‘Could not recognize, please try again’ will appear on the screen for 3 seconds before screen return to ‘main’ level. Otherwise the recognized image will be displayed until remote confirmation is made. If Pi A receives positive response from Pi B, that is, the one is allowed in by the house owner, the door will be unlocked by the servo and ‘The door is unlocked’ will show up on the screen. If Pi A receives negative response from Pi B, you will be told that ‘Entrance not allowed by the house owner’. At last, after 3 seconds, the system will return to its ‘main’ level.
When a user presses the ‘Enter Passcode’ button on the screen, the text ‘Please enter the passcode, end with #’ can be seen on the touchscreen and the user needs to enter the passcode using the 3x4 matrix keypad. Each pressed number on the keypad will be displayed on screen and then be covered by a star if the next key has been pressed. If the passcode entered is wrong, the we has the PiTFT display a message, ‘Password does not match, please try again’, which will last for 3 seconds before going back to ‘main’ level.
On the other hand, if the passcode entered is correct, the system will get into the second-level buttons: ‘Unlock’, ‘Reset Passcode’ and ‘Return’. Users could unlock the door by pressing ‘Unlock’ button and the servo will be driven to open the door. The password could be reset by pressing the ‘Reset Passcode’ button. The new passcode need to be entered through the keyboard too and will take effect next time. The ‘Return’ button is designed to return to the previous level. For security reason, we set the upper limit for times of entering wrong passcode. If the upper constraint is reached, the whole system will be locked for a certain amount of time, such as 15 minutes and screen will tell the user that ‘Maximum failed passcode attempts in restriction. Please try again after 5 minutes.’
Rasp Pi B
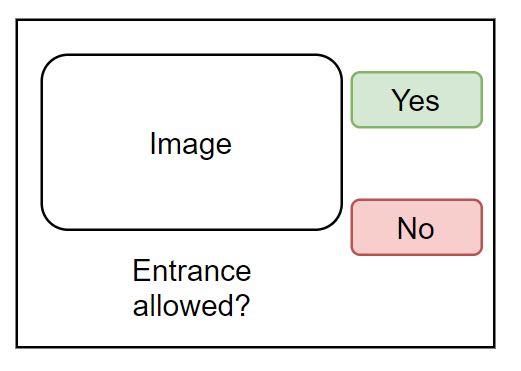
Pi B works as server waiting for connection from Pi A and its user interfaces only show up when Pi B receives an image. The image will be displayed on its PiTFT screen plus 2 buttons ‘Yes’ or ‘No’, by pressing which the corresponding response will be sent to Pi A. See details in 2 ‘main.py’ scripts in code appendix.
Figure 6: User Interface of Pi B
Test
Since there are many levels of touch buttons and we need to display various messages in different circumstances, we observed pygame window on computer monitor and debugged our user interfaces layer by layer. We tested the sensitivity and reaction time of each touch button and experimented with different sleep time to make sure buttons all work well. Besides these, we also did some corner tests to see what would happen.
• Face Detection and Haar Cascade Classifier
After preprocessing, like resizing and cropping, the image will be used as input of Haar Cascade Classifier to detect whether there is a single face detected in this image.
Face detection is a process of finding out the face area in the image. In the project, we use Haar Cascade to detect faces. Haar-like features such as edge features, line features and center-surround features are used and they are inputs of classifiers. Cascade classifiers test the image by cascade features. Since the amount of features is large, instead of applying all features on the window, the features are divided into different stages. The window will be tested stage by stage and initial stages usually have less haar-like features. If the window fails in a stage, it will be discarded and the following stages won’t be tested. The window which successfully passes all the stages is considered to be face image. Haar cascade classifiers han an advantage of its fast detection speed compared to other classifiers.
Test
We tried to resize captured images to different sizes and different classifier tuning parameters like scale factor, minimum number of neighbors, to find out the best configuration for face detection. See details in ‘face.py’ in code appendix.
• Face Recognition and Eigenface Classifier
If a single face is detected by Haar Cascade classifier, the face will be cropped out of the scene. Then the Eigenface classifier that has already been trained by prestored image library, will try to recognize the cropped face and return the confidence of its prediction at the same time. By setting a threshold for the predicting confidence, we can determine when to acknowledge that the face is truly recognized.
Face recognition is matching the input signal with the prestored library. Though the input signal is noisy due to the different angle, position and intensity of light, the image could be recognized according to the position of eyes, face and mouth in the face, and their relative distances between each other. These features are called eigenfaces and they could be extracted from original image data by principal component analysis. Each face is represented by a subset of eigenfaces and the face could be reconstructed if eigenface could be correctly calculated for each proportion. The new image will be recognized based upon eigenvectors and Euclidean distance between eigenvectors. See details in ‘train.py’ and ‘classify.py’ in code appendix.
Test
We tested the eigenface classifier with different confidence threshold to get the best recognition accuracy. After the system could recognize one face successfully, we also considered to make the system recognize multiple faces by setting up several classifiers and let them do recognition work in turns or in multi-thread way. As a result, due to the limited time, we continued on the former choice which is simpler than multi-thread.
• Passcode Implementation
In the implementation of keypad, the approach for deciding the pressed button is firstly setting outputs (column pins) and inputs (row pins) as high. When a button is pressed, it will produce low signal. Then each column is scanned in a ‘for’ loop. If the low signal is detected, we could know which button is pressed. See details in ‘passcode.py’ in code appendix.
Test
In the test of passcode function, the system worked well on the monitor screen at beginning. But in the condition that all buttons and layers were displayed on PiTFT screen,, the PiTFT screen would display sliding messy codes when we entered the password ending with ‘#’. The TA helped us debugging and told us the problem was caused by wrong circuit connection. We checked our circuit and found the reason is that we attached one of the keypad interface pin to GPIO 25 which is used for special function. We changed the connection to GPIO 21 and the problem was solved.
• Communication over TCP Sockets
The two Raspberry pis in the project are set to communicate using TCP sockets via wifi modular and a wifi router. The Raspberry pi A, which displays main buttons, is the client and the other Raspberry pi B, for remote confirmation, is the server. With specific IP addresses, the client could connect to the server and send files like images over TCP socket. Then the server will send response back to client and once response received, the client is going to close connection. We developed python script code for above communication routine by leveraging python library ‘socket’. See details in ‘server.py’ and ‘client.py’ & ‘client2.py’.
Test
When we started this communication part, there were 2 choice when deciding which Pi worked as a server or client. We tested on both 2 methods and found that Pi B needs to wait for images sent by Pi A at any time, so it’d better to be a server. By doing so, whenever Pi A, the client, is trying to send an image to Pi B, it could be connected to Pi B successfully since the server keeps on all the time.
Conclusion
We successfully finished a face recognition door lock system as initial plan. The passcode and face recognition work well. There is high accuracy in recognizing house owners faces and it could realize sending the matched face image to another Raspberry pi in time.
Video Demo
Components & Cost
Code Appendix
Reference
Acknowledgement
Sincerely appreciate Prof. Skovira Joseph for his guidance and support throughout this project. Thanks to TAs, Bredon, Steven, Mei and Arvind, for answering our questions and help us debugging.
Contacts
Ling Zeng (lz455@cornell.edu)
Rong Sun (rs2364@cornell.edu)