Video: Final product demonstration
Introduction top
"An inexpensive and interactive smart home assistant"
Smart Homes are now becoming more commonplace as compared to what it was a copuple of years earlier. Clap Switches, automatic lights, internet controlled appliances are all passé. Home assistants are now a reality. One does not need to go to each room to switch on or switch off appliances there. Just speak it out and it's done, much like Jarvis from the famed Iron Man series.
Many tech companies are investing extensively in this area. But already existing systems are expensive and can cost anywhere between $200 to $750 just for the microphone and speaker module. The cost of upgrading the switches are extra.
We intend to develop a low cost system which would cost less than a $100 and would use a Rspberry Pi 2, an affordable microphone and speaker and a relay. This system could be implemented in any home and can be used to control any device by just using voice commands. There is no need to upgrade individual switch circuits as the relay and Raspberry Pi could be installed around the main switchboard and that would be enough. Apart from this, an internet connection is all that is required to build your own personal home assistant, Jasper.
Objective top
Our objective is to build an inexpensive, easy to install home assistant, which would control the users home and also interact with him/her.It would also be capable of fetching the weather data, reading out the news and playing and controlling music.
For this we used Jasper, an open source integrated platform for voice control developed by Charles Marsh and Shubhro Saha.We used an online Speech to Text(STT) engine wit.ai and Text to Speech we used was Mary-TTS. We did experiment with various offline STT and TSS modules but discovered that the best results were obtained with these.
Design and testing top
Hardware
The main hardware setup consited of a Raspberry pi B, a USB microphone from eBerry, Logitech S120 speakers, a 4 channel relay module from Songle, LEDs for demonstration and current limiting resistors.
The first task of the project was to develop a resilient and easy to install hardware module. The GPIO pins of the Raspberry Pi can output 3.3V or 5V and a maximum of 16mA per pin. The total current it can output is about 50mA. This was an important parameter to be considered while designing the external circuit. To prevent overload, we used current limiting resistors of 1K on each output pin.
To drive the main 110V line, we used a LC-201 4 channel relay module which has current specifications similar to what our Pi can drive. It requires voltage signals of 5V but we discovered that it can also be driven by 3.3V pins. Hence we did not use a separate level shifter circuit. The relay has an inverting output.
For testing purposes, we used 12V as the main line (instead of 110V) for safety, and drove two 12V, 15mA LEDs through the relay. To demonstrate how fan speed could be controlled, we implemented PWM on an LED. The LED brightness would be varied as per the users commands. Two leds would also be randomly switched on and off when a command to play music is recieved to give the effect of party lights.
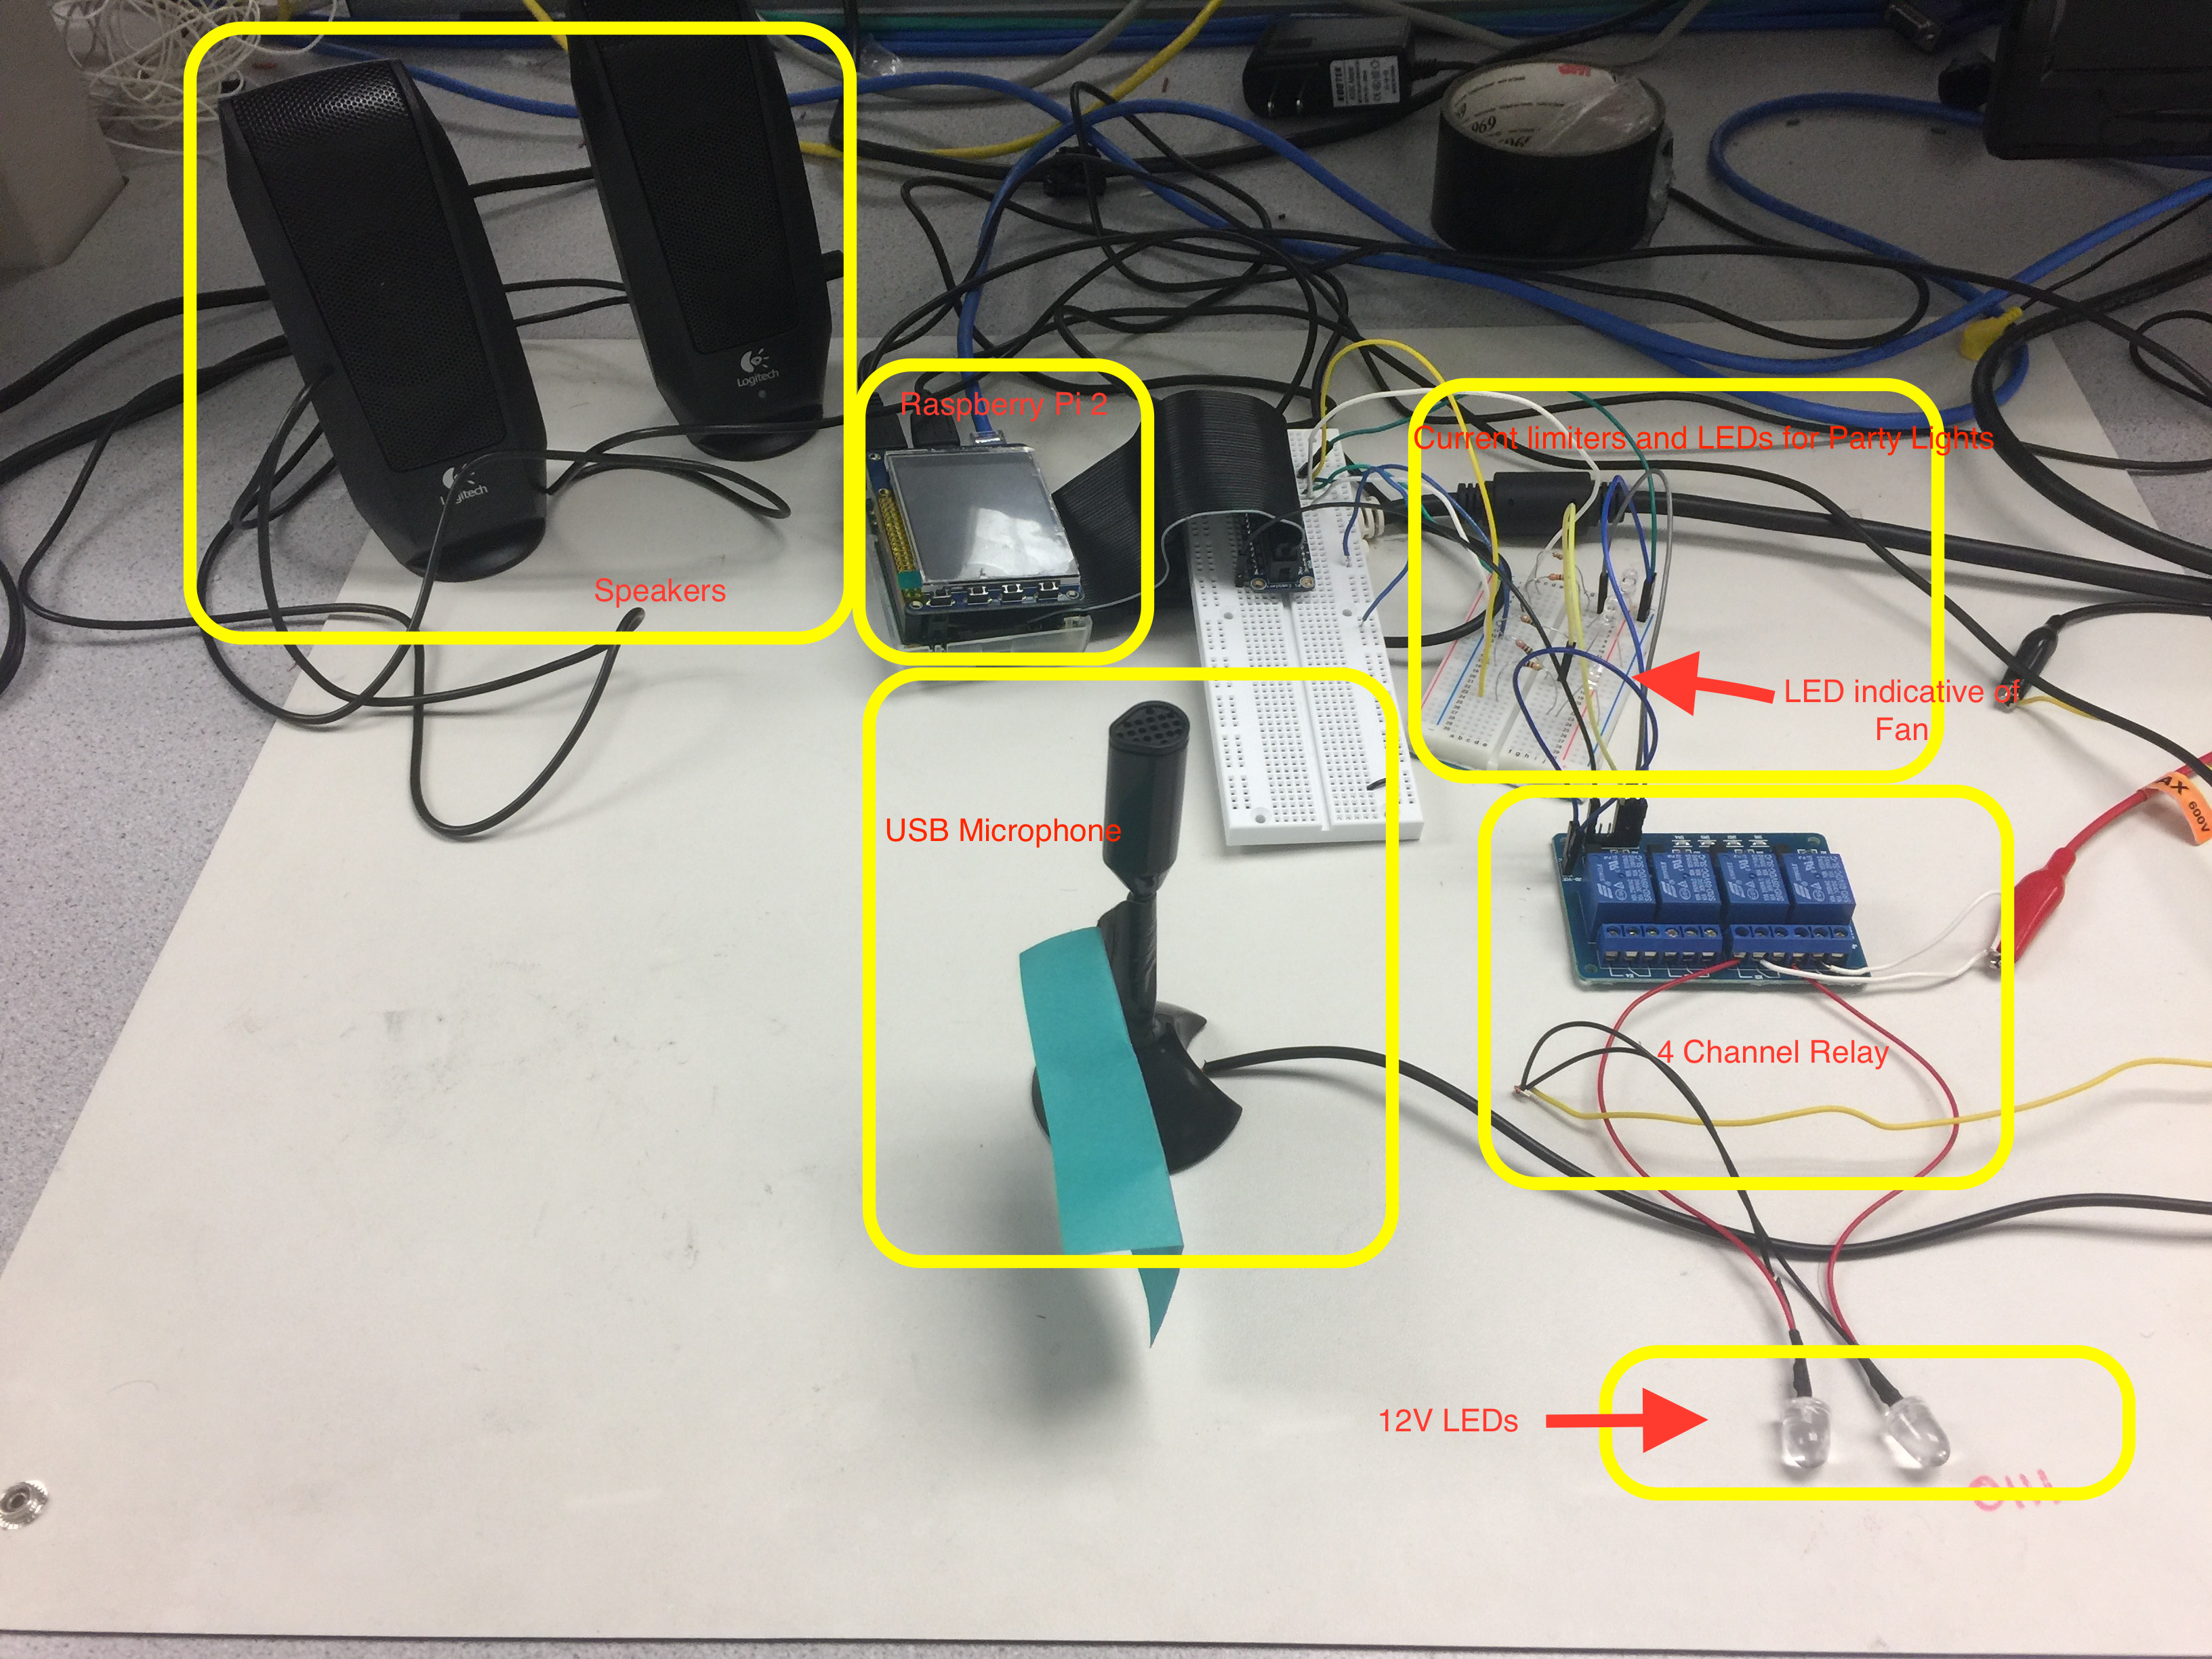
Fig.1 Overall System Hardware
Software:
To design this project we used Jasper framework to control the processing and handling of actions. And for Speech to Text conversion we used wit.ai STT and for Text to speech conversion we used Mary-TTS . We can basically use any of the speech to text converter and any text to speech converter as per the requirement but in our case since we wanted a good success rate and also did not want any daily limit on our number of STT conversions. So, we decided to go for wit.ai . The steps performed during software installation and configuration are mentioned below.
1) Setting up Audio devices :
Very first step in this project is to configure the audio devices such as mic and speaker and to ensure that they are working properly before moving on to STT and TTS. For this we connected our USB mic to the usb port of the raspberry pi board and mic to the 3.5mm audio jack and moved on to following steps.
Firstly, we confirmed if alsa (Advanced Linux Sound Architecture) is installed in our system or not by running alsa-mixer command, in our case the alsa screen showed up as shown in Fig 2 but if it is not then you may need to install it using below command
apt-get install alsamixer
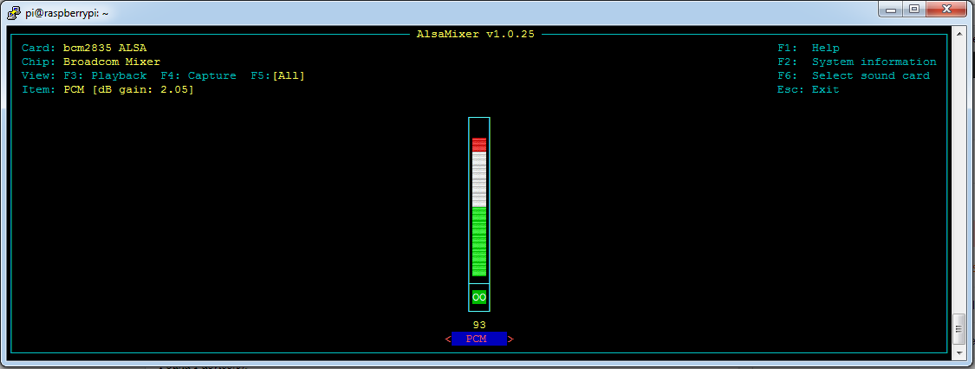
Fig.2 Alsa Mixer
Once on this screen you can check the devices you have connected using F6 key and set the audio record/play levels for each device using F3/F4 keys.
If your devices are not found in alsamixer screen then you can confirm if the devices are detected by your system by checking on a slightly lower level using below commands.
lsusb
pi@srs383_ps882:~ $ cat /proc/asound/modules
0 snd_bcm2835
1 snd_usb_audio
pi@srs383_ps882:~ $
pi@srs383_ps882:~ $ cat /proc/asound/cards
0 [ALSA ]: bcm2835 - bcm2835 ALSA
bcm2835 ALSA
1 [Device ]: USB-Audio - USB Audio Device
USB Audio Device at usb-3f980000.usb-1.5, full speed
pi@srs383_ps882:~ $
Then, to record you should be able to run the arecord command and to play you can use either speaker-test or aplay command. Please note below commands will work only if your default devices are correctly set.
^CAborted by signal Interrupt...
pi@srs383_ps882:~ $ aplay test.wav
Playing WAVE 'test.wav' : Signed 16 bit Little Endian, Rate 8000 Hz, Mono
In our case they threw error, since the default values mic and speaker were set to be the same ie. Hw:. So to resolve this we modified the commands to take hardware devices from command line itself. Commands shown below:
pi@srs383_ps882:~ $ arecord -f S16_LE -r 60000 -c 1 -D hw:1,0 test.wav
Recording WAVE 'test.wav' : Signed 16 bit Little Endian, Rate 8000 Hz, Mono
^CAborted by signal Interrupt...
pi@srs383_ps882:~ $ aplay -D hw:0,0 test.wav
Playing WAVE 'test.wav' : Signed 16 bit Little Endian, Rate 8000 Hz, Mono
Here, the -D option allows us to configure our correct audio device hardware. For this you need the sound card number and module number which you can get from below commands for arecord and aplay.
pi@srs383_ps882:~ $ arecord --list-device
**** List of CAPTURE Hardware Devices ****
card 1: Device [USB PnP Sound Device], device 0: USB Audio [USB Audio]
Subdevices: 1/1
Subdevice #0: subdevice #0
pi@srs383_ps882:~ $
Alternatively, you can also modify the values in alsa-base-config.conf file which in wheezy is stored in sudo vi /etc/modprobe.d/alsa-base.conf and in Raspberry Jessie is stored in sudo vi /usr/share/alsa/alsa-base.conf file
2) Installing Jasper:
Once we are sure that audio devices and their drivers are working fine we can move on to the Jasper installation. For this in the home directory of your Pi, clone the Jasper source code, depending on your internet speed it might take somewhere around 5-10 minutes:
git clone https://github.com/jasperproject/jasper-client.git jasper
To run properly there are some python libraries that jasper would need and to install those we can run below two commands.
sudo pip install --upgrade setuptools
sudo pip install -r jasper/client/requirements.txt
and finally to ensure that when you put the jasper script in crontab it runs properly you should make an executable.
chmod +x jasper/jasper.py
3) Installing dependencies :
Next step is to install the dependencies to support Jasper i.e. Jasper only provides the frame work to process the speech and configure the handling of actions on voice commands but there still needs to be a speech to text converter and a text to speech converter. As mentioned above we are using wit.ai in our case so we don’t need to install any extra software for that as the conversion is done over the internet. So, we only need to register for STT conversion on the wit.ai page. To do that, we first create a profile on wit.ai and create a dummy app. Then we need to select the dummy app, click settings and find Server Access token, you need to hold on to this token as it will be needed during configuration phase. Please note that in the settings you can also choose another language for wit.ai.
Note: If you choose to go for Pocketsphinx STT then extra software installation is needed.
And for text to speech conversion we are using Mary-TTS which again does not need to install any extra software. Other Options such as festival or espeak could be used if needed but they will need a package installed in local system. Also, please note that official site of mary-tts is not running the server anymore so you can either host it on your own server or use someone else’s server. In our case, we used a third party server for mary-tts
4) Cofiguring Jasper:
After the installation of jasper and its dependencies is done we can go ahead with the configuration part which basically involves setting up a profile.yml file in ~/.profile folder. This can be done either by putting in the values manually in the file or we could use is by running populate.py script which guides us through the information and stores the responses automatically in the profile.yml file.
Important part of profile.yml are mentioned here.
You will need to mention your access_token in the profile under the stt_engine setting.
stt_engine: witai
witai-stt:
access_token: YOUR_ACCESS_TOKEN
Additionally, the TTS engine needs to be configured using below statements. Please note that the server address and port are to be mentioned below the section where you have specified the tts_engine. Also, please note the “tab” in front of the sub sections
tts_engine: mary-tts
mary-tts:
server: 'mary.dfki.de'
port: '59125'
language: 'en_GB'
voice: 'dfki-spike'
5) Home automation configuration:
At this point we are done the setup of the jasper framework and next few steps will consist of utilizing that framework for our objective ie. configuring commands and handlers for home assistance
Locate the folder ~/jasper-client/client/modules/ and inside there are some preconfigured modules which are ready to use once the basic configuration for them is done. All the new modules that need to be setup will be created here.
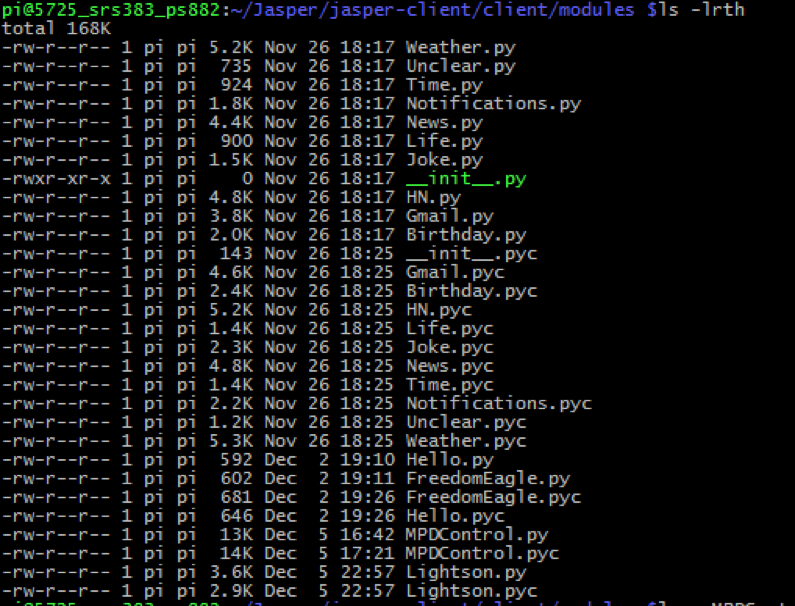
Fig.3 Modules in Jasper
For each of the moduels there are mainly 3 parts
First, at the top there is word section:
WORDS = [“YOUR”, “WORDS”, “HERE”]
Where different words that you want to be taken as a trigger for this module can be mentioned ie. Whenever, these words are encountered by brain script of jasper this module will be invoked and executed.
Second, there is a isValid section at the bottom which basically validates the keywords received by mic script of jasper. Ie. Once the module is triggered the entire text will be matched with your preset matching pattern and if the match is found then execution will move to next step else it will be stopped.
def isValid(text):
return bool(re.search(r'\byour words here\b', text, re.IGNORECASE))
This is a normal regex match for your pattern, which means that if the subtext “your words here” is found in any text statement forwarded by mic.py then the function will return true.
Third, once the pattern match is found to be success then the control is given to the handle function which takes “text” (the actual text received by mic) , object mic(which allows you to pass your text to your TTS engine) and profile (the information specified by you in your profile.yml file which includes your gmail username, password, facebook username etc.) as the input and performs the actions as mentioned in the handle function.
def handle(text, mic, profile):
mic.say(‘Hello’)
For the purpose of our project we have written our own module LightsOn.py in which we are using this handler to write the code streams to a fifo file and the value of the code streams depend on the text being given to our module by mic.py. These code streams are then read by a polling script which performs necessary action of switching on/off a GPIO pin etc.
In LightsOn.py we have currently configured below mentioned code streams:
BEDROOM – 1
LIVING ROOM – 2
JUMP – 3
FAN – 4
FAST – 41
SLOW – 42
SLEEP – 9
Ie. Whenever the value of “text” is BEDROOM then LightsOn.py module will be invoked by brain.py and inside the LigthsOn.py module first the validation of text will be done which will come out to be true if the text contains word “BEDROOM” which may or may not be surrounded by other words. On getting “true” in return of validation the handler script will then write value 1 in the FIFO ~/home_auto and waits to receive the response.
The further heavyweight work is done by the polling script, which will then read the FIFO and match the read value through its conditional statements with configured values. Upon finding that it is indeed for bedroom, it checks the current status of bedroom lights which, if ON will be turned OFF or else it will turn them on. After turning them on/off it will write the response that is to be spoken by jasper to the same FIFO , which in this case is “Bedroom lights turned on/off” . LightsOn.py module waiting to receive a response will read this value and pass it to the mic object and then exit. At this point jasper has done its part and goes on to passive listening again.
An outline of software design for this can be shown as below.
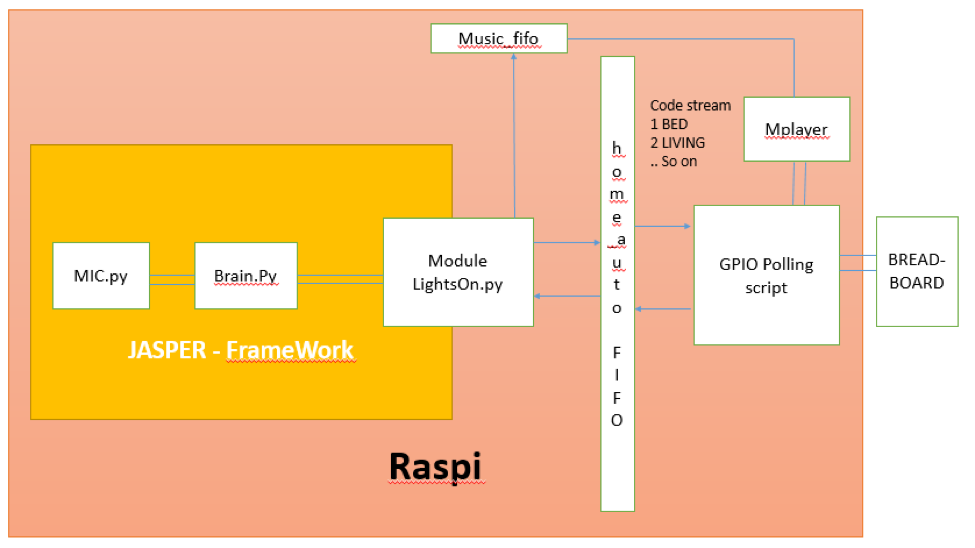
Fig.4 Outline of the Project
The polling script that we have mentioned above is an infinitely looped python program which reads the FIFO file and if the file is found to be empty the program would sit there waiting for some data to be written there. This is achieved in our script by using os.open call with BLOCK mode. Please note by default os.open call gives you Blocking mode only. Then once the output is read from the FIFO it will check the conditional statements and after performing GPIO action will write the output to the same FIFO file and it will sit there until and unless the Module LightsOn.py will read that and then the polling script will have its first loop completed and will again go to the FIFO file and wait until some content is written into it.
On its execution below output is captured from the polling script
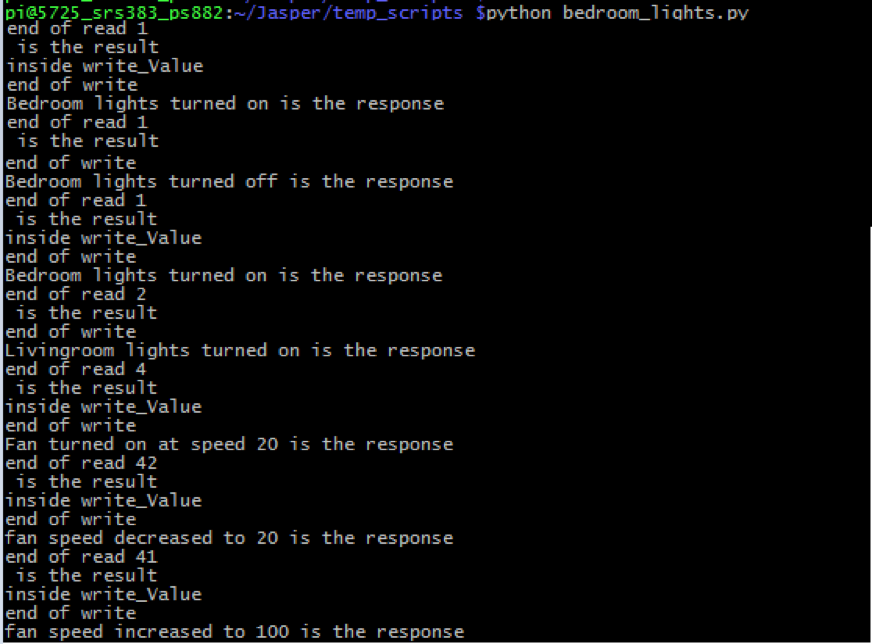
Fig.5 Polling Script Output

Fig.6 Polling Script Output
The final cog in the wheel is the Jasper.py script which is what runs the entire jasper framework. Other scripts such as main.py and brain.py and the module calling etc is called by Japer.py itself depending on what action needs to be taken. Below is the output from the execution of Jasper.py script.
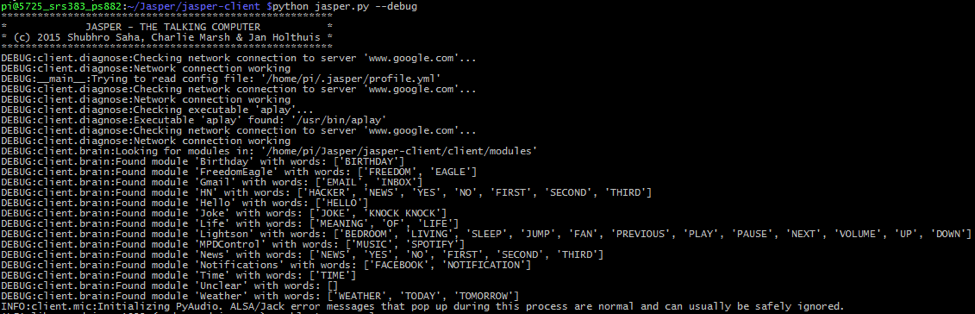
Fig.7 Output while executing Jasper.py
For ease, both the polling script and Jasper.py script can be put in the crontab with @reboot option so that at every reboot both scripts start running automatically and are always listening without having to need any manual intervention.
@reboot python ~/Jasper/jasper-client/Jasper.py;
@reboot python ~/Jasper/temp_scripts/bedroom_lights.py;
Results top
After proper installation and configuration, the system was performing well with the only exception of it not being able to understand a little “hard accent” once in a while.
Whenever you would say the activation keyword “jasper” it will give out a high-beep and wait for you to speak your command word. After receiving your command word, it gives out a low beep and processes the command word and takes appropriate action.
Actions and images are given below:
1. BEDROOM – 12V Relay switched BEDROOM light turned on with mic output as “Bedroom lights turned on”
2. BEDROOM – 12V Relay switched BEDROOM light turned off with mic output as “Bedroom lights turned off”
3. LIVING ROOM – 12V Relay switch LIVINGROOM light turned on with mic output as “Livingroom lights turned on”
4. LIVING ROOM – 12V Relay switch LIVINGROOM light turned off with mic output as “Livingroom lights turned off”
5. FAST – Nothing done as expected. Mic output as “Fan not running. Please start the Fan first.”
5. FAN – 3.3V LED turned on with PWM duty cycle of 10 with mic output as “Fan turned on. Speed is 10”
6. FAST – 3.3V LED’s dutycycle changed to 100 with mic output as “Speed increased to 100.”
7. SLOW – 3.3V LED’s dutycycle changed to 10 with mic output as “Speed decreased to 10.”
8. SLEEP – All devices are turned off with mic output as “All devices turned off. Have a good Night !”
9. JUMP – Mplayer started playing the music configured in the playlist and two 3.3V dancing led’s started blinking at random speed.
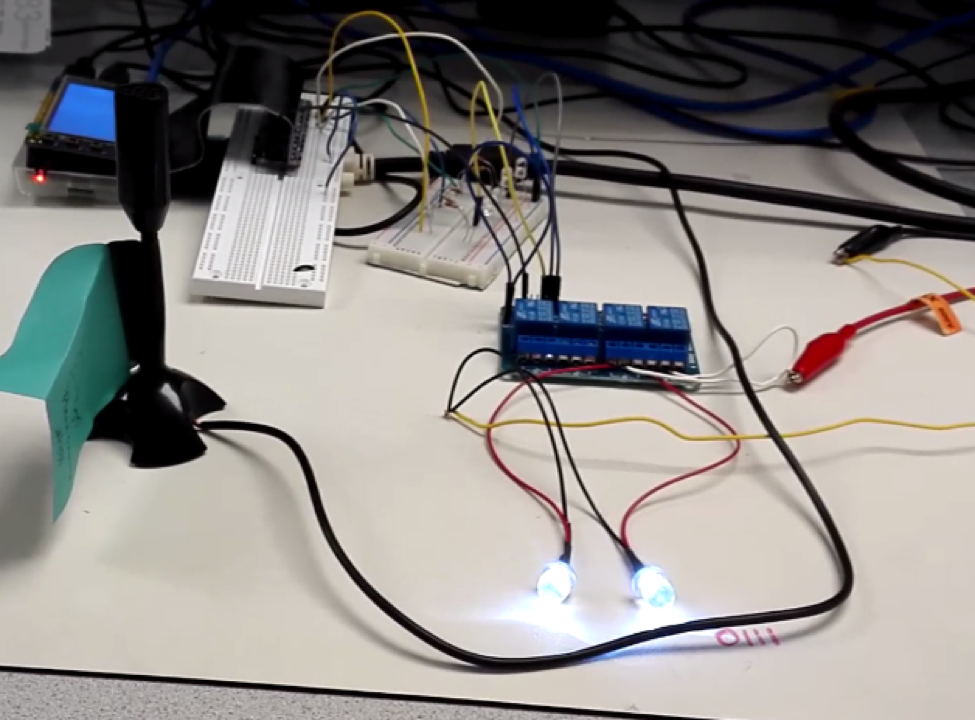
Fig.8 12V LED's Turned ON Through Relay(Demo for Livingroom and Bedroom Lights)

Fig.9 LED turned ON at Low Intensity (Indicative of fan being turned on at low speed)
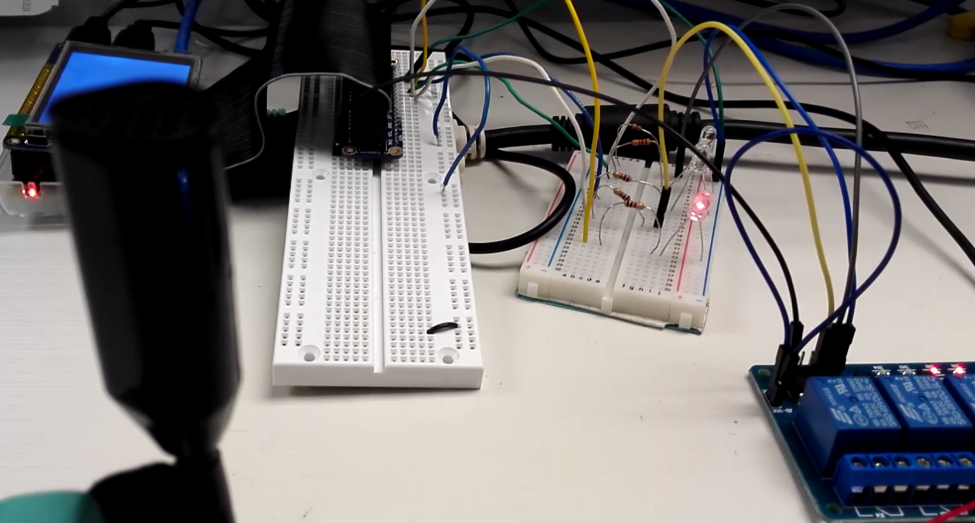
Fig.10 LED turned ON at High Intensity (Indicative of fan speed being increased)
Issues Faced and Future Work
As mentioned earlier, one of the major issues we faced was during the installation of Jasper. The instructions on the Jasper home page (link provided in Appendix) are outdated and we had trouble installing all the dependencies. We came up with installation process we mentioned after lots of search and is the most up-to-date process until now.
The next major issue we faced was with the USB microphone and speakers. We had to specify them as the intended devices as the pi did not consider them to be default. to resolve this we replaced
client/tts.py: cmd =['aplay','-D','plughw:0,0', str(filename)]
with
client/tts.py: cmd =['aplay','-D','plughw:1,0', str(filename)]
Lastly, we had some trouble getting Jasper to respond to a heavily accented voice. Some work needs to be done on the Natural Language Processing module on wit.ai.
However, despite the issues and limitations we faced, we were able to significantly reduce all sources of possible errors that might have impacted our system. In fact, as it can be seen in the video above, the sytem responds well to commands and works as expected. We are very happy with the results and the fact that we were able to overcome the limitations.
Future work:
The flexible design of our program structure allows us to have massive improvements in our current project. Since we are reading the values off of the FIFO we can control any number of devices and can incorporate an extremely complicated logic at the Polling script without having to disturb the Jasper functionality. Both the “Voice controlled part” and “GPIO Automation” part can be handled separately without having any dependency on each other, which further makes the program’s troubleshooting while testing easy. Keeping all that in mind we are aiming for future work that would include following points:
1. In this project for safety reasons we have used 12V in relay instead of 110 V. So, next we want to use it for controlling 110V home devices.
2. Adding more devices to the automated list. ie. Television, Microwave etc.
3. Implementing more interactive and complicated logic in the modules. Ie. Having multi statement conversations in which jasper would perform an action and wait for our further response and perform appropriate actions.
Example, A: Jasper , J: “H-Beep” , A: “Turn on the microwave” , J: “L-Beep” , J: “OK. What time would you like to set” , A : “20 seconds” , J: “Microwave turned on. Time set to 20 seconds”
4. Multi mic co-ordination is another thing that we are aiming for. which would allow multiple mic’s to be installed in different rooms of house and connected to same raspberryPi which would allow commands to be given from different places in the same house. Delayed speech reconciliation is one of the main challenges that we are anticipating here.
Conclusions top
In this project, we have learned how to integrate a voice controlled automation system with RaspebrryPi. The installation, configuration and, most importantly, orchestration of all the necessary components of voice activation system. Which includes learning setting up of audio devices, different components that are needed for voice control such as speech to text conversion, FIFO block/unblock read/write, jasper, GPIO etc.. Also, we have learned what different STT and TTS options are there and which ones are to be used in which situation. All these different components working in tandem on a raspi board can result in an extremely convenient and marketable solution of voice controlled home devices. critical that more sensors be used in order to increase the system reliability and performance.
Intellectual Property Considerations
We appreciate the work by Shubro Saha and Charles Marsh in developing Jasper the Talking computer, without which this project would have been impossible.
We have acknowledged all use of code and have abided by all copyright statements on both code and hardware. We have given credit to all hardware devices that were used in this project, as well as the open source Jasper project upon which our project is built.
Appendices top
A. Program Listing
The source file for the project can be downloaded here . This file is not meant to be distributed and must be referenced when using all or portions of it.
B. Parts List
| Part | Vendor | Cost/Unit | Quantity | Total Cost |
|---|---|---|---|---|
| Raspberry Pi 2 B | Lab | $35 | 1 | $35 |
| Bread Board (6 inches) | Lab | $2.50 | 1 | $2.50 |
| USB Microphone | eBerry | $7.99 | 1 | $7.99 |
| 4-Channel Relay Module (LC-201) | Lab | $8.85 | 1 | $8.85 |
| Speakers-Logitech S120 | Lab | $9.19 | 1 | $9.19 |
| LEDs 3.3V | Lab | $0.29 | 3 | $0.87 |
| LEDs 12V | Lab | $1.28 | 2 | $2.56 |
| Jumper Cables | Lab | $0.10 | 8 | $0.80 |
| TOTAL: | $67.76 |
C. Division of Labor
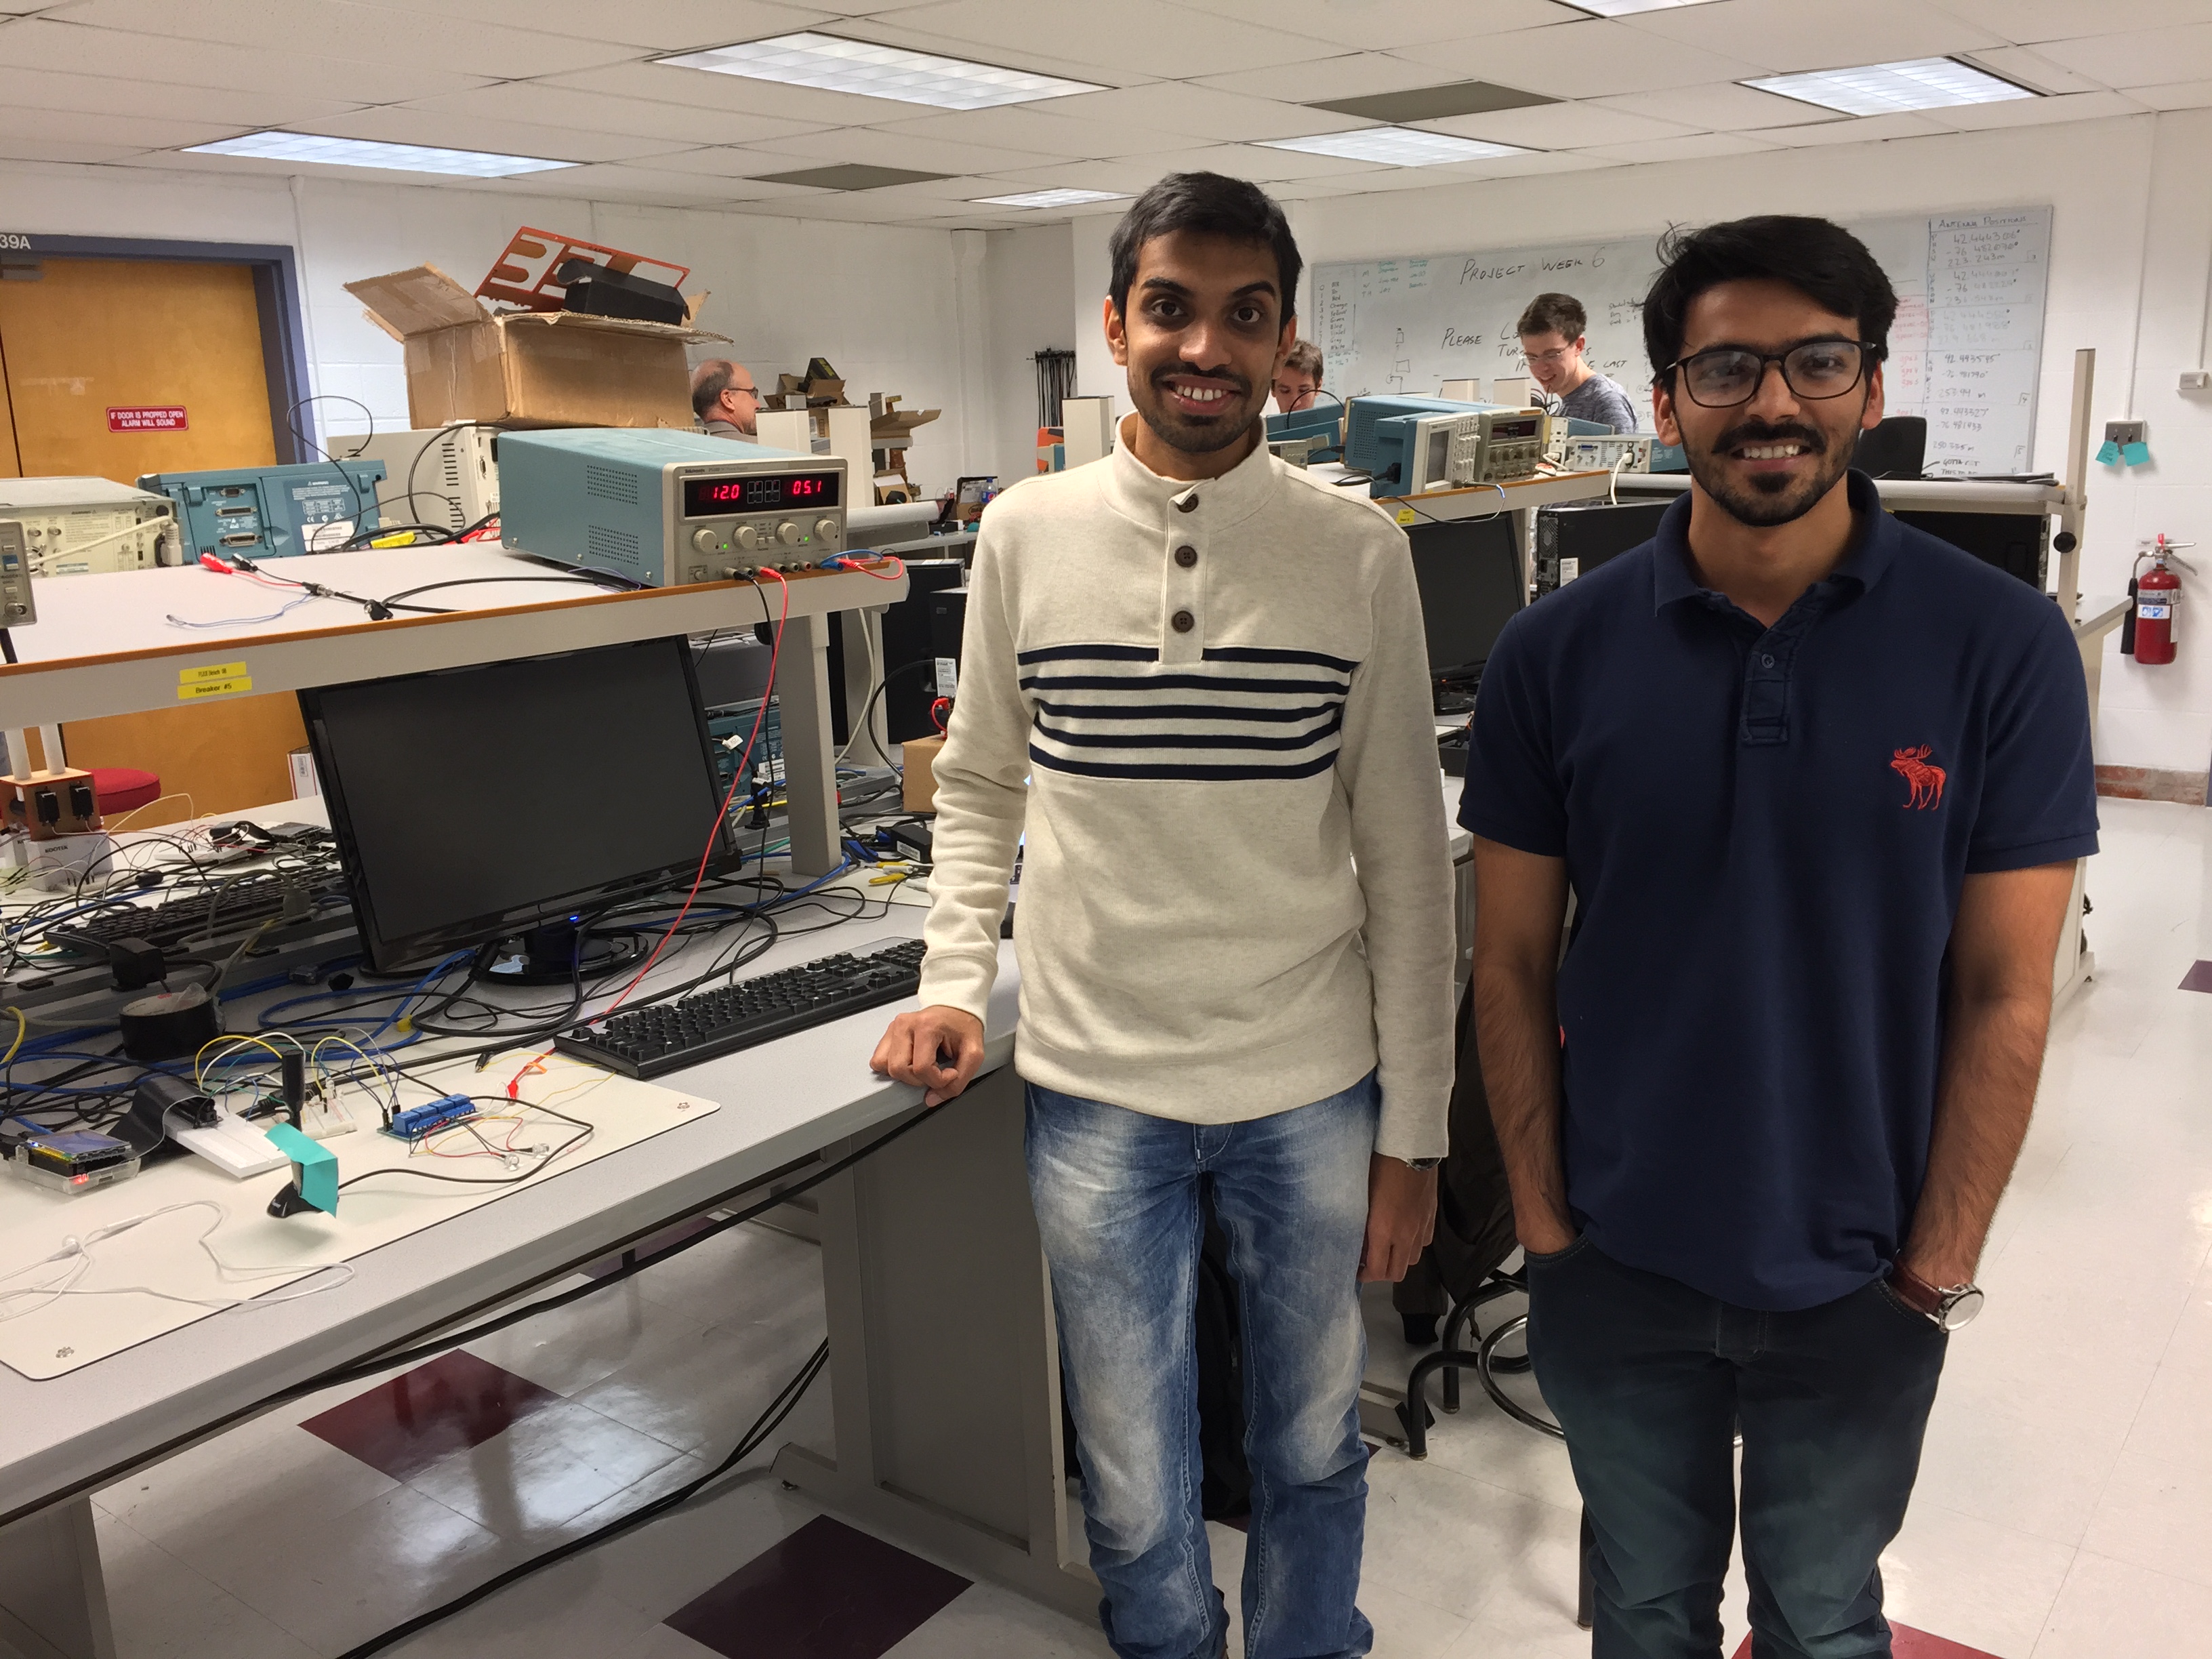
The work done for this project was evenly spreaded among team members. Shaan helped in the setup of the external peripharals and installation of Jasper with its various dependencies on the Raspberry Pi. Premdeep designed the FIFOs for home automation and music and wrote scripts to make it work in tandem with the Jasper script. The contribution both the members was crucial for testing and optimizing the system. The creation of this project is a result of the collaboration of both the members who spent many hours working on this fascinating project.
References top
This section provides links to external reference documents, code, and websites used throughout the project.
References
Acknowledgements top
We would like to give a special thank you to our professor Dr. Joseph Skovira for all the recommendations, support and guidance that he provided to us throughout our work on this project. Prof. Skovira was of valuable help in getting this project to its completion. We would like to also thank him for building an amazingly rewarding class from which we learned tremendously. Also, we would like to thank the TAs, especially Brandon and Jay, for the continous support and guidance throughout the semester.